In detail: do-it-yourself acoustics repair from a real master for the site my.housecope.com.
Acoustic systems are divided into active, passive, the difference is limited by the presence of sound processing chips inside, powered by electric current. Amplifiers, filters, interfaces for reading flash media, decoding compressed audio formats. In the latter case, the speaker system approaches the functionality of the player. Consider what to do when the speakers do not work. Speakers include a myriad of sound reproduction devices, readers are interested in how they repair speaker systems with their own hands. You will need special glue. When the USSR was BF 4, AK 20. Accordingly (the basis of the glue), solvents are selected. It will be necessary, disassembling, dismantling the connection, repairing the speaker system yourself.
The movable part with a rigid plate creates air vibrations that are perceived by the human ear.
To repair speaker systems with your own hands, doubting how the device works, it is supposed to use the principle - do no harm. Regardless of the size, the speaker of the acoustic system is formed by electrical, mechanical parts. The first is formed mainly by inductors. The second includes a permanent magnet, a membrane. Here is an incomplete classification of the speakers of acoustic systems.
Readers are familiar with naturally occurring sound reproduction devices. Not always in the dynamics of the speaker system there is an inductor. Therefore, before repair, in the process, the master performs the correct classification of devices, properly carrying out the necessary operations.
| Video (click to play). |
Partially touched the device. Let us consider electrodynamic models in more detail. The diffuser forms the support of the cap. Represented by the likeness of a wide horn, on which the coil is glued from the back. Flexible copper conductors carrying electric current fit directly to the membrane cap, penetrating the diffuser from the inside. Soldering points are visible from the front of the speaker. The coil is light, it is required to provide a relatively small inertia of the system. Even the tuning fork for the first octave lies at a frequency of 440 Hz. It is clear that for fluctuations of the indicated speed, the moving part of the acoustics speaker must be light.
The magnet is fixed on the frame. Usually circular. An inductor runs in both directions in the hole, moving the cap-membrane assembly. Connecting wires make constant vibrations. A centering washer is used to position the moving part along the vertical, horizontal axis. Perforated piece of elastic material, centering the location of the cap, diffuser. The centering washer does not interfere with the displacement of the moving part along the axis of symmetry. Repair is ridiculously simple:
Since the membrane and cap do not break, the point is to check the electrical installation, the soldering points of the wires, the integrity of the coil.
The inductance is wound in the image and likeness of the old one. Each layer of turns is smeared with BF 4 glue. Poor-quality soldering is performed again. Select the appropriate inductance winding technique. Usually a special device is made, formed by two pairs of racks, standing on a long board opposite each other. Both are connected by axles. One contains the core of the new coil, the other contains the purchased wire. It is recommended to buy wire with varnish insulation. It is necessary to maintain the correct thickness. You can measure using a caliper.
Winding is carried out relatively quickly while the glue dries. The coils fit tightly one to the other, professing the principle of the shuttle. It is important to maintain the correct number of revolutions, properly position the conclusions.
Often you have to disassemble the speaker of the speaker system for repair. Stock up on solvent. Glued joints are wetted, waiting for a fixed time. Please note: the joints are carefully cleaned. It is done regardless of the glue used to assemble the speaker speaker.
Loudspeakers are different types of acoustic systems, each has a limited range of reproducible frequencies. Each works as a kind of mechanical filter. However, it happens that you need to shift the range ... You can raise the resonance frequencies of the electrodynamic system by varnishing the centering washer. A 5–10% solution of CAPON, cellulose in acetone are used. The varnish is applied with a soft brush in a circle. Avoid misalignment of the moving part of the loudspeaker of the speaker system. By sequentially performing operations, we will increase the resonance frequencies by 1.5–2 times, approximately one octave.
To lower the range, stick weights on the moving part. The correct ring of cardboard is attached to the back of the diffuser. It should be more precise to maintain the symmetry of the arrangement of parts. The sound pressure drops rapidly. The volume decreases, the range narrows from the high frequencies. However, in the resonance region, the loudspeaker will perform well.

You can expand the range in both directions (if there is no cap). In the center, from the front, a truncated cone is glued above the inductor of the speaker speaker. The mass is made as small as possible. Thin, thick paper impregnated with TsAPON varnish will do. The upper platform is equal to the coil, the height is half the diffuser, the taper is 70 degrees. Due to the increase in the mass of the moving part, the resonant frequency drops, but the upper edge of the range rises, thanks to the rigid core, harder than the cone. The result is an expansion of the spectrum of reproduced sounds in both directions. The total increase will be one and a half to two octaves, the game is worth the candle. Take care to set up the electronic part correctly: if there are passive filters on capacitors and resistors, they will limit (cut off) the possibilities of mechanics.
Masters increase the sound pressure at the resonant frequency for an unshielded magnetic system. Try to find this or a similar installed ring. Then glue the second magnet on the reverse side of the standing one, the interaction of the fields will increase, therefore, the sound strength will increase.
The device of the speaker system is simple, which can break, they said. We hope the renovation goes off without a hitch.
Did the speakers wheeze? Do not rush to throw them away, it is not so difficult to get rid of the wheezing of the speakers. Speaker wheezing, a fairly common phenomenon, is most often found in broadband acoustics, due to the fault of dust and all kinds of debris caught between the core and the coil, which, when the speaker cone moves, causes an unpleasant sound in the form of speaker wheezing. Repair of speakers consists in disassembling the speaker and removing the source that causes an unpleasant sound.
The wheezing Pioneer four-way coaxial speaker has been repaired. The main tool for disassembling the speaker, a regular, flat screwdriver and a soldering iron.
First of all, I removed the tweeter module. In this model, the tweeter module was fastened with a long bolt, which was hidden under a magnet sticker. On other models, the tweeters can simply be glued on, in which case they need to be torn off, but before that, if possible, unsolder the wires going to the tweeters.
In the bottom photo, if you look closely, you can see the debris between the metal core and the sound winding.
After the tweeter module was unscrewed and the wires were unsoldered from it, armed with a screwdriver, I pry off the plastic pad that presses the rubber suspension of the diffuser and carefully, slowly, was peeled off.
With the same tool, I peeled off the diffuser suspension.With a screwdriver, just pry a little, then you can peel it off with your hands.
Unsoldered the wires to start peeling off the centering washer.
Peeling off the centering washer is a little more difficult, the parts that have been peeled off earlier, you can’t rush here, it’s easy to damage the washer.
Inside the speaker, there was quite a lot of debris, it is not surprising that he constantly wheezed.
On the voice coil of the speaker, scratches are visible, proving the presence of foreign objects, the insulation of the winding is damaged. It is desirable to restore the protective layer of the winding; for this, it can be opened with varnish or epoxy over scratches, not in a large layer.
We clean, wash, vacuum all parts of the speaker.
Well, now the most difficult thing that I had to face when repairing the speakers was the removal of metal particles magnetized to the core. The vacuum cleaner can't handle them. Scotch tape came to the rescue, with the help of such not cunning actions, everything that was superfluous in the dynamics was removed.
Then it was necessary to glue everything into place. I glued the speaker with ordinary, universal glue Moment.
I did not remove the old traces of glue, since it is easy to navigate through them when gluing the speaker, which allows you to glue it correctly and without distortions. But all the same, you need to check if the winding does not cling to the core when the diffuser moves.
If everything went well, there is no extraneous noise when the diffuser moves, glue it, solder it, assemble the speaker.
Refurbished speaker, pictured on the right. The repair of the speaker was successful, everything works and does not wheeze.
In disassembling the speaker, there is absolutely nothing complicated, everything is simple and easy, the main thing is not to rush. It took me about an hour to repair one speaker.
The speaker wheezed or stopped sounding and you want to bring it back to life? First, diagnostics. We remove the speaker, disconnect the wires from the terminals, having previously marked the polarity. In the future, we adhere to this rule: everything that we disassemble, draw or photograph will help a lot.
We check the winding resistance with the device. There are three options here.
1) Break.
2) Rated resistance.
3) Reduced resistance.
Now the second check. We put the speaker on the magnet and gently move the diffuser up and down. If a rustle or creak is heard, or there is no movement, the speaker will have to be disassembled.
If there is no scratch, and the winding is open - you need to check the conductivity of the flexible wires from the terminals to the soldering of the winding. They are made of threads intertwined with copper veins that break over time. They can be replaced without disassembling the speaker with M.G. wire. T.F. of a suitable section or braided tape to remove excess solder.
We solder the wires so that they do not stretch when the diffuser moves and do not touch it. We glue the place of soldering with Moment glue.
If the speaker needs to be disassembled, disconnect the wires from the terminals, put the speaker on a magnet and with a swab dipped in acetone, soften the glue around the protective cap and remove it, prying it with a not sharp scalpel. In the same way, peel off the outer edge of the diffuser and the outer edge of the centering washer. Carefully pull out the diffuser vertically upwards without distortion.
I do not recommend sticking the coil frame from the diffuser and the centering washer so as not to disturb the alignment of the speaker.
To rewind, you need to assemble a simple fixture, the device of which is clear from the figure. The most difficult part of it is the mandrel for the coil. For its manufacture, you need to contact the turner. Mandrel length 100-150 mm, material - any metal.
We measure the inner diameter of the coil (x). The mandrel for the spool should have a diameter of x+0.5 mm on one end and x-0.5 mm on the other end.
At the larger end, we drill a 3.2 mm hole and cut an M4 thread for attaching the handle.
We drill a through hole 6.5 mm for the stud. The surface of the mandrel must be sanded.
Now you can start winding. We will need alcohol-based glue, for example, BF-2 or BF-6, MBM capacitor paper, wire and a lot of patience.
Glue is diluted with alcohol. We pierce the centering washer with a needle, thread the winding wire and solder it to the flexible wire. We fix the wire at the place of soldering and at the beginning of the winding, gluing pieces of paper.
If the coil frame is made of metal, we glue it with a layer of paper from the capacitor without overlaying layers. We wind the wire turn to turn, gluing before winding and over. Remove excess glue with your finger. We try to wind not tight, but tightly.
On the first layer we glue the paper from the capacitor without overlapping layers and perform the same steps in reverse order. When the winding is ready and soldered to the terminals, you need to connect them to a 4-5 Volt power source with a current of 1-2 Amperes to dry. The winding will heat up to 50-60 degrees, while the glue will dry and harden, the coil will expand slightly. This will help to easily remove it from the mandrel.
We check the free play of the coil in the gap of the speaker and begin the assembly.
We need to align the coil exactly in the center. There are 2 ways to do this.
1) Place a spacer made of photographic film or x-ray film into the gap.
2) Apply a small constant voltage of 2-3 Volts to the coil so that it is pulled inward a little.
We apply a layer of glue "Moment" on the outer edge of the diffuser and the outer edge of the centering washer and lower the diffuser vertically down without skew and without radial displacement, press it. You can turn the speaker upside down on a flat table, and while the glue dries, solder the wires to the terminals.
After the glue dries, remove the gasket and check the free play of the coil in the speaker gap.
If everything is in order, glue the protective cap in place and enjoy the result!
The current state of the market with loudspeaker prices makes speaker repairs virtually unnecessary, but if it's difficult to get a new speaker to replace a broken or damaged one, then it makes sense to try to repair the damaged loudspeaker yourself. I got several coaxial-type speakers from various cars. Unfortunately, 2/3 of the speakers produce a distorted signal during playback, and the rest simply do not work. Below, material will be presented only on the restoration of “littered” coaxial-type car speakers for later use in the design or installation in multi-band stationary speaker systems. Before starting work, we will diagnostics speaker state.
1. Check for "litteriness". Coaxial-type speakers are not completely protected from foreign objects entering the magnetic gap, this is especially dangerous for old cars covered with rust or cars that have undergone body repairs. Checking is simple - gently with your fingers move diffuser inside the magnetic system, if at the same time extraneous sounds are clearly audible: rustles, crackles, rattles, then this means that metal debris may have got into the magnetic gap.
2. We take a tester and in the ohmmeter mode we check the resistance of the coil. If there is resistance, then this is our case. If there is no resistance, then it makes sense to check for an open thick flexible copper conductors from the speaker terminals to the diffuser. If there is no break, then most likely there is a break in the speaker coil and this case of self-repair is not considered in this article. Instructions for self-repair are given below.
1. We unsolder the flexible leads of the coil from the contact lobes for connecting the speaker and the contact lobes of the coaxial speaker.
2. Remove the coaxial speakers. Repair of the speaker system is not provided by the manufacturer and coaxial speakers are installed tightly. The column with reinforced tweeters was removed by drilling out an aluminum rivet. We work carefully, the main thing is not to tear or damage anything.
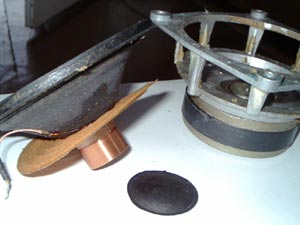
3. The speaker repair forums provide methods for dismantling the cone and centering washer. I also went down this path. We carry out work in the open air in the absence of sources of open fire! Having spent 100 ml of acetone, it was not possible to peel off the diffuser and the washer. The solvent quickly evaporated without softening the adhesive line. In order to save time and solvent, a cotton cord was placed on the gluing site and wetted with acetone; if necessary, wetting continued as evaporation continued until the glue softened. After softening with a thin screwdriver, pry off the edge of the centering washer and lift it above the gluing point. With a diffuser corrugation made of thin rubber, it is necessary to act more carefully and delicately so as not to damage the rubber.
Filling the solvent on the corrugation
4. Remove the diffuser. Damage to the insulation of the speaker coil is noticeable from debris that has got inside the magnetic system. It is useful under a magnifying glass to look at the degree of damage for the presence of short-circuited turns (scratches to a depth of more than 40% of the diameter of the coil wire), if there is a suspicion of short-circuited turns, then it is better to reject the speaker. Using a damp cloth, I cleaned the diffuser, centering washer and coil inside and out from dirt. Cleaning must be done carefully so as not to damage the coil.
There are scratches on the coil
5. The gap of the magnetic system is a sad sight. Strong magnet holds small metal debris and dust firmly. I tried to clean it mechanically, but the small size of the gap and its curvature did not allow me to successfully remove debris. I decided to use a strong jet of air from an air compressor - clearance failed! I had to use another tool - to use a high-pressure water jet from a car wash. The result is that I am all wet, but the gap is 100% cleared, and at the same time the entire frame of the frame shines like new. I tried to do it carefully, because the pressure of the water jet is very high and I admit, with special zeal, you can destroy the adhesive of the magnet of the speaker system. To prevent rust, you must immediately dry the frame and magnet. After drying, it is useful to check the cleanliness of the gap under a magnifying glass. And as experience has shown, it’s a good idea to seal the gap with tape to protect against accidental metal debris.
1. After cleaning and drying the components of the speaker, we assemble the structure. It's important not to rush. The goal is to position the coil in the magnet system exactly in the center and ensure there is no gap and no touching of the coil. From a strip of A4 office paper 10 cm wide, about 18 cm long, we fold the cylinder and insert it inside the diffuser coil. The cylinder should fit snugly against the coil and have no protrusions or bulges inside.
2. Let's try to insert such a construction into the magnetic system. Do not hurry! Better practice a few times. The cylinder should sink to the full depth of the magnetic gap and the coil should hardly move along the inserted cylinder. If the coil moves around the cylinder with great effort, then it is necessary to shorten the length of the paper strip, and if the coil moves freely, then it is necessary to increase the length of the paper strip.
Insert the cylinder into the gap
The coil moves tightly in the cylinder
Coil installed in the center
3. Holding the cylinder in the lower position, raise the diffuser and grease the area for gluing the centering washer with glue of the “Moment” type. We orient the washer along the leads of the coil conductors and speaker terminals, as well as along the cutouts in the corrugation of the diffuser. Attach the center washer.
4. Glue the corrugation of the diffuser.
5. After the glue has dried, solder the coil conductors to the terminals.
6. Carefully remove the paper cylinder. Checking the diffuser. If everything is done correctly, then there should be no extraneous sounds.
7. To close the magnetic system from debris, I sealed the coil hole from the diffuser side with black spunbond, and from the magnet side with adhesive tape.
Glue the center washer
Seal the diffuser hole
Tape the hole
8. We finally check the result of the work by connecting the speaker to the sound source.
Using this technique, several speakers were independently restored for installation in stationary acoustic systems and radio receivers to replace old or torn speakers.
I tried to collect. It didn't always work out.
I did the assembly differently. After gluing the corrugation of the diffuser and the centering washer, until the glue dried up, I connected the dynamic head through a low-resistance variable wire resistor to a transformer with a voltage of 6.3 volts.
It was enough to slightly move the diffuser.
In this case, the diffuser itself was centered. The noise disappeared immediately. Dry in this position.
The disadvantage of this method: 50Hz is still hard to withstand for a long time.
You need to connect the permanent!
Professionals - sure, but amateurs can do it!
Speaker systems can be active or passive. Inside they have different chips used for audio processing.
In order for the sound to be of high quality, many devices are used to play it. But all these devices cannot be seen with the naked eye, since they are located inside.
But everyone who owns them should know how loudspeakers are repaired. Repair of acoustic buttons and other elements can be done with your own hands, if you know the speaker device.
In our case, we will consider the situation when the speaker speakers stopped working. You need to purchase special glue in advance, which may be needed during the repair process.
In general, any quick-drying glue that you can find will do. It just may happen that when dismantling, you will have to disassemble the glued joints. After that, they will need to be somehow collected back.
Before you start repairing speakers, you should know how this system works. This is necessary in order not to harm her in the process of performing certain actions.
Despite the size of the column, it has two components: mechanical and electrical. The composition of the first includes a coil with an induced current.
The second contains a magnet, as well as a special membrane. At first glance, it seems that this mechanism is simple, but it is not.
This is why you may need to classify speakers:
- Coil. Their principle of operation resembles the operation of a geyser (used to heat water). The ring of the magnet makes it move due to the formation of a current in it.
Note: the device will work until all turns of the coil are intact. Therefore, if the coil speaker does not work, then first of all you should pay attention to the integrity of the coil.
- Tape. In this case, a narrow corrugation is a variable magnet.
At the same time, there is no coil inside, as in the previous version. To use such a device, you must first purchase matching transformers that need to be connected to the circuit.
Most often, these transformers are already installed from the factory.
Note: it is their presence or absence that allows you to quickly find out the type of speaker.
- Isodynamic, which include a square or round spiral. It carries out circular movements together with the membrane, being under the influence of a magnetic field.
- electrostatic speakers. Their main difference is that they work without making any movements. The current is initially already in the circuit, so you do not need to perform any actions in order for it to form.
In this case, the membrane moves a little, but it does not perform any translational movements.
Note: They are ideal for high frequency speakers.
- Capacitor, which includes two electrodes. One of them is quite massive, since it performs an important function - supplying an alternating potential.
It plays the role of a support for the second electrode. By the way, instead of the second one, you can use foil twisted into a thin tube. - There are also other types of speakers, but only the most popular and frequently encountered were considered.
Speakers work like this:
- Thin wires go to the cap located on the membrane. The cap itself is attached with a diffuser.
So these wires break through it so that they have access directly to the cap. - The coil must be light, as it is necessary to achieve low inertia in the system. After all, the oscillation frequency in the dynamics is huge, so in order to move at such a speed, the moving part of the speaker should not be heavy.
- The magnet is fixed. Most often it has the form of a ring. A coil with an induced current is located in the hole.
As a rule, it moves forward and backward. It also drives the membrane with the cap.
The connecting wires are also in constant motion. So that the moving parts do not move from their place, they are connected in the center with a special washer, which helps to ensure that the axis of symmetry is not broken.
Speaker repair is a fairly simple process. The cap and membrane break rarely.
Most often, the coil fails. You should also check the soldering points of the wires, as one of them may have come loose.