VIDEO
Repair racks are quite within the power of any owner of the VAZ 2109, who has at least a little experience in self-repair. But if there are no skills, use the services of a service station.
Welcome!
Note!
Summary:
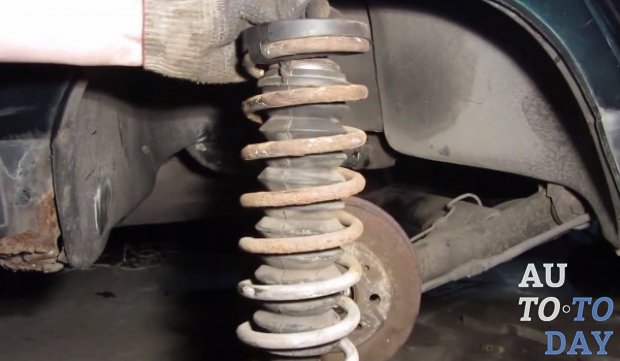
Where is the front desk located?
When do you need to repair the front pillar?
Note!
In addition, the serviceability of the racks can also be checked in specialized workshops, they have equipment with which they can tell you with great accuracy whether your racks are worn out or not!
1) Firstly, you will need to remove the rack itself, in more detail with the instructions for removing the front struts, you can read the article titled: “Replacing the front struts on a VAZ”, everything is described in detail in it.
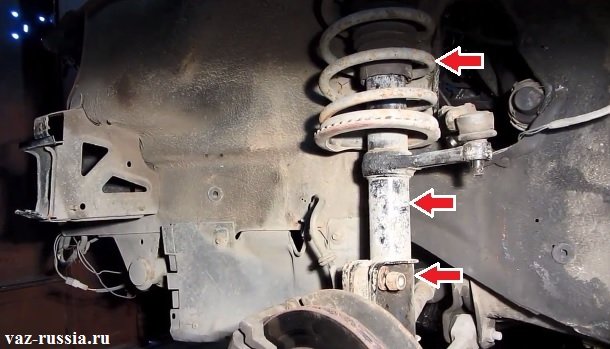
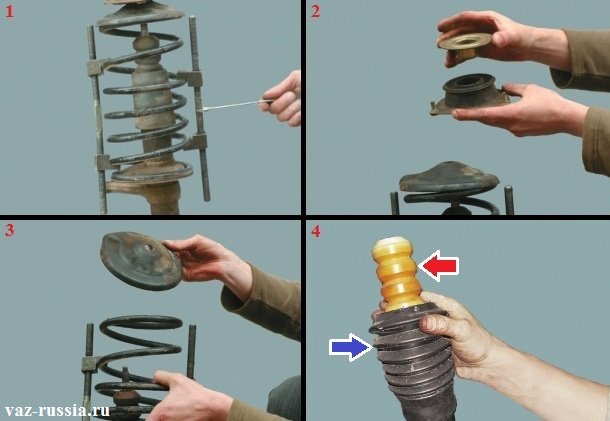
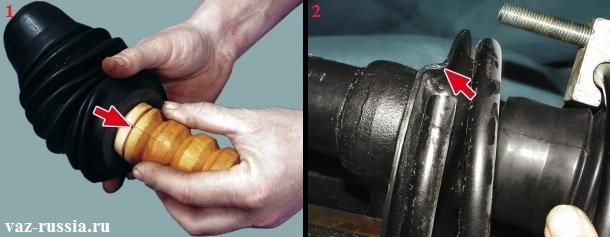
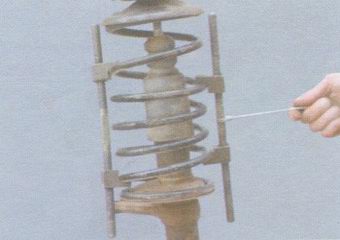
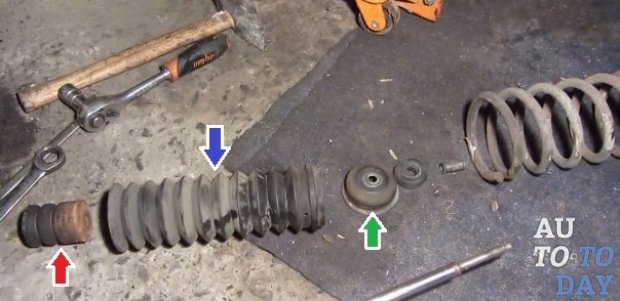
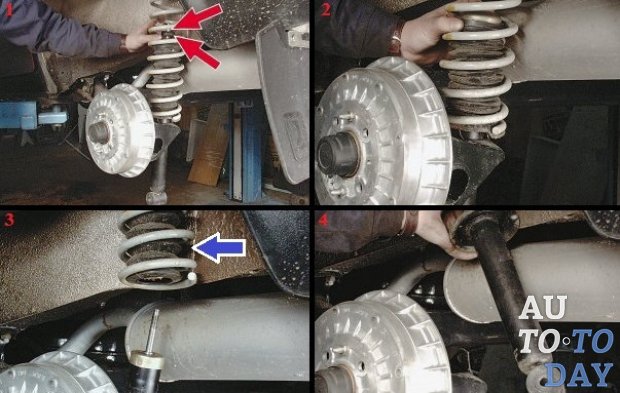
2) Now that the rack has been removed and is in your hands, place it in a vise and carefully clamp it with them (To prevent damage to the rack, we recommend that you put a rag in the place where you are going to tighten it with a vice, and thereby exclude direct contact between the vise and the rack) , after that, install special ties on the spring of the telescopic strut (as it is called scientifically) and compress the spring with them so that it does not shoot (see photo 1), then, while holding the shock absorber rod from turning, unscrew the nut that is located on this rod and secures the top the support of the rack, the top cup and the spring itself, so when this nut is completely unscrewed, carefully remove the top support from the rack (see photo 2), then remove the top cup from the same rack (see photo 3) and after it itself spring, unclenching it for this, carefully screeds and removing it, and when the spring no longer interferes, then remove the protective cover after it (Indicated by the blue arrow) and the compression buffer, which is indicated by the red arrow who is in photo 4.
Note!
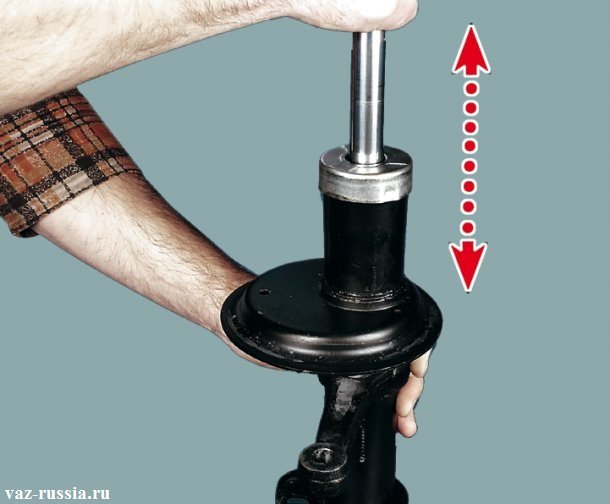
3) Then put the rack exactly vertically and then grasp its stem with your hand, then with the force of your hand down and up (Several times) raise and lower the stem, thereby while doing this you will feel whether the stem moves easily (It should be hard), and so feel if there are any jams and dips in it, otherwise replace the rack with a new one.
Note!
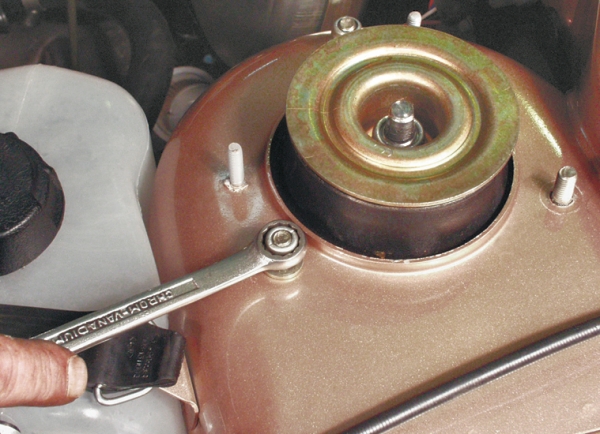
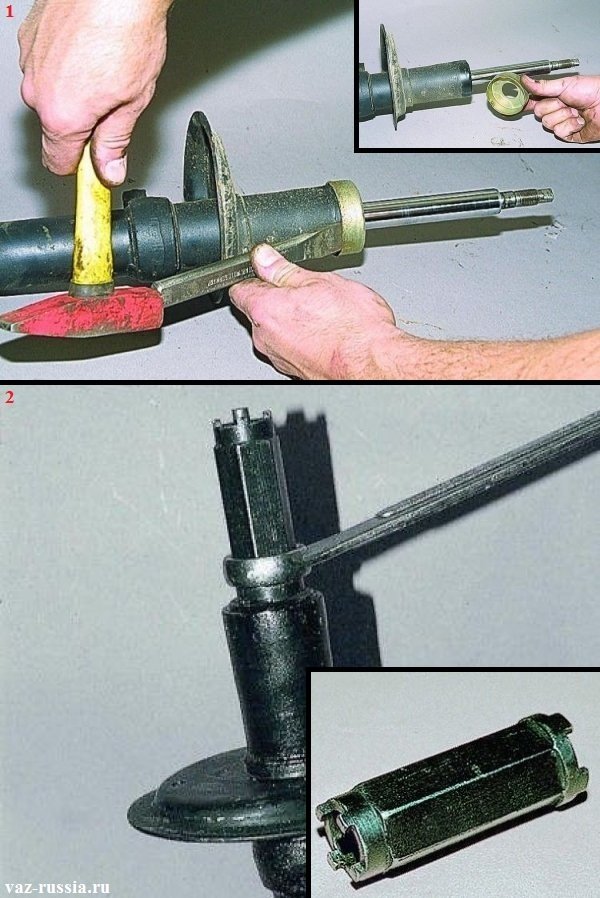
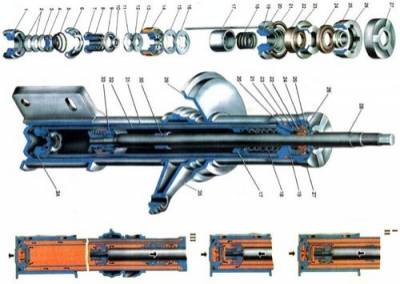
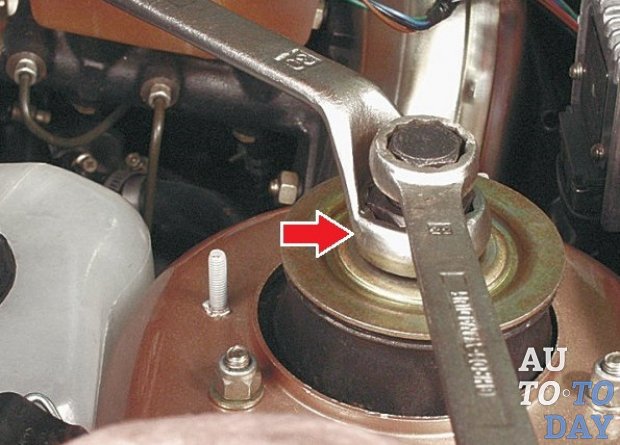
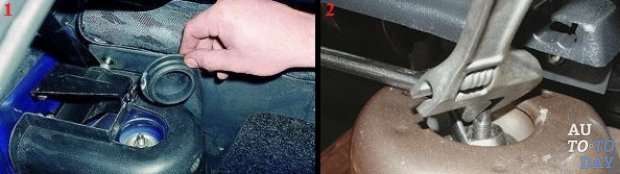
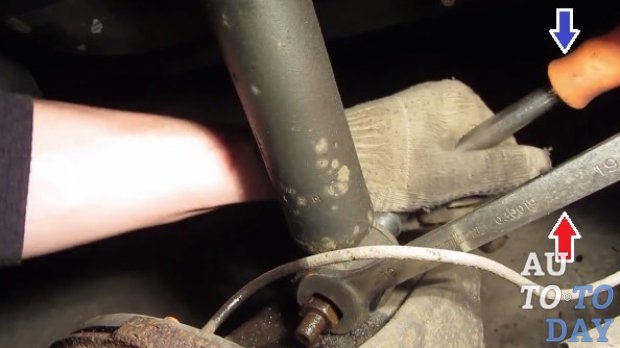
4) Now let's move on to replacing the cartridge itself, which is located in the rack housing, to do this, take a hammer in one hand and a chisel in the other and use them to knock down the compression buffer support as shown in the first figure, then using a special key (This key is sold in car shop, tell the seller that you need a special wrench to unscrew the nut of the telescopic strut housing cartridge and we hope he will understand you right away, but if not, then for clarity, take a look at the small photo number 2, this wrench is shown there), unscrew the strut housing nut as shown in the main figure under number 2.
Note!
5) Next, check the operability of the bearing of the upper support (For clarity, it is indicated in the diagram below under the number 4), it should not stick when you turn it, and it should also be tight and not have axial movement in the dough body, in addition, it should not be rusty, otherwise it will need to be replaced, you will also need to carefully inspect the body of the upper support (Indicated by the arrow under the number 3), this body should not have cracks and the studs should not be torn off, otherwise replace either the studs with new ones, or replace the upper support assembly itself.
Note!
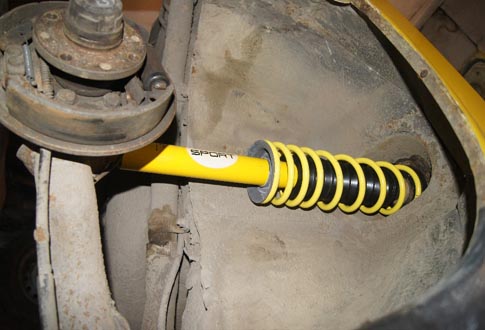
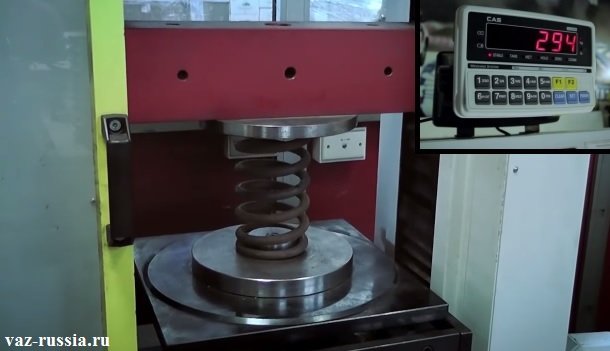
6) Next, take care of the spring (To check it, you need a special device that is only available in specialized workshops), so with the help of a special device you will need to completely (until all the turns come into contact) compress the spring three times, after which you will need to apply force to the spring in 3187 H (325 kg) and measure its length under the specified load, which should be at least 201 mm (Not less than 182 mm, for those machines that were exported).
Note!
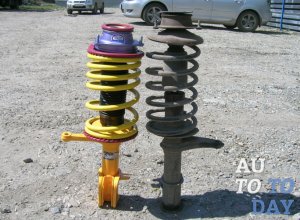
If you are suddenly going to change both front springs, then we recommend that you replace the springs with yellow markings with springs with green markings, and white with springs with blue markings, these springs already have class B and better hold the car on the road, as they are slightly smaller (Length means) and thus they are a little stiffer, so the car starts to hold the road well, but only, as mentioned earlier, in no case should one spring be changed to a spring of another class, only either both front ones with class A , or either both front but already with class B!
7) And finally, assemble all the parts removed a little earlier in the reverse order of removal, when assembling, take into account the fact that when installing the protective cover, put it on the groove that goes around the compression buffer (see photo 1), and also take into account the fact the fact that when installing the spring, it will have to rest with its ends against the protrusion on the lower cup (see photo 2).
Additional video clip:
Rear suspension strut VAZ 2109
To ensure a comfortable and safe ride on a VAZ 2109 car, shock absorber struts play an important role. But over time, their technical characteristics deteriorate, and even the suspensions become unusable.
Manufacturing defects.
The occurrence of a dull knock on the car body of the shock absorber supports, which appears when the car is moving on a rough road, over bumps.
The appearance of an unpleasant creak when starting or stopping the car.
It is possible to determine whether it is necessary to repair the VAZ 2109 rack by smudges of damping fluid, the rack becomes wet and dirty. The need to replace the shock absorbers can be indicated by the rocking of the car, as on a swing, although the road is flat.
Most often, the repair of the rack does not give the desired effect, after a short period of time it will make itself felt, which will force the owner of the VAZ 2109 car to replace the rack with a new one. The article proposes to familiarize yourself with the repair of racks with your own hands. Currently, they are more often made in one-piece structures. Therefore, you need to carefully inspect the products before starting repairs.
Tip: You need to know that sometimes repairing a unit is impractical and ineffective, and sometimes, after repair, you can create an emergency on the road.
The choice of racks depends on the quality of the road surface and the style of driving a car:
Oil racks VAZ 2109 due to the operation of the hydraulic unit provides comfortable movement on a good road in the city and along the highways. Their price is the lowest, the dimensions are small.
in the compensation chambers there is a mixture of air, which, with its excess, creates unreliability in the operation of the device, and with a deficiency, the shock absorber efficiency is zero;
poor heat transfer;
cavitation bubbles may appear when the car is moving on the primer, due to the frequent and sharp movement of the piston, and this will lead to foaming of the oil.
Gas racks VAZ 2109 are more durable and costly. They have increased rigidity at high speed of movement of the car, but the comfort is reduced by the increased shock load acting on the driver and passengers.
A compromise version of the first two versions is two-pipe gas-filled racks. They have sufficient softness of movement, stable, when driving at high speed, over rough terrain.
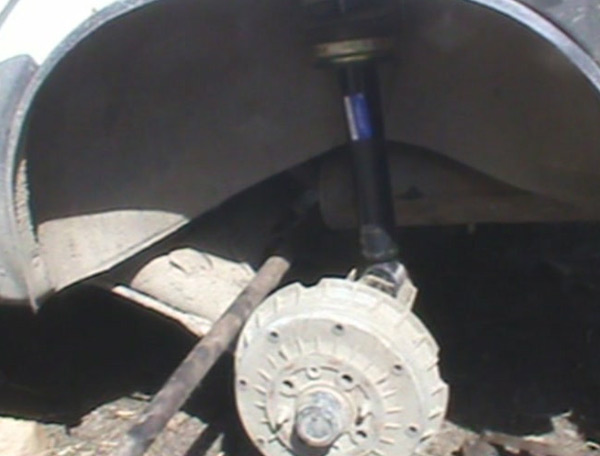
Above the wheels of the car on both sides are shock absorber struts.
The unit is removed from the car, cleaned of dirt.
The ties compress the spring until the support cups stop tightening, as shown in the photo.
Installing tie rods on shock absorber springs
The nut of the upper shock absorber support is unscrewed.
The limiter, support and thrust bearing are removed on the upper support.
The upper cup and spring are disconnected.
The front strut is released from the compression stroke buffer and protective cover.
Tip: If there are signs of deformation or destruction on the bracket, housing, lower spring cup or swing arm, the elements must be replaced.
After installing the rack in a vertical position, it is necessary to raise and lower the shock absorber rod to the stop several times. Seizures and knocks indicate the impossibility of repairing the shock absorber. In their absence, the repair of the front pillar of the VAZ 2109 can be continued.The compression buffer support is knocked down with a chisel and the shock absorber housing nut is unscrewed with a wrench.
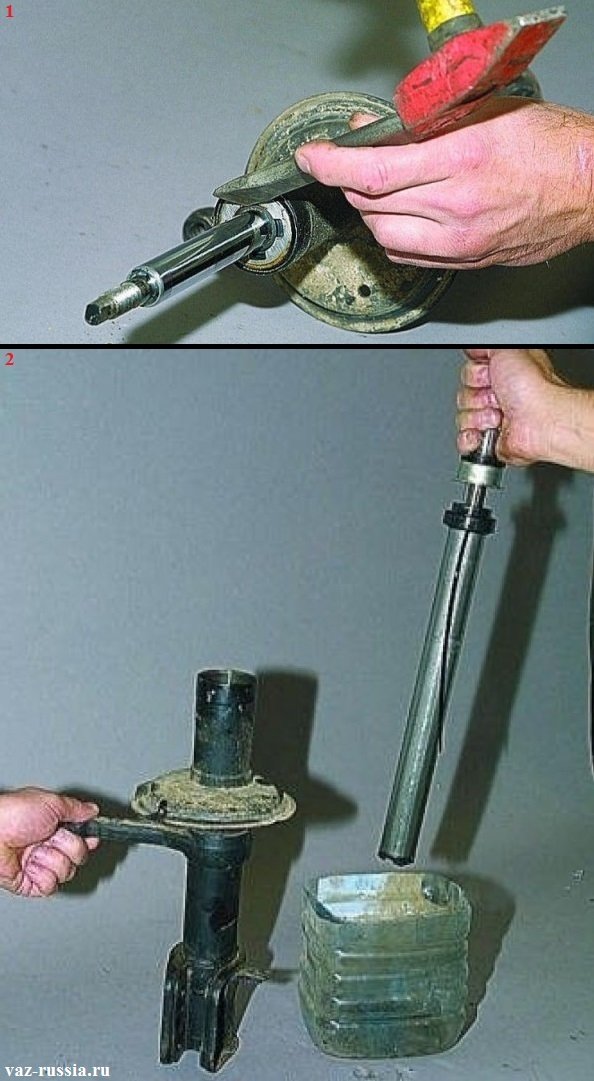
The nut is removed.
The rod, the working cylinder are pulled out.
The damping fluid is drained into a clean container.
The inside of the case is thoroughly washed.
An oil or gas cartridge is inserted.
The rack is assembled in the reverse order. All defective items are replaced with new ones.
A carefully compressed spring is installed.
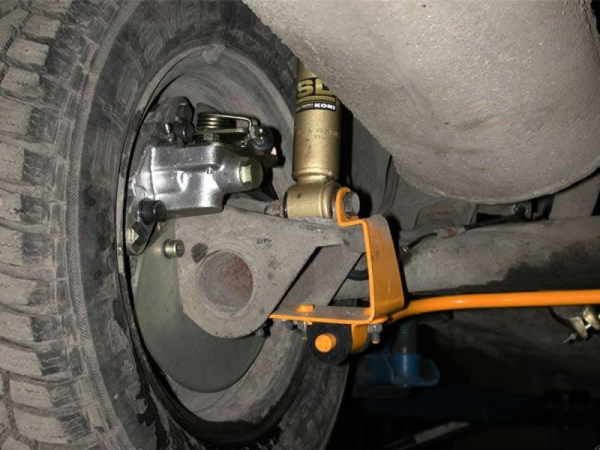
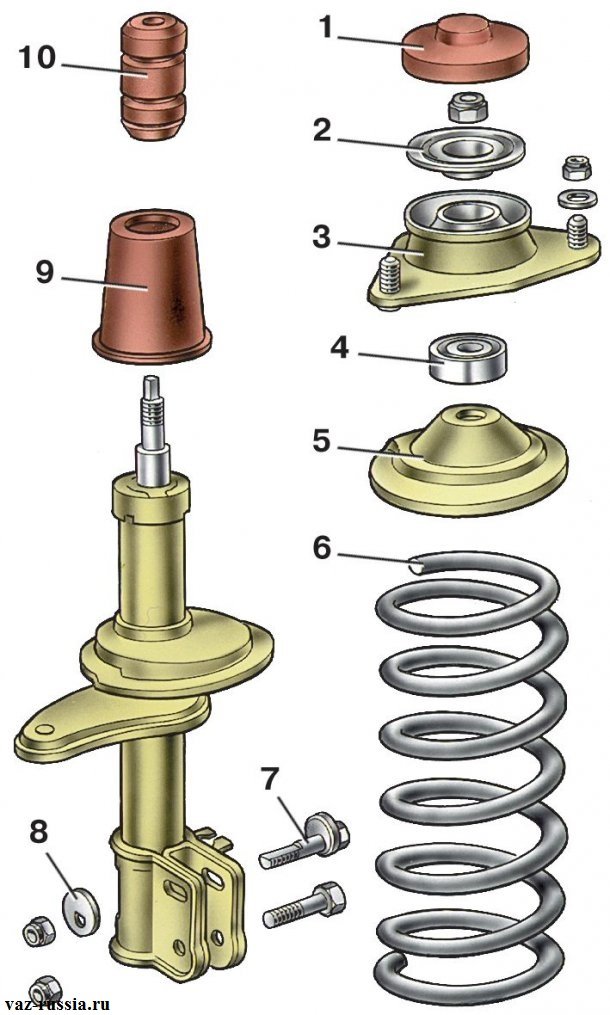
General view of the front pillar VAZ 2109
Malfunctions of elements in which their replacement is required:
The casing is changed if:
a break has occurred;
lost elasticity;
there was a detachment of the metal reinforcement.
cracks appeared on it;
received a deformation of the coil;
the length of the spring marked class A, yellow or white, has decreased, has become less than 207 millimeters.
If the threads are damaged, all fastening bolts must be changed.
The forward gear is engaged.
Stops are installed under the front wheels.
The back of the car rises. For reliable fixation, additional supports are installed near the jack.
The rear rack is removed.
The compression stroke buffer and anther, which remained in the spring, are pulled out.
Tip: If the buffer and boot are damaged, they must be replaced with new ones.
VIDEO
The shock absorber is flushed.
Mounted in a vice.
The stand is installed vertically.
The shock absorber rod will rise and fall several times until it stops.
Tip: The presence of jamming and knocking indicates the impossibility of repairing the shock absorber. In their absence, the repair of the rear pillar of the VAZ 2109 can be continued.
Visually inspect and, if necessary, change: rear shock absorber pads; on the lower mount of the rack - silent block; anther; gasket for insulation; compression stroke buffer; spring.
The shock absorber rod is pulled out until it stops.
The wrench unscrews the tank nut.
The working cylinder, the rod with all the details are pulled out.
The shock absorber fluid is drained into a clean container.
The guide sleeve of the rod, the rod itself and the piston are removed from the working cylinder.
The liquid drains.
The compression valve body is carefully knocked out of the cylinder assembly. The piston rod is clamped in a vise.
The recoil valve nut is loosened.
Removed: piston, valves, guide bushing, stem seal, gland cage.
If necessary, all parts can be replaced with new ones.
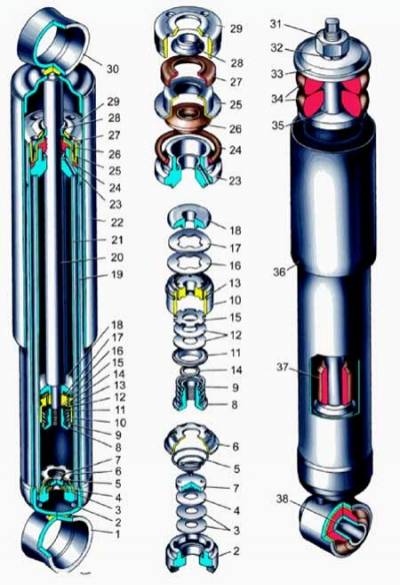
General view of the rear pillar VAZ 2109
The rear shock absorber is assembled in the reverse order. In this case, you need to take into account:
after the valve is assembled, it is necessary to check the stroke of the discs and valve plates, which must be free;
the clip is pressed onto the body with a mandrel;
a compression valve is inserted into the cylinder using a mandrel.
Malfunctions of the elements of the rear rack, in which their replacement is required:
cracks were found;
deformations have occurred.
lost elasticity;
torn.
Compression stroke buffer if:
damaged;
got deformities;
collapsed.
lost elasticity;
torn.
cracks appeared on it;
the coils are deformed;
the length of the spring marked class A, yellow or white, has decreased, has become less than 207 millimeters.
How to properly repair racks on a VAZ 2109 car can be seen in the video. Timely repair or replacement of shock absorber struts will ensure reliability and comfort when driving a VAZ 2109 car.
Keeping the struts of your "nine" in working condition will not only allow you to enjoy a comfortable ride, but also prevent serious accidents.
You can repair faulty racks on the VAZ 2109 model yourself, for this, study our instructions.
So, in order to repair the front struts, they must first be removed and cleaned from contamination.
Fix the strut spring with a special coupler, preventing its pressure on the support cups, then remove the nut of the strut upper attachment assembly.
Remove the upper support limiting assembly, the support itself and its bearing.
Check the condition of the swing arm, bottom cup, shroud and bracket assembly. If damage is found, replace the entire assembly.
Place the shock in a vertical position, then lower and raise the stem assembly until it stops. If there are signs of knocking, dips or jamming, the shock absorber part must be completely changed.
Using a chisel, dismantle the compression damper support assembly, using a wrench, unscrew the nut that secures the rack body.
Remove the nut, remove the part of the rod and the working cylinder, pour out the liquid from the shock absorber and the prepared container. The liquid can then be reused.
Reassemble the rack in reverse order. During assembly, replace defective parts, carefully install the spring in the compressed position.
[stextbox id="grey"]Please note that the unconditional replacement of components and parts on the A-pillar of the "nine" model is necessary if they have the following faults:[/stextbox]
The housing must be replaced if it is not sufficiently elastic, has cracks or holes, or delamination of metal reinforcement from rubber is observed.
The upper support assembly must be replaced if the bearing moves along the axis inside the housing, the bearing seizes, or grease leaks from under the protective rings are visible.
It is also necessary to replace the fixing bolts when fixing thread damage.
Put the gearshift lever in 1st gear, put the shoes under the front axle, raise the rear of the car and fix it with supports, dismantle the rear strut.
Remove the buffer and anther from the spring, replace them if there is a malfunction.
Wash and secure the shock absorber assembly in a vise.
Check shock absorber travel. If faults are found, replace it.
Check the condition of the silent block of the lower attachment point, pillows, anther, buffer, gasket, spring.
Pull out the damping rod, remove the fixing nut, remove the cylinder, drain the liquid.
Remove the pressure valve cover.
Fix the rod in a vice, remove the nut, piston, valves, bushing, stuffing box and its clip.
Check the parts, replace them with new ones if necessary, reassemble.
VIDEO
How to repair and replace racks on a VAZ-2109?
Symptoms of 2109 rack failure
How to replace the front and rear pillars of a VAZ 2109 car
How to remove and install front struts
Dismantling and installation of the rear racks
How to repair racks
The process of repairing the front struts
Dismantling the rear pillars VAZ 2109
In order to avoid all sorts of troubles, you should periodically monitor the operation of the shock absorber. You can go to the nearest service station. And you can do it yourself. There are simple signs that allow you to notice a malfunction of the shock absorber struts. These include:
oil leakage for shock absorber struts, deformation and contamination of its body;
oil leakage in the space between the wheel and the arch;
piston rod defects;
continuation of oscillations (after the pressure on the corner of the machine stops);
knocking in the suspension of a VAZ 2109 car;
uneven erasing of tire projectors;
skidding of the car (when driving a certain number of times at a stable speed on the same turn).
If it was decided not to bother with repairs and simply replace the faulty racks, then we advise you to follow the procedure given in the following paragraphs.
How to remove the front strut:
1. Open the hood and remove the plastic cover from the bowl.
2. Loosen the damper rod nuts.
4. Remove seal, brake hose and lay aside.
5. Mark the location of the top bolt in relation to the shackle.
6. Unscrew the nuts and pull out the bolts (2 pcs.) at the bottom of the bracket.
7. Pull the knuckle eye out of the bracket.
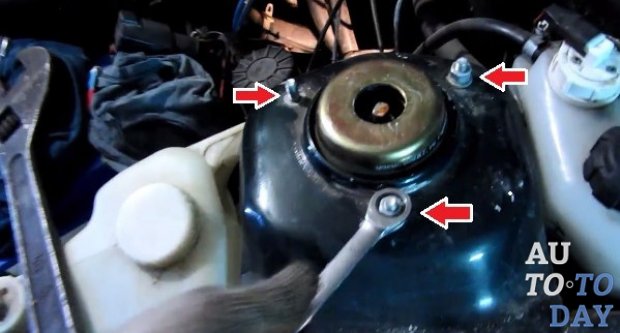
8. Unscrew the nuts (3 pcs.) On the top cup in the engine compartment.
We install the rack in reverse chronology.
Procedure for dismantling the rear pillars:
2. Remove the cap from the rack (from the side of the trunk).
3. Remove the stem nut (hold with a wrench).
4. Remove the bolt, nut and washers from the lower strut mounting.
5. Lower the shock absorber strut. Remove the shock absorber VAZ 2109 with a spring, pillows.
After replacement, install in the opposite order.
If you prefer to repair the front and rear pillars of the VAZ 2109, then you can do it yourself. To do this, here is a list of simple steps.
To repair the A-pillar, the following is required:
1. Remove the system, rid it of contamination.
2. Compress the spring until the compression of the support cups stops.
3. Unscrew the nuts from the upper support and remove the support, thrust bearing and limiter.
5. Remove the top cup.
6. Remove the compression stroke buffer and shroud from the strut.
7. Fix the shock absorber in a vise.
8. Move the rod (if there is jamming, extraneous sounds, the shock absorber cannot be repaired).
9. Inspect the housing (if there are oil smudges, replace the shock absorber).
10. Remove and inspect the springs (if there are defects, replace both).
11. Inspect the stem boots and compression stroke buffers for damage (replace if necessary).
12. Collect in reverse chronology.
13. Install the shock absorber.
To repair the rear rack you need:
2. Raise the rear of the vehicle.
3. Remove the rear suspension strut.
4. Remove the boot and travel buffer from the spring and inspect for malfunctions (replacement is necessary if defects are found).
5. Wash and secure the shock absorber in a vise.
6. Examine the shock absorber rod (if there is jamming, extraneous sounds, the shock absorber cannot be repaired).
7. Inspect such details as: silent block, pillows, gasket for insulation, anther, springs, buffer (if damage is found, change the parts).
9. Remove the stem with parts.
11. Delicately dismantle the compression valve cover.
12. Fix the rod with a vise.
Remove and check for damage the nut, piston, valves, bushing, stem seal and gland cage (replace if necessary).
Video (click to play).