
In detail: do-it-yourself perkins engine repair from a real master for the site my.housecope.com.
PERKINS DIESEL ENGINES
1004-42 (AR), 1006-60 (YG), 1006-60T (YH)
H3.50-500XL (H70-110XL) [G005];
S3.50-5.50XL (S70-120XL) [S004];
H6.00-7.00XL (H135-155XL) [F006];
S6.00-7.00XL (S135-155XL) [B024];
H13.00-16.00XL (H300-360XL) [D019];
H8.00-12.00XL (H165-280XL) [E007];
H3.50-5.50XM (H70-120XM) [K005];
H8.00-12.00XM (H170-280HD) [F007];
H13.00-16.00XM (H300-360HD) [E019];
H10.00-12.00XM-12EC (H360HD-EC) [E019];
H3.50-5.50XM (H70-120XM) [E004]
* Also, our company is ready to supply spare parts for the following brands of special equipment: Case, Liebherr, New Holland, Grove, Bobcat, Komatsu, Bauer, Putzmeister, Kato, Caterpillar, Terex, Volvo, HBM-Nobas, Fiat Kobelco, Fiat Allis, Atlas, Hydrema, Hamm, Bomag, Wirtgen, IR, Vogele, Marini, Hoffman. Check availability via the form.
Overall dimensions JCB 4CX
Overall length. 5.91 m
Wheelbase. 2.22 m
Axle distance. 1.36 m
Clearance from the supports. 0.34 m
Clearance from the column. 0.5 m
Height of the center of the RK. 1.88 m
Four-cylinder direct injection engine. Stage II engine standard. The working volume is 4.4 liters. Number of cylinders - 4
| Video (click to play). |
Entry angle. 74 gr.
Departure angle. 19 gr.
The angle at the top of the obstacle between the wheels. 118 gr. Power steering.
An exclusive torque lock system allows the operator to reduce time and significantly save fuel consumption.
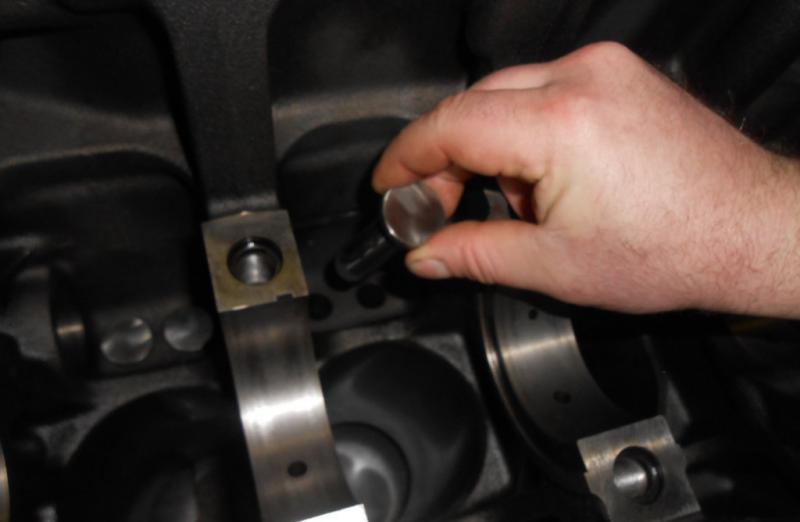
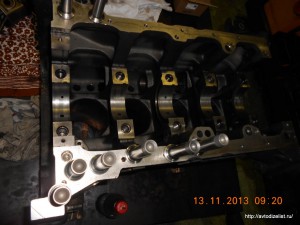
Let's start with the fact that the motor is disassembled, defective, washed. We lubricate and install the valve lifters.
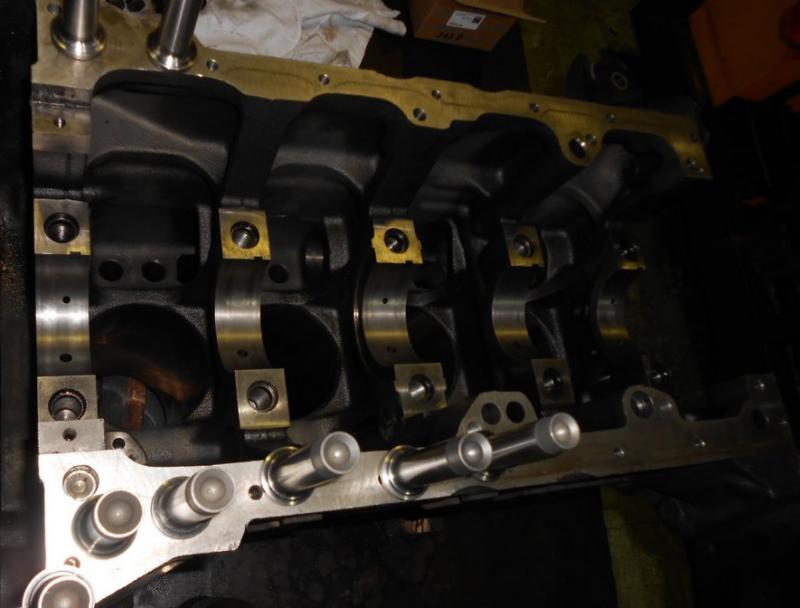
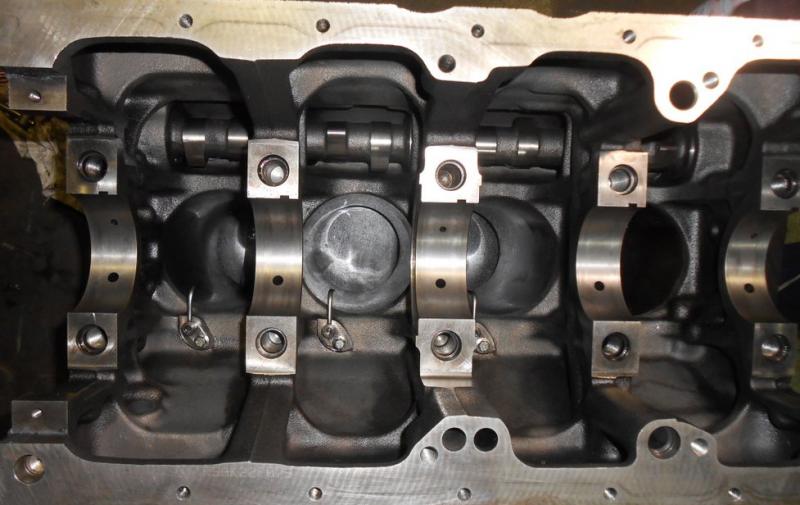
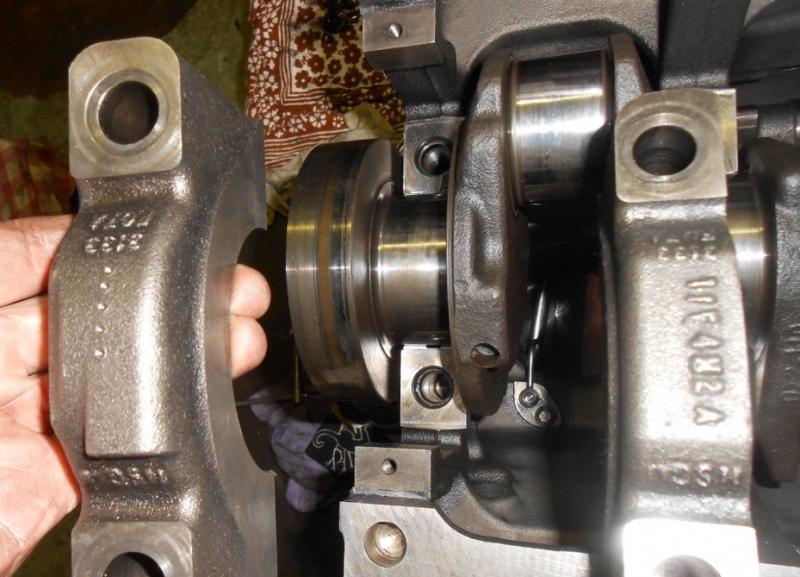
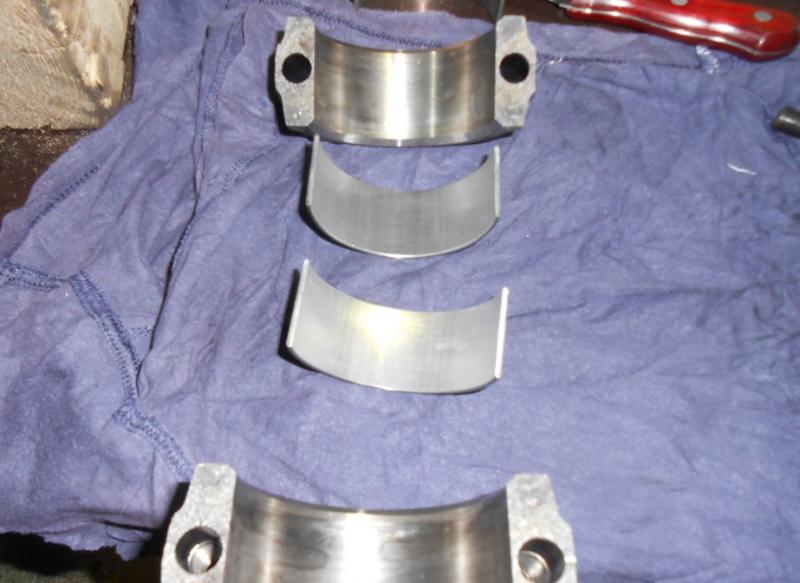
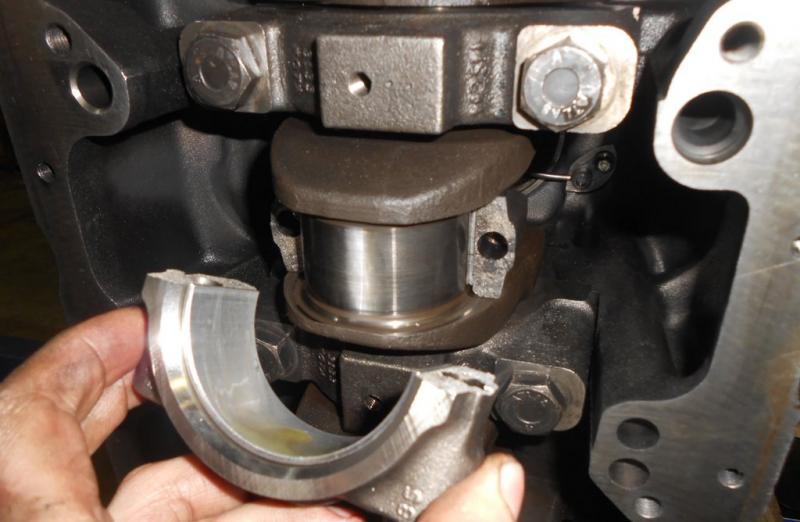
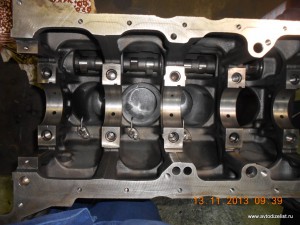
Once again we clean, wipe the crankshaft bed and install the main bearings. We smear the liners with oil, we put the crankshaft in the block.
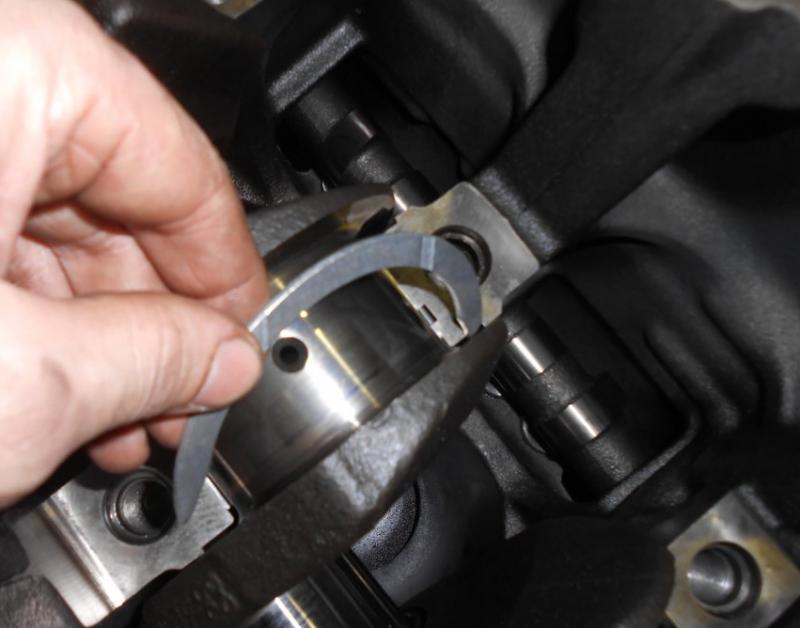
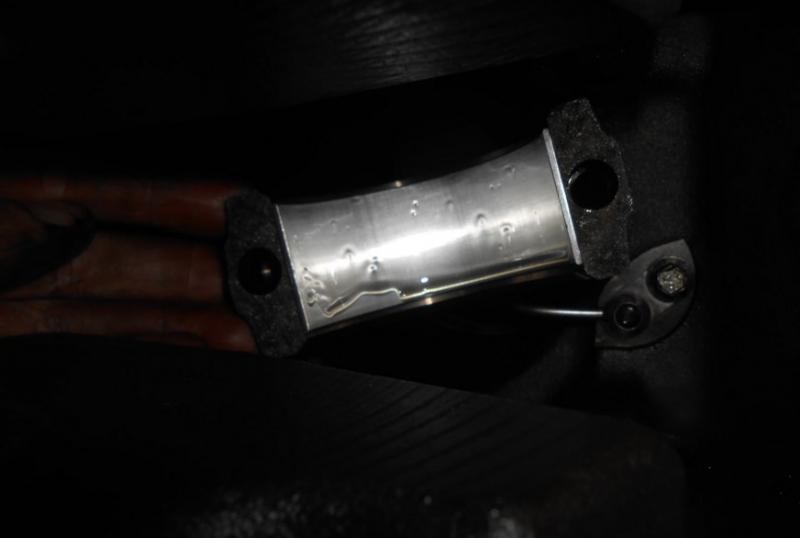
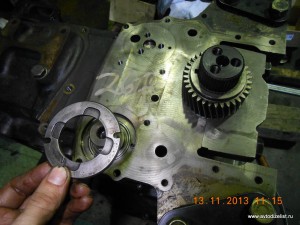
Do not forget to lubricate and put the upper persistent half rings with grooves to the crankshaft.
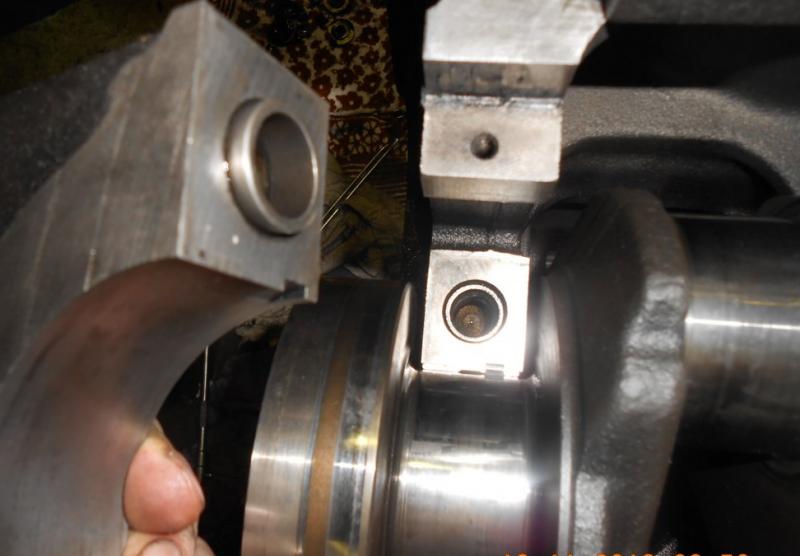
We put the lower main bearing shells in the main bearing caps, smear it with oil, put the covers strictly in their places, lock to lock. It is important not to mix up the first and fifth cover.
The fifth lid has a characteristic tide.
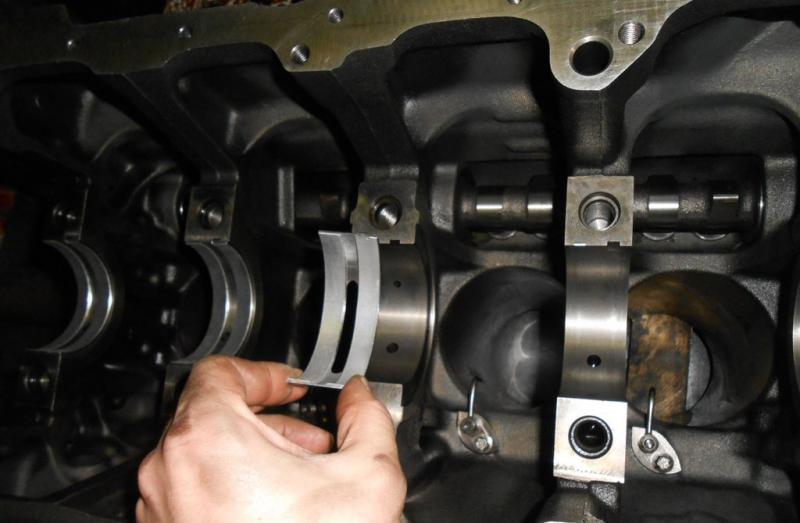
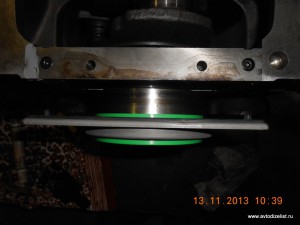
We put a pair of lower persistent half-rings into the third cover and put them in the block.

Lubricate the mounting bolts with clean engine oil along the threads and under the head, tighten them according to the tightening torques card.
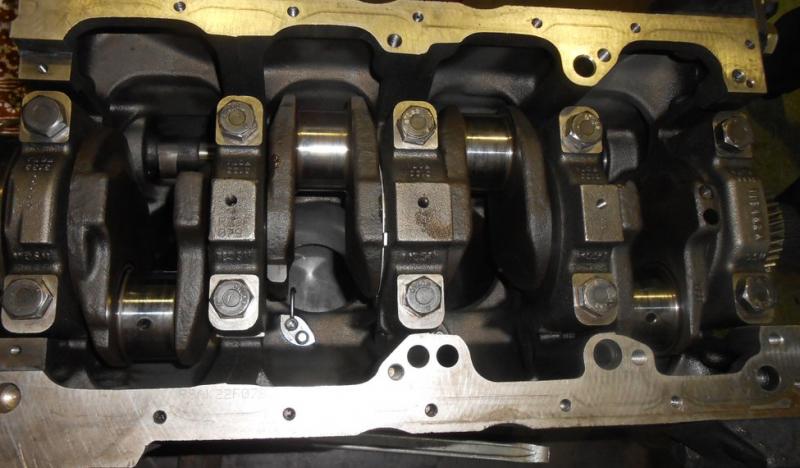
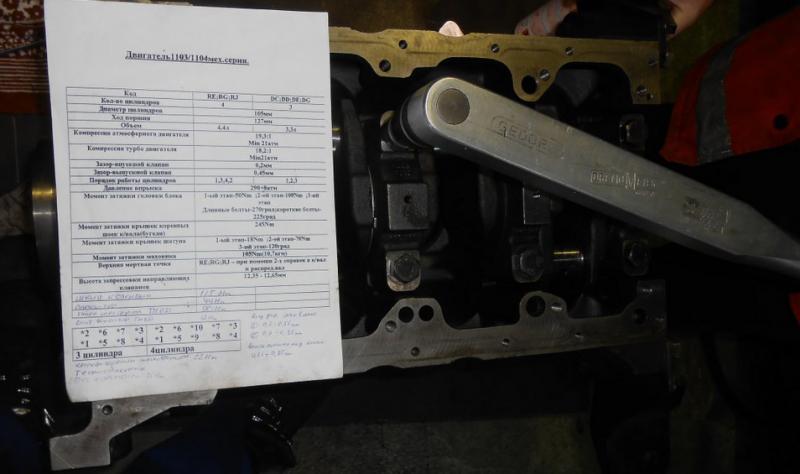
We check the smoothness and ease of rotation of the crankshaft after pulling each yoke, starting from the center.
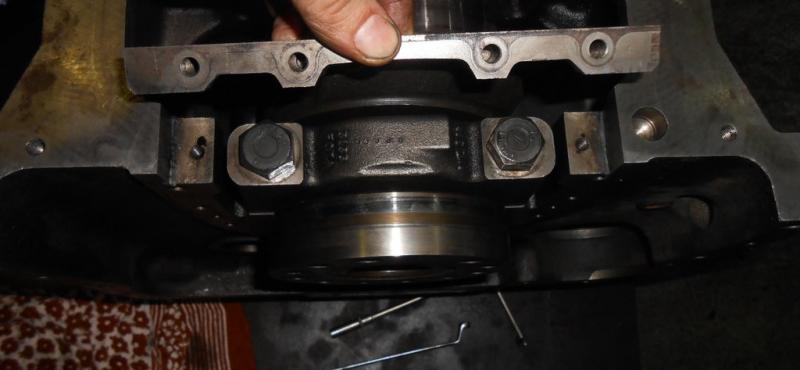
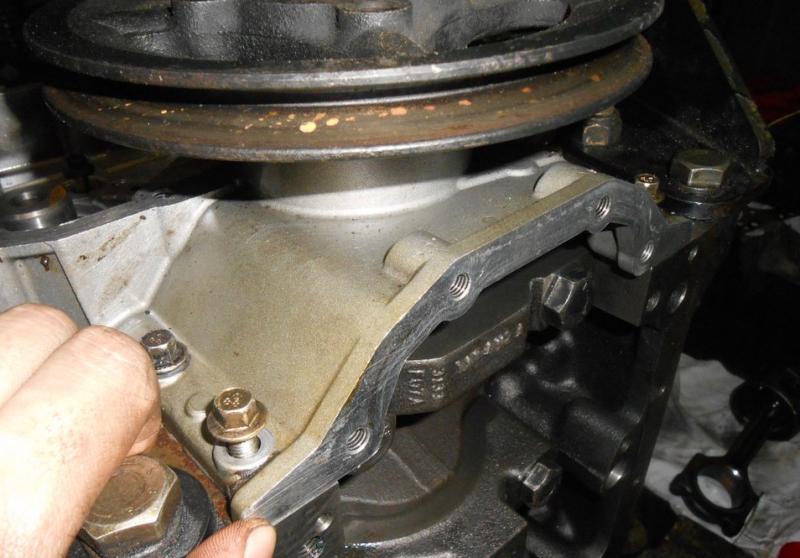
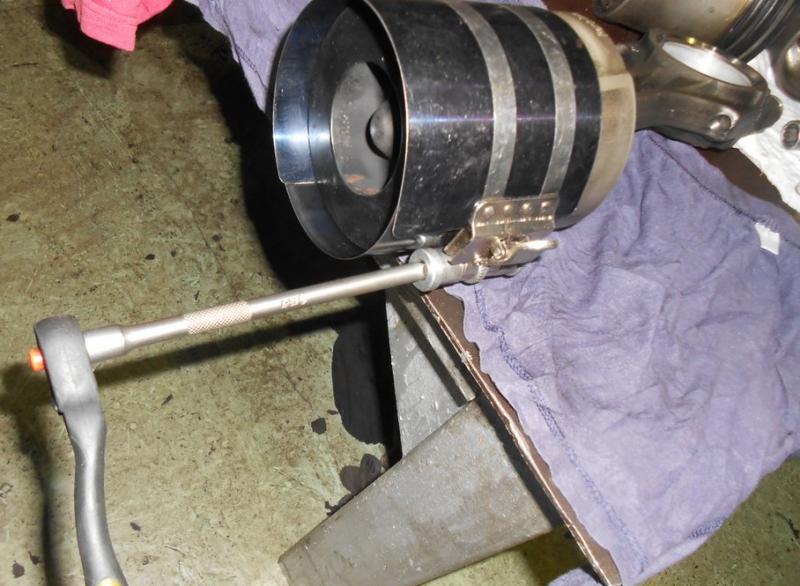
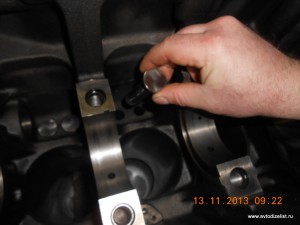
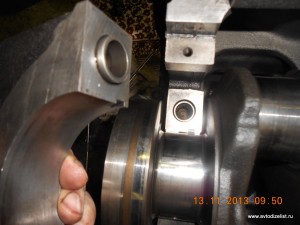
Above the fifth yoke, we attach a bar - the lower support of the rear crankshaft oil seal.
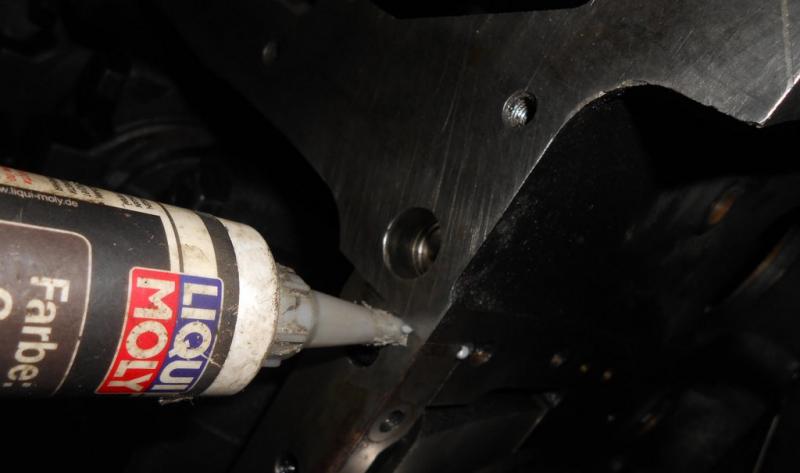
We fill the joint cavity with sealant.
We mount the viton oil seal.

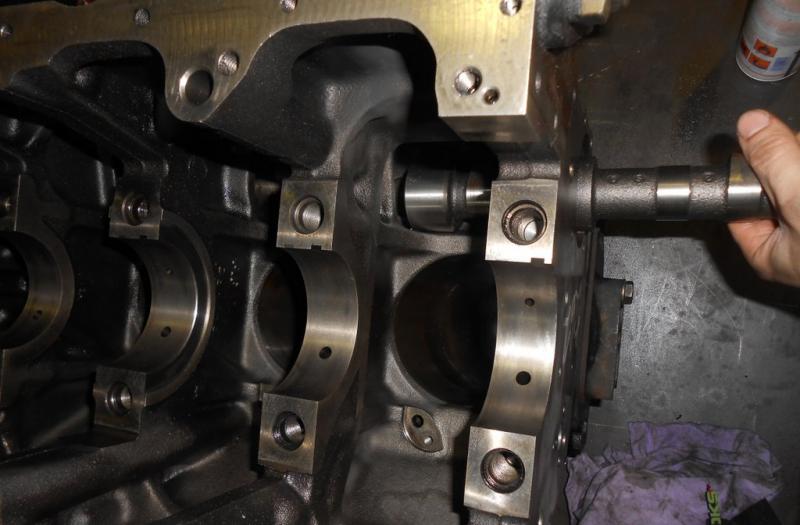
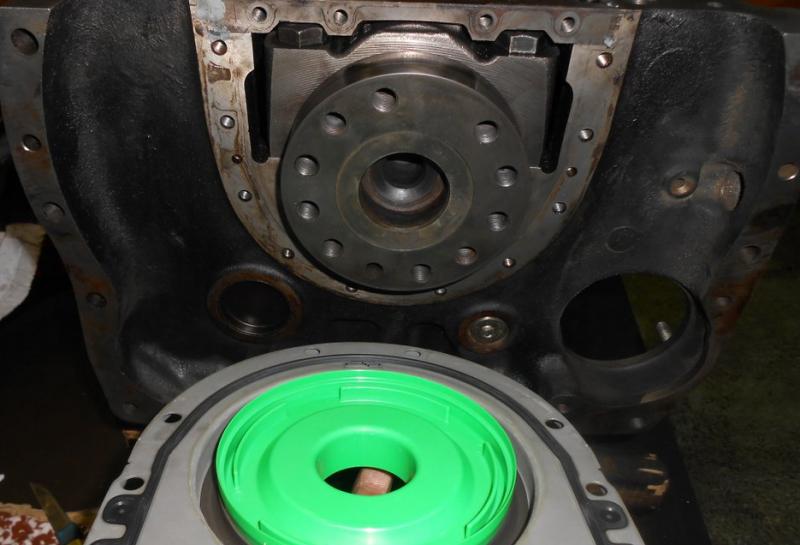
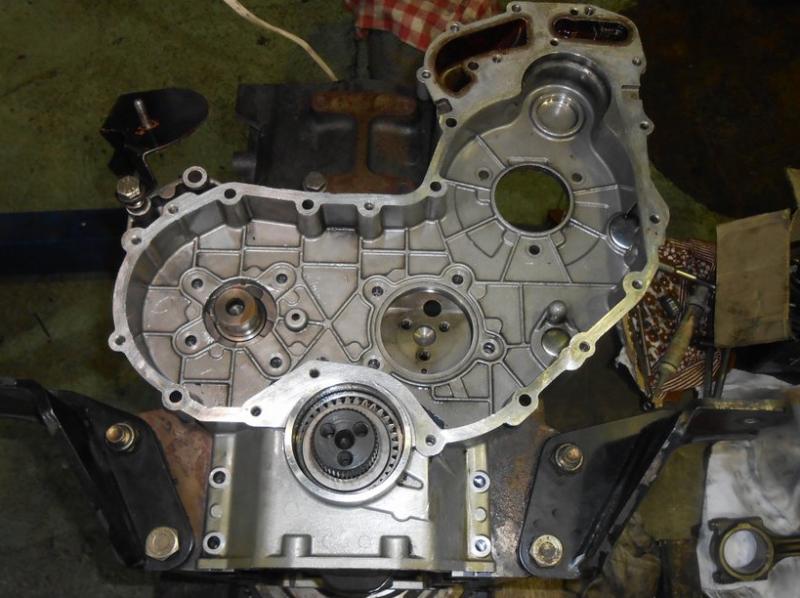
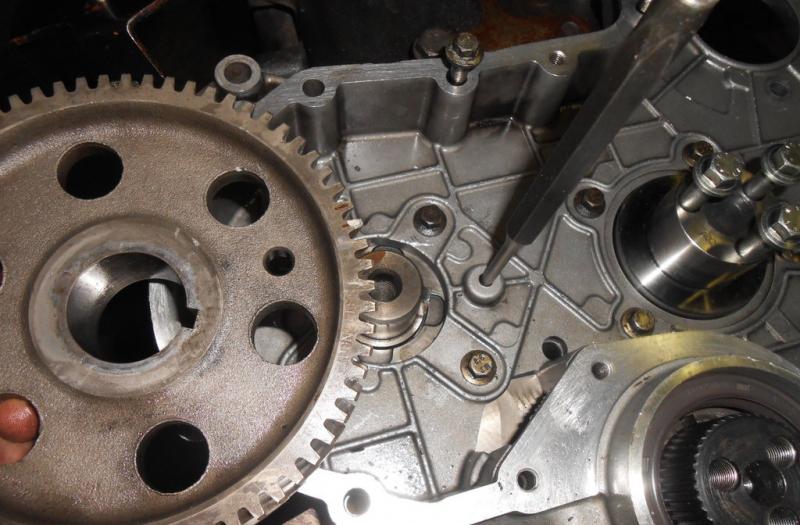
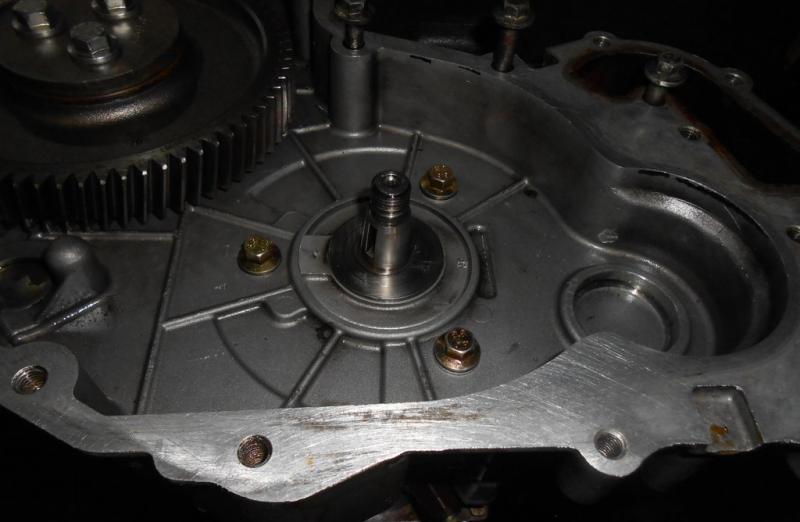
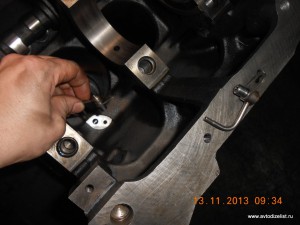
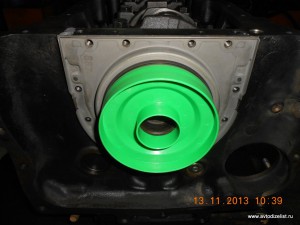
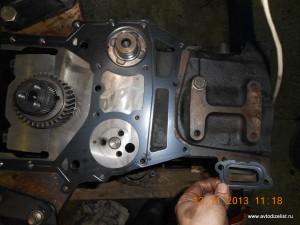
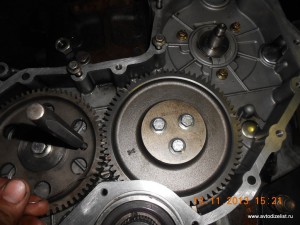
Next, we turn the block upside down, mount the gear block housing.
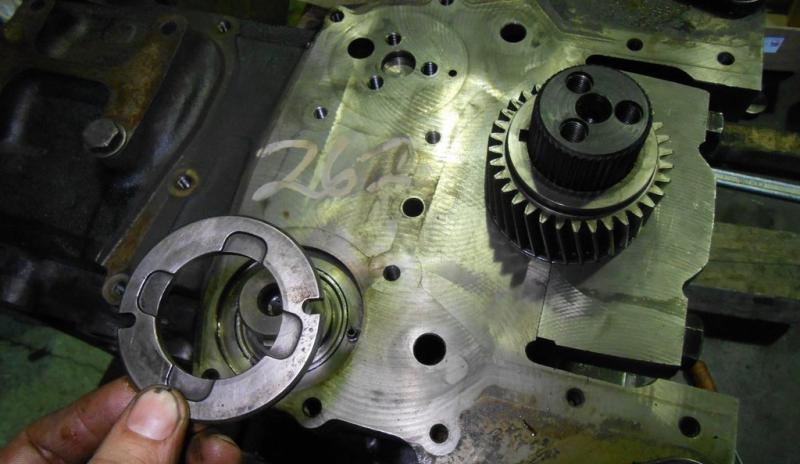
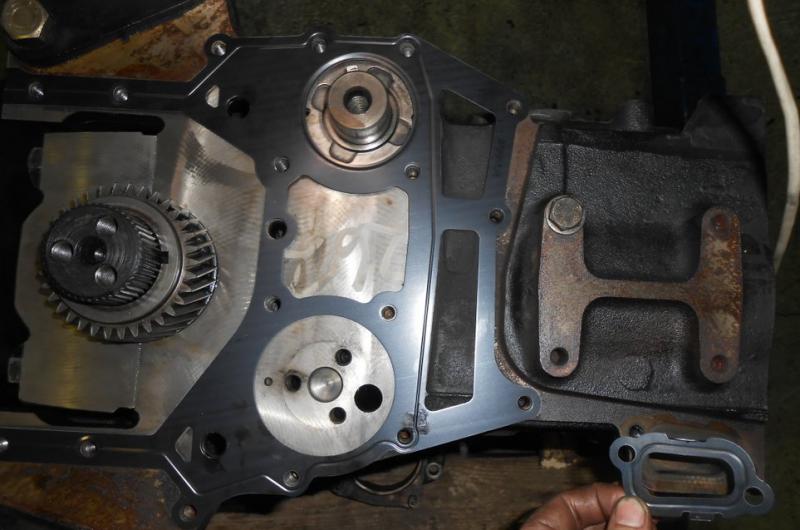
We set the axis of the parasitic gear so that the oil channels coincide.
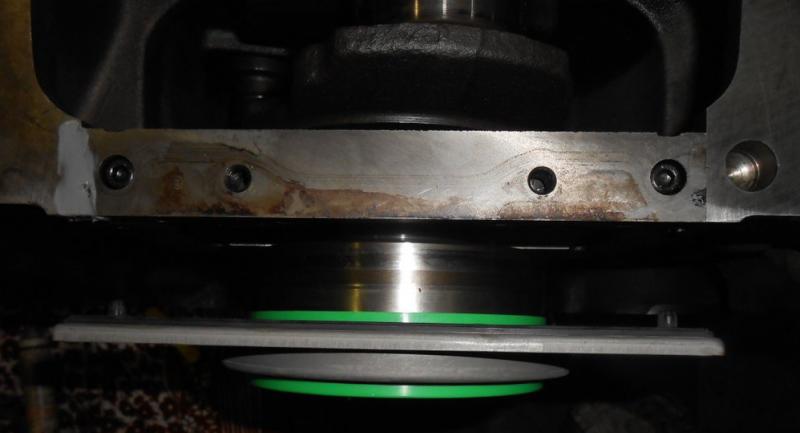
We put the front pulley on the crankshaft, center the gear housing along the oil seal. Then we tighten the gear housing fasteners.
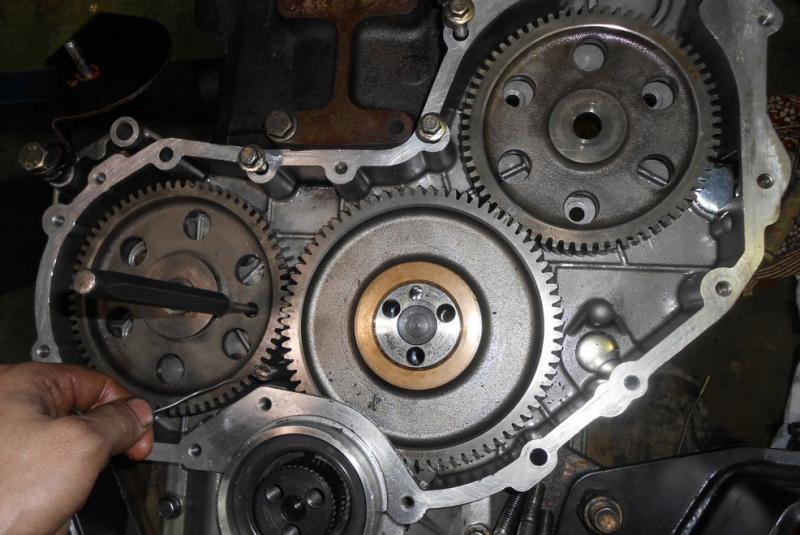
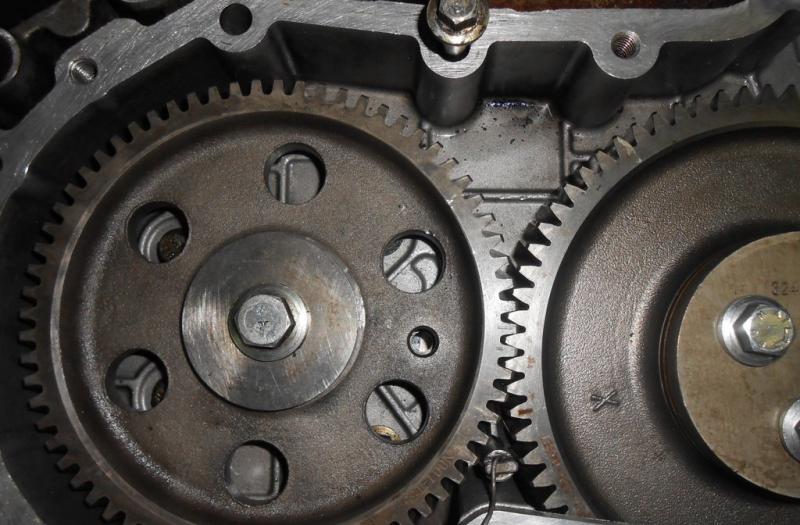
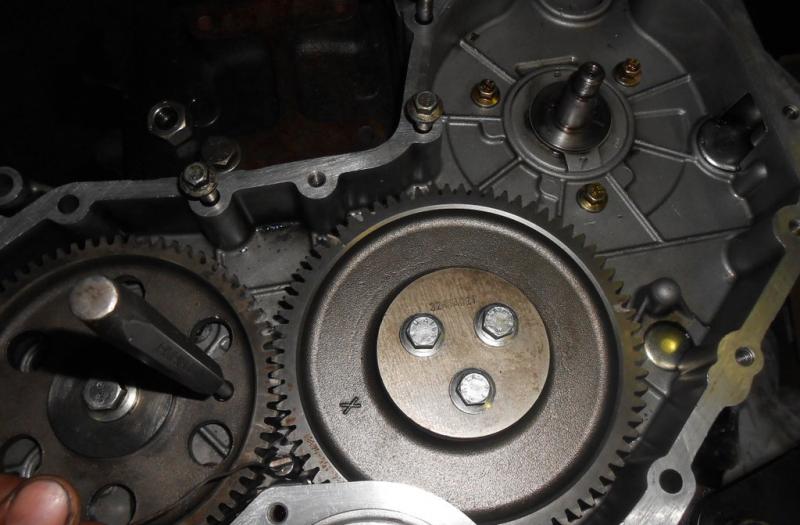
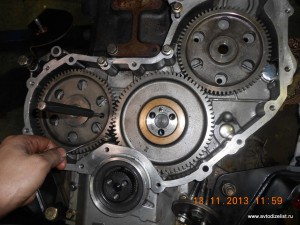
We put on the camshaft gear, set the shaft along the pin. The position corresponds to the TDC of the compression stroke in the first cylinder.
We set the crankshaft to the TDC position of the first cylinder, fix it with the second pin. We install the parasitic gear, check the positions of the shafts on the pins.
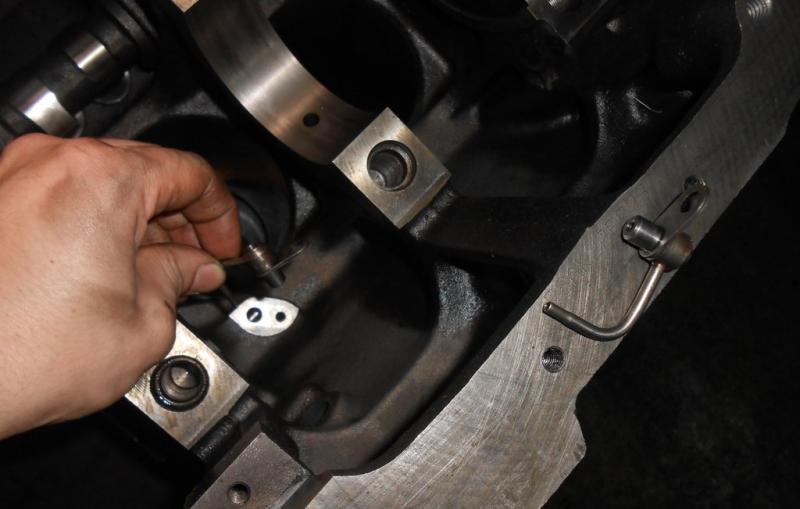
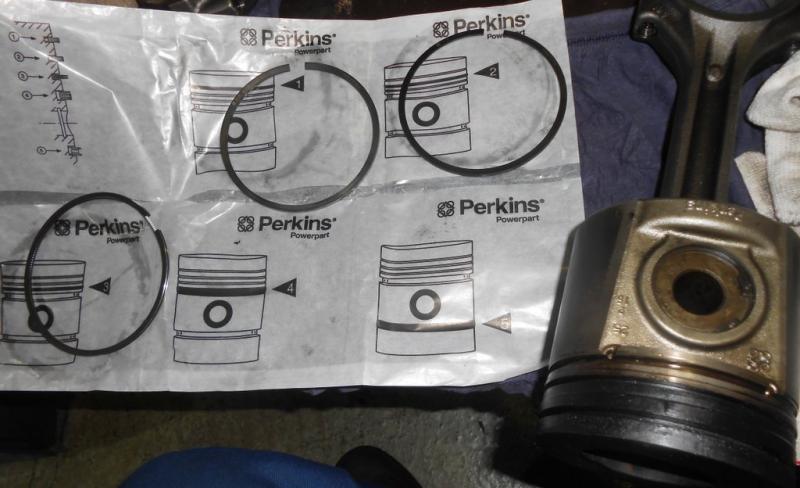
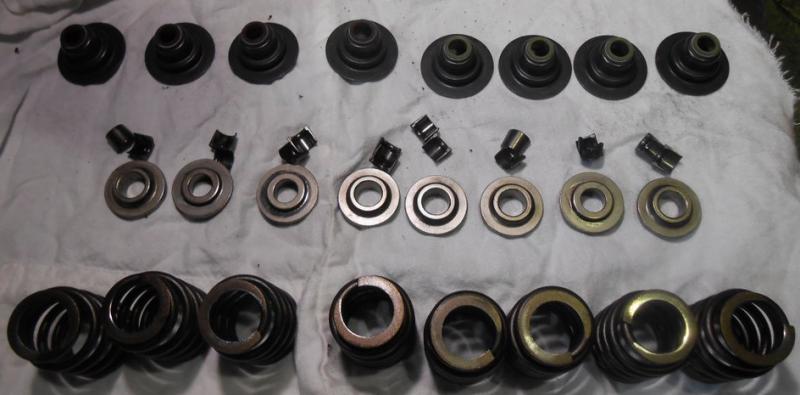
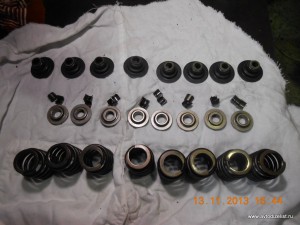
We put on the piston rings according to the instructions.
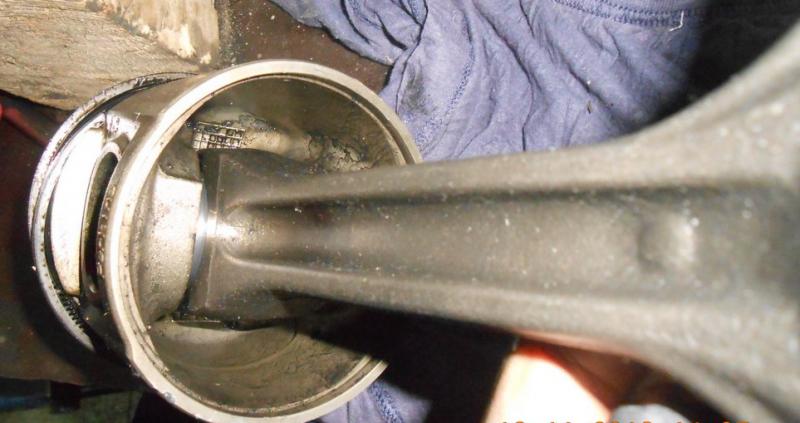
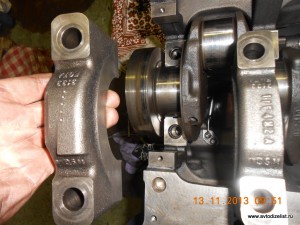
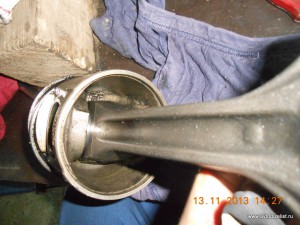
We put the lockless connecting rod bushings in their places.
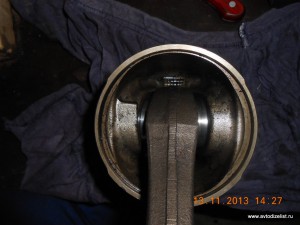
It should be noted that the pistons have an angular bump that is oriented towards the front of the engine. The connecting rod has a convex bump, it should also be directed towards the front of the motor.
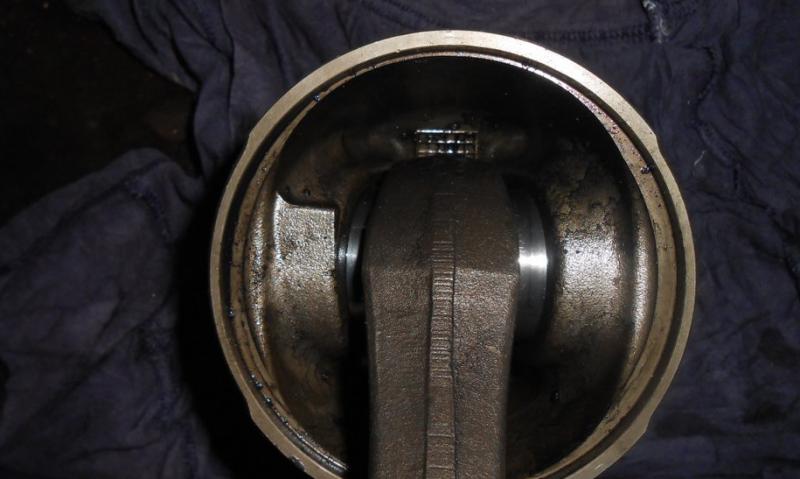
The connecting rod cover is also marked with a tide.
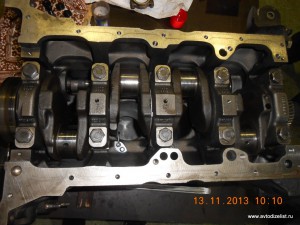
We tighten the piston rings with a mandrel.
We install pistons with connecting rods in the cylinders, it is important to control the movement of the connecting rod at the exit from the cylinder so as not to break the nose of the oil nozzle.
We close the connecting rod caps, tighten according to the moment map, check the smoothness and ease of rotation of the connecting rod bearings.
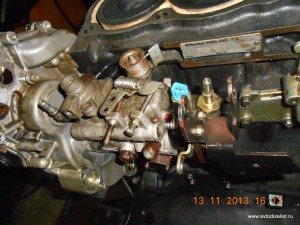
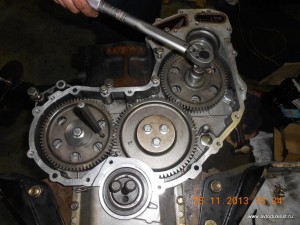
We will install the injection pump. The crankshaft with the camshaft is secured with pins. The injection pump shaft must be firmly clamped with a fixing bolt.
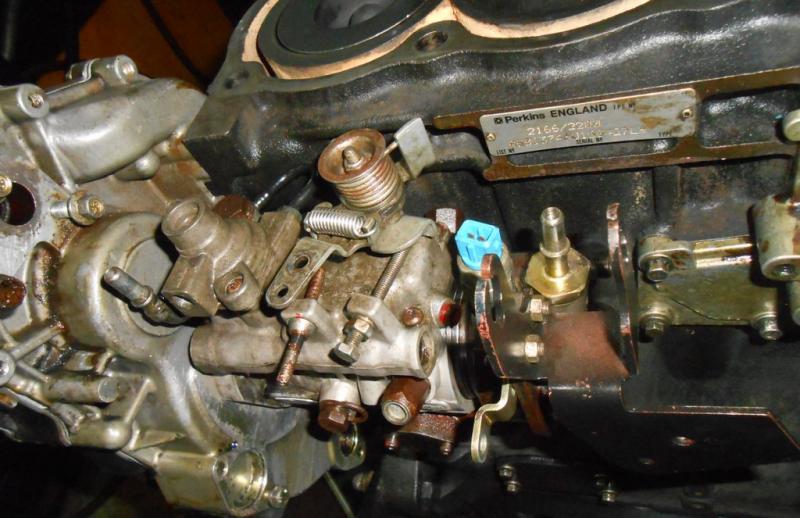
We tighten the fuel injection pump fasteners, pull the gear with the appropriate moment. We take out the pins, dissolve the stopper of the injection pump shaft. We close the front cover, attach the pump.
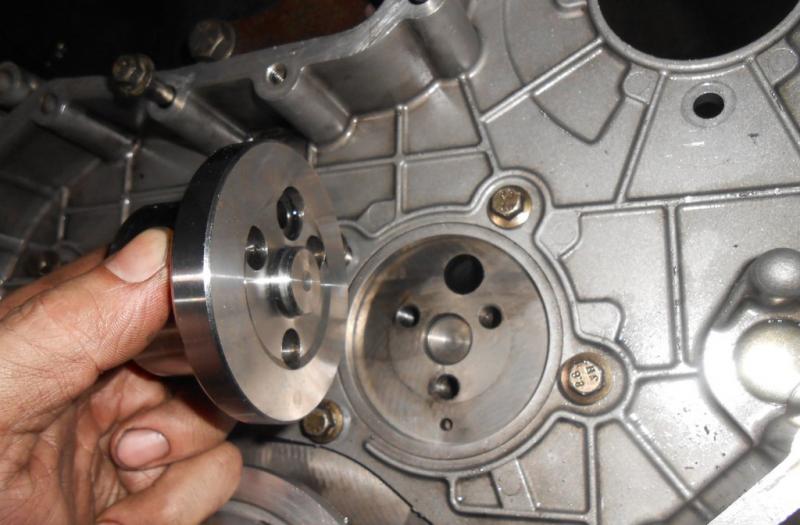
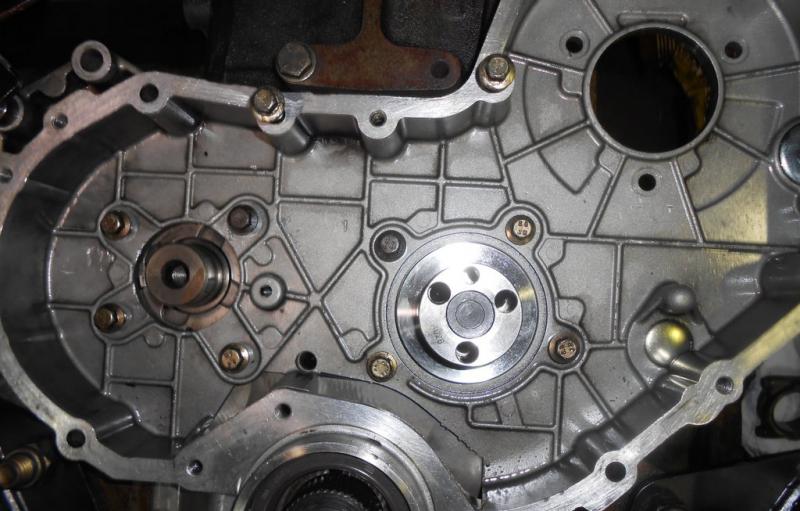
We mount the oil pump, close the oil pan, turn the engine over to its normal position.
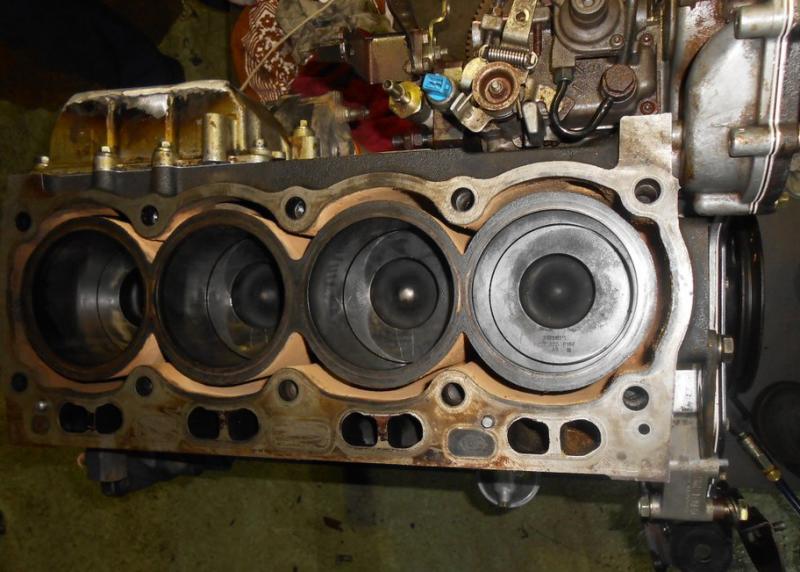
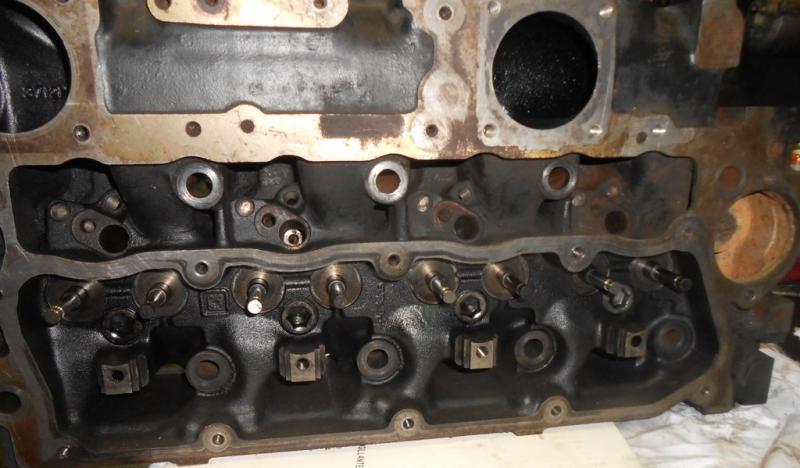
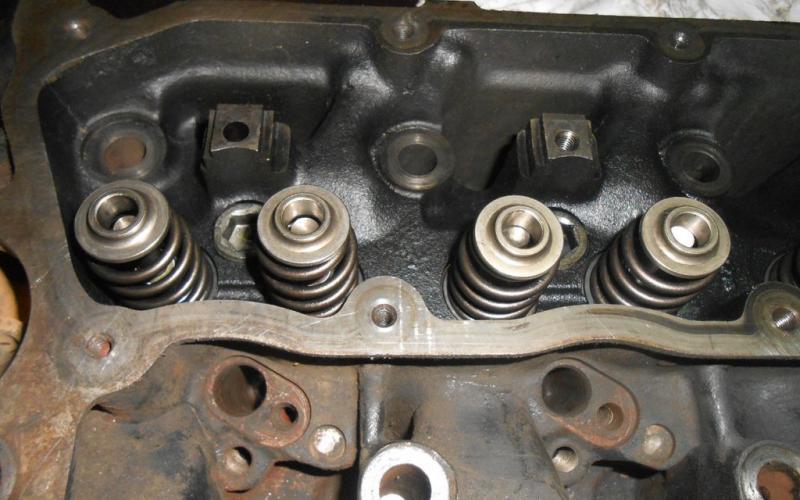
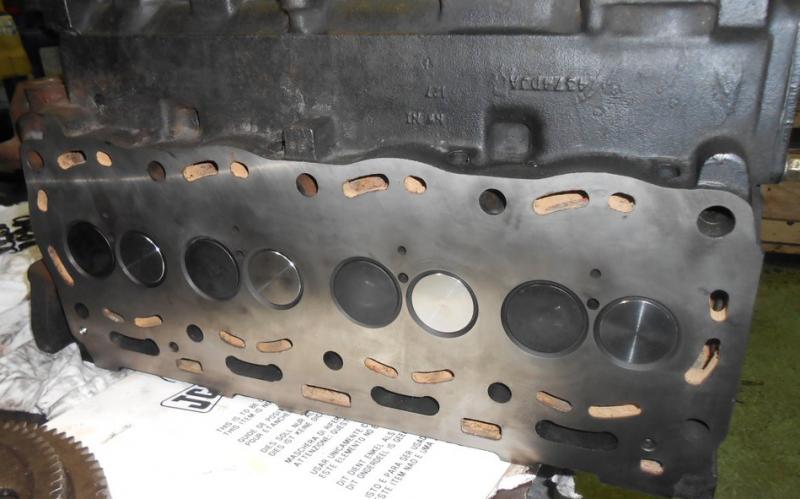
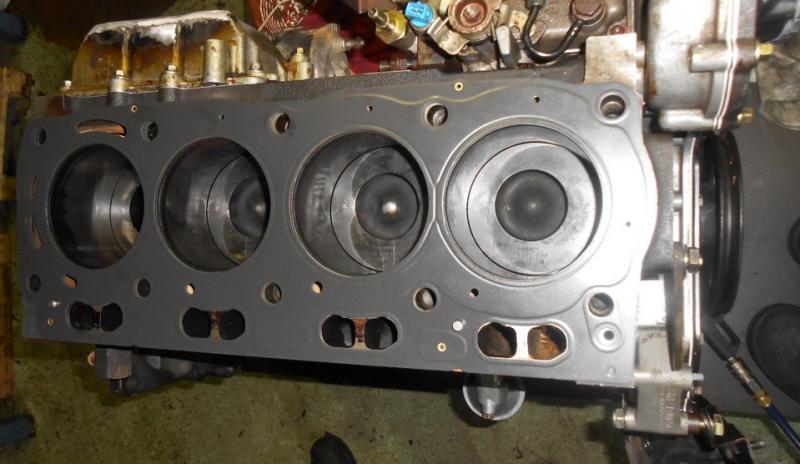
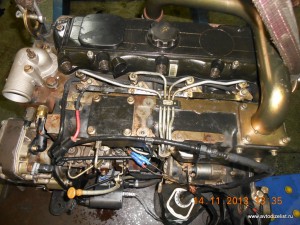
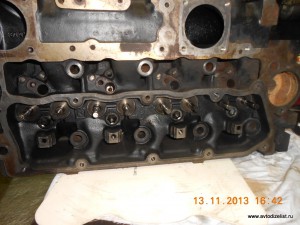
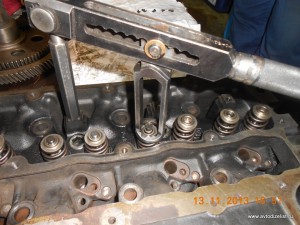
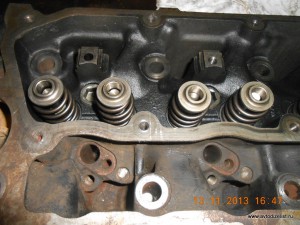
We put the gasket and mount the cylinder head.
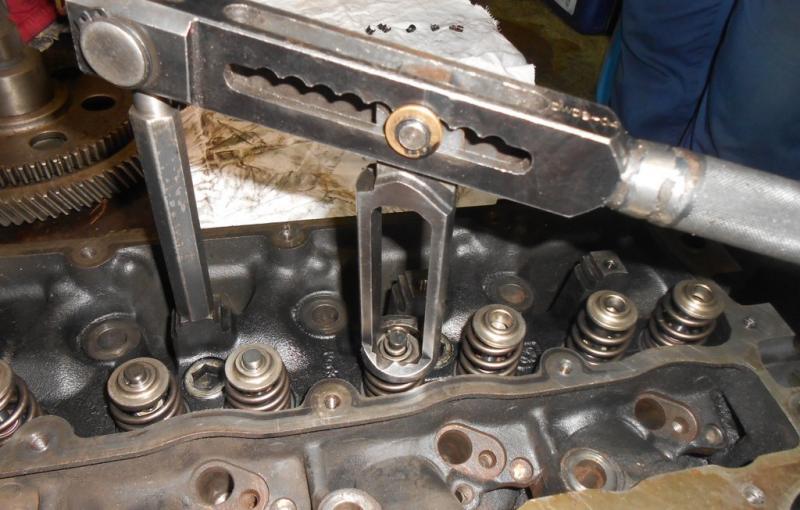
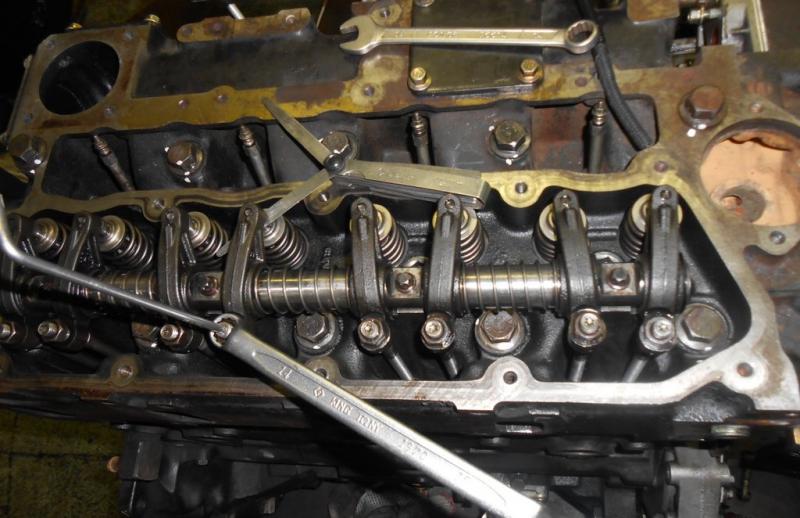
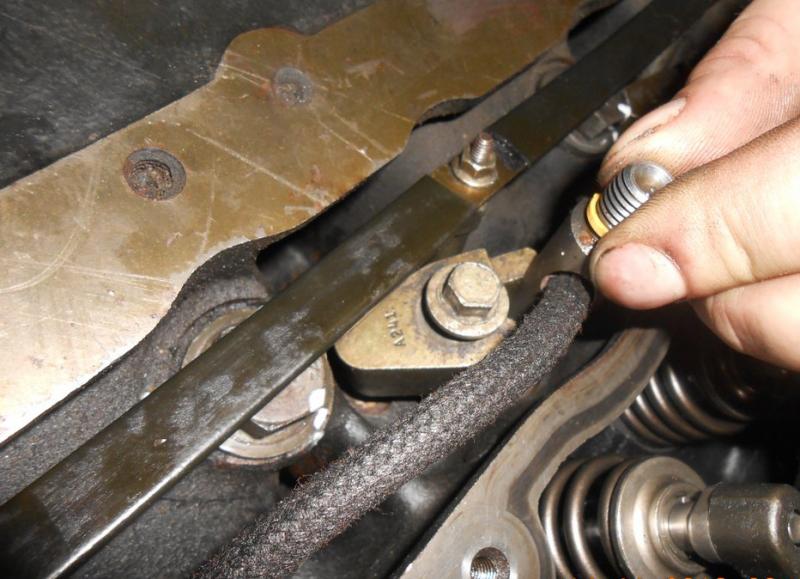
We install the rods, the axis of the rocker arms. We adjust the thermal clearance of the valves.
We install glow plugs, fuel injectors.
We fasten the attachments.
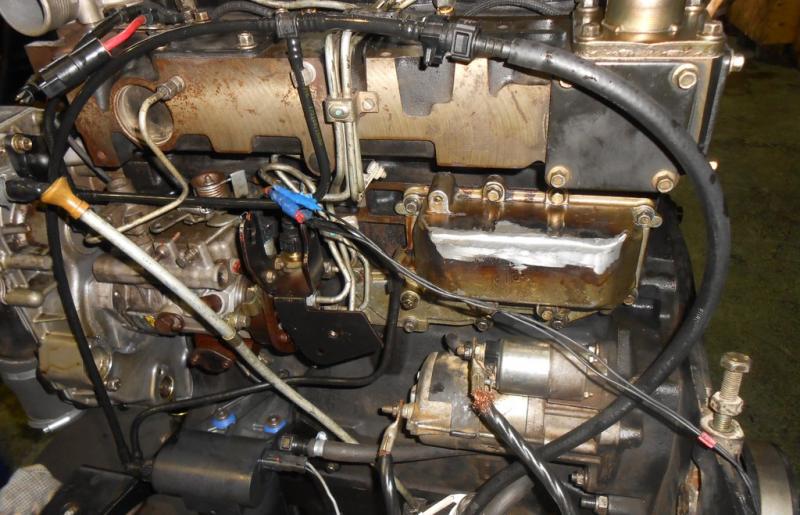
We connect the fuel lines, power the pumps, turn the starter. We measure the oil pressure in the system, pump the fuel equipment, make the first start.
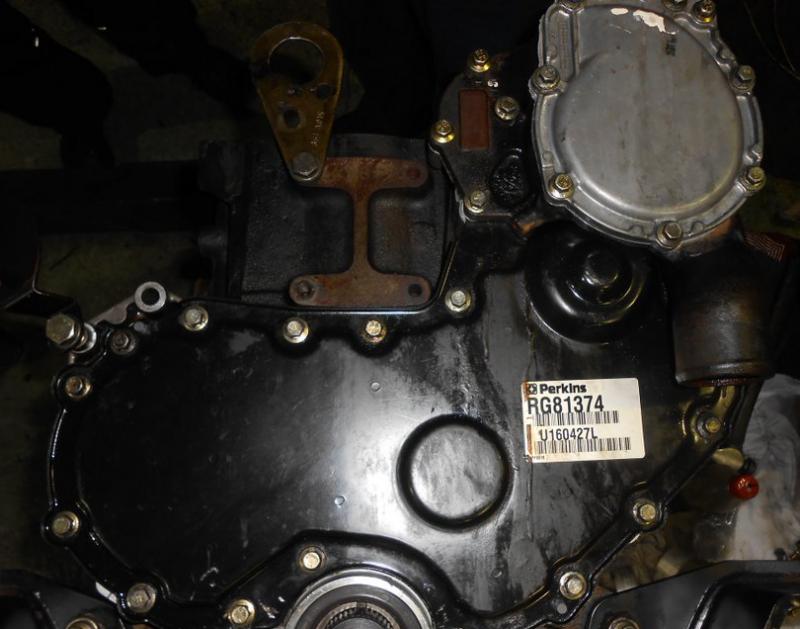
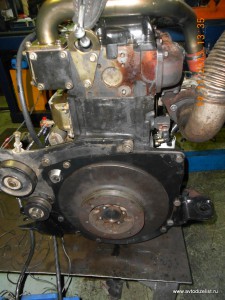
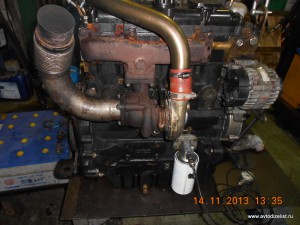
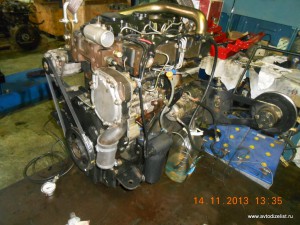
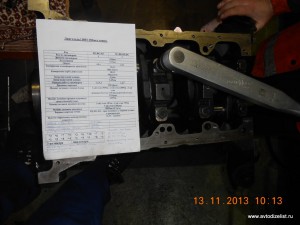
Photo report on the assembly of PERKINS 1104C-44T RG81374
One of the most common models of the PERKINS 1104 engine. This type of engine can be found on excavators and loaders such as VINIERI, TEREX, JCB, JON DEER, MANITOU, TVEX.
Let's start with the fact that the motor is disassembled, defective, washed.
We lubricate and install the valve lifters.
Once again we clean, wipe the crankshaft bed and install the main bearings. We smear the liners with oil, we put the crankshaft in the block.
Do not forget to lubricate and put the upper persistent half rings with grooves to the crankshaft.
We put the lower main bearing shells in the main bearing caps, smear it with oil, put the covers strictly in their places, lock to lock. It is important not to mix up the first and fifth cover.
The fifth lid has a characteristic tide.
We put a pair of lower persistent half-rings into the third cover and put them in the block.
Lubricate the mounting bolts with clean engine oil along the threads and under the head, tighten them according to the tightening torques card.
We check the smoothness and ease of rotation of the crankshaft after pulling each yoke, starting from the center.
Above the fifth yoke, we attach a bar - the lower support of the rear crankshaft oil seal.
We fill the joint cavity with sealant.
We mount the viton oil seal.
Next, we turn the block upside down, mount the gear block housing.
We set the axis of the parasitic gear so that the oil channels coincide.
We put the front pulley on the crankshaft, center the gear housing along the oil seal. Then we tighten the gear housing fasteners.
We put on the camshaft gear, set the shaft along the pin. The position corresponds to the TDC of the compression stroke in the first cylinder.
We set the crankshaft to the TDC position of the first cylinder, fix it with the second pin. We install the parasitic gear, check the positions of the shafts on the pins.

We put on the piston rings according to the instructions.
We put the lockless connecting rod bushings in their places.
It should be noted that the pistons have an angular bump that is oriented towards the front of the engine. The connecting rod has a convex bump, it should also be directed towards the front of the motor.
The connecting rod cover is also marked with a tide.
We tighten the piston rings with a mandrel.
We install pistons with connecting rods in the cylinders, it is important to control the movement of the connecting rod at the exit from the cylinder so as not to break the nose of the oil nozzle.
We close the connecting rod caps, tighten according to the moment map, check the smoothness and ease of rotation of the connecting rod bearings.
We will install the injection pump. The crankshaft with the camshaft is secured with pins. The injection pump shaft must be firmly clamped with a fixing bolt.

We tighten the fuel injection pump fasteners, pull the gear with the appropriate moment. We take out the pins, dissolve the stopper of the injection pump shaft. We close the front cover, attach the pump.
We mount the oil pump, close the oil pan, turn the engine over to its normal position.
We put the gasket and mount the cylinder head.


We install the rods, the axis of the rocker arms. We adjust the thermal clearance of the valves.
We install glow plugs, fuel injectors.
We fasten the attachments.
We connect the fuel lines, power the pumps, turn the starter. We measure the oil pressure in the system, pump the fuel equipment, make the first start.
So how did you get there?
a guess... Began to look at the glow plug, what did you see in the collector and the solarium liner? 
I disagree. Everyone must do their job.
Let's admit. I know a lot in theory, but in practice I am rather weak. A good seller of spare parts will quickly show you where and what, and he himself will start poking around, so he will sip grief. I know an excellent mechanic, but as an operator of his machines he is tough in his work (he spoiled a lot of cargo). Etc. etc.
Glad the problem was resolved 
I disagree. Everyone must do their job.
Let's admit. I know a lot in theory, but in practice I am rather weak. A good seller of spare parts will quickly show you where and what, and he himself will start poking around, so he will sip grief.I know an excellent mechanic, but as an operator of his machines he is tough in his work (he spoiled a lot of cargo). Etc. etc.
Glad the problem was resolved
Greetings!
So it’s good that there are different opinions.
I think so. We all communicate here and understand problems and jambs. In fact. we are not neighbors, so that we could call and figure it out with our own eyes and ponder. And if everything, i.e. the bulk of active members of the forum would be around, then I can't even imagine. the equipment would have time to be repaired. 
Vovikov is not familiar with the service by hearsay. It takes a long time to wait for the details, not less than a month, and sometimes it's a real grief to deal with the car. The unit itself is gorgeous. Have worked, . I have an idea, but as soon as possible, at least get into the loop. Brains are boiling and that's it. even cry. Worked only at idle or at the highest revs. They changed everything and called the mulion once. Even the electronics engineer was called. So they sold it over the hill. And in fact there was no work even 4 thousand. Fingers vaaasche did not rustle. Seagull was not an ex.
Everyone who can be drawn to a conversation when meeting at objects is definitely not indifferent to the komatsushka. And I didn't even breathe in their cabin. 
Company specialists Detroit-ST have accumulated extensive experience in the field of maintenance and overhaul of diesel engines. For more than 15 years, owners of various trucks and special equipment have been contacting us with requests for the repair of foreign-made engines, including the Perkins brand. Repair of engines of this brand requires special special knowledge and skills, and we are fully proficient in them. Our Perkins refurbishers continually update their skills in special theoretical and practical courses and successfully apply the acquired skills in practice, carrying out Perkins refurbishment for Detroit-ST customers. Our main pride during diesel engine overhaul Perkins (and other brands of foreign production) is an extended warranty for a period of 1 year or 2000 hours! You can make sure of the high qualifications of our company by following the links below.

In the line of internal combustion engines of this brand, there are units of the most different power, volume and purpose. You can read more about each series of motors in the Perkins Motors section. ICE repair is a rather complicated technological process. First of all, starting repair of the Perkins engine any model, our masters will familiarize themselves with the owner's complaints. Then the unit is pre-flushed using special equipment in its own repair shop. To begin the process of direct repair of the Perkins engine, the craftsmen disassemble it in strict accordance with the manufacturer's technological instructions. Already at this stage, experienced engineers notice most of the faults and understand which parts and assemblies need to be replaced or repaired. In our practice, we also use computer diagnostics of internal combustion engines for an accurate "diagnosis" of any unit. Then, the actual repair operations are carried out, the replacement of worn-out parts or their restoration, coordination of work with the customer. After the assembly stage of the repaired internal combustion engine, we will definitely run it in and paint the unit.
In our experience, engines that have been regularly serviced during their operation are generally quite infrequent in need of repair. Perkins is a fairly reputable company all over the world in the development and production of diesel engines for ships, industrial and construction equipment. Therefore, its engines, subject to the operating conditions, serve for a rather long time. But sooner or later, your technique, most likely, may need a major overhaul. repair of the Perkins engine... By contacting us for maintenance or overhaul of Perkins, you get a lot of bonuses at once. First, it is extended warranty for 1 year or 2000 hours of motor operation. Secondly, it is availability of many spare parts for internal combustion engines in our warehouse, which significantly reduces the repair time compared to competitors' terms.Thirdly, this is the use of only high-quality parts recommended for installation during the repair of Perkins by the manufacturer himself. Moreover, we are ready to offer you spare parts of both original production and cheaper analogs, but only approved by the manufacturer and tested by us in practice.
The company "Tradition-K" is the official dealer for the OEMD program of the PERKINS company. For several years, the company's service department has been providing a full range of services for the repair and maintenance of Perkins 1100 and 400 series engines:
During this time, our service center has overhauled more than 50 engines, while specialists often faced different degrees of wear and tear of internal combustion engine components.
As a rule, after troubleshooting the internal combustion engine, the client is provided with a detailed estimate for the repair, and almost always the client is surprised by the number of parts to be repaired or replaced.
Therefore, in this article, I would like to focus on the main causes of Perkins engine malfunctions. I hope that after studying the causes of breakdowns, our customers will have no doubts that timely scheduled maintenance is more profitable and more economical than an unexpected engine failure.
So, at the moment we have a certain statistics of engine failures for various reasons (out of 100% of all engine failures), let's look at each case in more detail.
As the diagram clearly demonstrates, approximately 80% of malfunctions and breakdowns of fuel equipment are caused by poor fuel quality.
The elementary presence of water and mechanical impurities in the fuel has a detrimental effect. The use of fuel with low lubricating properties inevitably leads to rapid wear of the injection pump parts and injectors.
The main symptoms of faults when using poor fuel:
- the main friction pairs are worn out (rotor-distributor, plungers, automatic advance switch, torque trimmer piston);
- the advance automaton is broken;
- the threaded part of the drive shaft is broken;
- nozzle needles have traces of sticking, wear.
A slightly smaller, but, nevertheless, noticeable percentage of breakdowns is caused by the use of low-quality oil.
It's no secret that properly selected oil according to the instructions prolongs the service life of the components and the engine as a whole.
Inappropriate savings, replacing the oil with cheaper analogues (Russian diesel fuel contains a large amount of sulfur) that do not meet the manufacturer's requirements lead to rapid oil oxidation, as a result, the resource and engine performance decrease.
The third important point that you cannot pass by is unwanted operating modes of the internal combustion engine, which also reduce the resource of its work.
For each technical device, there is an optimal operating temperature.
For example, the optimum temperature of the coolant is 85 - 90 degrees C. At the correct operating temperature, almost complete combustion of fuel occurs, the formation of carbon deposits on pistons, valves, and walls of the combustion chamber is minimized.
This achieves maximum engine power with minimum fuel consumption and emission compliance with environmental standards.
Thus, we get a high return at a low cost.
With a decrease in engine power, fuel consumption increases sharply.
At low oil temperatures, insufficient oil will be supplied to parts experiencing friction, leading to rapid component wear.
2. On the other hand, overheating of the engine also entails big problems up to thermal destruction of engine parts, burnout of pistons and valves.
With excessive heating of engine parts, in turn, the temperature of the air-fuel mixture rises, and the filling of the engine cylinders with the working mixture worsens.
Because of this, power and economic indicators fall, the oil "ages" faster, its viscosity decreases, and a precipitate appears quickly. The appearance of high-temperature deposits and soot is inevitable, up to the burnout of the block heads and loss of elasticity of the stuffing box seals.
The fuel also loses its viscosity, its lubricating properties deteriorate; the appearance of seizures leads to the rapid destruction of the fuel equipment.
When overheated, vapors of light fractions are formed in the fuel, which air the fuel system, which leads to engine malfunctions.
Incomplete combustion of fuel leads to increased carbon formation; unburned fuel washes off the oil film from the cylinder walls and enters the crankcase. Running the engine at low loads leads to the same problems as using it at low temperatures. 2. Continuous use of the motor under overload conditions will cause it to heat up, with all the ensuing circumstances.
So, after considering the statistics of the occurrence of breakdowns and malfunctions, the following recommendations can be formulated:
- Try to use the motors according to the manufacturer's recommendations, observe the correct temperature and load conditions.
- Pass inspection and diagnostics in a timely manner.
- If, nevertheless, there are problems, then our service center guarantees high-quality and fast service and repair of Perkins engines.
Perkins Engine Repair Kits - these are ready-made sets of spare parts required for repair work of one type or another. It is not only convenient, but also beneficial, because the total cost of purchasing the same spare parts separately will be higher, and it will take much longer.
Types of repair kits:
- Base. Includes pistons, rings, gaskets, oil seals and liners.
- Advanced. Includes basic kit + valve replacement kit.
- Specialized. Separate valve replacement kits, gasket kits, etc.
The Perkins Repair Kit is the most cost-effective way to purchase engine repair parts. The kit already contains everything you need, so you will not forget to order anything, which means you will not have to wait for individual spare parts, and the equipment will not stand idle too much time. In addition, you save on cost - spare parts purchased as a set are cheaper.
Register in the online store and get access to the online catalog, placing and paying for orders, discounts and regular promotions, order tracking.
Registration gives access to all the functions and capabilities of the online store - you can use catalogs, place an order, pay online, order delivery. After registration, you will receive a personal account where you can see the history of your orders, track the status of the current order, see your level of discounts and special offers for your equipment.
Repair Foton 1099 Perkins phazer 135ti
Good afternoon, please help with photon repair))
Interested in the following questions about the repair of Foton 1099 Perkins phazer 135ti:
1. Dimensions of the shaft (standard diameter of the main and connecting rod journals)
2. The size of the clearance between the piston and the liner.
3. Tightening torques of cylinder head bolts and tightening sequence
4. Tightening torques of the main and connecting rod journals.
5. Valve adjustment, what clearances and how it is done.
6. How the timing marks are installed.
Thanks in advance for your answers.)))
1. no one sharpens KV with us. this is not a rewarding occupation. the cement layer is removed and the shaft does not run for long.
2. The size of the clearance between the piston and the liner. also not a necessary parameter during a bulkhead, if the piston is not stuck and without scuffing, then it is good and they are all only of the first repair.
3. Tightening torques of the cylinder head bolts and the sequence of tightening. See the book Zil the bull. I pulled 200. If you put your head on a new pad, stretch it 2 times, the first time with an effort of 100, and the second 200.
4. Ibid. (See the book Zil the bull)
5.I do 0.25-0.45. according to the book 0.20-0.45
6. you have one mark on the HF, one on the RV, one on the pump gears and three on the parasitic. First you put KV, RV and the pump gear, then you combine these marks with a parasite, that is, all the marks should be opposite each other. it's hard to make a mistake there)))
The Perkins company has been producing engines since the thirties of the last century, and during this time has managed to gain popularity all over the world. The company, which started as a small workshop, has now grown into a global engine manufacturer.
Perkins engines, despite all their positive characteristics, sometimes require repair. Basically, the need for its implementation appears when the engine has been in operation for quite a long time, and the car with it has managed to wind many thousands of engine hours. Like all other parts of a car, Perkins engines can wear out - more precisely, there are usually some individual parts that wear out. By replacing them, you can extend the life of the engine and forget about repairs for a long time. To do this, you should contact experienced specialists who can confidently guarantee high quality service and the effectiveness of repairs. Such employees are on the staff of the Euroremdiesel service station. Each of them managed to gain more than ten years of experience, so the company vouches for the quality of the repair and gives guarantees on it.
The specialist can detect the following malfunctions:
- nozzles;
- fuel pump;
- fuel priming pump;
- turbines;
- starter;
- engine generator;
- water pump, etc.
Often these parts require replacement, as they wear out due to prolonged and intensive use. For replacement, Euroremdiesel offers its customers original spare parts from the manufacturer. Only such parts can ensure reliable long-term operation and the highest quality of repairs. Euroremdiesel offers original spare parts at reasonable prices, service station specialists can immediately install them. Thus, you can update the Perkins engine and significantly delay its overhaul.
Any Perkins repair begins with engine inspection and diagnostics. The specialists of "Euroremdiesel" can carry out these procedures both in the service station and in a place convenient for the customer - for example, in his own garage. For this purpose, in "Euroremdiesel" mobile teams work, which are engaged in computer and mechanical diagnostics, as well as repairs.
Among the main services of the service station for the repair of the Perkins engine:
- current repairs of any complexity;
- overhaul of the Perkins engine;
- complete engine bulkhead and analysis of its condition;
- identification of hidden faults;
- replacement of broken parts and parts with signs of severe wear;
- repair of cylinder head and turbines;
- repair of fuel equipment and cylinder blocks;
- grinding of crankshafts;
- restoration of camshafts, etc.
Troubleshooting is mandatory, in which the customer can participate. During troubleshooting, a specialist finds out the condition of the cylinder heads, checks the crankshaft, injectors and pumps. We repair diesel engines Perkins 400,800,1000,1100,1300,2300,2800,4000 series.
Such repair of a diesel engine includes the following work:
- Change of pistons for new sizes
- Cylinder boring
- Tuning and adjustment of all engine systems
- Valve replacement
- Grinding the crankshaft journals
- Assembly and installation of the power unit in the engine compartment
- Testing the engine, setting its parameters
Among other things, each engine supplied to Euroremdiesel for repairs is tested in its own workshop. After all the work is completed (this can take about 3 days if spare parts are available), a specialist goes to the customer to start the Perkins engine.
Prices for the services of Euroremdiesel specialists are among the lowest in the capital. For each client, the company calculates the total cost separately, since it directly depends on what kind of malfunctions the mechanics identified. The price of spare parts to be installed also plays a role.
Customers can monitor the entire repair process to ensure that it is effective.Engine repair warranty - 6 months or 12 months with maintenance from Euroremdiesel.


Repair manual, operator's manual for the Perkins engine (Workshop Manual)
No. 1199 Operator's manual. Engine Perkins 402D, 403D, 404D Industrial Engines
No. 78 Repair manual. Perkins 4.41 Series engine. Model LM (Workshop Manual)
No. 79 Repair manual. Perkins 100 Series engine. Models 102-05, 103-07, 103-10, 103-13, 103-15, 104-19, 104-22 (Workshop Manual)
No. 80 Repair manual. Perkins 400 Series engine. Models 403C-11, 403C-15, 404C-22, 404C-22T (Workshop Manual)
No. 81 Repair manual. Perkins 700 Series engine. Models UA, UB and UC (Workshop Manual)
No. 82 Repair manual. Perkins 800 Series Engine (Workshop Manual)
No. 83 Repair manual. Perkins 900 Series engine. Models 903.27, 903.27T (Workshop Manual)
No. 84 Repair manual. Perkins Phaser engine, 1000 Series. Models AA-AH, YA-YE (Workshop Manual)
No. 85 Repair manual. Perkins New 1000 Series engine. Models AJ-AS, YG-YK (Workshop Manual)
No. 86 Repair manual. Perkins Phaser engine, 1000 Series. Models Phaser 110T, 160T. Perkins 1001-4T, 1006-6 (Shop Manual)
No. 87 Repair manual. Engine Perkins 1006 Series (Workshop Manual)
No. 88 Repair manual. Engine Perkins 1100 Series, 4 cylinder engines. Models RE, RF, RH, RJ, RK (Workshop Manual)
No. 89 Repair manual. Engine Perkins 1103, 1104 Series (Workshop Manual)
No. 90 Repair manual. Perkins 1300 Series EDi engine. Models WK to WS (Workshop Manual)
No. 91 Repair manual. Perkins Peregrine and New Generation 1300 Series engine. NGD (Workshop Manual)
No. 92 Repair manual. Engine Perkins 2000 Series, 2000 Series Gas (Workshop Manual)
No. 93 Repair manual. Engine Perkins 2300 Series (Workshop Manual)
No. 94 Repair manual. Engine Perkins 2800 Series (Workshop Manual)
No. 95 Repair manual. Engine Perkins 3008, 3008 Series Gas (Workshop Manual)
No. 96 Repair manual. Engine Perkins 3012, 3012 Series Gas (Workshop Manual)
No. 97 Repair manual. Engine Perkins 4006, 4008 In-line Gas (Workshop Manual)
No. 362 Repair manual. Perkins 400 Series engine. Models HB, HD, HH, HL, HN, HP, HR
AA Four cylinder, naturally aspirated
AB Four cylinder, turbocharged
AC Four cylinder, compensated
AD Four cylinder, turbocharged Antercooled
YA Six cylinder, naturally aspirated
YB Six cylinder, turbocharged
YC Six cylinder, compensated
YD Six cylinder, turbocharged Antercooled
| Video (click to play). |
Spare parts catalogs for Perkins engines


