
In detail: Nexia's electric rear door window repair by hand from a real master for the site my.housecope.com.
1. Check the idle power window control key on the corresponding door (see "Passenger door power window control keys - check and replacement") or the control unit on the driver's door (see "Power window control unit - check and replacement").
2. Remove the door trim (see "Front door trim - removal and installation" or see "Rear door trim - removal and installation").
3. Peel off a part of the waterproof film to get to the power window gear motor.
4. Disconnect the block of the wiring harness of the motor gearbox of the power window of the front door ...
... or disconnect the wiring harness block from the rear door power window motor.
5. We connect the power window control key or the power window control unit (on the driver's door).
6. We connect the multimeter in voltmeter mode to the terminals of the power window harness block.
7. Turn on the ignition and measure the voltage with the power window control key pressed and raised. The voltage should be within 11-14 V. If there is no voltage, the electric power supply circuit of the power window is faulty (see "Checking and repairing electrical circuits").
When performing the following operation, connect the leads of the harness block to the battery for no more than 1-2 seconds. This time is quite enough to complete the check. Otherwise, the power window may be damaged.
8. With wire segments we connect one of the terminals of the power window wiring harness block to the negative terminal, and the second to the positive terminal of the battery (you can also use another voltage source, for example, a battery charger). A 30 A fuse must be cut into the piece of wire connecting the terminal of the wiring harness block with the positive terminal of the battery (see "Checking electrical consumers"), then reverse the polarity of the connection of the wires to the terminals of the block. A working power window will lower or raise the glass (depending on the polarity of the wires), if not, the power window must be replaced. If the fuse blows, there is a short circuit in the power window, it must also be replaced (see below).
| Video (click to play). |
The fastening of the button on the Nexia power window unit broke down, I decided to restore it with my own hands.
A couple of months ago, I noticed that when the driver's door glass was lowered, the window regulator button began to jam and somehow become skewed, and the glass spontaneously lowered or rose, even when you release the button.
Remove the door trim, then remove the power window control unit (ESP).
We carefully snap off the upper part of the ESP unit, 3 latches on each side, and remove the cover
Carefully cut off the remnants of the base of the broken ear, clean it with a file or sandpaper.
Using epoxy resin, glue the new eyelet in place of the old one. To make the eyelet fit exactly in its place, we pass the ballpoint pen rod through the rest of the button ears, thus centering the new eyelet
We are waiting for complete drying, install the ESP buttons on the site, assemble and install on the car.
We check the functionality, the buttons function flawlessly!
Has anyone had any problems with the button?
I have GL with a scythe and ESP from GLE
For some reason, I have a button on the driver's console that is responsible for the front passenger glass, sometimes, as if, it does not contact
You poke it up and down - it starts to grab and still lowers the glass
In this case, the button on the passenger door itself works with a bang
Disassembled the console - no traces of oxidation, breakage or short circuit. Everything is okay
It seems, however, there are still problems in the wiring, but you can track it down. The braid is long and goes through the block
Often the driver of a car can face such an unforeseen problem as a broken window regulator. This article will focus on the Daewoo Nexia car. The Daewoo Nexia power window control unit can fail for various reasons, and various troubleshooting methods will be highlighted below.
Window regulator for car
A window regulator is a device that can make life easier not only for the driver, but also for passengers. Thanks to him, you can raise and lower the glass as you wish. The device for correct operation must be installed in the door frame or in a subframe specially prepared for the window regulator.

Side door where the mechanism is located
The principle of operation is as follows. A mechanism is needed to raise and lower the glass. This drive mechanism integrates a gear unit (gear and worm gear) and an electric motor inside itself. The worm gear causes the wheel to rotate in only one direction.
The design of this mechanism, which raises and lowers the glass, can be of several types:
- Lever. It consists of a lever and a slider mounted on the end of the lever. To provoke the movement of the glass, an impulse from the drive is applied to the wheel and sector.
- Rack. The mechanism of this type consists of a toothed rack, which is not moving, and a plate, which is connected to the glass. It guides the movement of the glass.
- Rope. This type is characterized by the fact that it sets the glass in motion with the help of an elastic element - a cable, which is mounted in the door and fastened between the rollers.
Various models of Daewoo Nexia, released in different years, can be equipped with both mechanical and electric windows. If the first option is installed in the car, there should not be any special problems. In the case of an electric window regulator, everything is much more complicated (author - We Repair It By Ourselves).
Many drivers complain that cars of this brand have bad wiring, which is the reason for the failure of the mechanism. The problem is that over time they lose their elasticity and become rigid. If you accidentally bend such a wire, then it can easily be broken. This will break the copper wires inside the rubber. As a result, a short circuit may occur in the car, the result of which will be a blown fuse.
Broken wiring, which is protected by rubber, is one of the reasons for the failure of the power window. Check the wiring carefully. Copper is quite thin, albeit elastic. If you accidentally damage the wiring, the power window mechanism will fail.
Window regulator Garnet for Daewoo Nexia
After checking the copper wires, enclosed in one large wire - corrugation, you need to examine other vulnerable points that may be the cause of the malfunction. To do this, you will have to check the window regulator engine. If the glass seals are already out of order, rainwater or ordinary dirt could get into the engine, provoking metal corrosion.
In both the first and second options, it is important to check the wires, carefully inspect the collector brushes, as well as the adjusting screw. Perhaps the cause of the malfunction is that the screw is too tight and does not allow the mechanism to work.
The scheme of action for removing the device is as follows:
- First you need to remove the trim from the door.
- Lower the glass and unscrew all the bolts that secure it to the rail.
- After that, you need to unscrew the nuts that secure the power window.
- Disconnect the plug with wires from the motor.
- Then the rail on which the motor is fixed should be tried to be removed through the hole in the door without damage.
- First you need to get rid of the parts of the previous device. This can be done, as mentioned above, by drilling out the rivets.
- After that, you need to check how many holes there are for the new window regulator. If the holes are not enough, you will have to make them yourself with a drill.
- Next, you need to connect the wires together, as stated in the instructions.
- After that, you can return the engine of the new power window to its rightful place, and secure it with nuts.
How to install this mechanism on your car, the author of peling dot ru will tell you in the detailed instructions on the video.
Although now my GL has a panel with a tachometer, foglights, power steering, and now there are windows. From GL, only the door trims remained ... Sorry, I was distracted.
Before the May holidays, I bought myself a set of electric windows "Berkut" in UP.
The weather turned out to be extremely warm, so in the fresh air in the village we worked in a great mood!
Since opening the door, I decided to start noise and vibration isolation at the same time. I dedicated the rest of the first day to her:
There was such a door, so it took a lot of time to clean the anti-corrosion layer with white spirit, it took more than a liter for both doors
Next, glue a layer of vibra. If I did it again, I would first dismantle the old lift mechanism, then access to the inside of the door would be easier.
Add a layer of noise. By the way, it is convenient to cut it on a piece of plastic wrap that was glued to the door.
Next, we begin to dismantle the old mechanism by drilling out the rivets. It is very convenient with a 6.5 drill, especially since we will still need it in a short time.
We fix the new window regulator. With one hole, the manufacturers were wrong. I had to re-drill the hole. (Left hole)
With the right door it was even worse, there were no 2 right holes at all, I had to mark and drill. Drill 6.5
And finally, we fix the glass itself with the old bracket. Before that, the glass was in the upper position and was held by strips of adhesive tape. Everything seemed to go smoothly here.
It was the turn of the electrician. It took me longer than anything else. + took from the fuse 18, as it should be according to the scheme. For a long time I could not pull the contact out of the fuse box to attach the wire to it. Backlight from the rear window defogger button. The wiring that comes with the power windows just pleased me, the wires are long, everything is marked, even shrinkage is provided.
Well, the final part of the work:
As a result, everything opens and closes perfectly !! My son immediately demanded that I do the same thing back as well, so as not to twist the handles!
In the car, the speed is noticeably quieter. What will happen when there is a noise on the floor and on the back doors.
Difficulty: 1.
Lead time: 2 hours.
Withdrawal:
1. Place the vehicle securely on a level surface (see “Standard Operations”).
2. Raise the door glass up until it stops.
3. Remove the door trim (see “Front door trim - remove and install”).
4. We fix the glass in the seal with wooden wedges.
5. With an 8 mm drill, we drill the heads of two rivets securing the window lifter mechanism to the inner door panel.
6. Drill out the heads of the four rivets securing the guide.
7. Using a 10 socket wrench with a ratchet and an extension cord, unscrew the bolts securing the guide to the glass holder.
8. Through the opening in the inner wall of the door, remove the window regulator mechanism.
1. In the holes for the fastening rivets of the power window mechanism, cut a thread for the M6 bolts.
2. We install the window regulator mechanism in place, fix it on the inner wall of the door panel with bolts.
The rest of the parts removed during disassembly are installed in the reverse order.
THE SCISSOR LIFTS ARE GOOD IN PRINCIPLE, BUT IF IT IS LONGER WITHOUT ELEMENTARY LUBRICATION, IT CAN BE STRONGLY DEFORMED WHEN OPERATING, BENDING AND STOP RISING AND LOWERING.
REPAIR by simply VYPREMLYAEM SKI bracket, everything falls into place and estevstvenno silicone oil .ZAMENA Aerial occurs in stages, CAM Aerial FACTORY MOUNTED FOR DOORS WITH ALUMINUM KLOPOK, they need to be drilled out, AFTER pulled lifts, and secure NEW, YOU CAN ON BOLTS WITH NUTS, AND IT IS POSSIBLE ON RIVES, THERE IS NO SPECIAL DIFFERENCE.
Trapetsionnye LIFTS is similar to the Aerial FROM PRIOR OR 2110, the cause of failure is the refusal MOTOR, MOTOR BRUSH, PORVANY (ZAZHEVANY) TROS.REMONTU SUCH Aerial USUALLY DO NOT, REPLACE is the same drill dowel and change in the same manner as was DESCRIBED ABOVE.
ALSO INSTALLED ON NEXIA VARIOUS ELECTRIC LIFTS, "FORWARD", "SPALL", "POMEGRANATE", "GARANT"
ALL HAVE ITS ADVANTAGES AND DISADVANTAGES, BUT THE PREFERENCE IS GIVEN "FORWARD", ON SUCH LIFTS THE MOTOR TOGETHER WITH THE BRACKET FIXING TO THE GLASS WALKS UP AND DOWN IN JUNKING, JUNKING RUNNING.
LIFTS TO NEXIA ARE ALWAYS AVAILABLE, PRICE 1600 RUB. CHANGE 700 RUB WITHIN 30 MINUTES.
call 89372817000 Br-Gavs car repair shop
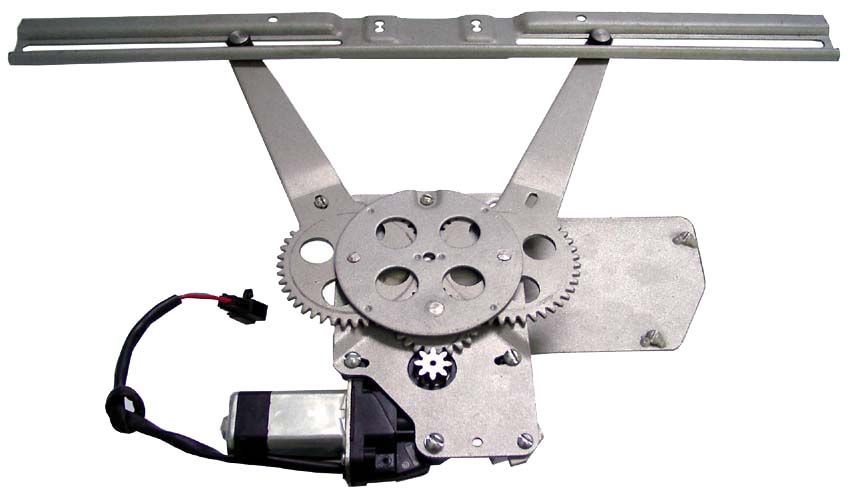
Daewoo Nexia 2008. REMOVING THE ELECTRIC WINDOWS OF THE FRONT DOOR NIKE
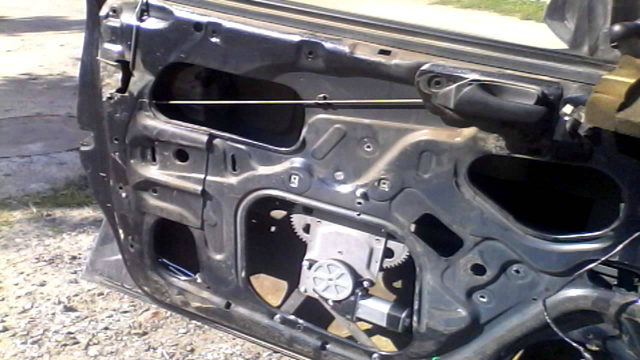
Remove the door trim (see "Removing the front door trim", page 237) and the protective film on the inner door panel.
We connect the power window mechanism switch and lower the glass until the glass fastening bolts are visible in the upper hole of the inner door panel. Disconnect the switch. Disconnect the negative wire terminal from the battery terminal.
Using the "10" head with an extension cord, unscrew the two bolts securing the glass holder to the window regulator slider.
Front door power window mechanism
FAN GM 
Group: Guests
Posts: 2865
Registration: 21.1.2008
From: Kiev, Vorzel-1
Auto: BUICK PARK AVENUE
Floor: 
So, dear nexiyavody, my driver's lift has broken. just took it and broke, i.e. glass went down, and back - well, not like .. At the same time, the motor itself hummed. I disassembled the door, removed the window regulator mechanism, and found out that I had a gearbox that worked as it should without load, but under load - well, I didn't want to raise the glass. The verdict is the replacement of the gearbox with the motor assembly. The issue price is UAH 337 (on Syretskaya). Further photos, let's go
We remove the door trim, remove the polyethylene insert (film), before that, we prudently put the glass in the middle position, unscrew the two bolts securing the guides to the glass, take out the glass (through the top) and see that the mechanism itself is riveted tightly to the door in 3 places, the motor itself with a gearbox (3 pieces), and a guide along which the glass travels from above (2 pieces) and from below (2 pieces). these rivets are drilled out elementary with a drill, 4-5 mm in diameter (not more). The rivets are soft - therefore they can be drilled easily. This is what we get after drilling
Next, we take out the ESP mechanism itself, together with the recorder, not forgetting to unfasten the 2-pin connector for the power supply of the motor, which is located next to the motor itself, here it is.
The gearbox is attached to the ESP mechanism with three bolts, under the cross, on m6, we also unscrew them and separate the mechanism from the gearbox. gearbox separately:
Then we take a similar one, only a new device, we screw it again instead of the old one
Installation of the ESP mechanism.
Since we drilled out the rivets at the time of removing the ESP, in order to re-fix the ESP mechanism, it is necessary in the ESP mechanism itself, in the places where the rivets are installed, to cut the thread, with a tap on m6, (I don’t remember the step), and then for fastening using short bolts for m6 with grovers all this is done very simply. This is what we end up with.
(in some places where the hand reached, the bolts were also locked with nuts)
After that, we insert the glass, as well as removed it - through the top, for this you have to pry off the outer seal of the side glass, combine the bottom of the glass with a movable support, fasten two fastening bolts, and adjust the position of the support - glass, according to the ease of its movement and the absence distortions when lowering raising.
Alas, I can’t upload the picture because our forum is not buggy.
Then we collect everything in the reverse order.
Shl. Put the pictures in order at the end, then only through the gallery, then - you can and so insert - I don't understand nifiga.
We continue to consider the electrical circuit of the domestic car Daewoo Nexia. Below are color-coded diagrams of components such as car horns, lights, direction indicators, hazard warning lights, warning buzzer, trunk lock, fuel valve, and a few others. The first part of the Daewoo Nexia electrical circuits is located here.
Wiring diagram of sound and light signals Daewoo nexia
E9 Automatic transmission range selector illumination lamp
E10 Front marker lamp (left)
E11 Front marker lamp (right)
E12 Lamp of a rear marker lamp (left)
E13 Lamp of a lantern of illumination of a license plate
E14 Lamp of a lantern of illumination of a license plate
E15 Lamp of the rear marker lamp (right)
KB Relay daytime running light
S9 Horn switch
Interior lighting, trunk lighting, cigarette lighter, car clock
E16 Backlight lamp (cigarette lighter)
E17 Backlight lamp (ashtray)
E18 Trunk lighting lamp
E18-1 Trunk lighting lamp (cars with a 5-door body)
E19 Interior lighting lamp
E49 Glove box illumination lamp
H2 Clock with digital indication
S10 Glove box light switch
S11 Trunk lighting switch (vehicles with 5 door body)
S12 Door light switch (right rear door)
S13 Door light switch (left rear door)
S14 Door light switch (right front door)
S15 Door light switch (left front door)
Brake lights, reverse, SBG
E20 Stop lamp (left)
E20-1 Lamp of the central high stop-light (cars with 3 and 5-door body)
E21 Brake light bulb (right)
E22 Reversing lamp (left)
E23 Reversing lamp (right)
S2 Park / Neutral Switch (3-Speed Automatic Transmission)
S2-1 Park / Neutral Switch (4-Speed Automatic Transmission)
S16 Brake light switch (mechanical manual transmission)
S17 Brake light switch (3-speed automatic transmission)
S18 Reversing light switch (manual transmission)
XI Diagnostic connector
Y4 EMC lock-up torque converter
Direction indicators, Daewoo Nexia hazard warning lights
E24 Alarm indicator
E25 Side turn signal lamp (left)
E26 Turn signal lamp (rear left)
E27 Turn signal lamp (front left)
E28 Indicator lamp (front right)
E29 Turn signal lamp (rear right)
E30 Lamp side direction indicator (right)
K8 Turn signal relay
S 19 Alarm switch
S20 Turn signal switch
Warning Buzzer, Trunk Lock, Vehicle Fuel Valve
K9 Warning buzzer
521 Trunk lock switch
522 Fuel valve switch
S37 Seat belt switch
Y5-1 EMK of the trunk lock (cars with a 30 and 5-door body)
Y5 Fuel tank
Rear window heater circuit Daewoo nexia
E31 Illumination lamp for the rear window heater switch
E32 Indicator lamp for turning on the rear window heater
K10 Relay timer for electric rear window heater
R11 Heated rear window
S23 Rear window defroster switch
Windshield wiper, car radio Daewoo
K11 Windshield wiper relay
K12 Windscreen washer pump relay (vehicles with 3 and 5-door bodies)
K13 Rear wiper relay (vehicles with 3 and 5-door bodies)
M6 Windscreen washer pump motor
M7 Wiper motor
M8 Windscreen washer motor (vehicles with 3 and 5-door bodies)
M9 Rear wiper motor (vehicles with 3 and 5-door bodies)
M10 Antenna with electric drive R4 Switch for operating modes of the wiper
R4 Wiper mode switch
S24 Windshield washer switch
S25 Wiper switch S25-1 Rear wiper switch (vehicles with 3 and 5-door bodies)
H3 Loudspeaker front left
H4 Loudspeaker rear left
H5 Loudspeaker front right
H8 Loudspeaker rear right
Power windows, central locking
M10 Power window motor (front left)
M12 Power window motor (front right)
M13 Power window motor (rear left)
M14 Power window motor (rear right)
M19 Electric motor right front
M20 Electric motor right rear
M21 Electric motor left rear
S26 Power window main switch
S27 Central locking switch
S37 Power window switch (front right)
S38 Power window switch (rear left)
S38 Power window switch (rear right)
S39 Power window switch (front left)
Dashboard Daewoo nexia
E34 Airbag malfunction indicator
E35 ABS malfunction indicator
E36 Minimum fuel supply warning lamp
E37 Oil pressure drop indicator
E38 Engine system malfunction indicator
E39 Indicator for the parking brake and the drop in the brake fluid level
E40 High beam indicator
E41 Washer fluid level drop indicator
E42 Turn signal indicator
E43 Signaling door open
E44 Seat belt not fastened warning lamp
E46 Dashboard illumination lamp
H9 Fuel level indicator
Zh1 Coolant temperature gauge
R5 Fuel level sensor in the tank
R6 Coolant temperature sensor
R7 Window washer fluid level indicator switch
S43 Switch (4-speed automatic transmission)
Air conditioner, electric fan, blower
F48 Air conditioner switch illumination lamps
K21 Electric fan relay (high speed)
K22 Electric fan relay (low speed)
K23 Air conditioning compressor relay
K24 Blower motor relay
K25 Electric motor (optional)
M26 Electric motor
M27 Blower motor
R10 Blower motor resistor
R11 Fan motor resistor (low speed)
532 Fan switch
533 Radiator temperature relay
534 Low pressure switch
535 high pressure switch
536 air conditioner switch
Y1 Air conditioning compressor
Y10 Solenoid for recirculation mode activation.
Daewoo Nexia Owners Club
28 Mar 2009 Saturday, 03:54:11 PM
28 March 2009 Saturday, 09:58:40 PM
30 Mar 2009 Monday, 09:23:27 PM
30 Mar 2009 Monday, 10:49:26 PM
13 Aug 2009 Thursday, 12:00:00
13 Aug 2009 Thursday, 04:05:28 PM
13 Aug 2009 Thursday, 23: 37: 20
A disease with a crookedly rising glass is treated very simply (from the experience of working with ubeks * no offense to ubeks *)!
Step once you take / buy WD40
Step two push the glass down all the way
Step three, you begin to pour WD40 abundantly inside the rubber bands along the edges of the glass in order to properly lubricate them and voila, it flows upward like clockwork 
Shl If you repeat the diff, perform all the above actions again!
In general, there is no such thing in the car that could not be fixed with a roll of electrical tape and WD40!
If something should not move but moves - Insulating tape
If something is not moving but should be moving - WD40
14 Aug 2009 Friday, 12: 46: 39
The glass of the passenger door gave way a bit, it was cured in this way 
Also today, the driver's door power window control unit has been repaired. It can be disassembled by latches, soldered with a soldering iron, ringing and repairing is quite simple
I have a contact in one of the two contactors of the right passenger door stuck to the closing of the glass. After disassembly, the contacts are polished and everything works like a clock. The only thing I encountered is to solder the contacts of the board well, which is under the contactors of the rear doors, until I rang it twice, I wore it in the office and back to the typewriter to check
.
22 Sep 2011 Thursday, 09:41:20 PM
22 Sep 2011 Thursday, 22:34:46
22 Sep 2011 Thursday, 22:42:22
23 Sep 2011 Friday, 06:50:03
27 Apr 2012 Friday, 11:36:47 PM
28 Apr 2012 Saturday, 09:07:27 AM
30 Apr 2012 Monday, 17:53:53
I want to stick an ESP on the front. Tell me where to connect + to power the ESP (it is also desirable where to look for this place)? Consumption current is approximately 5A.
In theory, it is necessary for the ESP to work after turning the key, where can I find a wire that can withstand the load?
10 Jul 2012 Tuesday, 11:48:17 PM
I put the ESP "Granat" to work with gluing the doors with vibra, alteration of the ESP connector (they did not correctly pinout at the factory), a small adjustment of the mechanisms, the insertion of the button - it took 8 hours. Everything was done slowly.
I took the power from the F16 fuse (power supply of the standard ESP), for some reason I had it plugged in and power was supplied to it normally in the GL configuration.
The amount spent (not counting the vibroplast in the door) - 2300 rubles + consumables for little things
Despite the fact that Ksenia as a whole is a very reliable and hardy car, there are places in it that can hardly be called pornography, one of which is just power windows. I will not now list the entire list of complaints against them - each of them is a separate topic, many of which have been discussed many times, I want to dwell on the control unit in detail. I got the car with completely faulty windows, when buying, I only made sure that their drives were working, I decided that there would be enough hands to return them to their normal state.
And there were enough hands, which I cannot say about the time: it was enough to restore the device on the driver's door according to the scheme, if only it would somehow work, at the same time I transferred control to the only live button of the rear door. It was winter and there was no need to open the windows, but winter ended abruptly, the heat began, and the last button became unusable, which made me pay attention to such an important de ...
Despite the fact that Ksenia as a whole is a very reliable and hardy car, there are places in it that can hardly be called pornography, one of which is just power windows. I will not now list the entire list of complaints against them - each of them is a separate topic, many of which have been discussed many times, I want to dwell on the control unit in detail. I got the car with completely faulty windows, when buying, I only made sure that their drives were working, I decided that there would be enough hands to return them to their normal state.
And there were enough hands, which I cannot say about the time: it was enough to restore the device on the driver's door according to the scheme, if only it would somehow work, at the same time I transferred control to the only live button of the rear door. It was winter and there was no need to open the windows, but winter ended abruptly, the heat began, and the last button became unusable, which forced me to pay attention to such an important device. I originally wanted to replace the whole block, but the inner toad was against (
1300-1500r) and I got down to work, starting with a search on the Internet for information about at least the expediency of the venture.It turns out that labor can be fully justified and there is even a detailed instruction (
). The instruction is quite comprehensive, there is nothing special to add to it, but there are very little subtleties that spoil the whole picture. Dismantling Let's start small: without a powerful (40W is indicated in the instructions) soldering iron, you don't even have to try to do something.
Massive metal plates inside the plastic perfectly dissipate heat, as a result of which the solder melts for a long time, turns into mush and quickly hardens, making it difficult to dismantle the switch. If you have a powerful soldering iron, it's too early to rejoice: there are six contacts, you won't have time to heat everything up at the same time to remove the switch, and if you try to pull with brute force, you can melt the case and displace the contact pads so that it will most likely not be possible to put them back in place. Soldering station owners know what to do, the rest will need a solder suction pump.
We heat the soldering points well and carefully select all the solder from each leg, intermittently, allowing the switch body to cool down. We disassemble and defect So, the switch is sealed. This is a common mikrik that can be found in various automatics in low-current control circuits. CONTROL and LOW-CURRENT, but not executive, from the current in which at the peak load (we are trying to raise the fully raised glass) everything that is possible sags! This is an important point, but more on that later. On the contacts, we will definitely see a large amount of carbon deposits, as well as shells and solders.
It should be noted that if the top contact is covered with carbon deposits to such a state that it does not pass current, then the additional block on the corresponding door will not work either, this is a design feature. So if the glass does not move from a single button, this does not mean that the drive has died. It is also worth paying attention to the stiffness of the spring. From strong heating, the spring may lose its elasticity and will not be able to press the contacts with the proper force, such a spring for replacement is useless to bend, as well as contacts with deep shells. Repair. We remove all contacts with a file to perfectly even, if possible, we polish, so the effect will last longer.
It is important that the surfaces of the movable and fixed contacts adjoin each other with the entire area without distortions, it may be necessary to bend the fixed contacts for this. You can check the area of contact with a piece of carbon paper. With a small contact area, the contacts will quickly burn out and all repairs will go down the drain. If any part of the switch cannot be repaired, there are two options:
1.
Donate a button on the central block. In this case, in order for the button on the door to work, at the place of the donor switch, jumpers must be soldered between the extreme (along the movement of the button lever) pads. 2. Of the three door buttons, select the one that is in the worst condition and disassemble it for parts
(there is exactly the same mikrik as in the central block), and instead buy a new one. (I chose this option)
After stripping and fitting, the switch can be assembled and soldered to its rightful place, without forgetting to check it first.
If you chose the second option, but you don’t want to buy a new button yet or at all (the driver’s one works and that’s enough!), Then you need to make a plug from the old button on the passenger door (it won’t work without it):
We just solder the jumpers as in the photo and assemble. Fly in the ointment So we repaired the block and it seems like we should be happy, the author of the instructions claims that the block will last at least three years. But not everything is as simple as it seems. What have we got? The most important thing is that we cleaned off the silver dusting from the contact (otherwise, nothing else - the shell), which should have prevented it from burning, and exposed the copper.Firstly, copper burns much faster than silver, and secondly, copper still oxidizes very quickly, especially in humid air, which leads to an increase in resistance, more heating and faster burning (hello autumn, goodbye to ESP!).
About Chinese blocks I was lucky, my car has a Chinese central ESP block. What is the difference? Yes, there is not much of it, except for a small detail:
To the left is a contact from a mikrik from the original block, to the right - from a Chinese one. As we can see, the original block has a contact pad, the Chinese does not have it, just a bent plate. This means that it is difficult to achieve perfect contact of contacts, and in large-scale production it is almost impossible. In addition, on the Chinese contact, there was originally some kind of pornography instead of silver plating.
Of course, this is just a backlight, but for such a layout it would be nice for the author to tear something off and stick it back in the same way. Solution If everything is so bad with the repair, then why is it needed? Needed! To begin with, if you want, you can try galvanic silvering, if you have the necessary reagents, there is nothing complicated, you can do it even better than before (I didn't bother so much). The contact spring has a very small smallest cross-sectional area and the load is very large. Almost all springs have traces of overheating, and if you touch the micric after a couple of lowering and raising the glass, you can notice a noticeable heating.
Heating can be so strong that the plastic melts under the middle contact. In addition, when the contacts are closed, a powerful spark jumps, which is the more powerful, the stronger the carbon deposits on the contacts and the smaller the contact area, it then leads to the formation of surface defects. This is explained by the fact that for mikriks of this design, the permissible current usually does not exceed 1-2A, not only does the current noticeably exceed this value, but also the inductance of the motor contributes.
The universal solution is decoupling two via a relay. In this case, only current flows through the micrik to power the relay winding, and the motor is powered through the contacts of one of these relays. One relay goes up, the other goes down. Such a decoupling will allow both to significantly extend the life of the restored unit (even if the contacts sour a little - the relay will turn on without consequences, there will be no new shells, because the current is small), and to make the new unit practically eternal.
Specifically, I'll write about the relay a little later, now I'm choosing what to do everything from and I'm waiting for an opportunity to do it. Hope the review was helpful. Cm.
Electrical schematic diagram of electric windows, central electric lock Daewoo Nexia (Daewoo Nexia) 94 onwards
L1 - Ignition coil
V1 Diode
H5 Loudspeaker front right
H8 Loudspeaker rear right
M1 Starter
M2 Idle valve (KXX)
MH Fuel pump motor
М4 Left headlight adjuster motor
M5 Right headlight adjuster motor
M6 Washer pump motor
M7 Wiper motor
М8 Windscreen washer motor (vehicles with 3 and 5-door bodies)
M9 Rear wiper motor (3- and 5-door vehicles)
M10 Motorized aerial R4 Wiper mode switch
S1 Egnition lock
S2 Park / Neutral Switch (3-Speed Automatic Transmission)
S2-1 Park / Neutral Switch (4-Speed Automatic Transmission)
S3 Brake light switch
S4 Oil pressure switch
S5 Right switch
S6 Headlight switch
S7 Front fog lamp switch
S8 Rear fog light switch
S9 Horn switch
S10 Glove box light switch
S11 Trunk lighting switch (vehicles with 5 door body)
S12 Door light switch (right rear door)
S13 Door light switch (left rear door)
S14 Door Light Switch (Right Front Door)
S15 Door light switch (left front door)
S16 Brake light switch (manual transmission)
S17 Brake Light Switch (3-Speed Automatic Transmission)
S18 Reversing light switch (manual transmission)
| Video (click to play). |
S19 Alarm switch
S20 Turn signal switch
S21 Trunk lock switch
S22 Fuel valve switch
S23 Heated rear window switch
S24 Windscreen washer switch
S25 Wiper switch
S25-1 Rear wiper switch (vehicles with 3 and 5-door bodies)
S26 Power window main switch
S27 Central locking switch
S28 Brake fluid level drop relay
S29 Parking brake switch
S31 Seat belt switch
S32 Fan switch
S33 Radiator temperature switch
S34 Low pressure switch
S35 High pressure switch
S36 Air conditioner switch
S37 Power window switch (front right)
S38 Power window switch (rear left)
S38 Power window switch (rear right)
S39 Power window switch (front left)


