In detail: LED flashlight rechargeable do-it-yourself repair from a real master for the site my.housecope.com.
The Chinese have learned how to make consumer goods and, in particular, flashlights. There is no such abundance of shapes, sizes, colors, perhaps, in any other group of products. There are at least five of them at home, but I bought another one. And not at all out of curiosity, I looked at it and my imagination drew a picture of how in the dark I turn on the side panel, attach it with the end part with a magnet to a metal garage door, and open the locks in the light, with my hands not busy. Service - "five stars"! But it was proposed to buy a lantern in a non-working condition.
- 6 LEDs (3 in reflector + 3 in side panel)
- 2 operating modes
- built-in memory
- magnet for fastening
- dimensions: 11x5x5 cm
Outwardly, an absolutely serviceable and attractive product did not create a luminous flux. Well, is it possible that such a wonderful thing was absolutely useless for nothing? This model was in a single copy, but the electronics lover in me "broadcast" that everything is surmountable.
The wire came off when the case was opened, but the plastic was already scorched and suggested that the electronic components of the charger circuit were burnt, and the battery could be quite serviceable.
And I started checking with it. The voltmeter showed the voltage at the terminals equal to one volt. Having already had some experience of dealing with such batteries, he began by opening the upper safety bar on it, removed the rubber caps, refilled each "jar" with one cube of distilled water and put it on charge. Charging voltage 12 V, current 50 mA.
Charging in high voltage mode (instead of the standard 4.7 V) lasted two hours, more than 4 volts were available.
| Video (click to play). |
Since the battery is serviceable, then it needs a charger assembled according to a more decent scheme and on more reliable electronic components than from a Chinese manufacturer, in which the input resistor "burned out", one of the two 1N4007 diodes of the rectifier was broken and smoked when turned on The charger is a resistor for the LED. First of all, you need a reliable capacitor of at least 400 volts, a diode bridge and a suitable zener diode at the output.
The compiled circuit showed its performance, a capacitor with a capacity of 1 μF and 400 V found MBGO (much more reliable and fits well into the intended case), the diode bridge is assembled from 4 pieces of 1N4007 diodes, the zener diode took the first imported one for testing (the stabilization voltage was determined by the prefix to multimeter, but its name could not be read).
Further, the circuit was assembled by soldering and used to produce a normal charge cycle of a previously discharged battery (milliammeter with a shunt, so in reality a complete deflection of the arrow occurs at a current of 50 mA). The zener diode is already used with a stabilization voltage of 5 V.
Printed circuit board for the final assembly of the charger with dimensions for the cell phone charging case. There is no better case here.
View of a really assembled, workable board. The capacitor body is glued to the board with “master” glue. But I was too lazy to poison the scarf, I blame, I accidentally found myself at hand a used one of practically the right size and this circumstance decided everything.
But I was not too lazy to replace the information sticker on the charging case. With a fully charged battery, in the dark, the side panel quite decently illuminates a room of 10 square meters. meters, and the light from the headlamp reflector makes objects clearly visible at a distance of up to 10 meters.
In the future, I propose to choose a more reliable and powerful battery for the flashlight. Posted by Babay from Barnaula.
Let's take a rechargeable flashlight from DiK, Lux or Cosmos as a sample (see photo). This pocket flashlight is compact, comfortable in the hand and has a fairly large reflector - 55.8 mm in diameter, the LED matrix of which has 5 white LEDs, which provides a good and large illumination spot.
In addition, the shape of the flashlight is familiar to everyone, and to many from childhood, in one word - a brand. The charger is located inside the flashlight itself, you just need to remove the cover from the back and plug it into an outlet. But, nothing stands still, and this design of the flashlight has also undergone changes, especially its internal filling. The latest model at the moment is DIK AN 0-005 (or DiK-5 EURO).
Earlier versions - DIK AN 0-002 and DIK AN 0-003 differ in that they contained disk batteries (3 pcs), Ni-Cd series D-025 and D-026, with a capacity of 250 mA / hour, or models АН 0-003 - assembly of newer D-026D batteries with a higher capacity, 320 mA / h and incandescent bulbs for 3.5 or 2.5 V, with a current consumption of 150 and 260 mA, respectively. The LED, for comparison, consumes about 10 mA and even a matrix of 5 pieces is 50 mA.
Of course, with such characteristics, the flashlight could not shine for a long time, its maximum was enough for 1 hour, especially the first models.
What is it about the latest model of DIK AN 0-005 flashlight?
Well, firstly - an LED matrix of 5 LEDs, as opposed to 3 or incandescent bulbs, which gives much more light with a lower current consumption, and secondly - in the flashlight there is only 1 finger modern Ni-MH battery for 1.2 -1.5 V and a capacity from 1000 to 2700 mAh.
Some may ask, how can a 1.2 V finger battery "light up" the LEDs, because they need about 3.5 V to shine brightly? For this reason, in earlier models, 3 batteries were installed in series and received 3.6 V.
But, here I don't know who was the first to invent, the Chinese or someone else, to make a voltage converter (multiplier) from 1.2 V to 3.5 V. The circuit is simple, in Chinese flashlights these are just 2 parts - a resistor and a radio component similar for a transistor marked - 8122 or 8116, or SS510, or SK5B. SS510 is a Schottky diode.
Such a flashlight shines well, brightly, and that is not unimportant - for a long time, and the charge-discharge cycles are not 150, as in previous models, but much more, which increases the service life at times. But!! In order for the LED flashlight to serve for a long time, you need to plug it into a 220 V outlet when it is off! If this rule is not adhered to, then when charging, you can easily burn out the Schottky diode (SS510), and often LEDs at the same time.
I once had to repair a DIK AN 0-005 flashlight. I do not know exactly what caused it to fail, but I assume that they plugged it into an outlet and forgot it for several days, although according to the passport it is necessary to charge no more than 20 hours. In short, the battery failed, flowed, and 3 LEDs out of 5 burned out, plus the converter (diode) also stopped working.
I had a 2700 mAh finger battery, it was left from an old camera, LEDs too, but finding a part - SS510 (Schottky diode) turned out to be problematic. This LED flashlight is most likely of Chinese origin, and such a part can probably only be bought there. And then I decided to blind the voltage converter from those parts that are, i.e. from domestic: transistor KT315 or KT815, high-frequency transformer and others (see diagram).
The circuit is not new, it has existed for a long time, I only used it in this flashlight. True, instead of 2 radio components, like the Chinese, I got 3, but gratis.
The electrical circuit, as you can see, is an elementary, the most difficult thing is to wind the HF transformer on a ferrite ring. The ring can be used from an old switching power supply, from a computer, or from an energy-saving non-working light bulb (see.Photo).
The outer diameter of the ferrite ring is 10-15 mm, the thickness is approximately 3-4 mm. It is necessary to wind 2 windings of 30 turns with a wire of 0.2-0.3 mm, that is, we wind first 30 turns, then we make a branch from the middle and another 30. If you take the ferrite ring from the board of a fluorescent lamp - it is better to use 2 pieces, fold them together. On one ring, the circuit will also work, but the glow will be weaker.
I compared 2 flashlights for a glow, the original (Chinese) and converted according to the above scheme - I almost did not see any differences in brightness. The converter, by the way, can be inserted not only into a rechargeable flashlight, but also into a regular one, which runs on batteries, then it will be possible to power it from just 1 battery of 1.5 V.
The charger circuit of the flashlight has hardly changed, with the exception of the denominations of some parts. The charging current is approximately 25 mA. When charging, the flashlight must be turned off! And do not turn on the switch while charging, since the charging voltage is more than 2 times higher than the battery voltage, and if it goes to the converter and increases, the LEDs will have to be partially or completely changed.
In principle, according to the above scheme, an LED flashlight can be easily made with your own hands, by mounting it, for example, in the case of some old, even the most ancient flashlight, or you can make the case yourself.
And in order not to change the structure of the switch of the old flashlight, where a small incandescent light bulb of 2.5-3.5 V was used, you need to break the already burnt out light bulb and solder 3-4 white LEDs to the base, instead of a glass bulb.
And also, for charging, mount the connector under the power cord, from an old printer or receiver. But, I want to draw your attention, if the body of the flashlight is metal - do not mount the charger there, but make it portable, i.e. separately. It is not at all difficult to remove the finger battery from the flashlight and insert it into the charger. And don't forget to isolate everything well! Especially in those places where there is a voltage of 220 V.
I think that after the alteration, the old flashlight will serve you for more than one year.

How to fix your LED Chinese pocket flashlight yourself. DIY LED lights repair instructions with visual photos and videos
Today we are going to talk about how to fix an LED Chinese pocket flashlight by yourself. We will also consider instructions for repairing LED lights with our own hands with visual photos and videos
As you can see, the scheme is simple. The main elements: a current-limiting capacitor, a rectifier diode bridge on four diodes, a battery, a switch, super-bright LEDs, a flashlight battery charging indication LED.
Well, now, in order, about the purpose of all the elements in the flashlight.
Current limiting capacitor. It is designed to limit the charging current of the battery. Its capacity may vary for each type of flashlight. A non-polar mica capacitor is used. The operating voltage must be at least 250 volts. In the circuit, it must be shunted, as shown, with a resistor. It serves to discharge the capacitor after you unplug the flashlight from the charger. Otherwise, you could get an electric shock if you accidentally touch the 220 volt mains terminals of the flashlight. The resistance of this resistor must be at least 500 kOhm.
The rectifier bridge is assembled on silicon diodes with a reverse voltage of at least 300 volts.
A simple red or green LED is used to indicate that the flashlight battery is charging. It is connected in parallel with one of the rectifier bridge diodes. True, in the diagram, I forgot to indicate the resistor connected in series with this LED.
It makes no sense to talk about the rest of the elements, so everything should be clear anyway.
I would like to draw your attention to the main points of repairing an LED flashlight. Consider the main malfunctions and how to fix them.
1. The flashlight stopped shining.There are not so many options here. The reason may be the failure of super-bright LEDs. This can happen, for example, in the following case. You put the flashlight on charge and accidentally turned on the switch. In this case, a sharp current surge will occur and one or more diodes of the rectifier bridge may be punctured. And behind them, the capacitor may not be able to withstand it and will close. The battery voltage will rise sharply and the LEDs will fail. So, in any case, do not turn on the flashlight when charging, if you do not want to throw it away.
2. The flashlight does not turn on. Well, here you need to check the switch.
3. The flashlight runs out very quickly. If your flashlight is "experienced", then most likely the battery has worked out its service life. If you actively use the flashlight, then after one year of operation, the battery no longer holds.
Problem 1. LED flashlight does not turn on or flickers during operation
This is usually the reason for poor contact. The easiest treatment is to tighten all threads tightly.
If the flashlight doesn't work at all, start by checking the battery. Perhaps it is discharged or out of order.
Unscrew the back cover of the lamp and use a screwdriver to close the housing with the negative contact of the battery. If the flashlight lights up, then the problem is in the module with the button.
90% of the buttons of all LED lights are made according to the same scheme:
The button body is made of aluminum with a thread, a rubber cap is inserted there, then the button module itself and a pressure ring for contact with the body.
The problem is most often solved in a loosely clamped pressure ring.
To eliminate this malfunction, it is enough to find round-nose pliers with thin stings or thin scissors that need to be inserted into the holes, as in the photo, and turned clockwise.
If the ring moves, then the problem has been fixed. If the ring is in place, then the problem lies in the contact of the button module with the body. Unscrew the retaining ring counterclockwise and pull the button module outward.
Often poor contact occurs due to oxidation of the aluminum surface of the ring or rim on the printed circuit board. Indicated by arrows)
It is enough just to wipe these surfaces with alcohol and the functionality will be restored.
Button modules are different. Some in which the contact goes through the printed circuit board, others, in which the contact goes through the side lobes to the body of the lantern.
Just bend such a petal to the side so that the contact is tighter.
Alternatively, you can solder tin to make the surface thicker and press the contact better.
All LED lights are basically the same.
The plus goes through the positive terminal of the battery to the center of the LED module.
The minus goes through the body and closes with a button.
It will not be superfluous to check the tightness of the LED module inside the case. This is also a common problem with LED lights.
Using round nose pliers or pliers, rotate the module clockwise until it stops. Be careful, it is easy to damage the LED at this point.
These actions should be enough to restore the functionality of the LED flashlight.
It is worse when the flashlight works and the modes are switched, but the beam is very dim, or the flashlight does not work at all and there is a burning smell inside.
Problem 2. The flashlight works fine, but dimly, or does not work at all and there is a burning smell inside
Most likely the driver is out of order.
The driver is a transistorized electronic circuit that controls the flashlight modes and is also responsible for a constant voltage level, regardless of the battery discharge.
You need to unsolder the burned-out driver and solder a new driver, or connect the LED directly to the battery. In this case, you lose all modes and remain only with the maximum.
Sometimes (much less often) the LED fails.
This can be verified very simply. bring the voltage 4.2 V / to the contact pads of the LED. The main thing is not to mix up the polarity.If the LED is on brightly, then the driver is out of order, if on the contrary, then you need to order a new LED.
Unscrew the LED module from the case.
Modules are different, but usually they are made of copper or brass and
The weakest point of such lights is the button. Its contacts are oxidized, as a result of which the flashlight begins to shine dimly, and then it may stop turning on altogether.
The first sign is that a flashlight with a normal battery shines weakly, but if you click the button several times, the brightness increases.
The easiest way to make such a lantern shine is to do the following:
1. Take a thin stranded wire, cut off one vein.
2. We wind the wiring on the spring.
3. Bend the wire so that the battery does not break it. The wire should protrude slightly
over the swirling part of the flashlight.
4. Tighten tightly. We break off the excess wire (tear off).
As a result, the wire provides good contact with the negative part of the battery and the flashlight.
will shine with due brightness. Of course, the button with such a repair is not a lot, therefore
turn on - turn off the flashlight by turning the head part.
My Chinese man worked like this for a couple of months. If you need to change the battery, the back of the flashlight
should not be touched. We turn our head away.
RESTORING THE PERFORMANCE OF THE BUTTON.
Today I decided to bring the button back to life. The button is in a plastic case, which
simply pressed into the back of the lantern. In principle, it can be pushed back, but I did it a little differently:
1. Make a pair of holes with a 2 mm drill bit to a depth of 2-3 mm.
2. Now you can unscrew the housing with the button with tweezers.
3. We extract the button.
4. The button is assembled without glue and latches, so it is easy to disassemble it with a stationery knife.
The photo shows that the movable contact has oxidized (round bullshit in the center, like a button).
You can clean it with an eraser or fine sandpaper and put the button back together, but I decided to additionally irradiate this part and the fixed contacts.
1. We clean with fine sandpaper.
2. We serve with a thin layer the places marked in red. We wipe the flux with alcohol,
collecting the button.
3. To increase reliability, I soldered the spring to the bottom contact of the button.
4. Putting everything back.
After renovation, the button works fine. Of course, tin also oxidizes, but since tin is a rather soft metal, I hope that the oxide film will be
easy to break down. It is not for nothing that the central contact on the bulbs is made of tin.
What is "hotspot", my Chinese person was very vague, so I decided to enlighten him.
We unscrew the head part.
1. The board has a small hole (arrow). With the help of an awl, we unscrew the filling,
at the same time, lightly press your finger on the glass from the outside. This makes it easier to get out.
2. Remove the reflector.
3. Take ordinary office paper, punch 6-8 holes with an office punch.
The hole diameter of the hole punch perfectly matches the diameter of the LED.
Cut out 6-8 paper washers.
4. Place the washers on the LED and press down with the reflector.
Here you have to experiment with the number of pucks. In this way, I improved the focusing of a pair of flashlights, the number of washers was in the range of 4-6. It took 6 of them on the current patient.
INCREASE BRIGHTNESS (for those who know a little about electronics).
The Chinese save on everything. A couple of unnecessary details - an increase in the cost price, so they do not put it.
The main part of the diagram (marked in green) can be different. On one or two transistors or on a specialized microcircuit (I have a circuit of two parts:
choke and microcircuit with 3 legs, similar to a transistor). But on the part marked in red - they save. I added a capacitor and a pair of 1n4148 diodes in parallel (I didn't find a Schottky). The brightness of the LED has increased by 10-15 percent.
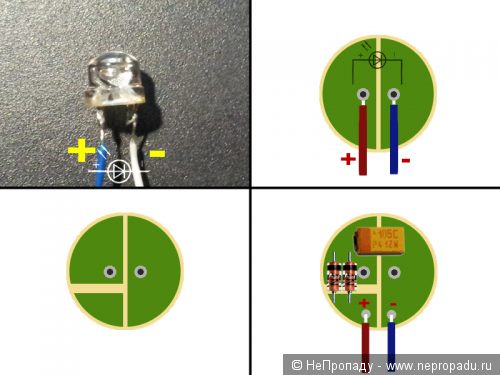
1. This is how the LED looks like in similar Chinese.From the side you can see that there are thick and thin legs inside. A thin leg is a plus. You need to navigate on this basis, because the colors of the wires can be completely unpredictable.
2. This is how the board looks like, to which the LED is soldered (on the back side). Foil is marked in green. The wires from the driver are soldered to the LED legs.
3. Cut the foil on the plus side of the LED with a sharp knife or a triangular file.
We sand the entire board to remove the varnish.
4. We solder the diodes and the capacitor. I took the diodes from a broken computer power supply, the tantalum capacitor dropped out of some burned-out hard drive.
The positive wire now needs to be soldered to the pad with diodes.
As a result, the flashlight gives out (by eye) 10-12 lumens (see photos with hotspots),
judging by the phoenix, which produces 9 lumens in the minimum mode.
RESTORING THE PERFORMANCE OF THE BUTTON.
Today I decided to bring the button back to life. The button is in a plastic case, which
simply pressed into the back of the lantern. In principle, it can be pushed back, but I did it a little differently:
1. Make a pair of holes with a 2 mm drill bit to a depth of 2-3 mm.
2. Now you can unscrew the housing with the button with tweezers.
3. We extract the button.
4. The button is assembled without glue and latches, so it is easy to disassemble it with a stationery knife.
The photo shows that the movable contact has oxidized (round bullshit in the center, like a button).
You can clean it with an eraser or fine sandpaper and put the button back together, but I decided to additionally irradiate this part and the fixed contacts.
1. We clean with fine sandpaper.
2. We serve with a thin layer the places marked in red. We wipe the flux with alcohol,
collecting the button.
3. To increase reliability, I soldered the spring to the bottom contact of the button.
4. Putting everything back.
After renovation, the button works fine. Of course, tin also oxidizes, but since tin is a rather soft metal, I hope that the oxide film will be
easy to break down. It is not for nothing that the central contact on the bulbs is made of tin.
What is "hotspot", my Chinese person was very vague, so I decided to enlighten him.
We unscrew the head part. 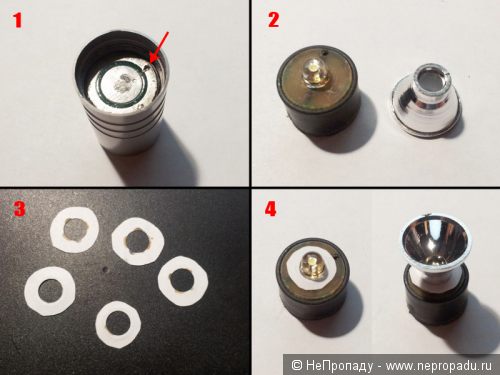
1. The board has a small hole (arrow). With the help of an awl, we unscrew the filling,
at the same time, lightly press your finger on the glass from the outside. This makes it easier to get out.
2. Remove the reflector.
3. Take ordinary office paper, punch 6-8 holes with an office punch.
The hole diameter of the hole punch perfectly matches the diameter of the LED.
Cut out 6-8 paper washers.
4. Place the washers on the LED and press down with the reflector.
Here you have to experiment with the number of pucks. In this way, I improved the focusing of a pair of flashlights, the number of washers was in the range of 4-6. It took 6 of them on the current patient.
What happened in the end:

On the left is our Chinese, on the right is Fenix LD 10 (at the minimum).
The result is quite pleasant. The hot spot has become pronounced and even.
INCREASE BRIGHTNESS (for those who know a little about electronics).
The Chinese save on everything. A couple of unnecessary details - an increase in the cost price, so they do not put it. 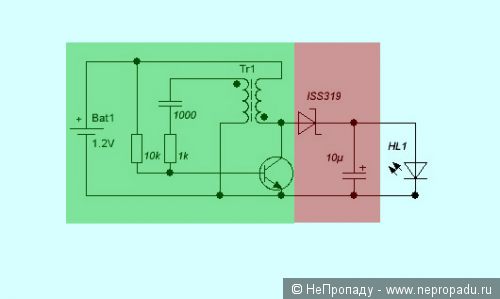
The main part of the diagram (marked in green) can be different. On one or two transistors or on a specialized microcircuit (I have a circuit of two parts:
choke and microcircuit with 3 legs, similar to a transistor). But on the part marked in red - they save. I added a capacitor and a pair of 1n4148 diodes in parallel (I didn't find a Schottky). The brightness of the LED has increased by 10-15 percent.
1. This is how the LED looks like in similar Chinese. From the side you can see that there are thick and thin legs inside. A thin leg is a plus. You need to navigate on this basis, because the colors of the wires can be completely unpredictable.
2. This is how the board looks like, to which the LED is soldered (on the back side). Foil is marked in green.The wires from the driver are soldered to the LED legs.
3. Cut the foil on the plus side of the LED with a sharp knife or a triangular file.
We sand the entire board to remove the varnish.
4. We solder the diodes and the capacitor. I took the diodes from a broken computer power supply, the tantalum capacitor dropped out of some burned-out hard drive.
The positive wire now needs to be soldered to the pad with diodes.
As a result, the flashlight gives out (by eye) 10-12 lumens (see photos with hotspots),
judging by the phoenix, which produces 9 lumens in the minimum mode.
And the last: the advantage of the Chinese over the branded flashlight (yes, don't laugh) 
Branded lights are designed to be rechargeable, therefore
with a battery discharged to 1 volt, my Fenix LD 10 simply does not turn on. At all.
I took a dead alkaline battery, which has worked out its life in a computer mouse. The multimeter showed that she sat down to 1.12v. The mouse did not work on it anymore, Fenix, as I said, did not start. But the Chinese man works!

Left - Chinese, right - Fenix LD 10 at minimum (9 lumens). Unfortunately, the white balance is out of order.
The phoenix has a temperature of 4200K. The Chinese man is blue, but not as bad as in the photo.
For fun, I tried to finish off the battery. At this brightness level (5-6 lumens per eye), the flashlight worked for about 3 hours. The brightness is enough to illuminate under your feet in a dark entrance hallway. Then for another 2 hours the brightness decreased to the level of the "firefly". Agree, 3-4 hours with acceptable light can solve a lot.
For this, let me take my leave.
Stari4ok.
ZY The article is not copy-paste. Made in ya, specially for "NEPROPADU"!
An electric flashlight refers, as it were, to an additional auxiliary tool for carrying out any work in the presence of poor lighting or no lighting at all. Each of us chooses the type of flashlight at our discretion:
- Head Torch;
- pocket flashlight;
- hand-held flashlight
etc.
The electrical diagram of a simple flashlight in Fig. 1 consists of:
- battery cells;
- light bulbs;
- key switch.
The scheme in its execution is simple and does not require explanations in this regard. The reasons for the malfunction of the flashlight with this scheme can be:
- oxidation of contact connections with batteries;
- oxidation of the contacts of the bulb holder;
- oxidation of the contacts of the bulb itself;
- malfunction of the light switch key;
- a malfunction of the light bulb itself, the light bulb has burned out;
- lack of contact connection with the wire;
- lack of battery power.
Other reasons for the malfunction may be any mechanical damage to the body of the flashlight.
headlamp with LED BL - 050 - 7C
The BL - 050 - 7C flashlight comes on sale with a built-in charger; when such a flashlight is connected to an external AC voltage source, the battery is recharged.
Rechargeable batteries, or rather electrochemical accumulators, - the principle of charging such cells is based on the use of reversible electrochemical systems. Substances formed during the discharge of the battery under the influence of an electric current are able to restore their original state. That is, we recharged the flashlight and can continue to use it. Such electrochemical batteries or individual cells can consist of a certain amount, depending on the voltage consumed:
- the number of bulbs;
- type of bulbs.
The number, the set of such individual elements of the flashlight, is a battery.
The electrical circuit of the flashlight in Fig. 2 can be considered both consisting of a simple incandescent light bulb and a certain number of LED bulbs. For any flashlight circuit, what exactly is important? - It is important that the energy consumed by the light bulbs in the electrical circuit - corresponds to the output voltage of the power source of the battery, consisting of individual cells.
Resistor R1 with a resistance of 510 kΩ and a rated power of 0.25 W in the electrical circuit is connected in parallel, due to this large resistance, the voltage in the further section of the electrical circuit is significantly lost, or rather, part of the electrical energy is converted into thermal energy.
With a resistor R2 with a resistance of 300 ohms and a nominal power of 1 W, current flows to the VD2 LED. This LED serves as an indicator light to indicate the connection of the flashlight charger to an external AC voltage source.
The current is supplied to the anode of the diode VD1 from the capacitor C1. The capacitor in the electrical circuit is a smoothing filter, part of the electrical energy is lost with a positive half-cycle of the sinusoidal voltage, since during this half-cycle the capacitor is charged.
With a negative half-cycle, the capacitor is discharged and the current flows to the anode of the cathode VD1. An external voltage drop for a given electrical circuit occurs when there are two resistors and a light bulb in the electrical circuit. Also, it can be taken into account that when the current passes from the anode to the cathode - in the VD1 diode - there is also its own potential barrier. That is, it is also common for a diode to undergo heating to some extent, at which an external voltage drop occurs.
On the GB1 battery, which consists of three cells, a current of two potentials + - is supplied from the charger when the flashlight is connected to an external source of alternating voltage. In the battery, the electrochemical composition of the battery is restored to its original state.
The following diagram in Fig. 3, which is found in LED flashlights, consists of the following electronic elements:
- two resistors R1; R2;
- diode bridge consisting of four diodes;
- capacitor;
- diode;
- LED;
- key;
- batteries;
- light bulbs.
For a given circuit, the external voltage drop occurs due to all the constituent elements of the electronics - connected in this circuit. One diagonal of the diode bridge of the bridge circuit is connected to an external AC voltage source, the other diagonal of the diode bridge is connected to the load - consisting of a certain number of light-emitting diodes.
All detailed descriptions on replacing electronics elements when repairing a flashlight, as well as diagnosing these elements - you can find on this site, which contains similar topics in which repair of household appliances is seen.
For my work, I sometimes have to use a headlamp. Approximately six months after the purchase, the flashlight's rechargeable battery stopped charging after it was turned on for recharging via the power cord.
When establishing the cause of the headlamp breakdown, the repair was accompanied by photographs in order to present this topic in an illustrative example.
The cause of the malfunction was not clear at the beginning, since when the flashlight was switched on for recharging, the signal light came on and the flashlight itself, when the switch button was pressed, emitted a weak light. So what could be the reason for such a malfunction? Is the battery malfunctioning or some other reason?
It was necessary to open the body of the flashlight to inspect it. On the photographs of photo # 1, the screwdriver tip indicates the places where the body connection is fastened.


If the body of the flashlight cannot be opened, you need to carefully inspect to see if all the screws have been removed.
Photo # 2 shows a buck converter in both voltage and current.
You should not look for the cause of the malfunction in the circuit, since when connected to an external source, the signal light is on, photo # 2 is a red LED light. We check further connections.
In front of us in the photo # 3 shows the light switch of the LED flashlight. The contacts of the push-button post of the switch are a double light switch device, where for this example light up:
- six LED lamps,
- twelve LED bulbs
flashlight. Two contacts of the switch, as we can see, are short-circuited and a common wire is soldered to these contacts. Two wires are soldered to the next two contacts of the switch - separately, from which current flows to the lighting:


When switching, it is enough to check the contacts of the light switch with a probe as shown in photo # 4. We touch the common contact with two short-circuited contacts with a finger and alternately touch the other two contacts with a probe.
If the switch is in good working order, the LED lamp of the probe lights up photo # 4. The light switch is serviceable, we carry out further diagnostics.
The power cord can also be checked here with a photo # 5 probe. To do this, with your finger, you need to short-circuit the pins of the plug and alternately connect the probe to the first and second contacts of the cable connector. If the probe light comes on, there is no break in the power cord.


The power cord for recharging the battery is working properly, we carry out further diagnostics. You should also check the flashlight battery.
On the enlarged image of the storage battery, photo # 6, it can be seen that a constant voltage of 4 Volts is supplied to recharge it. The current strength of this voltage is - 0.9 ampere hour. We check the battery.
The multimeter in this example is set to a DC voltage measuring range of 2 to 20 Volts so that the measured voltage matches the specified range.
As we can see, the display of the device shows the constant voltage of the battery - 4.3 Volts. In fact, this indicator should take on a greater value - that is, there is insufficient voltage to power the LED lamps. LED lamps take into account the potential barrier for each such lamp, as we know from electrical engineering. Consequently, the battery does not receive the required voltage when recharging.
And here is the whole reason for the malfunction of photo # 8. This cause of the malfunction was not immediately established - in the break of the contact connection of the wire with the battery.
The wires in this scheme are unreliable for soldering, since the thin section of the wire does not allow them to be securely fastened at the soldering point.
But even this reason for the breakdown is removable, the wiring was replaced with a more reliable section and the LED flashlight is currently operational, it works flawlessly.
I consider the presented topic unfinished, they will be given in examples for you - repairs of other types of flashlights.
I would call it "Notes of a Shitty Electrician"! The author simply does not understand how the circuit works, its elements, he confuses the concepts. Using the example of the operation of the circuit in Fig. 2: R1 serves to discharge the capacitor C1 after disconnecting the flashlight from the mains for safety reasons. There is no "loss" of voltage "in the next section", let the Author connect a voltmeter and look at it to make sure of this. Resistor R2 serves as a current limiter. The VD2 LED serves not only as an indicator, but also supplies a positive potential to the + battery.
Capacitor C1 in this circuit is a quenching (and not a smoothing filter), and it is on it that the excess of the alternating voltage is extinguished.
About the potential barrier, too, heap it up - it's ridiculous to read. And the current "current of two potentials" ?! According to classical physics, current flows from positive to negative potential, and electrons move in reverse.
Did the author go to school?
And he has this everywhere. Sad. But someone takes his "revelations" at face value.
Hello povaga! I stopped charging the "Oblic 2077" flashlight on one LED. I can’t find any schemes, but it’s like in figure # 3. Difference: there is no capacitor C2, diode VD5, two resistors and a three-pin board are soldered to the SA1 switch. I measured the voltage after the bridge - 2 volts, the battery is 4 volts, how can it be charged? Please help with the operation diagram and electrical circuit. Thanks in advance, Regards, Doldin.
Hello Mikhail. That is, you measured the voltage at the output of the bridge circuit and your measuring device shows 2 volts - this is of course not enough to charge the battery.You need to check the resistors (for resistance) and the rest of the electronics that are located on the board, or you can give it to a workshop for checking - the circuit board and resistors, and get advice there (on replacing one or another part).
Victor.
Hello Victor! 2 volts after the bridge is when the load is completely disconnected, only the HL1 power-on indicator is connected. R1 = 560 KOhm, C1 = 105J, I checked the resistor - a whole one and a capacity of about 1 μF. How to increase the voltage after the bridge? Is there an electrical circuit "Oblique 2077", or tell me where to find it? Best regards, Doldin.
Hello, I have a flashlight "Era" well, and in the back on the glued tag it says FA 18 E, 182W - 1500614, the trouble is that when I inadvertently used the wrong charger instead of 6 volts, I did not charge, I disassembled on the diagram, the resistor is charred or otherwise the resistance, if you know then tell me what is the resistance on this flashlight
Hello Nikolay. If the resistor is charred, you need to check the rest of the electronics, such as the capacitor and diodes. There are two diodes, if I'm not mistaken. They could also lose their current conduction properties. You'd better take this small circuit for repair to fix the malfunction. If an electrical diagram with the nominal values of the electronic elements in the "Flashlight Operation Manual" was attached, then there would be no problems with the elimination of the malfunction.
Victor.
Hello, help me assemble the flashlight as in photo # 2, my brother repaired the button and tore off the wiring, we cannot assemble the circuit if you can give pictures in details of what to solder.
Hello Valery. As soon as I have free time, I will immediately answer your question (on the wire connections in the flashlight circuit). The topic will have a title: “How to assemble a flashlight. Photo and description ".
Victor.
Hello Valery. I told you the name of the topic, the topic will be published today.
Victor.
How to connect the wiring of an escaped flashlight as in photo # 2, you need a diagram, please.
Fired two resistances R1 R2 in the ERA FA35M lamp. Please tell me their data to replace.
Hello. I did not find data on the resistance of two resistors for your flashlight on the Internet. Try to go to a store that sells electronics parts to a sales consultant. I believe that the sales consultant will be able to select resistors by resistance.
Chinese headband oytventyre no screws please tell me how to open
Hello. I believe that it is impossible to open a flashlight with a stamping design.
Often there is no contact on the retractable plug for charging the flashlight. It is necessary to disassemble and bend the contacts.
Good afternoon. I inserted the wrong batteries, the flashlight blinked and that's it, is there a chance to repair it?
| Video (click to play). |
Hello. Of course, there is an opportunity to repair the flashlight. You need to ring the circuit and determine the cause of the malfunction.


