Details: honda srv 1998 do-it-yourself suspension repair from a real master for the site my.housecope.com.
Greetings, dear friend! For a long time I was going to replace the silent blocks in the rear wishbones (upper and lower). In the upper lever, the silent blocks came off the outer wall and the lever simply spun in the rubber of the silent blocks. The first symptoms were on the lower wishbones, which promised that they would soon break. In principle, it would be possible not to touch the lower transverse ones, but wait until they break, but it was decided to replace everything.
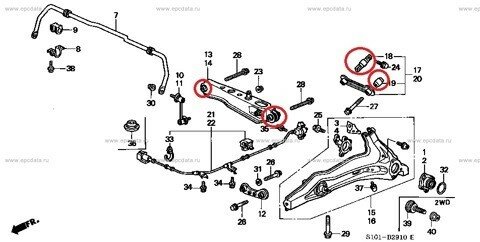
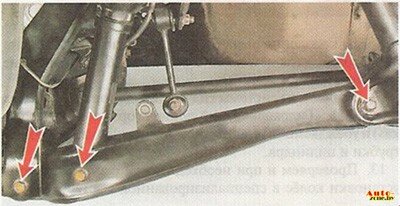
In the image, I highlighted which rubber bands are in question
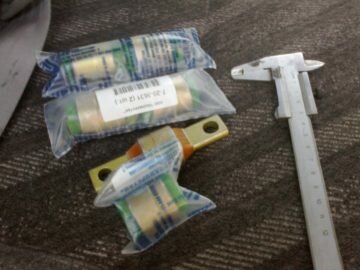
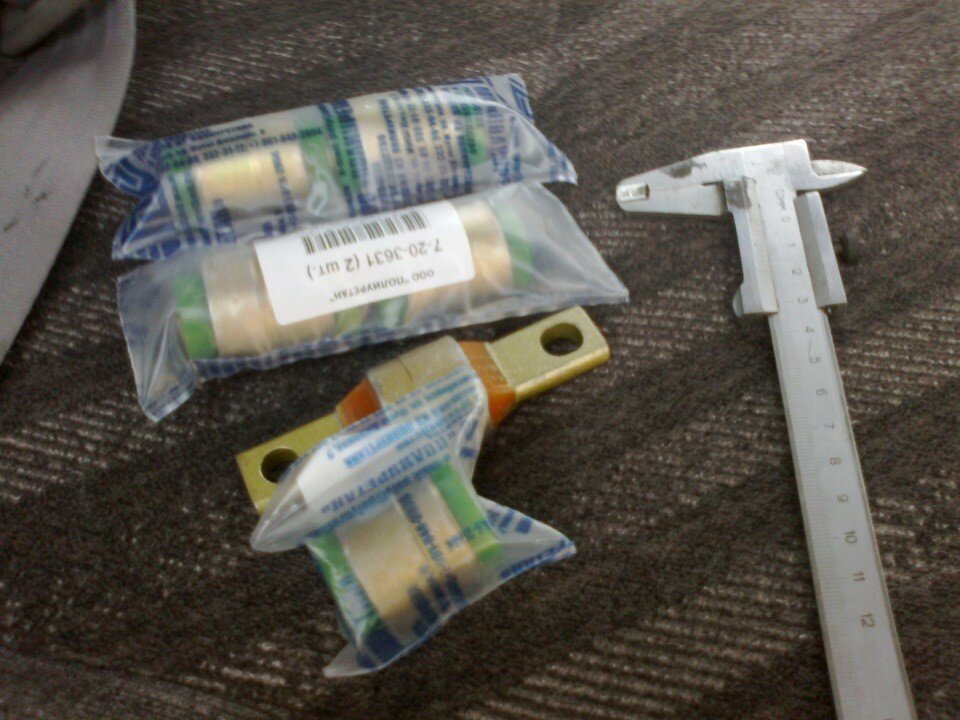
Strictly speaking, I have already consulted about which bushings are suitable where and what is better to take. Of the parts available for purchase, there were cheap rubber bands of unknown manufacturers for 100-200 rubles. apiece and original levers assembly for fabulous money. I decided to take polyurethane products from Novosibirsk. Average price. The quality is controversial: some people have such silent blocks, while others do not.
Set of silent blocks and levers for Honda CR-V
Video: Honda CR V RD1,2 - Replacing the rear silent blocks of the front lower arms
Removing and replacing the upper levers and silent blocks on Honda CR—V
- Removing the rear wheel
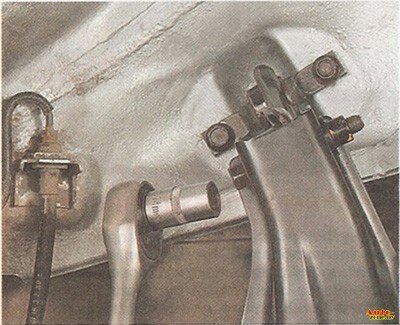
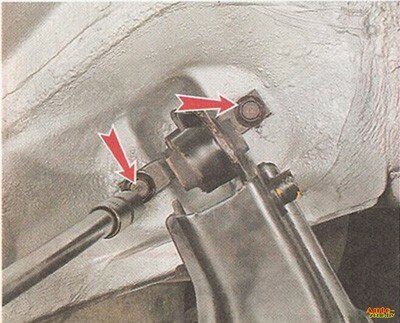
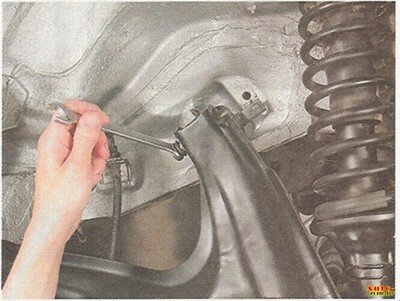
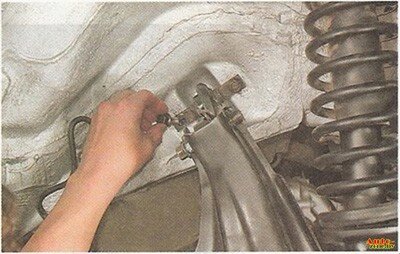
- Using a 14 mm socket wrench, unscrew the bolt securing the upper arm to the longitudinal.
- Using a 14 mm socket wrench, unscrew the two bolts securing the upper arm to the body and remove it.
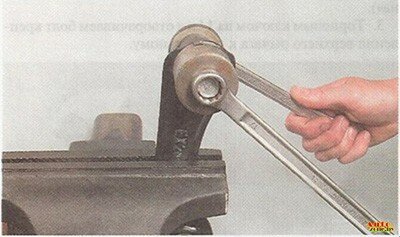
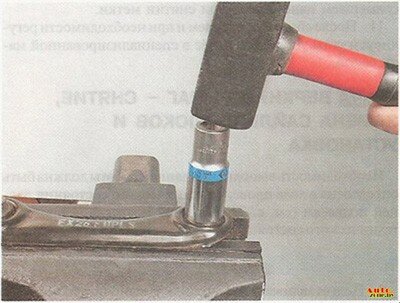
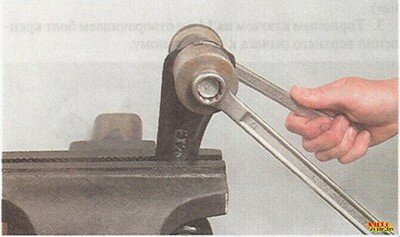
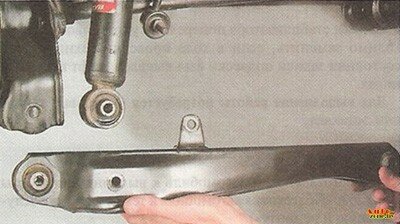
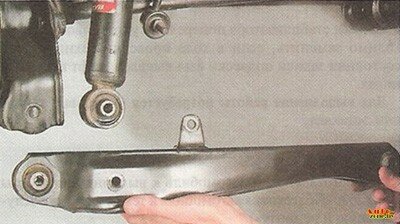
- Using a hammer, through a 22 mm tool head, knock out the silent blocks from the lugs of the lever.
- We press in the outer silent block with a cup puller.
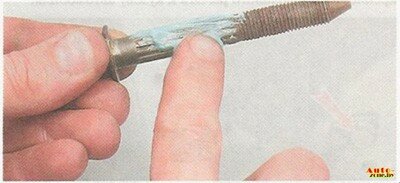
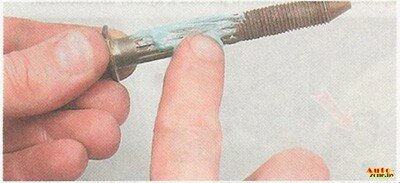
- We apply any grease to the spline part of the mounting bolt, and a thread lock on the threaded part.
- We bait the bolt of the transverse arm to the longitudinal.
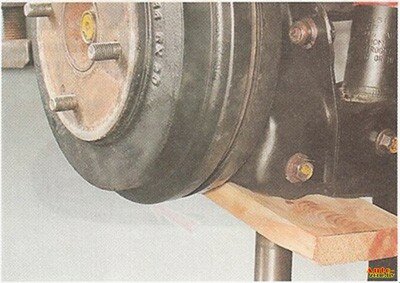
- Load the rear suspension with a jack through a wooden spacer.
- We bait the bolts of the upper arm to the body and tighten them one by one to a torque of 39 Nm.
- The bolt securing the upper arm to the longitudinal arm is finally tightened to a torque of 54 Nm on the car standing on the ground.
| Video (click to play). |
This is how the removal and installation of the upper levers and silent blocks on a Honda CR-V car takes place.
Video: Replacing the rear suspension silent blocks with a Honda CR—V 1999 year Honda CR—V
Removing the lower levers on Honda CR—V
- We hang the rear wheel on the side from which it is necessary to replace the lever.
- Disconnect the stabilizer post from the lever
- Using a 14 mm socket wrench, unscrew the three bolts securing the lever.
- We remove the bolts and remove the lever from the car.
- We install a new lever and attach the fastening bolts, first apply grease to their spline part, and a thread lock on the threaded part.
- We lower the car onto the wheels and tighten the mounting bolts to a torque of 54 Nm.
- We connect the anti-roll bar to the arm
Well, that's all dear friends in this article, we are with you in detail, we figured out how to replace the silent blocks and upper and lower arms on a Honda CR-V car.
The front suspension is independent, on two wishbones, with telescopic shock-absorber struts and a torsion-type anti-roll bar.
The lower arm on the inner side is attached to the front subframe through two silent blocks, and on the outside it is connected to the steering knuckle through a ball joint. The central part of the lower arm is connected via a silent block with a shock absorber fork. The front suspension strut is attached to the car body with three nuts.
The shock absorber strut consists of a shock absorber, a fork, a coil spring and an upper support. The fork is put on the shock absorber body with its upper end and secured with a tie bolt. The lower support spring cup is welded to the outside of the strut body.
The cylindrical spring with its lower coil rests on the lower support cup, and the upper one on the upper one, fixed on the shock absorber rod.Also on the shock absorber rod are installed a casing protecting the shock absorber rod from dust and dirt, the upper strut support, which prevents the transmission of vibrations to the body, the upper and lower shock absorber cushions, which protect the body from sharp shocks during suspension breakdown, as well as a spacer sleeve, which prevents the compression of the cushions when tightening the nut shock absorber rod.
Front suspension details: 1 - steering knuckle; 2 - upper arm; 3 - shock absorber rack; 4 - bar of the anti-roll bar; 5 - front subframe; 6 - lower arm; 7 - anti-roll bar; 8 - shock absorber fork; 9 - ball joint
The upper arm on one side is attached to the car body through two silent blocks, on the other - to the steering knuckle through a ball joint.
A double-row ball bearing is pressed into the hole of the steering knuckle and fixed with a retaining ring. The wheel hub is pressed into the inner ring of the bearing.
The ends of the stabilizer bar are connected to the lower arm of the front suspension by means of stabilizer struts. The stabilizer bar is attached to the front subframe via rubber pads.
Rear suspension - independent car, multi-link, with shock absorber struts. There are four levers on each side of the vehicle: the trailing arm, the upper arm, and the lower and front wishbones. In front, the trailing arms are attached to the car body through silent blocks. In the rear, the upper and lower arms are attached to the trailing arm through silent blocks, which are also attached to the rear subframe from the inside via silent blocks.
The front arm is attached to the body on one side through silent blocks, and on the other to the trailing arm before attaching it to the body. The bolt securing the lever to the body can be displaced relative to the hole, due to this, it is possible to adjust the toe-in of the wheels. The swing of the lever provides the effect of steering the rear wheels when the vehicle is rolling heavily.
The shock absorber strut is attached from the bottom to the lower wishbone through the silent block, and from the top to the car body through the upper support. The rack consists of a body in which a hydraulic telescopic shock absorber is installed, a coil spring and an upper support. The lower support spring cup is welded to the outside of the strut body.
The cylindrical spring with its lower coil rests on the lower support cup, and with its upper one - on the upper support cup, fixed on the shock absorber rod. Also on the shock absorber rod there is an upper strut support, consisting of a body and a rubber cushion. The pillow prevents the transmission of vibrations to the car body. In case of "breakdowns" of the suspension, the stroke of the shock absorber rod is limited by the compression stroke buffer made of elastic plastic.
On the flange of the trailing arm of the rear suspension, the hub assembly is fixed with three bolts (wheel bearing housing assembled with the rear wheel hub bearing).
Rear suspension details: 1 - upper arm; 2 - front lever; 3 - longitudinal lever; 4 - shock absorber rack; 5 - anti-roll bar; 6 - bar of the anti-roll bar; 7 - lower arm; 8 - rear subframe
Group: Users
Posts: 72
Registration: 22.10.2011
Town: Penza
Auto: Honda CR-V (II)
Gender: Male
Has thanked: 84 times
In the summer of 2013, a complete overhaul of the front suspension was carried out.
There was no time to unsubscribe.
Was purchased:
1. B4026 HONDA shock-absorber Tokico 3 400 rubles. 1 PC
2. B4027 HONDA shock-absorber Tokico 3 400 rubles. 1 PC
3. NSK / ZA45BWD12J1CA85 Wheel bearing 1 363 r. 2 pcs
4. LEMFORDER / 3120801 Ball joint 434 r. 2 pcs
5. BOSCH / 0265007905 Sensor, wheel speed 339 r. 2 pcs
6. ZIMMERMANN 280316752 Brake disc 3374 r. 2 pcs
7. SIDEM 47638 tie rod end 414 r. 2 pcs
8. Febest / HAB002 Rear bushing, front arm 165 r. 2 pcs
9. Febest / HAB001 Silent block front front arm 232 r. 2 pcs
10. Febest / HSB001 Front stabilizer bushing d27.2 62 r. 2 pcs
11. Hub nuts from GAZ (it seems from the Volga 31) at 36 60 rubles. 2 pcs
12. Primer and paint in a spray can 200 rub.2 pcs
13. Head Jonnesway 36 under 1 inch for a hub nut 450 r. 1 PC
The suspension is easy to disassemble, but it takes much longer to assemble.
In the manual you will find almost everything, I will tell you only the subtleties.
Documentation (manual) for the repair, maintenance and operation of Honda CR-V 1995-2001 model years with right and left hand drive, 2.0L B20B or B20Z engine, automatic or manual transmissions; The manual is also suitable for Honda Odyssey which have similar units, components and mechanisms.
Are you planning to buy an auto registrar? Our online store sells good quality DVRs at an affordable price! In our store you can buy a video recorder with good recording quality.
How widespread is the practice of concluding operating and leaseback lease transactions at the present time, based on your practice?
Answer:
To date, very few leaseback transactions have been carried out. There is also a certain risk for the leasing company, both financial and property.
With a positive credit history in a leasing company with an impeccable payment reputation, it is possible to provide clients with this type of leasing.
Why buy rear stabilizer bar bushings when there is a quick and inexpensive way to restore them.
arrived with increased oil consumption for 18 years it was worn out !! the owner added an additive RESOURCE she was lying.
I'm on drive2:
repair of a steering rack honda crv 1.
repair of honda srv from the beginning, inspection and troubleshooting, preparation for painting the car and preparation.
Body repair and painting of Honda CRV.
Repair of a steering rack on a Honda CR V. Repair of a steering rack on a Honda in St. Petersburg. Our service centers provide services.
Body repair, Honda, crv, cr-v, mugen, jdm.
Replacing the engine mountings, springs and struts, power steering belts and kondeya.
Spare parts catalog for your car - Avto.Pro - comparison of prices for spare parts from 2000 sellers, choose better.
Honda CRV Rear arches repair. My channel -
On the example of CIVIC VIII 4D I'm on Drive2
For communication on the topic of Honda CR-V Ukraine.
Alteration of the driveshaft Honda CRV.
This video describes how to diagnose and repair the Honda CR-V distributor with helpers and not only.
A quick folk repair with their own hands, I decided to sell the swallow, it is necessary to perform pre-sale preparation.
In this video, a 2008 Honda CR-V came to me, the problem is on the throttle check. I'll show you which one.
The creak of rubber bands on the pits portends the replacement of silent blocks or, at best, stabilizer bushings. In my.
Good evening. tell me where you can find the CR-V - 1 suspension in pictures. well, that is, where is what thrust, s.block is located, etc. Thank you
In general, it is better to indicate exactly the modification of your car, it will be more correct to look at the manual.
to Messir: I drag it to the "useful links".
Good afternoon, I ran into a problem when braking from 120 km / h and above, vibration appears. what's the matter ?
to makcimoos: Good day. Check rims with pads, do balancing, check tire pressure.
the pads and balancing are normal, the vibration in the steering wheel did not pass
This means you have behavioral brake discs. Most likely from overheating. Only change them.
to makcimoos: check, then unsubscribe.
for Messir! Dear expert! After arriving, it immediately became clear that when driving, the car was leading to the left / letting go on a flat road and starting to go gradually to the left, requires constant steering to the right /. the car had a blow to the left rear corner and a stretch was required. We did everything, brought the dimensions to the same parameters.We balanced all the tires, replaced the rear ammora, the drift remained, but the steering tension decreased when steering. They offered to go to the toe-collapse. on the collapse, only the right side was touched and the rear ones were brought back to normal. After that, the drift became noticeable both at the beginning and that NEW: - the steering wheel lost its horizontal position, the right side of the horizon dropped by 1.5-2 cm.
to akodoc: Unambiguously you did an illiterate similarity collapse. The steering wheel should be level after all adjustments. And, if before the adjustment there was no pull to the side, then after that it definitely should not be.
A decrease in steering effort when steering can even be a subjective moment, after driving a car with a pull to the side.
Good day to all. Tell me where you can download and print detailed diagrams for the repair of front and rear suspensions. Honda CR-V RD-1. I would be very grateful for your help.
Tell me please. Such a problem, when accelerating after 40 km / h, lateral vibration (very strong) begins on the body, it feels like the right front wheel is unscrewed. and even when you roll along the vibration is felt, from the crust when you roll too. 60-80 constant. the wheels are balanced, there are no backlashes in the hub bearings. levers do not dangle. what to do?
• Cover the fenders with a cloth to prevent damage to the paintwork.
• To avoid damaging the wiring, remove it carefully by grasping the connector.
• Label all electrical wiring and hoses to avoid misconnection. Also make sure they do not come into contact with other electrical wiring and hoses or interfere with other components.
1. Lock the hood in the open position (fix the support rod in the lower hole).
2. Disconnect the cable from the negative terminal of the battery first, then from the positive one.
4. Remove the cover from the intake manifold.
5. Disconnect the intake air temperature (IAT) sensor connector (A) and remove the breather hose (B), then remove the air cleaner housing (C).
8. Remove the throttle cover (A). Open the throttle rod and cruise control rod fully by hand, then disconnect the throttle cable (B) and cruise control cable (C) from the rods. Loosen the locknuts (D) and then remove the cables from the bracket.
7. Disconnect the battery cables from the underhood fuse / relay box, then remove the harness clips (B) and disconnect the ground cable (C).
9. Disconnect the ECM / PCM connectors (A) and the main wiring harness connector (B). Left-hand drive models
10. Remove the harness clips (A) and rubber grommet (B), then pull the engine harness out through the bulkhead.
11. Relieve fuel pressure.
12. Disconnect the fuel supply hose.
13. Disconnect the hose (A) from the carbon filter (EVAP) and the vacuum hose (B) from the brake booster.
14. Remove the clutch slave cylinder and clutch line bracket (MCP).
15. Remove the gear shift cable and the selector cable (MCP).
16. Remove the power steering pump (P / S) drive belt.
17. Remove the power steering pump (P / S) without disconnecting the hoses.
18. Remove the radiator cap.
19. Raise the winch to its full height.
20. Remove the front wheels.
21. Remove the dirt deflector.
22. Loosen the radiator drain plug, drain the engine coolant.
23. Drain the transmission fluid.
25. Disconnect the connector (A) of the primary heated oxygen sensor (primary H02S) (except for the K20A5 engine).
26. Disconnect the secondary heated oxygen sensor (secondary H02S) connector (B) (KE, KG, KS, KR, KU, KZ, KQ, FO models).
28. Separate the propeller shaft from the transfer case (4WD models).
29. Disconnect the stabilizer links.
30. Disconnect the lower suspension arm ball joints.
31. Remove the drive shafts. Apply clean engine oil to all components. Place plastic bags over the ends of the drive shafts and tie them.
32. Disconnect the gear shift cable (automatic transmission).
33. Disconnect the lower hose.
34. Unscrew the mounting bolt (A) of the ATF filter (automatic transmission).
35.Disconnect the ATF cooler hoses (B), then plug the ATF cooler hoses and pipes.
37. Disconnect the upper hose (A) and heater hoses (B).
38. Attach a lifter (commercially available for models supplied to EEC countries) to the engine as shown in the illustration at the top of the right column.
39. Remove the gearbox support mounting bolts / nuts.
41. Make sure the winch brackets are installed correctly. Raise the winch to its full height.
42. Remove the rear support mounting bolts.
40. Remove the upper bracket fixing bolt and nut.
It is quite obvious that any part of the Honda chassis must be in good condition. This is especially true of the suspension, since, unlike the engine, which can fail and the Honda CR-V simply will not go further, the breakdown of some suspension elements while driving can lead to a serious accident.
1. In addition to obvious safety, the chassis of the Honda SRV is responsible for a comfortable ride and good handling. The most dangerous thing is that in this case there will be a high probability of loss of control, with the next collision with an obstacle that has arisen on the road. Only regular diagnostics of the Honda CR-V chassis will avoid this situation.
Diagnostics of the Honda CR-V chassis includes checking the elements:
- springs and shock absorbers;
- levers and supports (bearings from above, silent blocks from below);
- stabilizer bushings for Honda SRV;
- steering rods and rack;
- wheel bearings;
- CV JOINT.
2. For experienced owners of Honda SRV, it is not difficult to determine the malfunction in the suspension. Experience will tell them what the problem is by the sound and its source. Plus, the most common suspension faults sound pretty much the same in all cars.
Diagnostics of the chassis of the Honda SRV should be carried out regularly, even without showing any hints of a malfunction. It is better to do this on a lift, but it can also be done on an ordinary flyover or observation pit.
3. It is important to remember how the Honda CR-V behaves in good condition, then any future malfunction will be obvious. To understand that something is wrong with a car, you do not need to be an experienced driver, and even more so, an auto mechanic.
Most often, the following signs of malfunctions of the Honda SRV chassis occur:
- the sudden appearance of noise, knocking, bouncing of the Honda CR-V chassis, which can both disappear and remain even on a completely flat road;
- too large rolls when cornering and noticeable swaying of the body when passing bumps or when braking;
- arbitrary steering to the side, Honda SRV leads away when driving straight;
- uneven tire wear.
4. Most often you can hear exactly the knock of the Honda SRV suspension, it indicates that the rubber elements are worn out or the fasteners that hold them are loose. There are a lot of rubber elements in the chassis, by and large, almost any Honda CR-V suspension unit can knock, as a result, in order to accurately identify the cause of the knock, the car must be inspected from below.
If you hear a crunch, especially when cornering or with a sharp acceleration of the Honda CR-V, then we can say with almost complete certainty that the reason lies in a malfunction of the CV joint of the Honda SRV, the so-called grenade. A squeak most often occurs after replacing the stabilizer bushings, often this indicates a poor-quality bushing.
5. If the Honda CR-V began to drift to the side, more often this happens after hard passage of pits and potholes, then you may have to do similarity collapse (camber-convergence Honda SRV). At best, this will eliminate the trouble; at worst, something could bend upon impact, starting from the steering rod and ending with the steering knuckle.
In the event of at least one of these signs, it is necessary to diagnose the running Honda SRV as soon as possible. Even the regulations explicitly prohibit operation with a faulty suspension, not to mention the fact that it is simply dangerous.
6. Not replaced in time the silent block of the Honda CR-V suspension, which is not so expensive, can lead to a breakdown of the lever, with a price tag of one hundred dollars.Many drivers drive without paying attention to the sounds that appear in the chassis of the Honda SRV, and drive until the sound becomes completely critical, or until something simply falls off, this approach is simply absurd.
7. Periodic visual inspection of the Honda CR-V undercarriage will save money, after all, if you find a cracked boot or cover in time and make a prompt replacement, then the element that was protected by the boot will last longer. If, when examining the Honda CR-V, an already torn boot was found, then you can be sure that soon this suspension element will need to be replaced.
After checking all the anthers, you should start diagnosing the front suspension elements of the Honda CR-V. The front suspension is more complex than the rear, it is subject to heavy loads, as a result, it breaks much more often. First, we inspect the Honda CR-V shock absorbers, they should not have dents or oil leaks. You can also try to swing the shock absorber to the sides, the swing amplitude should be insignificant.
But the easiest way to check the serviceability of this suspension element is to swing the Honda SRV by pressing the corner where the shock absorber being diagnosed is located. If, after pressing, the Honda CR-V, having returned to its original state, continued to swing up and down, then this indicates a malfunction of the shock absorber.
8. Next, the springs of the chassis of the Honda SRV are examined, often their turns break off, so you need to inspect them for cracks and the integrity of all turns. But here you can also determine the functionality of the springs without looking under the car. To do this, you just need to pay attention to the ground clearance of the Honda CR-V, if the car has become noticeably lower, then this already indicates a malfunction of the springs, they sagged and can no longer perform their function properly.
9. Ball and silent blocks are checked only from the bottom side of the Honda CR-V. To diagnose them, it is better to use some kind of metal lever to make it easier to check everything for backlash, they should not be in a working car. The stabilizer and link supports of the Honda SRV are checked in the same way. To check the wheel bearing, you need to shake the wheel, if there is a play, this indicates a poor condition of the bearing.
The tenth generation of the sedan has become calmer and more solid
Restyling of the sedan allowed to get rid of inappropriate design and engineering solutions
Economical, environmentally friendly, undemanding - the main engine of Honda cars in the near future.
In our store you can buy or order the original Honda SRV catalog for cheap, while we try to keep low prices for the entire range. The price of a spare part depends on the availability in the warehouse or the need to order it, who is its manufacturer. Our spare parts catalog contains the cost, number (article, code), description, photo, characteristics, dimensions, dimensions, weight and other parameters for the auto parts sold. The card for each product shows a possible replacement, analogs and applicability.
+7 (495) 797-60-03, +7 (499) 665-30-88
Address: Moscow, Marshal Katukov street, house 24, building 4
Honda CR-V Mark II (RD4 / RD5 / RD6 / RD7 / RD8) with gasoline engines: DOHC i-VTEC К20А4 / К20А5 (without catalyst) 2.0 l (1998 cm³) 150-155-158 hp / 110- 114-116 kW and K24A1 2.4 l (2354 cm³) 160 hp / 118 kW; Operation manual, maintenance and repair, technical characteristics, control dimensions of the body, device, diagnostics, design features. Production and practical edition of an off-road passenger car Honda SyRV compact crossover with all-metal monocoque bodies five-door station wagon of increased capacity front- and all-wheel drive models of the second generation of release from 2001 to 2006
ENGINE STARTING
1. Make sure the parking brake is applied.
2. Make sure the selector lever is in the P position. The engine can also be started from the N position, but for safety reasons, do it from the P position.
3. Step on the brake pedal with your right foot and start the engine.
ATTENTION
When the immobilizer indicator is flashing, the engine cannot be started.
START OF MOVEMENT
one.Press the brake pedal with your right foot and move the automatic transmission selector lever to position D, and if you want to move backwards, to position R.
WARNING
Do not switch the automatic transmission selector lever with the accelerator pedal depressed. This can lead to a sudden start of the vehicle and create an emergency.
2. Make sure that the position of the automatic transmission selector lever is displayed correctly on the dashboard.
3. Release the parking brake.
4. Check that the brake system warning lamp is off.
5. Slowly release the brake pedal and gently press the accelerator pedal.
WARNING
6. If you switch the automatic transmission selector lever to any position other than P and N, the car can start moving even if the accelerator pedal is not pressed.
8 Immediately after starting the engine rpm is high, so depress the brake pedal harder. If, after pressing the brake pedal, the automatic transmission selector lever does not move from position P to another position:
1.Using a screwdriver with a cloth wrapped around the end, remove the cover of the shift lock release hole.
2. Insert the key into the hole and, pressing it, move the automatic transmission selector lever to the desired position.
STARTING A STEP UP
1. Determine the position of the automatic transmission selector lever by the indicator.
2. With the parking brake applied, slowly release the brake pedal.
3. Slowly press the accelerator pedal and make sure that the car is ready to start moving.
4. Release the parking brake and drive away.
Honda CR-V (RD1, RD2) - Replacing the silent blocks of the front upper levers
Replacing the front struts with Honda CR-V RD1, RD2 1996-2000
Honda CR V RD1,2 - Replacing the rear bushings of the front lower arms
Rear Wheelhouse Fix on HONDA CR-V - Rear Adjustable Arms
Honda CR-V suspension repair
Honda CR-V rd1 suspension and semi-axle repair 2000
Replacing the rear suspension bushings with a 1999 Honda CR-V Honda CR-V
The principle of operation of the all-wheel drive Honda CR-V
Honda CR-V noise search (rear suspension)
Suspension knocks (do not trust services. See for yourself)
Bacho
Drives: Honda cr-v
With us from 20.09.11
Total Posts: 58
Good evening. tell me where you can find the CR-V - 1 suspension in pictures. well, that is, where is what thrust, s.block is located, etc. Thank you
Rain
Chief newsmaker
With us since 26.09.07
Total Posts: 1571
In general, it is better to indicate exactly the modification of your car, it will be more correct to look at the manual.
Bacho
Drives: Honda cr-v
With us from 20.09.11
Total Posts: 58
Messir
With us from 05.12.10
Total Posts: 1837
Rain
Chief newsmaker
With us since 26.09.07
Total Posts: 1571
to Messir: I drag it to the "useful links".
makcimoos
With us from 06.10.11
Total Posts: 8
Good afternoon, I ran into a problem when braking from 120 km / h and above, vibration appears. what's the matter ?
Rain
Chief newsmaker
With us since 26.09.07
Total Posts: 1571
to makcimoos: Good day. Check rims with pads, do balancing, check tire pressure.
makcimoos
With us from 06.10.11
Total Posts: 8
the pads and balancing are normal, the vibration in the steering wheel did not pass
Messir
With us from 05.12.10
Total Posts: 1837
This means you have behavioral brake discs. Most likely from overheating. Only change them.
makcimoos
With us from 06.10.11
Total Posts: 8
Bacho
Drives: Honda cr-v
With us from 20.09.11
Total Posts: 58
mATr1xX
Drives: Audi A4
With us from 05.02.11
Total Posts: 1309
to makcimoos: check, then unsubscribe.
akodoc
Drives: Honda cr-v
With us since 10/27/11
Total Posts: 13
for Messir! Dear expert! After arriving, it immediately became clear that when driving, the car was leading to the left / letting go on a flat road and starting to go gradually to the left, requires constant steering to the right /. the car had a blow to the left rear corner and a stretch was required. We did everything, brought the dimensions to the same parameters. We balanced all the tires, replaced the rear ammora, the drift remained, but the steering tension decreased when steering. They offered to go to the toe-collapse. on the collapse, only the right side was touched and the rear ones were brought back to normal. After that, the drift became noticeable both at the beginning and that NEW: - the steering wheel lost its horizontal position, the right side of the horizon dropped by 1.5-2 cm.
Messir
With us from 05.12.10
Total Posts: 1837
to akodoc: Unambiguously you did an illiterate similarity collapse. The steering wheel should be level after all adjustments. And, if before the adjustment there was no pull to the side, then after that it definitely should not be.
A decrease in steering effort when steering can even be a subjective moment, after driving a car with a pull to the side.
Sergo4351
Drives: Honda cr-v
With us from 10.05.12
Total Posts: 1
Good day to all. Tell me where you can download and print detailed diagrams for the repair of front and rear suspensions. Honda CR-V RD-1. I would be very grateful for your help.
DesDenis
Drives: Honda cr-v
With us from 12.06.11
Total Posts: 3
Tell me please. Such a problem, when accelerating after 40 km / h, lateral vibration (very strong) begins on the body, it feels like the right front wheel is unscrewed. and even when you roll along the vibration is felt, from the crust when you roll too. 60-80 constant. the wheels are balanced, there are no backlashes in the hub bearings. levers do not dangle. what to do?
Messir
With us from 05.12.10
Total Posts: 1837
to DesDenis: All vibrations are discussed in their respective topics.
Carefully read the title of the topic where you are writing!
Use the search! Don't litter your topics!
make
Drives: Honda cr-v
With us since 16.01.12
Total Posts: 9
Good day everyone! Please help me to cope with the problem. General dull, rustling noise in the suspension, as if all the wheel bearings are starting to cover at the same time. In addition, the grinding while driving is clearly heard somewhere from 40 km / h and above, the grinding is similar to the rolling of a broken bearing, the amplitude of the grinding depends on the transmission speed. Even when driving in reverse, there is a sharp knock, as if someone hit the piece of iron with a hammer once, and when you start moving in front of you, this also happens. The grenades (CV joints) only really checked the outer ones, I replaced one because it initially crunched and it was understandable. But what crunches further I can not find, help. I have cr-v, right wheel, 1996, automatic, 4 everywhere. body RD1, capacity v20v-2litra.
Messir
With us from 05.12.10
Total Posts: 1837
to make: Hello. Have you checked the bearings themselves?
postal67
Drives: Honda cr-v
With us from 10/12/13
Total Posts: 1
| Video (click to play). |
hello. when turning left, squeak in the left wheel.

