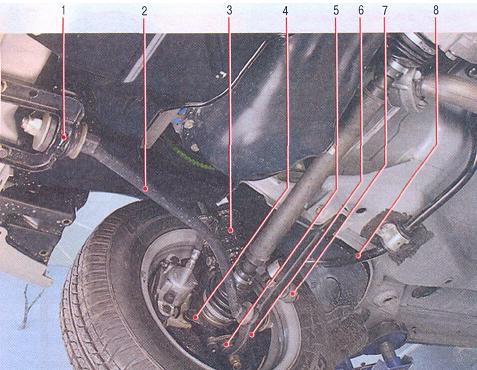
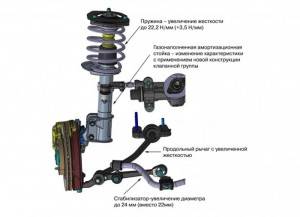
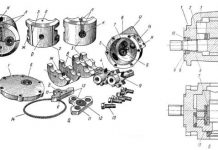
The basis of the suspension is a shock absorber, the lower part of which is connected to the steering knuckle by two bolts. The camber angle is adjusted with the top bolt. A helical conical spring, a polyurethane foam buffer of the compression stroke, as well as the upper support of the rack assembled with a bearing are also installed on the rack.
The top support is attached to the body splash guard cup with three self-locking nuts. Its design differs significantly from the design of the supports that were used on VAZ 2108-2110 cars:
Longitudinal braces absorb braking and traction forces. Washers are installed at the joints at both ends of the brace to adjust the caster angle of the wheel rotation axis.
The sealed double row angular contact ball bearing is installed in the steering knuckle and secured by two retaining rings. The wheel hub is installed in the bearing inner rings with an interference fit. The bearing is not adjustable during operation. The nuts for fastening the wheel hubs are the same, with a right-hand thread.
If you notice a knock or creak in the Kalina front suspension, then you need to perform diagnostics during which to identify the malfunction. Kalina front suspension repair is discussed in other articles.
Problems in the front suspension system, and more specifically the silent blocks on the Lada Kalina, can be recognized by the characteristic sounds it makes while driving. So, driving on uneven roads can be accompanied by various crackles, squeaks and other unpleasant noises. This situation not only causes great discomfort, but can also cause a more serious malfunction, or cause an accident.
VIDEO
Front suspension bushing close
The silent blocks on the Lada Kalina car are located in the same way as the VAZs of previous years. These elements are located generally on the wishbone or adjacent to it ... You will have to change them either on the entire element at once, or by choosing the most damaged ones. Of course, if there is damage to one of them, the wishbone with rubber (stock - approx.) Stabilizers must be removed and replaced with polyurethane analogues.
In order to start work on replacing old silent blocks with new ones, you need to put the car on a viewing hole, a lift or raise it on a jack.
The next step is to remove the wheel and spray all the connections on the wishbone with WD-40.
After the grease has penetrated into all hard-to-reach places, we begin to unscrew the bolts.
First of all, we begin to dismantle the ball joint bolt, but before that we remove the cotter pin from the bolt.
Then we unscrew the bolt securing the hinge of the longitudinal extension (where the "daisies" are attached - approx.) And remove it from the seat.
A generously lubricated bolt, a guarantee of success.
When dismantling this unit, problems should not arise.
For the best impact on the bolt, a wrench extension can be used.
The rubber-metal hinge of the longitudinal stretching, or simply "chamomile", is designed to take the main blow from the unevenness of the roadway, despite the fact that this element is very important, it is very easy to dismantle it.
Having previously held the lever in a vise, we knock out the silent blocks in turn using a chisel or a thin flat screwdriver.
Beating the daisies is not an easy task.
This is what the old suspension elements look like.
To inflict the least damage to the silent blocks, it is better to put pieces of wood between the vices.
The stabilizer bar, or just "eggs", and the pillow provide the stabilizer bar stable operation while driving.
It is very easy to dismantle the "eggs", it is enough to unscrew the mounting bolt from the transverse arm, and simply release the other end from the anti-roll bar by simple swinging.
Sometimes it happens that they just break
Having unscrewed the mount, it is very easy to remove the pillow, but putting on a new one is much more difficult.
The largest silent block of the lever located at the very base, in spite of the fact that it has, among others, more impressive dimensions, is not difficult to dismantle.
The easiest option to remove is arson. When the rubber on it burns out, you just have to get it out and clean the seat. (Of course, you can squeeze it out through a vice, but this will take time and may cause some inconvenience).
So the old silent block is guaranteed to come out of the seat without any consequences.
Installing a new silentblock can also take time.
The silent blocks are assembled on the lever ...
... and so they are assembled by car.
If during the execution of work you find that the bolts and nuts are in an obscene condition (there are cracks, traces of strong rust, bad thread - approx.), Then such elements are best replaced with new ones, using bolts made of high-quality steel and nuts with a self-locking element ...
The rest of the front suspension elements, in which the rubber-metal and metal hinges are located, change immediately in assembly. These include:
These elements cost about 500 rubles per set, and also do not require specific installation skills.
In total, there are four main reasons why noises and squeaks can annoy the car owner of Lada Kalina, and three of them can be independently eliminated and everything returned to a safe state.
The first reason why there is a knock in the suspension is this is a poor quality of the road surface ... A suspension that is in good working order can also emit a certain amount of extraneous noise. If, when driving on a good road, the noise disappears, then everything is in order with your suspension, you can go to the item below.
If there is a knock and simultaneous vibration in the steering wheel, it is possible the reason lies in a faulty steering rack ... If you can tighten the steering rack yourself, then it is better to entrust its repair or replacement to professionals.
The third reason is lost its elasticity front suspension strut spring ... Since the spring tone is significantly reduced, the suspension hits the body directly. How to change the front struts, and with it the spring, is described in detail in this article.
And the last reason is cracked silent blocks, which are simply necessary for thoroughly damping knocks and vibrations that occur during movement. For information on how to properly replace these elements of the front suspension, read below our article.
The car produced by AvtoVAZ Lada Kalina has received popular recognition in Russia - this brand has enough fans, there is a club, and many forms have been created on the Internet. But the car has its own characteristic "diseases", and therefore the repair of Lada Kalina is a relevant topic, worries many car owners.
In this article, we will look at the most vulnerable spots of a car, the most common malfunctions and methods for their elimination.
Lada Kalina has been produced by the Volzhsky Automobile Plant since the end of 2004; since 2013, Togliatti residents have started producing the second generation of the polar car. Kalina-1 is presented in three bodies:
sedan, model 1118;
hatchback, 1119;
station wagon (Combi), 1117.
Kalina-1 is equipped with three types of gasoline engines:
1.4 L 16-valve 11194 89 hp With.;
1.6 L 8-valve 21114 (81 HP);
1.6 L 16-valve 21126 (98 HP).
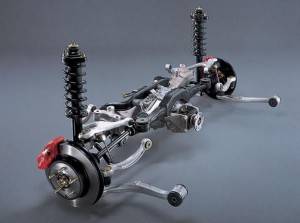
On the first generation car, only a manual gearbox with five gears is provided. The front suspension of the VAZ car is a typical MaCpherson; a beam with a stabilizer, shock absorbers and springs is installed on the rear axle.
Major breakdowns with the car are rare, but there are enough various unpleasant little things. The clutch on a VAZ car is not distinguished by high reliability and a long resource, regardless of the type of engine, and it can fail at a mileage of 40-50 thousand km. The main reason for the breakdown is a collapsed clutch disc.
In the engine, it is necessary to constantly monitor the oil level - it can go through the gaskets, burn through the piston rings. Only the oil pressure emergency lamp is installed on the instrument cluster, there is no dial indicator. When the indicator is constantly on, it may be too late - the crankshaft will knock.
A well-known disease of all VAZ gearboxes is an increased hum. It is difficult to get rid of the noise of the gearbox; in some cases, even replacing the bearings, filling in high-quality gear oil does not help. The checkpoint is howling on new cars, so AvtoVAZ has repeatedly modified the transmission.
Also, starting with the "eights" and "nines", the thermostat in the engine was considered a problematic part, and the valve in it could jam in any position. It is unpleasant if the engine does not warm up to the desired operating temperature, but when the engine overheats it is even worse.
In an electrician on Lada Kalina-1, three main problems most often arise:
bearings and diode bridge quickly "die" in the generator;
the ignition module often fails;
the power window cable of the driver's door is torn.
If the ignition coil is punctured, either the first and fourth or second and third cylinders in the engine stop working. The breakage of the ESP cable occurs due to the fact that it jumps off its guides.
The reason for the appearance of the crunching of the outer SHRUS is the lack of lubrication, the thrifty plant workers put it in a little. As a result, there is intense wear of the hinges, and the "grenade" has to be changed.
A broken timing belt is always unpleasant, but if on an 8-valve 21114 you can change the belt drive and go further, then on motors 11194 and 21126 valves bend from the oncoming impact with pistons, and repair is quite expensive. A break can also occur due to a jammed water pump, therefore, if the pump is noisy, it must be urgently changed.
Lada Kalina-1 is a fairly simple car, and the driver can fix many breakdowns on his own. For example, it will not be difficult with your own hands;
remove the airlock from the cooling system;
eliminate the bounce of the gearshift knob;
replace the engine air filter;
change the water pump;
replace the diode bridge in the generator;
install a new outer CV joint instead of the crunchy old drive;
replace the ignition module.
In Lada Kalina, do-it-yourself repairs should be carried out according to the instructions, use high-quality auto mechanic tools, if necessary, do the work with the help of pullers and special equipment.
It is possible to change the external "grenade" to "Kalina" without a lift or a pit, but the car must be installed on a level surface. We make the replacement as follows:
first of all, we loosen and unscrew the hub nut - when the wheel is removed, it will be problematic to move it;
we loosen the wheel nuts, jack up the car, dismantle the wheel. To prevent the car from rolling, it is necessary to put stops under the rear wheels, and put a support (for example, a wooden beam) under the threshold in front of the jack next to the jack for safety;
turn off the ball joint bolts from below (2 pcs.);
we pull out the steering knuckle towards ourselves, release the wheel drive;
remove the clamps from the boot;
we take the boot closer to the gearbox, knock down the outer CV joint through a bronze or copper drift;
install the new part in place, stuff the grease into the hinge, fix the boot on the CV joint with new clamps;
we assemble all parts.
The cooling system can "air" for various reasons, and first of all, the stove in the cabin stops blowing warm air, the temperature rises, the antifreeze boils. If you squeeze the upper and lower radiator pipes, you feel that they are empty, there is no coolant in them. Often, "airing" occurs after replacing the stove radiator, and it is sometimes very difficult to remove air from the system. Alternatively, you can install an additional tee on the lower pipe of the heater under the hood, and lead the new hose into the expansion tank from above; put a plug in the lower pipe from the tank to the lower radiator pipe.
On an 8-valve VAZ-21114 engine, on average, the resource of a water pump is about 70-100 thousand kilometers, and if it starts to make noise or leak, it must be replaced. It should be noted that on all models 2108-15, Lada Priore and Kalina with an 8-valve internal combustion engine, the pump changes according to the same principle.
Replace the water pump as follows:
we drain the antifreeze from the cooling system;
remove the plastic timing belt cover;
if the timing belt does not need to be changed, then the crankshaft pulley is not removed, respectively, it is not necessary to dismantle the right wheel;
we set a mark on the camshaft - it should match the ebb on the rear timing case;
weaken the tension roller, remove the belt from the camshaft;
unscrew the three pump mounting bolts with a hexagon, take out the pump;
put a new pump in place, put on a belt, tighten with a tension roller, check the alignment of marks, on the crankshaft the mark is on the flywheel, under the rubber plug of the gearbox housing;
fill in the antifreeze, start the engine, check if the antifreeze is leaking, and if the pump is noisy. If everything is in order, put the timing case back in place.
Replacing the air filter on the Lada Kalina (engine 21114) is very simple, we perform the work in the following order:
unscrew the four screws of the upper cover of the air filter housing, for this you need a regular Phillips screwdriver;
lift the top cover, remove the filter element;
we install a new filter in place;
we tighten the four screws of the VF case.
It is recommended to replace the filter element on Lada Kalina every 30 thousand kilometers, but if the car is operated in a dusty area, the filter element should be changed more often.
If on a Lada Kalina car the power window cable becomes unusable or the motor burns out, the ESP must be changed. The replacement operation is performed in the following order:
dismantle the power window control unit;
remove the door trim;
to disconnect the window lifter from the glass, the latter must be lifted all the way up;
unscrew the four bolts that secure the glass to the ESP (two in the front and two in the back). The glass is supported by seals, but it can also be secured so that it does not fall down;
unscrew the black metal bar (three screws);
we unscrew the eleven fasteners of the window regulator (bolts for 10), disconnect the power plug from the electric motor;
we start to take out the power window from the back, first we take out one half of it;
then we take out the front part together with the motor from the door cavity;
A burned-out electric motor on a lift can be easily changed. For this:
we unscrew three pins on the body of the mechanism, then four more screws;
dismantle the motor, holding the reel with the cable by hand, install a new part;
we mount the window regulator in the door, connect it to the glass guides, put the trim in place.
A characteristic disease of Lada Kalina is bouncing in the area of the gear lever, it is especially well heard at engine speeds of about 3000. The cause of the extraneous sound is the bushing, which is a little thicker than necessary, and therefore a gap is created in the connection. To eliminate the defect, we proceed as follows:
remove the handle cover, it is fastened with latches;
turn the nut and bolt with two keys for 13;
remove the washers and bushings, the design looks like this;
to exclude bouncing, the bushing (the one in the middle) can be slightly sharpened in width, or grease the connection with a sealant;
after completing the action, we collect everything back. The sealant does not always help, but sharpening the sleeve by 0.3 mm gives the desired effect.
VIDEO
diagnostics - check - do-it-yourself inspection of the viburnum fret.
Lada Kalina: Improvements after purchase. Do it yourself!
Replacement of struts, replacement of steering tips, replacement of the ball joint, replacement of anthers on the drive, replacement of the CV joint.
Remove the knock on the steering rack LADA Kalina.
Video about how I repair steering racks and cardan shafts Kalina, Grant, Priora. Pretty worn out with the steering wheel.
Do-it-yourself timing belt replacement for Lada Kalina. Video instruction on how to independently change the timing belt to Kalin.
A channel about diagnosing a car with your own hands and about repairing a car in general.
LADA KALINA QUICK OIL CHANGE IN THE BOX (OWN HAND REPAIR) watch video Auto News - information.
VAZ, A method for adjusting the camber angles on a VAZ, with your own hands without a stand. ___ COOL AUTO LIFE Hacks
Kalina dented the front fender. Using a chisel and an ax, I urgently repair the car.
How to find the required video - about it here Support the project! CARD (SBERBANK) - 427654002987381.
The constant velocity joint (abbreviated SHRUS) ensures the transmission of torque at cornering angles.
A channel about diagnosing a car with your own hands and about repairing a car in general.
Do-it-yourself muffler and resonator repair. The car runs on gas and a problem with the muffler arises.
Repair of a window regulator viburnum. The easiest and fastest way. We repair both windows (left.
Do-it-yourself lubrication and repair of a brake caliper using the example of a VAZ 2112 front caliper. Repair and maintenance.
In this video you will see: how to sort out a starter with your own hands. You will also see how to change the bendix or.
Do-it-yourself Lada Kalina repair with a detailed description and photos: https://my.housecope.com/wp-content/uploads/ext/1145/
Repair of a glove box (glove compartment) Lada Kalina 1118.1119.
Car repair Lada Kalina gearbox repair.
This section provides instructions and manuals for the repair and maintenance of the chassis and suspension of the Lada Kalina car. The material is presented both in standard form in the form of a text description with photo reports, and with video reviews on repair. Each article is shown graphically using the example of specific components and assemblies. If, as a result of reading the materials of the section, you have any questions, you can ask them after each article. Members of the blog will help answer your questions and solve some problems.
If we consider directly the process of replacing the rear beam on Kalina, then we will not consider it completely, but it will be shown.
To be honest, I don't even know what has to happen to the rear hub axle to have to be replaced. But still.
Greetings to all blog readers. For those who are subscribers to my YouTube channel, I think the article will not be new, since.
Good day! Today I worked with my top ten and decided to make a guide to replacing the rear hub bearing. Since Kalina.
After installing the new front suspension from the SS20, of course everything suited me, and the smoothness of the shock absorbers, and the missing knocks on the rebound.
Today I decided to write an article on replacing ball joints, although mine were still in good condition, I did it for the article.
Hello everyone! As promised, I am writing my review and impressions of the new SS20 suspension. As you already know what I put.
In the last article I talked about the choice of front suspension components for my Kalina. And here I will try to describe everything in more detail.
I think that most of the owners of Lada Kalina are very unhappy with the factory suspension, namely the work of the front struts. At first, when I just bought it.
Recently, a friend of mine, who also drives Kalina, contacted me with the following problem. When driving, even.
Today they sent useful material, which can certainly be useful to many owners of Kalina, who have alloy wheels. The tutorial is pretty simple, and.
Although the winter season is already ending, I decided to create this theme, just fresh impressions, there will be something to share with many owners.
I wrote this topic in my old blog, but decided to highlight this problem here again. Here's what happened.
We carry out the check on a viewing ditch or overpass. Levers and braces, rod, struts and anti-roll bar pads of the front suspension must not have cracks or deformations. Also, the brackets of the front and rear suspensions and their attachment points to the body should not have cracks, deformations and ruptures.
... alternately sharply pull the upper part of the wheel towards ourselves, and the lower part away from ourselves, and vice versa.
We check the condition of the protective boots of the suspension ball bearings.
Leaning on the front suspension arm bracket with a powerful screwdriver or mounting paddle.
... and the rear ends of the guy lines.
... and silent blocks of the stabilizer bar struts.
We check the condition of the silent blocks of the rear suspension beam.
We check the condition of the hinges and the protective cover of the gearshift rod and jet thrust.
Video (click to play).
... inspecting the protective outer covers.

