There are such malfunctions in the car in which you can drive as before, but they constantly bother you, cause unpleasant feelings. Such malfunctions include the failure of the glass heating circuit at the rear of the car.
Usually, this electrical circuit is always amenable to repair. And there are troubles with these threads for the following reasons:
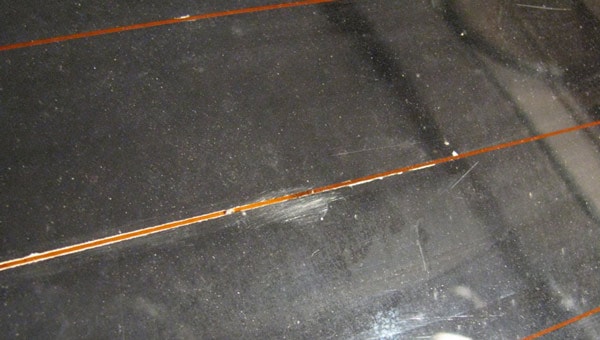
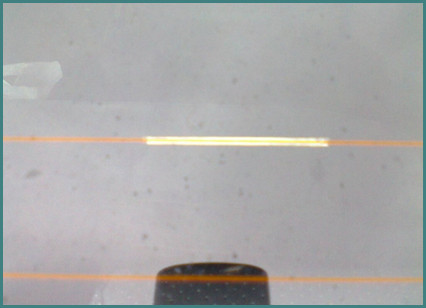
The most common thread break occurs on the window. Sometimes it can be determined visually, but more often with the help of an instrument. Next, we will figure out how to diagnose, and how to repair the heated rear window.
We will analyze the step-by-step process of repairing the heated rear window when the thread breaks with our own hands. Useful for us:
Read also about the ban on tuning SUVs and replacing the parking brake cable VAZ 2114.
You can buy special glue for repairing heated rear window at a regular auto shop. We start repairing damaged heating threads by turning on this system with a button in the cabin.
This is how the damaged threads of heating the rear window are repaired with their own hands. It is clear that you will have to buy a set with glue beforehand.
Now let's talk about how to repair broken rear window heating contacts. To do this, you must first understand the principle of building this electrical circuit.
VIDEO
It turns on only when the ignition is on, an additional relay is responsible for this. It supplies power to the system button. When the button is on, the lamp lights up in parallel and the switching relay, powered by the fuse, is activated. Then the voltage is supplied to the heating threads.
Repair of glass heating contacts consists in restoring their performance. To repair any faulty rear window heating terminal, we need:
multimeter;
screwdriver;
soldering iron, solder, rosin.
We check all the elements of the circuit to find the location of the malfunction. First, we look at the fuse.
Next, we check the serviceability of the button by measuring the contacts with a multimeter when it is turned on.
We check the relay, when it is triggered, the corresponding contacts should give out a voltage of 12 V.
We measure the voltage of the connector at the rear window.
We check all the wires going from the button and relay to the heating track system, see what the state of the insulation is, if there is a short circuit to the car body.
We restore the faulty place by replacing the terminal, additional insulation or soldering the contact.
This is how the contacts for heating the rear window of the car are repaired. If the open circuit is on the threads, then we find a specific place according to the algorithm already described above with the help of a tester. Further, in the absence of purchased glue, you can fix the thread break like this.
brass or copper bar;
file;
red paint;
Scotch.
Use a file to prepare brass or copper shavings.
Mix the paint with shavings in a 1/1 ratio.
We turn on the heating.
We glue the adhesive tape on top and bottom of the faulty area, leaving a distance commensurate with the thickness of the thread. We clean this area.
We apply a composition of paint and shavings.
We wait for drying for a few minutes. We remove the scotch tape.
Here is such an interesting technology. There is another option for restoring the lost section of the heating track in the absence of special glue. Let's consider it on the example of a specific car.
To repair the heated glass in the rear of Renault Logan, we need to use the following accessories:
copper sulfate (purchased at a fertilizer store);
battery electrolyte (sold in any auto shop);
a piece of copper bar with a diameter of about 6 mm;
a piece of regular cloth.
This method is called electrolytic. You need to make the following manipulations.
Wrap the end of the bar with a piece of fabric so that the tip hangs down slightly, and, moreover, fix it so that it does not fall off.
You can prepare a solution for work in the following proportion: half a glass of water plus two teaspoons of copper sulfate, literally a hundredth of the electrolyte. Stir everything.
We connect a bar with a rag as an electrode to the positive terminal of the car battery. In this case, the contact of the thread on the glass with a minus of the chain must be serviceable.
The resulting positive electrode is dipped into the solution and driven along the lost area of the heating track. The copper from the solution should cover the entire area.
This method works well for all small scratches. In addition, it is not as difficult to perform as it might seem at first glance.
However, if you still do not want to do anything yourself, it is enough to contact a car service, where the entire electrical circuit will “ring” completely, quickly find the place of the defect and professionally fix it.
And what is the price for glass heating repair is spelled out in the following table. Here it is - with average data for large Russian cities.
The problem is not new, there are often holivars about treatment. If you solder, then what? Will the glass crack?
On Lechin's whim, he solved this issue by sticking a contact.
There is a repair kit Permatex 21351
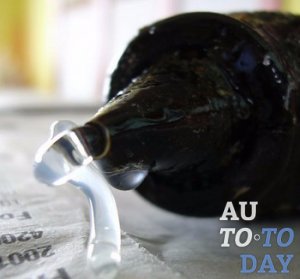
Consists of a sachet (blue) with a napkin, which is impregnated with an activator (starts the chemical hardening of the glue) and the conductive glue itself (a transparent sachet in front of the napkin).
- clean the surface of the contact that has fallen off with a file
- degrease the contact surfaces and glass in the place where we will glue the contact with alcohol or gasoline. In this case, there is no need to glue strictly to the old place. the contact strip is huge, you can step back 1-2 cm in any direction.
- Wipe the contacting surfaces with a napkin with an activator, i.e. contact and glass in the place of gluing, let the activator dry for 5 minutes.
- at this time, we wrinkle a bag of glue with our fingers, achieving a homogeneous mass. We put 1-2 drops of glue on the contact.
- we apply contact to the glass. No additional pressure is required. The contact is held on the glass by surface tension forces. It is possible to correct the position of the contact on the glass without affecting the final result.
- We leave for 24 hours. If done correctly, the contact is tight. You shouldn't be careful with it, if it falls off, it means that something was done wrong and you need to redo it as expected.
Features of storage of the composition: For some reason, these ghouls made of permatex made a disposable envelope with a napkin.In the sense that after opening it cannot be glued back. This becomes especially offensive, because the available amount of glue can cure a whole taxi fleet. Well, in fact, according to my estimate, the glue will be enough for about 20-25 glasses. So, it turns out that this is not a problem. The dried activator can be easily diluted with gasoline. I just pissed on a napkin with gasoline from a flower sprayer. The glue itself does not dry out at all. Even in an unopened bag.
At me on one side of the glass the “corner” fell off - (well, that's on which actually the wiring with a plug of the “mother” type is put on). That is, I understand that with this composition the corner (“dad”) can be glued to the heating?
I trained several times on unnecessary glasses, first I warmed the glass with a hairdryer up to 70 degrees and a hundred-watt for a minute and drove solder over it. Then just a soldering iron on glass at room temperature for a minute. I soldered a bunch of garbage, small screws, terminals on the platforms, which was at hand. In general, if you do not do this in the cold, and the gumboil is good, you can quickly solder it, then nothing will happen to the glass.
glue is easier, at the beginning of the century I glued a ton of contacts to the glasses.
So after all, you need the glue to be how to say it .. "conductive" or what? So I would take it and stick it on the same proxypol, only to the point of this - it can and will hold, but it will not conduct current (when it dries up, it freezes), which means that the heating will not work either. So you need something like that - (like glue) - so that when it sticks, the current passes. Or am I missing something? (Correct then). And yet - how to stick it all the same?
I don’t rummage in English .. But so I understood that THIS is what we need? (That is, something like conductive?)
Oh, kay, I'll look at the local auto dealerships.
Vitya, thanks for the info about the napkin. And then the second package was opened for three contacts.
Wow, I didn’t look here, but it turns out that the topic aroused keen interest in clubmates. It's nice.
Why should the glass crack, it is tempered. And the wiring was initially soldered in the same place. Glue xs, then touch it and fall off again. But soldering on non-dismantled glass is inconvenient, yes.
I believe that glass can crack because the melting point of tin is 220 degrees. Tempered glass is a tricky thing, and I'm a little afraid of it. There are cases when tempered glass exploded on its own. It's just that the stresses inside the glass didn't match up so well. And I personally cannot predict how the heating of a patch with a diameter of 10 cm will affect up to 220 degrees, despite the fact that the temperature of the surrounding glass will be 20 degrees. I also have experience in soldering contacts to glass. The glass did not explode, I think it was lucky. In any case, soldering the contact to the glass, you feel like a sapper.
In the case of a Zhigulyator, the cost of an error is low. In the case of a caprice, the hemorrhoids will be such that even thinking about him is scary. And the apotheosis of hemorrhoids is my Twarus (Toyota) with a liftback body. There glass exists separately from the trunk only in the catalog. In practice, the glass problem = replacement of the complete boot lid with repainting.
At me on one side of the glass the “corner” fell off - (well, that's on which actually the wiring with a plug of the “mother” type is put on). That is, I understand that with this composition, the corner ("dad") can be glued to the heating?
- Yes, conductive glue. On the one hand, it smells of magic, on the other hand, there is the 21st century in the yard and the respected Permatex as a manufacturer. I tried it, it turned out great, shared the methodology and results with the comrades.
Bold red ELECTRICALLY CONDUCTIVE. Hmmm. what is it for?
Vitya, thanks for the info about the napkin. And then the second package was opened for three contacts.
On health, I was glad to help.
I believe that glass can crack because the melting point of tin is 220 degrees. Tempered glass is a tricky thing, and I'm a little afraid of it. There are cases when tempered glass exploded on its own. It's just that the stresses inside the glass didn't match up so well.And I personally cannot predict how the heating of a patch with a diameter of 10 cm will affect up to 220 degrees, despite the fact that the temperature of the surrounding glass will be 20 degrees. I also have experience in soldering contacts to glass. The glass did not explode, I think it was lucky. In any case, soldering the contact to the glass, you feel like a sapper.
In the case of a Zhigulyator, the cost of an error is low. In the case of a caprice, the hemorrhoids will be such that even thinking about him is scary. And the apotheosis of hemorrhoids is my Twarus (Toyota) with a liftback body. There glass exists separately from the trunk only in the catalog. In practice, the glass problem = replacement of the complete boot lid with repainting.
Well xs, when I was still working at AB MO, we soldered these glasses on the Volgalisches and somehow did not even think about it, and I do not know of a single case of explosion. Then there was no trace of such adhesives
Calmly soldered with an ordinary soldering iron on 2 machines, nothing fell off and did not break. Glasses are warming up.
Soldered on twenty cars, and on the twenty-first it burst.
twenty-first they are.
Here we glue them with this Permatex. Extremely surprised you are not changing the 5th door assembly ... What kind of alloy or google it?
The client is not the same now .. Greedy all what so. Poor people write a thousand on a new glass can not spend. I have to google about the alloy to Rose and solder. And then Permatex usually no longer causes reversible damage.
Fixing the rear window heating contact!
I wanted to write for a long time, but forgot. Back in the summer, when I removed the rear pillars, I tore off one of the rear window heating contacts, not the threads, but the contact itself! Naturally, in the summer, as it was, he did not care, but now the weather is like this, the glass is constantly sweating and nothing is visible, driving is simply dangerous, coupled with the fact that nothing is especially visible in the mirrors in this weather! In the internet there are 2 ways to solve this problem - to glue with conductive glue and solder!
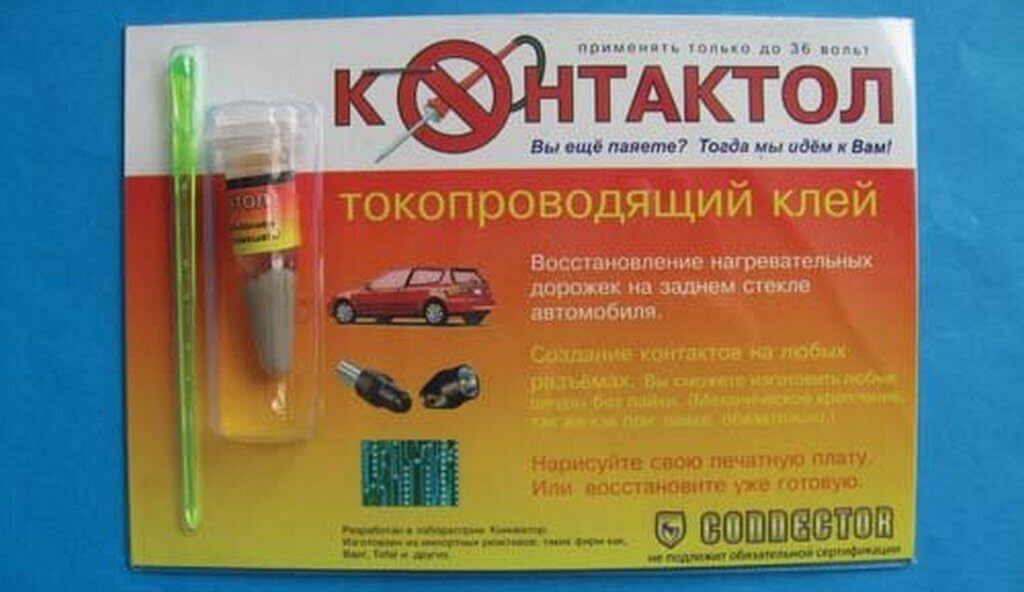
To get started, I tried the first option. Traveled all the shops in the city and markets, by the way, too, and did not find the glue that they advise - Done Deal, it is expensive, but it definitely helps. Everywhere they offer to glue it with glue for repairing heating threads - but it definitely won't help, it's stupid money down the drain! A cheap but also effective option - Contactol glue, was also not found. As a result, the maximum that I found was Permatex glue in BB, it costs 170 rubles.
I read on the internet that people make a plate, a heating wire is soldered into it and the plate is glued to the contacts on the glass and it is advised to apply even small copper shavings. A piece of brass was found at home, they tried to glue it 2 times, the first time was simple, the second time with copper shavings. There is no effect.
As a result, there was an option - that they simply did not hit on horseback, the plate slid down during the drying of the glue. Checked by control - power goes to both contacts, the light comes on. But at the top it sparkled a little. I bought glue again - they re-glued it as normal, again there is no effect. Now I am considering an option, what can it be about brass, that it is thick and heats up for a very long time or does not stupidly transmit enough current to the thread ?!
Guys, can anyone come across such a problem? The glue remained for one time, but I'm already leaning towards the option to solder! True, I'm worried that the glass would not crack. And if you solder at what point you need to solder the contact, does it even matter? I will be glad to help!
Finally, I fixed the contact! What can I say - no need to rely on cheap glue, 2 tubes were wasted! All the same, it turned out to be the most effective and simple way - to solder! Business then for 10 minutes and it all worked! We take the wire - from one end we solder the “daddy”, on the other side just a bare wire. We clean the terminal itself from the remnants of glue, which does not really conduct current, as it turned out, I cleaned it off with a soldering iron. Then we clean it with fine sandpaper, degrease it with alcohol and solder it. We turn on the heating, wait - everything works! Not very nice, of course it turned out, but the main thing here is practicality and not aesthetics!
a year ago Tags: DIY repair 2418 views
tucson-club.ru / forum / showthread. php? t = 170 & page = 14
I also tore the terminal off the glass when I was repairing the rear wiper.
I was soldering in my wife's car. the story is this:acid from a jar "soldering acid" (I suspect that this is zinc chloride, but the jar is old, I took it on the shelf), and once poked with a 60-watt soldering iron with the required amount of solder on the tip. the solder was POS-61 , I had no other. I soldered both the terminal and 2 more wires in reserve. but, I repeat, I had to learn how much to drip, how much solder and how to poke. the glass was glued to me the next day.
In general, I soldered the chip to the strip.sandpaper ... Rubbed degreaser ... Put in place flux for aluminum (I didn't have time to use soldering acid). I did not touch the torn terminal, took a copper wire and tinned it. On the reverse side, the glass was heated with a hairdryer. Next, to the place of soldering on the glass, you need drip (just drip without rubbing) as much solder as possible (I used POS-61 ) and cool. The solder spot should be as large as possible in area. I dripped twice. Then a copper wire was soldered onto these two drops. And the copper wire to the heater terminal. Ideally, it is necessary to drip so that at one time the drop hits the glass and onto the wire. Then from above you need pour glue on everything (I took epoxy) or varnish, since the soldered wire can be torn off from the deposition on the glass. On the factory terminal, it is also poured from above with some kind of glue or varnish. And it is advisable to fix the wire so that it does not dangle.
I drove from work today, checked the heating. Everything works, the glass warms up normally, the place where the solder is heated in the same way as from the side of the factory terminal (that is, there is no such thing that the place of soldering is very hot). Good luck to all!
It is similar to some, during the repair of the rear wiper, tore off the heater clamp. Traveled to workshops, almost all of them immediately refuse to solder. I did find one master shareholder who agreed to try it. But there are no results - do not stick to the solder on this coating. I read everything I found on the Internet - in total: 1.asahi 60/40 soldersotyi.
autolada. ru / viewtopic. php? t = 205326
The other day I was going to tint the car and noticed that one thread of heating the rear window (the third from the bottom) does not work. I decided to do it, I thoroughly prepared for this issue
2nd way:
3rd way:
Directly repair threads:
In all the methods listed below, you must first clean the conductive strip from varnish (better - with a bent steel wire, a paper clip) until a metallic sheen appears and degrease.
1st method (conductive paste):
3rd method (paint with shavings):
4th method (magnet and glue):
5th method (special adhesives):
6th method (soldering):
7th method (sawdust and glue):
Heating filaments on the rear window of a car may fail after a long service life of the car or due to mechanical damage. As a result, car drivers are faced with a lack of heating of a part of the glass. This causes condensation to form on it with significant temperature changes inside the passenger compartment and outside during the cold season.
Misted glass significantly reduces the visibility of the road surface, which is fraught with an increase in the risk of accidents. This problem, fortunately, can be eliminated by hand using a special glue or paste.
Part of the car's glass stops heating due to a broken thread, which, for example, you can touch with an abrasive, removing the glue from the tint film. Since the heating elements are thin and under certain lighting conditions they are practically invisible. There are several ways to detect a break:
Before you start repairing the heated rear window with your own hands, make sure that the conduction strip is clear of varnish. This must be done very carefully using a paper clip. Degrease the work surface after cleaning.
There are several ways to fix a car window heater:
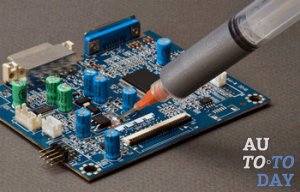
Conductive paste. To use it, turn off the window heater and allow the glass to cool down. After cleaning the filament, mark the working area, and then apply the paste in a layer of about 2 cm to each of the damaged ends of the heater element. The paste dries within 24 hours, during which it is impossible to use window heating. However, to speed up the process, drying with a building hair dryer is possible.
VIDEO
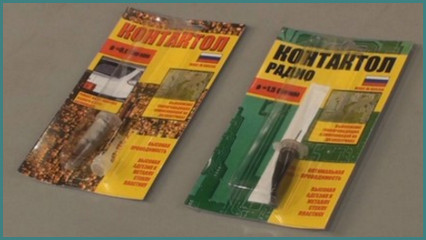
Adhesive for conducting current is produced by such manufacturers whose products you can find on the market:
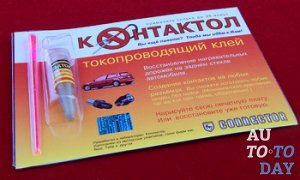
Keller ... Produces Kontaktol, a kit that contains the smallest particles of silver. Presented as a one-component mixture, low-toxic, hypoallergenic, water-resistant, heat-resistant;Loctite ... Sold in a set with a stencil, applied using the brush included in the set;Russia ... Produces "Kontaktol" agent, which is applied to the surface with a layer of 0.2 mm. Withstands temperatures up to +110 degrees. It has low elasticity and is water resistant.
How to make conductive glue yourself, cooking recipes
What is conductive glue for and where is it used
What characteristics should the glue have
4 ways to make conductive glue
In modern conditions, buying this kind of adhesive will not be a problem, but when large quantities of this glue are needed, you need to think about the cost of such repairs. On average, 25 g will cost you 100 rubles.
Conductive glue is an almost universal substance that is used in all branches of mechanical engineering, computer technology, home appliances, etc. This adhesive can be used to repair various electronic circuits such as keyboards and various household appliances. Due to its heat resistance, it is used to repair a variety of heating mechanisms, underfloor heating, tiles.
This type of glue is indispensable when repairing a car: for glass repair, it is used as a conductive paste for sealing when heating the rear window, as well as for repairing the heating threads of the rear window.
Due to its long-term use, the conductive adhesive has formed its characteristic properties.
The main feature of such an adhesive is its low electrical and thermal resistance. But, in addition to these qualities, the glue must have high adhesion with different surfaces, strength, reliability and long service life.
For more stable and high-quality parameters, it is advised to use glue, which contains polymers. They contribute to greater elasticity of electrical connections and the strength of the connection of elements.
An important feature of conductive glue is instant drying, because with slow drying, the work of the master also slows down. Elements in microcircuits may also be damaged, filled with this glue, if the glue is liquid and does not stick to a location specified by the master.
In addition to the basic functions of a conductive adhesive, it must also have a high level of safety for both the environment and the craftsman.
The internet is flooded with a variety of DIY methods for making electrically conductive glue. After checking the most popular ones, we can say that half are worthless. For your convenience, we have identified 4 basic “recipes” for making conductive glue.
A universal method that is designed for the main property of conductive glue - electrical conductivity.
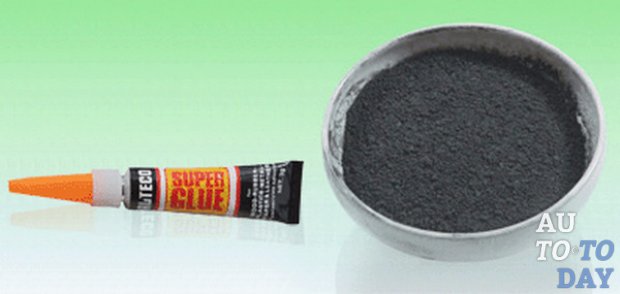
We buy the most common Chinese glue, which is in tubes. If you need a large quantity, then, most likely, you can freely find on the auto goods market or order directly from China.
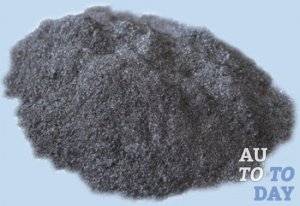
the powder should resemble graphite dust. You can use an old blender for this, and then - everything manually under a press. The proportions should be 1: 1. Mix all these ingredients thoroughly - and the conductive glue is ready.
We mix everything thoroughly and grind until smooth. This adhesive can thicken over time, therefore acetone must be added before use to obtain the required adhesive viscosity. This recipe is ideal for repairing a heated rear seat. This is a great option for do-it-yourself conductive glue for a car.
This recipe is for when you need to strike the perfect balance between electrical conductivity and bond strength.
Stir the glue well with a glass rod before use. You can adjust the viscosity of the resulting glue using acetone. All components are thoroughly mixed in a porcelain mortar. Ready glue (syrupy liquid of gray-black color) is poured into glassware with an oven.
This type of glue is great for when you need glue to repair the heated rear window filaments.
For this recipe, we need a chainlac and a central graphite rod of any battery.Grind the core to a powdery state and mix thoroughly until the consistency of thick sour cream. This type of adhesive is ideal for repairing small home appliances and car rear windows.
who actually did it? bought Don Deal heating filament repair agent. I spoiled my own when I wiped off the glue of the transits with a scraper with a knife 🙂 in the middle of the glass does not heat.
how difficult is it? are there any features?
I had a problem with the rear window defroster when I cleaned the tape with which the Transit was glued damaged the heating threads.
For repair we need:
1. scotch tape, better narrow;
TROUBLESHOOTING
To begin with, we simply visually inspect the threads for breaks, cuts, etc. they are clearly visible on them.
That's the whole repair. As a result, we have a working rear window heater, the places of repair are noticeable, but I personally do not care, my tinting is native and I don't really look there.
What to do if a break in a conductive thread is detected was discussed earlier. Now let's take a closer look at how to make a conductive glue for repairing a heated rear window with our own hands.
Why on your own? Aren't there any factory reagents? Of course I have. The industry has taken care of this. There are various kinds of repair kits and repair kits for rear window heating threads.
Quick Grid, for example, or Permatex. The set includes stencils with threads, cylinders with polymer thermoactive resin (compound).
You can use DD6590 glue, equipped with an applicator and a special activator.
Conductive adhesive Kontol-A is available for sale.
Or the products of the Moscow manufacturer Elekont.
If necessary, you should also use various conductive pastes during repairs.
But we are interested in the algorithm for making a conductive glue for repairing a heated rear window, made by hand, due to saving money and time. Do not think that in any car dealership there is a rich selection of all of the above drugs, this is far from the case.
Therefore, in most cases, you need to rely only on your own strength, especially since it is not particularly difficult to prepare such glue on your own.
How exactly to do this has been partially explained in this article. Now about this in more detail.
Conductive adhesive can be made by mixing shavings with paint. It is advisable to choose the color of the paint red, the shavings should be cut with a file, processing a copper-brass bar.
A good glue for repairing rear window heating is obtained by mixing the same shavings with BF-2 glue.
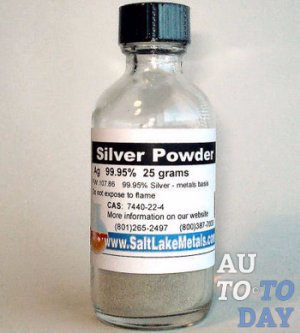
The next recipe for glue will be a little more complicated. In a porcelain bowl, 4 components must be mixed with a glass rod: vinyl chloride-vinyl acetate copolymer (30 g) + fine powder graphite (15 g) + silver powder (30 g) + pure acetone (32 g).
You can go the other way. Thoroughly crush 3 grams of shellac in a mortar and add 31 grams.alcohol (ethyl).
Another repair option is to mix graphite chips with epoxy.
In all cases, you need to remember: the main task is not just to make a reagent with your own hands from improvised means.
This is what you need to remember when making a conductive adhesive for repairing heated rear window of a car.
I don't know if my recipe will work. I do this: I mix Chinese super-glue or tsaponlak with graphite cut from a pencil in equal proportions. The conductivity is good.
Sergey on True reviews of Fenox shock absorbers
Alexei. on How to practically charge a car battery 60 amperes and 55 amperes
Alexey Vladimirovich on Alarm Starline A93 - reviews, reasoning, conclusions
Petr on DVR HD Smart 3in1 - reviews and advice when buying
Eugene on Reviews about Liquid Moli 5w30 synthetic oil and some tips
Video (click to play).
Your message has been successfully sent. Thanks!