
In detail: checkpoint lifan do-it-yourself repair from a real master for the site my.housecope.com.
Lifan Solano / 620. REMOVAL AND INSTALLATION OF TRANSMISSION
You will need: keys "for 8", for 10, "for 12", "for 13", "for 15", "for 17", "for 18", "for 22", a flat-blade screwdriver, pliers, mounting scapula.
1. Remove the battery (see "Removing and installing the battery", page 163).
7. Remove the ends of the cables from the shafts of the gear shift levers, remove them from the bracket seats on the gearbox
(see "Replacing the transmission control cables", page 107) and move the transmission control cables to the side.
14. . disconnect the harness holders and move the cover to the side.
15. Place the car on a lift.
16. Remove the engine crankcase protection
(see "Removing and installing the engine crankcase protection", page 54).
17. Remove the engine mudguards
18. Drain the transmission oil
(see "Checking the level, topping up and changing the oil in the gearbox", page 105) and screw in the drain plug.
19. Remove the front suspension cross member
20. Remove the front wheel drives
21. Disconnect the harness connector from the vehicle speed sensor.
22. Support the engine securely or support it with a lifting device.
23. Install a similar support under the gearbox.
24. Remove the left and rear suspension mounts of the power unit
All further operations are shown on the removed engine for clarity.
27.. and one rear transmission mounting bolt.
28. Carefully remove the transmission from the vehicle.
WARNING
When removing the gearbox, do not rest the end of the input shaft against the diaphragm spring petals, so as not to deform them.
29. Install the transmission and all removed parts and assemblies in the reverse order to removal.
| Video (click to play). |
Before installing the gearbox, check with a special mandrel how the clutch disc is centered.
30. Fill the gearbox with oil (see, "Checking the level, topping up and changing the oil in the gearbox", p. 10S).
1. Place the gearbox on a stand to drain the oil, unscrew the drain plug from the gearbox housing and drain the oil.
2. Remove the clutch release bearing, release fork and release fork boot.
3. Unscrew the gear shift cover bolts and remove the shift mechanism and reversing light switch, then using a special tool, unscrew the locking screw of the reverse gear axle.
4. Unscrew the fastening bolts and remove the rear cover, as well as the bearing return disc spring.
5. Using a special wrench, unscrew the four bolts from the four holes of the output shaft rear bearing cover, then remove the gear shift cover.
6. Remove the bolts connecting the gearbox and clutch housings, then remove the gearbox housing.
7. Unscrew the reverse gear rocker arm bracket bolts, then remove the bracket with the rocker arm and the parasitic reverse gear axle.
8. Using a special tool, gently tapping, remove the differential, as well as the input and output shafts as an assembly. First, remove the differential assembly, shift forks, output and input shaft assemblies, and then disassemble each unit separately.
9. Using a magnetized rod, remove the intermediate retainer.
10. Remove the shift fork retaining ring as shown in the illustration.
The modern car market is developing rapidly and the Lifan Solano car, which appeared not so long ago in the CIS countries, managed to win the trust of many drivers.This is due to the low cost, ease of operation and maintenance of the car, as well as its safety and attractive appearance.
Of course, this is not an elite vehicle and it is designed for "ordinary" people, so that the identification and elimination of all problems, the production of repair work, the drivers, as a rule, carry out with their own hands.
Problems with the clutch can arise both in outbound cars that have covered more than one thousand kilometers, and in almost brand new cars. To determine what exactly has broken or is not functioning correctly, one should know the "symptoms" of a faulty clutch. By the way, not always, if the car's gears do not turn on, it is it that is to blame, read more in the material: Why the gears on Lifan Solano are not turned on.
This is what the new clutch disc looks like
The main reasons for the breakdown of structural elements of the clutch are:
- Inaccurate behavior of the driver when operating the car - pressing the clutch while the vehicle is moving, etc.
- Of course, you may end up with an "unsuccessful" car with a deliberately low-quality part, non-original constituent elements, etc.
- All things have their own service life and parts can simply wear out, in particular this applies to the driven disk - with careful driving, it becomes unusable after 100 thousand kilometers, but for fans of "high speeds" it is even faster.
- Due to wear or damage to the integrity of the gearbox or engine oil seals, oiling of the fractional lining at the driven disk can occur.
Signs of a clutch problem are likely to occur:
- When an incomplete shutdown is observed, they say "the car is driving", while difficulties arise at the time of gear shifting with the engine running, accompanied by crackling, hum, noise. This may indicate possible damage to the lining of the driven disk, contamination or depressurization of the hydraulic drive, etc.
- When the clutch "slips", that is, poor vehicle dynamics is observed, fuel consumption sharply increases, the engine overheats, and so on. This "behavior" is typical for oiling, damage to the integrity or wear of the driven disk, breakage of the working cylinder, etc.
I must say right away that this is a difficult and time-consuming process, so if there is a need for replacement, all the necessary tools should be prepared in advance - so that the work is quick and productive, everything should be “at hand”.
- To begin with, you need to remove the protection of the engine compartment (engine crankcase) from below, and by opening the drain cover with a wrench, drain all the oil. If it will be used again later, then it must be placed in a clean container (you can put it in a 2.5–3 liter jar, since the total amount of oil is 2.1 liters).
- As mentioned earlier, replacement is a lengthy process, and there is not a minute to waste. So, while the oil is being drained, you can proceed to other manipulations - removing the battery and its platform. In this case, the terminals are disconnected from the battery in the following order: "minus", then "plus".
- After - the air filter is removed - its top cover is removed along with the pipe up to the throttle valve. To do this, loosen the clamp on the throttle unit branch pipe and quickly disconnect the branch pipe, then unscrew the 3 bolts on which the lower part of the air filter is fixed. Note: to prevent dirt and dust from getting into the throttle assembly, cover it with a clean piece of cloth.
- Now you need to disconnect the two hoses connected to the absorber and remove the absorber from the bracket (with a sharp upward movement).
- The cables are separated from the gearbox and moved to the side, the same is done with the working cylinder.
- Disconnect all existing crankshaft position, speed and reverse sensor connectors.
- First of all, the front wheels are removed, and the suspension is partially disassembled (to disconnect the wires from the gearbox).Now it is possible to disconnect both - the right and left hubs. The starter located under the exhaust manifold is removed or moved to the side. Note: for such manipulations, an assistant should be invited.
- Now you can disconnect the gearbox and only when it is completely removed, you can observe the clutch installed on the flywheel.
- The clutch basket, fixed with 8 bolts, is unscrewed from the flywheel (it must be thoroughly cleaned of possible dirt). Next, a new basket with a clutch disc is installed and screwed loosely, the disc is carefully centered, and after that all 8 bolts can be tightened tightly.
This is how one part of the gearbox looks when this part of the box has already been removed.
This is how the gearbox looks like in the place where the clutch kit is installed
It looks like an old clutch release with a mileage of 60,000 km on Solano
After replacing the clutch, it may need adjustment. Read more about the adjustment here.
W21200H - clutch kit Krafttech
According to one of our users, all clutch parts fit Solano from Breez.
Repair of the transmission (checkpoint) Lifan X60 can be major or partial. Repair of the box (manual transmission) Lifan X60 must be done only after initial diagnostics in a car service. Very often, a third-party opinion that the box needs to be repaired turns out to be erroneous. It can also be caused by the clutch, flywheel, and gear selector.
We offer two options for repairing a transmission (manual transmission):
Partial (local) repair of the Lifan X60 gearbox - we remove the box, disassemble it, wash and defect. Troubleshooting a box is determining the cause of its failure, indicating a specific malfunction. A list of spare parts for this malfunction is also provided. After agreement, we make repairs to eliminate the specific malfunction that the client has contacted. We do not touch the rest of the components and spare parts in the gearbox.
Overhaul of the Lifan X60 checkpoint - as well as with partial repairs, the box is removed and completely disassembled, washed and defective. In this case, we are not looking for a specific cause of the breakdown, but we are doing a complete defect diagnosis. All units and spare parts with increased wear, all bearings, oil seals and gaskets are determined and changed.
The box on the Solano was named LF481Q3, and the engine on the Solano was named in the same way. The transmission is 5-speed (5 gears forward and 1 reverse), has a differential. The forward gears have synchronizers, but the reverse gear does not have a synchronizer. Therefore, sometimes there may be noise when engaging in reverse.
The synchronizer serves to equalize the speed of the shaft and gear, thanks to which the gears shift smoothly and the service life of all mechanisms is significantly increased.
Among the shortcomings, it can be noted: fuzzy engagement of the first or reverse gear on some cars, lack of protection against accidental engagement of reverse gear. I rarely encountered noise in the box.
Now a little about oil. GL5 Gear Oils contain special additives that create a strong film on the metal surface. Thus, the GL5 resists loads well, reduces friction and the gears in the gearbox pass more.
But these same additives will not allow synchronizers to work normally, because their work is precisely based on the frictional force. Therefore, the use of GL5 oils can lead to earlier wear of the synchronizers.
On the other hand, the GL4 will keep the synchronizers longer, but will care much less about gear wear. Well, in general, no one knows in advance where it will fall, so do not bother too much with the choice of oil, the box is not eternal ...

To remove the box, you need to remove the front wheels, the subframe and the drive shafts of the front wheels. Jack up the box, unscrew the bolts and remove it.
one . Remove the release bearing and clutch fork
2 Remove the reverse switch, retainer and remove the bolts securing the gear selection mechanism.
Set the lever to the neutral position and carefully separate the mechanism housing from the gearbox housing with a rubber hammer and pull it up.
3 Unscrew and remove the speed sensor, unscrew the gearbox housing bolts
4 Remove the bolt securing the idler reverse gear axle and the gearbox housing bolts. Separate the transmission housing from the clutch housing and remove it.
5 Pull up the idler reverse gear shaft and remove the gear itself. Unscrew the mounting bolts and remove the reverse gear lever.
6 Separate from the clutch housing as a single unit: input shaft assembly, output shaft assembly, shift rods with forks. If necessary, to facilitate the process of separating the shafts from the crankcase, knock with a plastic hammer (or through a wooden spacer) on the end of the input shaft from the inside of the clutch housing (on the side of the release bearing guide sleeve).
7 Remove the differential assembly with the final drive gear from the clutch housing.
Video: dynamics of acceleration lifan solano
I will then share a step-by-step strategy for replacing brake pads with my own hands, who may come in handy:
The first bell, which informs that the car requires replacement of brake pads, is a creak.
So, getting started, first of all, you need to jack up the wheel and remove it. As soon as you remove the caliper, pay attention to the condition of the boots. In the event that no defects are observed, then there is no point in replacing them, although they are cheap. Then release the brake rails from the caliper. When you are able to do this, sand them with sandpaper to get rid of the rust, and wipe the dirt off with a rag. Next, grease them and put them back, while putting on the anthers.
It often happens that the rails simply get stuck in the bracket, the main reason for this is dirt and moisture. In this case, you have to work a little. The best option is to use a gas burner cylinder. Warm up the guides well and use a wrench to unscrew them, just do it carefully so that the guide head does not suffer.
Before installing new brake pads, it is necessary to carefully clean the places where they are located. To do this, take an ordinary screwdriver. After that, it is necessary to compress the caliper cylinder with a special device. If you don't have one, then take a simple hammer. Place it on the cylinder and push with great force. If the cylinder is twisted inward, the procedure will be a little more complicated. To do this, you will have to show a little imagination and use the tools at hand. Many people use a large screwdriver or pry bar.
Having overcome this rather difficult stage of work, you just have to place new pads in the bracket, put on the caliper and fix it. To make it easier to tighten the screws, you can drop a few drops on the threads of the bolts with special oil. Tighten the bolts firmly but carefully.
As a rule, replacing brake pads takes 30-60 minutes.
If the doors close behind badly:
[B] 1) option: [/ B]
“We unscrew the“ shackle ”of the lock from the body of the Solano and move it so that it is in the center of the lock.
Then we tighten it a little and slam the door, carefully open it, tighten it and if it is better or move it further, we slam it again. etc.
There is nothing terrible or difficult. "
[B] 2) option (simpler) [/ B]
Tap with a mallet-wooden hammer, without removing the rubber seal from the body, from the threshold to the top of the seat back, with normal force. The sealing gum on the doors themselves, it has been experimentally found that it does not affect the closing.
found the video “Do-it-yourself cleaning of Lifan Solano nozzles” maybe someone will come in handy
Do-it-yourself elimination of clutch slip on a Lifan Solano car
Clutch slip during hard acceleration in 3-5 gears
This malfunction occurs periodically on a car. Sometimes it manifests itself to a small extent, mainly when you need to quickly pick up speed to overtake. The tachometer climbs uphill, and the speed is in no hurry to follow it. There are several reasons for this malfunction:
1. Development on the box shaft on which the release bearing slides - in this case, the repair will be associated with the replacement of the shaft and release bearing.
2. Biting the piston of the clutch slave cylinder coupled with a tight return spring inside it. The clutch basket springs do not overpower through the release bearing and its tab to sink the slave cylinder rod, as a result of which the clutch is not engaged and slipping appears. This malfunction is treated by cleaning the cavity of the working cylinder and replacing the spring with a softer one. It is possible to replace the spring with a spring from the repair kit for the working brake cylinder of Taeta Koroly.
A few comments on this case:
The clutch slave cylinder is too close to the clutch foot. As a result, the clutch foot practically rests on the rubber cover-corrugation of the working cylinder rod.
The cover is fully compressed between the cylinder body and the release foot, preventing the foot from fully moving and engaging the clutch. Moreover, the piston of the working cylinder is completely recessed and abuts against the fully compressed return spring. Our manipulations with replacing the spring and shortening the stem to some extent solve the problem, but in my opinion not completely, since the rubber cover of the stem still does not allow the release foot to move completely and therefore fully engage the clutch.
Perhaps it makes sense to try to rearrange the slave cylinder a little further using a metal spacer plate screwed into place of the cylinder, and shift the cylinder by 5-10 mm. In my opinion, there is such an opportunity. Then there is no need to alter anything in the cylinder.
Chapter 3 Transmission (continued)
Rice. 3-37 slave cylinder of the driving axle. 1 - working cylinder 2-holder
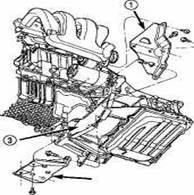
Rice. 3-38 left horizontal clamp and ring. 1-holder 2-ring 3-boot
Rice. 3-39 dismantling / installing the right-hand bent clamp. 1-axis transmission drive 2 engine 3-horizon
(15) remove the transverse bent clamp between the left side of the engine and the transmission (Fig. 3-38).
(16) remove the boot from the socket-body (fig. 3-38).
(17) remove the transverse bent clamp between the right side of the engine and the transmission (Fig. 3-39).
(18) Remove the starter (fig. 3-40).
(19) Remove the 4 bolts connecting the clutch and drive plate, when tightening the bolts, you may have difficulty aligning the holes on the drive plate. When removing the bolt, label the drive plate and clutch assembly for easier alignment when reassembling.
(20) Use a screw jack and square timber to support the engine.
(21) Loosen the transmission drive axle studs, accessing this screw through the wheel housing from the driver's side
(22) Carefully place the engine and gearbox on the screw jack to obtain sufficient space for dismantling.
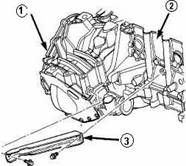
Rice. 3-40. Removal / installation of starter 1-bolts 2-weight 3-starter 4-bolts
Fig. 3-41 bolts of fastening of the upper support of the driving axle of the transmission 1-support 2-bolts 3-holder
fig. 3-42 dismantling and installation of the transmission drive axle-1.6 L 1-modular clutch unit 2-clamp 3- transmission drive axle 4-clutch bolts (4) 4-clutch bolts (4)
(23) When removing the bolts from the transmission drive axle and the engine, a second person must secure the transmission drive axle (Fig. 3-42).
(24) Remove the transmission drive axle from the vehicle
(Figure 3-42).
(25) when installing or replacing the transmission drive axle, disconnect the upper fixing part (fig. 3-43). fit the spare parts and tighten the bolts to 68 Nm
Inspection and repair of the inner parts of the drive axle of the T 350 transmission can only be carried out after the gearbox has been separated from the transmission socket
Warning: The drive axle of the transmission can only be serviced and repaired as a whole.Do not disassemble or try to assemble it separately. This could damage the transmission.
(1) Place the drive axle of the transmission on a workbench.
(2) Disconnect the clutch release bearing and the clutch release lever. Slide and align the fork and bearing in a straight line. Use both hands to grasp the lever to release it from its landing site. Apply pressure with constant force.
Warning: do not try to disconnect the lever with a screwdriver or punch, this may damage the lever or clamps.
(3) Remove the pin, remove the gear shift lever.
(4) Remove the drive axle housing bolts (Fig. 3-44).
(5) insert 2 screwdrivers between the housings as shown
in fig. (fig. 3-45), divide into 2 parts
(6) Disconnect the housing flare from the box (Fig. 3-47).

rice. 3-43 upper lock and bracket for the drive axle of the transmission 1 retainer 2- the drive axle of the transmission
rice. 3-45 drive axle housing
rice. 3-46 Split of the hull. 1-screwdriver 2-half-body 3-hole for opening
rice. 3-47 dismantling the bell 1-bell 2-differential gears 3-gearbox
Figure 3-48 disassembly of the 1-Vx transmission unit. shaft 2-Vykh. shaft 3-differential 4-box
Rice. 3-49 intermediate shaft s / stroke
1-check point 2- intermediate shaft s / stroke
3- intermediate shaft bolts w / stroke
Rice. 3-50 dismantling the reverse intermediate shaft
1- reverse intermediate shaft

Rice. 3-51 Intermediate shaft and reverse gear oil seal 1-oil seal 2- reverse intermediate shaft
(7) Disconnect the roller bearing from the output shaft.
(8) Disconnect the differential gear assembly (Fig. 3-48).
(9) Disconnect the reverse gear intermediate shaft bolts (Fig. 3-49).
(10) Pull out the reverse intermediate shaft (Fig. 3-50).
(11) remove the intermediate shaft of the reverse gear (fig. 3-51).
rice . 3-52 holder fixing screws

rice. 3-53 Dismantling the holder of the plug w / stroke 1-fork w / w 2-shaft w / w 3-shift shaft
Rice. 3-54 removing the drive axle gasket
1-node changeover 2-gasket
Rice. 3-55 switching axis 1- switching unit 2-switching axis
Rice. 3-56 Dismantling the drive axle cover 1-drive axle housing 2-cover
Rice. 3-57 end cap 1-cap 2-box.
(12) unscrew the 2 screws securing the reverse fork support (Fig. 3-52), disconnect the reverse and reverse camshaft assembly (Fig. 3-53).
(13) Use round nose pliers to remove the selector shaft washer (fig. 3-54).
(14) Remove the selector shaft pin from the lock washer, turn
switch shaft up and set it aside (Figure 3-55).
(15) Disconnect the transmission drive axle end cover (figs. 3-56 and 3-57).
(16) Remove the 2 elastic retaining rings holding the output shaft, input shaft and bearings (fig. 3-58).
Rice. 3-58 elastic rings - bearing holders 1-round nose pliers 2 - elastic rings-holders
Fig. 3-59 puller 1-oil seal 2-drive shaft of transmission 3-6785
1 - bearing clamp 2-drive shaft housing
(16) Using a puller and oil seal (Miller tool # 6785, 6785-1 and 6785-2), rotate the transmission drive axle. Place the shaft on the clamping plate (fig. 3-59).
Make sure the seals are properly seated on the tool, then place the drive axle under the press unit.
(17) Install Miller Tool Bearing Clip 6768 onto the bearing
the drive axle of the transmission (Figure 3-60).
(18) Make sure the alignment of the input and output shafts of the tool is correct.
Warning: improper use of the clamp can damage the deflectors on both ends of the shaft.
(19) Place the drive axle box on the baler, press out the input shaft assembly and
output shaft out of the box. (Figure 3-61).
(20) Carefully remove the transmission drive axle from the press unit.
(21) Carefully remove the transmission drive axle housing from the axle housing, input shaft assembly, output shaft, and puller (Figure 3-62). do not damage the end bearing oil passage (fig. 3-63).
(22) remove the reverse stop cone and lock ring from the input shaft assembly (Figure 3-64).
(23) Remove the shift stopper assembly from the puller (fig. 3-66).
(24) Remove the input shaft and output shaft assembly from the puller (figure 3-67).
Warning: The output shaft assembly is a one-piece assembly. do not try to repair it. If 2 synchronizers or gears are faulty, replace the entire assembly.
Rice. 3-61 pinion pressing 1-bearing clamp 2-press head
3-case of the driving axle of the transmission. 4-plate tool
rice.3-62 Dismantling the drive axle housing 1- housing 2-Puller 3-gearbox
Rice. 3-63 oil feed groove 1- oil feed groove
Rice. 3-64. 1 - friction cone

Rice. 3-65.1-reversing retaining ring
Rice. 3-66 stopper dismantling 1- 6785 stripper 2- stopper assembly
Warning: The output shaft assembly is a one-piece assembly. do not try to repair it. If 2 synchronizers or gears are faulty, replace the entire assembly.
Use solution to clean gears, bearings, shafts, synchronizers, washers, oil filler, transmission, gearbox and housing. with the exception of the bearings, use compressed air to purge all parts. Dry the bearings in the shade or wipe dry with a cloth.
Check gears, bearings, shafts and seals. If wear, damage, cracks, stains are found, or if the bearing holder is damaged or warped, replace the bearing and bearing cap. In case of wear, breakage, loss of wear of the gear teeth, replace the gears. check the synchronizer: in case of broken teeth, wear.
Rice . 3-67 Dismantle gearing unit 1-785

 Figure 3-68. puller 2-in / out. shafts

Rice. 3-69 installation of led. axles 1- puller 6785 2- switching plug
rice. 3-70 Stopper Installation 2-Shift Stopper Assembly
Figure 3-71 Installing the reverse circlip

 Rice . 3-72. 1- frictional locking cone
If there is wear on the friction material, replace the retaining ring. Check the key and the synchronizer spring. If wear, cracks or deformation are found, replace.
the inner parts of the drive axle of the T 350 transmission can only be accessed for repair and maintenance after the gearbox has been separated from the bell of the clutch cover.
Warning: The output shaft of the drive axle of the transmission is serviced as a whole. Do not try to disassemble / assemble this unit, as this could damage the drive axle. The seal used on both ends of the drive axle housing is Mopar Gasket Marker, Loctite 518 or equivalent. Seal used for Mopar RTV bearing.
(1) Make sure the removal plate clamp
the oil seal is removed from the Miller puller. Install the output and input shafts on a puller (Miller Tool 6785) (Figure 3-68).
(2) Insert the axle plug and the switch-on plug into the puller (Fig. 3-69).
(3) Install the stopper assembly onto the stripper (Fig. 3-70).
(4) Install the reverse stop circlip (Fig. 3-71).
(5) Install the reverse stop friction cone (Fig. 3-72).
(6) close the cover (fig. 3-73), align the holes of the flange 3-4.
(7) Align the flange of the friction cone of the h / h stopper with the slot on the gearbox (Fig. 3-74), make sure that the stopper oil seal is in place
(8) Install the input and output shaft bearings onto the shafts using Miller's C-4992-1 Bearing Press-In Tool, making sure the bearings are steel in place (Figure 3-75).
Rice. 3-73 check point 1 - box
2-puller 3-gear block
Rice. 3-74 1-gearbox 2-friction cone flange 3-input shaft
Rice. 3-75 Bearing Installation
1- bearings I / O shafts 2.Special tool C -4992-1
Traction problems can arise both after 15-30 thousand kilometers traveled, and with a small kilometer. Sometimes malfunctions occur even with "unbroken" cars. Careless handling or normal wear and tear are not so important reasons. The main thing is that you can replace the clutch yourself, without going to a car service.
How do you know if your clutch needs replacing?
A common symptom is slipping. For example, when shifting from 2nd to 3rd gear, a drop in power can occur with a simultaneous increase in rpm and fuel consumption. If this happens, most likely something is wrong with the driven disk.
Other signs include noise or dull crackling noise when shifting gears. These sounds are associated with a damaged disc lining or dirt in the hydraulic drive. Incomplete disengagement of the clutch when it is "driving" can also signal its malfunction.In all these cases, it is better not to delay the matter and replace it at the first convenient opportunity, otherwise you will have to buy a new flywheel as well. And these are completely different expenses.
Preparing for replacement
To get started, you will need:
- Buy a new basket and clutch disc. You can buy them in the KITZAP online store. It will cost much less (often 2-3 times) than repairs from an authorized dealer.
- Prepare tools for work: a set of heads with extension cords and cardan shafts, a hammer, a jack, pliers, centering for a clutch disc.
- Allocate from 3 to 8 free hours in your schedule. Replacing a clutch is a long process.
- It is advisable to ask a friend for help. It will be difficult for one to cope.
The clutch replacement process can be divided into 4 conventional stages. Let's take a closer look at each of them.
Stage one - working under the hood
First, you need to remove the crankcase protection from below and unscrew the plug at the checkpoint (the easiest way to do this is with a 22 open-end wrench). Let the oil drain into a clean bowl or bulky plastic bottle - then you can refill it.
Then you will need to sequentially remove several more units:
- Battery: disconnect the terminals (first "minus", then "plus"), unscrew both nuts and remove the battery together with the pallet.
- Air filter: loosen the clamp of the air duct, remove the top cover to the throttle assembly, and then the bottom of the housing.
- Absorber (first disconnect both hoses from it).
Disconnect first the cables and the slave cylinder from the gearbox (all this is held by 5 bolts), and then the connectors of the reverse, speed and crankshaft position sensors. You need to be careful with the crankshaft sensor: it is installed very close to the thermostat, it is easy to miss and break it.
Now it's time to get down to the "lower level".
Getting ready to remove the checkpoint
Raise the front of the machine with a jack (one or two). It is undesirable to leave the car on a jack; it is better to substitute wooden blocks. When the machine is in the desired position, remove both wheels and disconnect the ball joints. Now pull out the right wire from the checkpoint, while simultaneously pulling out the right hub (this is a difficult number - it is better not to do it alone). The left wire will have to be knocked out through the socket of the right drive, and also while simultaneously pulling the left hub.
The starter will be released, which can be removed or pushed a little to the side so that it does not interfere with subsequent work. It remains only to remove the gearbox.
Dismantle the gearbox
Removal is done in 3 steps:
- It is imperative to hang out the engine with a hoist, although this is a time-consuming operation.
- Deprive the gearbox and engine of points of contact by unscrewing all supports (they are held by a total of 6 bolts).
- Remove the box very carefully and smoothly.
When disconnecting the engine, it is better to secure the gearbox with a jack so that it does not fall or get damaged.
Replacing the clutch
After a long preparatory work, a direct admission to the clutch is finally emerging. It remains to do what for the sake of which all this was started:
- disconnect the clutch basket from the flywheel (the flywheel itself must be thoroughly cleaned from dirt with a cloth);
- put a new clutch basket with a disc, center the disc and tighten all previously removed bolts tightly (in that order);
- replace the release bearing on the gearbox shaft, after having lubricated the shaft;
- put the gearbox back and reassemble everything in the same way, but strictly in reverse order.
Ready! The deed is done, and on the revised Solano, you can hit the road again. Just in case, do not forget to adjust the clutch before doing so so that no annoying interference occurs.
professional repair with a guarantee of quality mechanical transmission of Lifan X60 all modifications Moscow Russian Federation
REPAIR OF CAT LIFAN X60
MEKHANLIFAN X60 INDIVIDUAL GEARBOXES
installation | replacement | buy all modifications
shaft repair and restoration | argon welding of the manual transmission body
Moscow city
Artem 8 965 126 13 83 Vadim 8 925 675 78 75
Full car diagnostics during repair - free of charge!
Possessing a high level of professionalism, extensive experience in the repair of manual transmissions, and our own warehouse of spare parts, we carry out diagnostics, sale, replacement and repair of all types of manual transmissions for the LIFAN X60 car. Box repair begins with an initial, obligatory free diagnostics.
- consulting by a repairman / by phone free of charge /
- delivery of the car for repair / within the city of Moscow 3,000 rubles. From the Moscow region and other regions of the Russian Federation - by agreement /
- complex car diagnostics / determination of the presence of a malfunction of the engine, manual transmission, ABS, brake system; checking the electrical circuits of the car for corrosion, checking the kinematic destruction of the unit, checking the level of transmission oil, checking the operability of the clutch hydraulic system / - during repairs free of charge
- visual inspection, checking the integrity of the hull
- checking the transmission oil content for steel, aluminum or bronze chips
- opening the pallet / if necessary /
- removal from the car
- disassembly, flushing of parts and assemblies
- troubleshooting / presence of the car owner - required /
- agreement with the car owner on the cost of full repair and the date of completion of the repair
- receipt of spare parts from the warehouse / rem. kit, consumables, units /
- repair / argon welding / gearbox housing if necessary
- assembly
- clutch replacement / at the request of the car owner /
- installation on a car
- filling with gear oil
- output diagnostics and tested drive of the car
Warranty from 3 to 24 months or 60,000 km. mileage.
We have a fund restored manual transmissions / see article replacement / ... If the car owner wishes, we can replace the faulty one with one that has been sorted out from the exchange fund, which is often more economically expedient.
When buying a used gearbox for Lifan X60, it is important to clarify which speedometer drive is on your box (mechanical or electronic). If you install a drive other than yours, the car speedometer will not work! Pay attention to the pictures below:
Complex troubleshooting of manual transmission (disassembly - assembly) without repair
Removal and installation (as separate work)
Replacing the clutch with the box removed
- economy - from 3,000 to 8,000 rubles / use, at the request of the car owner, only used parts to reduce the cost of repairs /
- business - from 8,000 to 18,000 rubles. / replacement only of directly damaged parts in the unit /
- representative - from 18,000 to 40,000 rubles / replacement regardless of damage with a set: oil seals, bearing bearings, needle bearings, synchronizers, stoppers, coupling hub locks - plus directly affected parts /
Own warehouse of spare parts necessary for the repair of manual transmissions. Bearings, oil seals, gears, synchronizers, gear couplings, shafts, differentials, manual transmission housings are available and on order for all brands of cars.
Most of Lifan x60 gearbox repair requests are associated with bearing noise and a malfunction of the fifth gear. An example of such a box in the photos below. The bearing bearings, oil seals, gears and gear couplings are being replaced:


