In detail: a lamp for auto repair with your own hands from a real master for the site my.housecope.com.
I have long wanted to open Chinese car bulbs and look at their design. By the filling, you can find out the main problems with heat removal from the LEDs and drawbacks in the assembly. Let's open the H11 LED bulbs, this is a car low-beam base. Samples provided by the online store is the only store that writes real characteristics, not Chinese ones.
First, read part # 1 "H11 LED Bulb Review", which measures light and electrical parameters.
- 1. Characteristics of the H11 autolamp
- 2. Filling
- 3. Radiator and ventilator
- 4. Heat pipe
- 5. Plates with LEDs
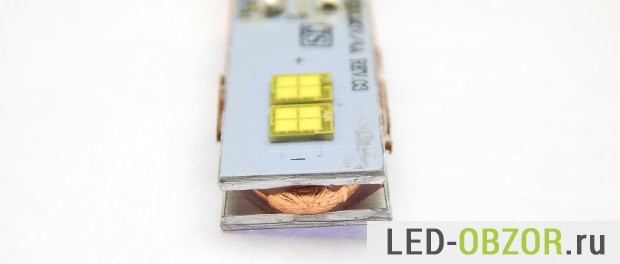
In terms of luminous flux, this autolamp fully corresponds to 3200lm xenon with a color temperature of 5000K. It is equipped with 4 powerful Philipz MZ LEDs, which, after warming up in operating mode, provide 3200lm. It turns out that each diode shines at 800lm. Usually all shops and Chinese lie about lamps, they have any LED equal to xenon. Roughly speaking, two Philips MZ chips will shine at half the brightness of xenon with good cooling, except for a flexible radiator with braided petals.
An analogue of Philips MZ chips is the Cree XHP50 LED, they are similar in luminous flux and power. The main difference is that the maximum crystal temperature of the Cree can be up to 150 degrees, which is 15 higher than that of the competitor.
These bulbs are most often in demand among car owners Mazda 3, Mazda 6. Their optics are lensed, the lens shines better than a reflex headlight. They put it in the low beam, sellers and owners say that it shines with the correct cut-off and good light distribution.
| Video (click to play). |
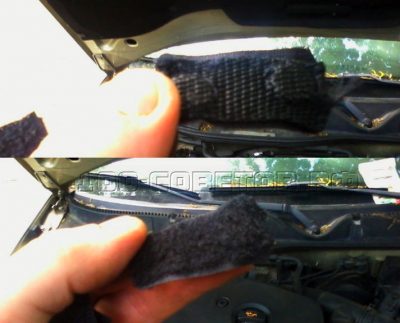
Due to the presence of an active cooling system, I do not recommend installing it in foglights (PTF). The part that will stick out from the outside must be isolated from road dirt and dust. Therefore, it will feel good only in the low beam of the car.
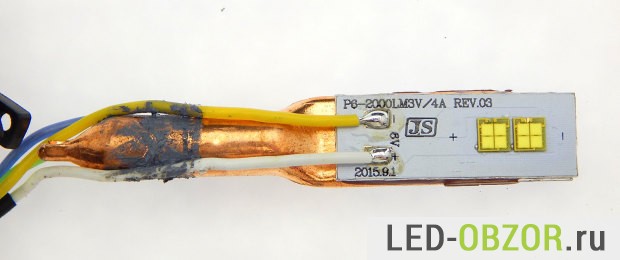
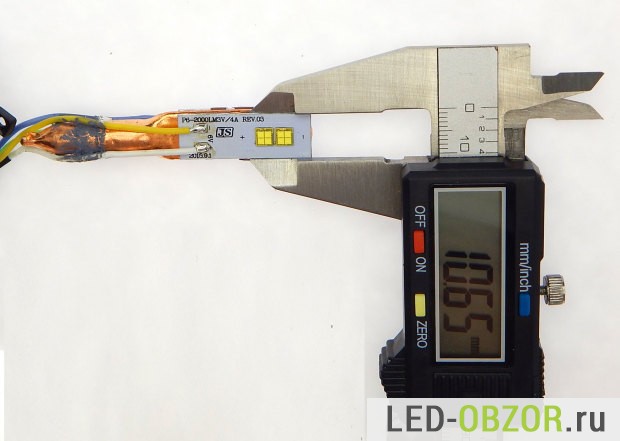
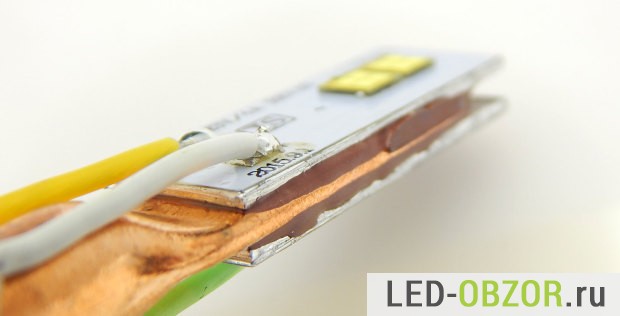
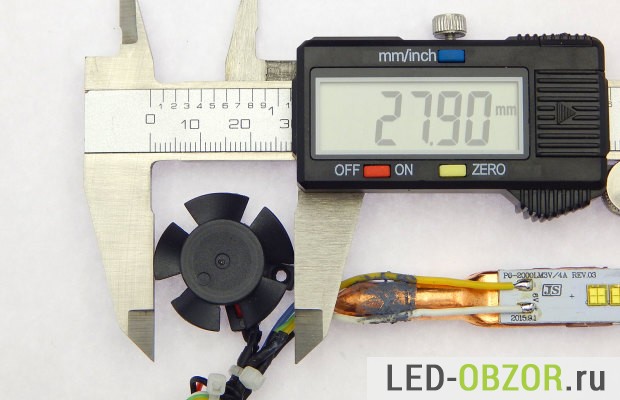
This LED car lamp is very difficult to disassemble, it took an hour to remove the plastic protection. It sits on 4 hard-to-reach latches. They had to be ground and cut so that the sample did not lose its presentation. The radiator with the fan is covered with a protective casing made of decent plastic, not fragile.
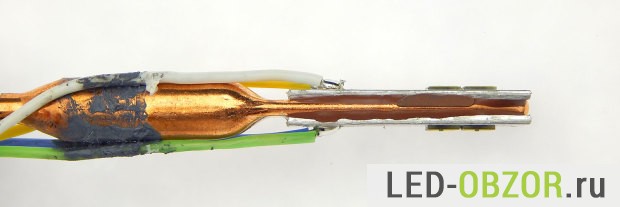
The wire coming from the driver is shielded with a layer of foil so that the PWM interference does not fall into the VHF range, and the radio works without interference. The current source is powerful enough, the total power consumption at 13.2V is 50W and a current of 3.5 Amperes. The cable consists of 5 wires in a silicone sheath; in the cold, the insulation will not crack like PVC. It turns out for each diode a separate power supply. According to the specification, the Philips MZ chip has 3 supply voltages 3V, 6V, 12V.
When I removed the fan, radiator, twisted the base, the understanding with the LED lamp for the car ended. The ring did not want to be removed, although it moved back and forth by 2mm. To expose its hidden mounts, I had to wipe off the thermal paste. But the white mass turned out to be a sealant.
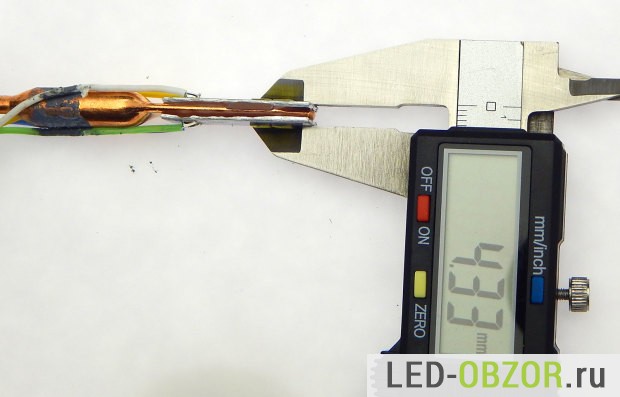
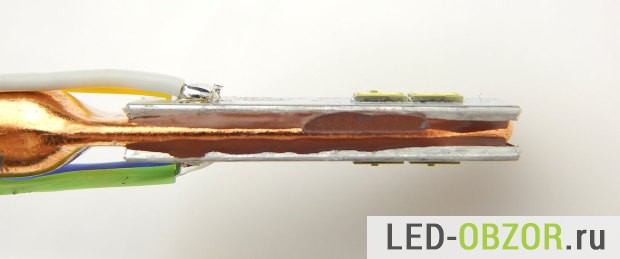
The H11 car LED bulb is assembled on a heat pipe. It contains a liquid that boils at low temperatures, for example, 70 °.
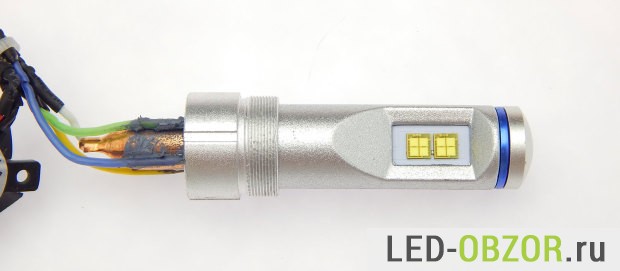
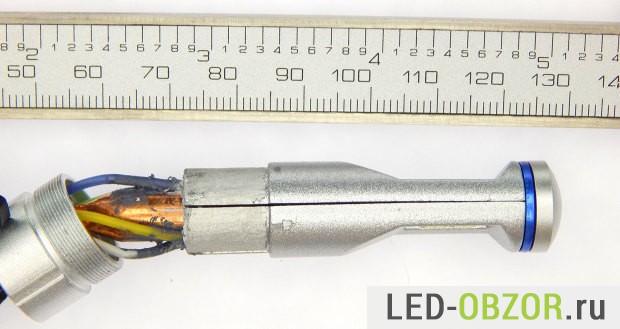
Philips MZ LEDs are mounted on heat-conducting glue. It will be impossible to solder them parallel to each other. The adhesive is abundant and tight to the tube. The only cap on the end of the LED lamp could not be removed, which is after the blue ring. I tried to knock out, as soon as the decorative protection with holes for led diodes will break and wrinkle.
Uncovering the Truth About Starled LED Bulbs
Powerful H7 LED bulbs for cars on CREE MT-G2
Revolutionary LED headlights
Sergey, good afternoon! Tell me how the plastic case is removed from these lamps?
Very poorly removable, with damage to the body.
Good afternoon, I plan to buy these lamps on ikstrayl 31 Restayl with halogen lenses. The first question is - will the test be carried out with a xenon lens or a halagen lens? I have a stg without a jackdaw, but as in all galagenic lenses on the curtain there is a tongue for "polite" illumination of the signs and I would like to see how much the illumination above the stg will be "polite" with these lamps or with the tongue on the curtain I will have to do something. 2 - doubt crept in about the originality of the ice, as in the photo of the original (your site "characteristics of MZ diodes", the tracks on the diodes are slightly different.
The lens for these lamps has appeared recently, so I plan to conduct a comparison test with a halogen soon. Although it will be possible to compare with xenon.
These lamps cost more than a year in PTF lenses, everything works fine as well as -40 in winter and up to +40 in summer. In the summer, the lamps worked for 17 hours without turning off in the morning +25, in the afternoon up to 40. There was no way to measure the difference in brightness with high heating, I forgot the light meter at home. So you can put in PTF without any problems, unless of course you are engaged in road driving.
Now I can test these lamps in H11 lensed optics, I recently found a suitable lens. Such lamps cannot be installed in a headlight with a reflector (reflector). How these lamps work, right or wrong, will be shown by the diagram of the distribution of light from the lens. It happens that some powerful lamps shine very badly in the lens, because some of the LEDs are located incorrectly. After installing the PTF, it is necessary to check the cut-off line, the angle of inclination, and adjust them.
Exactly, I forgot to insert a link to the first review of these H11 lamps.
Wed Jul 29, 2014 
 Category: Do it yourself
Manufacturing of LED lamps and their installation on the example of a Porsche 924 car. This article describes a method of making LED lamps at home with their subsequent installation on any car without unnecessary interference in the design of the car itself, lighting devices and wiring.
This means that everyone, regardless of the make and model of the car, can replace the failed bulbs of the rear lights, direction indicators, instrument panel illumination with new LED ones, using only the base of the old lamp.
Without going too deep into theory, we know that LED lamps consume 80-90% less power than incandescent lamps, while having a comparable luminous flux. This way we reduce the load on the generator and battery, save fuel and protect the environment. A trifle, but nice! Also, LED lamps have a significantly longer service life, reaching, according to Chinese manufacturers, 50,000 hours or almost 6 years of continuous operation. In practice, this figure can be safely reduced by half, or even three times, but still much more than that of Ilyich's bulbs.
Someone might argue that car LED lamps are no longer news. You can safely buy them without throwing away half of your salary. But it just so happened that I ride an old Porsche 924 from 1980. And I love this car, especially since during the entire time of ownership, it has never let me down. Like a woman, she requires regular care and prevention. But modern cold white light with a bluish tint does not suit the rarity. I want the right warm light with a cozy yellowness.
Unfortunately, all LED car bulbs I have come across have a cool white light. But there are LEDs with the correct warm glow, but in bulk, that is, without a base.
So, I bought a hundred 3mm LEDs with the "right" warm glow and 470 ohm resistors to accommodate the car's electrical system.
I confess that my conscience is not clear. One of the backlight lamps on the speedometer has burned out a long time ago. To replace it, you need to disassemble the instrument panel. And this is not so easy to do.View lamp type. Assemble the panel back. Order lamps and wait a month until they are delivered. Then disassemble the panel again and change the lamps. Not a rosy prospect.
My patience ran out when the rear right side marker stopped working. It was a 12V / 5W lamp. Moreover, the evening before the weekend and all the shops are locked.
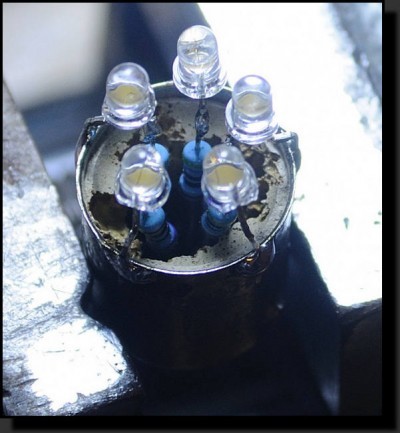
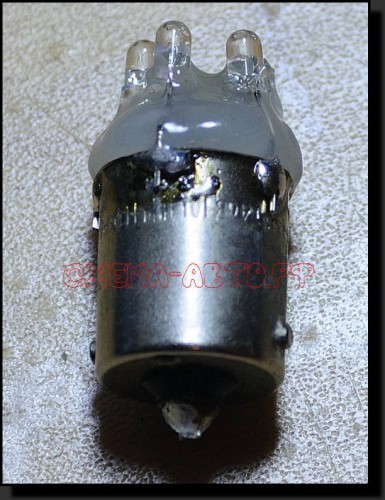
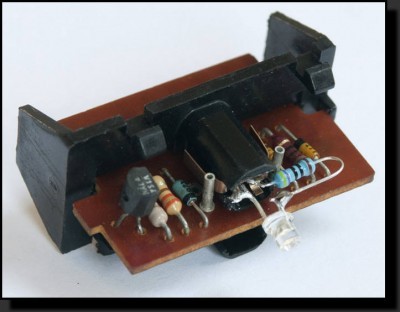
So I took the burned out llama, removed the glass and the remnants of glue, soldered 5 LEDs with resistors into the base and filled everything with hot melt glue for reliability. Here's what happened.
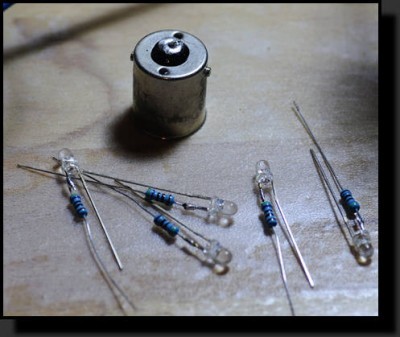
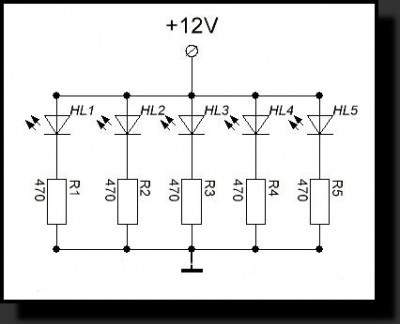
From my point of view, it is not worth connecting LEDs in series (for example, as in the picture).
This will save a couple of resistors, but the power consumption will not change. The voltage in the chain will simply drop. In this case, the entire structure must be placed on a small board of a suitable size. And if one of the LEDs burns out, the rest in the chain will also stop working and the lamp will have to be replaced again. But it will be much better this way ...
The next day I was not too lazy, took off the steering wheel and disassembled the instrument panel, got to the backlight lamps and safely soldered the LED paired with a resistor into each base.
The dashboard now shines like new again.
By the way, each light bulb consumed 1.2 watts of power, and there were as many as 6 of them on the dashboard. Plus one more in the clock, voltmeter, pressure gauge and engine operation indicator. In total, this is already 12 watts. And I have not yet counted 5 W lamps, of which I have replaced one so far, lamps for lighting the trunk, interior, glove compartment, a lamp under the hood and room lighting.
I spent not so much time on all the work and got a lot of pleasure.
The idea is interesting, but what kind of LEDs did you use? I have a VAZ 2108 in the tail light, the lamps are located sideways, and the St. diode shines forward. What to do, what do you recommend?
You need to leave long leads at the LEDs (if necessary, build them up) and, since the lamp is on the side, bend the soldered LEDs in the direction you need, after inserting the lamp into the headlight holder (so that it does not come out crooked later). Next, fill the LED leads with hot glue, epoxy or any other compound for sealing.
I put such LEDs, but in the sun they are almost invisible, although I soldered about ten of them, so that the side light and one LED is enough for the eyes, but they will not go back to the turn signal.
The author claims that the power consumption is the same when connected in parallel and in series - this is not the case.
The second diagram shows 5 parallel circuits, one LED per circuit. with a current of 20 milliamperes through the LED, we get a total current of 100 milliamperes. Multiplying the 12V supply voltage by a current of 0.1A, we obtain a power consumption of 1.2W.
Now let's look at the first diagram. Two circuits with 3 LEDs each. The same current of 20 milliamperes is multiplied by two circuits, we get 40 milliamperes and multiply by 12 volts - we get a power consumption of 0.48W.
In total, 5 LEDs connected according to the second scheme consume 2.5 times more electricity than 6 LEDs connected according to the first scheme.
The author is constantly distorted and complicates everything. It is possible to power all the LEDs connected in parallel through one resistor and that's it. As for the sea of pleasure, I deeply doubt it. But the sea of masochism with a soldering iron is for sure
It is forbidden.
Rather, if you want to do it in one place, then you can. It is also possible for the Chinese in basement products.
And in life, LEDs cannot be parallel, because they light up not from voltage, but from current. Why is a current-limiting resistor installed (although for a good driver you need a normal one). And with your scheme "one resistor for two parallel diodes", there will be a situation that each diode (and their performance characteristics are different) has its own current ... and if one burns out, then the other will be pulled along, because the current will go to the other more.
The author has not the slightest idea in the manufacture of LED lamps for a car. In a car, the voltage ranges from 11.6 to 14.5 volts. LEDs when selecting a resistor for 12 volts will burn like matches when the voltage rises to 14.5 volts, and when it falls up to 11.6 volts can glow in the floor.
For normal operation of LED lamps, it is necessary to make drivers on a Chinese-made LM317 microcircuit or similar.
pavel74
Banned![]()
Konstantin_EX
Warnings: 1![]()

insert an energy-saving light bulb into the carrier, and that's it! does not shake off, does not eat a fig and shines norms.
took a cheap one for a promotion in one store for 40 rubles,
satisfied 
Dymdyr
I also took a fluorescent lamp powered by a battery - garbage, if it's light outside and you need to look under the car, there is little light from this lamp for your eyes.
it can only be used in complete darkness, the eyes get used to the norms, but who works in the garage at night? but on the track at night if you got up - will help out.
I use three carriers myself! 
at 220V. one in the form of a bell on a clothespin, took in Auchan for 100 rubles.
and two classic Chinese carriers with different cord lengths.
energy savings are everywhere.
there is a Chinese headlamp - it is convenient for repair in out-of-garage conditions,
and there is also a small manual flashlight (expensive high-quality china), look at an example in the clutch housing, look at the mark, sometimes you need a compact directional light.
Konstantin_EX
Warnings: 1![]()
O150rus
it needs to be specifically dropped so that the flask would break.
while the flask is intact, it works.
I myself have dropped the carrier many times into the pit - all the rules.
Added after 2 minutes 47 seconds:
count, purely financial result, for yourself.
if once a year you climb under the car, then the old “Ilyich's lamp” will suit you.
_________________
Konstantin_EX
Warnings: 1![]()
her, how many incandescent bulbs you click while repairing 
I'm not talking about kW speech mind.
although kW is also nice to save.
if you do not use the tool, then generally the penny burns up.
although kW is also nice to save.
if you do not use the tool, then generally the penny burns up.
rover
Cunning vanger
I have such a flashlight on a clothespin. Only a lamp there needs a weak-power 20-40 watts, no more, otherwise the cartridge inside begins to fall out. The cord was immediately changed to a round low-current one so that it would not curl, it was long, about 6 meters. Enough with him to climb anywhere, sockets on both sides of the car. If there is one outlet, then 8-10 meters should be
Konstantin_EX
Warnings: 1![]()
Konstantin_EX
Warnings: 1![]()
snow02rus
such a booze has gone 
headlamp is the most convenient type of flashlight!
I used to be sick with flashlights
here is such a gift to receive.
factory China.
of this brand (Phoenix) I bought three hand-held flashlights. they are already 6 years old, one really lost a year ago at work 
, but generally please with their good quality.
Added after 17 minutes 46 seconds:
Phoenix is traded by a number of firms in Russia, but only one official. dealer.
You can still order from the USA, if you cooperate with someone, delivery will be cheaper, in the end everything will be cheaper than buying in Russia.
You can still dig on Ebey and Alibaba.
you can generally order a Chinese brandless from the dielextreme, such as
_________________
Konstantin_EX
There is no such thing on all counts. 
You hit everything with your headband in cramped conditions, and if it is not tilted, it shines into the ceiling.
Phoenixes are expensive and stupid: often yesterday's crystals and non-separable constructs for horse money, plus only good electronics (only if it quacks, the lantern is in the trash heap). There is a bunch of good China for sane amounts (s-mini or convoy s2 for example).
... and if you need “bling-bling” then here is a brass steampunk lantern, the smallest one for lithium 18650: https://aliexpress.com/store/product/New-Version-Brass-CREE-XP-G2-R5-3C-NW- 1 × 18650-EDC-Flashlight / 925745_1978743895.html
_________________
Domestic cars only!
Gentlemen, start your engines!
Renault-Nissan, hands off AvtoVAZ!
Konstantin_EX
Warnings: 1![]()
snow02rus
I worked in a forehead, I have all the rules
only positive emotions, even from shitty Chinese, shines after all and hands are free!
by lithium. to be forever tied to an outlet? chargers and custom-made elements? well nafig,
For me personally, AA (finger) is a priority, I immediately take packs of batteries of 10 pieces, and they are at home and in the car. I understand that AA is not quite suitable for lanterns in terms of characteristics (the capacity sags very much from the load), but availability!
Added after 7 minutes 7 seconds:
I went through the very stage of using AA batteries.
not for me.
this is for those who use a flashlight every day on duty.
the self-discharge is high, it does not lie down much, you turn it on, but it is enough for 15 minutes, so it was spent on batteries, they do not ask to lie down and eat.
_________________
Konstantin_EX
Warnings: 1![]()
Have a spare bottle in your pocket, don’t? Of course, "a charger and custom-made elements", but even in a 2000 mAh can of a raznofayer 18650, the energy is three times more than in a good AA cell.At a current of 150 mA (and on such a modern crystal XM-L gives about 100 Lm, enough for work), the Panasonic 3600 will last about a day. The main jamb of lithium - it blows off great from the cold, at -30, despite the fact that on the head it gives 50% or less of the capacity.
.
Wake up and sing, my friend: 7-8 years ago nickel-metal hydrides with a low self-discharge appeared, they are discharged from a third to a half in a year. Even in ikea, right now there are super-cheap batteries with low self-discharge,
50 rub. for AA. Called LADDA (LADDA).
.
For example, I would like to disassemble my ITP A4 EOS: change the ancient cyanotic XPE to a modern neutral XML, but fig - it's glued tight. 
_________________
Domestic cars only!
Gentlemen, start your engines!
Renault-Nissan, hands off AvtoVAZ!
Konstantin_EX
Warnings: 1![]()
Have a spare bottle in your pocket, don’t? Of course, "a charger and custom-made elements", but even in a 2000 mAh can of a raznofayer 18650, the energy is three times more than in a good AA cell. At a current of 150 mA (and on such a modern crystal XM-L gives about 100 Lm, enough for work), the Panasonic 3600 will last about a day. The main jamb of lithium - it blows off great from the cold, at -30, despite the fact that on the head it gives 50% or less of the capacity.
Yes, I know that's all.
and have a spare jar in your pocket. you yourself understand that here again we need pencil cases for the elements (you short-circuit the usual AA in a fist, you will understand what I mean.) + regular check, or training of reserve (discharge / charge)
I repeat once again, the AA battery format is more convenient for me.
and you can go fishing / hunting away from the outlet, right now you think that you just need to strangle the toad and buy more spare lithium batteries
yeah invest money and then hardly use it?
, I have the right not much and lag behind the industry, I used to use Ansmann.
Well, you understand perfectly well - everything understands there, this glue has a number of functions.
- "protection from the fool"
I think this is its main goal, because children can also be a user.
- joint sealing
- a kind of seal, service workers when contacting during the warranty period, everyone will understand whether they climbed or not.
- creating a temporary permanent connection
I personally don't need my head spinning under a car or in a forest.
how to open it, I think you yourself know, here are just two questions, without under ** side, but just interesting, since right now I have two lanterns from phoenixes on my hands, with already ancient diodes. (LD10, TK20). Having opened your flashlight, how are you going to achieve the alignment of the new crystal relative to the reflector? if the departure changes, then the operating mode of the reflector will change. and how will you get rid of the dust?
_________________
Very rarely, car repairs are carried out at night, but such a possibility cannot be ruled out, and therefore every zealous owner should keep in the garage portable lamp for situations like this.
Most car owners prudently put lighting in their garages, but it so happens that there is no light in the entire area, and the vehicle flatly refuses to start. And you need to crawl under the hood, but it's inconvenient with a flashlight, but dangerous with a candle. And if there is no generator set, one option remains - a portable ultraviolet lamp, for a car service or a private garage it is equally suitable. Moreover, we are not talking about a household version (a cartridge on a long two-core wire with a plug for a standard outlet) - the light source should be convenient for repairs in any conditions. For comfortable work, you need diffused white light, which is provided by fluorescent lamps with ultraviolet radiation.... A conventional incandescent lamp, which emits radiation in the red-yellow spectrum, is not suitable for a garage.

But again, the light source shouldn't just be screwed into the socket at the end of the wire. Since you have to disperse the darkness above the engine, where you will have to work with a variety of tools, you need a reliable housing for the lamp, and the device should not take your hands. So, we need a lamp with a hook or other hanging device. Today, models are produced equipped with one or more hooks, and some also have quite comfortable handles.The power source can be sockets, but, as the example above shows, this is an unreliable way to provide the lamp with electricity, so it is better to choose options that work from a cigarette lighter, and in case of damage to the car's wiring, with built-in batteries. For comparison, we present a table with descriptions of several models.

In a car workshop or garage, local light sources are quite strict. In particular, lamps for use in operating conditions must be fitted with opaque reflectors. At the same time, in places with an increased danger of fire, the lamps must be powered with a voltage of up to 50 V, no more. If the ventilation in the garage cannot cope with the load and the room has high humidity or temperature, the fluorescent lamp should be enclosed in a light grate... However, once you leave the garage, all of the above fades into the background. Now the most important thing for you is the autonomy of the lamp and its convenience, because if the car breaks down on the road, its repair will take place in rather uncomfortable conditions.

A portable car lamp, by definition, must be connected to the car's cigarette lighter and, in addition, have batteries with sufficient capacity for several hours of operation. Even better, if the lamp has alligator clips, then the wires can be connected directly to the battery. The controversial question of what kind of lighting the lamp should give out - a diffused or a directed beam, here it is more convenient for someone. One thing is indisputable - it is very easy to drop the lamp during operation, and therefore it must have either strong reinforced glass or a grill covering the shade. This is similar to garage and road lighting fixtures. You also need a long wire so that you can work anywhere in the car, and, of course, a hook or a suction cup for fixing - your hands should be free.

Camping gaz