
In detail: lenovo yoga 13 do-it-yourself screen repair from a real master for the site my.housecope.com.
I took this laptop from my hands. The previous owner dropped it and flooded it. As a result, the display sensor was broken and the keyboard did not work. I replaced the keyboard, did not touch the sensor, because it is not sold separately, but only comes with the display matrix - a sandwich. Since then, I have been using a laptop for one year. Now it's time to clean it up.
In this video I have highlighted disassembly and Lenovo IdeaPad Yoga 13 laptop service Highlight the most important and critical points in the disassembly. Good luck and good mood!
LCD - 13.3 inch IPS (1600 × 900)
CPU - Intel Core i5 - 3337U
Ram - 8Gb DDR 1600
SSD - 2 x 128Gb
Bluetooth, Wi-Fi, USB 3.0
Windows 8.1

Failure of the matrix and the screen sensor, it is required to replace the model as a whole or separately of the sensor, matrix. Check the exact prices for the display assembly with the manager.
Repairing a Lenovo Yoga 13 laptop is an extremely difficult task, because the device is capable of operating in two modes: laptop and tablet, which means that all fasteners and hinges must function flawlessly and evenly distribute pressure.
The employees of our service center are highly qualified and experienced in order to successfully cope with the task. We will promptly repair your Lenovo Yoga 13 laptop due to a breakdown of its unique 360-degree lid flip system, as well as caused by careless handling or failure of other components.
By contacting us, you can be sure that before the start of the repair, diagnostics will be performed and the exact cause of the malfunction will be established. We will quickly restore this original model and give a warranty on all Lenovo Yoga 13 laptop repairs.
| Video (click to play). |
I bought a laptop from my hands, everything was fine for a couple of months. Then a problem arose - from time to time, vertical multi-colored stripes appeared on the entire screen. What is typical:
1. On the cold never appear, at least 20 minutes should pass.
2. They may appear in an hour, or may not jump out in a day.
3. They also disappear and after them the screen does not return to normal immediately, but gradually, there are traces of them that disappear.
4. All this can happen on an absolutely motionless laptop (appear and disappear) and often at the moment the Windows screensaver is turned on.
As I understand, there can be three reasons - a loop, a matrix, a chip.
First of all, I disassembled, cleaned, changed the thermal paste. The Furmark benchmark lasted an hour, with a maximum temperature of 70 degrees. Did not help.
The second thing I did was to disassemble the matrix and when the glitch appeared, I began to change the train - zero effect. I also disconnected ALL connectors, checked the connection. (I bow that it's not about the loop)
You do not have access to view the attachments:
1. Please log in or register.
2. You must have 15 (FIFTEEN) or more messages.
3. You can buy access to files from us.
The laptop screen is the most fragile part and is therefore often shattered. But there is nothing difficult in replacing the screen with your own hands and it is possible even at home.
Today we will look at how to change the entire display module using the example of the Lenovo Yoga 3 model 80JH laptop.
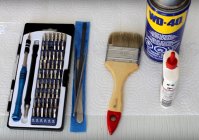
For self-repair we need:
1 Phillips screwdriver (preferably small, like ph00)
2 Spatula, plectrum or just a plastic card
Well, it is desirable, but not necessary
4 Brush and gasoline to wipe off old glue
Before proceeding with the replacement of the screen itself, it is imperative to disconnect the battery.
On this particular laptop, for this you will have to disassemble the case)))
Unscrew all the bolts from the bottom of the laptop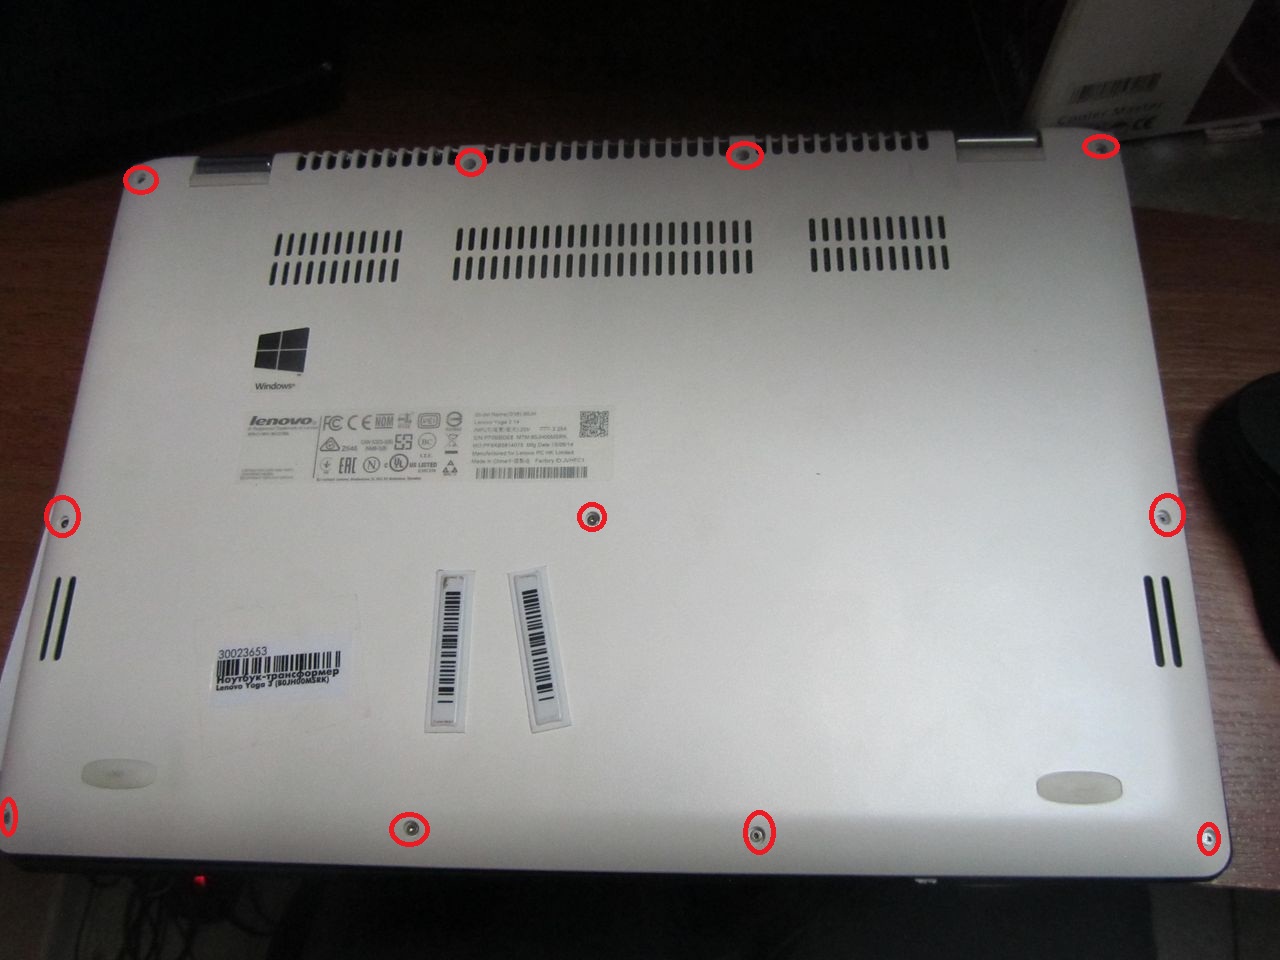
And pry off the bottom with a spatula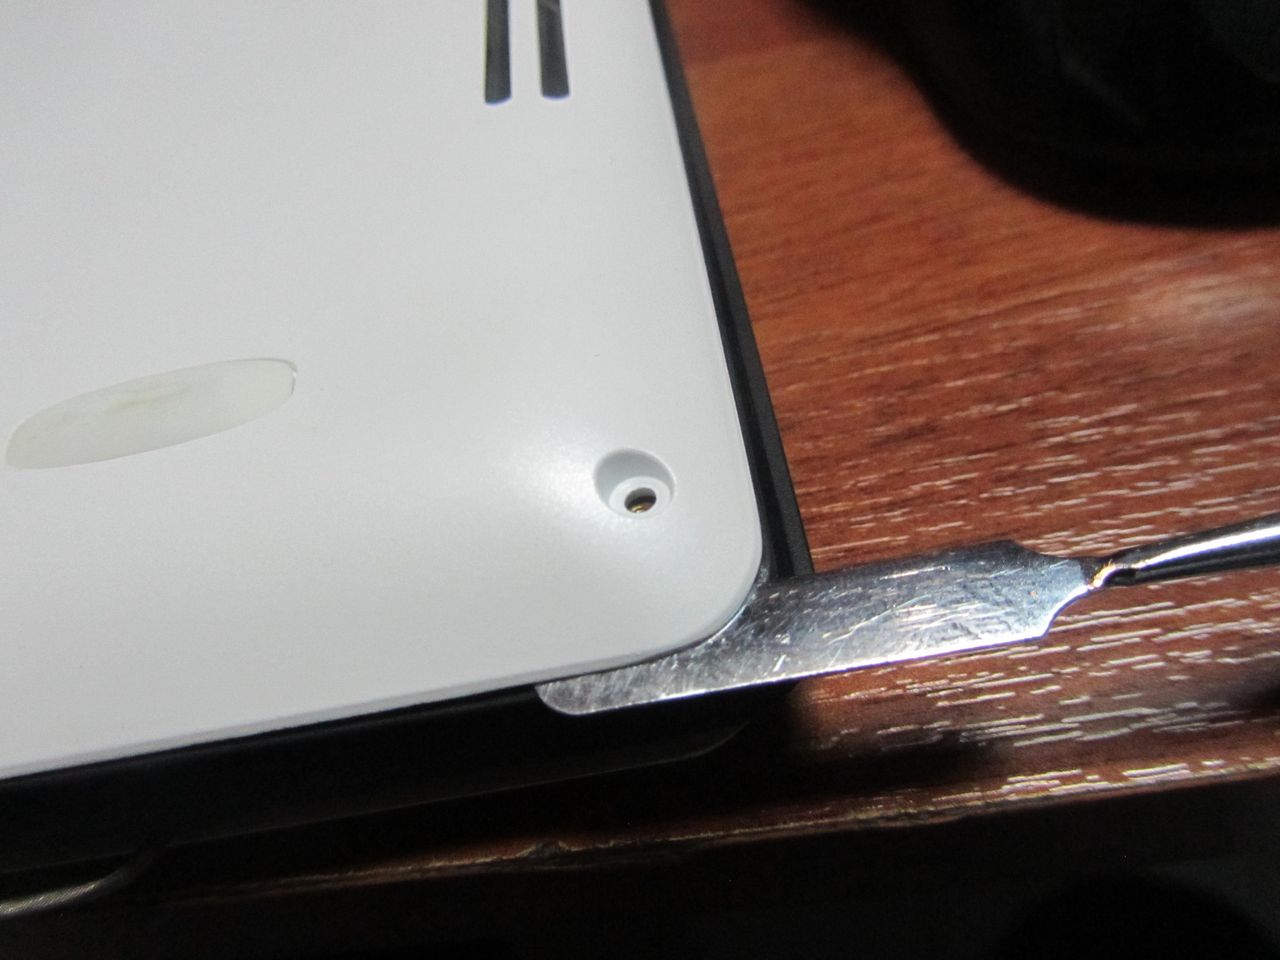
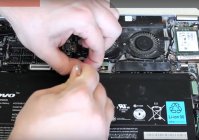
Now we see the built-in battery and can gently disconnect its connector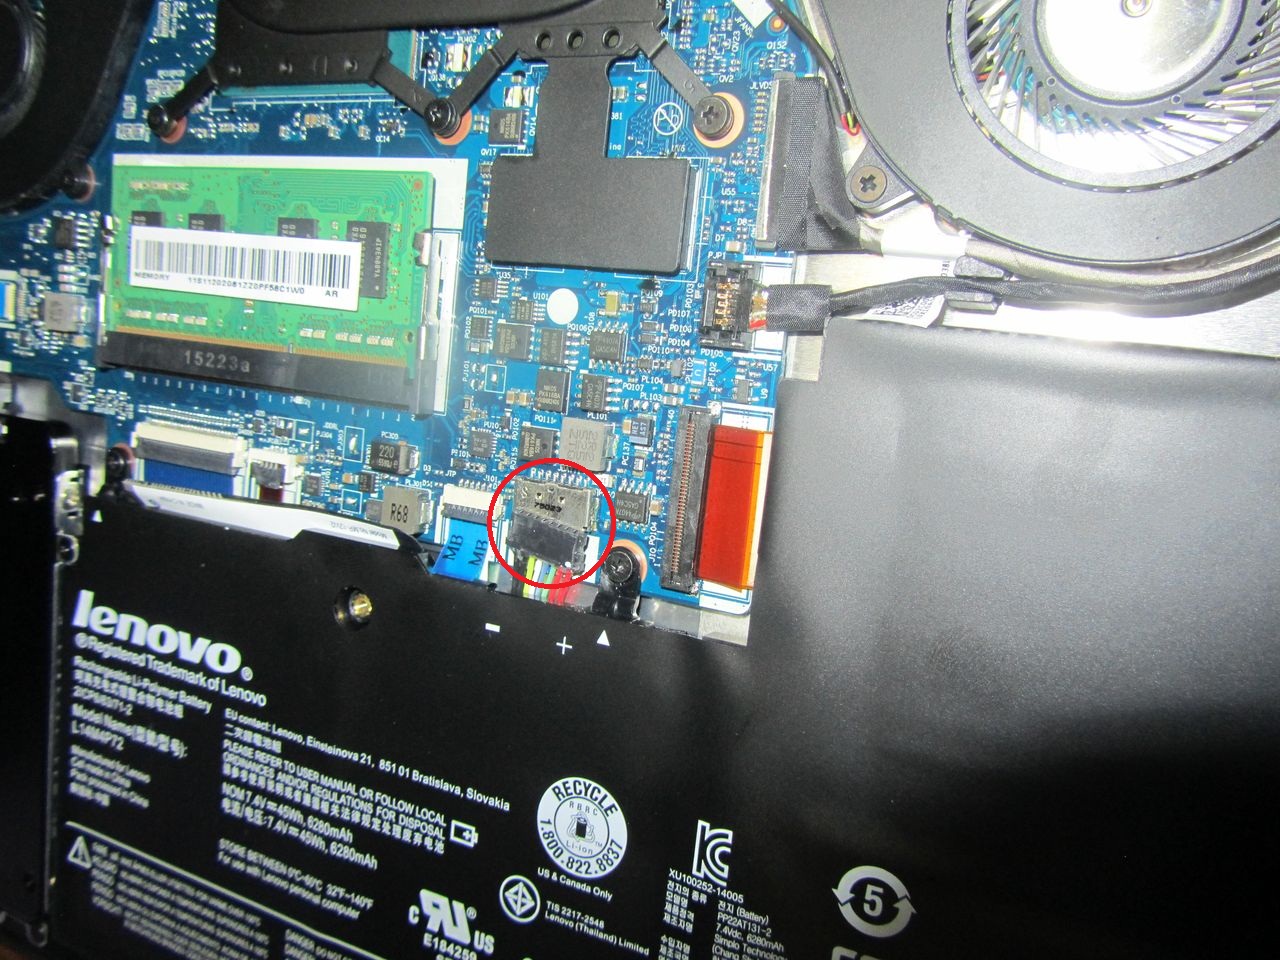
Well, you can start analyzing the screen part.
It can be easily disassembled by simply prying it off with a spatula.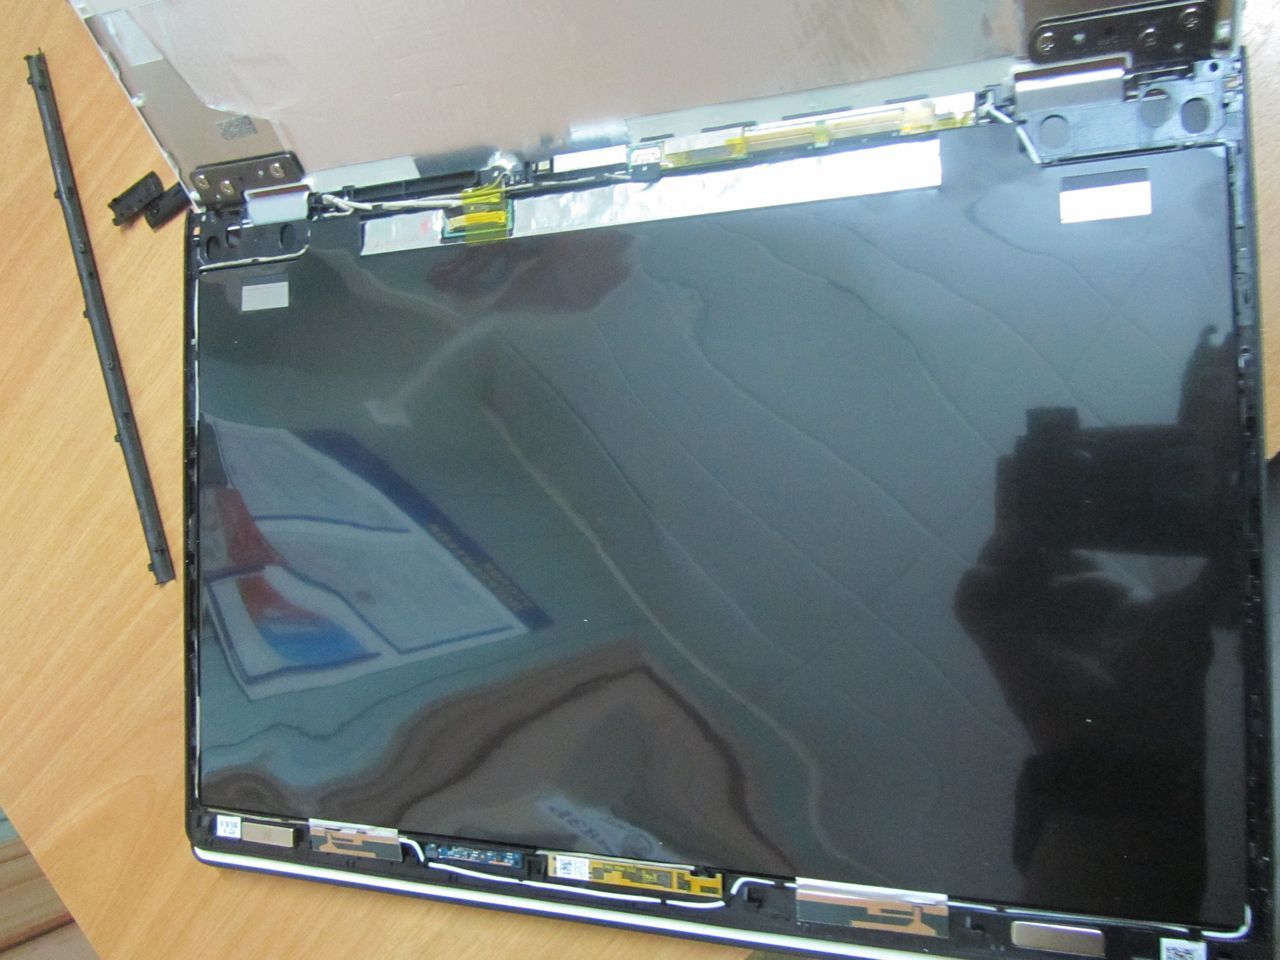
The screen module on this laptop is not glued or screwed on, so we just disconnect all the cables and take out the coaxial cables. Do not forget to carefully peel off all the scarves.
In our case, a module came from the supplier with ready-made gluing for the boards, and we did not have to glue them ourselves.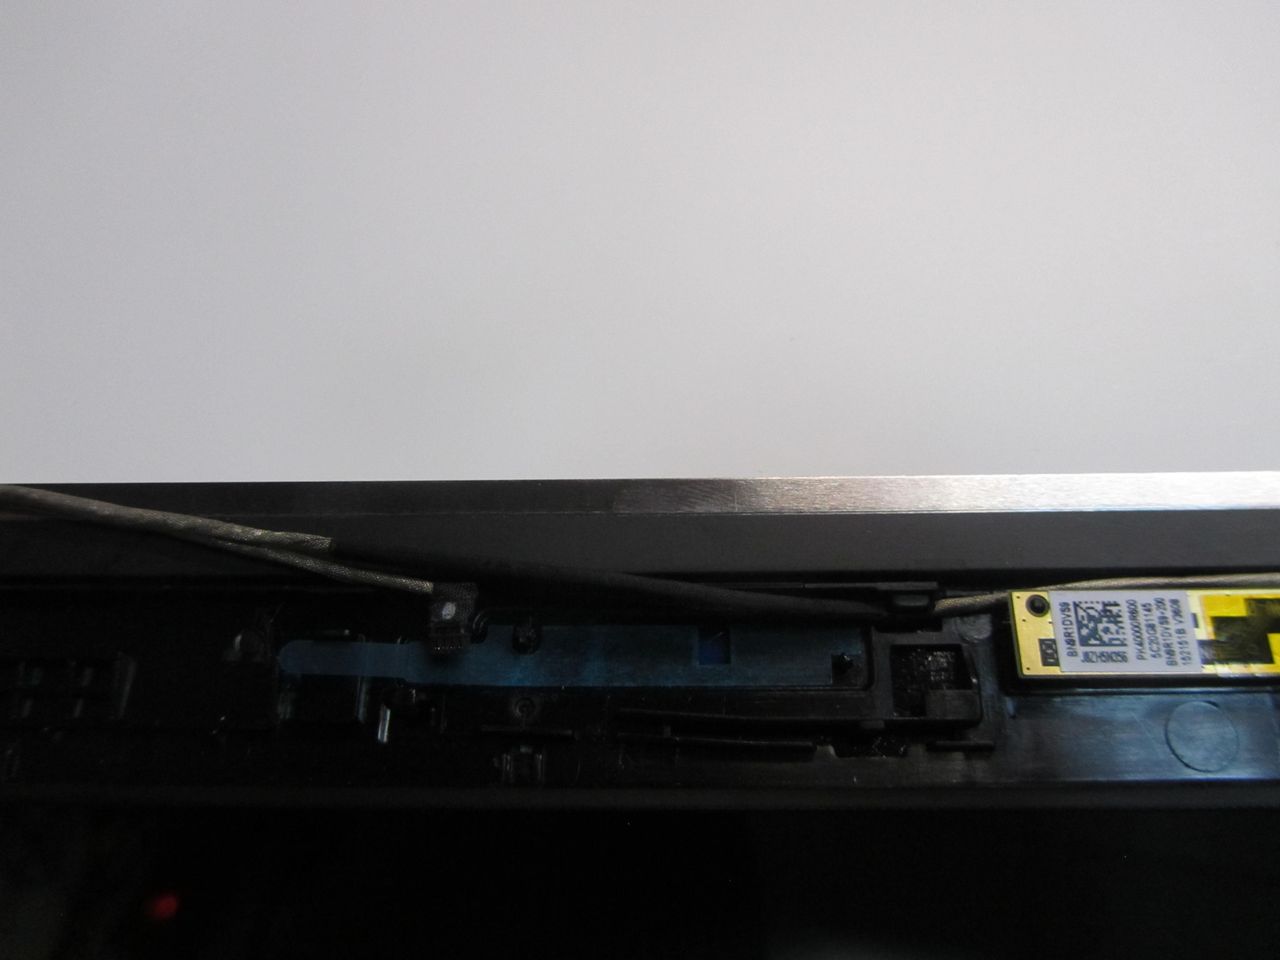
But the black shielding on the module was missing, and we had to re-glue it from the old one.
After that, we put everything in the reverse order and use the laptop with pleasure!
Treat your laptops with care and you do not have to change screens on them))
But, and if, nevertheless, the misfortune has already happened, and you decided to fix it yourself, then carefully read the article and clearly follow all the instructions!
The notes in this manual should be better. Help us fix them or write new annotations.
This guide will explain how to safely remove the screen from your Lenovo Yoga 2 13 ″. It will provide a list of the tools needed as well as the easiest way to remove the screen without damaging it.
No details required.
Using an opening pick, remove one small black rectangle piece on two corners to locate screws.
Carefully remove one 4.762 mm screw from each corner using a Phillips head screwdriver.
Remove the long centerpiece covering between the hinges.
Detach the screen from the front panel, by sliding the screen up about 2mm. Do not pull too far, as there are still connected wires.
Locate the gold wire and follow it to two clips. Remove the clips and the clear tape securing the wire.
Gently unsnap the wire from the hooks along the perimeter, also removing any tape along the wire.
Completely separate the screen from the laptop.
During reassembly remember to set the screen about 2 mm beyond the lid top edge then slide down to engage the tanges.
To reassemble your device, follow these instructions in reverse order.
To reassemble your device, follow these instructions in reverse order.
10 other people completed this guide.
thanks for your guide. Step 1 and 2 - no problem. But how actually did you do step 3? I can’t detach the screen, I can just lift it a few millimeters at the corners or at the side, totally hard ..
edit: Ok got it: slide the touch-lcd up a bit 🙂
Hey Nichelle, do you have any recommended vendors for both the screen and the digitizer? Thanks!
Choose a size and copy the code below to embed this guide as a small widget on your site / forum.
Learn new things every month:
We have a chance to guarantee our right to repair electronic equipment — like smartphones, computers, and even farm equipment. This is a once-in-a-generation chance to protect local repair jobs — the corner mom-and-pop repair shops that keep getting squeezed out by manufacturers.
Join the cause and tell your state representative to support Right to Repair. Tell them you believe repair should be fair, affordable, and accessible. Stand up for your right to repair!
We decided to clean the lenovo yoga ultrabook from dust. In terms of disassembly, the laptop is interesting, but it is very difficult to disassemble it without a special screwdriver (if suddenly someone wants to unscrew the screws with a star cap with a small flat screwdriver).
Usually, before starting all work, I write about the need to remove the battery, but here it is hidden in the case and physically it cannot be done without disassembling, so be careful not to accidentally turn it on when disassembling it (by pressing the on / off button).
We turn the laptop over and unscrew all the screws around the perimeter with a special screwdriver (asterisk).
We open the laptop in order to remove the keyboard, it is held by latches on the top, latches on the sides and bottom and latches in the middle in the form of hooks on the keyboard itself. Also on the sides on both sides double-sided tape. First, snap off the latches on top with a thin flat screwdriver.
Next, release the keyboard on the sides of the latches and double-sided tape and carefully slide the keyboard towards the monitor (to release the hooks from the slots in the case) and lift it.
We take out the keyboard cable from the motherboard and put the keyboard aside. We unscrew the 5 screws that were behind the keyboard.
We take out the cable (touchpad) on the right.
Now we need to remove the cable on the left (which is responsible for the power button and not only).
After all these operations, you can separate the top cover of the Lenovo Yoga laptop from the bottom, the whole thing is kept on latches that snap off without problems.
After opening, we see the insides of yoga in front of us, and the battery occupies a larger area than everything else and the most interesting thing is that the motherboard is slightly larger than a 5-inch smartphone in size.
We unscrew the 4 screws that hold the battery and disconnect it from the motherboard, as well as the cable that goes from the board to which the ssd hard drive is connected.
And here is a joke from the collectors, they drew a star 🙂
We unscrew the screws of the cooling system.
We also unscrew the screws that press the radiators to the processor and video card. Do not forget to disconnect the fan cable from the motherboard.
We look at how much dust has accumulated between the radiator and fans.
We clean out the dust and remove the old thermal grease.
Apply a new thermal paste and put it all back together.
ATTENTION. Before connecting the battery to the motherboard, you must first connect a ribbon cable with a laptop on / off button. when the battery is connected, the laptop automatically turns on, and since your laptop will be half disassembled, this is not very good. So by connecting the loop with the power button, you can turn it off without any problems when connecting the battery.
The Lenovo Yoga 2 13 is designed with quality and durability in mind for regular use at home and at work.
The devices manufactured by Lenovo are almost flawless, but it is impossible to fully protect them from mechanical damage.If suddenly your laptop needs repair, our experts will solve the problems with high quality.
Repair of Lenovo equipment with typical problems within 24 hours
Free troubleshooting within 15 minutes
Free visit of a specialist within 1 hour and delivery to the SC
We use only original spare parts and components Lenovo
Ask a question to a service center specialist
Working hours: from 10:00 to 20:00 (seven days a week)

[offline]
Group: Honorary members of the forum
Messages: 6838
Registration: 30.01.08
Samsung Galaxy S7 EDGE SM-G935F
Reputation: 
1244 
Discussion Lenovo IdeaPad Yoga 11 / 11s / 13 
Lenovo IdeaPad Yoga 11 / 11s / 13 Windows 8 "| Windows 8.1 "| Windows RT and software "| Ubuntu "| Changing the OS "| Search programs »| Antiviruses "| Ambulance for laptop owners ”| IT people smoking room "
Lenovo IdeaPad Yoga - a versatile convertible ultrabook that can work in four positions: laptop, tablet, presentation and console. With powerful processors from Nvidia or Intel, it can tackle any task with ease, and its small size and weight, coupled with high battery life, make it suitable for use anywhere. There are three types - Lenovo Yoga 11 with Windows RT, Lenovo Yoga 11s with Y-processors, and Lenovo Yoga 13 with U-processors on full Windows 8.
Lenovo Yoga 11:
CPU: Nvidia Tegra 3 T30S 1.4 GHz.
RAM: 2GB DDR3L-1600MHz, 1 slot, 2GB maximum.
Video card: Nvidia ULP GeForce 533 MHz, 12 cores, SMA.
Screen: 11.6 ″ 1366 × 768, ten-finger multitouch.
HDD: SSD 32-64 GB.
Battery life: up to 13 hours.
Operating system: Windows 8 RT (no other OS can be installed!)
Weight: 1.27 kg.
Dimensions (LxWxD), mm: 298x204x15.6.
Connectors: USB 2.0 x2, HDMI, 1 audio 3.5 mm, SD.
Wireless connection: Wi-Fi 802.11n / b / g, Bluetooth 4.0.
Camcorder: frontal, 1 MP.
Lenovo Yoga 11s:
CPU: Intel® Core ™ i3-3229Y 1.4 GHz / i5-3339Y 1.5 GHz / i7-3689Y 1.5 GHz (Ivy Bridge).
RAM: 2/4/8 GB DDR3L-1600 MHz, 1 slot, maximum 8 GB.
Video card: Intel HD Graphics 4000 350-850 MHz, up to 2 GB SMA.
Screen: 11.6 ″ 1366x768, ten-finger multitouch.
HDD: SSD 128/256/512 GB.
Battery life: up to 8 hours.
Operating system: OEM Windows 8 SL x64.
Weight: 1.4 kg.
Dimensions (LxWxD), mm: 298x204x17.2.
Connectors: USB 3.0 x1, USB 2.0 x1, HDMI, 1 audio 3.5mm, SD, 2 mSATA inside.
Wireless connection: Wi-Fi 802.11n / b / g, Bluetooth 4.0.
Camcorder: frontal, 1 MP.
Lenovo Yoga 13:
CPU: Intel® Core ™ i3-3217U 1.8 GHz / i3-3227U 1.9 GHz / i5-3317U 1.7 GHz / i5-3337U 1.8 GHz / i7-3517U 1.9 GHz / i7-3537U 2.0 GHz (Ivy Bridge).
RAM: 4/8 GB DDR3L-1600 MHz, 1 slot, maximum 8 GB.
Video card: Intel HD Graphics 4000 350-1100 MHz, up to 2 GB SMA.
Screen: 13.3 ″ 1600x900, ten-finger multitouch.
HDD: SSD 128-256 GB.
Battery life: up to 8 hours.
Operating system: OEM Windows 8 SL x64.
Weight: 1.54 kg.
Dimensions (LxWxD), mm: 333.4x224.8x16.9.
Connectors: USB 3.0 x1, USB 2.0 x1, HDMI, 1 audio 3.5mm, SD, 2 mSATA inside.
Wireless connection: Wi-Fi 802.11n / b / g, Bluetooth 4.0.
Camcorder: frontal, 1 MP.
More details here: Lenovo Yoga.
Video reviews: Oldi, YouTube.
Accessories: Lenovo Shop.
Case review: Lenovo IdeaPad Yoga 13 and Yoga 11 (Post # 24188729).
User manuals:
-in English: 
yoga13_ug_en.pdf (5.13 MB)-in Russian.
V: After reinstalling Windows, my physical keyboard does not turn off in tablet mode. How to fix it?
A: You can fix this by installing Lenovo Transition and ALSControl (available in the drivers on the Lenovo website).
V: In tablet mode, the processor frequency drops sharply and it becomes uncomfortable to work. How to fix it?
A: This can be fixed by disabling the DPTF parameter in the BIOS.
V: What is the battery life of an ultrabook?
A: From 5-6 hours in power saving mode to 2-3 hours in high performance mode.
V: Ultrabook goes to sleep for a long time. How to fix?
A: Solution.
V: The keyboard flexes slightly at the top. This is fine?
A: Yes, everyone has it, and it is not a marriage.
V: What is Windows RT and can I run an .exe on it?
A: This is a special version of Windows for ARM processors, in appearance it almost does not differ in any way from Windows 8. But due to the incompatibility of the ARM and x86-64 .exe architectures, you will not be able to launch.
V: My ultrabook does not charge more than 60%. How to fix?
A: In the Lenovo Management program, you need to check the "Maximum battery life".
V: Where can I see games that run normally on an Ultrabook?
A: Here.
V: I want to increase the RAM to 8GB. Which bar should I take?
A: See here.
V: According to the specification, the memory should be 1600 MHz, and according to the readings of the programs, it should be 800 MHz. What's the matter?
О: Read here.
V: I want to expand my SSD. Which CD should I take?
О: Discussion topic SSD. According to reviews and reviews, the best Crucial M4 CT256M4SSD3.
V: How much cards does Yoga support?
A: Accurately supports SD and SDXC cards up to 128GB.
V: Does Wi-Fi work at 5 GHz?
О: No, only at 2.4 GHz.
V: Is it possible to install HDD 2.5 ″ instead of the second SSD?
A: No, because SATA has a different interface.
V: How to turn Bluetooth on / off?
A: That's it.
V: How to increase the sensitivity of the sensor?
A: In Device Manager in HID Devices, remove the power saving checkboxes on both USB input devices.
V: Is there Flash in Metro IE?
A: Yes, both on Yoga 11 and 13.
V: In my games, the ultrabook heats up to 90-95 degrees. Wouldn't that hurt him?
A: No, it won't hurt - the maximum operating temperature of ULV processors is 105 degrees. Such heating occurs due to the cooling system not adapted for games.
V: How to make Wi-Fi see many networks around?
A: That's it.
V: Are there any Yoga 13 benchmarks?
A: Yes: 3DMark 06, processor stress tests from here on out, SunSpider test.
V: Is it possible to put something else inside instead of the second SSD?
A: Yes, you can, because mSATA is essentially the same as mPCI. You can put, for example, a modem.
V: Why do the different ULV processors in the Yoga 13 heat up differently when they have the same TDP of 17 watts?
A: This is not entirely true.
V: How does Ubuntu behave on Yoga 13?
A: Read from here and below.
V: Flash apps don't work in Metro IE. How to fix?
A: That's it.
V: How to make Windows 8 boot in special mode via the command line? How do I create a shutdown or restart shortcut to Special Boot Options?
A: That's it.
V: How do I make more apps available in the Windows Store?
A: In the store in the Charms Bar, turn off both parameters in the settings.
V: IE from Metro opens on the desktop. How to fix?
A: You must set IE as the default browser.
V: How to make the keyboard appear automatically when typing on the desktop?
A: That's it.
V: How do I zoom in on all the elements?
О: Control panel - Appearance and personalization - Screen - Scale 125%.
V: How can I turn off the sound of keys on the virtual keyboard?
О: Charms Bar - Options - Change computer settings - General - Play the sound of keys as you type.
V: When a hard disk is connected, it buzzes / flashes a light, but is not detected. How to fix?
A: Nothing - this drive requires additional power.
V: How to set energy consumption parameters automatically?
О: Control Panel - Find and fix problems - Optimize power consumption.
V: Lights are visible at the bottom of the screen against a black background. Is this a marriage?
A: Many people have it, it is not a marriage. really doesn't get in the way.
V: Why does the system not see all the RAM?
A: Because 128 MB are "tied" to the video card, and the system cannot use them.
V: Will my warranty continue after reinstalling Windows?
A: Installing a new system will not be legal, system recovery from disks is legal regardless of the number of times.
V: Where can I get and how can I update the BIOS?
A: Here.
V: How do I install an .appx application?
A: So.
V: How to install the app to SD card?
A: So.
V: Does Yoga work for AutoCAD and Photoshop?
A: Yes, they work absolutely fine, incl. with 3D models.
V: Is it normal that the Windows folder is 30 GB?
A: Yes, quite normal.
V: Where can I find a list of Windows Store apps on the Internet?
A: Here.
V: Does the Yoga 13 have a screen protector?
A: Yes, Yoga 13 ″ screen protector SP830.
V: Where can I read about touch gestures in Windows 8?
О: Here:
V: How else can you invoke the Task Manager other than Alt + Ctrl + Del?
О: Press the Windows button at the bottom of the screen and the shutdown button.
V: The brightness of the screen drops when you open some programs. How to fix it?
A: So.
V: What kind of RAM can be installed in the Lenovo Yoga 13?
A: Any DDR3 or DDR3L, the latter is preferable due to lower power consumption.
V: Dolby Home Theater does not work after installing the drivers for the audio card on Windows 8.1, how to fix it?
О: Install audio card drivers for Windows 8.
V: Can Lenovo Yoga 13 install 7 / Vista / XP?
О: It is possible, but only 7 will work normally. XP and Vista do not support ULV processors.
V: A quiet squeak is heard when the cooler is off, is this normal?
A: Yes, this is the sound of a working SSD.
V: Does Lenovo Yoga 11 have coolers?
A: No, there is passive cooling.
V: .Mp3 and .mp4 stopped playing after installing Windows 8.1, how to fix?
О: Install audio card drivers from Lenovo website.
V: Is there a 3G version of Yoga?
A: No, and it won't be in the near future.
V: Bluetooth devices are constantly falling off, how to solve the problem?
A: So.
V: The double tap on the touchpad stopped working, how to fix it?
A: So.
If someone helped you, do not write in the subject line: “Thank you, you are super!”. At our forum, it is customary to express your gratitude by raising your reputation. This is done by clicking on the green plus button on the left under the user profile. If you have less than 15 posts, then contact the moderator by clicking the "Complaint" button with a request to raise the reputation of the user who helped you.
Post has been edited PikNic – 01.07.15, 11:29
Hello, forum users and (hopefully) Lenovo employees.
I am writing here because I do not already know what to do. Some time ago, my Lenovo Yoga 2 13 cracked the display neatly (I won't go into details of how it cracked - that's another story, but if you're interested, google “lenovo yoga 2 13 cracked screen” and you will see that I am not alone
As usual in such cases, I called the support service, from where I was kindly directed to the site in the section of service centers. Here I saw many, many SCs in Moscow, but the first impression was deceiving. I removed irrelevant ones from the impressive table (only for legal entities, only for smartphones, etc.) and wrote in the rest (about 10). Of these they answered me two SC.
In the first, the cost of replacing the screen was almost equal to that of a laptop. In the second, they kindly agreed to change the screen for 10,000 rubles. Happy, I took the laptop to the address and waited. I waited 2 months, but in the end it turned out that SC cannot find the screen (“no”) and cannot help me in any way.
Independent searches on aliexpress and ebay also did not lead to success - either the price, again, is comparable to the cost of a laptop, which is nonsense, or the price is suspiciously low and I'm not sure if it's a fake. And in the end, buying a laptop from a decent reputable company (and this is what I think Lenovo is), I buy at least some kind of support, right?
Summing up, I want to ask the representatives of the company if such people drop in on the official forum. What should I do? Just please, do not advise me to contact the SC or search at flea markets (I read this advice in a similar topic on this forum). In other words, does Lenovo have real customer support Or it all ends after the purchase and all they can do to help me is to send it to a well-known section on the site?
- Chipset: Intel Core i3-3217U
- Processor: 1800 MHz
- Screen: 13.3 WXGA
- Video adapter: Intel HD Graphics 4000
- Hard drive: 128 Gb
- RAM: 4096 Mb
Do not panic when your Lenovo IdeaPad Yoga 13 laptop has stopped turning on or does not boot completely. Even a liquid spilled on it or a broken case is not a reason to put an end to expensive equipment. In the skillful hands of our service center specialists, this is a fixable business. No time wasted, bring your computer to us.
Our clients are provided with free diagnostics of a breakdown and all possible options for its elimination. The rich experience and professional skills of our employees allow us to conduct Lenovo IdeaPad Yoga 13 laptop repair quickly and efficiently. For any kind of work done, we give a guarantee - this is your confidence in the quality of each spare part and the competence of the master.
Our service center has professional equipment for testing and repairing computer equipment. All operations are carried out neatly, without scratches on the case and additional damage. For our clients, we have organized the delivery of refurbished equipment. Entrust your laptop to experienced craftsmen and it will continue to serve you faithfully in the future.
To get a discount - repost below
The price is indicated only for the service, excluding the cost of spare parts
Professional consultation and accurate diagnostics of Lenovo Yoga Tablet 2 13 with Windows are performed in our Service Center free of charge.Wizards will check the hardware, identify hidden faults, assess the technical condition of the device, which will allow for a high-quality tablet repair.
Order renovation by October 21 and get a discount of up to 30%
- Our advantages:
- Affordable prices
- High quality
- Warranty from 1 month
- Working hours from 10:00 to 21:00 daily
- Service centers in different districts of St. Petersburg
The operative firmware of Lenovo Yoga Tablet 2 13 with Windows optimizes the operation of the device, restores or improves its functions, and updates the software. Experienced masters of our Service Center will ensure the safety and confidentiality of your personal data. The quality of the service is guaranteed.
Order renovation by October 21 and get a discount of up to 30%
- Our advantages:
- Affordable prices
- High quality
- Warranty from 1 month
- Working hours from 10:00 to 21:00 daily
- Service centers in different districts of St. Petersburg
Broken screen? Our Service Center is replacing the display and glass on Lenovo Yoga Tablet 2 13 with Windows. A technician will carry out repairs efficiently and quickly, which will save your time and achieve the desired result.
Order renovation by October 21 and get a discount of up to 30%
- Our advantages:
- Affordable prices
- High quality
- Warranty from 1 month
- Working hours from 10:00 to 21:00 daily
- Service centers in different districts of St. Petersburg
Need a quick display / screen replacement on Lenovo Yoga Tablet 2 13 with Windows? Contact our Service Center, where qualified specialists will make repairs using high-quality components and special equipment. All manipulations guarantee the correct operation of your tablet.
Order renovation by October 21 and get a discount of up to 30%
- Our advantages:
- Affordable prices
- High quality
- Warranty from 1 month
- Working hours from 10:00 to 21:00 daily
- Service centers in different districts of St. Petersburg
Replacing the touchscreen with Lenovo Yoga Tablet 2 13 with Windows is carried out by the masters of our center in the shortest possible time, and most importantly, professionally and efficiently. Component compatibility, correct operation of the new sensor and Multi-touch functions, warranty for the services provided.
Order renovation by October 21 and get a discount of up to 30%
- Our advantages:
- Affordable prices
- High quality
- Warranty from 1 month
- Working hours from 10:00 to 21:00 daily
- Service centers in different districts of St. Petersburg
Our Service Center replaces the glass / sensor with Lenovo Yoga Tablet 2 13 with Windows quickly and inexpensively. An experienced specialist will carefully replace the glass, correct the sensor and multitouch. Your tablet will be as good as new!
Order renovation by October 21 and get a discount of up to 30%
- Our advantages:
- Affordable prices
- High quality
- Warranty from 1 month
- Working hours from 10:00 to 21:00 daily
- Service centers in different districts of St. Petersburg
Replacing the case with Lenovo Yoga Tablet 2 13 with Windows in our Service Center is carried out by experienced specialists, which will eliminate the appearance of various defects and backlashes. Help with repairs if your tablet casing breaks or cracks after being hit or dropped, if it is worn out and frayed. The most attractive prices.
Order renovation by October 21 and get a discount of up to 30%
- Our advantages:
- Affordable prices
- High quality
- Warranty from 1 month
- Working hours from 10:00 to 21:00 daily
- Service centers in different districts of St. Petersburg
Need to replace the back cover on Lenovo Yoga Tablet 2 13 with Windows? Ask the experts of our Service Center for help to avoid further breakdowns. Improper installation of the cover can cause the tablet to heat up and cause backlash and other defects. Competent repair will guarantee the device's functionality and will take a little time.
Order renovation by October 21 and get a discount of up to 30%
- Our advantages:
- Affordable prices
- High quality
- Warranty from 1 month
- Working hours from 10:00 to 21:00 daily
- Service centers in different districts of St. Petersburg
Lenovo Yoga Tablet 2 13 with Windows running out of battery power quickly? After an accurate diagnosis, the battery will be replaced. High-quality repairs at affordable prices.
Order renovation by October 21 and get a discount of up to 30%
- Our advantages:
- Affordable prices
- High quality
- Warranty from 1 month
- Working hours from 10:00 to 21:00 daily
- Service centers in different districts of St. Petersburg
Need a quick speaker replacement on the Lenovo Yoga Tablet 2 13 with Windows? Qualified craftsmen will conduct free diagnostics and consultation, and subsequently competent repairs without interfering with the integrity of the motherboard. A high-quality repair will eliminate quiet sound or its absence, broadcast interference. Fast results at the best prices.
Order renovation by October 21 and get a discount of up to 30%
- Our advantages:
- Affordable prices
- High quality
- Warranty from 1 month
- Working hours from 10:00 to 21:00 daily
- Service centers in different districts of St. Petersburg
No sound from your tablet? In our Service Center, you can replace the polyphonic speaker with Lenovo Yoga Tablet 2 13 with Windows using quality spare parts. New speaker, high-quality sound and the shortest possible time.
Order renovation by October 21 and get a discount of up to 30%
- Our advantages:
- Affordable prices
- High quality
- Warranty from 1 month
- Working hours from 10:00 to 21:00 daily
- Service centers in different districts of St. Petersburg
Need a microphone replacement for Lenovo Yoga Tablet 2 13 with Windows? Experienced masters of our Service Center will make high-quality and inexpensive repairs. We will restore your tablet to full functionality.
Order renovation by October 21 and get a discount of up to 30%
- Our advantages:
- Affordable prices
- High quality
- Warranty from 1 month
- Working hours from 10:00 to 21:00 daily
- Service centers in different districts of St. Petersburg
Repair or replacement of the motherboard for Lenovo Yoga Tablet 2 13 with Windows is performed by our experienced craftsmen with high quality and within a reasonable time frame. Accuracy in work will ensure the safety of the device body and its correct performance in the future.
Order renovation by October 21 and get a discount of up to 30%
- Our advantages:
- Affordable prices
- High quality
- Warranty from 1 month
- Working hours from 10:00 to 21:00 daily
- Service centers in different districts of St. Petersburg
Tablet camera not working? Our Service Center repairs or replaces the camera on Lenovo Yoga Tablet 2 13 with Windows using high quality spare parts. Attractive prices and efficiency in work.
Order renovation by October 21 and get a discount of up to 30%
- Our advantages:
- Affordable prices
- High quality
- Warranty from 1 month
- Working hours from 10:00 to 21:00 daily
- Service centers in different districts of St. Petersburg
Tablet won't charge? Our Service Center replaces the power connector for Lenovo Yoga Tablet 2 13 with Windows as soon as possible, because we always have all the necessary spare parts and components in stock. The repair will be carried out professionally and with high quality.
Order renovation by October 21 and get a discount of up to 30%
In a situation where the Lenovo yoga tablet needs repair, we advise you to contact our service center. We will offer quality repairs on the best terms. The specialists working in our company will diagnose and eliminate any malfunction as soon as possible. We offer a full range of services for the maintenance and repair of Lenovo Tablet Yoga, among them:
- repair of Lenovo Yoga tablets;
- Lenovo Yoga Tablet screen replacement;
- replacement glass Lenovo Yoga Tablet and others.
| Video (click to play). |


