Complete instructions with photographs for disassembling LG G3, with which you can disassemble the phone to replace the failed component and then, following the instructions in reverse order, assemble the phone back. To disassemble you need: Phillips screwdriver; plastic spatula or spudger; a hairdryer to soften the glue; a suction cup and of course straight arms growing from the right place.
The first step is to remove the back cover, it can be removed easily, just pry it off with your fingernail.
We remove the battery, since it can be simply taken out here, not glued or screwed on like in some other phones.
We unscrew twelve screws to remove the back frame of the phone.
If necessary, you can remove the button from the back of the phone frame by unscrewing one screw.
On the inside of the frame, you need to peel off the button connectors so that you can completely dismantle it.
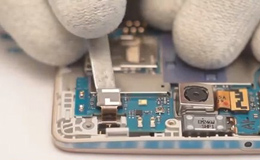
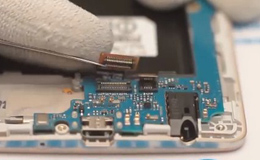
In order to remove the motherboard, you just need to disconnect one connector.
If required, dismantle the rear camera from the motherboard.
In the same way, we dismantle the front camera from the motherboard.
You can also remove the signal cable from the motherboard.
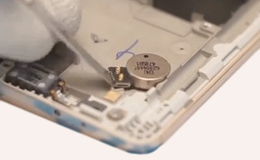
We dismantle the vibration motor from the front of the phone, well, of course, if you need to replace it.
We remove the earpiece from the front of the phone case.
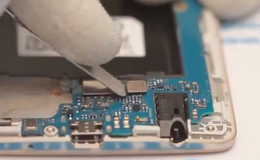
Remove the headphone jack.
Next, we proceed to dismantling the display from the phone frame, for this we release the connector and the display cable from the glue with which it is glued to the frame, after softening it a little with a hairdryer. After that, we also soften the glue with a hairdryer, with which the display is glued to the frame. Then, using a suction cup, we tear off a little from the frame and insert the picks into the hole formed, and then along the perimeter with a plastic spatula we completely peel off the display from the frame.
After these manipulations, you can remove the display and gently glue a new one in its place.
LG G3 exploded view. In general, disassembling the LG G3 is one of the simplest, there are a minimum of screws and glue, all the main components are on the motherboard.
Disassembling the LG G3 is a time-consuming job that requires care and attention, so do not start disassembling if you are not confident in your abilities!
If our instruction helped you: “LG G3 disassembly”, support our site - share the link with your friends:
Disconnect the battery.
Using a screwdriver (Phillips 1.5 mm), unscrew 12 bolts around the perimeter of the phone.
Detach the middle frame.
Disconnect the PCB connectors and remove the main and front cameras.
Disconnecting the connectors on the PCB.
Detailed photo instructions: how to disassemble LG G3s + review and full specifications of the smartphone LG G3s
Use a spatula or a pick to separate the back panel of the phone from the body.
Using a spatula, snap off the cable of the main and front cameras.
We carefully remove the microcircuit from the case.
If there is no need to replace the sensor or display, then the disassembly ends at this stage.
VIDEO
In this manual, you will learn how to fix the most common breakdowns of LG G3 mini (D724) phones with your own hands. It describes in detail how to fix a phone, a sensor, replace buttons, speakers and a cable. Even if you are not a professional cell phone repairman, after looking through this manual, you can fix the microphone yourself and even repair a wet phone. You will find that parsing a cell phone is not all that difficult.
Fast delivery of inexpensive original spare parts for a cell phone LG G3 mini (D724) in Moscow and other regions of Russia by phone - 8 (495) 125 29 79.
This article is about LG G3s D724 disassembly. Also, we will give some tips for using such a device. For work, prepare the following tools: a pick, a metal spatula, tweezers, a Phillips screwdriver, a heat dryer. After disconnecting the phone, you can start parsing.
Use a spatula or a pick to separate the back panel of the phone from the body. We remove the LG battery.Use a Phillips screwdriver to unscrew the bolts securing the middle panel of the case. Detach this panel from the case with a metal spatula.
Using a spatula, snap off the cable of the main camera, and then the front camera. We remove the main camera from the body. Next, bend the sensor glass cable with a spatula. We immediately snap off the display cable behind it.
We carefully remove the motherboard from the case. Remove the headset connector from the socket with a screwdriver and a vibration alert. Following him, we take away the earpiece with tweezers. The front camera is also removed from its compartment.
The phone is practically disassembled. The display module is also disassembled. If there is no need to replace the sensor or display, then the disassembly ends at this stage. If it does exist, then a heat dryer must be used to disconnect the sensor and display. After warming up the surface of the touch glass from above, detach it with a pick or spatula. Install a new part instead of the faulty one and assemble the phone in the reverse order, replacing other parts in the process. Unless, of course, there is a need for this.
We insert the front camera onto the display module into its compartment. After it we return to the place the earpiece, vibration alert and headset connector. Then we carefully install the motherboard on the case. We attach a display cable to it. Then we snap in the touch glass cable. We install the main camera in the case and fasten its ribbon cable. Do not forget to secure the front camera cable as well.
After connecting the cables and securing the motherboard, we cover it with the middle case panel. We fix it with bolts using a Phillips screwdriver. We put the battery in its place. We slam the lid and turn on the device.
It's no secret that in order to protect your device from unnecessary external damage, you need to use a cover and a protective film. We also strongly recommend that you heed this advice. You can buy Mobiking protective film for LG G3s D724 inexpensively in our online store. It not only protects against scratches, but also absorbs shock shocks. The percentage of protection of your phone when using Mobiking film for LG G3s D724 will significantly increase.
No matter how badly damaged your LG G3 D855 is, don't worry. The LG Russia service will help you when you need it most.
The LG G3 D855 phone is distinguished by its long-term performance. But this does not exclude the fact that during operation each device will not be hindered by prophylaxis, and in special cases, maintenance in a service center.
Phone repair cost
right now
Or leave a request by calling a single LG service center
Price-list for components for phones LG G3 D855
Troubleshooting 15-40 minutes
More than 10,000 LG parts in stock
Courier delivery - from 30 minutes
Elimination of typical faults within 24 hours
Repairs are carried out using professional, state-of-the-art technology: infrared repair stations SEAMARK ZM-R5860; digital microscopes Eyepiece KE-208A; test cards; oscilloscopes-multimerts; ultrasonic baths / sinks.
All the time in sufficient quantity any consumables: sockets for boards; thermal tape; BGA balls for reball; microprocessors; BGA flux; capacitors, transistors.
You or our courier bring the device to the LG Russia service.
Engineers carry out full diagnostics: hardware, technical. The procedure takes some time.
The managers agree with you on all the terms of the repair: cost, terms, warranty conditions.
The foreman carries out repairs: replaces the faulty part with a new original part.
At the end of the repair, you pick it up or the courier delivers a serviceable gadget with a warranty form to your home.
The information on the site is not a public offer and is for informational purposes only. The final conditions for the provision of services are determined by the company's manager based on the results of software or hardware diagnostics and are agreed with the owners of the equipment by phone. The name of the LG company, its logos are used on the site for informational purposes.
Good day.There is a phone lg g3 vs985, in it, when replacing the sim connector, I accidentally tore off the circled resistor along with the contact pads, the track goes into the board. The question is, is it possible to restore it somehow, or where to put the jumper?
The microphone does not work because of this.
I would be grateful for any help.
Sorry for the photo, I couldn't find it better, but there is nothing to take a picture with.
there is a board for r3 at work, tomorrow I will tell you where the penny goes)
If you have a multimeter, then you can try to look where the interlayer goes. If somewhere on the same side, you can try to throw a snot with a thin MGTF-ohm.
A spiral made of thin copper on the probe and the inclusion of compensation (if possible) on the device. Although in the short circuit ringing mode, this does not matter. If it does not ring, most likely the leg goes directly under the BGA ball. What is wrong. There is already a datasheet and look at the typical binding. Then harshly wash the places of separation and subsequent soldering and poke again. If there is a reaction, then there is an element of luck. If not, separation of the transition between layers is possible. Well, here are the waffles.
In block diagnostics, it is determined which specific element (housing, protective glass, sensor, printed circuit board, connectors, speakers, microphone, antenna, battery) is out of order.
Checking s ayadku , if the phone is fully charged, otherwise:
We check the phone connector, if it works, then:
If all of the above does not suit you, then you will need to reflash or repair the phone's motherboard.
Checking P I will lose the charge if the phone battery is charged then:
We check and whether it is correct power button on the phone;
If nothing was found at this stage, the cause of the breakdown, we recall - if the phone was flooded with liquid, or the phone fell and stopped turning on, most likely the phone's motherboard will need to be repaired.
Check if the phone detects another sim card if it detects then:
Checking Phone settings if the settings are correct then:
Phone flashing is required.
Checking phone flash card if serviceable then:
Checking USB flash drive connector on the phone, if it is also working properly, then:
You need to flash your phone, or to remot the phone's motherboard.
Checking usb cable if the cable is ok then:
We check the phone connector, if it is ok then:
You need a motherboard repair or phone flashing.
Checking settings , if the settings are correct, then:
Checking Internet connection , if the connection is stable, then you need to reflash your phone.
Checking Phone settings if the settings are correct then:
Checking WiFi adapter phone, if the order requires a flashing of the phone.
Checking connection cable to the computer if the cable is whole then:
Checking driver phone on the computer, if the correct drivers are installed, then:
Phone flashing is required.
Checking for availability physical damage screen, if not then:
Checking display cable phone, if the loop is intact, then:
Phone flashing or motherboard repair is required.
We check the integrity of the touch screen for damage, if it is intact then:
Checking touch screen flex , if int, then:
Phone flashing is required, or controller repair display.
Checking Phone settings if the settings are correct then:
We check the integrity of the microphone, if it is intact:
Check if it works microphone controller if it works on the phone:
Phone flashing is required.
Display - part screen which shows the image and is behind touch or protective glass . Damaged display phone LG G3 D855, whether defective pixels or blurry screen , makes it difficult to work with the LG G3 D855 phone or makes it impossible, because the image loses its sharpness and clarity.
With a defective display, it is more difficult to read text on the screen of the LG G3 D855 phone, operate with the touch screen, and view images or videos.
Damaged display will not "cure" over time, but it can finally go out at the most inopportune moment, which can cause very great inconvenience. If display on LG G3 D855 phone is faulty - You can contact our service center .
Every year, phones perform more and more functions, and are already mini-computers. And for stable operation, a debugged operating system is required.
You may need to flash your phone for most problems - from the fact that the phone stopped detecting the computer to the fact that the phone's display stopped working.
Microphone is not working on LG G3 D855;The sensor stopped working on the LG G3 D855 phone:
LG G3 D855 phone turns on but there is no image on the screen or it is garbled by the phone:
LG G3 D855 does not see the computer;
LG G3 D855 won't connect to Wifi;
LG G3 D855 is not updated;
LG G3 D855 will not turn on or does not load;
The LG G3 D855 phone does not catch the network or does not see the sim card ;
LG G3 D855 does not see an SD card, does not detect a USB flash drive;
LG G3 D855 not charging via usb.
In most cases, LG G3 D855 phone problems arise due to firmware or incorrect updating. Due to a failure in the phone's firmware, the settings get lost, or the drivers of some controllers fail, and some functions may simply stop working.
In modern models of smartphones, there are practically no buttons left, and the keyboard function has been taken over touch glass ... If the glass has lost its sensitivity, then you will not be able to fully control your smartphone.
And even if The touchpad on the LG G3 D855 is cracked , but did not lose sensitivity, then you should know: he did not have long before the final breakdowns ... If you don't want to lose the main control, or damage the display .
The display of the LG G3 D855 mobile phone protects against damage by a special protective glass ... If glass cracks or a chip appears on it as a result of the fall, then display your phone is at risk: it may be damaged too, and the image may become “blurry” or the phone G3 D855 may stop displaying altogether. If dust or small debris gets behind the glass, which will further damage it. The specialists of our service center can replace the protective glass of the phone LG G3 D855 to prevent possible display breakage .
Instructions for replacing the sensor on the LG G3 D850.
Lg, G3, screen replacement, lcd, replacement, screen, Ogden Cell Phone repair, Cell phone repair, smartphone repair, cell phone repair, Mobile phone repair, smartphone repair, lg G3 screen repair video, lg G3 how to repair video, lg G3 touch screen repair, replacement lcd screen for G3,
Leave your question through the feedback form and the master will call you back and answer without imposing any services.
Your message has been sent.
Order a repair in our service center, and you will receive a working device in an hour, with a 1 year warranty
We accept your request for repair.
You give us your defective device by arriving at the service yourself, or by ordering a free courier
The master conducts diagnostics, after which he agrees with you the time and cost of the work.
The wizard fixes all faults
You receive your device in good condition with a guarantee up to 1 year!
Many problems arise due to damage to the display module and, in particular, failure of the touchscreen. Outwardly, its breakdowns can be expressed in the appearance of cracks, chips, lack of response to touching the screen, delays or non-execution of given commands, spontaneous switching on or off of applications, turning pages, and so on.
Therefore, when repairing the LG G3 s D724 smartphone, it is necessary to replace the display, touch glass.
A common cause of breakdown is the ingress of moisture into the mechanism of the device. This is dangerous because moisture can penetrate into the device earlier, and the consequences of this appear much later, when the processes of oxidation of contacts of microcircuits, loops are already intensively going on, and corrosion of nodes and parts has begun. It is necessary immediately, after the liquid enters the device, to remove the battery, SIM-card and contact the masters of our service center.We will clean the mechanism, ultrasonic drying, replace the damaged microcircuits, solder problem contacts.
Malfunctions in the operating system can be aggravated by poor-quality unlocking and phone settings, non-professional firmware, downloading of unofficial applications, or a virus attack.
Experienced masters of our service center can help eliminate all these problems, carry out a high-quality repair of the LG G3 s D724 phone, replace the speaker, microphone, back cover of the case.
You may be interested in:
Unlike the regular version of the LG G3, the G3s can replace the broken touchscreen separately without a display. Such repairs will be much cheaper than replacing the assembled display module, as suggested by the official LG service. Replacing the sensor in time takes at least a day for the repair to be of high quality. We glue the sensor onto a special sealant that dries for ideally 10 hours. The next photo shows a broken touchscreen peeled off from the frame.
And here is the result of the work done to replace the touchscreen. After assembly, we test the phone and fully test its functionality.
The cost of repairing LG G3s to replace a broken screen was 680 UAH on 07/14/2017 ... It is better to check the current prices with the master by phone during working hours or write a question in the comments to the article. Do not forget to indicate your phone model and screen glass color.
You can now find out the actual cost of repairing the LG G3s phone and the availability of spare parts directly from the master
If you are not from Kiev, you can send your LG phone to our service by “New mail”. Payment upon receipt from repair
The LG G3 boasts a suite of innovative software features. With the release of Android Lollipop, some of its original features have changed or become inoperable, but there are quite a few of them, from enhanced accessibility to the ability to use multi-screen applications. Our today's article will show you how to do that and more with our LG G3 tips and tricks.
The LG G3 includes a number of tools, the use of which depends a lot on your pressing skills. You can double-tap the display to turn it on and off (although it does work if you tap on an empty space on the active home screen). Also, to lock and unlock your smartphone, you can use the tapping code instead of the usual pattern, and if you need to activate the display, you just need to touch it once.
To set the desired parameters in the "General" tab of the settings menu, select the "Security" section, then "Screen lock" and then "Select screen lock". Now select "Knock Code" and you will be prompted to create and submit your Knock Code template. In addition, you will be asked to create a backup PIN in case you forget your master code.
A feature called Smart Screen will keep the display active as long as you look at it. Basically, this is a very handy feature if you are reading or spending a lot of time looking at something (for example, a photo). To enable Smart Screen in the settings, open the "Display" section and select "Smart Screen".
You can take screenshots on almost every Android device, but LG's QuickMemo + feature will give you the ability to add handwritten notes to the screenshot. You can access this feature in two ways: by clicking on the icon in quick settings, or by adding the QuickMemo + navigation icon to your home screen.
If you have a desire to somehow spice up your G3's home screen or see a more interesting font for your apps, LG has provided that option and gives you the ability to adapt text styles according to your preferences. To get started, in the settings go to the "Display> Font type" scheme, and then select the font you like.
The LG G3 is a powerful smartphone with a number of great features, although in truth, there are very few of them that are really useful.These include the one-handed control mode, which lives up to its name. When the above mode is enabled, you can align the location of the dialer, keypad and lock screen, making it very easy to use your phone with one hand. To activate the one-handed mode in the settings, open the "General" section, then find the "One-handed mode" item and enter it. Now check the boxes for the functions you want and you're done.
In the G3, you can reassign the location of the navigation keys as you see fit. Do you want your home key to be on the left? Or do you want the return key to be on the right? No problem - you can change the layout of these touch buttons and even hide them when not in use by going to Settings> Home touch keys> Key layout. After opening the last item, reassign the location of the touch buttons as you like.
In addition to the above, you can also use the volume key to launch two applications directly from standby mode by long pressing it. Long pressing the bottom of the volume button will launch the camera application, and if the top one will open the notes application. By the way, this order cannot be changed (a definite minus), plus, the functions are also limited if your smartphone is protected by a knock code, PIN code or some kind of security template. If so, then you need to unlock your device first before attempting to launch one of the above applications.
If your G3's keyboard takes up a lot of space or needs a little more space, you can resize it by holding your device in portrait mode. In the settings, open the "Languages and input" section, then enter the "LG Keyboard". Here you can make any changes you want to the keyboard layout. You will also have the option to split the keyboard when your phone is in landscape mode or if one-handed mode is active.
A long press on the back key will launch the dual window function, where multiple system applications can be displayed on the display at the same time. These applications include browser, maps, news, and email. You only need to drag the two apps you want to use to the top or bottom half of the display. The size of the windows of the displayed applications can be adjusted using the bar-crossbar located between them.
Smart cleaning is one of the hallmarks of the LG G3 that reminds you to remove apps you aren't using and other data to free up space on your phone. This feature, in addition to the above, may prompt you to clear the cache of applications, temporary Clip Tray files, and applications that have not been used for a certain period of time. The default interval for notifications and downtime is 1 month, but this number can be increased or decreased if you wish. Going through the "Settings> General> Smart Cleanup" scheme, you can select the category with which you plan to deal - "Temporary files", "Load folder" or "Non-working applications".
Opening the "General" section in the settings, and then the "Accessibility" item, you will see the "Color settings" option. With it, you can change the look and contrast of the entire display, including application icons. Once this function is activated, you just need to slide your finger across the screen, and the interface palette will be changed in accordance with the color you selected.
Basic functions such as volume control, power on / off, home screen, settings and return can be accessed through the additional Touch Assistant app icon, which can be located anywhere on your G3's display and will be present on all screens. To activate this application in the main settings, open "Accessibility", then select "Touch Assistant". Now a corresponding icon should appear on your home screen, clicking on which, you will see a menu with a set of basic functions.
If you're not a big fan of the default messenger app theme, you can change it. In the settings of this application, select "Chat Wallpaper" to change the background and appearance of speech bubbles. You can even use a photo as a background if you like.
If you do not like the icon of a particular application, you can make a long press on it and release, after which an icon in the form of a brush will appear in the upper right corner of the display. By clicking on this icon, you will have access to a variety of icons from which you can choose one to replace.
Here we have listed some of the customization options offered by the LG G3. Let us know in the comments what is your favorite feature in this pretty decent smartphone.
Contents: 1. The influence of the display on the autonomy of the LG G3 2. How to take a screenshot on the LG G3? 3. You can change the buttons in the navigation bar 4. Don't need Smart Bulletin? Disable it! 5. Control your TV using LG G3. 6. Knock Kode is a great way to protect your smartphone 7. LG G3 is a big smartphone, but its ...
Hello everyone. If you are the happy owners of the flagship smartphone from LG, as you understand I am talking about the LG G3, then I have something interesting for you. Namely, 8 things you simply must know about your new smartphone.
This smartphone has a 5.5-inch display that has a stunning resolution, namely 1440x2560 pixels. Immediately after the announcement of the LG G3, everyone immediately rushed to discuss a display with such characteristics. Most users said one thing, a display with this resolution is simply not needed. QHD resolution will only use up the battery faster. And in general, with such a diagonal of the display, the "usual" FullHD would be enough.
And now, a little about how this same display affects the autonomy of the smartphone LG G3. The reporters of the site Androidcentral did a small test, according to them, this display with a density of 543 pixels per inch, does not have a negative impact on the G3's battery life. You can still use your smartphone during the day, and if you are more "economical" in use, the smartphone will easily "live" for two days.
Yes, I understand that such a subtitle sounds a little silly. But, the fact is that there are several ways to take a screenshot on this device. The first of them is a screenshot using the buttons on the back of the smartphone (to do this, you need to hold down the volume down button + the power button of the device). It looks like this:
If this method does not suit you for some reason, do not be discouraged. To take a screenshot of the screen, the preinstalled software, namely the QMemo program, can also help you. To take a screenshot using this program, simply pull up and to the right of the home button, which is located on the navigation button bar of your smartphone. QMemo software will take a screenshot and will also allow you to draw or write on it, after you finish editing the screenshot, just click the save icon in the upper right corner.
If for some reason you do not like the buttons or their order in the navigation bar, then you can change this. So to speak, you have the opportunity to change "for yourself." To do this, you need to go to the "Settings-Front Touch Buttons" menu. And already there you can choose one of the types of front, touch buttons.
In addition, you have a choice of not only a set of buttons, but also the background on which they will be located.
To the left of the desktops, there is a proprietary screen from LG, whose name is Samrt Bulletin. This screen is for collecting information from LG Health app. If you don't need it for any reason, then you can easily turn it off.
To disable it, you need to go to the applications menu-click the three dots in the upper left corner-Home Screen Settings, in the menu that appears, disable the "unnecessary" Smart Bulletin.
It seems to me that this function is undeservedly underestimated. With an infrared port and built-in Quick Remote app in your smartphone, you no longer need to search for your TV remote. This application has support for a huge number of TVs.So your smartphone can rightfully be considered a universal remote control.
It is also a great way to mock your friends 🙂
For the first time, LG showed us this feature during the announcement of the LG G2 smartphone, during the Mobile World Congress conference. Even though it is possible to lock the device using a PIN and pattern, locking with Knock Kode is more secure.
From my experience, I am ready to declare that even the graphical code is guessed 🙂
With the "One-handed operation" mode, even a user with a small hand can use this smartphone without any problems. I want to remind you that the G3 measures 5.5 inches, which is not very small. Fortunately, LG is thinking about its users. That is why users of this smartphone have the ability to change the size of the keyboard, dialer and even choose the place where the PIN code will be displayed on the lock screen.
The stock version of the Android operating system does not have such a built-in mode. That some do not like and they resort to the help of third-party programs. But even here LG is thinking about its users. The LG G3 has a built-in quiet mode.
Video (click to play).
In addition, it is possible to make exceptions to quiet mode. So, even if it is active, then you will never miss a call or SMS message.