Details: Minsk DIY repair from a real master for the site my.housecope.com.
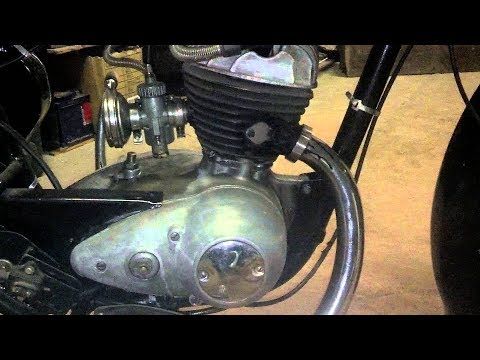
Are you here "Forum about repair and tuning of motorcycles" MINSK "," VOSKHOD "" Useful articles "Complete engine overhaul of the motorcycle" MINSK "
You will need a special tool - for example, it is not easy to remove the crank from the motor without pullers. If you do not find it at the familiar owners of Minsk and Kovrov motorcycles, the device can be made according to the drawing.
Wash the engine: cleanliness is the key to a successful repair.
Start the engine - let it run and dry, then stop it and drain the oil from the gearbox.
Remove the right crankcase cover and disassemble the clutch release mechanism located in the cover.
Disconnect the cable, the return spring, unscrew the worm shaft and shake out the support ball. If it is out of shape, replace it.
Disconnect the generator wiring by tagging the wire accessories to each terminal.
Disconnect the wheel drive chain, release the drive sprocket. You can do otherwise - remove the chain along with the sprocket. To do this, straighten the sprocket nut lock washer, “fix” the motorcycle with the brakes to prevent it from moving, and unscrew the nut (turn it clockwise - left-hand thread).

Video (click to play). You can discard the lock washer - it is better to install a new one during assembly.
Now “tighten” the nut into place so that the driven shaft does not fall out of the bearing when the gearbox cover is removed.
Remove the engine from the frame, remove the clutch rod and intermediate ball (it will roll out by itself if you tilt the engine to its right side, although sometimes the engine has to shake). Unscrew the fasteners and take out the generator stator. According to the instructions, it is necessary to remove the rotor from the crankshaft trunnion with a special puller. But you can do it differently (this method is also recommended by the motorcycle manufacturer) - unscrew the fasteners by 2-3 turns, grab the rotor and pound the bolt head with a hammer.
However, this method is fraught with danger - inadvertently you can at least hammer the thread as much as damage the crankshaft (hammer the crankshaft journal). Do this: unscrew the tightening bolt, cut the M10x1 (1.5) thread in the rotor hole. Screw in a long bolt with a pointed tip (8-10 mm) - and then easily pull the rotor off the crankshaft. After removing the generator, immediately remove the key from the shaft.
We pass to the cylinder-piston group. After unscrewing the nuts securing the cylinder head, remove the washers, then the head itself. Lower the piston to BDC. Lightly strike the ribs of the shirt with your palms up and down several times and you can remove the cylinder.
Do not take care of the gasket under the cylinder - prepare a replacement for it in advance, as well as other "seals".
Spread (a couple of millimeters) the ends of the upper piston ring with your fingers and insert three thin plates into the gap - this makes it easier to remove the ring. Repeat the operation with the lower ring. Remove the piston pin stoppers with an awl or a sharpened nail (before that, do not forget to close the neck of the crankcase with a clean rag - the stoppers usually tend to fall into it). Remove the finger itself with a punch, but first place a block of wood under the piston (on the opposite side). Be careful not to bend the connecting rod.
Using a calibrated dipstick, assess the condition of the piston. If you notice seizures on the skirt and the gap between it and the cylinder mirror is more than 0.25 mm - buy a new part.
Insert the rings into the cylinder to a depth of 20-30 mm and measure the gap in the locks. Rings with a gap of not more than 1.0 mm are considered capable. Do not waste time checking parts with mileage close to 30 thousand km - their resource is exhausted.
Remove the kickstarter and gear shift levers, remove the left crankcase cover and disassemble the engine transmission. With a hook (made of wire or wheel spokes), discard the springs from the pressure plate, remove the mushroom, drive and driven discs.
Check the status of the entire set. Fix the drive sprocket with some copper (or aluminum) bar so that it does not turn over - insert it between the teeth and the chain.
Unscrew the nut securing the sprocket, remove the spring washer. When assembling, it is advisable to replace it with a new one - over time, the elasticity of the part is lost. Remove the sprocket from the landing cone with a puller - for this, any universal one with two or three legs will do.
Under the nut holding the clutch basket, straighten the edges of the lock washer. Place a wrench made from a used driven disc with a welded handle onto the splines of the inner clutch. Unscrew the nut with the left-hand thread on the input shaft of the gearbox - now the motor gear can be removed without hindrance. A key is installed under the drive sprocket - remove it and take care that it does not "dissolve" on the workbench. Observe the same "safety measures" in relation to the two washers and the sleeve belonging to the clutch shaft.
Disassemble and inspect the drive clutch from the "rear" - backlash of rivets in the ratchet transmission from the kick is unacceptable! Check and the gear teeth, if they are "eaten", change the clutch assembly. Integers? Tighten the rivets with a hammer, mandrel, and the hands of an experienced craftsman.
Before disassembling the gearbox, reset the kickstarter spring and remove the shaft itself. Unscrew the fasteners and, tapping the cover around the perimeter with a mallet, remove it. Remove from the gearbox compartment the shaft of the gear shift forks, then the movable gear from the input shaft together with the fork. Remove the input shaft and countershaft with gear sets and then the first gear on the countershaft. On the gear shift shaft, sink one of the pawls into the bore and remove the shaft from the crankcase. Inspect the shift disc without removing it. If its grooves for the cleats of the forks and the projections in contact with the pawls are not broken, the part will still serve. Replace gears if you see that they have chipped teeth or wear more than 0.3 mm in thickness. It is also unacceptable to work out on the "cone" of the gear engagement cams. When worn up to 0.5 mm, the cams are repaired - level them with a thin abrasive wheel so that the working planes of the cams make an angle of 4-6 ° with the gear end. Change the speed engagement forks if the wear of the antennae planes exceeds 0.2 mm. Change the shafts too if their splines are wrinkled. Replace bearings in which you find play in the inner race.
The "Minsk" gearbox has one undoubted advantage: you can replace some of its parts without removing the engine from the motorcycle. An exception is the drive shaft and bearings located in the crankcase. Therefore, if you do not need to change them, as well as the crankshaft, further disassembly of the motor can be omitted.
Knock out the bushings from the "ears" of the engine to the frame at the front of the crankcase. Remove all screws holding the crankcase halves together. Install a special puller on the right plane of the motor and push the crank journal out of the bearing. In the same way or using a press, remove the left half of the crankcase. Entrust the repair of the "Minsk" crank only to an experienced master who works with the necessary equipment.
Remove the oil seals, bearings, bushings and oil squeeze washers from the bore holes and inspect the crankcase: you will notice that there are cracks in its walls, in which holes for the shafts are made, replace the crankcase with a new one. Do not try to replace only one of its halves - the bearing axes will not line up.
The following defects are eliminated: cracks and chips on the crankcase planes, slight wear of the bearing holes, partial thread stripping in the holes for the studs and bolts.
Damage to the metal is sealed with "cold welding" or epoxy resin with the addition of up to 50% aluminum powder and a small amount of starch or flour. Apply a thread locking agent (the hardest class) to the bearing races that enter the holes without interference and to the loose fasteners during assembly.
Assemble the engine in reverse order, tighten the fasteners with a torque wrench. I would like to point out some of the subtleties of assembling parts. Apply a thin layer of sealant to the cleaned surfaces of the crankcase - the gasket will "connect" the motor to it more reliably. Place the crank into the bearings - first on the right, then on the left side of the crankcase. Tap the motor halves (around the pins) with a mallet. Hammer in the oil seals with a mandrel - otherwise you will bend their cages and then the tightness of the mating will not be ensured. Put the cuff of the right half of the motor on the shaft using a guide sleeve (roll it up from cardboard) - without it, the spring ring can break off the oil seal. Charge the kickstarter spring one turn before installing the motor transmission, then insert the shaft into the crankcase. Place the thickest driven disc first in the clutch basket.
Assemble the gearbox as follows: lubricate the shaft seats with Litol: sink the pawls into the bushings and install the gear shift shaft, mount the input shaft with the 2nd gear gear. Place the 1st gear of the intermediate shaft in the crankcase with the smooth side in the gearbox cover. Put the fork on the movable gear of the intermediate shaft and put them in the gearbox. Install the shaft itself in them. Passing the axle (with the flow downwards) through the holes of the shift forks, at the same time install the cleats of the forks into the grooves of the shift disc. If it is not possible to align the forks shaft with the hole in the gearbox cover, open the bearing cover and use a screwdriver to help the shaft slide into place. At the same time, check that the thickness of the washers corresponds to the clearances above the bearings. After closing and securing the cover, adjust the axial travel of the shift shaft - loosen the lock nut, tighten the support screw to the end, then unscrew it 1 / 4-1 / 2 turn and tighten its nut.
Fill the gearbox with half a liter of engine oil.
Having assembled the engine, adjust the ignition timing: rotating the crank, set the piston to TDC, then lower it by 2-2.5 mm (rotate the shaft counterclockwise) and align the groove on the rotor with the axis of the ignition sensor core, then normalize the gap “sensor - rotor "- it should be 0.3-0.5 mm.
When tightening the fastening of the parts, make sure that the settings are not lost.
Mount the engine to the motorcycle and start running in the engine. Carry it out without fail (I'm sure the pilots know the program itself), and then you will get a confident engine mileage of almost fifty thousand miles.
You can download movies, clips, episodes, trailers for free, and you do not need to visit the Youtube site itself.
Download and watch an ocean of endless video in high quality. Everything is free and without registration!
Repair of two-compartment refrigerators Atlant with a crying thawing system
Photo 1. In the photo In this refrigerator, it is impossible to eliminate the leakage of freon in the foamed part
Further we will consider only Atlant refrigerators with a lower location of the freezer and a crying thawing system. We have dealt with those refrigerators that are not being repaired. Now let's see in what cases you can repair the Atlant refrigerator with your own hands. I draw your attention to the fact that if a freon leak occurs in a refrigeration unit or a compressor fails, then such repairs should be carried out by a qualified technician. In no case do not drain the freon yourself, the fact is that the master must determine how much refrigerant is in the system, and the blockage in the capillary tube is also determined by the presence of refrigerant.First, let's list the signs of a refrigerant leak and a clogged capillary tube.
- The refrigerator has stopped freezing and chilling
- The refrigerator compartment does not cool
- Ice forms in the upper compartment of the refrigerator on the back wall
- The refrigerator has stopped turning off
- The temperature in the freezer compartment is very low, but in the refrigerator compartment, on the contrary, the temperature has increased
- Cold condenser at the back of the refrigerator
- Half of the condenser is hot and the other half is cold
- The compressor runs quieter
- Swollen plastic on the back wall in the refrigerator compartment
- If the leak occurs outside the foam part, then oil may appear in this area.
- Between the refrigerator and the freezer, the intermediate bar is strongly rotted and an unpleasant smell of oil is felt
It seems to have listed everything, now I want to say a few words about the capillary tube. Its clogging can be determined by the condenser (radiator, whatever you like), I wrote about this in point 7, everything else is more about freon leakage. In photo 2, you can see a crying evaporator installed on the back wall in the refrigerator compartment, this is how you can cure this trouble. Here you need to add the following, if you are offered to simply refill your refrigerator, then this does not guarantee the subsequent performance of the refrigerator. In order for your refrigerator to work 100% after renovation, it is advisable to install a crying evaporator. Below you can watch a video in which I do this procedure.
Photo 2. What does the refrigerating chamber look like after repair
Watch a video on how to fix a freon leak in a two-compartment refrigerator with a crying system
Here it must be added that it is practically impossible to smell the leakage of freon (refrigerant), since there is a scanty amount of it in the cooling system, moreover, the refrigerant has no smell, smells like oil, and this is only if the leak is very large. After looking at the entire article, I understand that I already tired you, and the topic of the leak is quite large and there is something to talk about here, so I decided to describe this topic in a separate article.
photo 3. How to restore the rubber band on the door
As a result of the incomplete adherence of the sealing gum to the refrigerator body, ice freezes in the refrigerator quickly, and this leads to a loss of cold performance, in addition, warm air is sucked in from the environment, all this leads to incorrect operation of our unit. Quite often, due to the seal, the refrigerator simply cannot turn off, especially on hot days. To change the sealing gum for “Atlant or Minsk” is not an easy task, despite the seeming ease of this process. For frequent sealing rubber is glued to the refrigerator door and this causes tangible problems in replacing it, besides, the price of a set for a 2-chamber refrigerator is quite high, and the price of work on installing a seal also bites.
Watch a video on how to repair the seal on the refrigerator door


