In detail: do-it-yourself nexia gearbox repair from a real master for the site my.housecope.com.
Repair and adjustment of the gear shift drive on cars Daewoo Nexia, Daewoo Lanos, Chevrolet Lanos
Increased the free play of the gear shifter? Lost switching clarity? Is it hard to "find" the reverse gear or the first time you can't turn on the first? If you say yes, to all questions (or almost all) and you are a happy owner of a car Daewoo Nexia (Daewoo Nexia), Daewoo Lanos (Daewoo Lanos), Chevrolet Lanos (Chevrolet Lanos), then in this article you can find a solution to your problem. Also, the article will be interesting and useful, no less happy car owners Opel Kadett (Opel Cadett) and Opel Vectra (Opel Vectra).
The reason for the deterioration of gear shifting in these cars is "broken" gear shift drive... And there are two options for solving this problem. The first option, the simplest, fastest and most expensive, is to replace the entire drive. The second option, more troublesome and cheaper (much cheaper!), Buying repair kit for gearshift drive... Which of the options will be more convenient for you, you can decide after reading the article. So….
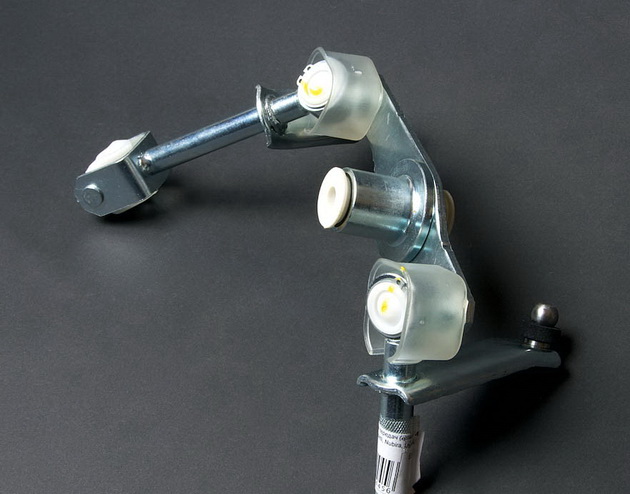
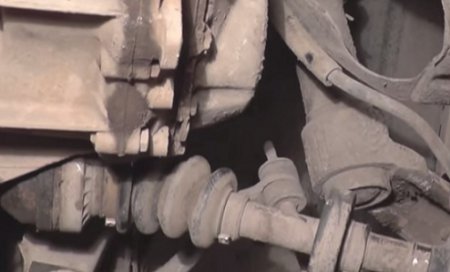
Let's start with the spare parts. I think that now, it will not be difficult to find at the car market or auto shop, repair kit for gearshift drive for Daewoo Nexia (Daewoo Nexia), Daewoo Lanos (Daewoo Lanos), Chevrolet Lanos (Chevrolet Lanos), consisting (see photo 1) of a rod of a choice of gears and five plastic bushings with rubber rings. To this kit, you should also buy separately - one large axis of the shift drive and two small ones with spring locks (photo 2). I also recommend repair the gearshift drive in parallel with replacing the rod and the oil seal of the gearshift mechanism... You can read how to do this here. So, in most cases, the rod lugs have a fairly large output (as an example, a large output - photo 3). As a result, it is better to replace the gear shift rod. We figured out the spare parts ...
| Video (click to play). |
Let's move on to the tool. In order to repair the gearshift drive on Daewoo Nexia (Daewoo Nexia), Daewoo Lanos (Daewoo Lanos), Chevrolet Lanos (Chevrolet Lanos), You will need: a hammer, a screwdriver, expanding pliers for removing the retaining rings (photo 4), two 5mm drills, and a “12” socket wrench.
Removing the gearshift drive from the vehicle:
1. In the engine compartment, loosen the tightening of the bolt on the clamp connecting the shift shaft and the drive (photo 5).
2. We take out the spring clip and take out the small axle connecting the gear shift rod to the drive (photos 6 and 7).
3. And the last step. We take out the axle connecting the gearshift drive with the bracket (photo 8). To do this, turn the axle slightly counterclockwise and, prying it with a screwdriver, pull it up.
The drive is removed. You can proceed to the main part - Repair of the gearshift drive.
1. Alternately changes the drive hinge bushings - remove the retaining ring with pliers, and disconnect the connection; remove the old bushing and install a new one on the hinge; press the eyelet onto the bushing until the groove for the retaining ring appears (photo 9).
2. We change the plastic triangle of the drive (its replacement is very important, since it is always significantly developed, see photo 10) - we grind the riveted end of the axle, knock it out and install new parts - the triangle and the axle; rivet the end of the new axis (photo 11).
3. And the easiest. We change the bushings and elastic bands on the drive lever itself (photo 12).
Now, as they say, we install the finished product on the car. But we do not tighten the clamp for connecting the shaft and the gearshift drive.
Getting ready to adjust the drive and gearshift scenes on Daewoo Nexia (Daewoo Nexia), Daewoo Lanos (Daewoo Lanos), Chevrolet Lanos (Chevrolet Lanos).
1. Set the box to the neutral position. We find on the gearbox mechanism, the plug of the adjusting hole (photo 13).And we take it out (photo 14).
In its place we insert a drill with a diameter of 5 mm and slowly turning the shift shaft, grope for the fixing hole (photo 15).
2. After that we climb into the salon and…. "Lanosovody" simply remove the cover from the gear shift stage, but the owners of Nexia are engaged in a small disassembly of the cabin (photos 16 and 17). After that, we find the adjusting holes on the casing and the rocker. We combine them and fix them with the second drill (photo 18).
3. When everything is fixed with us, you can tighten the clamp for connecting the shaft and the gear shift drive.
4. We take out the drills, install the plug and check how the gears are shifted.
If everything is done correctly, then additional adjustment is no longer required. All programs will be "in place". True, the curtain will be a little tight, but as practice shows, this is not for long, for the first 3-4 days.
UPD 03.01.2016
I began to notice that lately, on cars Daewoo Lanos and Daewoo Nexia after repair or complete replacement and final adjustment of the gearshift drive, after a certain time, these same transmissions begin to be lost again. You check, everything is fine, all the details are in place. You do a second adjustment, after which there are no problems with the gears. But, not for long. A day, two, and again the programs ran away. I had to look for a problem that lay in the backstage yoke and economical Chinese manufacturers.
In the original gearshift drives the diameter of the drive shaft is 13.6 mm, and on Chinese products, the shaft diameter fluctuates from 12.5 to 12.9 mm... Plus, to this, the threads on the bolt and the clamp were covered with rust, which also made it difficult to use the clamp to the end. And these two factors, combined, became the reason why the adjustment of the drive constantly went astray. The way out of this situation is simple - we remove the clamp and, using a tap and a die (8 * 1mm), we drive the threads. Install the clamp and tighten the bolt. Mission Complete! Gears were no longer lost)))
Therefore, I recommend to all motorists, after repair and especially after replacing the gearshift drive, remove the clamp and drive the threads. This undertaking will not take much time, but it will allow you to avoid unpleasant surprises.
Shift cover
Intermediate Switch Lever
Installing an additional crankcase in the tool
Removing the driven gear of the 5th gear
The location of the plugs of the rod retainers
Additional crankcase complete with shafts and gears
Installing the gear block bearing
68. GEAR BLOCK BEARING
70. INPUT SHAFT GEAR BLOCK
Repair and replacement of the Daewoo Nexia clutch a rather laborious operation that will require the removal of the gearbox. Replacing the Daewoo Nexia clutch is best done on a pit or overpass. It will be necessary to provide for the installation of a stop under the engine. To work, you will need not only a standard set of tools, but also a special mandrel for centering the clutch disc. Without this mandrel, it will not be possible to replace the clutch, because without proper alignment, it simply will not work to insert the input shaft of the gearbox into the basket.
To remove the Daewoo Nexia gearbox there is a lot of work to be done.
When removing or installing the gearbox, do not support the input shaft of the gearbox on the petals of the pressure spring of the clutch cover, so as not to damage them.
To replace the Daewoo Nexia clutch we carry out the following procedure.
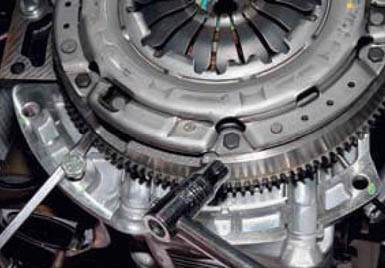
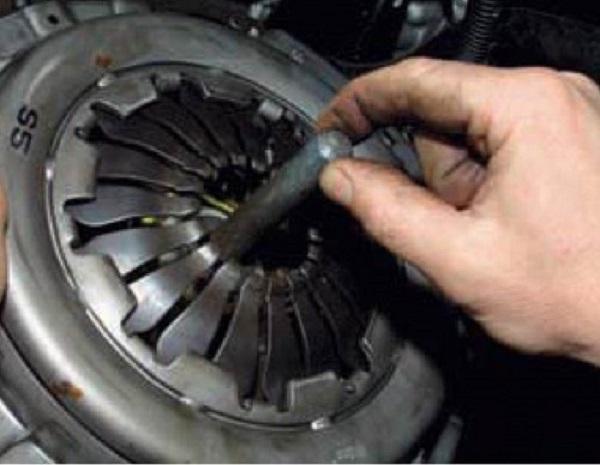
Using the "11" head, unscrew the six bolts securing the clutch cover to the flywheel. We hold the crankshaft from turning with a screwdriver inserted between the teeth of the flywheel and resting on a bolt inserted into the hole in the oil pan. Unscrew the bolts evenly, no more than one turn each, so as not to deform the diaphragm spring of the clutch cover. Next, see a photo of the process.
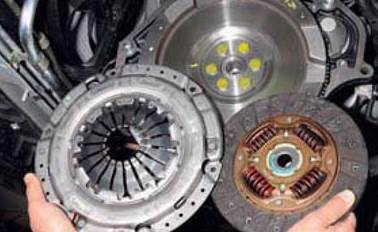
Remove the cover (clutch basket) together with the driven disc.
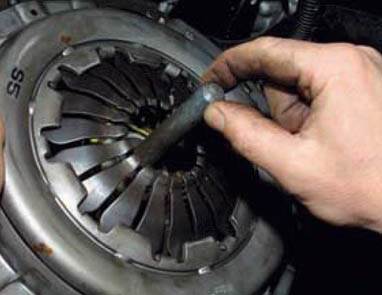
When installing the clutch, we orient the driven disc with the protruding part of the hub towards the casing and insert the centering mandrel into the hole of the driven disc.
We insert the mandrel into the hole of the crankshaft and in this position we fix the clutch cover, evenly (one revolution per pass) tightening the bolts.
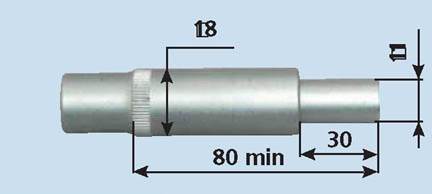
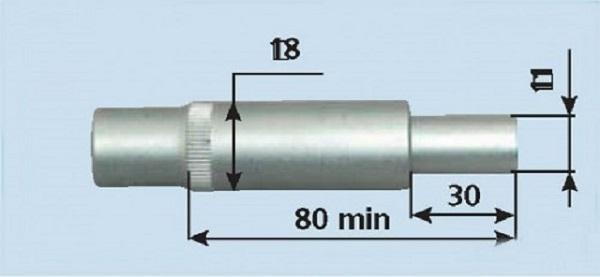
The centering mandrel for Nexia has the following dimensions, see the photo below. The mandrel can be turned on a lathe from metal, wood, plastic, or assembled from two tool heads with suitable diameters and lengths.
Some clutch kit manufacturers offer a plastic mandrel as a bonus and pack it in a box with a new clutch.
With a certain desire, replacing the clutch with your own hands on a Daewoo Nexia is quite possible. Moreover, this operation, with a moderate driving style, should be carried out quite rarely.
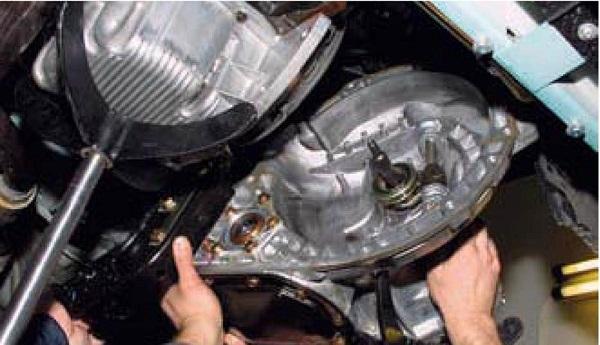
... and remove it together with the rear support of the power unit.
When removing or installing the gearbox, do not support the input shaft of the gearbox on the clutch cover pressure spring petals, so as not to damage them.
Before installing the gearbox, apply a thin layer of grease, for example, SHRUS-4, on the spline part of the input shaft. Install the gearbox in reverse order. After introducing the input shaft of the gearbox into the spline hole of the clutch disc, push the gearbox to the right until the mating surfaces of the clutch housing are in full contact,
the cylinder block and the oil pan by simultaneously centering it on the two bushings. We screw in and tighten all the clutch housing mounting bolts. We install the support of the power unit.
After installing the gearbox, fill it with oil, adjust the gearshift drive, pump the clutch hydraulic drive.
Finally, we tighten the clutch housing mounting bolts with the required moments in the following order:
- tighten the three bolts A of the lower attachment to the cylinder block with a torque of 72-74 Nm;
- one bolt B of the lower attachment to the sump of the engine (next to the hole in the clutch housing for the drive of the right front wheel) - a moment of 30-32 Nm;
- three bolts B of the lower attachment to the engine oil pan - a torque of 20-22 Nm.
- the three bolts Г of the upper attachment to the cylinder block are tightened with a torque of 72-74 Nm
Repair of a gearbox is a rather difficult job, requiring high qualifications from the performer and the presence of many special devices. Therefore, it is better to repair a gearbox, especially an automatic one, in a specialized workshop. Here, the process of removing and installing the gearbox will be described, which is necessary for repairing the clutch, replacing the clutch release bearing, the rear crankshaft oil seal and the gearbox input shaft oil seal. Technically, this work is not difficult, but it requires a certain skill and physical strength.
Difficulty: 5.
Lead time: 8 hours.
To complete the work, 2 assistants are required.
1. We carry out preparatory and basic work on the removal of both drive shafts (see "Front wheel drive shafts - removal and installation").
2. Remove the storage battery (see "Storage battery - removal and installation").
3. Drain the oil from the gearbox (see "Oil in the manual gearbox - change").
4. Remove the engine hood (see “Hood - Removal and Installation”).
5. Disconnect the stabilizer links from the lower suspension arms. To do this, hold the nut of the stabilizer link bolt to the lever with a 13 spanner wrench, and unscrew the thrust axle bolt with a 13 socket wrench with a ratchet.
6. Using a 19 socket wrench with a ratchet, unscrew the lower bolt of the clutch slave cylinder mounting bracket, while holding the nut with a 19 spanner wrench.
7. Using a 19 spanner wrench, unscrew the upper bolt of the clutch slave cylinder mounting bracket.
eight.Having unscrewed the mounting bolts, we move the clutch slave cylinder together with the bracket, without disconnecting the hydraulic line.
9. Using a 19 socket wrench with a ratchet and an extension cord, unscrew the upper bolt securing the gearbox housing and the wiring harness mounting bracket.
10. Using a 19 socket wrench, unscrew the bolt securing the gearbox housing to the cylinder block, located under the supply pipe of the cooling system.
11. Disconnect the reversing light switch electrical connector.
12. Disconnect the speedometer drive cable, disconnect the speed sensor and, by unscrewing the mounting bolt with a 10-point socket wrench, remove the driven gear of the speedometer drive.
13. Using a winch, we hang the engine by the standard loop located next to the ignition distributor.
14. Using a 19 socket wrench with a ratchet and an extension cord, unscrew the 3 lower bolts securing the gearbox housing to the cylinder block:
- first a bolt located near the oil filter,
- further the bolt under the starter,
- then the bolt located closer to the radiator.
15. To facilitate the subsequent assembly, with a marker we apply alignment marks that determine the relative position of parts on the connection of the gearbox control rod.
16. Using a 12 spanner wrench, loosen the tightening bolt of the transmission control rod connection.
17. We remove the inner part of the connection.
18. Using a 14 socket wrench with a ratchet, unscrew the 3 bolts securing the flywheel guard to the gearbox housing.
19. Disconnect the flywheel guard.
20. We substitute a support in the form of a hydraulic jack and a wooden block under the gearbox.
21. Using a 14 socket wrench with a ratchet and an extension cord, unscrew the 3 bolts securing the bracket for the left support of the power unit to the gearbox housing.
22. With the same key, unscrew the 2 bolts securing the left support of the power unit to the side member.
23. Disconnect the support together with the bracket.
24. We pass a rope under the gearbox housing (a towing cable is possible) and bring the ends of the rope up into the engine compartment.
25. With a 17 socket wrench with a ratchet and an extension, first unscrew one bolt securing the rear support of the power unit (item 1), and then unscrew the second bolt (item 2) through the hole in the bracket.
26. Using the winch, gently tilt the engine with the rear end down, at the same time release the hydraulic jack-support and hold the gearbox from above by the rope and from below with your hands.
27. Disconnect the gearbox from the engine, taking care not to damage the diaphragm spring petals of the clutch basket with the input shaft
The weight of the manual transmission is about 60 kg. This operation must be performed by 3 people.
28. We lower the gearbox to the prepared stand.
With the gearbox removed, check the condition of the clutch, including the release bearing and the release bearing sleeve. We check the absence of leakage through the oil seal of the input shaft of the gearbox and the rear oil seal of the crankshaft of the engine.
Install the parts removed during disassembly in the reverse order.
Fill the gearbox with oil (see "Manual gearbox oil - change").
We check the alignment angles of the front wheels (in a specialized workshop).
Most of the owners of used Daewoo Nexia cars are faced with the problem of gear shifting, this can be expressed in heavy or incomplete engagement, fuzzy shifting, for example, when a completely different gear is engaged instead of one. There is an explanation for this, there may be a clutch or gearbox malfunction, but, most likely, the cause of all the troubles will be the gearshift drive rocker, sometimes it is called a "helicopter". It is customary to call the linkage mechanism of the multi-link assembly, which connects the rod coming from the gearshift lever with the rod that fits the box.To solve the problem, you can replace the shift actuator assembly or purchase a rocker plate repair kit.
Removing the curtain.
- Do some preparatory work. Remove the engine crankcase guard for easy access from below. Open the hood and disconnect a few terminals from the sensors, move the wiring harnesses to the side. Unscrew the expansion tank and move it to the side; it is not necessary to disconnect the hoses from it. These measures will give you easy access from above.
- From the bottom of the car, loosen the clamp connecting the gear lever to the rocker arm.
- From above, through the engine compartment, loosen the clamp bolt that connects the shift shaft to the drive.
- Remove the spring clip and pull out the small shaft that connects the shift rod to the rocker arm.
- Turn the axle, which connects the gearshift actuator and the bracket, in a counterclockwise direction, pry it with a screwdriver and remove it by slightly pulling it up.
- Now that the rocker arm is disconnected from the lever and from the entire gearbox, it will remain attached by its center section to an enclosed platform located in the engine compartment. There are latches on the top of the rod of its fastening, squeeze them in different directions and pull on the guide rod. Now the stage can be easily removed, pull it out through the top.
Backstage repair.
- The bushings on the drive pivots should be replaced. Take the pliers, remove the retaining ring, disconnect the connection. Remove the old bushing and install the new one on the pivot, press the lug onto the bushing until the groove for the circlip appears.
- Replace the plastic triangle on the actuator, its wear is always very significant. Grind off the riveted end of the axis, knock it out and install a new triangle and axis, rivet the end of the axis on the new part.
- Replace actuator arm bushings and rubber seals. After everything is assembled, you can proceed with the installation. Take your time to tighten the clamp that connects the shaft to the yoke.
Assembly and adjustment of the stage.
How to replace the release bearing with your own hands on a Daewoo Nexia (Daewoo Nexia), the video is also instructions on how to remove the gearbox from the car. Car 2005 onwards, mileage at the time of repair 110 thousand km.
How do you know if the release bearing is broken? The most obvious reasons for a release bearing malfunction are when the clutch pedal is pressed, and there is a distinct noise and vibration felt.
Video of replacing the release bearing, removing the gearbox on Daewoo Nexia (Daewoo Nexia):
The repair is quite time consuming, you will have to remove the gearbox (gearbox), drain the oil from it, remove the drives, in order to simply replace the release bearing. We recommend starting this work with experienced assistants, having a viewing hole or overpass and, accordingly, a margin of time. Purchase the necessary spare parts, new transmission oil in advance, look at the condition of the drives, you can kill two birds with one stone, replacing them if the situation requires it.
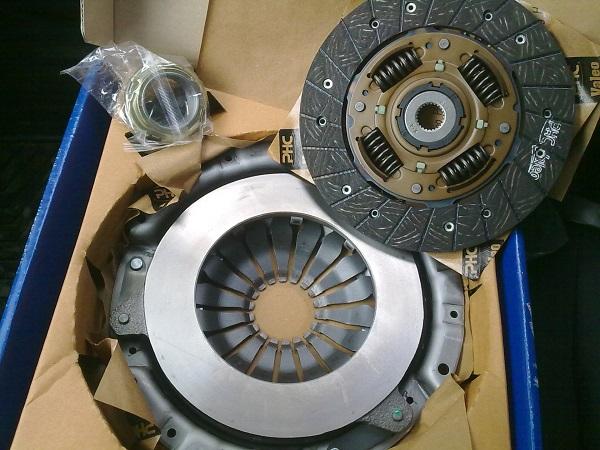
If the clutch fails, it is necessary to replace the entire set consisting of release bearings, driven and driving discs.If you change only faulty parts, then the installed old undamaged components have a small resource and they will need to be replaced soon. The article discusses in what cases it is necessary to change the clutch, what kind of malfunctions there are, and how to do it yourself with a Daewoo Nexia.
On Daewoo Nexia cars, a single-plate dry clutch (SC) is installed, in the center of which there is a diaphragm spring. The pressure plate is housed in a special casing, attached to the flywheel with mounting bolts. The driven disk is put on the splines of the input shaft of the gearbox and is located between the pressure plate and the flywheel.
The design of the hydraulic drive for shutting down the SC includes two cylinders: the main and the working one, the pipeline and the clutch pedal (PS). The SC stem is connected to the PS using a pin and a stem plug. In addition, the master cylinder is connected by a tube to a reservoir located on the front end. The hydraulic drive is filled with brake fluid.
Replacing the clutch may be necessary when the following faults are found:
- jerks during gearbox operation;
- when shifting gears, extraneous noises are heard;
- the clutch "slips", does not fully engage.
Replacement will eliminate the disadvantages.
For the convenience of work, the vehicle should be installed on a lifting device or the vehicle should be lifted with a jack and installed on supports.
From the instruments for the procedure you need to prepare:
- the key is at "11", it will be more convenient to use the socket head;
- mounting blade;
- screwdriver;
- torque wrench;
- a set of tools for dismantling the checkpoint;
- a frame for performing centering.
The mandrel can be made by yourself according to the following drawing.
Having prepared all the necessary tools and consumables, you can start replacing.
The replacement process consists of the following steps:
- First you need to remove the gearbox (gearbox).
- Before removing the gearbox, you must remove both front wheel drive shafts.
- Remove the battery.
- Then it is necessary to drain the oil from the gearbox.
- Next, you should release the slave cylinder and take it together with the bracket to the side.
- Then you need to release the gearbox from the attachment to the engine. Next, you need to release the flywheel cover.
- Then you should remove the support of the power unit.
- Now the checkpoint is being dismantled.
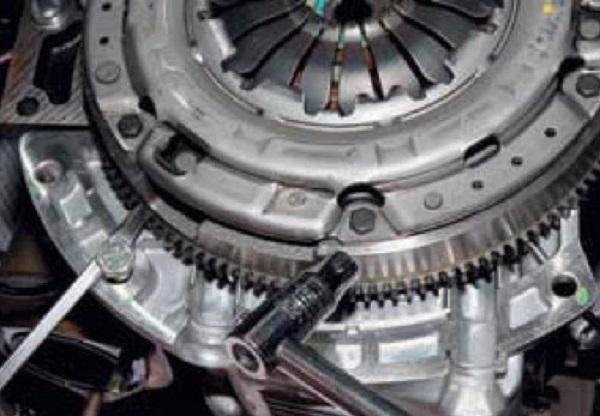 Unscrew the mounting bolts
The bolts should be unscrewed evenly, making two turns with a wrench on each bolt, moving in a circle. When all the bolts are unscrewed, you need to carefully dismantle the clutch basket and the driven disc from the flywheel.
At the end of the work, you should check how the gearbox works and adjust the PS stroke if necessary.
This completes the replacement of the clutch on the Daewoo Nexia. For long-term and trouble-free operation of the clutch, you should not keep your foot on the PS all the time. This habit usually comes about when learning to drive, as many are afraid of not having time to disengage the clutch when the car stops. Not only does the leg get tired quickly, when the PS is slightly squeezed out, the driven disc gives a slipping, which leads to premature wear.
The release bearing is also subject to this increased load and therefore increases its wear. If you need to stay in traffic jams for a long time, it is better to put the car in neutral.
This video discusses replacing the clutch using the example of a Daewoo Sense car.
Disconnect the connectors from the reversing light switches and the vehicle speed sensor.
Then remove the gearshift drive.
Remove the front wheel drives.
We drain the oil from the gearbox.
We unscrew the two bolts securing the coolant pipe and take the pipe slightly down.
for this you will need a key for 10,
Then, with a 19 key, unscrew the upper bolt securing the gearbox and the bracket of the clutch slave cylinder to the cylinder block.
With a 19 key, we hold the bolt from turning, and with the second key we unscrew the nut of the bolt securing the clutch slave cylinder bracket to the gearbox.
Using a 19 key, unscrew the two upper bolts securing the gearbox to the engine block.
After the rear top bolt is removed, move the wiring harness attachment bracket to the side.
Now we install an adjustable stop under the engine.
Then we straighten the edges of the stop plate.
Then we take the 17 key and unscrew the three bolts securing the gearbox bracket.
We take out the bolt securing the bracket to the rear support.
And we unscrew the three bolts securing the left support to the gearbox and two bolts securing the bracket to the support.
Then, with a 19 key, unscrew the two front bolts securing the gearbox to the cylinder block.
And with a 17 key, unscrew the two front and one lower bolts securing the gearbox to the engine sump.
The cost of work on the repair of the Daewoo Nexia gearbox, excluding the removal and installation of manual transmission, is from 6000 rubles. The cost of repairing the checkpoint, taking into account the removal and installation - from 11,000 rubles. The prices for spare parts are fixed when ordering them.
We service Daewoo Nexia cars of any generation and modification. Among the advantages that favorably distinguish our services from those of competitors are the constant availability of a large range of auto parts in the warehouse, as well as the possibility of prompt ordering; specialization in manual transmission and experienced craftsmen of this type of work; providing a guarantee for all types of work performed by our specialists. When giving a car to our service for gearbox repair, you can be sure that you are handing it over to the hands of professionals who will identify and eliminate the breakdown as soon as possible!
You can buy from us (if available in the warehouse) or order any spare parts for the repair of the Daewoo Nexia gearbox, as well as manual transmissions for complete replacement. To order and clarify the price, let us know the VIN number of the car. We draw your attention to the fact that the sale of manual transmissions and spare parts is carried out only during repairs with us!
Basic data for monitoring, regulation and maintenance
Tightening torques for screw connections
Gearbox - technical condition check
Before starting to check the technical condition, we check the oil level in the gearbox. In a box operated with a low oil level in the crankcase, there is intense wear of parts and soon it may fail.On a viewing ditch or overpass, we inspect the gearbox from all sides, making sure that there are no oil leaks:
1) from under the differential cover. If there are traces of leakage, the cover gasket must be replaced;
2) at the joints of the gearbox with the internal hinges of the drives. The presence of traces of oil leaks in these places indicates the need to replace the oil seals of the front wheel drives;
3) in the lower part of the joint of the clutch housing and the engine block; the presence of traces of oil leaks in this place indicates the need to replace the oil seal of the input shaft of the gearbox;
4) on the gearshift rod. If there are signs of leakage, the stem oil seal must be replaced.
We are convinced of the serviceability and correct adjustment of the clutch release and gear shifting mechanisms. To do this, pressing the clutch pedal, turn on all the gears in turn, check the ease and clarity of their switching on and off. If necessary, adjust the gear shifting mechanism and the clutch release mechanism.
To eliminate the malfunctions listed below (if any), it is necessary to repair the gearbox associated with its disassembly. This requires special equipment and high qualifications, therefore, it is advisable to entrust the repair of the gearbox to a specialized service station.
Set the gear lever to neutral and start the engine. Having pressed the clutch pedal several times, we listen to the sound of the gearbox bearings. It appears when the clutch pedal is released and disappears when it is depressed. Loud bearing noise indicates wear and tear and the need to disassemble the gearbox and repair it.
We check the operation of the gearbox in motion. We are convinced of the absence of crunching, knocking and other extraneous sounds during the operation of the box. We check the work of synchronizers; for this, moving first with acceleration and then with deceleration, we switch gears up and then down. Gears should shift clearly and without crunching, and there should be no spontaneous disengagement of gears when the load changes.
If you hear a crunch when shifting all gears, then the most likely cause is incomplete clutch disengagement.
Gearbox - oil change
Changing the oil in the gearbox during operation is not provided by the manufacturer. However, the need to drain the oil and then replace it may arise, for example, when removing the gearbox for repair or to replace the differential cover gasket. The gearbox uses an oil with a viscosity of SAE 80W (for operation at extremely low temperatures - 75W-90). The oil volume in the gearbox is 1.8 liters.
To carry out the work, you need a viewing ditch or overpass, a special syringe for filling oil into the gearbox.
Sequence of execution
1. Install a container under the differential cover to drain the oil.
2. Loosen the ten bolts securing the differential cover.
3. Drain the oil from the gearbox without removing the cover.
4. Finally, unscrew the mounting bolts and remove the cover.
5. Drain the remaining oil from the lid.
Replace the differential cover gasket before refilling with new oil (e.g. after repairing the transmission).
6. Install the cover and tighten the mounting bolts to 40 Nm.
7. Fill the gearbox with oil.
Transmission - removal and installation
Removing the gearbox is necessary for repairing it or replacing clutch parts. Performing this operation is quite laborious and requires certain skills and equipment, so if you are not confident in your own abilities, it is better to entrust the performance of this work to a specialized service station.
To complete the work, you will need a viewing ditch or overpass.
The gearbox weighs more than 30 kg, so work with an assistant or using an adjustable stop or lifting device.
Withdrawal
1. Preparing the car for the job.
2. Disconnect the wiring harness pads from the reversing light switch and vehicle speed sensor.
3. Remove the gear change drive.
4. Remove the front wheel drives.
5. Drain the oil from the gearbox.
6. Remove the starter.
7. Using a 10 mm wrench, unscrew the two bolts securing the coolant pump branch pipe and move the branch pipe slightly upward.
8. Using a 19 mm wrench, unscrew the upper bolt securing the gearbox and the clutch slave cylinder bracket to the engine block.
9. Using a 19 mm wrench, keep the bolt from turning, and with a second wrench of the same size, unscrew the nut of the bolt securing the clutch slave cylinder bracket to the gearbox.
10. Remove the bolt and move the clutch slave cylinder assembly with the bracket to the side.
11. Using a 19 mm wrench, unscrew the two upper bolts securing the gearbox to the engine block.
12. After unscrewing the rear upper bolt, move aside the wiring harness mounting bracket.
13. Install an adjustable stop under the engine.
14. Straighten the edges of the stop plate.
15. Using a 17 mm wrench, unscrew the three bolts securing the gearbox bracket.
16. Remove the bolt securing the bracket to the rear support.
17. Using a 17 mm wrench, unscrew the three bolts securing the bracket of the left support to the gearbox and two bolts securing the bracket to the support.
We carry out further work with an assistant or install an adjustable stop under the gearbox.
18. Using a 19 mm wrench, unscrew the two Front bolts A securing the gearbox to the engine block and with a 17 mm wrench, two front and one lower bolts B securing the gearbox to the engine sump.
19. Using a 19 mm wrench, unscrew the rear bolt A securing the gearbox to the engine block and with a 17 mm wrench - the rear bolt B securing the gearbox to the engine sump.
20. Move the gearbox as far as possible from the engine to the left side member and carefully lower the gearbox to the floor.
When removing the transmission, do not rest the input shaft on the clutch diaphragm spring, as this may damage the clutch.
Installation
1. Apply grease to the splines of the gearbox input shaft.
2. Install the gearbox in reverse order.
3. Tighten the bolts and nuts to the prescribed torque.
Daewoo Nexia is a Korean compact class passenger sedan that replaced the Daewoo Lemans model with the bestseller in Russia in 1994 and is still being produced practically unchanged in Uzbekistan. In addition to Uzbek and Korean, on the roads of Russia there are “Rostov” and “Taganrog” copies of the late 90s (on the “Rostov”, as well as on the Korean, unlike the “Uzbek” and “Taganrog”, bumpers painted in body color were installed and other rear lights). In the automotive market of Asian countries, Daewoo Nexia was supplied under the name Daewoo Cielo.
The exterior of Daewoo Nexia is already difficult to assess, such as the exterior of the VAZ 2110 car, it has become so familiar. We can unequivocally say that the design of Daewoo Nexia is unlikely to represent any artistic value, however, this is hardly important for an inexpensive utilitarian car. In 2003, the "Uzbek" Nexia underwent restyling - the bumpers began to be painted in the body color, the radiator lining changed (in addition, in the "DOHC" version, the rear crystal lights and trim on the trunk lid were installed on the car, the moldings became wider). Although our compatriot knows the car Daewoo Nexia exclusively with a sedan body (only such cars were assembled in Russia and Uzbekistan), the range of Daewoo Nexia (Daewoo Lemans) bodies in Korea also included three- and five-door hatchbacks.
Inside, Daewoo Nexia looks very conservative - straight lines and dark tones prevail. From today's point of view, the design of the interior of Daewoo Nexia is undeniably outdated, but from a functional point of view, it is still quite comfortable.
The Nexia engine range consists of two gasoline engines: the first - with a volume of 1.5 liters and 16 valves with two camshafts, produces about 90 hp. (this engine was installed on the "Korean" Daewoo Nexia from the very moment of their appearance, and on the "Uzbek" - only since 2003), the second - an 8-valve single-shaft with a volume of 1.5 liters produces about 75 hp.
Front suspension Daewoo Nexia - McPherson type. Rear suspension Daewoo Nexia -. Both front and rear Daewoo Nexia has anti-roll bars. The ground clearance height (clearance) of Daewoo Nexia is 150 mm. Nexia was often equipped with an ABS system, in which case the car has disc rear brakes. The Daewoo Nexia has a rack and pinion steering gear, equipped with an optional hydraulic booster.
Daewoo Nexia is a front-wheel drive vehicle equipped with both a mechanical 5-speed and an automatic 4-speed (3-speed + OVERDIVE) gearbox.
Daewoo Nexia, due to the simple suspension of a rather old design, cannot boast of impeccable handling, however, when using the car not for racing, but as a family car, the suspension capabilities should be quite enough.
| Video (click to play). |
Based on 10 years of operating experience, Nexia can be described as reliable. Even the suspension of Daewoo Nexia, due to its simple design, rarely requires attention. In no case should you forget about timely and full-fledged service of Daewoo Nexia. The durability of the Daewoo Nexia transmission and engine will depend on compliance with the operating rules: the manufacturer recommends changing the oil in gasoline engines - every 15,000 km, in an automatic transmission - every 30,000 km. It should also be noted that when replacing the timing belt on a Daewoo Nexia on any of the above engine types, the rollers should also be changed (this will save, at least, from repaying the same work after some time, if you have time, otherwise however, a jammed roller will inevitably lead to a rapid breakage of the timing belt and the meeting of valves with pistons).


