In detail: do-it-yourself roomba battery repair from a real master for the site my.housecope.com.
After working for six years, my iRobot Roomba never made it to the charging base. The vacuum cleaner stopped at various places in the apartment with the request "Please charge Rumba". This is a symptom of the loss of battery capacity of the robot vacuum cleaner. Of course the battery needs to be replaced. Below, the Master shares his experience of where to buy a new battery at an affordable price and how to replace the old battery in the iRobot Roomba with your own hands.
In my city, you can buy an original battery and analogs, the price of the original is equal to the price of a new robot vacuum cleaner, more primitive Roomba. Non-original batteries are bought to order, you pay and wait a month for the battery to be delivered to the store. The price of this battery is almost twice as expensive as the one ordered in China. Naturally, I bought a battery for my Roomba 500 for 1,700 rubles (summer 2016) in China on Aliexpress. Here is the link to buy the Roomba 500 battery https://ali.pub/na071... The battery is also suitable for Roomba 550, Roomba 560 and Roomba 780.
The store in China was selected based on the number of orders and the quality of reviews. Literally two weeks later, the battery arrived at the post office!
Replacing the battery with your own hands is very simple, but it is better to combine it with a little prevention of the insides of the vacuum cleaner.
- We turn the vacuum cleaner over onto the top cover and immediately unfasten the garbage container.
- Unscrew the four screws securing the Roomba's bottom cover. See photo.
iRobot Roomba mounting screws
- For prophylaxis, we take out and clean the roller axles of the wheel of the distance traveled counter.
- Unscrew the screw securing the side brush. See photos and videos. Remove the brush and remove debris from the axle.
- Remove the bottom cover of the vacuum cleaner.
- Using the side ears, we remove the old battery from the socket of the vacuum cleaner body.
- We remove all the debris seen from the case.
- We install a new battery with our own hands. Roomba will notify itself of successful installation. Watch a video.
| Video (click to play). |
New battery installed
- We assemble the vacuum cleaner in the reverse order.
- After assembly, we charge a new battery and the iRrobot Roomba is ready to work.
see also how to remake power adapter for the robot from 110 volts to 220 volts. This is also not difficult.
How to quickly revive the "shrunken" battery for robot vacuum cleaner aerobot... Is it possible to replace the battery in the vacuum cleaner with another and where can I buy a suitable battery?
The Robot Vacuum Cleaner is a unique household helper. He is ready to do the dirtiest work for you around the clock - cleaning. Moreover, your participation in the process is not required at all. The robot moves around the house completely independently, without the need for outside help. This freedom of movement is provided by a built-in battery.
It is the state in which the battery for the Aerobot robot vacuum cleaner is located that is the main guarantee of its performance. If you notice that your device is running slower than usual and needs recharging more often than before, it is possible that your robot's battery is dead. This does not mean that you need to throw it away and buy a new one. You can try to restore the original battery capacity.
1. Discharge the battery for the Irobot robot vacuum cleaner completely before turning off the device. After fully discharging, place the robot on the charging base and leave it alone for 16 hours. During this time, the robot's battery should reach its maximum capacity. Do not remove the robot earlier, do not interrupt charging before its end.
2. Completely discharge the battery again and repeat the 16-hour charge. In total, you have to do three of these procedures. During this time, the battery must recover to the capacity originally laid down in it by the developers.
3. If after such "pumping" your battery still shows low productivity, take it to a service center.It is quite possible that he could have already worked out his resource, but let the specialist make the verdict after the diagnosis. If this is true, then it's time for you to buy a new battery for the Aerobot robot vacuum cleaner.
Robot vacuum service technicians strongly insist on purchasing only high-quality batteries for their respective robot models. Numerous tests have shown the extremely low efficiency of all alternative batteries on the market today. They do not hold the declared capacity, they are not able to work even the time calculated in the nominal characteristics.
In addition, such parts can cause irreparable damage to the robot itself.
You can buy a battery for the Aerobot robot vacuum cleaner inexpensively for any model if you order the latter in our online store. We guarantee the authenticity of all spare parts and their compliance with the declared value.
The order was made on March 30, after a couple of days it was sent, the track was not tracked from the word altogether. The delivery was quite long - half a month. The batteries came packed in blisters in two pieces, and everything is in a standard package with a bubble inside.
First of all, the battery was sent to the "smart" charger Opus BT-C3100 (excellent thing, I recommend!).
Immediately I noticed that two of the four batteries had voltage less than 1.1V:
The battery capacity test confirmed my passions - the capacity of two out of four batteries is nowhere to be found:
To repair the battery, I needed 3 elements, and it happened that only two years came. Saddened by this fact, I opened a dispute on ebay, indicating the seller that 2 elements are given to us. Attached are the photos given above. The seller responded within 24 hours, silently returning the full price of the order.
So the batteries were free, which made me not too happy. It was decided to try to download old batteries. For this, the "discharge refresh" mode was chosen, in which the charging device afterwards fully charges and fully discharges the elements 5 times. Sometimes this will help to bring the battery back to life, restoring the capacity almost to its original state.
So, the results after 5 full charge / discharge cycles:
The items I changed places, do not be surprised. Well, it’s better, two "live" batteries almost did not change the result, 1700-1800 is the maximum of such elements. And now two old ones are gradually returning to life. 1200 mAh - this is no longer a corpse, on such a battery it will take about an hour to run.
I put the batteries for another 5 full cycles, and here's the result:
Hurray! Now you can say that I have three unique "living" elements. 1800, 1800 and 1600 - this is already a capacity that you can work with, and wait up to two hours of work on such batteries. The fourth battery could not recover, even after 10 cycles, although 1000 mAh is already far from being used up 130. =))
Internal resistance test of elements:
A strong discrepancy speaks and the low quality and instability of these batteries. Although in general, the numbers are not criminal.
Weight per battery:

For comparison - a battery from the original iRobot Roomba:

With this review of UltraCell rechargeable batteries, I am finishing it, and I will expand on the results.
Pros:
The capacity in the region is 1700-1800 mAh, this is not a record, but it is quite bad.
Vendors without a problem return money when they are presented with photographs. As a result, the rechargeable batteries are either fully or almost free.
Cons:
Unstable parameters of the batteries, the batteries require pumping, if they do not bring them, they can send completely killed individual elements, like me.
Now, having on hand three relatively live battery cells, you can start and immediately repair the battery.
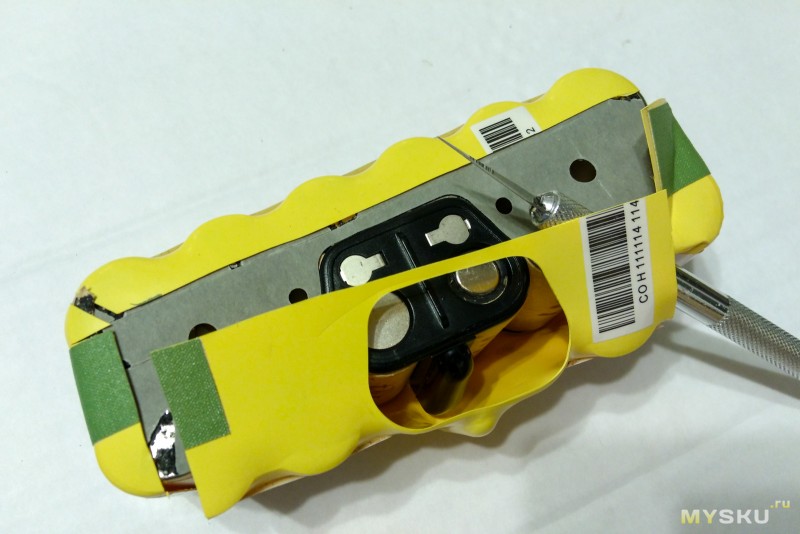
We take our dead original battery, and neatly open the plastic wrap with a foot:
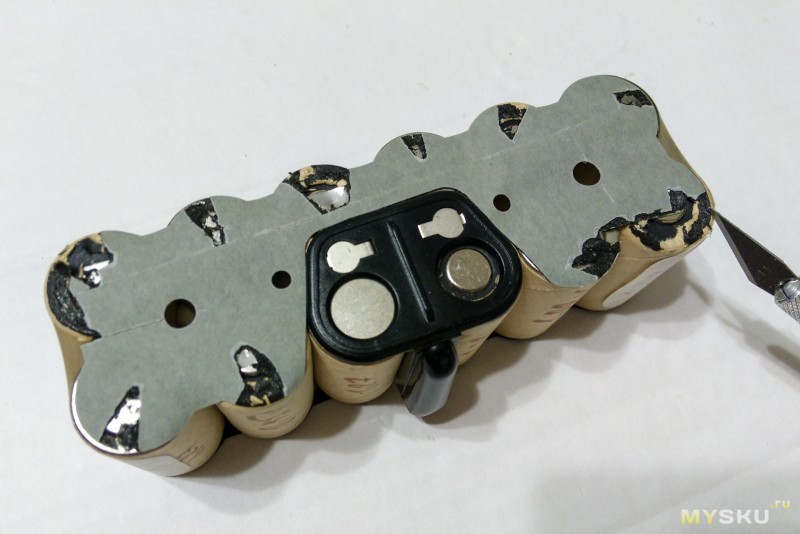
We strip the insulation on the elements to be able to measure the voltage across them:
We measure and write the voltage directly to the elements:

The results will be as follows - most of the elements will have approximately the same voltage. It can be different (1.1, 1.2, 1.3 volts, depending on when the battery was charged at the last time, and as many times as it has gone). My live elements had a voltage of 1.27-1.28 volts. And then the dead elements are immediately and quickly allocated - 0.45V, 1.00V, and 1.13V. These elements must be replaced in order to restore the life of the battery.
Let's mark the additional elements with crosses. and we begin to pick out from the assembly:


At their place we will weld our UltraCell:


Observe the polarity! The solder is heavy, the solder does not come to them, and the solder from me is useless. Immediately I apologize, if I distorted the type of this soldering with the same feeling of the soldering iron masters! =))
After soldering, we fix the elements in the assembly with thermal clips:


We make sure that our crooked solder has not been poured anywhere, and we will pack the assembly back into a happy yellow wrap:

We measure the assembly voltage:

14.91V - not bad for a spare battery. Fully charged has 17 volts in the region.
We put our assembly into operation and include:


Works! Even on such an uncharged and false battery, the robot traveled about an hour until it turned off completely. Excellent result. After a full charge it will take 2 ++ hours. The result is reached. Free. Economy - 6000 rubles.
A similar assembly, with two "dead" elements replaced by UltraCell, successfully works with the mother already after a long year, and so far it will not be recognized. The robot will make it easier to clean the entire apartment before you start to charge. Theoretically, after some time the original elements will start to subside, but they can also be replaced with UltaCell during the peacetime. Perfectionists can immediately order 12 ultra-targets, and completely transfer the battery to them. Well, or buy a non-original battery, such as JapCell, where this operation has already been done for you.
Bonus:
Comparison of the collection from the review, and the original JapCell battery


Dmitry DEMONCHIK Rok temu
how long did the battery last?
Dmitry DEMONCHIK Rok temu
+ Sekretmastera - DIY I personally think of ILIFE V7S
Rumba is not killed with proper and regular care. It must always be cleaned. Do not bring the brushes to the felt. Clean all axles regularly. He must clean regularly, i.e. maintain cleanliness. Remove all obstacles and dangers. There was a fall of the system unit through a wound USB cable. If you run it once a month, then it will definitely wind everything that comes across on all axes. Refused once - the left wheel is jammed. Dismantled to the gearbox, pulled out the wound dyed hair - came to life.
Dmitry DEMONCHIK Rok temu
+ Sekretmastera - do it yourself, well, in my opinion, the price of 12k rubles is adequate, but nevertheless, the voices are interrupted - let's say the vacuum cleaner refused, and that - how - where to go.
it's a lottery. From experience, the likelihood of success is greater in buying in stores with a large number of orders and not being carried out on very cheap offers.
Good evening and happy holiday to you Muskovites!
Today I will tell you about the very controversial Sub-C size batteries, as well as how they are used to repair the battery of the iRobot Roomba. Also from this review you will learn about the advantages of owning the Opus BT-C3100 charger, which was able to bring seemingly completely hopeless batteries back to life ... Details under the cut.
The order was placed on March 30, a couple of days later it was sent, the track was not tracked from the word at all. The delivery was quite long - a month and a half. The batteries came packaged in blisters of two, and all in a standard bag with a bubble inside.
First of all, the batteries went to the "smart" charger of the Opus BT-C3100 (great thing, I recommend it!).
Immediately alarmed that two of the four batteries had a voltage of less than 1.1V:
The battery capacity test confirmed my concerns - the capacity of two of the four batteries is worthless:
To repair the battery, I needed 3 elements, but it turned out that only two were suitable. Saddened by this fact, I opened a dispute on ebay, indicating to the seller that 2 elements are completely dead, and the remaining two traditionally have twice as low as the promised capacity. Attached the photos above. The seller reacted a day later, silently refunding the full value of the order.
So the batteries turned out to be free, which still didn't make me too happy. It was decided to try to swing the dead batteries. For this, the “discharge refresh” mode was chosen, in which the charger fully charges and fully discharges the cells 5 times in succession. Sometimes this helps bring the battery back to life, restoring the capacity to almost the original one.
So, the results after 5 full charge / discharge cycles:
I swapped the elements, don't be surprised. Well, already better, two "live" batteries have hardly changed the result, 1700-1800 is the maximum of such cells. But two dead ones are gradually returning to life. 1200 mAh is no longer quite a corpse, the robot will travel on such a battery for about an hour.
I put the batteries in for another 5 full cycles and here's the result:
Hooray! Now we can say that I have three required "living" elements. 1800, 1800 and 1600 are already those capacities with which you can work, and expect up to two hours of robot operation on such batteries.The fourth battery could not recover, even after 10 cycles, although 1000 mAh is far from the original 130. =))
Internal resistance test of elements:
A strong spread indicates both the low quality and instability of these batteries. Although, in general, the numbers are not criminal.
Single battery weight:

For comparison, the battery from the original iRobot Roomba:

This concludes with the review of UltraCell batteries, and summarize.
Pros:
The capacity is in the region of 1700-1800 mAh, this is not a record, but quite good.
Sellers refund money without any problems when they are presented with photographs. As a result, batteries are either completely or nearly free.
Minuses:
Unstable parameters of batteries, batteries need a buildup, if you are not lucky - they can send completely killed individual elements, like me.
Now, having in hand three relatively living battery cells, you can proceed directly to the repair of the battery.
We take our dead original battery, and carefully open the plastic wrap with a knife:

We expose the insulation on the elements in order to be able to measure the voltage across them:

We measure and write down the voltage directly on the elements:

The results will be as follows - most of the elements will have approximately the same voltage. It can be different (1.1, 1.2, 1.3 volts, depending on when the battery was charged the last time, and how much it has been lying since then). My living cells had a voltage of 1.27-1.28 volts. But the dead elements immediately and sharply stand out - 0.45V, 1.00V, and 1.13V. These elements must be replaced in order to restore the life of the battery.
We mark the dead elements with crosses, and begin to pick them out from the assembly:


In their place we solder our UltraCells:


Observe polarity! The elements are hard to solder, the solder sticks to them reluctantly, and I'm a useless plumber. Immediately I apologize if I offended the subtle feelings of the soldering iron masters by the sight of this soldering! =))
After soldering, we fix the elements in the assembly with hot melt glue:


We make sure that our soldering curve hasn't fallen off anywhere, and pack the assembly back into a cheerful yellow wrapper:

We measure the assembly voltage:

14.91V is not bad for an old battery. Fully charged has around 17 volts.
We insert our assembly into the robot and turn on:


Working! Even on such an uncharged and stale battery, the robot traveled for about an hour before it turned off completely. Excellent result. After a full charge, it will drive 2 ++ hours. The result has been achieved. Is free. Savings - 6,000 rubles.
A similar assembly, with two “dead” elements replaced by UltraCell, has been successfully working for the mother for six months, and has not yet shown signs of degradation. The robot manages to clean the entire apartment before getting up to recharge. Theoretically, after some time, the remaining original elements will also start to die, but they can also be replaced with UltaCell as they die. Perfectionists can immediately order 12 ultracells and completely reassemble the battery on them. Well, or buy a non-original battery, such as JapCell, where this operation has already been done for you.
Bonus:
Comparison of the weight of the assembly from the review, and the non-original JapCell battery


Please leave a LIKE, COMMENT, SHARE and SUBSCRIBE!
Please LIKE, COMMENT, SHARE and SUB!
The Sekretmastera channel was created for those who love to do crafts with their own hands. Are you improving your skills and abilities in this interesting business? Naturally, you want to find like-minded people who are ready to share their own experience and discuss other people's inventions? Then subscribe and join the DIY community of the Master's Secret channel. Only verified homemade products are published.
Our project is an opportunity to easily, quickly, without costs (using materials at hand), create original things, surprises, useful little things for everyday life and recreation, reanimate equipment, repair a home and even build.
On the channel, in addition to the topic “how to do it yourself,” there are also entertaining, educational and funny videos.
The channel maintains a policy of benevolence. Please be positive and constructive.
Comments from empty and suspicious channels are blocked.
The channel works for “thank you”, do not forget to leave the word “thank you” in the comments, and the like will give the authors of Sekretmastera more inspiration and optimism!
IMPORTANT. The authors make crafts as part of their hobby, skill and available tools. By repeating crafts on the video with your own hands, you take full responsibility for possible injuries and any damage from the construction and use of the thing you made.
***********************************************************************
The song "Mountain Sun" belongs to the performer Audionautix.
License: Creative Commons Attribution
(https://creativecommons.org/licenses/by/4.0/).
Executor:
***********************************************************************
Video How to replace the battery in the Rumba robot vacuum cleaner with your own hands / Repair iRobot / Sekretmastera channel Sekretmastera
Topic of section For examination in category Nook; Hello! The battery in the I-robot is dead. Physically assembly of 12 pcs Ni-Mh 3000mAh batteries (SC size). I tried to run the cycles on the model.
I strongly doubt it. If you have a Li-ion battery, then I think it will be possible to adapt. I then charge with a metal-hydide algorithm for a delta-peak with temperature control. If charged separately with a model charger, then 4 cans will be enough.
By the way, today on my akka the vacuum cleaner traveled for more than an hour and went to charge it himself. So that the experiment can be considered successful.
I wonder how old they are.
I ended up with similar ones around 2009

In 2008, Pasoons were allowed polymers.
Well, if all is well, then congratulations!
This is interesting, of course, but there is another problem: why does a robot need such a crazy capacity? His bunker on an ordinary battery sometimes clogs up at a stroke and all the brushes are in his hair. If he drives in this form for another two hours - at least there will be no additional benefit, at most - the motor will burn out somewhere. And the engines are collector everywhere.
The 800s, which are standardly with lithiums, have a more powerful sucking part due to this - so they use additional battery energy.
How to replace the battery in the Rumba robot vacuum cleaner with your own hands / iRobot repair / Sekretmastera.
good afternoon, see how to replace the old battery with a vacuum cleaner roughly to access the battery you need to unscrew
4 screws securing the bottom cover at the same time can be removed for cleaning the roller of the distance traveler
it is also necessary to remove the side brush under which it will probably be mousse remove the lid under the lid too
there will be garbage yellow block this is a ruble battery remove the battery by the side guns remove the garbage
a new battery having bought a power supply link in the description of the video externally in terms of dimensions and weight the batteries are identical insert a new one
the battery in the rumba socket said that he agreed with this before work, we charge the battery now after cleaning the vacuum cleaner
roomba will get to its base subscribe to the channel thanks for watching.
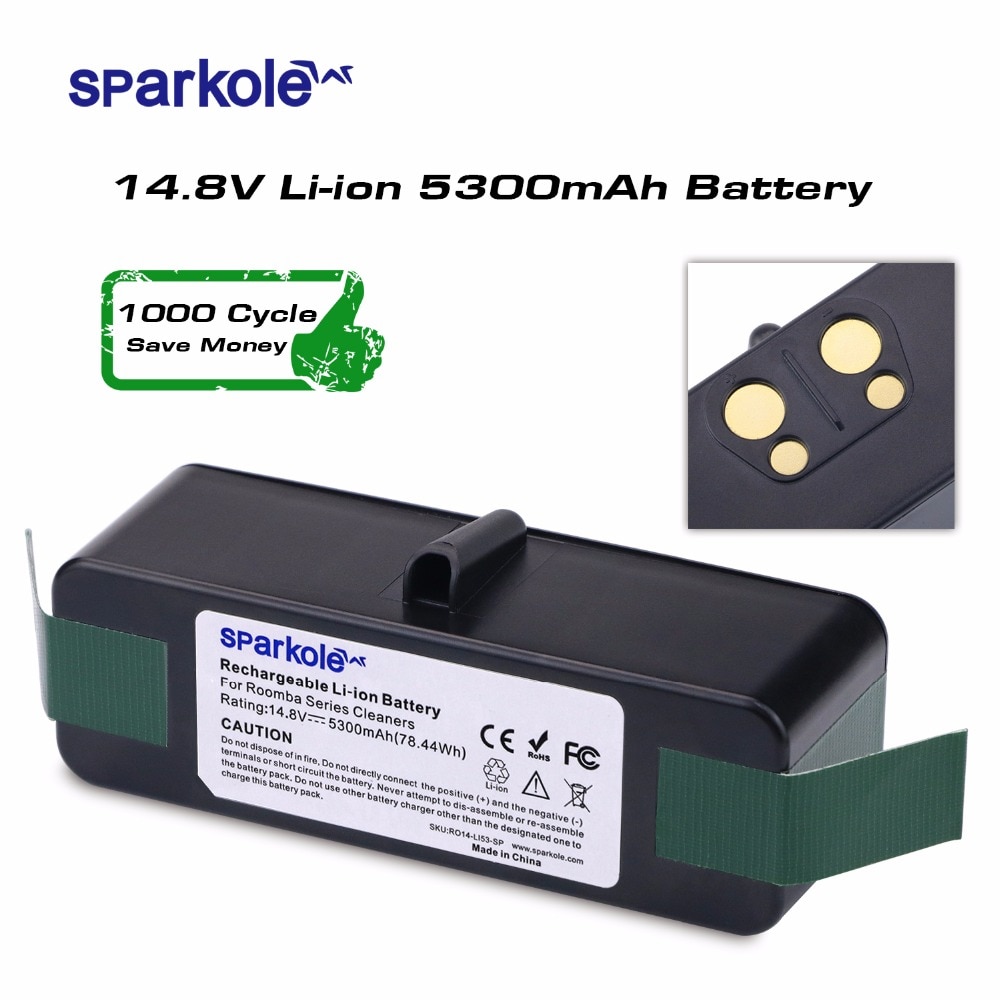
Hello to all. In this brief overview, I want to talk about the replacement battery for the Roomba 780.
In short - it's worth taking! That rare case when the Chinese did not fail in the honesty of the battery capacity.
In general, at one fine moment, after never using the robot, which was calmly standing on the base, I decided to turn it on. He started and stopped and died within 5 cm of the exit path from the base. "Here are the times!" - I thought, pulled out the battery, which, by the way, had already been bought once instead of the original one on the same Ali, ni-mh. I put it in iMaxB6, and checked the capacity. The capacity was if you do not lie 4mAh)). And so I went, driven by the wind, driven to Ali, to look for alternatives on Ali after I saw that the original battery costs about 80 cu, I decided to see what the brothers had and whether they had released the same thing, but with mother-of-pearl lithium batteries ... And as you might expect, they did it! I came across this lot with a bundle of positive reviews, a sufficient number of purchases. Reviews reported that the vacuum cleaner drives like after liposuction, forever young and ever charged, i.e. 1.5-2 times longer on a single charge. This is what I needed!
So I ordered it. The goods arrived by CDEK courier in 24 days. The track format was ZESZE1234567890YQ. Usually it is not interesting to watch the track of the tracking number, but here it was very detailed.
The product was in a box for the size of the battery and in a bubble-wrap envelope. Unpacked. Everything is as in the photo of the seller. Well done, we did everything as it should be. When installing it on the memory, I was somewhat confused, since it was indicated that it was Li-Ion, and the voltage was indicated as 14.8, instead of 14.4. Based on these 14.8 for the first tests of the full capacity, I set 4.25 for charging and 2.75 for discharging, realizing that at the lower boundary, the controller will most likely cut off the power supply to the battery when it realizes that it’s enough to endure it. Which, by the way, is what happened if you look at the voltage after the end of the discharge. 78.44Wh is declared and now we will check it.
First, I discharged what was from the factory.

It was intended to be 40% - straight as a standard to preserve capacity.
Then I charged it to the maximum based on 4.25v per cell, i.e. 17th century

Well, I also discharged it to the cutoff, based on a minimum of 2.85v per element, i.e. 11.4v

After checking the capacity for discharge and charge, I sub-discharged it and put it on recharge in the vacuum cleaner itself through the base in order to see to what voltage the charger charges the native one, and after charging the base, measure the capacity given by the battery. Note that the starting voltage during discharge was 16.4 volts. He climbed into the vacuum cleaner as if he himself was original - perfect. And it did not dangle easily and just closed the lid. The very ears for which to pull it out are also present.
And then a pleasant surprise awaited me. The capacity figures have hardly changed. What is the reason for the voltage jump on the battery during discharge is not clear, but I do not hammer my head with this yet, although I saw this for the first time. Charging cannot discharge with a large current yet. I can't cope with the settings. But future tests will already be with higher currents, I ordered the IMAXRC X100.
The discharge stopped at such a voltage at the terminals and by that time had accumulated the indicated capacity - if you want to get it on purpose, it will not work.
5500mAh! What can you say about this battery in the end? Just now, he's great! And money for this is not a pity and it is made foldably and the capacity is adult. Yes, 5500mAh when discharged by a vacuum cleaner will definitely not be, it will be less, but any manufacturer declares the full capacity, and not used with efficiency. So I suppose that he will calmly give up his 4500-5000mAh in operating mode, but the controller will not let him wither ahead of time. It will be seen further, but so far the impression is very good. If there are problems, I will supplement the review, but for now I am satisfied.
The channel maintains a policy of benevolence. Please be positive and constructive.
Comments from empty and suspicious channels are blocked.
The channel works for “thank you”, do not forget to leave the word “thank you” in the comments, and the like will give the authors of Sekretmastera more inspiration and optimism!
How to replace the battery in the Rumba robot vacuum cleaner with your own hands. Every iROBOT ROOMBA vacuum cleaner after a long period of use comes a moment when it does not have time to return to the base for recharging and stops anywhere, not having worked out the allotted time for cleaning. This is a symptom of the loss of battery capacity of the robot vacuum cleaner. To replace, you need to purchase a new battery. The nearest seller sold only a non-original battery under the order)))) You pay and wait)))). We went through this))) I ordered the accumulator for the vacuum cleaner of my Rumba 500 in China (it is also suitable for models 500, 600, 700 and 800 series).
Here is the link
it turned out 2.5 times cheaper than the store one.Choose a store with a large number of orders, rather than small ones and with a completely suspicious price (there is a risk of getting a fake). You can also order a lithium-ion battery for the Rumba. Two weeks later, a battery came for my ROOMBA 500 vacuum cleaner. In the process of changing the battery, be sure to remove all debris from the axles and internal cavities. After changing the battery, charge the new battery and GO to cleaning!
Please support the channel by SUBSCRIBING and watching my other videos !!
Please support this channel by SUBSCRIBING and watching my other videos !!
Please leave a LIKE, COMMENT, SHARE and SUBSCRIBE!
Please LIKE, COMMENT, SHARE and SUB!
The Sekretmastera channel was created for those who love to do crafts with their own hands. Are you improving your skills and abilities in this interesting business? Naturally, you want to find like-minded people who are ready to share their own experience and discuss other people's inventions? Then subscribe and join the DIY community of the Master's Secret channel. Only verified homemade products are published.
Our project is an opportunity to easily, quickly, without costs (using materials at hand), create original things, surprises, useful little things for everyday life and recreation, reanimate equipment, repair a home and even build.
On the channel, in addition to the topic “how to do it yourself,” there are also entertaining, educational and funny videos.
The channel maintains a policy of benevolence. Please be positive and constructive.
Comments from empty and suspicious channels are blocked.
The channel works for “thank you”, do not forget to leave the word “thank you” in the comments, and the like will give the authors of Sekretmastera more inspiration and optimism!
IMPORTANT. The authors make crafts as part of their hobby, skill and available tools. By repeating crafts on the video with your own hands, you take full responsibility for possible injuries and any damage from the construction and use of the thing you made.
***********************************************************************
The song "Mountain Sun" belongs to the performer Audionautix.
License: Creative Commons Attribution
().
Executor:
***********************************************************************
DIY repair of the iRobot Roomba brush unit gearbox. The brushes of the robot vacuum cleaner do not rotate. Video about how.
How to replace the battery of accumulators in the robot vacuum cleaner RUMBA with your own hands. Each iROBOT ROOMBA vacuum cleaner after.
Repair the power socket of the iRobot Roomba charging base. simple DIY repair. He came to visit, and at the same time Rumbu.
Repair of the iRobot Roomba 620 robot vacuum cleaner. The brushes do not spin (the rotor is dead), we completely replace the brush block. Buy.
Replacing the battery in the IRobot Roomba 620. Personal experience Now it's time to change the battery. The video tells you how to do it.
Complicated repair of laptops, tablets, smartphones in Neftekamsk. We repair motherboards, solder BGA.
The vacuum cleaner began to work incorrectly, as if it saw an obstacle in front of it. Disassembled, cleaned, works.
| Video (click to play). |
Dismantling the Robot Vacuum Cleaner C&C 112, Xrobot 5001 and analogues.

