
In detail: do-it-yourself android repair from a real master for the site my.housecope.com.
A program that teaches you how to make repairs yourself, without the help of a professional team. The best answers to questions from the field of repair and construction are in the program "DIY repair" for Android!
Advantages
Step-by-step instructions will teach you how to properly wash off the primer, remove yellow spots, glue wallpaper, repair doors, etc.
The types of repairs are categorized. For example, window repair, door repair, plumbing, etc.
Tips are accompanied by pictures, which is very convenient
The application is suitable for both real masters and pros
Flaws
There is not enough content in the "Plumbing" section
Some categories take a long time to load
This section contains all the useful information about the repair of phones and other mobile devices. You will find answers to your questions related to this issue, in particular:
- what to do if the phone won't turn on
- how to unlock a mobile phone, smartphone running Android if you forgot your password or pattern
- what to check first if the tablet is not charging
I also answer any of your questions regarding mobile device breakdowns. Carefully study the section and, if the required answer is not found, contact the problem through the contact form on the site or create a new topic on the forum.
If the internal memory on the phone is not enough, applications and the Android system slow down, you need to take action and start cleaning. Trust me, this will solve the problem. In this guide, we will increase the free space in the Android memory in several simple ways. By spending 20 minutes now, you will save hours of your life and stop worrying about the brakes on your phone and tablet.
| Video (click to play). |
What if the phone does not see the sd memory card or other storage device? Due to the fact that I am very often asked this question, I decided to write a separate material in the form of a table. Any device, be it a tablet, digital camera, computer, TV - at one moment may refuse to read the sd card or flash drive. What to do?
Problems with displaying files in the Android operating system occur, as a rule, due to software errors or hardware incompatibility. In half of the cases, they can be solved by rebooting, flashing and formatting the media, in the rest, all that remains is to throw out the SD card and buy a new one. To find out what happened in your case. it is not necessary to carry a smartphone / tablet to the service and pay for diagnostics.
iOS remains a simple and intuitive operating system, but progress does not stand still and appears in the OS every year
Quite often, an Android smartphone has various problems and errors in the system. And this is not surprising, because the system is simple, with free

In the modern world, flash drives for PCs are quite popularized, and microSD memory cards are used in mobile devices. The popularity of devices is due to
During such a rapid development of computer technology and various electronic devices, many opportunities appear. At the moment, most smartphones on
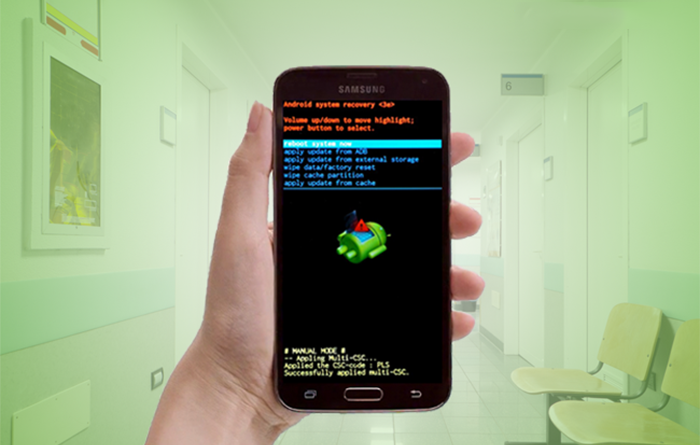
Recovery Mode allows you to access a range of advanced features found in your Android smartphone or tablet
How to disassemble a UMi Touch smartphone, as well as what is inside - look at the official video from the UMi service.
This instruction should be suitable for any device with a MediaTek processor, for example screenshots were taken by me on the UMI X1 Pro.
In this post I will tell you how to remove the backup firmware from almost any device based on MediaTek processors.
Meizu M1 Note: dismantling the damaged screen, removing the frame from the display module and gluing it to a new one, checking the screen and sensor.
No.1 A9 was disassembled, identified weak points and eliminated those shortcomings that could have been. The result is true moderate moisture resistance.
The page contains a list of articles published on the site on the maintenance and repair of tablets with your own hands. To go to the page with the publication, just click on the photo or "More".
If the tablet does not turn on, what should I do? The tablet may not turn on for one of the following reasons: the battery is discharged, the power adapter is faulty, the software does not work correctly, the Power button, battery and other components are out of order. How to disassemble a tablet and disconnect connectors and flat cables without damaging them. More details.
How to check the performance of the tablet using the mouse. Where to buy a touchscreen. An example of replacing the touchscreen in the MonsterPad tablet. How to check the touchscreen before installing, remove the cracked one, prepare the frame and install a new one. More details.

Tablet does not turn on - do it yourself tablet repair
Topic of the article - the tablet does not turn on and do-it-yourself tablet repair... The reasons may vary. A number of reasons can be associated with the "iron" filling of the apparatus. Also, the reasons may be hidden in the failure of the OS. Either way, there are some actions that users can take to fix the problem on their own.
It's important to remember when the tablet was last charged. When fully discharged, sometimes ten minutes of charging is sufficient for the device to turn on. During charging, press the power button with short interruptions for a minute to turn the device back on. Of course, the charger must be in good working order.
If the charging option did not help solve the problem, then it is recommended to carefully examine the tablet for mechanical damage. The presence of chips on the screen or dents on the case may indicate that the device has been dropped. As a result, the reason is obvious. If there is a guarantee, you should go to the service center.
Tablet does not turn on - do it yourself tablet repair
In this case, the reason lies in a software failure. For example, the backlight may turn on, and then the inscription "АNDROID" or a picture of an idle green robot appears. Here the reasons are as follows - incorrect installation of applications and forced termination of system processes. As a result, suffered tablet firmware.
You can restore the device using the Hard-Reset or Hard-Reset program. By the way, the program can be found on the Internet. So, with the help of Hard-Reset, you can reset the factory settings of the tablet. The principle of action in this case for most models, especially Chinese ones, remains unchanged:
- You need to turn off the tablet.
- Now you need to remove the SIM card and micro card.
- It is necessary to hold down the volume up button for ten seconds - while the vibration of the tablet is felt.
- Using the volume and power buttons, you need to select the "Setting" settings in the menu, and then - "Format System".
- Now you need to select "Reset Android".
- At this point, the tablet will reboot.
The specified procedure will lead to the fact that the data will be erased. If it's clear how to flash a tablet, then you can repeat the procedure in case of failure the first time. Nuance - sometimes the result can be negative. In this case, it is recommended to think about a complete flashing of the device. On the site you can find information about how to flash Android do it yourself.
There are several reasons why the tablet power button might not respond. However, the device can be turned on. In this case, you can turn on the device when it is completely discharged:
- First you need to connect the charger.
- You need to simultaneously press the volume down and power buttons.
- Using the volume down button, in the “bootloader” menu, select the “powder off device” section.
- The option should be selected with the power button.
- After turning off the tablet, you need to disconnect the charger.
- Now the tablet needs to be connected again - the charge indicator should appear on the screen.
In principle, that's all. If now the tablet does not turn on and does not want to charge, then the charger and power supply should be checked. As for the power button, mechanical damage is also possible. In this case, you should disassemble the device and restore the button (replace, restore paths, eliminate broken contacts, etc.).
A broken display, an uncharged battery, a dirty speaker, a clogged headphone jack, or a faulty camera are classic malfunctions that are not covered by the warranty and for which their own initiative pays off.
CHIP article series: how to repair electronics at home
Why do people throw away a smartphone that is only two years old if it just has a cracked screen or the battery no longer charges? These days, advances in technical development are not so rapid that there is a constant need to own the latest model. If the warranty period has already expired, what is stopping you from saving money by showing your skills?
Conveniently, smartphones and tablets have a modular design, so many components can be replaced without the need for a soldering iron. You just have to be careful not to damage the delicate flat cables. Unfortunately, you will not be able to replace everything that you have dismantled. If, for example, a fingerprint scanner is built into the Home button, then your device is likely to be locked after you replace parts yourself. Safety-related components must be individually registered with the hardware - and this can only be done by an authorized dealer.
Many manufacturers, such as Apple or Samsung, send parts for their devices only to authorized service centers. What is available in parts stores are, at best, made by the same Chinese manufacturer as the original part; however, it can also be a used part or a more or less well-made copy. With minimal risk of being scammed, you can get them from major, highly rated parts suppliers or through the iFixit platform, which also provides you with a functional warranty and a right to return, which of course comes at a price.
However, for many special details, you have no choice but to try your luck on eBay or AliExpress. Read the descriptions of the offers as carefully as you read the terms of the contracts. Don't go to the cheapest deals. At first glance, such "bargain" purchases are often indistinguishable from the original parts, and only during installation it becomes clear that they do not fit due to too large dimensional tolerances or that the alleged Retina display is actually just an LCD display with large pixels.
Pentalob, Tri-Wing or Torq - the industry is capable of "inventing" very clever screw heads, but it will be possible to get suitable screwdrivers on the web very quickly. Almost all manufacturers, with the exception of Apple, use common profiles, in most cases Philips Phillips head (PH) or Torx (TX) sprocket. At the same time, manufacturers willingly hide one or more screws under a branded tag or rubber inserts glued to the case. If the case does not open, then it should be inspected for the presence of such "hiding places".
In the case of tightly seated screws, you can easily damage their slots if you loosely install the screwdriver.It should be pressed with full force into the screw head to achieve maximum adhesion. However, if the incident has already occurred, then a narrow flat-head screwdriver with significant applied force can help. Or you have to purchase a so-called “screw remover” from iFixit. Thanks to its sharp-edged crown-shaped tip, it is firmly anchored in each screw. If the screw, on the contrary, turns, then clamp the plectrum or the tip of the tweezers under the screw head (as a locking lever) and continue to unscrew the screw.
Thin cases are often connected with small latches. These clips can be opened elegantly with a guitar pick. It is thin and flexible, but durable and non-conductive. Use it to try to reach the corner between the case cover and the bezel, but do not push the pick too deep to avoid damaging the hidden flat ribbon cable.
Move the pick in one direction until you feel resistance, and then release the hidden retainer by tilting the pick up. As with disassembling a bicycle tire, things are easier if you use multiple picks to prevent re-snapping of already open connections.
To better protect electronics from moisture penetration, more and more devices are additionally glued. Typically, these adhesives are thermoplastic and can soften again when heated. If your hair dryer does not have the ability to adjust the temperature, we recommend working with cooling-heating compresses. Such gel pads are not that expensive in pharmacies. They are heated in a water bath or in the microwave (check if three to four minutes of heating at 750 W is enough, and add a few more minutes if necessary).
The gel pad transfers heat to the device over the entire contact surface, which prevents cracks caused by internal stresses in parts due to uneven heat distribution. In addition, it makes it impossible for the components to overheat, since the pillow bursts when heated above 90 ° C. If you are not yet experienced with compresses, place it in a grocery bag while heating to prevent possible mess if it bursts. When the glue seal softens, picks come to the rescue again. This time, use the suction cup to pull the back of the case (or the glued top glass) up, while simultaneously releasing the latches with your pick.
When the case is finally open, the next step should be the mandatory photographing of its internal elements. Careful documentation will greatly facilitate the subsequent assembly. To ensure that exposed electronic components do not receive additional damage from static electricity, now is the time to use ESD protection, or at least touch the nearest radiator.
The first step is to disconnect the battery cable to de-energize the gadget, preventing a short circuit. Before the final installation of sensitive parts (for example, a display), it is necessary to temporarily connect them without assembling the devices and check their functioning.
To begin with, it is strongly recommended that you familiarize yourself with at least the basics of radio electronics. The fact is that the repair of mobile phones is closely related to theoretical knowledge in this area. For example, if you need to replace a resistor (this is a passive current-limiting electronic component), then you definitely need to know its labeling, resistance, power dissipation, temperature coefficient, etc. With other owls, it is not very advisable to repair mobile phones without knowing Ohm's law.There are a huge number of books and manuals on the topic of radio electronics, as well as thematic sites on the Internet. But this is not enough. Mobile phones are digital devices, not analog ones. Consequently, all parts and components used for the production of the latter have differences among themselves. For example, for analog devices, surface mount technology is mainly used, and for digital devices, surface mount technology. The latest technology is called SMT (surface mount technology). It also translates as "surface mount technology". And the components used in this technology are called SMD (surface mount device).
Also, there is no analog signal in digital electronics, because it is actually digital. Consequently, all digital devices have their own types and levels of programming. These are just a few of the differences between analog and digital technology. But even this is enough to scare a newbie away. But there is no need to despair here. Everything is much easier than it seems. A lot of that frightening information is not needed when repairing mobile devices. But if you are planning to seriously tackle this business, then it is strongly recommended to study analog and digital radio electronics.
Now we come to the main goal of this article. So, now you will be described in detail the procedures for technical repair of mobile phones and types of repair devices.
In order to repair a cell phone, including repairing Nokia, Samsung, Sony-Ericsson, LG, Motorola, the first thing is to determine the cause of the failure of the mobile device and identify the component, assembly, module or part that has failed. For this, the knowledge that is described above is just needed. Usually, the breakdown of a mobile phone is caused by improper operation or loss of functionality of external devices. For example, in the first case, the phone fell into the water by negligence. To restore it, complete disassembly and thorough drying are required. After that, you need to use a soft-bristled brush to clean the phone's printed circuit board with a special cleaning agent or 96% alcohol solution. In the second case, the LCD, speaker, microphone, keyboard, etc. are out of order. As a rule, in most cases, such parts cannot be repaired and must be replaced. But if there is damage to the surface (soldered) parts on the printed circuit board, then a professional approach and experience are required. In addition, for this type of repair, you will need a diagram of assemblies, modules and components of the printed circuit board of a mobile phone.
In order to start the repair procedure, the phone must be disassembled.
To open a mobile phone without causing cosmetic damage to it, you need to acquire special tools for opening them. They allow you to open the phone case accurately and as efficiently as possible without causing defects. As a rule, these instruments are sold in sets, each item of which is responsible for its own specific opening. Such kits are not difficult to find in specialized stores. In addition, they come in different types. The difference is the functionality and the price.
You also need a specialized set of screwdrivers for mobile phones. You don't need to save on this. The more specific number of attachments you have, the more chances you will have to unscrew the screws without breaking the edges.
Further, in order to diagnose the phone for its malfunction, you will need a good digital multimeter. It can be used to measure AC and DC voltage and current, resistance, capacitance of capacitors, coefficient of transistors, diode state, continuity of circuits, sections of circuits or nodes, temperature. With skillful use and knowledge of some physical laws, they can find faults in the circuit. The range of multimeters is enormous. The difference is usually in functionality and price.
We also need a laboratory power supply or power supply. With it, it will be possible to set the specified voltage and current. You will need it very often when carrying out repair work, because it will be inconvenient to substitute the rechargeable battery for testing, over and over again. Modern power supplies are equipped with a current stabilization and protection function, as well as a large number of all kinds of clamps and probes for various cases.
Soldering equipment and fixtures. To carry out soldering work, you need a soldering station. Their variety is infinitely large, and the choice is determined by the price and functional range. There are combined soldering stations that combine both a heating soldering iron with temperature control and a hot air dryer, which also has the function of adjusting temperature and air flow.
A hot air dryer is usually required for mounting and dismounting SMD components, as well as integrated circuits made in a BGA package.
Also, when carrying out soldering work, you will need a device for the bottom heating of printed circuit boards. The fact is that when installing or dismantling, for example, integrated circuits (chips), there is a risk of overheating and failure. When using a heating device, on which the printed circuit board of the mobile phone is placed and fixed, the board is rationally heated. And already when the board is heated, you can start assembling or disassembling components without fear of their breakage. this procedure takes place in a few seconds.
Antistatic thermo-tweezers are also useful for soldering work. It is very convenient to use it to dismantle some of the components.
Since you will be faced with soldering work on the installation / dismantling of integrated circuits, you will need a vacuum manipulator. This device is manual and automatic. It is designed to place the chips with the contact pins on the surface of the printed circuit board of the mobile device as accurately, efficiently and conveniently as possible. It is inconvenient to do this with tweezers, especially since there is a high probability of “kill” the microcircuit with an uncalculated pressure. This will never happen with a vacuum manipulator.
Also in the work you need a desoldering pump. With the help of it, you can easily perform soldering by removing the molten solder.
Optics. Parts and components of mobile phones are measured in micrometers and nanometers. It is clear that working without special magnifying devices is very problematic and harmful to vision. In these cases, it is strongly recommended to acquire a 40 diopter technical microscope (not to be confused with a biological one). You will also need a backlit tabletop magnifier. It is not convenient to work with a microscope in all cases, and a desktop magnifier is convenient to use almost always when ultra-high magnification is not required. Mounting magnifying glasses or forehead binocular glasses also do not hurt.
To carry out washing, cleaning of all kinds of components and printed circuit boards from dirt, oils, fats, solder, plaque and rosin, you will need an ultrasonic bath. It performs ultrasonic cleaning very efficiently and safely.
Other tool. Among other installation tools and accessories, you will need a mounting fixing table, with which you can easily and securely fix the printed circuit board for repair work. Be sure to have a variety of tweezers, mounting awls, round-nose pliers, pliers, long-nose pliers, wire cutters with you. You can add solder paste, flux, solder, rosin, cleaners, ultrasonic cleaner and other consumables to this list.
Where to get parts and components for repair? Of course, you can buy them in specialized stores, but it is best to buy broken phones.Since in some cases, it will be very problematic to find some parts, and it will not be difficult to buy, for example, a broken phone, which contains the necessary part, moreover, at a very low price.
Well, here we are with you and got acquainted with the minimum that a mobile device repair engineer should have. Of course, knowledge and experience will come with time, as theoretical and practical skills are developed. Read books on electronics, if possible, sign up for special training courses in the repair of mobile phones, communicate with people who have experience in this area, visit specialized forums on specific topics, where people are always ready to help.
In general, great success to you in your mobile phone repair business!
More information for learning self-repair of mobile phones HERE.
Hello, reader of a website about DIY repairs
BrandApp has developed and published a mobile application for the Android platform - "Do-it-yourself repair" for our website. Its theme is very accurately emphasized directly in the title. The application helps to get answers to various questions in the field of construction and renovation.
With its help, everyone will go through the school of repair and learn how to do it correctly with their own hands, using step-by-step instructions and descriptions, secrets and subtleties in the detailed material.
The descriptions are made in sufficient detail and are available to a wide audience, both for the customer of finishing works or a novice craftsman, and for professionals in the field of repair.
The application is quite active and the material in it is constantly updated with new interesting ideas and subtleties of repair.
For beginners and for Masters mastering related professions, there is a section "Video courses" in which you can get photo and video material for in-depth study of various directions in repair (for example: how to make a stretch ceiling, how to make a stove, how to make a warm floor, and so on ...) ...
Also in the application you can read daily updated news in the field of repair and construction.
There is a function - "Question to the Master", with the help of which you on autopilot will be able to send the question you are interested in to the Master and immediately receive a professional answer to it.
For everyone who makes repairs and who wants to have our mobile application at hand the link:

If you, dear colleague or interested reader, would like to develop a mobile application for your blog, website, online store or portal at reasonable prices, please contact BrandApp. More details on the website of the developer company:
Subscribe to the magazine for free> and receive new useful articles about DIY repairs directly to your email.
One comment in the article:
Great app, uploaded. Yuzay! Everything is beautifully drawn.
Few people guess about this, but you can come to a service center for repairing smartphones with your own spare parts. True, this is not always welcome: check before contacting.
Why carry your own parts? They are more expensive in the workshop. Why? Because the service takes care of the time costs associated with delivery, is responsible for possible defects, gives a guarantee for spare parts and stores components in stock in our own warehouse, for which you also need to pay.
Components are different:
1. Original new parts from a smartphone manufacturer. Usually they are delivered to official service centers, but you can get them privately with some extra charge. The most reliable and expensive option.
2. "Donor" spare parts... These are components that were removed from the "dead" devices. For example, some smartphone's motherboard burned out, but the screen remained completely intact. Why not use it a second time? Such parts are cheaper, but you need to diligently look for them at online flea markets.
3. Third Party Parts... Chinese friends are always ready to help in someone else's trouble.On the same Aliexpress you can find thousands of items of components for a variety of smartphones.
In most cases, these are non-original spare parts, with which you may or may not be lucky. The sudden death of a new Chinese screen a week after purchase and installation is a very real scenario. And, of course, the quality of third-party components from the original will also differ markedly. Not to mention the fact that they can simply be smashed in the mail during delivery.
Spare parts from disassembled smartphones. Left - the speakers of the iPhone 6S and Samsung Galaxy S7 edge. Right - S7 edge cameras.
The second way to save money on repairs is to do it yourself. YouTube is full of videos that show you step-by-step how to fix various faults.
There is absolutely nothing terrible inside a smartphone: in fact, it is the same computer with a central board, to which various modules are connected using loops or directly - buttons, screen, cameras, speakers, etc.
However, the individual characteristics of specific models cannot be discounted. For example, the Samsung Galaxy S7 / S7 edge / Note 7 has a glass back cover: it may crack during disassembly. Plus, removing it, you automatically lose moisture protection. However, in the unofficial service, you will not be given a guarantee that after the repair the smartphone can be bathed again.
Some devices are disassembled from the side of the screen. Not even all service centers undertake their repair, because in attempts to get to a cheap speaker it is as easy as shelling pears to damage an expensive matrix for tens of thousands of rubles. So be sure to check out at least a few good video guides before climbing inside!
Only the simplest type of renovation can be done at home: modular. That is, replace the defective component with a serviceable one. It is unlikely that you can cope with complex tasks involving soldering and knowledge of electrical fundamentals. In addition, few people in the apartment accidentally have a soldering iron with special equipment, power supplies for determining the current consumption and a microscope. "Recessed" phones at home can only be dried, and there are only services for cleaning and soldering.
Any savings in repairs are an opportunity cost:
- You waste time looking for spare parts
- You run the risk of buying defective or unsuitable components
- It also takes time to view instructions for assembling and disassembling gadgets.
- You do the job longer than a foreman in a service center
- You risk breaking something out of inexperience
- Nobody gives a guarantee for work and purchased spare parts in case of self-repair
There is no one-size-fits-all solution, but the general advice is this. If you want to quickly, but reliably and with a guarantee, then the way lies to the service center. You need a little savings - you can look for spare parts, having previously found out their price in the selected service. The option with self-replacement of modules is for the most experienced and self-confident.
Almost all of our life is in a smartphone: contacts, passwords, photos and even bank data. We try to prevent this information from falling into the wrong hands, but sometimes the gadget still has to be given to other people, for example, during repair and sale. Our instructions will help you to competently prepare the device for these events in order to protect yourself from an overly curious buyer or repairman. Well, then you can restore all the data in a few taps on the same or another device.
We have divided the instructions into two parts, dedicated to Android and iOS. In each, we will tell you how to back up data and applications and hard reset your smartphone. We will offer several ways to prepare your smartphone for repair or sale. Each of them will be useful in certain situations, whether you have a fully working device or a gadget with a broken touchscreen or a completely inoperative display.For more information on each step, we will provide links to a forum where more information can be found and where you can ask experienced users for advice.
The first step is to make a backup of all important data. There are many backup methods for Android. A lot of information can be recovered if you use Google services. All your mail, calendars, contacts, photos in the "Photos" application, passwords from Wi-Fi networks and other data are constantly synchronized with the "cloud", and therefore you just need to enter your username and password on a new smartphone to access all this information. But what about your favorite programs with their data?
Option 1: Google Cloud Backups
Back in Android 5.0 Lollipop, Google began to remember exactly which apps are installed on your smartphone, but the most useful innovation appeared in Android 6.0 Marshmallow. Starting with this version of the operating system, Google allocates 25 MB for each application in the Google Drive service. What kind of data will be stored in the "cloud" is determined by the developer himself, therefore, restoring the cloud backup of your smartphone during its initial setup, you get your favorite programs exactly in the form in which they were saved. And if you use branded launchers Google, Google Now or Pixel Launcher, then after restoring the backup, even program shortcuts on desktops will take their place. And all that remains for you to do, if necessary, is to re-authorize in third-party programs.
Make sure the service is working. To be sure that the data from your smartphone is saved in the "cloud", open the settings on your smartphone, and then go to the "Backup and restore" section. On different smartphones, its name may sound different, and on some gadgets, it may be in a different section, for example, "Cloud and accounts". Once you've opened the settings you want, make sure data backup is enabled for your Google Account. If you have multiple accounts, make sure the correct one is specified in the settings.
If everything is configured correctly, after a hard reset of your old smartphone or when setting up a new one, when you enter your account information, the gadget will offer to restore the data. Moreover, you can choose not only the smartphone from which you need to restore data, but also select specific programs if you do not want to download everything. Depending on the number of saved applications, this process can take quite a long time, but the result is worth it.
Check available backups. To find out exactly which backups are stored in the "cloud", you need the Google Drive application. After launching the program, press the "Menu" button, and then - "Backups" and select the desired device. In the list that opens, you can see which programs are using the cloud storage or delete the backup, but you cannot regulate data storage for individual applications. However, this is not necessary - although such backups are displayed in Google Drive, they do not take up space on the cloud drive.
Option 2: Nandroid backup
If the bootloader is unlocked on your smartphone, then most likely you also have a third-party recovery, for example, ClockworkMod or TWRP. In this case, it is worth making a Nandroid backup, which is a complete image of the smartphone's memory. Such a backup will allow you to return your gadget to exactly the state it had at the time of the image creation, including all credentials. The only drawback of such backups is their large size, especially if you have a lot of programs installed. However, the advantages of this type of backups outweigh the disadvantages, and you can learn how to do them in the topics on ClockworkMod and TWRP.
Some third-party shells, for example, Nova Launcher, allow you to make your own backups of settings, which, in the event of a hard reset of the device, allows you to restore program icons, widgets and the appearance of the launcher in a few clicks.
Useful links on the topic:
After all important data is safely stored in the cloud or locally, you can do a hard reset on your device. In most cases, this operation is straightforward, but sometimes you have to be inventive. We will tell you about all the possible ways.
Option 1: factory reset through settings
If your device is fully functional, the easiest way is to use the standard reset method - through the menu. To do this, you need to find the appropriate item in the smartphone settings. On different smartphones, the location of the cherished button may be different, so you should be careful: many devices offer several reset methods to choose from. We need a "Reset Data", which will delete all account information and data from the internal memory of the smartphone (files on the memory card will not be affected).
Option 2: remote reset if screen is broken
The method described above is as simple as possible, but will not work if your smartphone screen is broken. In this case, you can use one of the alternative methods. The first is a remote reset of the device, which will work even if there is no picture on the screen, but requires the smartphone to be connected to the network. To use remote reset, open a special Google service in a browser on your PC and select "Erase data" in the side menu.
Option 3: reset with mouse if touch isn't working
When using the following method, you do not need to connect the gadget to the Internet, but you will need a USB OTG adapter with a USB Type A connector on one end and a micro-USB or USB Type-C plug on the other. It is also necessary that the gadget has a working screen and supports the USB host function, which is required to connect wired peripherals to it. Although the USB host mode is supported by most modern smartphones, if you are not sure about its availability, you should inquire in advance. If all the conditions are met, you just need to connect a mouse to the smartphone using an adapter, after which the cursor will appear on the display, and you can reset your device through the menu.
Option 4: reset via recovery if other methods are not available
Useful links on the topic:
If you are preparing a smartphone for sale, after the backup and reset, it will not be superfluous to take care of its appearance - this way you will make the best impression on the buyer. When cleaning a gadget, you should use only proven materials - a microfiber cloth or other soft cloth and a special liquid for cleaning monitors. Under no circumstances should you use household detergents containing acids and alkalis - they can damage the oleophobic coating. If you decide to use a special liquid, do not sprinkle it directly on the gadget, especially if it does not have moisture protection - it is better to moisten a cloth and clean all the dirt with it.
Smartphones often suffer from dust, which clogs up in the cracks between the body parts, between the buttons, as well as in the connectors. If your gadget is waterproof, following all precautions, you can try to simply wash the dust. To do this, immerse the device only in standing warm water (in no case under a tap) and do not press any buttons. If there is no moisture protection, or you do not want to risk it, you can use a can of compressed air to fight the dust. In this case, you should not stick the nozzle deep into the connector, and the main advice for any cleaning is to act as delicately as possible.
Once you've finished cleaning, it is a good idea to stick a film on the display - even if you don't normally use it. This will subconsciously assure the buyer that you handled the gadget carefully. And if there are still small scratches on the screen, the film will perfectly mask them.
It is easier for Apple device owners - all data is backed up by standard means. Let's take a look at what and how you can save.
Save your backup to iCloud. If you followed Apple's recommendations when setting up a new gadget, then all your data is already stored in the iCloud cloud service. You can verify this by opening the "Settings" and going to the "iCloud" section. Here you can choose which data to store in the cloud and enable the creation of a backup of the device to iCloud.
Save the backup to iTunes. Cloud computing is great, but having a locally saved backup that can be restored even without Internet access is always safer. To do this, just connect the gadget to your computer, open iTunes and click on the "Create a copy now" button.
Now you can safely do a full reset of the device, and to restore the backup, you will need to either log into iCloud with your credentials and select data recovery during initial setup, or click the "Restore from a copy" button in iTunes and point to the desired file.
Useful links on the topic:
If you plan to sell a gadget, you need to sign out of iCloud before resetting - otherwise the new owner will not be able to activate the device with his account. On iOS 10.2 and earlier, you need to open the settings, go to the iCloud section, scroll to the bottom of the menu and click the "Exit" button. In iOS 10.3 and later, in the "Settings" click on the username at the top of the screen, scroll down the "Apple ID" menu that opens and tap on the "Exit" link.
Option 1. Reset via menu
After you have signed out of your iCloud account, return to the main settings screen, select the "General" section, then - "Reset" and click on the inscription "Erase content and settings". The gadget will ask for a four-digit password restrictions, after entering which you will be asked to confirm your action for the last time.
Option 2. Reset via iCloud in case of a broken screen
If this method does not suit you (for example, due to a broken screen), you can reset the gadget in three more ways. The first is to use iCloud remote control, if, of course, it was enabled on your device. All you need to do is go to the service website, select the desired device in the drop-down menu at the top and click the "Erase" button. Of course, for this, the device must be connected to the Internet, and, in addition, be prepared to answer security questions or enter a code that will be sent to another device.
Option 3. Reset via iTunes
The second method is to use iTunes, and it must be a PC to which you have already connected your smartphone or tablet, otherwise you will not be able to press the "Trust this computer" button on the screen. One more condition - the function "Find iPhone / iPad / iPod" (cloud search in iCloud) must be disabled. If this option suits you by connecting the gadget to your computer, open iTunes and click the "Restore iPhone / iPad / iPod" button. Before resetting, the program will offer to create a backup - be sure to do it now, if you did not follow our advice earlier.
Option 4. Hard reset with buttons if other methods are not available
| Video (click to play). |
If the previous methods turned out to be useless, you can hard reset the gadget for iOS using the buttons. To do this, press the power button and the Home button on the device at the same time (the volume down key for iPhone 7), and then hold them until the Apple logo appears (or about 15-20 seconds if your display does not work). After that, the device will reboot, and all data from it will be deleted.


