
In detail: do-it-yourself car speaker repair from a real master for the site my.housecope.com.
After posting, an unpleasant circumstance emerged - the speakers were chronically flooded with water... Moreover, the water flowed directly onto the coil, into the magnetic gap! In this case, the air channel of the core was the “water supply”.
Then I remembered that in cold weather the sound sometimes disappeared, and appeared as the cabin warmed up, from a barely audible wheeze to normal sound. It turns out that during the rains, the speaker was flooded with water, and in winter it simply froze over. I had the same effect in the previous car, with different speakers. In both cases, neither the car designers nor the speaker installers provided adequate protection. And, judging by the information on the Internet, such a problem often occurs in people.
In the first dynamic there was no sound due to the broken conductor at the junction of the centering washer and the coil. It's strange, because the working deformations in this place are absent by design. The problem was solved by winding half a turn from each pole, and placing the leads 180 degrees from the starting position.
Second speaker rattled due to corrosion products in the magnetic gap. I cleaned it, and, just in case, shifted the conductors, just like in the first one. After assembling the speakers, I put in the air ducts and covered the back surface with rubber washers.
This decision was dictated not only by the desire to protect the speakers, but also by their properties in this acoustic design (read - at the door of my car). Sounds like a little damping would be good for them! After muffling the channel, a significant drop in Qms became visible on the graph, and the character of the sound changed subjectively for the better, even when tapping on the gimbal.
| Video (click to play). |
To re-install the heads in the door, I had to make new spacers. Guess where is the job of an amateur, and where is a professional installer. I will keep the epithets addressed to the would-be craftsmen, born during the extraction of this stump.
From bitumen foil noise insulation on the heads, similar drainage systems were installed. Then the speakers were installed in the door. Hope the moisture won't hurt them anymore. The sound has become more collected.

Hello everyone! My name is Mikhail, now I'll tell you a story about how I managed to exchange a dvenashka for a 2010 Camry. It all started with the fact that I was wildly annoyed by the breakdowns of the two, like nothing serious broke down, but the little things, damn it, so many things that really started to enrage. Here the idea was born that it was time to change the car to a foreign car. The choice fell on the tayet Camry of the tenths.
One day in my the car wheezed (ripelled) the speaker I decided to just replace it with a new one. After I found out that good speakers are not cheap, I decided to give it a try. repair the old speaker yourself... To repair and remove the wheezing of the speaker we need:
- Screwdriver
- Acetone
- Double-sided tape
- Camera roll
- Knife
- Battery 3v
- Rubber glue (for example, "Moment")
- Syringe
- Scissors
- Piece of Whatman paper
Soak the upper gum and the lower diffuser from the glue... For this we use a syringe filled with acetone.
Peel off the upper membrane with a sharp knife, while gradually moistening with acetone. We do the same with the lower diffuser.
We unsolder contacts using a soldering iron.
Unscrew the central bolt and carefully extract everything.
If the coil winding is not intact, then you need to turn to the rewinder.
Wipe the coil from metal droplets and debris.
Need to rub around the core... For this we use double-sided tape. We glue it on a piece of narrow cardboard and try to collect the dirt inside.
Need to check, so that the core is strictly centered... It is necessary to clearly center the coil during installation.
Therefore, during installation, the upper speaker will interfere with us, which also needs to be unsoldered.
My speaker rustled due to the fact that the inner part of the coil touched the core. (the trail is clearly visible in the photo).
Centering with photo film... The foil must be wrapped around the core so that it is no more and no less than it.
We carefully put it there so that later you can get it.
We clean the surfaces from glue and apply a new layer of glue... First, lower it to the lower part, where the membrane is located, and once again check the centering using a battery. When the contacts close, the diaphragm should retract.
Leave the glue to dry and check that the membrane is pressed. We do not touch the membrane so as not to knock off the centering.
Further glue the upper part. Apply glue and press for a day. For this I used a saucer, ideally matched in diameter, a paint can and my wife's flower 🙂
After drying take out a photo film and checkso that there is no rubbing when pressed.
After soldering everything back.
As a result, I saved on acoustics 2600 RUR
Loudspeaker repair video
Are the speakers wheezing? Do not rush to throw them away, getting rid of the wheezing of the speakers is possible and not so difficult. Speaker wheezing, a fairly common phenomenon, is most often found in broadband acoustics, due to dust and all kinds of debris trapped between the core and the coil, which, when moving the speaker cone, causes an unpleasant sound in the form of a speaker wheezing. Speaker repair consists in disassembling the speaker and removing the source of the unpleasant sound.
A wheezing four-way coaxial speaker from Pioneer was repaired. The main tool for disassembling the speaker, a regular, flat screwdriver and a soldering iron.
First of all, I removed the buzzer module. In this model, the buzzer module was fastened with a long bolt, which was hidden under the magnet sticker. On other models, the tweeters can be simply glued, in which case they need to be ripped off, but before that, if possible, unsolder the wires going to the tweeters.
In the lower photo, if you look closely, you can see debris between the metal core and the sound winding.
After the tweeter module was unscrewed and the wires were soldered from it, armed with a screwdriver, he forged the plastic cover that presses the rubber suspension of the diffuser and carefully, slowly, was peeled off.
With the same tool, I peeled off the diffuser suspension. With a screwdriver, it is enough to pry it off a little, then you can peel it off with your hands.
I unsoldered the wires to start peeling off the centering washer.
Peeling off the centering washer is a little more difficult than previously peeled off parts, you can't rush here, it is easy to damage the washer.
There was a lot of debris inside the speaker, no wonder it was constantly wheezing.
On the voice coil of the speaker, scratches are visible, proving the presence of foreign objects, the insulation of the winding is damaged. The protective layer of the winding, it is advisable to restore, for this you can open it with varnish or epoxy resin over the scratches, with a small layer.
We clean, wash, vacuum all parts of the speaker.
Well, now the most difficult thing that had to be faced with the repair of speakers is the removal of metal particles magnetized to the core. A vacuum cleaner cannot cope with them. Scotch came to the rescue, with the help of just such not cunning actions, everything that was superfluous in the dynamics was removed.
Then it was necessary to glue everything into place. I glued the speaker with ordinary, universal glue. Moment.
I did not remove the old traces of glue, since it is easy to navigate along them when gluing the speaker, which allows you to glue it correctly and without distortions. But all the same, you need to check if the winding clings to the core when the diffuser moves.
If everything went well, there is no extraneous noise when the diffuser moves, we add it, solder it, assemble the speaker.
Refurbished speaker, pictured on the right. The speaker repair was successful, everything works and does not wheeze.
There is absolutely nothing in disassembling the speaker, there is nothing complicated, everything is simple and easy, the main thing is not to rush. It took me about an hour to repair one speaker.
Previously, we have already addressed the topic of repairing car dynamic heads, or simply say, do-it-yourself speaker repair. Then we considered the method of restoring the head suspension using ordinary silicone. But we also face problems of a more serious nature. That is why, today we decided to focus on such a common problem as misalignment.
Naturally, today everyone knows what a dynamic head consists of. So, in it, an electrical type signal is converted into membrane movement and propagates through the air.
At the time when the same signal is concentrated on the coil, a magnetic field is formed, which interacts with the magnet. And due to the fact that this signal is temporary, the coil begins to vibrate, as if running away from the field. However, the coil has nowhere to run and it starts transmitting this signal to the diffuser, which in turn transmits it into the air, creating sound. Naturally, this process is conveyed in simple words, and it will sound completely different in technical terms. But the very essence is important.
A core made of iron is used here to implement the directionality of the field. In turn, this core is attached to a permanent magnet. It is a disc-type circular iron platform with a hub in the center that consists of a voice coil. In order for this coil to move easily in the middle of the magnet and the core, there is a special gap. And due to some unfavorable factors, the glue, due to which the disc is connected to the magnet, is weakened and the core crushes the coil, which leads to the immobility of the diffuser. The speakers may work, but you will not be able to hear any bass.
How to get out of this difficult situation? And is it possible to make the speakers return to their normal state? This is what will be discussed later in the article. So, in the situation that I encountered, there was a breakdown of the speaker suspension, and because of this, I immediately started with the centering washer. It so happens that in the speakers, the same centering washer is attached to a very weak glue.
Therefore, in order to separate the washer, you just need to moisten the junction of the chassis with it with simple acetone and wait a couple of seconds. And in some cases, acetone alone is not enough. Most often this applies to high-quality speakers, where strong and high-quality glue is used to attach the washer and the chassis. Here you need to resort to the most real vandalism. Namely, you need to cut off the washer and wires going from the voice coil towards the speakers with a clerical knife.
At the end of these manipulations, it becomes clear that the core sticks to the magnet and needs to be put in its place, namely in the center. However, it should be noted that this is not easy at all, because here you need to work with iron and a permanent magnet.
They interact extremely reliably with each other, and it will be difficult for you to place the core in the center. It is important to understand, however, that the voice coil is fully attached to the cone and crushed. Therefore, you need to tighten the diffuser itself. After releasing the coil, you need to take a good look at it.
If the varnish covering its wire is damaged or the coil itself is dented, additional coil reconstruction is also required.
To repair the coil, the first step is to look for metal sheets, the thickness of which is half a centimeter.
These sheets need to be fastened between the core and the magnet. In general, we need to fill all the space that the coil occupies.
After all this, you need to glue the magnet to the washer that holds the core itself. It is best to use a good moment type glue for this.
Also, for these purposes, you can take epoxy, but here it is already necessary to mix it with sawdust or pieces of fabric for greater reliability.
Then, after the glue has hardened, you can remove all the plates and put the entire speaker back together.
The hanger and centering washer sit on the same adhesive. At the same time, the suspension can also be additionally repaired.
In this way, you can repair heads of various types.
And I also want to note one point, if you have decided to sell your car and do not know where to start, just call Center-Auto, which will buy your car. Even if it is after an accident, contact and receive the money on the same day.
The current state of the market with loudspeaker prices makes speaker repair virtually unnecessary, but if there are difficulties in purchasing a new speaker instead of a damaged or damaged one, then it makes sense to try to restore the damaged loudspeaker with your own hands. I came across several coaxial speaker systems from various cars. Unfortunately, 2/3 of the speakers produce a distorted signal during playback, and the rest simply do not work. Below will be presented material only on the restoration of "littered" coaxial-type car speakers for use in the future in the design or installation in multi-way stationary speaker systems. Before starting work, we will carry out diagnostics speaker states.
1. Check for "trash". Coaxial speakers are not fully protected from foreign objects falling into the magnetic gap, this is especially dangerous for old cars covered with rust or cars that have undergone body repairs. Checking is simple - gently with your fingers moving diffuser inside the magnetic system, if at the same time extraneous sounds are clearly audible: rustles, crackles, rattling, then this means that metal debris may have got into the magnetic gap.
2. We take a tester and in ohmmeter mode we check the resistance of the coil. If there is resistance, then this is our case. If there is no resistance, then it makes sense to check for an open circuit thick flexible copper conductors from the speaker terminals to the diffuser. If there is no break, then most likely there is a break in the speaker coil and this case of self-repair is not considered in this article. Instructions for self-repair are given below.
1. We unsolder the flexible leads of the coil from the contact lugs of the speaker connection and the contact lugs of the coaxial speaker.
2. Remove the coaxial speakers. Repairs of the speaker system are not provided by the manufacturer and coaxial speakers are installed tightly... The column with reinforced tweeters was removed by drilling an aluminum rivet. We work carefully, the main thing is not to tear or damage anything.
3. On the forums for repairing speakers, there are ways to dismantle the diffuser and centering washer. I also went along this path. We carry out work in the open air in the absence of open fire sources! After spending 100 ml of acetone, it was not possible to peel off the diffuser and the washer. The solvent evaporated quickly without softening the glue line.In order to save time and solvent, a cord made of cotton cloth was placed in place of gluing and moistened with acetone; if necessary, moistening as it evaporated continued until the glue softened. After softening with a thin screwdriver, he forged the edge of the centering washer and lifted it over the gluing point. With the corrugation of the diffuser made of thin rubber, you need to be more careful and delicate so as not to damage the rubber.
Pouring solvent onto the corrugation
4. Remove the diffuser. From trapped debris inside the magnetic system, damage-tearing of the speaker coil insulation is noticeable. It is useful under a magnifying glass to see the degree of damage for the presence of short-circuited turns (scratches to a depth of more than 40% of the coil wire diameter), if there is a suspicion of short-circuited turns, then it is better to reject the speaker. Using a damp cloth, I cleaned the diffuser, centering washer and coil inside and outside from dirt. Cleaning should be done carefully so as not to damage the coil.
There are scratches on the coil
5. The gap in the magnetic system is a sad sight. Strong magnet holds fine metal debris and dust firmly. I tried to clean it mechanically, but the small size of the gap and its curvature did not allow successfully removing debris. Decided to use a strong blast of air from an air compressor - it was not possible to clear the gap! Another remedy had to be used - a high-pressure jet of water from a car wash. The result is that I am all wet, but the gap is 100% cleaned, and at the same time the whole frame of the frame shone like new. I tried to do it carefully, since the pressure of the water jet is very high and I suppose with special zeal it is possible to destroy the gluing of the speaker magnet. To prevent rusting, you must immediately dry the frame and magnet. After drying, it is useful to check the cleanliness of the gap under a magnifying glass. And as experience has shown, it is good to seal the gap with tape to protect it from accidental metal debris.
1. After cleaning and drying the speaker components, we assemble the structure. It's important not to rush. The goal is to position the coil in the magnet system exactly in the center and to ensure there is clearance and no touching the coil. From a strip of A4 format office paper 10 cm wide and about 18 cm long, we roll up the cylinder and insert it into the diffuser coil. The cylinder must fit snugly against the spool and not have any protrusions or bulges inside.
2. Let's try to insert such a structure into the magnetic system. Do not hurry! Better to practice a few times. The cylinder should descend to the full depth of the magnetic gap and the coil should hardly move over the inserted cylinder. If the coil moves along the cylinder with great effort, then it is necessary to shorten the length of the paper strip, and if the coil moves freely, then it is necessary to increase the length of the paper strip.
Insert the cylinder into the gap
The coil runs tightly in the cylinder
The reel is centered
3. Holding the cylinder in the lower position, raise the diffuser and grease the area for gluing the centering washer with glue of the "Moment" type. We orient the washer according to the leads of the coil conductors and speaker terminals, as well as along the cutouts in the corrugation of the diffuser. We glue the centering washer.
4. We glue the corrugation of the diffuser.
5. After the glue has dried, we solder the coil conductors to the terminals.
6. Carefully remove the paper cylinder. Checking the diffuser travel. If everything is done correctly, then there should be no extraneous sounds.
7. To close the magnetic system from debris, I sealed the coil hole on the side of the diffuser with black spunbond, and on the side of the magnet with tape.
Glue the centering washer
Sealing the diffuser hole
Seal the hole with tape
8. Finally, we check the result of the work by connecting the speaker to the sound source.
Using this technique, several speakers were independently restored for installation in stationary speaker systems and radio receivers to replace old or torn speakers.
I tried to collect this way. It didn't always work out.
I did the assembly differently. After gluing the corrugation of the diffuser and the centering washer, until the glue has dried, I connected the dynamic head to a 6.3 volt transformer through a low-resistance variable wire resistor.
It was enough to slightly stir the diffuser.
In this case, the diffuser itself is centered. The noises disappeared immediately. In this position, he dried.
The disadvantage of this method: 50Hz is still hard to withstand for a long time.
The constant must be connected!
Professionals - a must, but amateurs can do so!
Today, the number of good sound lovers who just throw out a wheezing speaker is not decreasing! At the same time, the cost of an analogue can be a tangible amount. I think the following will help anyone who has hands that grow out of the right place to fix the speaker.
Available - a miracle of design thought, once the former column S-30 (10AC-222), now serving as one of the autosubs. A week later, after the mutation, the patient began to show signs of the disease - he emitted extraneous sounds when working out the bass parts, and wheezed a little. It was decided to conduct an autopsy.
After autopsy, a diseased organ was removed from the patient's body - woofer 25GDN-1-4, 86 of release. The organ clearly needed operation - when gently pressing the diffuser, an extraneous sound was heard (very similar to a quiet click), and when ringing in various tones (generated by the nchtoner program), a clearly audible rattling-crackling sound was heard with a large diffuser stroke and when ultra-low (5-15Hz) ) frequencies. It was decided to trepan this organ
First, the patient's flexible lead wires were sealed off (from the side of the contact pads)
Then a solvent (646 or any other capable of dissolving glue, such as "Moment") was moistened with a syringe with a needle, the place where the dust cap and the diffuser were glued (along the perimeter).
... the place where the centering washer is glued to the diffuser (around the perimeter).
... and the place where the diffuser itself is glued to the basket of the diffuser holder (again around the perimeter)
In this state, the speaker was left for 15 minutes with periodic repetition of the previous three points (as the solvent was absorbed / evaporated)
Attention! When working with a solvent, safety measures should be observed - avoid contact with skin (use rubber gloves!) And mucous membranes! Do not eat or smoke! Work in a well ventilated area!
When wetting - use a small amount of solvent, avoiding getting it on the gluing area of the coil and centering washer!
Depending on the type of solvent and air temperature, after 10-15 minutes of the above operations, using a sharp object, you can gently pry off the dust cap and remove it. The cap should either come off very easily or offer very little resistance. If you need to make significant effort, repeat the operations with wetting its edges with a solvent and waiting!
After peeling off the cap, carefully pour out the remaining solvent from the recess near the coil mandrel (by turning the patient over).
By this time, the centering washer has time to peel off. Carefully, without using any efforts, we separate it from the basket of the diffuser holder. if necessary, re-wet the gluing site with a solvent.
Wet the place where the diffuser is glued to the diffuser holder. We wait. Wet again and wait again. After about 10 minutes, you can try to peel off the diffuser. Ideally, it should detach from the diffuser holder (together with the coil and centering washer) without effort.But sometimes he needs a little help (the main thing is accuracy! Do not damage the rubber suspension.) 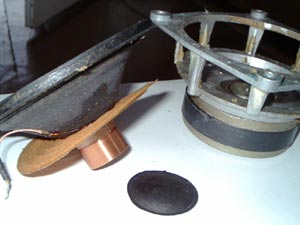
We clean the gluing points from the old glue and dry the disassembled speaker. We examine the disassembled patient for a malfunction. We look at the coil. If there are no scuffs and loose turns on it, we leave it alone. When peeling off the coil, glue it back with a thin layer of BF-2 glue.
We carefully inspect the place where the lead wires are attached to the diffuser. So it is - the patient has the most common malfunction in old speakers with a large diffuser travel. The lead wire at the attachment point is frayed / broken. What kind of contact can we talk about when everything hangs on a thread passed into the center of the wiring!
Gently bend back the copper "antennae".
... and solder the lead wires.
We repeat the operation for the second wiring (even if he is still alive - the disease is easier to prevent!)
We cut the supply wiring at the break point.
... and we serve the resulting ends (of course - first we use rosin). Here you need to be careful! Use a small amount of low-melting solder - the solder is absorbed into the wire like a sponge!
Gently solder the wiring into place, bend the copper "antennae" and glue (Moment, BF-2) the place where the wiring adheres to the diffuser. Remember - you cannot solder the wires to the fastening "antennae"! Otherwise, how can the wiring be changed again in ten years?
We collect the speaker. We put the diffuser with the entire “household” into the diffuser holder, orienting the wiring to the places of their attachment. Then we check the correctness of the polarity - when connecting a 1.5V AA battery to the terminals, when connecting the “+” battery to the “+” of the speaker, the diffuser will “jump out” of the basket. We put the diffuser so that its “+” lead wire is at the “+” mark on the speaker basket.
We solder the lead wires to the contact pads. Please note that the length of the wires has decreased by almost half a centimeter. Therefore, we solder them not as it was at the factory - to the hole in the plate, but with a minimum margin to maintain the length.
We center the diffuser in its basket using photographic film (or thick paper), which we place in the gap between the core and the coil. The main rule is to place the centering evenly around the perimeter, to maintain the same gap. The amount (or thickness) of the centering should be such that when the diffuser is slightly protruding outward, it freely rests on it and does not fall inward. For the 25GDN-1-4 speaker, 4 pieces of film are enough for this, placed in pairs in front of each other. The length of the film should be such that it does not interfere if you put the speaker on the diffuser. For what - read below. We glue the diffuser. We use the indication for the glue used (I recommend "Moment", the main selection criterion, so that the glue can be subsequently dissolved with a solvent). I usually stick out the diffuser 1-1.5 cm up so that the centering washer does not touch the basket of the diffuser holder, then I apply a thin layer of glue on it and the basket with a brush, wait and firmly push the diffuser inside, additionally press the washer against the basket around the perimeter with my fingers ... Then I glue the diffuser (in the retracted state, avoiding distortion).
We leave the speaker upside down for several hours under load (this is why our film should not protrude beyond the plane of the diffuser!).
Then we check the speaker for correct assembly. We take out the centering and carefully check the diffuser travel with our fingers. It should walk easily, without emitting overtones (there should be no touching of the coil and core!). We connect the speaker to the amplifier and send low-frequency tones of low volume to it. Extraneous sounds should be absent.In case of improper gluing (misalignment, etc.), the speaker must be glued (see above) and reassembled, being careful! With a high-quality assembly, we get 99% of a fully working speaker.
We glue the edge of the dust cap with glue, wait and carefully glue it to the diffuser. Here you need accuracy and precision - a crookedly glued cap does not affect the sound quality, but it spoils the speaker's appearance very much. when gluing, do not press on the center of the cap. It can bend from this and you will have to peel it off, straighten it, coat it from the inside with a thin layer of epoxy for strength and stick it back.
We wait until all parts are completely glued together (about a day) and put the finished speaker in its place. We enjoy sound that is no worse than that of a new factory analogue speaker.
That's it, now you can see that fixing a speaker is an easy task. The main thing is slowness and accuracy! So in an hour, you can slowly repair almost any woofer or midrange speaker of domestic or foreign production (for gluing imported speakers, a more powerful solvent is often required, such as acetone or toluene, carefully - they are poisonous.) Having a similar defect.
Yes, after the operation, the former patient got a second wind and the cheerful yellow subs continue to do their hard bass work:
To repair speakers, it is important to understand how a typical representative from the world of audio technology works, we will disassemble its device and design, for this, refer to the figure below.
The speaker consists of a magnetic system located on the rear side. It consists of a ring magnet made of special ferromagnetic alloys or magnetic ceramics, steel flanges and a cylinder (Kern). There is a gap between the core and the flange, in which the magnetic field is generated. In the gap, there is an inductance coil wound with a thin copper wire on a rigid cylindrical frame. It is also sometimes called a voice coil. The coil frame is fastened to the diffuser - it then "moves" the air, creating compression and discharge - acoustic waves.
The diffuser can be made from a variety of materials, but it is usually made from compressed paper pulp. To prevent the coil from touching the core walls, it must be placed in the middle of the magnetic gap using a centering washer. The diffuser is mounted on a metal frame. Its edges are corrugated to allow free vibrations.
Thin wires from the coil go to the outside of the diffuser and are attached with special rivets, and a stranded copper wire is attached to them on the other side. Then these stranded conductors go to the petals, so the speaker is connected to the circuit.
Now you can start DIY speaker repair.
If an alternating electric current is passed through the voice coil of the speaker, a magnetic field will arise, which will interact with the constant magnetic field of the speaker system. This forces the coil to either be pulled into the gap or pushed out of it at a different time, depending on the direction of the currents. The mechanical vibrations of the coil are transmitted to the diffuser, which oscillates in time with the frequency of the alternating current, generating acoustic vibrations.
The speaker in the diagrams is indicated as follows. Next to the designation there are letters B or BA and the serial number of the speaker in the diagram.
Using the example of the Focal Polyglass 165 VRS speaker, because these speakers have high sound quality and, accordingly, are very expensive, I decided to try to repair them. On both speakers, upon visual inspection, I noticed a wire break, and it was impossible to solder without disassembly.
The diffuser in this speaker was woven from fabric. Rubber suspension. It took about an hour to disassemble the head. I used a solvent to separate the suspension.The main problem was that the main frame of the head was made of plastic, which was “dissolved” by the solvent.
Separated the centering washer with a mounting knife, there was access to the - the coil. It is usually screwed onto a metal sleeve with a very high accuracy tolerance. The sleeve itself is interesting with holes for cooling. The cap is made of plastic. All that remains is to solder the new flexible wires to the coil.
The assembly process must be carried out in the reverse order, then what was removed with such difficulty must be glued back, I used super glue for this, as it dries quickly. If you use long-drying glue, you will have to clamp it under a press and make special templates. An hour later I turned on the speakers, the sound was just magical.
Speaker repair was successful
I doubt that this miracle device has great practical value, but anyone can assemble it for fun in about thirty minutes. Although perhaps you had an unsuccessful repair and something is better than nothing.


