Do-it-yourself windshield repair is not a very difficult job, any car enthusiast who loves to repair his car can handle it. To do this, you need to know the rules and procedure for performing work and have the necessary tools and materials.
Diagnose the windshield. Triplex glass is suitable for repairs. A chip or crack that appears on the windshield of your car should not panic you. The chip must be repaired, and the crack must be properly treated. Examine the crack and assess the area of damage to the glass surface.
You can repair a single small crack yourself, as well as in a branded car service. If the entire windshield is cracked, consult an experienced technician. Perhaps the cost of repairs is cheaper than replacing the entire windshield, but no one will guarantee the quality of the repair and its preservation for a long period of operation. And the new glass is new. This question is up to you.
After assessing the detected defect, prepare the necessary tools and materials to repair the damage. You do the cleaning of chips and cracks from various contaminants regardless of the elapsed time, when the damage was formed.
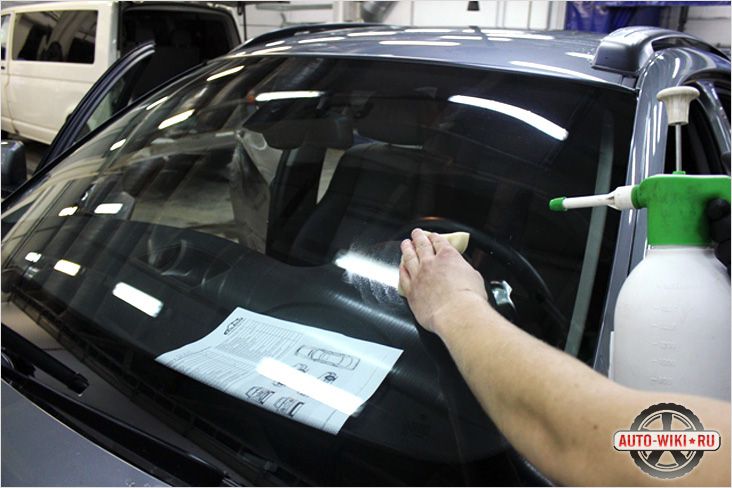
Remove dirt, micro-fragments with special compounds. Blow thoroughly, you can use a simple pump, rinse and dry the place where you will make repairs. Degrease the surface to be repaired with alcohol. Having done all the preliminary work, slowly proceed to the restoration of the windshield.
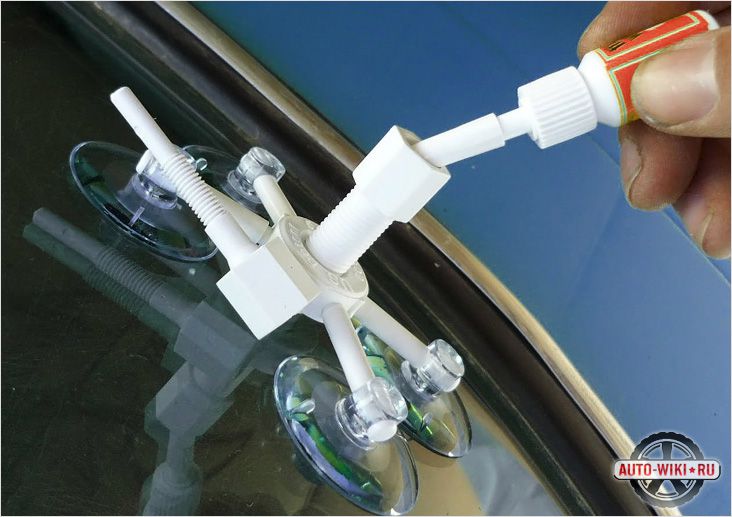
Install the injector over the repair site. How to do this, read the instructions supplied with the repair kit. Everything is written in it in an accessible and understandable language.
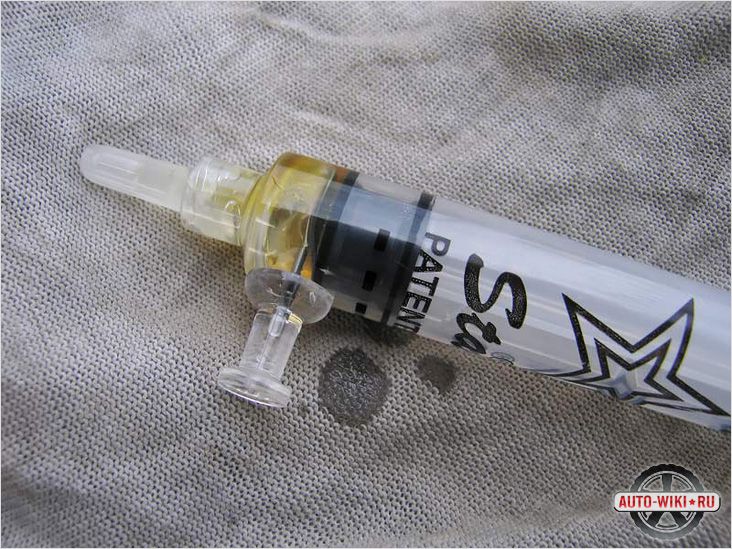
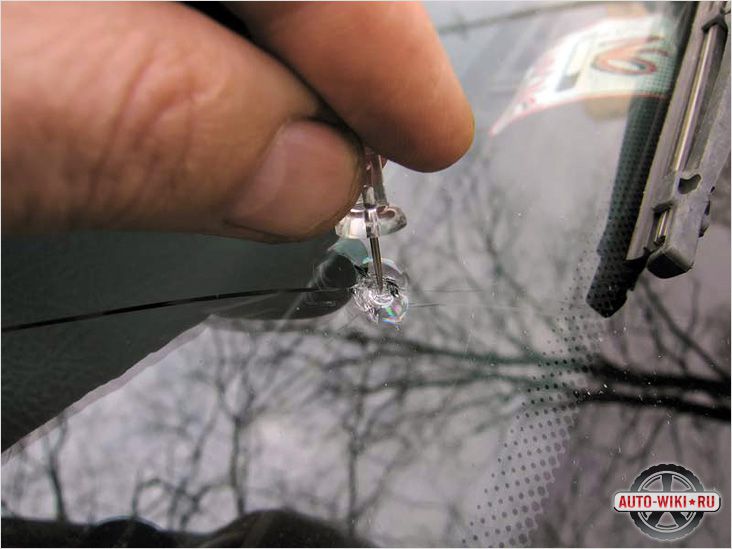
The process of repairing a chip on the windshield consists in the following actions. You start to inject polymer glue into the chip. Do it like this. Take a syringe and fill it with glue. Insert a syringe into the nipple of the injector. Repeat this operation two times. The polymerization process takes several hours. After the polymer has completely hardened, clean the place of repair from excess glue. Then all that remains is to polish the repair site or the entire glass surface of your car.
If you have a small crack in the glass, repair it right away. It can change and become ramified. And this is a serious defect, it is sometimes impossible to eliminate it. We'll have to think about replacing all of the glass.
Repairing a crack in your windshield will take you longer than repairing a chip. Use the repair kit similar to the previous one. All operations for repairing cracks on the glass surface are identical to your actions when removing a chip on glass. Differences are observed in the process of preparing for future repairs.
Repairing the surface of your windshield will take a small amount of your free time and money. You just need to correctly follow all the instructions and advice of experienced motorists.
What to do if a chip appears on the windshield? Try to repair the glass as quickly as possible, because due to vibrations and temperature changes, even a small chip can turn into a large crack. You can remove a crack or chip on the windshield at a service station or using a special kit.
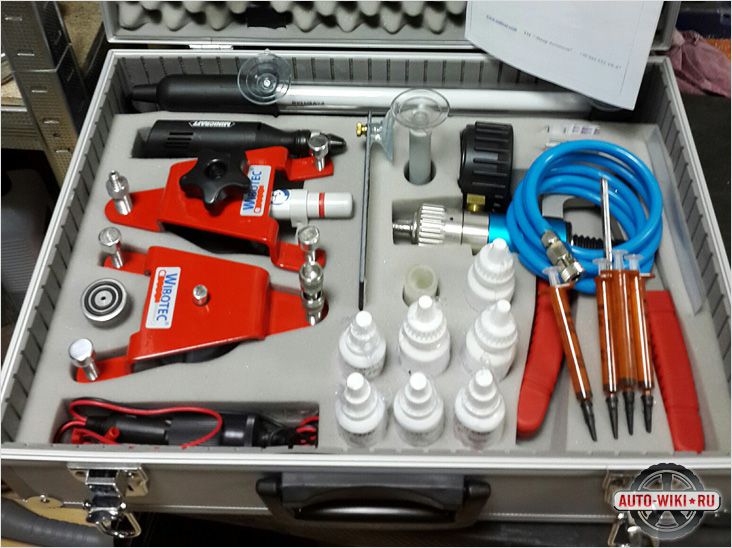
You can buy a special set at a price of 300 rubles. It should include: a syringe with a repair compound, an applicator for filling in chips and rings with a sticky surface for installing the applicator on the glass. Additionally required: blade and food film. Using the kit, you can repair a crack in the windshield up to 20 cm in length.
The windshield must be clean, dry and cool (not exposed to sunlight).
VIDEO
The windshield must be clean, dry and cool (not exposed to sunlight).
Procedure :
Place the syringe firmly on the edge of the crack.
Squeeze out the repair compound by moving the syringe (from the end of the crack to the beginning) slowly and smoothly along the crack. In order for the repair compound to completely fill the crack, lightly press on the glass under the crack.
Cover the crack with cling film.
Put the car in the sun for 20 minutes to polymerize the composition (on a cloudy day for 1 hour).
To stop the crack in the windshield, you will need to drill the glass, for this, seek the help of specialists. If the number of cracks on the glass is large and they cannot be repaired, then the windshield should be replaced (instructions).
If the crack is in the driver's line of sight, then such vehicle operation will not be safe. By the way, do you know which washer nozzles do their job better?
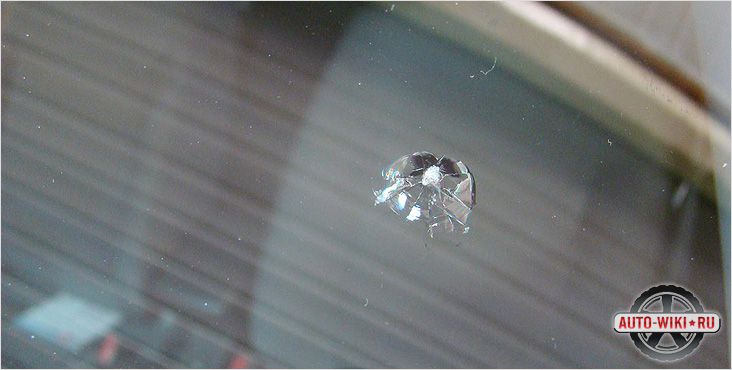
Windshield Repair Kit - a kit for self-repairing chips and cracks on auto glass, in particular, on the front.Its main goal is to instantly “block” the crack and completely stop its further spreading on the glass. The set is an easy-to-use portable vacuum system, inside of which there is a special restoring compound (glue-polymer) with increased penetrating ability. The kit is designed for several applications and can overcome the following most common types of cracks: bull's eye, asterisk, combined or swirl-like chipping.
Register to leave a review.
If you follow the instructions and direct hands, the results of the repair are absolutely invisible. This is achieved thanks to a modern formulation based on optical adhesives. There is a high-quality filling of cracks and all types of chips. The slightest defects that are not visible to the naked eye are eliminated. As a result, glass breakdown is stopped and costly repairs are saved. The process itself is very simple. First, I thoroughly clean the glass from the smallest fragments and dust, then thoroughly degrease it. Then I install the vacuum system so that the central ring is clearly above the problem area.
The auto glass repair kit is pretty simple. It is enough just to follow the clear step-by-step instructions in Russian. I pay special attention to the preparation of the damaged surface. A prerequisite for a high-quality repair is cleaning from the smallest fragments and dirt. When applying a special composition, I had to act like a sapper. It is very liquid, it must be squeezed out extremely carefully. If you overdo it, it will turn out ugly. And the hardened resin protruding above the glass surface will have to be polished for a long time and tediously.
I tried to repair a cracked windshield with a kit. Further spreading of the crack stopped instantly. The entire repair and subsequent cleaning took no more than an hour. The glass looks intact, the transparency is not broken. This is due to the low viscosity of the adhesive. It is more like water in consistency and transparency, which ensures perfect filling of cracks and chips. In this case, not just freezing occurs. The edges of the crack are tightened securely. Precipitation, extreme cold and heat, and sudden changes in temperature do not have any effect on the characteristics of the frozen composition; it regularly performs its functions.
Glass restoration is carried out by filling the crack with a special solution. The set is enough for 1-2 times, depending on the size of the crack or chip. After restoration, the crack is practically invisible, but the most important thing is that it does not increase in size, thus violating the overall integrity of the glass.
It is important to follow all the steps without neglecting any of them. The suction cups must be positioned so that they do not "run over" the crack. Do not rush when screwing, squeeze out the resin slowly and in small quantities. The resin should not come into contact with the coating of the car. It is necessary to carry out repair work with good lighting and preferably on a sunny day, so that immediately after the repair is completed, the place will be in the sun. Thanks to the precise execution of the instructions, I managed to make the star on the glass invisible, the destruction of the glass stopped and the glass was like new.
I always carry the repair kit with me in the car. It takes up a minimum of space. The complete repair cycle takes no more than 40 minutes. It is possible to eliminate a crack or chip right on the spot. So that on the way to the car service, it does not grow even more from the shaking. No special tools are needed, not even rubber gloves are required. All you need is a glass cleaner with a degreasing function, so that the adhesive is then held securely.
Nowadays, there are various proposals on the market to protect glass from damage. One of the most popular options is a protective film sticker on the glass, which protects an expensive part from damage, and many car owners prefer not to wait for the next stone in the glass with subsequent repair or replacement of this glass.
But what about the situation if the windshield of the car was nevertheless damaged, and small cracks and chips have already appeared on it? Go to a car service for an expensive repair or try to fix this problem yourself?
If you decide to repair cracks on the windshield with your own hands, we will tell you what materials and tools you need and how to do it according to all the rules.
To begin with, we will determine what minor damage can be easily and simply repaired on our own, without replacing the windshield.
Glass chips in any part of it. Chips should be repaired immediately before they develop into deep cracks, otherwise you cannot avoid glass replacement.
Simple cracks. They often appear as a result of a sharp and constant temperature drop due to improper heating of the car, non-observance of the temperature inside and outside the passenger compartment.
Branched cracks. Unlike simple cracks, branched cracks are difficult to remove. Untimely elimination of a simple crack can lead not only to the appearance of deep branched cracks, but also to the forced replacement of the windshield.
Chipped. The reason for their appearance is a gross mechanical effect.
So, in order to independently repair cracks on the glass, you need to prepare the following set:
Photopolymer glue.This glue is intended for the repair of automotive and other glass. The glue has a sufficiently high coefficient of transparency and reflection of sunlight, therefore, after application, it remains completely invisible on the glass. Photopolymer hardening occurs due to exposure to directional ultraviolet radiation. The hardening time is 15 minutes (when using a UV lamp) and 45 minutes (when naturally drying).
Glue injector. With the help of an injector, the polymer is applied to a crack or chip on the glass. Injectors can be either plastic (disposable) or metal (reusable). We recommend purchasing a reusable injector.
Electric drill. It allows you to remove excess stress from the glass by drilling the edges of the crack to prevent its possible enlargement. For cracking, thin diamond drills are used.
UV lamp for drying glue.
Scriber. Used to gently clean the edges of the crack, as well as the working area around it.
Applicators. Allows you to attach the injector to the windshield.
Liquid and wipes to remove excess dirt and moisture.
Pump for cleaning the edges of cracks from dirt and dust.
Having prepared the necessary set of materials and tools, we proceed to the repair.
Watch a video detailing the entire windshield repair process:
VIDEO
If you want to get a high result of windshield repair, we recommend that you take this process with the utmost seriousness and scrupulousness. Read also how to fix cracks in the bumper.
If you have never had to repair cracks in auto glass, then you are insanely lucky. But such luck does not last forever, because the appearance of a crack on the windshield is a matter of seconds, and you cannot influence it in any way.
But if such a nuisance nevertheless happened, then only timely and high-quality repair of chips and cracks will help save your car from having to replace the windshield for a while. And, given the current prices for parts, repair is the most optimal option that will help you save your money.
Deep knowledge of physics is not needed to understand that glass has its own structure and a certain strength. And if this structure is broken in any place, then the damage will spread over the entire plane due to the exerted stress on the glass surface. In other words, the so-called "domino effect" will begin, when an insignificant chip or crack on the windshield rapidly grows, turning into a large cobweb.
Every car owner should at least once face all sorts of damage to the "lobovuha", and if not, then okay. Then we will help that group of people who want to be aware of all the nuances and features of the repair.
For those readers who are not in the know, it is possible to repair cracks only on glass of the "triplex" type. But you shouldn't worry about this, because almost all modern cars are equipped with this type of glass.
The peculiarity of "triplex" is the presence of a protective film located inside the glass. This adds strength and resistance to mechanical damage to the product. If even large pebbles hit, the structure of the glass will not be broken and it will not crumble into small pieces when driving, which increases the level of safety for the driver and passengers.
There is also another type - "Stalinite", used for the manufacture of rear and side windows. Unfortunately, this type of glass cannot be repaired, since at the slightest damage they crack and crumble into pieces.
To be precise, there are only three main types of damage to car glass, each of which you can easily cope with yourself, without outside help. The only thing that is required of you (besides the tools for work and the desire to do all this) is to determine the damage in time. Repair work should not be postponed until later, because every day the cracks will increase, and replacement will become inevitable.
This is the name of the loss of a small area of the glass surface, which in most cases does not lead to a decrease in visibility.To eliminate the resulting defect, you must use a photopolymer, after which polishing is carried out (you can do it yourself or use the services of a service).
It is advisable not to delay the process of repairing chips, because soon they can turn into cracks, the elimination of which will require much more effort and money.
Cracking is more serious. I think there is no need to worry, but you still have to repair the crack on the windshield of the car with your own hands. The resulting cracks impair the driver's view, which is fraught with unpleasant consequences on the road, moreover, they tend to grow, gradually turning into a fork. In this case, you will have to replace the windshield. Therefore, it will be much cheaper to carry out high-quality timely repairs, and the part will be able to serve you faithfully for a certain time.
The last stage of the growth of cracks, the repair of which has not been given due attention. Such damage is very noticeable for the driver due to strong distortion, poor visibility and light refraction, therefore this type of repair is considered the most time consuming and unpleasant. On top of that, you can easily be stopped by traffic police, and, when cracks reach a certain size, you can write you a fine.
Before proceeding with the repair, it is necessary to study this issue in more detail, so to speak "under a microscope." Learn about all the features of this process, common mistakes and necessary tools.
If we consider the repair of chips and cracks in theory, then we can say that it is very simple. However, you should familiarize yourself with some of the subtleties. When making a purchase, you need to make sure that the kit includes a tube of special polymer adhesive and a resin-based additive used for repairs. The technical condition of the processed glass will directly affect the success of the process.
It is imperative to prepare the windshield before repair, because this will improve the result of the repair being carried out. Initially, you need to wash the car glass, and not ordinary water is used, but distilled water. After rinsing, dry it, thus getting rid of the remaining moisture in the holes, cracks and chips.
Repairs should be carried out indoors or under cover. Use a regular razor blade and pump to clean the cracks. This is done in this way: with a blade you clean the part of the glass being repaired, and with the help of a pump you blow it, thereby getting rid of the remnants of dirt and small pieces of glass. Only after carrying out these operations will you be able to close the crack or chip at the proper level.
You need to figure out the tools that will come in handy in your work. Most of the list below is included in the standard emergency kit. So, you cannot do without:
electric drill;
windscreen washer fluid;
polymer glue;
knife;
ultraviolet lamp;
compressor;
lantern;
injector and bridge;
plastic scraper.
Armed with such a set, you can slowly begin to eliminate cracks or other defects on the windshield. When purchasing budget kits, you will not be able to find an applicator there, although you will need it for work.
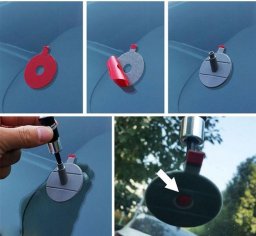
Important! When installing the applicator, direct it to the middle of the crack or chip being repaired. It is very convenient to check its position from inside the machine. You can attach it to the glass using special suction cups.
Now we proceed directly to the repair.
Relieve stress from the area to be repaired. This requires drilling a hole a few millimeters from a certain edge of the crack. It takes a lot of efforts to bring the crack to the made through hole. In order to prevent the growth of the defect, this step must be performed first. I would like to note right away that this stage is rather difficult.
Thoroughly rinse the surface of the windshield and wait for it to dry completely. If you do not have time to wait or it is too cold outside, then use a regular hairdryer (if you have an industrial one, you are insanely lucky).
Position the injector bridge so that the gander is just over the crack. In this matter, accuracy is required, since the result of all the work will depend on the correct installation of the gander.
Then turn on the glue to fill in the cracks and chips in the glass. Remove the bridge after all voids in the crack are completely filled.
To accelerate the hardening of polymer glue, an ultraviolet lamp is perfect. If you don't have one, then get ready for a long wait (under sunlight, the glue dries 2-3 times slower). You can read detailed information about the setting time on the product packaging.
After the adhesive has hardened, sand the windshield.
Another important point. You should not demand the impossible from the service station workers or from yourself, namely, to obtain a perfectly smooth and even surface after the repair. The ideal state is not expected, and there are several reasons for this:
you will not be able to completely get rid of the accumulated dirt and dust in the resulting cracks. Accordingly, you will not be able to completely fill the crack with glue;
in case of strong blows to the windshield, the film in the "triplex" peels off, which is no longer amenable to repair. As a result - clouding of the repaired area of the windshield;
you will not be able to match the color of the polymer to the perfect color of the glass. Minor optical effects will still be present, such as refraction of light.
The repair procedure is quite laborious and has many of its own nuances. Therefore, to increase its efficiency, the following recommendations should be followed:
close the crack that appears to prevent dust and dirt from entering. For this purpose, use tape (transparent);
try to move at low speeds. This is necessary to prevent the appearance of a branched crack, as body vibrations occurring during movement lead to the propagation of even the smallest cracks;
avoid washing damaged glass with shampoo - this will reduce the effectiveness of cleaning the damaged area from the formed films.
That's all, you have read the necessary information on the repair and renewal of the windshield after cracks appear. The appearance of a defect in itself is not a reason to despair, because a well-carried out repair will allow you not to think about this problem for a long time. Good luck on the road, dear motorists!
VIDEO
Mechanical damage that appears on the glass of the car can be repaired only in the following cases:
the inner layer of the triplex is not damaged;
factory-made glass is used;
cracks are no more than 50 cm long and do not reach the edge of the auto glass;
notch, chipping or spall without cracks or with small outgoing cracks.
Recovery is impossible if the triplex is split into several parts, its central part is crumbled or covered with a network of cracks.
To understand the complexity of the repair to be performed, you should decide on the type of damage. They can take various forms and types:
cracks that form arcs or circles;
round chips;
cracks in the form of cobwebs;
defects from cracks and chips;
double-sided crack.
If only the outer layer of auto glass is damaged, then you can repair it yourself. If the inner and outer sides are damaged, the glass sheet will have to be dismantled. It is rather difficult to carry out such a procedure on your own.
To restore the triplex, you will need a special car set of tools, which can be purchased at the Inseif online store. The set should include:
blades for cleaning glass from polymer;
ultraviolet lamp;
injector;
injector rings and seals;
transparent plates;
scriber;
hand electric drill;
syringe;
polish;
various polymers for filling chips and cracks;
drills from carbide alloys.
The quality of the windshield repair largely depends on the preparatory work. First of all, the glass must be cleaned of dust and dirt, having previously sealed the damaged areas with tape so that moisture does not get into them.
Cleansing technology depends on the type of damage:
Cracks in the form of rays are first processed with a drill. They need to be drilled out with a tapered drill. You should get a wide, but not deep cone. Drill carefully so as not to damage the inner layer.
A skyber is used to clean rounded cracks. If it was not possible to remove the dirt with this tool, then the damaged areas are reamed with a drill.
Cracks running in different directions are cleaned with a carbide rod or reamed with a drill. So that the length of the damage does not increase, you need to drill a conical chip, retreating 1-2 mm from its end. After that, the cracks are artificially brought to a chip by gently pressing on the glass with your hands.
Damage to the laminated glass is filled with a special polymer glue, the properties of which are close to those of auto glass. Before pouring the polymer, dust and small particles should be removed from the surface with a vacuum cleaner. Then everything is thoroughly wiped with a dry napkin. Filling is done with an injector.
Procedure for the procedure:
The injector is installed over the chip and is attached to the surface using suction cups. The equipment should be installed so that it completely covers the chip.
The injector cylinder is carefully screwed into the axle. The sealing rubber located on the tip must be in contact with the triplex surface. To prevent the glue from flowing through the O-ring, the cylinder is screwed strictly parallel to the surface.
6-8 drops of the selected polymer are instilled into the injector cylinder. The density of the polymer composition directly depends on the thickness of the cracks. For small cracks, a polymer with a low density is selected.
When the chips and cracks are filled, the piston is unscrewed and set to the top position. For about a minute, air will be pumped out of microcracks and a vacuum will be created.This procedure is performed several times. There should be no air bubbles in the damage.
When all defects are filled with a polymer composition, the bridge and injector can be removed. The equipment used can be cleaned with alcohol or acetone.
Defects are filled with polymer, but you can not use the car until the glue dries well ... You can quickly dry it using an ultraviolet lamp, after dropping PL-106 polymer onto the treated area and covering it with a special film from the kit. The film is smoothed out, and a lamp is installed over the windshield for 5-6 minutes.
When the surface dries, the lamp and the film are removed, and the treated areas are cleaned of excess glue. A blade is used for this, which must be held perpendicular to the triplex. The cleaned surface is wiped with a napkin and rubbed with a special polish.
After the repair, damage should not be noticeable. You can only see them if you look closely.
If the damage is small and there is no time to glue them thoroughly, you can use the tools at hand.
A thin crack can be varnished with a colorless varnish to prevent damage from growing. The varnish is applied on both sides in a thin layer. It should dry well. Even the rains cannot wash off the varnish ... It can hold out on glass for several years.
Using these tools, you can prepare a composition that is suitable for repairing damage to the windshield. Recipe:
In a glass container, mix turpentine and acetone in a 1: 3 ratio.
Cut the styrofoam into small pieces and add them to the solution.
When the foam dissolves, it should be viscous and transparent.
The solution is mixed and chips or cracks are filled with a thin brush or syringe.
The adhesive hardens quickly, so it must be used immediately, applying to damage in small portions.
VIDEO
In any hardware store you can buy a silicone-based adhesive and apply it directly from a tube to damage. If the crack is thin, you can use a syringe. The cavities are filled with silicone slowly to avoid air entrapment. The glue can dry from 12 hours to a day. ... After that, it can be covered with clear varnish.
If you have a little experience and a special kit, you can repair the glass yourself with your own hands. However, if the damage is serious or you are in doubt about your ability, contact a car service that solders the windshield. There, with the help of special equipment, they will quickly be able to solder almost any chips and cracks. After such a renovation, the triplex will look like new.
Before we deal with the types of equipment for auto glass repair, we need to decide on technologies and terms. Modern cars are named.
The windshield of a car (in everyday life it is also often called "windshield" or "windshield") is one of the most vulnerable elements of a car. Kog.
Video (click to play).
Almost any scratches can be repaired with quality glass polishing wheels. Thanks to high-quality abrasives, they grind damaged.


