In some severe cases, bumper repairs can be either too expensive or useless. From different sellers prices for it can range from 2,500 rubles to five thousand depending on the manufacturer and year of manufacture of the vehicle. A good renovation with painting can be even more expensive, so you should think about its feasibility.
Attachment points and types of bumper fasteners used.
The bumper on a Chevrolet Cruze can be removed simply, but when dismantling, you need to be careful not to damage the body paintwork.
For work, it is advisable to invite an assistant, since it is advisable to control the bumper from both sides, especially at the time of removal.
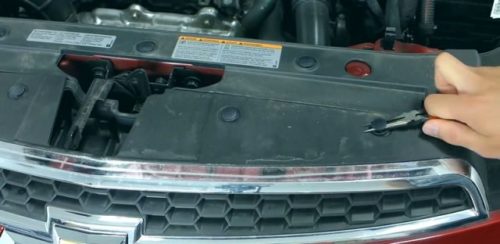
For dismantling, we need a thin flat-blade screwdriver, a Torx T20 bit and it would be nice to have a plastic spatula. It can be replaced with a simple wide flat screwdriver, but it will need to be wrapped with masking tape before use.
If everything is clear and the tool is selected, let's get to work.
Unscrew 2 bolts and remove 4 clips.
Unscrew the self-tapping screws on the wheel arches.
Remove the front mudguards.
We unscrew the screws around the PB perimeter.
We remove the plastic cover to the side.
We remove the connectors from the fog lights.
The arrows indicate the steps to undo the latches.
On these latches, the bumper is attached to the sides.
To avoid damaging the paint, use a plastic spatula or a wrapped screwdriver.
At these points there are catches under the headlights.
Now that all the bumper attachment points are corroded, carefully remove it with both hands.
It is better to remove the bumper from the car with two people, being careful not to damage the paint on the fenders. Successful work and trouble-free travel to all!
VIDEO
The Chevrolet Cruze was bought from hands, and its former owner left an unpleasant present on the car - there was one small defect on the rear bumper. The previous owner, parking backwards, drove onto the curb and sat on the bumper, when he began to drive out, the bumper caught on the concrete structure, as a result of which the bumper broke at the seam, and the tow hitch plug was lost.
The skirt was strongly curved, and a crack went along the decorative depression. The current owner decided not to delay the repair and give the bumper to a specialized workshop. However, in this salon they asked for a tidy sum for this work and it did not suit the owner. The guy decided that he could carry out the repairs on his own and, without delay, got down to business. He stocked up on the following tools: a soldering iron, an industrial hair dryer, as well as a plug for the towbar hole and original paint for painting the plug, since they are unpainted at dealers.
After that, work began to boil. The owner drove the car into the garage and completely washed the bumper so that nothing would interfere with the treatment of the part. With the help of a hair dryer, the owner warmed up the bent part of the skirt and slowly began to press it against the attachment point.
After some time, the bent section took its original shape and now it could be soldered in place. It is important not to overexpose the hair dryer while heating the bumper, as the paint may turn yellow with prolonged heating. Next, the owner began to solder the bumper. Initially, the guy thought to solder the whole thing with copper wire, but soon changed his mind, since the seized plastic would also hold up well. Soldering the whole thing is from the inside, so as not to damage the paintwork. This is exactly what our hero did, he abundantly soldered the seam with a 65-watt soldering iron, after which the plastic just grabbed tightly and now the work can be considered complete.
After the work was done, the owner painted the plug of the towing hole and, having installed it in place, proudly went for a drive.
Good day!
Has anyone come across this and where can this be repaired for a reasonable price?
Good day!
Has anyone come across this and where can this be repaired for a reasonable price?
Good day!
Has anyone come across this and where can this be repaired for a reasonable price?
do it yourself Chevrolet Cruze rear bumper repair.
Preparing to repair the bumper Chevrolet Cruze (Part 1)
Chevrolet Cruze Bumper Repair (Part 2)
Small tips and tricks for operating a car.
Cruise's body repair after an accident, pulled out, aligned, replaced the wing and assembled! Further painting! Repair.
Spontaneous shooting, I post it as it is, without editing. We repair the bumper with super glue and soda 1. Degregate.
Chevrolet Cruze bumper repair result (Part 3)
See how you can restore the trunk knob of a Chevrolet Cruze with your own hands, as well as read all about Chevrolet.
See how to properly adjust the handles in a Chevrolet Cruze with your own hands, as well as watch and read the news.
straighten the threshold. skins flying around the varnish from the bumper. and paint.
Hello Friends, especially for the Chevrolet Cruze club, I made a small review on the topic of installation, tuning.
Repair and extraction of the Chevrolet cruze threshold using a microwave spotter.
The front bumper on the Chevrolet Cruze is the first to take the bumps of stones from the road. If you often drive off-road, it will quickly become unusable and not always painting chips will be able to save the situation. Often it needs to be removed to be completely repainted or replaced with a new one.
To remove the front bumper of the Chevrolet Cruze, you will need:
flat screwdriver;
a plastic spatula or wide flat screwdriver wrapped in masking tape;
head 10 mm;
bit asterisk t20.
It is recommended to work with an assistant who holds the bumper on one side. The main rule is to act carefully so as not to damage the paintwork, especially if you still need the part.
This is an easy procedure that even a beginner in auto repair can handle. If you have free time and car tools, remove the bumper yourself. Otherwise, it is better to do this in a car service, where competent craftsmen will do all the work in a few minutes. Further repairs and installation of a new part can be done by yourself.
Work is best done in a ventilated garage on a level surface. Removing the front bumper on a 2011 Chevrolet Cruze is a simple process, if necessary, it can be carried out in the yard.
Video (click to play).
How to remove the front bumper on a Chevrolet Cruze:
Remove the battery from the car.
Under the hood, in the area of the radiator grill, unscrew the screws on the right and left.
In the same area, remove the 4 plastic caps. To do this, pry off the plugs with a flat screwdriver and pull out the caps.
Unscrew the plastic protector at the front of the wheel arch liners. It is attached to three self-tapping screws in the wheel arch, which can be removed with a T20 bat.
Remove the plastic protection from the bottom, it is held by 4 self-tapping screws.
Unscrew the remaining 8 self-tapping screws around the perimeter of the plastic casing.
After that, remove the 4 pistons in the same way as under the hood.
Remove the Chevrolet Cruze front bumper lower boot.
You will see the fog lights and air temperature sensor. Disconnect the terminals from them.
The front bumper mount for the Chevrolet Cruze is made in the form of latches. You need to pull the part towards you and bend the latches using a plastic spatula or flat screwdriver. The latches are located under the headlights and on the fenders.
The bumper is attached to the fenders with plastic hooks. You need to sink each of the 3 hooks down, then the holes in the bumper are free. Better to start moving from the wheel to the center.
Now you know how to attach the front bumper on a Chevrolet Cruze and how to remove it. The process is simple, it takes from 30 minutes to 1 hour, depending on your experience.
If you are changing the front bumper of a Chevrolet Cruze to a different one, you can purchase the part from a store or auto breakdown. As a rule, during disassembly, body parts are not of very good quality, it is easier to buy in a store. Depending on the manufacturer, the price ranges from 2,500 to 5,000 rubles.
The stores sell standard black parts. You can paint them yourself or order this service from the service. Many drivers drive with black plastic bumpers.
Repair with painting of the old part in the service costs about the same. What is more profitable - you can decide on your own to buy a new spare part or repair an old one, depending on the prices in your city.
The front bumper reinforcement on the Chevrolet Cruze is a cross member that absorbs the impact when it collides with an obstacle.
Bumpers and amplifiers appeared on cars due to the fact that initially fragile structures could not withstand collisions with flower beds, posts and fences. Automotive designers developed a U-shaped piece that protected the engine and radiator.
The amplifier is a metal part located under the main plastic bumper. It gives strength to the structure and protects lighting fixtures.
Many car enthusiasts consider this part superfluous, as it adds extra weight. But in conditions of movement on bad roads, it is better to install additional reinforcement. You can buy a finished part or make it yourself from a metal channel.
The fragile front of the car definitely needs reinforcement. Novice drivers understand this after the first accidents that happen to everyone. Cracks on the bumper require serious repairs or complete replacement of the part, which always hits the pocket. And the repair of headlights and radiator requires more serious investments. Therefore, you should not save on an amplifier, it is better to install it once than to constantly change parts on the front of the car.
Car tuning has always been popular, because motorists want to stand out from the city stream. For this, various technical means and design details are used. On the Internet you can find many body kits for front and rear bumpers for all car models.
As a rule, new designer parts are made of fiberglass. It is a lightweight material, it does not put additional stress on the car body. If you have the skills to work with the material, you can make the bumper yourself.
You can make a part completely from scratch or make a body kit that is attached to the standard body. Usually companies offer the second option, since its production is cheaper. You can purchase a front bumper spoiler on a Chevrolet Cruze and attach it to the self-tapping screws.
To make a tuning kit, you will need:
epoxy resin;
fiberglass;
wire;
sandpaper;
kraft paper;
cling film;
polyurethane foam.
First, draw on paper or in a 3D program the future appearance of the car. You must have a good idea of what you want to get, and only then start to work.
Remove the bumper, wash it with shampoo, degrease the surface.
Put the part back on the machine and cover it with cling film.
Fill the part with polyurethane foam. Be careful not to get foam on other parts of the body, otherwise they will be damaged. Reinforce the shape with wire, make a frame and fill it with foam on top. Let the structure dry for 1-3 days, depending on the properties of the foam. Remove the model from the vehicle.
Make templates for a new part out of paper or cardboard. Cut a new shape along them with a sharp knife.
From above, glue the blank with paper using the papier-mâché method.
When the paper is dry, remove it and cover it with glass cloth. Place epoxy between coats. Pay special attention to the folds - the structure should be tight, without cracks.
Treat the last layer with aluminum powder.
Leave the structure to dry for a day.
Sand the surface gradually reducing the grain size. The result should be a smooth detail.
Degrease and paint the surface. Observe all the rules for painting a car body: do not allow dust to enter, distribute the paint evenly. Wear gloves and a respirator. To facilitate the task, you can take paint and varnish in aerosol cans.
Making a bumper yourself is a tricky tuning path. If you want to update the look of the car, you can buy a Chevrolet Cruze front bumper lip and attach it to the self-tapping screws. It will take a few minutes, and the car will already look different.
During the restyling of the Chevrolet Cruze, the front bumper changed its shape and size.Today this model is not sold in Russia, but spare parts for it can be found in online stores, both original and Chinese counterparts. The latter are cheaper, and the quality of the front bumper skirt on the Chevrolet Cruze will not differ from the original.
VIDEO
We show how to correctly and quickly remove the front bumper in a Chevrolet Cruze car. The video is in good quality, shown from the first person, you can see all the tools used, hidden mounts, etc. The actions are performed step by step, doing this work on your machine it will be difficult for you to make mistakes. The only drawback is the voice comments in English, which you will probably not understand, but they do not say anything particularly important, so it is better to watch the visual range.
Be careful with plastic mounts, they are very fragile and break easily, especially if you remove the bumper in our severe Russian frosts.
Video removal of the rear bumper in the Chevrolet Cruze:
Backup video instruction for removing the rear bumper of the Chevrolet Cruze:
VIDEO
As you could appreciate, there is nothing difficult, with a minimal set of tools and straight hands, you can do this work in your garage without any problems.
It will not be difficult to remove the front bumper on a Chevrolet Cruze with your own hands, the main thing is to do it very carefully (why exactly look at the photo). Removing the bumper does not require a lot of tools, but for the convenience of the procedure, you will need to slightly raise the front of the car.
Of the tools you will need:
not large platypuses;
flat screwdriver;
T20 bargaining head and usual 10 mm head with extension and ratchet;
masking tape and a plastic spatula (when removing the bumper from the side).
The front bumper of the Chevrolet Cruze is attached to the body with plastic clips and a few screws (or rather, not a few, but a lot).
How to carefully remove the front bumper Cruz, see the photo report.
After appearing on the market, the Chevrolet Cruze gained immense popularity among domestic motorists. Gradually, new accessories, technical and software solutions appeared for the modernization and high-quality tuning of this model in the sedan, hatchback and station wagon bodies.
The appearance and technical characteristics of the Chevrolet Cruze car allow modernization work in various directions, from a compact family station wagon to a bright sports car with increased power and "pumped-over" technical capabilities.
Tuned car Chevrolet Cruze We recommend that you familiarize yourself
In any case, high-quality basic modifications to the appearance, engine and interior of a car should include such changes as:
tuning the front and rear optics of the Chevrolet Cruze;
installation of a sports body kit (mudguards, deflectors, wheel arch extensions);
improving comfort in the car;
changes in technical units (tuning the suspension, braking system);
mechanical and chip tuning of the power unit.
All of the above changes can be carried out both in specialized technical services and ateliers, and with your own hands, if you have certain knowledge and skills, as well as a set of original accessories that can be purchased in various online stores. Next, we will describe in detail several options for how to make tuning a Chevrolet Cruze sedan with your own hands.
The first step is to remove the standard headlights of the car, to do this, unscrew four screws one by one from the bumper fender liner. After that, unscrew the two self-tapping screws with caps securing the bumper, and carefully remove them from the main mounts. Next, with a 7 key, unscrew the screw that secures the headlight to the body and remove it. Before starting work, be sure to remove the negative terminal from the battery.
It is almost impossible to remove the glass from the headlight using heating in the case of the 2013, 2014 Chevrolet Cruze, as the manufacturer uses a special adhesive sealant that is not subject to heating. Therefore, the only way is to carefully cut it with a mini-grinder with a special disc at the gluing points.Then the incision will need to be carefully soldered.
Tuning headlights Chevrolet Cruze
Then remove the chrome-plated headlight reflector. Remove the spray layer with sandpaper. Using a special waterproof paint, paint the reflector a different color (eg matte black) and leave to dry for a few hours. Next, install the reflector in the glass, solder it and install the optics in the reverse order of removal.
In addition to painting, you can install LEDs of different colors inside the headlight, as well as perform external tinting using a special film. Film is a convenient option if you do not want to remove the headlights from the car.
VIDEO
Installing a new bumper on the Chevrolet Cruze station wagon is a popular revision among the owners of this car. Together with a side body kit and plastic body overlays, the bumper gives the car a sportier look and improves aerodynamic performance while driving. We recommend purchasing ready-made original front and rear bumper kits for Chevrolet Cruze. There are many models on the market that are easy to attach to standard mounts with your own hands.
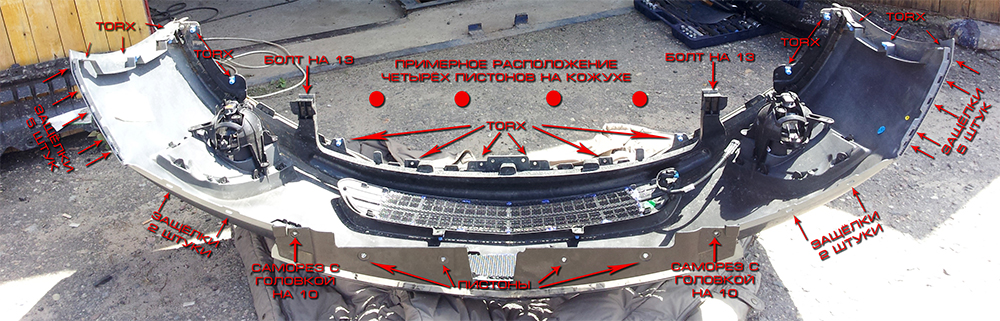
New bumper on the Chevrolet Cruze To remove the original Chevrolet Cruze bumper, it is necessary to unscrew three side screws on the left and right using a 20 (Torx) head. Further, one more self-tapping screw at the bottom of the joint with the wheel arch liners. After that, you should disconnect the four clips of the "crocodile" type and remove the lower boot. If you have foglights installed, then before removing the bumper, you must disconnect the PTF mounts and chips from the temperature sensor.
Next, unscrew the lower amplifier and carefully remove the bumper from the four latches that secure it to the side fenders and headlights. Now remove four more clips in the engine compartment and unscrew the two M6 bolts. Be careful, as after unscrewing the bolts, the bumper can fall down sharply, thereby damaging the paint, if possible, support the bumper when removing from below with your hands. After removing the bumper, it is easy to remove and upgrade the radiator grill, which can be painted or also replaced with a more sporty counterpart.
Among the most interesting solutions for improving the comfort and ergonomics of the interior of the Chevrolet Cruze are the following:
changing the dashboard backlight;
installation of additional equipment (new monitor, additional sensors, buttons);
new central tunnel with a comfortable armrest;
inserts for door cards and door handles;
sports mats and pedal pads;
branded accessories for the dashboard (aluminum, plastic of various colors);
noise insulation, new acoustic and multimedia system;
interior lighting with automatic or remote activation.
New multimedia system All these accessories can be found in specialized stores, every day more and more manufacturers produce original or close to original parts for internal tuning of various Chevrolet models. You can install them with your own hands, for example, replace the standard center console with a modernized one with a comfortable armrest (relevant for sedan and hatchback versions of 2013-2014 in the "Comfort" manual transmission configuration).
To remove the old cladding, you need to unscrew the two bolts in the back, they fix the tunnel to the floor, and then unscrew two more self-tapping screws screwed into the base of the cup holder. After bending the latches, forcefully remove the frame with the cover for the gear lever. Next, bend two panel clips each on the side of the driver and passenger seats, two bolts securing the ashtray to the center console and two panel and tunnel clips. Then disconnect the block with the wires at the rear, lift the parking brake lever up and remove the old lining. Reinstall the new part with armrest in reverse order, most versions are easy to install on the factory mounts.
VIDEO
The standard versions of the engines, which are equipped with the Chevrolet Cruze 2013, 2014 in station wagon, hatchback and sedan, can be called economical and reliable. 1.6 and 1.8 liter engines with a capacity of 114 and 143 horsepower have good dynamics, but such power is not enough for sports tuning. In addition, some car owners complain of frequent dips and slow acceleration, as well as the lack of well-coordinated operation of the automatic transmission on some versions of the station wagon.
These problems can be solved both mechanically and programmatically. In the first case, we are talking about replacing the camshaft, installing a sports filter, changing the operation of the cylinder head, modernizing the exhaust system (installing direct-flow pipes). However, all this is quite expensive and difficult for a simple car enthusiast, therefore, chip tuning of the Chevrolet Cruze is becoming more and more popular, which allows you to achieve optimal results and eliminate the shortcomings of the standard electronics when controlling the engine and gearbox.
Chevrolet Cruze after chip tuning As practice shows, with the help of the new firmware, it is possible to achieve not only an increase in power, but also an improvement in the efficiency and dynamic characteristics of the unit. Tests on professional stands showed that, on average, for the 2013 Cruze, 2014 model with a standard 1.6 petrol engine, with a torque of 150 Nm, the power increase after a quality ECU reprogramming is at the level of 8-9 percent. For diesel engines with a turbine, these figures exceed 12 percent of the manufacturer's declared capacity.
The standard chip tuning procedure for the Chevrolet Cruze model includes software adjustment of the automatic transmission algorithms, adjusting the fuel supply with a change in the automatic octane number detection system (available on Chevrolet Cruze models after 2013). In addition, the new program optimizes the operation of electronic sensors, in particular the USR and the E-Gas electronic gas pedal. Sometimes the particulate filter system is also turned off, and some tuners completely remove this element from the engine system.
The cost of chip tuning depends on the specific model, but usually a complete flashing of the system does not exceed 25,000 rubles. You can do this tuning yourself, but you will need hardware, software, removal of the ECU controller. In any case, it is definitely worth doing chip tuning on Cruz, since the dynamics and accuracy of the automatic transmission after that increase noticeably, which cannot but please the car owner!
With all the progressive development of the global automotive industry, the bumper remains an irreplaceable part of cars. The role does not change - to protect the car body from mechanical damage. And there are plenty of reasons for damage on the roads, and the material from which these protective beams are made is very fragile. Therefore, you need to be ready to independently remove the front bumper of the Chevrolet Cruze or the rear one.
The first and important circumstance requires you to remember constantly - not to rush, to think about your actions. This is because the plastic bumper of the Chevrolet Cruze can be easily damaged during dismantling. Careless movements during bumper removal and installation will damage the body paint. This means that you need to have a clear idea of the sequence of dismantling work, how to remove the part. To work, you need the right tools:
a flat screwdriver is needed to remove the central rod of the piston;
the Torx head unscrews the screws that secure the wheel arch liners;
key for 10;
Phillips screwdriver;
clip remover (klipsoder);
flashlight.
It is recommended to use the instructions of a personal car, which indicate the nuances of installation work.
When the tool is prepared, the replacement process itself begins.
First, the hood rises, the negative terminal is disconnected, through which the battery is connected to the car body.
Two screws are unscrewed, called self-tapping screws, located on the right and left sides of the radiator grill.
The caps (there are 4 of them) and the plug are removed from the top panel with a thin screwdriver.
The clip is removed with a flat screwdriver, platypuses. First, the part is pushed off with a flat screwdriver, then the platypuses are pulled up, and the clips are removed with a screwdriver.
The plastic protection is removed using a Torx head, with which the screws on the left and right are unscrewed.
Using a screwdriver, the caps holding the lower skirt of the spare part are removed (work is carried out under the bottom of the machine).
The caps fixing the lining are removed.
It is more difficult to remove the plastic fixings, which are neatly unfastened from the edges of the car body.
The connectors of temperature sensors, shock sensors and power supply of Chevrolet Сruze foglights are disconnected.
VIDEO
Now the bumper is held only by the latches located on the fenders and under the headlights. The parts are removed with neat movements using a plastic spatula or a wide screwdriver wrapped in masking tape.
The process of removing the front bumper is coming to an end. Within the front fenders there are 3 hooks on the left and right sides, in the bumper area there are 3 longitudinal holes. Removing the hook, carefully immerse it in the hole, then the front body kit is unhooked.
Installed linings are retracted to the side.
The front bumper is now pulled towards you and carefully removed.
Since the Chevrolet Cruze car is equipped with plastic protective parts, it is possible to repair them yourself.
The new part is mounted in the reverse order of removal.
Dismantling is carried out with the utmost care so as not to damage the body paint.
The rear bumper is removed in the same way, using the same tools as the front one.
The luggage compartment opens.
On the right side of the wall there is a plastic cap, which can be removed in a known manner.
Then the edge of the luggage trim is folded back, the taillight is disconnected and removed. Similarly, the headlight gets on the other side.
Phillips screwdrivers get the fasteners on the left and right, the wheel arch liners are detached. Next, you get the rivets that hold the lower part of the rear bumper.
Care should be taken to detach plastic clips as they break easily. With the help of plastic screwdrivers wrapped with tape, the actions are the same as before - all screws are disconnected
After removing all the clips on the Chevrolet Cruze car, the bumper can be easily removed.
Assembly and installation of the bumper in place is carried out in the reverse order. The part is adjusted in a vertical position. Horizontal adjustment is carried out by adding or removing shims.
The process of removing both buffers from a Chevrolet Cruze car is not complicated, but requires utmost attention and accuracy. You can't rush, in the hustle and bustle you just ruin the painting, break the spare parts. Dismantling is recommended to be carried out by two people in order to provide support at the right moments, thereby preventing unwanted movements that entail damage.
With careful attention to dismantling, the reverse buffering process shouldn't be too much of a hassle.
Preparing to repair the bumper Chevrolet Cruze (Part 1)
Chevrolet Cruze bumper repair result (Part 3)
Spontaneous shooting, I post it as it is, without editing. We repair the bumper with super glue and soda 1. Degregate.
Chevrolet Cruze Bumper Repair (Part 2)
Exposing gaps on the bumper, fender of the Chevrolet Cruze, removing the bumper, bumper mountings for the Chevrolet Cruze.
An example of how you can remove the front bumper.
do it yourself Chevrolet Cruze rear bumper repair.
removing and installing front bumper on chevrolet cruze xenon bulbs - cheap, free shipping
Video lesson on how to correctly and efficiently repair bumper mounts, which come off in many modern times.
Hi, I'm Nika. I present to your attention the Chevrolet Cruze. In the video I will tell you how to repair a car for a little.
Hello Friends, especially for the Chevrolet Cruze club, I made a small review on the topic of installation, tuning.
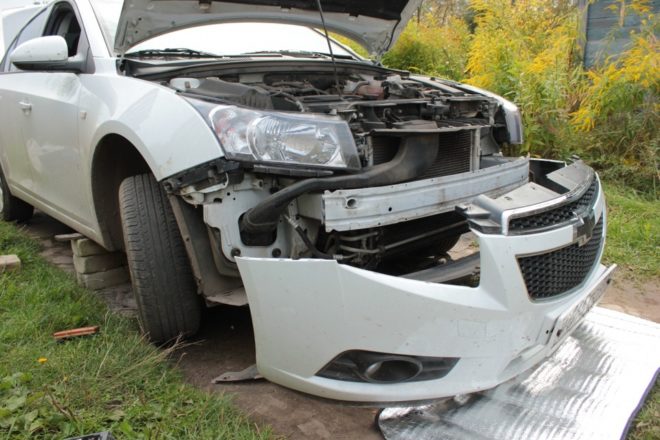
The role of the bumper in the entire history of the development of the automotive industry has not changed - it takes on the mechanical load when the car collides with an obstacle, protecting the body and mechanisms from serious damage. This part of the Chevrolet Cruze, like most modern passenger cars, is made of plastic, that is, it is far from the most durable material. If, as a result of even a minor accident, damage to the front or rear of the body was not without, then, most likely, the bumper will suffer the most. In this situation, this finishing element will have to be repaired or completely changed. Therefore, it will be useful for you, as a car owner, to know how to remove the front or rear bumper of a Chevrolet Cruze, if you do not intend to pay specialists for this work.
Before dismantling, you must take into account that this plastic body element is fixed with special clips, removing which you risk damaging them. Due to the fragility of the details, hasty and rash actions are highly undesirable here. Take your time, follow the recommendations on how to remove the bumper on a Chevrolet Cruze, and dismantling work will take place without any unpleasant surprises.
For dismantling work, a minimum number of tools are required, which are at hand for every driver. In order to get to the plastic clips on which the bumper is attached, several trim elements must be disconnected. If, until this moment, you did not know how to remove the front bumper on a Chevrolet Cruze, do not be upset - just follow the procedure described below:
First, remove the caps securing the plastic trim on the front of the engine compartment. For this, a flat screwdriver is used, with which the central rod of the piston is removed. After that, the fastener is easily removed from the hole.
Next, unscrew the screws that secure the wheel arch liners using the Torx head.
After that, you need to move under the lower part of the car in order to gain access to the caps that hold the lower skirt of the part. Extraction takes place with the same screwdriver.
Now you need to remove the plastic pads located at the bottom and along the edges of the bumper. They are fixed on the same caps.
The turn has come to the most difficult thing - removing the plastic fixes. Starting at the edges, carefully unfasten these latches where they dock with the car body.
At this, the dismantling can be considered complete, but before removing the front bumper and proceeding with its repair or replacement, do not forget to disconnect the power connectors for the fog lights (if installed), shock and temperature sensors.
An earlier version of the Chevrolet Cruze car was produced in the sedan body, and later this model appeared on the market in the form of a hatchback. The change in appearance entailed a number of design changes, including the expanded functionality of the bumper. But as for the method of fixing it, here the manufacturer chose not to change anything. Therefore, it would hardly be advisable to describe in detail the dismantling process for each option.
So, let's look at how to remove the rear bumper of a Chevrolet Cruze hatchback:
VIDEO
do it yourself Chevrolet Cruze rear bumper repair
I love to crackle on this channel - Do-it-yourself rear bumper repair. Soldering and painting the bumper at home was done by me without any special tools, which was what worked). I parked at the dacha and did not notice a stump in the grass, as a result, a crunch and 7 hours of continuous work))). I did everything for the first time, so the result pleased me, and I saved an extra $ 50 on repairs, or even more. I did not polish the bumper, since the paste and the polishing wheel cost money, and I don’t want to spend too much money on an already old car, so the result suits me).I ask all skeptics not to swear, I understand that there are a lot of mistakes and shortcomings, I do not pretend to be a bumper repair master, I am just an amateur and only) Skin: 240; 400; 600; 1000; 2000. Putty: finishing; I soldered it with an ordinary soldering iron, only I made the tip myself from a nail, so that it would be more convenient to smooth it. Primer: epoxy. The paint was pumped into the balloon on the selection. I bought the varnish at the car market.
How to remove the front bumper cover on the Chevrolet Cruze. This should work on 2012 - 2014 models. I'm disappointed at how flimsy the bumper is on the Cruze, especially the tabs that clip into the fender. Very easy to break those unless you use a couple of tools to carefully disengage the them.