In detail: do-it-yourself car alarm unit repair from a real master for the site my.housecope.com.
The car alarm system of the famous and popular model pantera qx-55 is a small plastic box with a pack of cigarettes. All peripherals are connected to it - locks, sensors, turn signals, a signal, and a small vibration sensor box. It is made according to a rather interesting principle with a ZP-shka as a sensitive element.
All this economy is interconnected by an unthinkable number of wires, among which it is very easy to get confused when connecting. What actually happened. The owner tried on his own to rearrange the car alarm to another car, the sad result of which we are seeing.
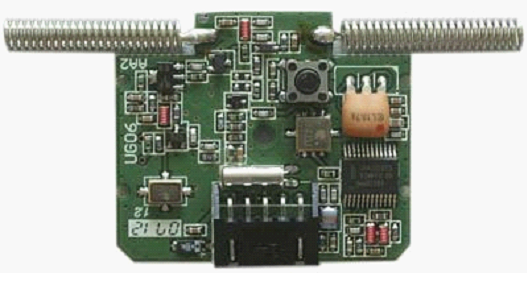
We open the box and see a small board with several relays and a small scarf of a super-regenerative receiver on the side. And then the savings!
You can feel the unforgettable smell of burnt electronics. And here's the reason - a charred powerful transistor. Of course, we will not call him :) Everything around him is burnt, so all the surrounding details are worth checking.
One of the diodes, IN4005, was broken and rang shortly. The rest of the elements seem to have survived. We solder the transistor and not finding a similar one at hand, we use everything that is available. Judging by the form of the transistor and the place of its installation - the collector switches two relays, it should be about 50V 10A. The structure is pnp, since the emitter goes through the relay to the plus of the power supply.
Having restored the burned-out tracks, we temporarily solder the existing analogue - KT818. It is advisable to solder in this case not immediately to the signaling board, but through the wiring. Double-sided mounting is not so easy to solder, and even more so, in case of failure, to unsolder.
| Video (click to play). |
We connect the power - the LED blinked, we hook on the necessary contacts a howler, and try to press the “close” button on the key fob. The signal beep once. By pressing the "open" button, we force the alarm to beep twice and click the turn signal control relay. But the sound is not very good. Instead of a short, crisp peak-to-peak, there is a slightly blurry poo-oo-oo. We replace KT818 with some powerful imported pnp. Now the signaling is clear.
Everything seems to work. To finally make sure of this, we give a load of a 12V bulb to the relay outputs and by clicking on the vibration sensor, we make the signal roar, and the lamp blinks. Repair of the pantera qx-55 alarm, made successfully.
It would seem that what is easier - to take and replace the battery in the alarm key fob. The owner himself will be able to perform this action without errors. Only now, after the replacement, the connection between the key fobs and the signaling is somehow lost. In fact, there is a loss of synchronization, and the consequences of this "loss" can be corrected according to the text of the manual supplied by the manufacturer. Here it is considered what actions should not be allowed when repairing car alarms, as well as immobilizers and key fobs.
A key fob with feedback, or the so-called pager, contains several elements in its design. The display is connected to the printed circuit board via a ribbon cable. But it is difficult to solder this part (loop) in practice. This is precisely why the replacement operation has an increased cost.
Nevertheless, you can do this replacement yourself. What is proven in the video.
Having disassembled and opened the plastic case, you will notice an important detail covered with a metal shell. The cylinder is a watch quartz, and you need something similar.
Let's say the pager display shows that there is no connection. In this case, the repair of the alarm key fob is done as follows:
- Solder the junction with the antenna, perform assembly, check;
- If the defect remains, change the main quartz.
In general, the repair of car alarm key fobs does not involve searching for defects using special equipment. More often they are guided by logic, changing "suspicious" nodes and details. They also strive to eliminate mechanical defects: they replace button modules, restore contacts. The main thing is to remove all power supply elements before soldering. And wait 20 seconds.
Do-it-yourself keychain repair is a painstaking and difficult job. Having removed any battery, it will be necessary to restore the synchronization. But the equipment working with the dialog code does not lose synchronization.
Any modern car has a module that automatically blocks the engine. Such modules are called "immobilizers", and their malfunctions are characterized as follows:
- The starter cannot be started even with your own (standard) keys;
- Commands from the remote control buttons (key) are not perceived in any way.
It happens that the malfunction lies in the electronics of the console. But hardly anyone will undertake to repair it.
Here, it is considered how to repair the immobilizer, more precisely, the antenna and the main unit. The unit itself, at least, can be disassembled by hand, without using special equipment.
The standard equipment of the MAZDA GF-626 car is an immobilizer, in which the main communication frequency is set by a ceramic resonator. The specified detail looks like this.
Over time, the parameters of the parts change. Therefore, the repair of the immobilizer will consist in the following: we solder the "bad" resonator, install a new quartz in its place. The frequency of the quartz resonator can be selected experimentally (here the numbers 2.4576 are indicated on the case).
Let us make a digression regarding the choice of resonators. Having bought a replacement quartz with the corresponding numbers, a good result can not always be obtained. The reason is the following:
- Low thermal stability;
- Frequency jitter.
In general, a new part is selected as one of several. What you need to know when repairing an immobilizer, key fob and even an alarm. Who said it would be easy?
The immobilizer reads the data from the key, establishing communication with the latter by radio. For standard car systems, the following is characteristic: an inductive antenna is wound around the ignition lock. For example, you cannot start the starter even with your own keys, stitched in the memory of the main unit. Then the immobilizer repair begins with checking the antenna, completely disconnecting it from the connector.
The external view of the antenna module is shown in the figure above. It may turn out that the resistance between the black and white wire is equal to infinity (open circuit).
No one will be able to wind a similar coil with their hands. But you can do the following:
- A soldering iron without solder is installed between the turns, and each turn goes through this way until the ohmmeter shows 5-10 ohms;
- The gap is eliminated, even with the appearance of short-circuited turns.
When carrying out alarm repairs, you will not encounter the problem discussed here. The antennas are located there in a separate module, and their appearance inspires respect.
Consider the diagram of the main module of a homemade alarm.
The value of all resistors sometimes has to be selected so that the operation is stable. This must be remembered when repairing an immobilizer or signaling that does not have electromagnetic relays in its circuit.
Alarm repair is a difficult task, and special training is needed to solve it. But the block design provides for the replacement of blocks. This property should not be neglected in practice. The choice between the speed of repair and the cost due to the price of a block or module will be made by the owner.
There are many publications on how to fix a car's electrical equipment with your own hands. These publications provide advice: you need to disconnect the negative terminal of the battery. Probably, no one should neglect this recommendation. We wish you success.
All alarm faults can be conditionally divided into the following types:
- nutritional problems;
- wiring problems;
- software failure;
- false positives;
- malfunction in the key fob.
Let's take a closer look at each of the malfunctions in car alarms.
You need to start with the key fob. Inspect it for mechanical damage and traces of water. If the key fob gets into water, condensation will form on the inside of the display lid. The operation of such a device (if it turns on) will be unstable. If the key fob did not fall and fell into the water, but the display is turned off and nothing happens when you press the buttons, then the discharged battery is to blame.
If the key fob is completely functional, but nothing happens when you press its buttons, then there may be two reasons for this - strong external interference or problems with the car and the alarm. Try to bring the key fob to the part of the car where the car alarm antenna is installed and press the button. If nothing happens, then the malfunctions need to be looked for in the car itself or in the alarm equipment installed on it.
Next, power and wiring diagnostics are performed. Check the battery charge and inspect the terminals for oxidation.The full charge of the battery can be easily determined by the operation of the on-board electronics. If everything is in order, then the next step is to check the wiring. To do this, you need a special tester with which the contacts are called. Inspect the wires for mechanical damage. Special attention should be paid to fuses. Usually they are in a box, which is located on the wire coming from the positive terminal of the battery.
If the cause has not yet been found, then a defect in the control unit or a failure of its software is to blame. It will not be possible to eliminate such a defect with your own hands, but with a software failure, everything is much easier - it is enough to carry out simple manipulations, which we will talk about below.
Most often, when the key fob falls from its board, quartz comes off. To eliminate this defect, it is enough to disassemble the keychain and solder the quartz to its original place.
To fix cracks in the display, you need to completely replace it. Remove the old display, strip the contacts and solder the cables of the new display. The process itself is not very complex and requires initial soldering skills. The difficulty lies in finding a new display. You can hardly find it in stores, so you will have to order from China via the Internet. Defects caused by water ingress cannot be eliminated by yourself.
Power and wiring problems are solved by stripping the battery contacts and terminals, and replacing fuses and damaged wires. To avoid unnecessary work, use the tester to find the exact cause of the problem and then fix it.
To resolve software crashes, you need to reboot the system. To do this, de-energize it by disconnecting one of the terminals from the battery for a few minutes. If this does not help, then set the factory settings of the car alarm. Step-by-step instructions for resetting the settings can be found in the instructions for your alarm model.
Most of the problems associated with the operation of car alarms can be eliminated by hand. It is better to entrust the repair of the control unit and other complex electronics to specialists. If, after following the above recommendations, the breakdown is not eliminated, then you need to contact a car service. To continue driving with a broken alarm, you need to master the process of turning it off with a secret button, which you can read about in the instructions for the car alarm.
Modern anti-theft Starline systems consist of many electronic devices, the breakdown of which will lead to incorrect operation of the signaling as a whole. Repair of Starline car alarms can be done by hand.
The main symptoms of a problem are:
- lack of signaling response to commands sent from the remote control;
- the alarm siren is triggered for no reason;
- after arming the alarm does not close one or several doors.
Problems of this kind can be associated both with the operation of the communicator and with the functionality of the additionally installed equipment. The presence of voltage drops in the electrical network can ultimately lead to breakdown of the main control module. In the absence of power, the anti-theft complex will be de-energized, as the battery will be discharged.
Signs of such a problem include non-response of the signaling to the commands sent from the remote control. This malfunction may be due to the discharge of the battery installed in the device, this will turn off the display and indicator light. If the battery is discharged, it will also reduce the range of the communicator. It is necessary to diagnose the battery using a multimeter, and also check the status of the power supply in the key fob.
Prolonged use of the anti-theft complex, as well as temperature changes and moisture, lead to wear and the formation of oxidation on the contact elements of electrical circuits. Because of this, the voltage will not be able to pass through the power lines, the same happens when the circuits are broken. The reason is often associated with the connection of additional equipment and electrical appliances, as well as an attempt to steal a car. Power problems are often caused by broken fuses.
Symptoms of a malfunction include a lack of response to commands sent from the remote control, although the communicator itself will be in working order. Diagnostics of the wiring is carried out with a multimeter, it is necessary to check each electrical circuit connected to the microprocessor unit.
Firmware malfunctions will lead to incorrect functioning of the complex. Car alarm can trigger an alarm mode for no reason, and also not respond to sending commands from the communicator. Unreasonable blocking of the power unit is possible. It will not be possible to detect such a problem on your own.
In reviews, motorists often complain about such a problem as the unreasonable operation of the siren. In practice, malfunctions of such a plan are usually caused by mistakes that the consumer made during the installation and adjustment of the signaling operating parameters. The user could incorrectly adjust the sensitivity of the shock sensor, as a result of which the alarm reacts to passing cars and animals.
If the sensitivity is too high, the siren can be triggered in response to loud sounds and wind. Incorrect operation of the shock sensor is due to its incorrect installation, for example, the user has used a plastic or rubber gasket between the device and the surface of the body. In accordance with the instructions for a specific model, the sensor's sensitivity is diagnosed.
If the device fails and malfunctions or malfunctions, then the microprocessor device will not be able to receive signals from it. The problem is related to wear or mechanical or software problems. The device may have been dropped or water might have been spilled on it.
In winter frost, the electrolytes in the battery move more slowly, as a result of which power problems occur in the on-board network. This is especially true for the northern regions, where the air temperature can be lower than the manufacturer's allowable temperature.
Paha Blue showed a "glitch" in the anti-theft system Starline.
If the signaling with feedback A91, A61 or another model does not work in the car, then you can try to diagnose the problem yourself.
If a problem is found, the repair is carried out as follows:
Alexander Shestopalov spoke about diagnostics of the car battery and generator set using a tester.
It is not recommended to repair the microprocessor device yourself; it is better to trust the professionals for a quality result.
Faults in the operation of the key fob can be corrected by yourself.
Algorithm for cleaning the Starline signaling console:
If the screen or case breaks, it will be difficult to find new parts. You can buy a new pager on the market or in stores, but the manufacturer does not supply the accessories for sale. Therefore, it is advisable to look for a screen and a case on the secondary market or on the Internet.
Before carrying out repairs, do the following:
- The battery is dismantled from the control fob; to remove the battery, the rear cover is dismantled.
- A screwdriver with a small blade unscrews the screws that secure the two parts of the case. The back cover is removed, the buttons are removed from the communicator.
- If the display is broken, then this is not such a serious problem. It is much worse if fragments of it damaged the microcircuit. Remove the board by detaching the latches, the circuit is pulled out of the case with the transceiver module. To dismantle the display from the microcircuit, you must disconnect the LED backlight lamps. Carefully, using a screwdriver or a clerical knife, the graphite cable is disconnected from the board contacts. Flex cable, be careful when removing.
- Cleaning is performed with the contact of the microcircuit. Then take a new screen and attach it to the body of the device, make sure its dimensions are correct.
Roman Marketov demonstrated the screen replacement procedure on the Starline communicator.
Algorithm of actions when repairing a communicator:
The Auto Launch channel demonstrated the process of communicator repair and replacement of the screen with a loop.
Prices for repairing Starline car alarms differ depending on the city of residence and the model of the anti-theft complex.
ATTENTION! Found a completely simple way to reduce fuel consumption! Don't believe me? An auto mechanic with 15 years of experience also did not believe until he tried it. And now he saves 35,000 rubles a year on gasoline! Read more"
Modern signaling systems are divided into several types. Some are connected by standard
So far, there are few fans of wireless signaling systems, but the standard model is on every car. It is on her example that possible breakdowns will be determined. A standard alarm that is connected to the car with a wire can break for the following reasons:
- incorrect operation of the vehicle control system;
- mechanical damage to the central unit;
- breakage of signaling wires;
- work at temperature conditions that are lower or higher than recommended;
- software failure due to attempts by unauthorized persons to gain access to the security system;
- lack of normal voltage, poor performance of the car battery;
- inaccuracies made during system connection;
- incorrect operation of control key fobs.
To repair the car alarm with his own hands, the driver must turn it off completely, find the cause of the breakdown, and eliminate it with high quality. To disable the security system, you should use one of these methods:
- special computer support;
- killers or linemen;
- jack emergency shutdown button;
- introduction of a personal code value.
After completely disabling the security system and its siren, the driver needs to start looking for the problem. To do this, he needs to go through a couple of simple steps in the following sequence:
- inspection of the standard connection diagram - it will tell you exactly where to look for the problem if the person does not
set the alarm yourself;
- inspection of the central unit of the car, checking the correct connection of the wires and their integrity;
- checking the LED indicator, latching relay, limit switches, sensors and siren;
- checking the quality and power of the current supply, the operability of the key fob.
After finding the source of the problem, the driver needs to deal with it. To do this, he should prepare the appropriate tools, if necessary, dismantle the alarm. If the cause of the breakdown of the car alarm could not be found, the car owner should contact the service center for help.
The car dealership will carry out a full diagnosis in a short time, they will be able to determine the exact location of the problem, and solve it at a professional level. If the driver is not sure that he will be able to make the repairs correctly, it is better for him not to do it with his own hands, because it will only get worse. Standard problems of signaling systems are resolved quite quickly, without significant material damage to the car owners. If professional assistance cannot be provided, the system is completely out of order, the driver will need to replace it, which is also done in specialized repair centers.


