In detail: do-it-yourself grinder repair Bearing replacement from a real master for the site my.housecope.com.
site of home craftsmen, professional advice and useful information for everyone who loves tinkering and knows how to work with their own hands
A detailed photo report on replacing the bearings of an angle grinder armature (grinders) 1400 W 220V.
The angle grinder got its nickname “Bulgarian”Back in the days of the Soviet Union. Because, at that time, this instrument was manufactured and supplied from Bulgaria. Bulgarian in the arsenal of home tools, the most versatile and multifunctional assistant. Bulgarian in operation, it is exposed to strong and uneven loads and long periods of operation, therefore, malfunctions occur more often than with other power tools.
In my Bulgarian when turned on, an extraneous sound and increased vibration appeared. It is more expensive to operate a tool with such characteristics further.
Grinder repair start by unscrewing the four screws on the gearbox cover.
Prying off with a screwdriver, remove the gearbox cover assembly with a secondary shaft and gear. The bearing of the output shaft turned out to be working, without backlash and jamming.
But the front armature bearing - completely crumbled. The bearing balls were in the gear grease and the small gear retaining ring was worn on one side. To replace the front bearing, you must first unscrew the armature contact brush caps and remove the brushes.
Then we unscrew the four screws securing the grinder gearbox to the stator and remove the armature together with the gearbox housing.
To remove and install the armature gear retaining ring, you need to make a simple tool. For this I used old scissors. The ends of the scissors on emery were ground off, as in the photo.
| Video (click to play). |
This is the view I got from my retaining ring. For the convenience of mounting the retaining ring when assembling the reducer, the ends of the scissors were heated red-hot with a gas burner and bent at right angles to the plane of the scissors. Then they were again heated and cooled in engine oil.
After dismantling the armature gear, I removed the armature from the gearbox housing. This is the view of the front armature bearing.
We buy new bearings and a retaining ring in the store, continue grinder repair.
The outer cage of the armature bearing is removed from the gearbox housing by lightly tapping on a metal screwdriver inserted into the groove of the cage from the inside of the gearbox housing. It is important not to skew the cage when pressing out.
But the inner bearing race was tightly seated on the armature shaft.
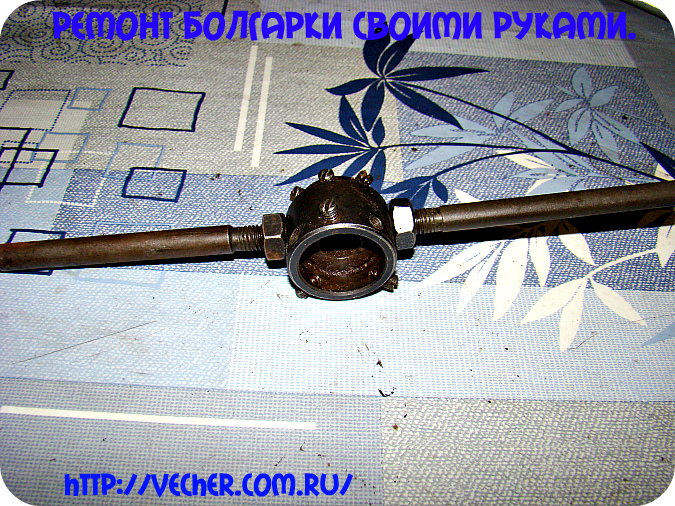
To dismantle it, I used a standard tapping tool holder.
Studs were unscrewed from it for rotation when threading. And the rod holder itself is installed on the bearing race, so that the screws for fixing the rod fit into the groove of the bearing race. Then tighten the screws evenly on each side and thus securely attach the holder to the holder. Now we grab the puller with the paws of the tool holder and remove the holder from the shaft.
This is the view of the front bearing of my armature grinders.
New bearings must be filled with grease. To do this, you need a sharp awl, Litol 24 grease and a mandrel for mounting bearing caps. To lubricate a closed bearing, you need to remove the cover by prying it with an awl, as in the photo.
Now we fill the bearing with grease and put the cover in place.
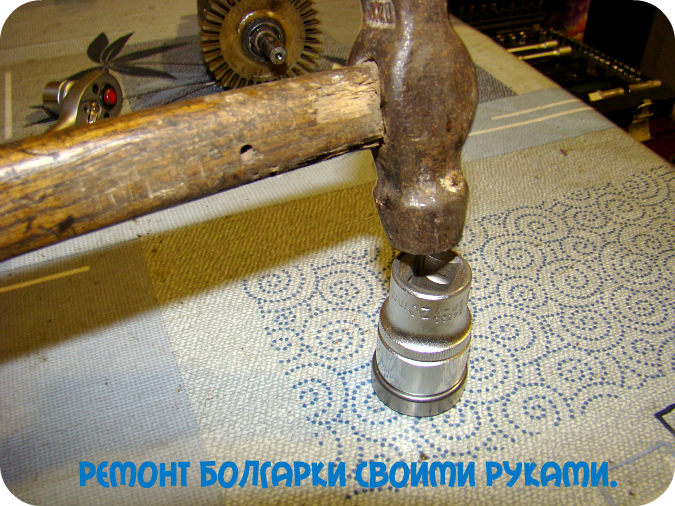
To put the cover in the bearing without damage, you need to select a mandrel in diameter slightly larger than the outer diameter of the bearing cover. I used a socket wrench head.
The bearings are lubricated.Press the front bearing into the gearbox housing using the outer race of the old bearing and fix it with a flange.
At the anchor, the anchor collector is cleaned with P1000 sandpaper. With a stationery knife, carefully, without much pressure, we clean the paths between the collector lamellas. And after these operations, we carefully wipe the collector with a cotton napkin moistened with white spirit or other solvent.
Next, you need to press the armature shaft into the inner race of the front bearing. To do this, place the gearbox housing on a wooden surface with the bearing facing up. We insert the armature shaft into the bearing cage from above and lightly tap it through the mandrel, along the rear armature bearing we put the armature in place.
We put a small gear on the armature shaft. If, after installing the gear, the groove for the circlip extends beyond the end of the gear, then the installation is correct. We put the retaining ring in place.
If the groove does not come out due to the end of the gear or is halfway out, the shaft must still be seated in the housing.
After these operations, remove the old rear bearing from the armature shaft and install a new one. We place the armature with the gearbox in the stator and tighten the four screws securing the gearbox. We check the shaft for rotation. The shaft should rotate easily without jamming in the bearings. We put in place the contact brushes and screw their covers. Now we put a special lubricant for angle grinders in the gearbox grinders and put in place the cover of the gearbox with the secondary shaft.
Tighten the four fastening screws and check grinderby plugging into the network.
Bulgarian should quickly gain momentum and work without extraneous overtones. On this grinder repair can be considered complete. Good luck with your work!
Angle grinders during the Soviet era were made in Bulgaria. Therefore, the angle grinder began to be called a grinder. Currently, there are many companies for the production of angle grinders of various models. But the basic elements are the same. Having familiarized yourself with the device, probable breakdowns and diagnostics of the tool, you can repair the grinder of any modification with your own hands.
The grinder is designed for grinding and cutting various materials.
The main elements of the grinder
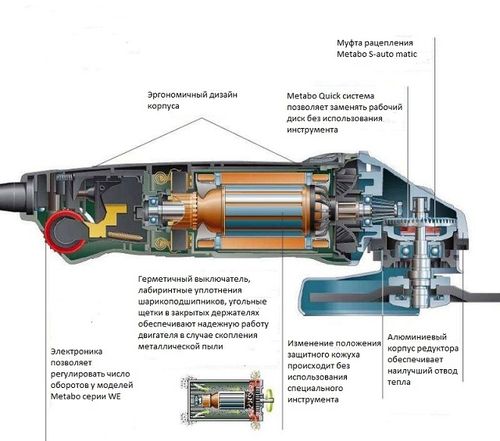
The grinder consists of the following elements:
- The flat aluminum alloy gear housing provides better heat dissipation.
- Carbon brushes.
- Fastening the handle.
- Electronic soft start system. Prevents start-up jerk and reduces starting loads on the engine.
- Quick-detachable protective cover.
- Ball bearings.
- Electric motor.
- Grinder switch.
A large selection of bearing products is offered by the Termopolis company -
Main breakdowns and reasons:
For troubleshooting, the grinder must be disassembled.
-
Remove the nut that holds the scraper disc.
Unscrew the bolts securing the protective cover.
Unscrew the bolts of the grinder body and those with which the body is attached to the gearbox.
Remove the upper part of the back case. Unscrew the bolts securing the cord. Remove the wires and the button from their grooves. In some models, for example, in DWT, the rear case is not disassembled into parts, but removed entirely.
Unscrew the gearbox bolts located around the casing mount.
To disconnect the armature from the aluminum housing, unscrew the nut located in the gearbox housing.
Assemble the tool in reverse order.
During operation, the disc can be tightened so tightly with the nut that it begins to crumble. It is impossible to unscrew the nut with a wrench. And you don't need to do this, since you can break the grinder. First, break the disc down to the nut. Then find a metal plate slightly thinner than the scratch disk. With its help, grind off the remnants of the disc under the nut. It can be easily unscrewed with a key or by hand. To avoid bringing the tool to this problem, place a washer under the nut.
For some grinders, for example, Bosh, the casing is not bolted, but snapped into place. To remove it, you need to turn the cutout of the casing perpendicular to the grinder. To dress, turn until it clicks.
The stator is checked with a multimeter.
- Turn-to-turn closure. Set the resistance mode to 200 ohms. Connect the test leads of the device to the ends of one winding. One means open, and zero means short circuit between turns. If it shows a resistance of more than 1.5 ohms, then check the second winding. Both windings should have approximately the same resistance.
- Breakdown to ground or short circuit of the winding with the metal stator housing. Set the multimeter to the maximum resistance mode. Connect one probe to the end of the winding, the other probe to the metal stator housing. The unit indicates the absence of breakdown.
First, visually inspect the manifold and winding. There may be visible damage: black marks, bent windings, raised, worn or burnt collector plates. After inspection, proceed with the tester check.
-
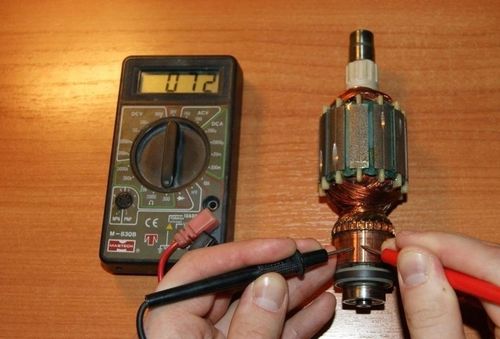
Put a resistance of 200 ohms. Connect the test leads to the two adjacent manifold plates. If the resistance is the same between all adjacent plates, then the winding is in good order. If the resistance is less than 1 ohm and very close to zero, there is a short circuit between the turns. If the resistance is two or more times higher than average, then there is a break in the winding turns.
The determination of the breakdown to ground is done in the absence of a winding break. Set the maximum resistance on the scale of the device. Depending on the tester, it can be from 2 MΩ to 200 MΩ. Connect one probe to the shaft, and the other to each plate in turn. In the absence of faults, the resistance should be zero. Do the same with the rotor. Connect one probe to the iron body of the rotor, and move the other along the plates.
Put the tester in the dialing mode.
Insert one probe into the outlet of the button and the other into the opposite inlet.
Click the button. A sound signal indicates the health of this part of the button.
Do the same with the other input and output buttons.
If you actively use a grinder, then you are a good craftsman. It will not be difficult for you to understand the structure of the tool and fix it with your own hands. First, find the problem and determine which parts to check. Repair the grinder carefully, without haste, so that a minor breakdown does not turn into a major one.
Sometimes it is better to carry out tool prophylaxis on time than to get expensive repairs.
After reviewing many videos on the topic of removing the anchor from the grinder, I came to the conclusion that no one knows how to remove it without breaking anything. I will tell and show you how to do this.
One of the ways of making a small puller from scrap materials is considered More information at https://my.housecope.com/wp-content/uploads/ext/2532 Information for those who want to master electronics repair, learn how to use a multimeter, figure out what is current, voltage, power, frequency.Get short and capacious information about resistance, capacitor, diode, transistor, microcircuit, circuit diagram. The channel covers topics such as automotive electronics, alternative energy, independent energy, TV repair, do-it-yourself electronics repair. - Playlists: - Subscribe:
# The tool bought a new one for free, after 5 minutes, a lot of sparking. Test windings are fine, 2 lamellas burned out and fell out. Video replacement of lamellas, grinding, .. in the garage, # groove without a lathe. After the repair, it worked for 1-2 minutes with a minimum load, which helped to finish the work, then I bought a new anchor for the reserve. Dear subscribers, I will be very grateful if you pay attention and support the channel of my novice friend, with a huge margin of time, you can go to the channel the link is one of the few videos, my friend will give you a lot of attention. Thanks for your understanding.
One of the ways to remove the drive gear of the gearbox of an angle grinder (grinder). The main steps are shown. LBM “Zubr” 2100W (d = 230mm) is shown as an example. The internal structure of the gearbox of other models may be radically different from this example.
The easiest and easiest way to demagnetize a pipe! With a simple electric welding holder.
Sometimes it is better to carry out tool prophylaxis on time than to get expensive repairs.
After reviewing many videos on the topic of removing the anchor from the grinder, I came to the conclusion that no one knows how to remove it without breaking anything. I will tell and show you how to do this.
One of the ways of making a small puller from scrap materials is considered More information at https://my.housecope.com/wp-content/uploads/ext/2532 Information for those who want to master electronics repair, learn how to use a multimeter, figure out what is current, voltage, power, frequency. Get short and capacious information about resistance, capacitor, diode, transistor, microcircuit, circuit diagram. The channel covers topics such as automotive electronics, alternative energy, independent energy, TV repair, do-it-yourself electronics repair. - Playlists: - Subscribe:
# The tool bought a new one for free, after 5 minutes, a lot of sparking. Test windings are fine, 2 lamellas burned out and fell out. Video replacement of lamellas, grinding, .. in the garage, # groove without a lathe. After the repair, it worked for 1-2 minutes with a minimum load, which helped to finish the work, then I bought a new anchor for the reserve. Dear subscribers, I will be very grateful if you pay attention and support the channel of my novice friend, with a huge margin of time, you can go to the channel the link is one of the few videos, my friend will give you a lot of attention. Thanks for your understanding.
One of the ways to remove the drive gear of the gearbox of an angle grinder (grinder). The main steps are shown. LBM “Zubr” 2100W (d = 230mm) is shown as an example. The internal structure of the gearbox of other models may be radically different from this example.
The easiest and easiest way to demagnetize a pipe! With a simple electric welding holder.
Sometimes it is better to carry out tool prophylaxis on time than to get expensive repairs.
After reviewing many videos on the topic of removing the anchor from the grinder, I came to the conclusion that no one knows how to remove it without breaking anything. I will tell and show you how to do this.
One of the ways of making a small puller from scrap materials is considered More information at https://my.housecope.com/wp-content/uploads/ext/2532 Information for those who want to master electronics repair, learn how to use a multimeter, figure out what is current, voltage, power, frequency. Get short and capacious information about resistance, capacitor, diode, transistor, microcircuit, circuit diagram.The channel covers topics such as automotive electronics, alternative energy, independent energy, TV repair, do-it-yourself electronics repair. - Playlists: - Subscribe:
# The tool bought a new one for free, after 5 minutes, a lot of sparking. Test windings are fine, 2 lamellas burned out and fell out. Video replacement of lamellas, grinding, .. in the garage, # groove without a lathe. After the repair, it worked for 1-2 minutes with a minimum load, which helped to finish the work, then I bought a new anchor for the reserve. Dear subscribers, I will be very grateful if you pay attention and support the channel of my novice friend, with a huge margin of time, you can go to the channel the link is one of the few videos, my friend will give you a lot of attention. Thanks for your understanding.
One of the ways to remove the drive gear of the gearbox of an angle grinder (grinder). The main steps are shown. LBM “Zubr” 2100W (d = 230mm) is shown as an example. The internal structure of the gearbox of other models may be radically different from this example.
The easiest and easiest way to demagnetize a pipe! With a simple electric welding holder.
- Tarixində dərc edildi 10 Mar 2017
- Sometimes it is better to carry out tool prophylaxis on time than to get expensive repairs.
- YouTube editor
The upper bearing is checked by weight holding the gearbox vertically with an anchor downwards, we twist the shaft and with our hand we feel whether the balls are gnawing at the cage, if there is wear in the balls, you will definitely feel it in your hand.
in the video you did not check it correctly, the case should not be twisted in your hand, but the anchor should be unscrewed, then in your hand from the case you will feel the vibration of the balls gnawing on the inside of the clip. Because the body weight is only 60-80 grams and it will not give any load to the bearing. Always if there are two or more bearings on the shaft, then the bearings always change only in pairs. do not spare the money, the 629ZZ SKF bearing costs no more than 200 rubles or 80 hryvnyas and it is cheaper than screwing up a grinder or pulling out the remnants of torn metal from your body in the hospital.
Yuri, hello. Thanks for your comment. So, in a similar way, I checked the upper bearing, so I did not change it.
Stanislav, hello. The bearing is lubricated so that dust does not penetrate into it. This is certainly not a panacea, but it prolongs life a little.
like for the pullers, I went to do it.
Valery, hello. Thank you for rating)))
Of all the videos on YouTube, yours is simple and clear.
Hello. Thank you for the kind words.
If only the upper one showed the bearing, generally respect)
Vladislav, hello. This time there was no need to change it. I will definitely show you the opportunity. Thank you.
sometimes this option does not help if the grinder is made by Made in Russia, China or Ukraine, China, then there the bearings are mounted on epoxy.)))
Sherzon hello. Thank you, everything is simple and accessible.
One of the most common household appliances for repair and construction work is considered a grinder, or an angle grinder (angle grinder).During the operation of the machine, there are often cases of heavy loads and careless handling, which leads to wear and tear of parts and breakdown. But the repair of angle grinders can be done independently. To do this, it is worth seeing how to repair a grinder with your own hands in the video.
- The grinder's anchor (rotor) is the most overloaded element of the angle grinder mechanism. It is subject to thermal, electromagnetic and mechanical damage, so its failure is not surprising. The armature winding may burn out when heated, which will lead to a short circuit. Therefore, repairing the grinder anchor with your own hands is a frequent practice.
- If the collector fails during operation, from strong vibration of the brushes, they burn out, therefore, a very noticeable sparking appears. The brushes conduct current to the collector.
- Bearings on the rotor shaft are also subject to severe wear, which can completely collapse if replaced without time. They need to be checked in case of abnormal noise from the operation of the machine.
- The fixed part of the grinder's electric motor is the stator, which contains the winding. The stator itself is quite rarely the cause of the breakdown of the grinder.
- A gearbox is a rotation transmission mechanism that needs timely cleaning and lubrication.
- The easiest way is to replace the brushes on the grinder, but this is also the most frequent repair procedure, because they are made on the basis of graphite.
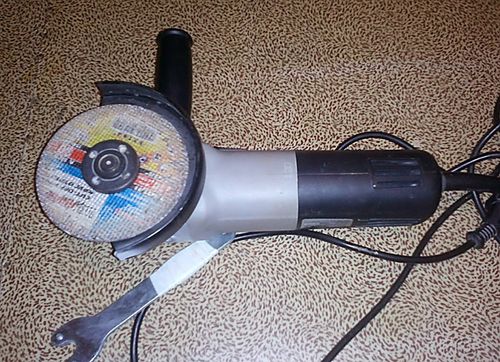
It is worth considering that the repair technologies for angle grinders of different models and manufacturers may differ. So, repairing an Interskol grinder with your own hands differs from repairing a malfunction of a Bosch machine.
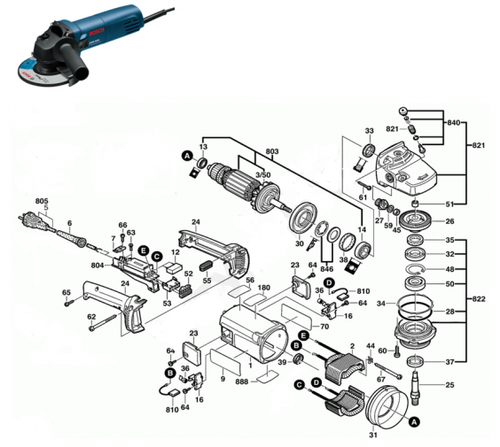
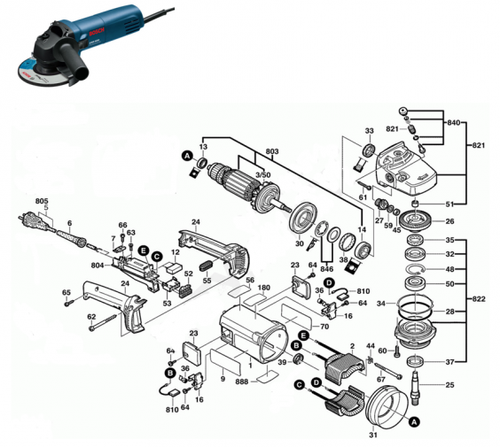
That is, it is important to know the features of your angle grinder and have a diagram from it in your hands, then you can easily and efficiently repair the grinder with your own hands.
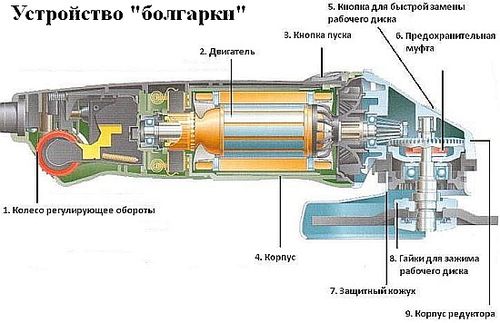
Only after reading the detailed description and diagram of the angle grinder, you can start disassembling it. The repair should have a specific sequence of actions. And the most important thing is the observance of safety measures.
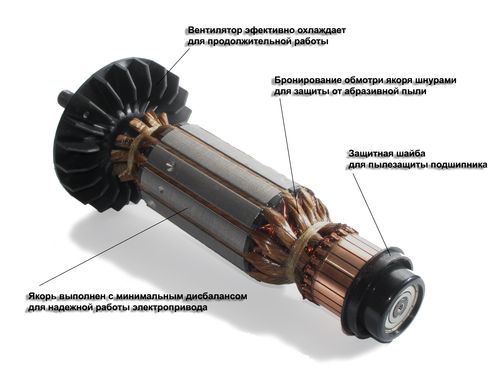
Broken wire at the handle is the most common problem with instrument failure. To verify this malfunction on the button, you must use a standard voltage tester. Only then check if the button itself works.
If you notice an increase in the spindle shaft play, then the needle bearing needs to be replaced. By the way, it is not available in all LBM models. To dismantle it, disassemble the housing and take out the shaft of the large gear.
Using a machine tap, the inner race is removed from the damaged bearing.
The tap must be clamped into the screwdriver chuck and screwed into the bearing race. When the bottom of the body is reached, you need to continue screwing in slowly so that the ferrule rises along the thread.
Due to damage to the helical gears, the gearbox breaks down. Often, the small drive gear attached to the rotor shaft is replaced, which is attached in two ways:
- They resort to a keyed connection with a clamping nut;
- A threaded connection is used.
The large driven gear can also be keyed, but can also be pressed onto the shaft.
Subject to the correct operating conditions, repairing the Interskol grinder with your own hands can be done very rarely.
In order to replace the gears of the reducer, its case is disassembled, and the cover is released. Since the driven gear is attached by pressing, it must be removed using a press. Then remove the bearing with a puller.
If the stator burns out, you need to calculate how many turns the wire has, and what is its cross section.
It will not be superfluous to watch the repair of the Interskol grinder with your own hands in the video.
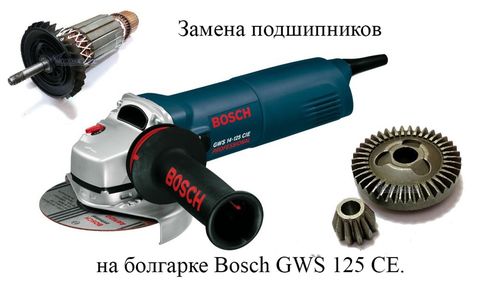
The design of all models of the Bosch line has an identical layout. Do-it-yourself Bosch grinder repair usually comes down to replacing bearings.
The spindle shaft is pressed onto the driven gear. It rests on a needle bearing in the gear housing, which, when worn, leaves only a cage inside.The drive gear is attached to the rotor shaft with a left-hand thread and then secured with a nut.
The Bulgarian Makita is distinguished by its protective case, which can be quickly removed. This can be called a plus, because grinders of this company are most often prone to breakdowns. This applies mainly to fakes that have flooded the domestic market. The real Makita angle grinder is famous for its durability and reliability. Despite the fact that a fake or a real grinder fell into your hands, the most common cause of damage will still be the gearbox and its gears. This becomes noticeable when there is a slipping of the driven gear, jamming of the gearbox and an increase in shaft play.
| Video (click to play). |
When repairing, the grinder is first disassembled. The gearbox is disconnected from the stator housing; for this, the brushes are released and the screws are unscrewed. Next, the screws holding the rotor cover are removed. The driven gear can be removed with a press and the driven gear is keyed with a locking nut. The pullers are used to remove the rotor shaft bearings.
Thus, no matter what grinder you have, with proper study of the problem, you can fix the main faults yourself with your own hands. The main thing is to understand the scheme correctly and have the equipment necessary for repairs. Despite this, the angle grinder is a complex mechanical power tool, and there are often cases of damage to more difficult-to-reach parts of the mechanism. In this case, if you have not previously encountered such breakdowns, it will be more effective to first consult with specialists specifically on your problem.

