In detail: do-it-yourself repair of cast-iron bathtubs from a real master for the site my.housecope.com.
A cast-iron bathtub is a thing of long-term use. But over time, even the highest quality coating loses its visual appeal. Changing a cast iron bath is troublesome, so the question arises, how to repair a cast iron bath?
Of course, repairing a bathtub is quite laborious and requires patience. However, many people prefer to carry out a restoration rather than change the bathtub to a new model. There are three main ways to restore the appearance of your bathtub. Consider each of them.
Preparing a cast iron bath for repair
To complete the work you will need:
Drill with attachment for removing old coating.
Oxalic acid.
Composition for surface degreasing.
Enamel.
Brush for applying enamel.
The work is performed in the following sequence.
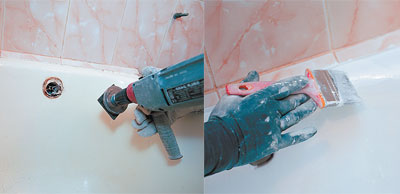
The surface of the bath is cleaned from the layer of the old enamel. The easiest way to do this is with a drill with an appropriate attachment.
If there is scale on the surface, remove it with oxalic acid.
The surface is thoroughly cleaned from dust and degreased.
To make it easier to collect dust, cover all surfaces in the bathroom with old newspapers or sheets.
Hot water should be taken into the prepared bath and kept for ten minutes. Then drain the water and wipe the surface thoroughly and let it dry well.
Prepare the enamel by mixing the main component with a hardener.
Apply the first layer of enamel to a dry bath surface. Let it dry for 20-30 minutes.
Apply the second and third layers, remembering to allow time to dry.
The last fourth layer is fortifying. After its application, the repair can be considered complete.
Video (click to play).
It will be possible to use the bathroom after applying the enamel no earlier than three days later.
Sanding the bath and applying new enamel
It allows you to change the color of the bath at your discretion, selecting the desired bath enamel shade.
The work can be successfully completed independently, even with modest experience in construction.
The disadvantages of this restoration method are much greater:
The method is laborious, a lot of dust is formed in the process of cleaning the enamel.
The resulting coating cannot be compared in strength to enameling in the factory. The restored bathroom will need to be handled with extreme care, but in this case, the new coating will last no more than 20 months.
Bath repair using acrylic liner
To complete this work you will need:
Sanitary acrylic insert to fit the size of the bathtub.
Two-component assembly foam or special mastic.
Silicone sealant.
This recovery method is one of the simplest and most effective. To implement it, you should purchase an acrylic bath insert.
A good result can be achieved only if the acrylic liner is of high quality. Therefore, when buying, you should definitely require the presentation of a certificate.
Repair procedure:
First, prepare the insert by making drain and overflow holes in it.
The space near the holes made are lubricated with a sealant.
The liner is secured in place with two-component foam or special mastic.
The foam should be applied evenly over the entire surface of the liner, otherwise voids will appear in which the acrylic will bend. The consequence of such a flaw will be the imminent appearance of cracks.
The advantages of this method:
Bathtub restoration can be carried out easily and quickly enough.
Provided that a high quality liner has been used, the bathtub will be able to serve for a long time.
The surface of the acrylic liner is smooth and shiny, it is resistant to wear and does not fade during use.
The disadvantages include the need to carry out work before finishing the walls in the room. Otherwise, you will have to beat off the tiles located around the perimeter of the bath.
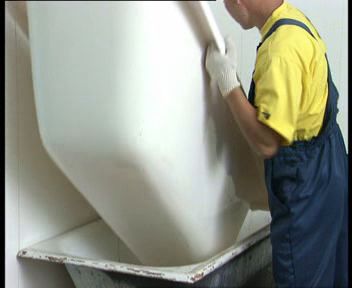
Bathroom renovation using liquid acrylic
To carry out the restoration in this way, you will need a special composition - liquid acrylic, which is sold under the brand name "Stakril". In fact, this method is similar to enameling a bath, but the material consumption is an order of magnitude higher, which means that the layer of the new coating will be thicker. Due to the use of a modern hardener, the material spreads evenly over the surface, so there is no need to distribute it manually.
When using this method, as with applying enamel, careful surface preparation will be required. It will be necessary to thoroughly clean the bath from the old coating, degrease, wash and dry it.
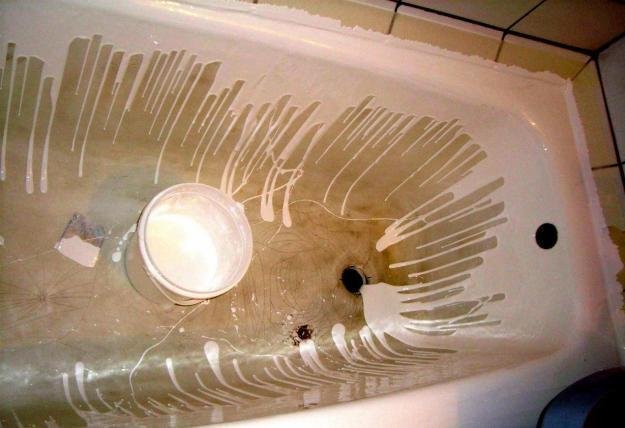
Acrylic coating, unlike enamel, is not applied with a brush, but is poured over the surface (hence the name of the method). Pouring begins from the upper sides, then the walls in the lower part are processed and, last of all, the bottom.
When performing this work, it is required to disconnect the bathroom drain and place a container under the drain hole into which excess material will drain. This ensures that the acrylic is applied evenly.
The coating layer will be about 6 mm. It will be possible to use the bathroom 3-4 days after the completion of the work, since the new coating should have time to dry well.
The disadvantages of this method are its laboriousness, but the coating is of higher quality and more durable than when using enamel. This coating is more resistant to mechanical damage, and a wide range of colors of the Stakril material allows you to choose the shade of the bath to your taste.
By applying one of the methods described above, you can successfully repair an old cast iron bathtub. Of course, if you plan to carry out repairs on your own, then doing this work will take time and significant labor costs. However, restoration is still cheaper and easier than replacing a bathtub.
After all, cast iron is a very heavy metal, and it is extremely difficult to transport and mount bathtubs made of this material. If there is no desire or opportunity to carry out the restoration work on your own, you can make an order in companies that are engaged in the restoration of the enamel of old bathtubs.
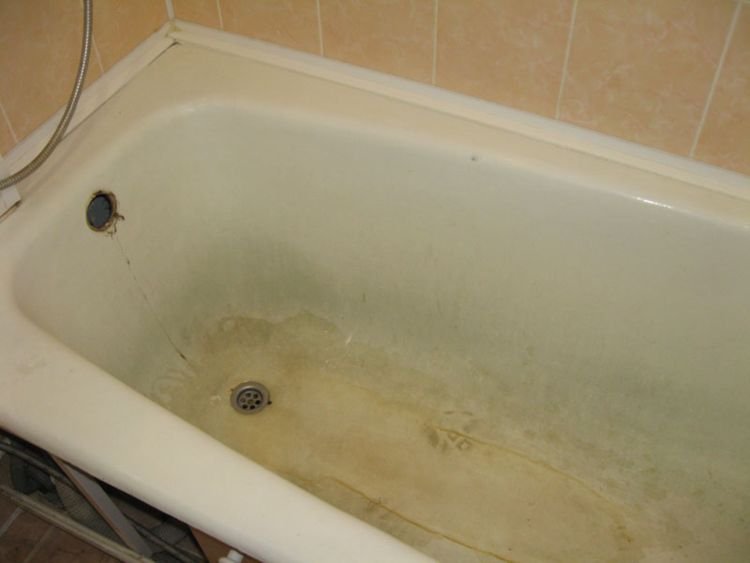
A cast iron bathtub is a solid, durable plumbing fixture with an almost inexhaustible potential for repairability. If a small crack or chip appears on the enamel surface, it is not at all necessary to buy a new product, which costs at least 10-12 thousand rubles, it is quite possible to restore the appearance and functionality of the bowl by repairing the cast-iron bath with your own hands. In this article, we will tell you about 3 effective ways to restore cast iron plumbing fixtures.
If the enamel has a crack, chips, scuffs, and the bathtub itself turns yellow and becomes rough, there is no need to postpone the repair. In order for the result of the restoration to last longer and withstand mechanical stress, contact with water and temperature drops, it is necessary to carefully prepare the surface for work. The preparatory stage, as a rule, takes more than half of the time and effort spent on restoring the enamel with your own hands. It consists of the following operations:
Cleansing from dirt. The surface of the bath is cleaned of dust and dirt with an ordinary alkaline-based detergent, and then rinsed abundantly with running water.
Important! Before starting work on the repair of plumbing equipment, you need to assess the feasibility of the event. If the damage is sporadic, then you can repair the bath yourself.In case of extensive damage and the presence of through holes, it is better to contact a professional.
A small chip with a diameter of up to 2 cm or a crack is the result of mechanical stress or point impacts; these are the most common damage that can be easily repaired locally with your own hands. It is better to close up such damage immediately after their detection with the help of a special putty and enamel. The technology for sealing chips is as follows:
The area around the chip is cleaned of dirt with a detergent. It is better not to use abrasive products, as they aggravate the destruction of the enamel.
Please note that local repair of chips on the enamel surface gives a temporary effect, only postponing the time of more global events. Aerosol enamels do not hold well, but they are much easier to use.