In detail: do-it-yourself speaker repair on the phone from a real master for the site my.housecope.com.
A mobile phone is a convenient and irreplaceable assistant. But it often happens that failures occur in his work and this cannot but upset.
For example, when the interlocutor is completely inaudible, although the speaker volume is set to maximum in the settings. This is due to the failure of the auditory speaker. The sound is either not audible at all or audible, but very weak.
Here, do not do it, replacing the speaker simply cannot be avoided.
This article details disassembling and replacing the speaker in a common smartphone.
You can find a speaker for your model in one of the online stores, of which there are plenty.
Sometimes the speaker may outwardly differ from the one in the phone, it may be analogs that will perfectly replace the original one. It so happens that they work even longer than branded ones.
In any case, it is better to first disassemble the phone and see what your speaker looks like, then you can be sure that you are ordering what you need.
So, first remove the back cover. Everyone knows how to do this on their phone. Usually it is kept on snaps.
Next, it's a little more complicated. It is necessary to remove the battery, SIM card and memory card.
Then, using a small straight or Phillips screwdriver, unscrew all the screws around the perimeter of the case.
When all the screws have been loosened with the plectrum - if you have one - remove the protective cover. It also has snaps.
Instead of a pick, you can use a sharpened piece of a plastic ruler or a plastic card.
This must be done carefully, making sure that the working part of the tool does not protrude into the body by more than 2 mm.
| Video (click to play). |
When the protective casing is removed, we find the earpiece.
It is soldered through a ribbon cable in two places.
Using a magnifying glass and a 25W soldering iron, you can easily remove a faulty speaker. You just need to sharpen the soldering iron tip in the shape of an awl. It is better to do this on an emery machine.
Heating the soldering iron and grabbing the speaker with your fingers, gently solder it.
Here is a dismantled speaker in the photo.
A similar Chinese analogue can serve as a replacement for the original speaker.
We clean the place where the speaker is installed from dust that penetrates from the outside through the holes on the case. Then we insert the speaker there and use tweezers to form the wires so that their ends fall on the soldering points.
Next, holding the wires, we solder them.
We wipe the place of soldering with cotton wool dipped in alcohol or cologne.
We put on a protective cover and insert a SIM card, we check the speaker's operation.
If everything is ok, fix the cover with screws.
Insert the memory card and snap the cover.
Now the phone is like new, if the problem recurs, we replace the speaker again in the same way. But so that the problem does not recur often, it is better to set the volume to an average value.
Let's consider one of the main reasons for the failure of a mobile phone: "various liquids hitting the board" does not turn on, a white screen or some buttons do not work. Of course, before opening the case, you need to know the cause of the breakdown. If one of the above is written, read on.
We open it, conduct a visual inspection for the presence of corrosion, dirt and other unnecessary substances.
First of all, we remove all plastic parts, in general, everything that can be removed is detached. Do not forget about the film with membrane-type keyboard buttons, we also peel it off (this is on other models, on ours the keyboard board is disconnected).
We take a cleansing liquid (such as alcohol, Kolosha gasoline, cologne), I use Isoprapanol, it does not have an unpleasant odor like Kolosha.
We take a toothbrush, who doesn't mind a new one, dip it in alcohol, and clean the board until it looks like new - especially the contacts for the display, the USB connector. Do not press too hard, some components may be demolished.
We cleaned it, now we take the flux, take a brush, smear it with flux near the microcircuits (more), put the hair dryer at 325 degrees and warm up all the microcircuits in a circle and in the middle, the distance from the outlet of the tip (nozzle) of the hair dryer to the surface of the microcircuit is 1.5 cm. it is better and more economical to take a medium diameter.
We heat to such an extent that the tin melts at the components located around the perimeter (adjust the temperature to 330 degrees). Very, very neatly shake the microcircuit with a needle so that it moves a little. It is important not to wobble too much, otherwise it will slip off the contacts, and so on with all the microcircuits not glued (without compound). We also warm up the filters, in order to remove the flux, you can use an ultrasonic bath, but we will do it differently.
We pour alcohol under all the microcircuits without a compound, hold it for a little so that the alcohol has time to collect all the dirt. Now we take the hair dryer from the soldering station and blow it under the microcircuits. Blowing alcohol out from under the microcircuits in this way, we do not need it there. The temperature of the hair dryer should be for warming up, not for soldering, it is in the range from 260 to 290 degrees, depending on which station.
Done, let's move on. Now let cool and collect. If the breakage is fixed after assembly, then "Hurray, everything is ready." If, nevertheless, the white screen and non-short buttons do not work, you need to replace the filters or put jumpers, but that's another story. The most important parts that can fail after water or after a fall (impact) are filters (so-called glasses), they look like this.

You need to do the same with them as with the rest of the microcircuits, only solder these places more carefully. Warm up, stir, about the flux (do not forget to apply) with it, the components will not get off the contacts. Now everything seems to be. What we have done only applies to breakage due to moisture getting inside the phone. Other breakdowns, such as "does not charge" or "the network does not catch" - this cannot be fixed, components will need to be replaced. More about this in future publications. Best regards, OPA.
So before us is the nokia 6120 classic phone (fig. 1). This phone model is of course outdated, but it's still a pretty good phone, according to the classification it is a mini smartphone with the Symbian operating system installed.
After three years of using the phone, one fine day, when talking with the subscriber, the sound disappeared, that is, I could not hear the subscriber at all. This sometimes happened before that time and was eliminated by rebooting the phone. But after the reboot operation, the situation did not change. And when the speakerphone was turned on, everything worked fine, but through a different speaker.
As with any phone, the nokia 6120 has two sound sources:
-conversational (voice) speaker - EARPIECE (Fig. 2 a);
-polyphonic speaker - IHF SPEAKER (Fig. 2 b).
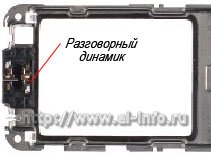
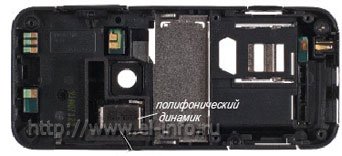
Figure 2.a) earpiece speaker; b) polyphonic speaker.
It immediately became clear that the matter was most likely in the conversational dynamics: either it failed, or there was no contact, or it was in electronics (which of course is worse).
So, I started disassembling the phone. To do this, I only needed two tools from the cell phone repair tool kit: an opener and an A5 screwdriver (Fig. 3).
Figure 3: Phone disassembly tool
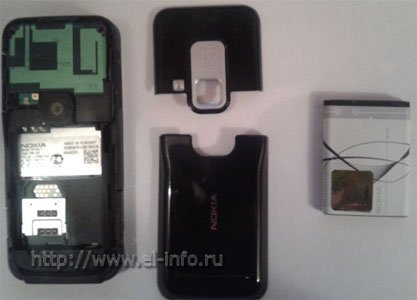
1. Remove the back cover, remove the battery from the compartment and use the opener to disconnect the back cover of the phone case (Fig. 4)
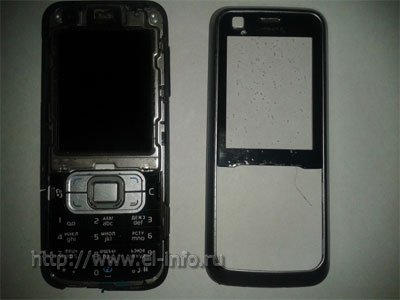
2. Also, using the opener, detach the front cover of the phone case (Fig. 5)
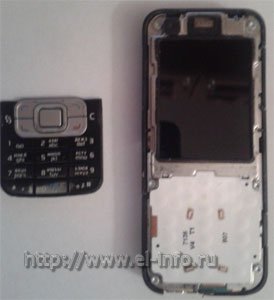
3. Disconnect the keyboard (fig. 6)
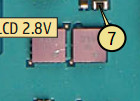
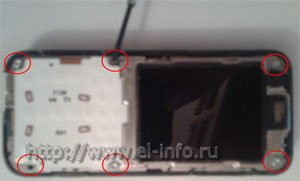
4. Unscrew the six screws securing the front frame (Fig. 7)
5. Disconnect the keyboard backing connector (Fig. 8)
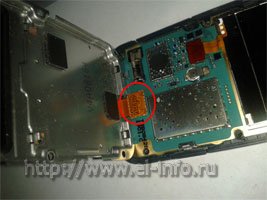
6. Turn the frame over and observe the earpiece (fig. 9)
First of all, I, of course, with the help of a multimeter rang out the speaker for an open circuit, and it turned out that it was not working properly!
LIKE THE ARTICLE? SHARE WITH FRIENDS ON SOCIAL MEDIA!
The phone is about 3 years old, the model of the Chinese smartphone is called Hero 9300+, which served me with faith and truth, but for the last half a year the speaker practically did not work (wheezing, noisy), at first it cleaned it, and everything was fine, but then all the same covered himself. The speaker is a bit out of the ordinary, I didn't want to go looking, so I decided to try to install the speaker from another phone, namely from the broken Nokia X2-00.
I took out the speakers, there are 2 of them in Nokia, so there was plenty to choose from, to the left of the Chinese, to the right of Nokia.
To begin with, I wanted to check if the speaker on my phone will play at all, I soldered two wires to the speaker and two to the contact on the phone.
The speaker played, but it wheezed, apparently, it was also broken, so I tried to connect a second speaker, which was already playing cleanly, and it completely suited me.
But since the speakers were different, in terms of placing contacts, they had to be redone, antennae were taken from the native speaker.
Then they were soldered to the Nokievsky speaker, in this way.
Now all that remained was to put it in the place of the native speaker.
But the Nokia speaker was a little wider and didn't fit in the tray, so one partition had to be removed.
And he firmly fell into place.
Then he slightly bent the antennae forward, just like on the native speaker, so that the beam would contact, and assembled the body.
As a result of all these actions, I finally hear that someone is calling me, and I can listen to music as in the old days. : e113:
Thank you for your attention, I hope this alteration will help someone else, and he will hear the sounds of his own phone!
Information
To leave your comment - register or enter the site under your name.
The fact that a speaker for a mobile phone requires urgent replacement is evidenced by extraneous noise when using the phone or the complete absence of sound. From the practice of specialists: repairing a damaged speaker is a painstaking business, and not rewarding, since a repaired part is unlikely to last long. To make your phone work like new and serve you faithfully and effectively for a long time and productively, it is enough to replace the speaker.
Installing a new speaker for mobile phone, you can not only restore the sound functions of the gadget, but also significantly improve the sound. You can make a replacement both at home and in a service center, where the work will be done much faster and better.
If you nevertheless decide to install by yourself speaker for mobile phone, then we suggest using a small algorithm of actions for the most convenient work. Replacing the speaker is not as difficult an operation as it seems at first glance. The main thing is to have the necessary tool at hand, some knowledge, a desire to work and perseverance.
And the most important thing is self-confidence. The most necessary tool, in this case, is a soldering iron with a thin tip. Even when removing a faulty part, in no case should it be torn off or pulled out, it is necessary to carefully solder the contacts with a soldering iron and pull out the old speaker. In any case, the repair must begin with the fact that the phone should be disassembled or unscrewed, that is, remove the back cover.
In every phone speaker for mobile can be located in different places, but it is not difficult to find it. Having freed the phone from the old one, they did it as indicated above, and having two free contacts at their disposal, you can install a new spare part. You should work very carefully with a soldering iron, since due to the small size of the speaker, the contacts are located close enough to each other, and if you carelessly, you can connect them, thereby provoking their closure and combustion.
If you decide to install a speaker from another phone model to increase the sound capabilities of the gadget, keep in mind that due to the non-standard dimensions, it may go beyond the gadget. A new spare part on the board should be installed strictly in the place where the old one was installed. When installing a speaker removed from another mobile device, keep in mind that the sound quality may vary from device to device.
If you are going to install speaker for mobile on the slider, you must first perform the operation to disconnect the cable by pulling it out of the case or disconnecting it from the screen under the front cover. The second option allows you not to completely disassemble the phone, which allows you to complete the work on installing a new component much faster.
If you still doubt your abilities, you shouldn't risk it and disassemble the device yourself. Use the services of the service center.
Today, the number of good sound lovers who just throw out a wheezing speaker is not decreasing! At the same time, the cost of an analogue can be a tangible amount. I think the following will help anyone who has hands that grow out of the right place to fix the speaker.
Available - a miracle of design thought, once the former column S-30 (10AC-222), now serving as one of the autosubs. A week later, after the mutation, the patient began to show signs of the disease - he emitted extraneous sounds when working out the bass parts, and wheezed a little. It was decided to conduct an autopsy.
After autopsy, a diseased organ was removed from the patient's body - woofer 25GDN-1-4, 86 of release. The organ clearly needed operation - when gently pressing the diffuser, an extraneous sound was heard (very similar to a quiet click), and when ringing in various tones (generated by the nchtoner program), a clearly audible rattling-crackling sound was heard with a large diffuser stroke and when ultra-low (5-15Hz) ) frequencies. It was decided to trepan this organ
First, the patient's flexible lead wires were sealed off (from the side of the contact pads)
Then a solvent (646 or any other capable of dissolving glue, such as "Moment") was moistened with a syringe with a needle, the place where the dust cap and the diffuser were glued (along the perimeter).
... the place where the centering washer is glued to the diffuser (around the perimeter).
... and the place where the diffuser itself is glued to the basket of the diffuser holder (again around the perimeter)
In this state, the speaker was left for 15 minutes with periodic repetition of the previous three points (as the solvent was absorbed / evaporated)
Attention! When working with a solvent, safety measures should be observed - avoid contact with skin (use rubber gloves!) And mucous membranes! Do not eat or smoke! Work in a well ventilated area!
When wetting - use a small amount of solvent, avoiding getting it on the gluing area of the coil and centering washer!
Depending on the type of solvent and air temperature, after 10-15 minutes of the above operations, using a sharp object, you can gently pry off the dust cap and remove it. The cap should either come off very easily or offer very little resistance. If you need to make significant effort, repeat the operations with wetting its edges with a solvent and waiting!
After peeling off the cap, carefully pour out the remaining solvent from the recess near the coil mandrel (by turning the patient over).
By this time, the centering washer has time to peel off. Carefully, without using any efforts, we separate it from the basket of the diffuser holder. if necessary, re-wet the gluing site with a solvent.
Wet the place where the diffuser is glued to the diffuser holder. We wait. Wet again and wait again. After about 10 minutes, you can try to peel off the diffuser.Ideally, it should detach from the diffuser holder (together with the coil and centering washer) without effort. But sometimes he needs a little help (the main thing is accuracy! Do not damage the rubber suspension.) 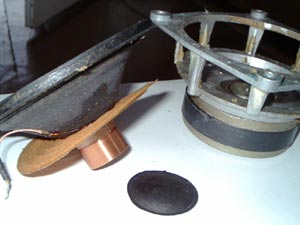
We clean the gluing points from the old glue and dry the disassembled speaker. We examine the disassembled patient for a malfunction. We look at the coil. If there are no scuffs and loose turns on it, we leave it alone. When peeling off the coil, glue it back with a thin layer of BF-2 glue.
We carefully inspect the place where the lead wires are attached to the diffuser. So it is - the patient has the most common malfunction in old speakers with a large diffuser travel. The lead wire at the attachment point is frayed / broken. What kind of contact can we talk about when everything hangs on a thread passed into the center of the wiring!
Gently bend back the copper "antennae".
... and solder the lead wires.
We repeat the operation for the second wiring (even if he is still alive - the disease is easier to prevent!)
We cut the supply wiring at the break point.
... and we serve the resulting ends (of course - first we use rosin). Here you need to be careful! Use a small amount of low-melting solder - the solder is absorbed into the wire like a sponge!
Gently solder the wiring into place, bend the copper "antennae" and glue (Moment, BF-2) the place where the wiring adheres to the diffuser. Remember - you cannot solder the wires to the fastening "antennae"! Otherwise, how can the wiring be changed again in ten years?
We collect the speaker. We put the diffuser with the entire “household” into the diffuser holder, orienting the wiring to the places of their attachment. Then we check the correctness of the polarity - when connecting a 1.5V AA battery to the terminals, when connecting the “+” battery to the “+” of the speaker, the diffuser will “jump out” of the basket. We put the diffuser so that its “+” lead wire is at the “+” mark on the speaker basket.
We solder the lead wires to the contact pads. Please note that the length of the wires has decreased by almost half a centimeter. Therefore, we solder them not as it was at the factory - to the hole in the plate, but with a minimum margin to maintain the length.
We center the diffuser in its basket using photographic film (or thick paper), which we place in the gap between the core and the coil. The main rule is to place the centering evenly around the perimeter, to maintain the same gap. The amount (or thickness) of the centering should be such that when the diffuser is slightly protruding outward, it freely rests on it and does not fall inward. For the 25GDN-1-4 speaker, 4 pieces of film are enough for this, placed in pairs in front of each other. The length of the film should be such that it does not interfere if you put the speaker on the diffuser. For what - read below. We glue the diffuser. We use the indication for the glue used (I recommend "Moment", the main selection criterion, so that the glue can be subsequently dissolved with a solvent). I usually stick out the diffuser 1-1.5 cm up so that the centering washer does not touch the basket of the diffuser holder, then I apply a thin layer of glue on it and the basket with a brush, wait and firmly push the diffuser inside, additionally press the washer against the basket around the perimeter with my fingers ... Then I glue the diffuser (in the retracted state, avoiding distortion).
We leave the speaker upside down for several hours under load (this is why our film should not protrude beyond the plane of the diffuser!).
Then we check the speaker for correct assembly. We take out the centering and carefully check the diffuser travel with our fingers. It should walk easily, without emitting overtones (there should be no touching of the coil and core!). We connect the speaker to the amplifier and send low-frequency tones of low volume to it. Extraneous sounds should be absent.In case of improper gluing (misalignment, etc.), the speaker must be glued (see above) and reassembled, being careful! With a high-quality assembly, we get 99% of a fully working speaker.
We glue the edge of the dust cap with glue, wait and carefully glue it to the diffuser. Here you need accuracy and precision - a crookedly glued cap does not affect the sound quality, but it spoils the speaker's appearance very much. when gluing, do not press on the center of the cap. It can bend from this and you will have to peel it off, straighten it, coat it from the inside with a thin layer of epoxy for strength and stick it back.
We wait until all parts are completely glued together (about a day) and put the finished speaker in its place. We enjoy sound that is no worse than that of a new factory analogue speaker.
That's it, now you can see that fixing a speaker is an easy task. The main thing is slowness and accuracy! So in an hour, you can slowly repair almost any woofer or midrange speaker of domestic or foreign production (for gluing imported speakers, a more powerful solvent is often required, such as acetone or toluene, carefully - they are poisonous.) Having a similar defect.
Yes, after the operation, the former patient got a second wind and the cheerful yellow subs continue to do their hard bass work:
I needed a second phone for the device, the requirements were - to call, be push-button, keep the battery and be cheap. I found a used Philips e1500, but the truth is not quite working, but with a whole keyboard and battery - for only 100 rubles! Here is a small overview of the device in the form of characteristics from the manufacturer:
- Number of SIM-cards 2
- Weight 70 g
- Dimensions (WxHxT) 46x107x15 mm
- Screen type color TFT
- Diagonal 1.77 inch
- Image size 160 × 128
- Pixels Per Inch (PPI) 116
- Type of melodies 64-voice polyphony, MP3 melodies
- Multimedia Capabilities - MP3, FM Radio
- There is a dictaphone
- There are games
- 3.5mm headphone jack
- GSM 900/1800/1900 standard
- Internet access WAP, GPRS
- Interfaces Bluetooth 2.1, USB
- Slot for memory cards up to 32 GB
- Battery capacity 800 mAh
- Talk time 6.7 h
- Waiting time 670 h
- Speakerphone - built-in speaker
- There is a flashlight
- Equipment - phone, battery, charger, stereo headset
The device turned out to be with a wheezing speaker.
I checked the battery - it looks good, and with measurements I realized that it was like new.
I disassembled the phone: I cleaned everything, during the operation a lot of dirt has accumulated, including metal shavings.
I disassembled the device with special curly screwdrivers and a mediator - you can also use a plastic card.
The speaker completely collapsed and was covered in shavings - it certainly was for replacement, and the new speaker for this device was flat and did not fit from other devices - I had to buy a new original one, which at a price turned out to be more expensive than buying the device - 200 rubles. Yes, repairs came out 2 times more expensive than the phone itself, it often happens.
The frame of the mobile phone had a small crack in one place - it dissolved the epoxy composition and glued it under a hair dryer from the soldering station at a temperature of 100 degrees, now this is the most durable place in the phone - as a rule, such connections do not break even with a hammer when the resin hardens.
Everything was thoroughly washed, including the slightly green board - first in a degreaser, then in alcohol, and finally wiped with napkins for cleaning monitors and a special composition.
Assembled in reverse order and it turned out almost like new, especially since the device actually holds the battery for about a week - calls from it per day for 20 minutes + messages, the flashlight is convenient in the garage, only one card slot is used. It is possible to leave the mobile phone in the cold, although it has not been possible to test below -2 so far, but at the same time, even after almost 8 hours, the performance of the device has not changed at all in such cold weather. Author - redmoon.
To begin with, it is strongly recommended that you familiarize yourself with at least the basics of radio electronics. The fact is that the repair of mobile phones is closely related to theoretical knowledge in this area. For example, if you need to replace a resistor (this is a passive current-limiting electronic component), then you definitely need to know its labeling, resistance, power dissipation, temperature coefficient, etc. With other owls, it is not very advisable to repair mobile phones without knowing Ohm's law. There are a huge number of books and manuals on the topic of radio electronics, as well as thematic sites on the Internet. But this is not enough. Mobile phones are digital devices, not analog ones. Consequently, all parts and components used for the production of the latter have differences among themselves. For example, for analog devices, surface mount technology is mainly used, and for digital devices, surface mount technology. The latest technology is called SMT (surface mount technology). It also translates as "surface mount technology". And the components used in this technology are called SMD (surface mount device).
Also, there is no analog signal in digital electronics, because it is actually digital. Consequently, all digital devices have their own types and levels of programming. These are just a few of the differences between analog and digital technology. But even this is enough to scare a newbie away. But there is no need to despair here. Everything is much easier than it seems. A lot of that frightening information is not needed when repairing mobile devices. But if you are planning to seriously tackle this business, then it is strongly recommended to study analog and digital radio electronics.
Now we come to the main goal of this article. So, now you will be described in detail the procedures for technical repair of mobile phones and types of repair devices.
In order to repair a cell phone, including repairing Nokia, Samsung, Sony-Ericsson, LG, Motorola, the first thing is to determine the cause of the failure of the mobile device and identify the component, assembly, module or part that has failed. For this, the knowledge that is described above is just needed. Usually, the breakdown of a mobile phone is caused by improper operation or loss of functionality of external devices. For example, in the first case, the phone fell into the water by negligence. To restore it, complete disassembly and thorough drying are required. After that, you need to use a soft-bristled brush to clean the phone's printed circuit board with a special cleaning agent or 96% alcohol solution. In the second case, the LCD, speaker, microphone, keyboard, etc. are out of order. As a rule, in most cases, such parts cannot be repaired and must be replaced. But if there is damage to the surface (soldered) parts on the printed circuit board, then a professional approach and experience are required. In addition, for this type of repair, you will need a diagram of assemblies, modules and components of the printed circuit board of a mobile phone.
In order to start the repair procedure, the phone must be disassembled.
To open a mobile phone without causing cosmetic damage to it, you need to acquire special tools for opening them. They allow you to open the phone case accurately and as efficiently as possible without causing defects. As a rule, these instruments are sold in sets, each item of which is responsible for its own specific opening. Such kits are not difficult to find in specialized stores. In addition, they come in different types. The difference is the functionality and the price.
You also need a specialized set of screwdrivers for mobile phones. You don't need to save on this. The more specific number of attachments you have, the more chances you will have to unscrew the screws without breaking the edges.
Further, in order to diagnose the phone for its malfunction, you will need a good digital multimeter. It can be used to measure AC and DC voltage and current, resistance, capacitance of capacitors, coefficient of transistors, diode state, continuity of circuits, sections of circuits or nodes, temperature. With skillful use and knowledge of some physical laws, they can find faults in the circuit. The range of multimeters is enormous. The difference is usually in functionality and price.
We also need a laboratory power supply or power supply. With it, it will be possible to set the specified voltage and current. You will need it very often when carrying out repair work, because it will be inconvenient to substitute the rechargeable battery for testing, over and over again. Modern power supplies are equipped with a current stabilization and protection function, as well as a large number of all kinds of clamps and probes for various cases.
Soldering equipment and fixtures. To carry out soldering work, you need a soldering station. Their variety is infinitely large, and the choice is determined by the price and functional range. There are combined soldering stations that combine both a heating soldering iron with temperature control and a hot air dryer, which also has the function of adjusting temperature and air flow.
A hot air dryer is usually required for mounting and dismounting SMD components, as well as integrated circuits made in a BGA package.
Also, when carrying out soldering work, you will need a device for the bottom heating of printed circuit boards. The fact is that when installing or dismantling, for example, integrated circuits (chips), there is a risk of overheating and failure. When using a heating device, on which the printed circuit board of the mobile phone is placed and fixed, the board is rationally heated. And already when the board is heated, you can start assembling or disassembling components without fear of their breakage. this procedure takes place in a few seconds.
Antistatic thermo-tweezers are also useful for soldering work. It is very convenient to use it to dismantle some of the components.
Since you will be faced with soldering work on the installation / dismantling of integrated circuits, you will need a vacuum manipulator. This device is manual and automatic. It is designed to place the chips with the contact pins on the surface of the printed circuit board of the mobile device as accurately, efficiently and conveniently as possible. It is inconvenient to do this with tweezers, especially since there is a high probability of “kill” the microcircuit with an uncalculated pressure. This will never happen with a vacuum manipulator.
Also in the work you need a desoldering pump. With the help of it, you can easily perform soldering by removing the molten solder.
Optics. Parts and components of mobile phones are measured in micrometers and nanometers. It is clear that working without special magnifying devices is very problematic and harmful to vision. In these cases, it is strongly recommended to acquire a 40 diopter technical microscope (not to be confused with a biological one). You will also need a backlit tabletop magnifier. It is not convenient to work with a microscope in all cases, and a desktop magnifier is convenient to use almost always when ultra-high magnification is not required. Mounting magnifying glasses or forehead binocular glasses also do not hurt.
To carry out washing, cleaning of all kinds of components and printed circuit boards from dirt, oils, fats, solder, plaque and rosin, you will need an ultrasonic bath. It performs ultrasonic cleaning very efficiently and safely.
Other tool.Among other installation tools and accessories, you will need a mounting fixing table, with which you can easily and securely fix the printed circuit board for repair work. Be sure to have a variety of tweezers, mounting awls, round-nose pliers, pliers, long-nose pliers, wire cutters with you. You can add solder paste, flux, solder, rosin, cleaners, ultrasonic cleaner and other consumables to this list.
Where to get parts and components for repair? Of course, you can buy them in specialized stores, but it is best to buy broken phones. Since in some cases, it will be very problematic to find some parts, and it will not be difficult to buy, for example, a broken phone, which contains the necessary part, moreover, at a very low price.
Well, here we are with you and got acquainted with the minimum that a mobile device repair engineer should have. Of course, knowledge and experience will come with time, as theoretical and practical skills are developed. Read books on electronics, if possible, sign up for special training courses in the repair of mobile phones, communicate with people who have experience in this area, visit specialized forums on specific topics, where people are always ready to help.
In general, great success to you in your mobile phone repair business!
More information for learning self-repair of mobile phones HERE.
If you want to replace and at the same time amplify the speaker on your mobile phone, this is the place for you! I changed the speaker on my Samsung phone
Hey! Many people have great phones, but they have a bad speaker or a raucous sound. Also, many people rush to buy a new phone faster just because of such a trifle, not knowing that the speaker volume can be corrected by replacing the speaker on the phone.
This is what I suggest you do with your own hands. Replacing the speaker is not an easy thing, since everything is very compact in the phone, and if you accidentally do something wrong, it will be very difficult to return everything to its original form. This is especially true for replacing the speaker on the phone with your own hands.
To replace the speaker in your phone, you need professional soldering iron with a fine tip, for delicate work. Before starting to replace the speaker, I would like to say right away if you are not sure about your accomplishment of this task, then it is better not to start it!
Because you can completely break your entire phone. And if the phone is just bought or new, I would also advise against disassembling it if you are not sure of your achievement.
And so in this article I will describe how to amplify the sound speaker by replacing it with a non-standard one. That is, replacing it with another speaker of non-standard sizes.
To amplify the sound, replace the speaker with a non-standard one, you will need the following components:
1. The phone in which you are going to change (amplify) the speaker
2. Speaker. Since we are going to amplify the sound with a non-standard-sized speaker, you will need a speaker from an old player or radio that is relatively small.
3. Small tip soldering iron
And so if you still dare change the speaker on your phone with your own hands, then you need to disassemble it first. Since I was amplifying the sound on my old Samsung slider, I had to disassemble it completely by removing the sliding front cover. If you have an ordinary phone, without any retractable gadgets, then you should just unwind it.
After unwinding, you should see a small speaker on the front cover, perhaps it will be in some other place, not as shown in the picture. Basically, each phone has a personal arrangement of parts so take a closer look and you will find everything you need.
Pulling out the speaker
Since our speaker is not standard sizes, it will look out. But on the other hand, you will have a very significant result.There will be a loud sound that will be heard well in nature, in a crowd of people, and especially at home.
So, in order to solder this speaker to the main board, you need to first remove the old one. In no case, you can not pull it or tear it off. You need to take a soldering iron with a small sting and carefully, without unnecessary effort, solder the old speaker. After the two conductors are released, you can start working.
Be very careful when soldering and soldering all conductors. Since in the phone all the conductors are at a very small distance from each other, you can not on purpose, without wanting to, close two contacts.
The new speaker should be soldered to the same place where the old one was.
If you have a slider phone, like mine, then I want to give you a little advice on disconnecting the loop. If you can't pull it out of the case, then this is not necessary, since you can simply open the front cover and disconnect the flex cable from the screen.
This quick method does not require a complete disassembly of the phone, so you do not have to take it apart for a long time.
Well, as you can see, we again replaced the speaker with Our Own Hands, improved and amplified the sound on our phone. I think this is a great achievement. Moreover, the old speaker can be put back at any time.
Let me remind you again! If you are not sure of your ability to do this, you better do not take it.
Thank you for reading! Happy speaker change on your phone.
See also how to make or fix electronics with your own hands
Today, the number of good sound lovers who just throw out a wheezing speaker is not decreasing! At the same time, the cost of an analogue can be a tangible amount. I think the following will help anyone who has hands that grow out of the right place to fix the speaker.
Available - a miracle of design thought, once the former column S-30 (10AC-222), now serving as one of the autosubs. A week later, after the mutation, the patient began to show signs of the disease - he emitted extraneous sounds when working out the bass parts, and wheezed a little. It was decided to conduct an autopsy.
After autopsy, a diseased organ was removed from the patient's body - woofer 25GDN-1-4, 86 of release. The organ clearly needed operation - when gently pressing the diffuser, an extraneous sound was heard (very similar to a quiet click), and when ringing in various tones (generated by the nchtoner program), a clearly audible rattling-crackling was heard with a large diffuser stroke and when ultra-low (5-15Hz) ) frequencies. It was decided to trepan this organ
First, the patient's flexible lead wires were sealed off (from the side of the contact pads)
Then a solvent (646 or any other capable of dissolving glue, such as "Moment") was moistened with a syringe with a needle to the place where the dust cap and the diffuser were glued (along the perimeter).
... the place where the centering washer is glued to the diffuser (around the perimeter).
... and the place where the diffuser itself is glued to the basket of the diffuser holder (again around the perimeter)
In this state, the speaker was left for 15 minutes with periodic repetition of the previous three points (as the solvent was absorbed / evaporated)
Attention! When working with a solvent, safety measures should be observed - avoid contact with skin (use rubber gloves!) And mucous membranes! Do not eat or smoke! Work in a well ventilated area!
When wetting - use a small amount of solvent, avoiding getting it on the gluing area of the coil and centering washer!
Depending on the type of solvent and air temperature, after 10-15 minutes of the above operations, using a sharp object, you can gently pry off the dust cap and remove it. The cap should either come off very easily or offer very little resistance.If you need to make significant effort, repeat the operations with wetting its edges with a solvent and waiting!
After peeling off the cap, carefully pour out the remaining solvent from the recess near the coil mandrel (by turning the patient over).
By this time, the centering washer has time to peel off. Carefully, without using any efforts, we separate it from the basket of the diffuser holder. if necessary, re-wet the gluing site with a solvent.
Wet the place where the diffuser is glued to the diffuser holder. We wait. We wet again and wait again. After about 10 minutes, you can try to peel off the diffuser. Ideally, it should detach from the diffuser holder (together with the coil and centering washer) without effort. But sometimes he needs a little help (the main thing is accuracy! Do not damage the rubber suspension.)
We clean the gluing points from the old glue and dry the disassembled speaker. We examine the disassembled patient for a malfunction. We look at the coil. If there are no scuffs and loose turns on it, we leave it alone. When peeling off the coil, glue it back with a thin layer of BF-2 glue.
We carefully inspect the place where the lead wires are attached to the diffuser. So it is - the patient has the most common malfunction in old speakers with a large diffuser travel. The lead wire at the attachment point is frayed / broken. What kind of contact can we talk about when everything hangs on a thread passed into the center of the wiring!
Gently bend back the copper antennae.
... and unsolder the lead wires.
We repeat the operation for the second wiring (even if he is still alive - the disease is easier to prevent!)
We cut the supply wiring at the break point.
... and we serve the resulting ends (of course - first we use rosin). Here you need to be careful! Use a small amount of low-melting solder - the solder is absorbed into the wire like a sponge!
Gently solder the wiring into place, bend the copper "antennae" and glue (Moment, BF-2) the place where the wiring adheres to the diffuser. Remember - you cannot solder the wires to the fastening "antennae"! Otherwise, how can the wiring be changed again in ten years?
We collect the speaker. We put the diffuser with the entire “household” into the diffuser holder, orienting the wiring to the places of their attachment. Then we check the correctness of the polarity - when connecting a 1.5V AA battery to the terminals, when connecting the “+” battery to the “+” of the speaker, the diffuser will “jump out” of the basket. We put the diffuser so that its “+” lead wiring is at the “+” mark on the speaker basket.
We solder the lead wires to the contact pads. Please note that the length of the wires has decreased by almost half a centimeter. Therefore, we solder them not as it was at the factory - to the hole in the plate, but with a minimum margin to maintain the length.
We center the diffuser in its basket using film (or thick paper), which we place in the gap between the core and the coil. The main rule is to place the centering evenly around the perimeter, to maintain the same gap. The amount (or thickness) of the centering should be such that when the diffuser is slightly protruding outward, it freely rests on it and does not fall inward. For the 25GDN-1-4 speaker, 4 pieces of film are enough for this, placed in pairs in front of each other. The length of the film should be such that it does not interfere if you put the speaker on the diffuser. For what - read below. We glue the diffuser. We use the indication for the glue used (I recommend "Moment", the main selection criterion, so that the glue can be subsequently dissolved with a solvent). I usually stick out the diffuser 1-1.5 cm up so that the centering washer does not touch the basket of the diffuser holder, then I apply a thin layer of glue on it and the basket with a brush, wait and firmly push the diffuser inside, additionally press the washer against the basket around the perimeter with my fingers ...Then I glue the diffuser (in the retracted state, without skewing).
We leave the speaker upside down for several hours under load (this is why our film should not protrude beyond the plane of the diffuser!).
Then we check the speaker for correct assembly. We take out the centering and carefully check the diffuser travel with our fingers. It should walk easily, without emitting overtones (there should be no touching of the coil and core!). We connect the speaker to the amplifier and send low-frequency tones of low volume to it. Extraneous sounds should be absent. In case of improper gluing (misalignment, etc.), the speaker must be glued (see above) and reassembled, being careful! With a high-quality assembly, we get 99% of a fully working speaker.
We glue the edge of the dust cap with glue, wait and carefully glue it to the diffuser. Here you need accuracy and precision - a crookedly glued cap does not affect the sound quality, but it spoils the speaker's appearance very much. when gluing, do not press on the center of the cap. It can bend from this and you will have to peel it off, straighten it, coat it from the inside with a thin layer of epoxy for strength and stick it back.
We wait until all parts are completely glued together (about a day) and put the finished speaker in its place. We enjoy the sound, which is no worse than that of the new factory analogous speaker.
That's it, now you can see that fixing a speaker is an easy task. The main thing is slowness and accuracy! So in an hour, you can slowly repair almost any woofer or midrange speaker of domestic or foreign production (for gluing imported speakers, a more powerful solvent is often required, such as acetone or toluene, carefully - they are poisonous.) Having a similar defect.
| Video (click to play). |
Yes, after the operation, the former patient got a second wind and the cheerful yellow subs continue to do their hard bass work:


