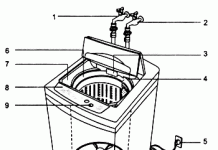
In detail: do-it-yourself repair of a zelmer electric meat grinder from a real master for the site my.housecope.com.
The electric Zelmer meat grinder is, of course, more convenient in our household use in comparison with a simple mechanical meat grinder.
The electrical circuit of the meat grinder can be attributed to simpler circuits.
Zelmer electric meat grinder
As with every household appliance, the meat grinder has its own causes of malfunctions:
- untimely care;
- power surge;
- mechanical damage
and other reasons. What can be attributed to untimely care? - Poor sharpening of the cutting edge of the knives is admissible. In this example, a load is created both on the electric motor of the meat grinder and on the electric circuit of the meat grinder, at which a malfunction of both the electric motor itself and the capacitor in the electric circuit of the meat grinder can occur.
You cannot name all the reasons at once. Let's say you bought a meat grinder in the winter, brought it home and plugged it in right away. In a warm room, condensation has formed on the stator windings, - you connected it and the electric motor of the meat grinder immediately burned out. It is also necessary to pay attention to the correct use of household appliances.
The mechanical part of the electric meat grinder is shown in Fig. 1.
In general, no clarifications on this part are required. Timely it is necessary to monitor the cutting part of the knife, as well as monitor the grate so that it does not become clogged with tendons from the meat.
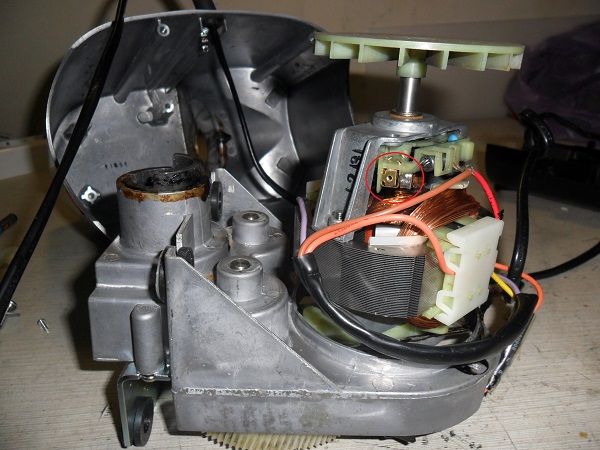
The photo shows the electric motor of the Zelmer meat grinder, - with a gearbox.
In this unit, the cause of a malfunction can be both a malfunction of the electric motor itself and wear of the gear transmission of gears.
| Video (click to play). |
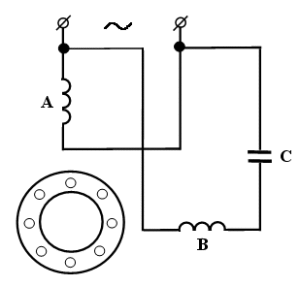
Consider the electrical diagram of the Zelmer meat grinder without additional elements in Fig. 2, an explanation in this topic will be given to the main causes of malfunctions of the electric meat grinder, such as:
The two stator windings of the electric motor are offset from each other by ninety degrees. The current in winding B differs in phase from the current in winding A, due to this difference, the initial start of the rotor is ensured.
The difference in the currents of the two stator windings is created by a capacitor, namely, the current value for winding B will be greater than that for winding A. That is, the capacitor in the electrical circuit here serves to ensure the initial acceleration of the rotor.
The electric motor of the meat grinder is asynchronous, the rotor speed of which lags behind the rotation speed of the stator magnetic field.
Consider some of the causes of a malfunctioning electric meat grinder. For example, your diagnostics established a capacitor malfunction. How to choose the right capacitor?
The tolerance in the deviations of the capacitance of the capacitor is not important, since the deviations in the capacitors are insignificant. Important characteristics are the capacitance of the capacitor itself and the nominal voltage value of the capacitor.
The next reason for the malfunction is a burned out electric motor. With such a malfunction, it is easier to replace the electric motor itself, if the cost itself is more acceptable for purchase.
These parts are available from the radio store. If the capacitor you need is not on sale, the capacity of the capacitor you need can be selected from two separate capacitors, let's say two capacitors. In this example, to increase the total capacitance, two capacitors are connected in parallel.
Minor causes of malfunctions include:
- break in the mains cable wire at the base of the plug;
- break in the wire of the network cable along its length
A general diagnosis of all connections can be carried out - with a probe.Diagnostics of the electric motor is carried out by the Ohmmeter device or by the Multimeter device, previously set to measure the resistance of the stator windings of the electric motor.
It's easy to guess: there is an electric motor inside the meat grinder, supplemented by a rotation speed control circuit. If we put aside the cases when it is necessary to replace the protective sleeve, coupling, repairing meat grinders with our own hands concerns the knowledge of the theory, the practice of the operation of AC motors. In electric motors, collector designs are more often used by consumer electronics; in industry, asynchronous ones dominate. Newbies will ask where the authors got their information from. We answer: according to the Ariston service department, since the 90s of the last century, collector motors have been replacing asynchronous motors in the household segment. Today, the percentage of the former reaches 85 of the total. On this bright note, let's start looking at AC electrical machines and control methods.
One often hears the statement: brushed motors work equally well on AC and DC. Let's say more: the alternating current loses part of its power, passing through the stator and rotor chokes, the inductance tries to delay the frequency. 50 Hz is a bit too much for a simple lacquered wire spool. Often, the stator windings are driven out individually, as they are. You can power one. Power suffers, losses are reduced, reaching a minimum size.
How easy it is to regulate an induction motor. Found two methods used by meat grinders:
- Changing the amplitude of the supply voltage.
- Commutation of windings.
It is clear that the first method requires the inclusion of additional elements in the circuit. I would like to notice about this! I happened to read on the forum about the domestic speed controller of an asynchronous motor, as if there were only resistors. The author hinted at the presence of a resistive voltage divider. But! When the active element operates in a linear mode - most regulators are built by thyristors - the resistance is far from infinity or short circuit. They put radiators, protecting the semiconductor keys, we will touch on the topic below. We would like to bring to the attention of the reader: there will always be losses.
A little blood is not enough. The grinder device contains a motor with two windings, a starting capacitor, the rotor is represented by a drum, we see a 100% asynchronous motor with a squirrel cage rotor. Let's meet a circuit with switching windings. As follows. One coil is wound around the periphery, connected through a capacitor, providing the desired phase shift. The second is wound at an angle of 45 degrees around the circumference, there is no phase shift. One is divided by two unequal windings. Each can be switched on separately, in parallel (together). Gives three speeds.
Let's add asynchronous motors to the theme. The manual for the repair of meat grinders will forget to mention a trifle: a thermal fuse designed for 135 degrees is often placed inside the windings. Foreign elements are often decorated with the letter F, the number has little to do with Fahrenheit. Unlike Elenberg transformers, where the braid honestly writes: there is a thermal fuse inside, asynchronous motors are often devoid of mention. Call the windings: one suffers a break, patiently inspect for different elements hidden between the wire. It can be difficult to do, believe me. The first glance shows only copper, the second - copper, the third - an element of protection is noticed.
The thermal fuse is found, it should be evaporated, ringing. With a positive breakage test, get a new one, solder instead of the old one. Can you guess why you can't short-circuit? Right! The next time it is not the thermal fuse that burns out - the asynchronous motor, the hassle will increase. Similar radioelements are found in many products, there are no special requirements. Surely there is a suitable specimen at the flea market. Be careful not to tinker yourself.As is the case with the regulation of the speed of induction motors. The method of dividing the voltage by a thyristor is suitable; in practice, current cut-off is used.
- The supply voltage is supplied bypassing the brushes in series on the rotor and stator. The direction of movement of the shaft is determined by the direction of the windings.
- The current flows through a thyristor switch controlled by the sum of the voltages.
The source of the switching signal shaping determines the complexity of the circuit. Brush motors spark. When switching sections, a back-EMF occurs. Directed opposite to power supply. Apply feedback. Through a capacitor, the back-EMF diode is added to the thyristor control electrode. The more the amplitude, the less the gateway is open. The motor starts, or the load increases - the speed decreases. The amplitude of the self-EMF becomes less, the key current increases, and the engine returns to the mode. Needless to say, how important it is to keep the speed constant, the circuits solve this problem. It is clear that part of the power is lost on the key, the inevitable payment for stability. The speed can be adjusted separately via a variable resistor. Who is interested - you will find good options here
The meat grinder is open, we begin to inspect the engine. It is necessary to measure the resistive input resistance. If a capacitor is visible in the circuit, we define it as an open circuit, it is misinterpreted, considering it a breakdown. To repair the grinder yourself, check the proposed engine type. Traditionally collector, it is easy to recognize, thanks to the characteristic drum, broken by segments, two graphite brushes are diametrically adjacent. Asynchronous motors are sold with squirrel-cage, phase-rotor options. In the first case, the rotating part is devoid of electrical contact with the stator, the power source, in the second, there is a pair of rings supplying current to the rotor windings.
The difference between an induction motor with a phase rotor - the shaft is devoid of a segmented drum, there is no pair of brushes. Repair of electric grinders is carried out according to the type of engines. The asynchronous entry is ringing anyway. The collector engine is not enough.
We will ring the section, rotate the shaft, measuring the resistance of each step. The values must be equal. The process stops - the turnover is completed. In collector motors, the stator is often made on a single coil. It is connected to the rotor by a magnetic circuit, represented by a core with wire turns. Do-it-yourself meat grinder repair will be a freebie. Even if the wire is burnt in the center, always buy a roll of a new one with lacquered insulation in the store, wind the required volume with your own hands.
They use a device formed by two pairs of racks mounted vis-a-vis on a long board. Each has a rotating axle. One holds a new spool, the other holds a coil of wire. Here you wind up the old choke to localize the break, how many turns to wind, what is the length of the wire. Most people use a handle, like an old barrel organ, it is allowed to use a screwdriver drive, a drill. Determine the speed so that it is convenient to lay the turns tightly. With the shuttle, the other hand guides the wire from side to side, from edge to edge of the spool. In conclusion, we will ring the coil and measure the electrical resistance.
Repair of induction motors is determined by the design. The stator is repairable. The configuration of the rotor windings is complex (if any). However, if there is a lot of strength, time, desire to practice, it is impossible to stop the master. Let the day be spent, the engine again works as part of the meat grinder.
- Winding direction.
- Number of turns.
- Location of terminals.
Three whales will help to correctly position the wire, it is allowed to combine it with neighboring coils, enlisting the help of soldering, applying insulation at the place of electrical connection. The main reasons for the breakdown of meat grinders are the consequences of improper operation. More often, there are two gross violations on the part of users of household appliances:
- Exceeding the permissible time of continuous work, underestimating the duration of rest. The parameters are not advertised by manufacturers, not all meat grinders contain protection against overheating. Users are deprived of information about the features. Housewives are losing blenders. The motor breaks easily.
- The second oversight is getting hard bones under the auger. Repair of the Zelmer meat grinder consists in replacing the protective sleeve. Sometimes you have to buy a set of spare parts.
Capacitors burn, swell (electrolytic on filters). Call, conduct a visual check: one side sticks out. The butt is pressed through with a cruciform recess. Bends outward. Burnt capacitor - consider a favorable outcome. Happy repair to everyone!
If your electric meat grinder suddenly refused to work normally, then, having familiarized yourself with the materials of this master class, you can repair it yourself.
The subject of our proceedings is an electric meat grinder Zelmer Typ 986.84. According to its owners, in the process of making tomato paste, it sharply reduced the speed and the auger began to rotate only in the opposite direction, and regardless of the position of the switch - except for the “off” mode.
Since when the “Start” button is pressed in any direction, the engine starts with a delay of several seconds, we conclude that the “brains” of the device, including the timer, are operational.
Having unscrewed the four self-tapping screws for fastening the halves of the meat grinder body, we disassemble it and take out the motor with the gearbox - the control board is also located there.
We proceed to a visual inspection.
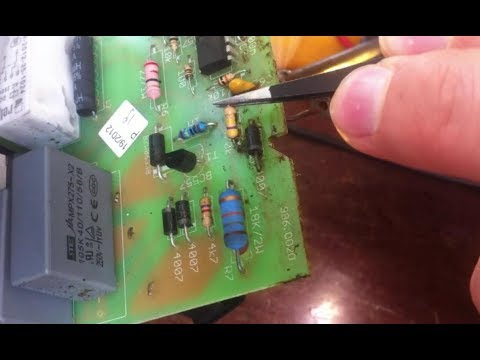
We notice traces of soot on the board - the result of a short circuit and burnout of the current-carrying track.
We check the integrity of all diodes and diode bridges with a tester that have connections with the damaged track. Since the short circuit occurred through the leaked liquid, we also check the elements related to the tracks located in the immediate vicinity of the short circuit.
The result was not long in coming: the diode bridge remained intact, but at least one of the diodes connected to the circuit in the counter-parallel direction and marked in the photo was broken.
Not relying on the quality of the remaining whole diode, we change both of them - the circuit uses 1N4007 diodes, you can replace any one with a current of 1A and a voltage of 1000 V.
Now we start to restore the track.
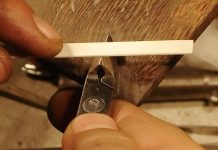
With a sharp knife we clean the edges of the burnt parts of the paths, we serve them.
We make a rope out of two or three thin copper wires and service it, then we connect the break point with a jumper.
Observing all precautions, we turn on the meat grinder to the network and turn the switch in turn into both modes - work and rotation in the opposite direction.
There is no increased sparking on the brushes, which means that the engine is working properly.
Now we wash the board with alcohol to prevent a repeated short circuit. in case of moisture ingress. We wash the board clean, if necessary, peeling off the carbon deposits with a knife until the board is free of its traces.
We protect the washed and dried board from the soldering side by applying two or three layers of nitro or zapon lacquer.
After the varnish has dried, proceed to the assembly of the unit.
We pay special attention to the assembly of the fixation unit - the rod and the lever of its drive, structurally combined with the button.
The rubber sealing ring, if it remains on the meat grinder mechanism, is installed in the hole intended for it in the front of the body.
We carefully install the mechanism in the front of the case, avoiding distortions and making sure that the rubber ring mentioned above is in the correct position.
From the first time, this operation may not work, but if you start assembling the meat grinder in the back of the case, the device will not be able to be assembled guaranteed, it has been verified by personal experience.
The final touch is to install the back cover of the electric meat grinder and tighten the screws.
Another warning: if the varnish on the board is not completely dry, do not turn on the meat grinder! Otherwise, an electrical breakdown will occur, and in this place such consequences as permanent short circuits and, as a result, burnout of the board are possible.
After a few hours (following the instructions for using the varnish), the assembled product can be used.
The electric assistant today is very popular and in high demand among Russian buyers. Despite high-quality manufacturing and high reliability in operation, electrical appliances tend to break down over time. Many breakdowns can be repaired at home, so we will tell you in detail about the repair of an electric meat grinder, which you can easily do with your own hands.
It doesn't matter what kind of meat grinder you have - Kenwood, Zelmer or Moulinex, each of them has its own nuances, but the faults are pretty typical for all. Electric meat grinder repair specialists have compiled the following register of the main problems encountered in these products:
- violation of various contacts of the electrical circuit;
- deformation of the engine rotor;
- breakage of the teeth of the gears of the reducer - arises from the increased load;
- malfunctions of the electric motor, extreme wear of the brushes;
- wear of the cutting tool due to the processing of too stringy meat, the ingress of small bones due to the user's oversight;
- breakage of keys, safety devices;
- damage to insulation, power cord;
- replacing the motor or rewinding its windings.
Many failures of reliable technology are due to violations of operating conditions and only a few - a factory defect or a human factor during assembly.
If any malfunction occurs, it is necessary to immediately carry out diagnostics in order to find out the cause and localize the breakdown. Inspection of the mechanical part of the product is carried out visually, and the electrical circuits are checked with special devices. If a visual inspection of all parts of the mechanical part did not give a positive result, then you need to dismantle the product and inspect the gearbox, electric motor. May have happened clogged lubricant rubbing parts, the bearings do not work correctly, they need to be replaced.
Timely diagnostics allows you to identify and eliminate malfunctions at an early stage of their development, which significantly extends the life of the entire product.
Let's consider in detail the malfunctions of the meat grinder and methods of their correction.
- The engine does not reach the set speed - the reason may be broken switch or the engine itself. Replace worn mechanisms or an electric motor.
- Interruptions observed in the drive - extreme wear of graphite brushes, you need to install new ones.
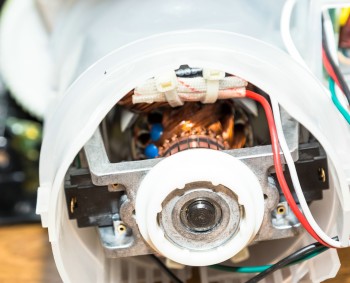
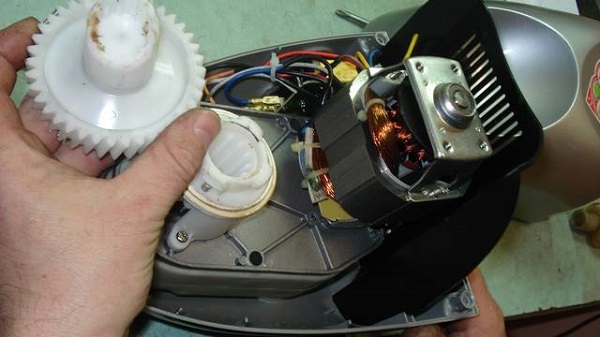
In the latter case, there are several reasons for the occurrence of such an unusual failure: incorrect assembly of the gearbox, cranking of the motor shaft, breakage of the drive gear teeth, and very rarely licking of the connection by the auger shaft (erasure of the hexagon).
On a note! The non-conformity of the metal of the part leads to its breakage during the ultimate load.
If the hexagonal receiver, where the auger shaft is inserted, is made by mistake of a softer metal, then during operation it quickly expands, or its edges wear off, the tight contact will be broken... The same can happen with the auger tip. It is difficult to repair a meat grinder with such problems with your own hands; the help of professional repairmen of similar equipment is required.
In order for the electric meat grinder to delight you with flawless work for a long time, you must follow simple recommendations for proper operation:
- before starting work, always carefully check if the assembly is correct and reliable fixation of all parts;
- pay special attention to the contact between the cutting tool and the grate - they must fit snugly, the fixing nut must be tightened with effort;
- cut the product into piecesnot exceeding the diameter of the loading cylinder, in order to avoid them getting stuck;
Special attention! Before processing meat and fish, it is necessary to free them from bones, remove large veins, make sure that small bones that can damage the knives do not get inside the product.
Do not turn on the meat grinder without loading, do not try to push through the stuck pieces of food with your hands - there is a special pusher for this, never overload it. If you thoroughly fulfill all the requirements, then the product will work flawlessly for the entire period assigned to it by the manufacturer, and she will not need repairs with her own hands.

