
In detail: do-it-yourself electric planer repair from a real master for the site my.housecope.com.
For many, woodworking is a great pleasure. It's nice to make a table for the veranda with your own hands, assemble a garden bench or change a leaky board. Only the joys of creativity are darkened by the routine physical work that electric planers are called upon to fight. Everyone, even a beginner, can work as a manual electric plane.
The plane is the oldest tool for woodworking after the ax. Any professional treats him with special respect. Painstaking work of designers and electricity made the plane even more perfect and efficient. Thus, modern electric planers outwardly resemble their mechanical counterparts, however, new designs are several times superior in productivity to manual labor.
The electric planer is intended for processing wood, reducing the thickness of wood products, preliminary planing, fitting, processing boards on the bed, beveling the edges and creating an extended groove of various shapes (chamfers, quarters, tongue) in products. All this is called one term - planing. This tool is not suitable for large areas, but with small volumes it makes it easier for the frequent repairman or the professional when handling wood.
The main function of a planer is to level a wooden surface that has been roughly finished beforehand. After leveling the product with a plane, all irregularities and defects disappear from the surface, and it becomes extremely smooth. Finishing wood is usually done with a grinding plane. You can also chamfer or groove a workpiece with an electric planer.
| Video (click to play). |
The construction of an electric plane is quite simple. Let's take a closer look at the electric planer circuit and its constituent elements.
In the body of the electric planer, on the base plate, there is the main working element - a rotating drum on which the knives are attached. As a rule, in the "knife drum" there are two, less often three or one, knives, which are engaged in cutting the upper surface of the planed wood. The knife shaft is much more technologically advanced than a conventional cutter, and the power of the tool allows you to work without any additional effort.
Knives are made from tungsten, hardened steel or carbide. By the number of knives that are fixed on the drum, electric planers are "two-footed" and "one-footed". The first type of tool works only with accurate alignment, otherwise only one knife will work, the second is simple and productive. Electroplanes with a knife, which is fixed obliquely on the drum, are capable of making a specific "spiral" cut for high-quality planing of the board.
Knives wear out over time. There are reusable knives that need to be sharpened, or disposable knives that need to be replaced. The frequency of these procedures is largely determined by the operational loads: the type of wooden surface and the time of their processing.
To remove the knife, slightly loosen the bolts that press the knife holders. They can be easily removed from the grooves of the drum. After sharpening, the knives are put in place, aligning in height with each other, as in the video about the electric plane.
Due to the presence of a centering groove, straight knives made of carbide are easily mounted in their place in holders, which are inserted in turn into the grooves of the drum. Sharpened steel knives require more careful leveling in height.
The sole of the electric planer is made of die-cast aluminum and is divided into 2 parts relative to the drum - front and back. The rear is fixed to a fixed position, and the height of the front, which is able to move on wood that has not yet been worked, can be set using a knob or button. The depth of planing, or in other words, the thickness of the chips, depends primarily on the position of the front part.
The sole influences the stability of the electric plane. In any case, this element should not interfere with work and be smooth. The soles, which are produced by some manufacturers, have several V-shaped grooves in their surface, which are necessary for chamfering from the corners of the workpiece.
The rotating drum is connected to an electric motor using a drive belt, which is responsible for transmitting rotational motion. The drive belt needs to be changed from time to time. But this activity is not at all troublesome, because belts are sold in all tool stores. You can dismantle the old belt yourself. To facilitate this operation, the manufacturers made the protective cover removable.
The electric motor has a power of 580 - 900 W, its rotation speed reaches 1000 rpm. The quality of the treated surface largely depends on the power of the engine. The electric planer device contains a switch with a lock and a cord with a plug, as well as various electronic components: changing or stabilizing speed, soft start, drum balancing, overload protection and even an electronic brake.
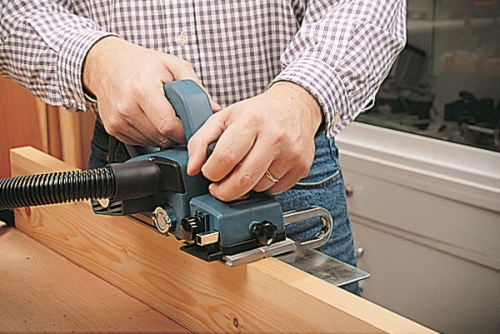
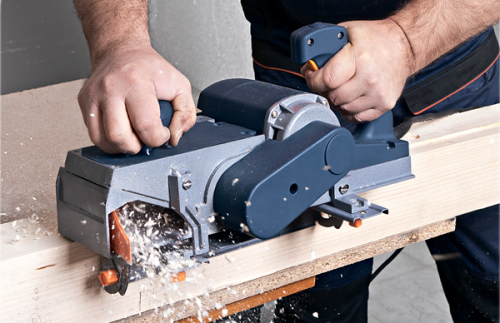
To move along the working surface of the electric planer, two handles are used. The rear of them allows you to push the tool, it houses a start / stop trigger with a double safety system. With the help of the front additional handle, only the movement of the electric plane is directed, the same handle allows you to work "in full swing". If you press down well on the front handle, a large layer of wood can be removed at the end of the material to be cut.
Since the adjustment knob is sometimes used as a second knob, it is often made with internal notches for the possibility of raising it when switching, otherwise it is possible to knock down an unintentionally set chip thickness during operation. A handle without such notches is capable of adjusting this parameter on the fly, but this does not allow you to get rid of unwanted switching.
Switching steps are usually 0.1 millimeters, but each electric planer is different. The cutting depth can be set by turning the knob. In this case, the front part of the sole drops or rises, opening the drum with knives less or more.
Two types of safety devices protect the work surface and fingers from below and to the side from contact with the knives. At the bottom of the sole there is a leg, as in the photo of an electric planer, which is automatically thrown out, slightly raising the back of the sole. The movable safety leg will fold back when the electric planer is not working and the workpiece will be protected from contact with the knives. The planer can also be laid on its side with the drive belt cover facing down.
A side protection plate on the spring covers the edge of the knife drum and rises as far as the plane will go deeper into the wood when the quarter is selected. The side edge of the knife drum, which allows the selection of a quarter, is hidden under the pivoting plate.
The direct chip ejection procedure relieves the electric plane from clogging and occurs in three ways. In the first case, no technical excesses are required, the chips will scatter throughout the room, but the working surface will not be clogged.
The possibility of the directionality of the ejection socket in some models makes it easier to remove chips, this is the second option for ejection of chips. The bag holds a large volume of chips, although it is not too bulky.If you need a bag, you should inquire whether there is one in the set and whether it is possible to purchase it in addition.
A good solution to the problem is to connect it with a corrugated hose to the vacuum cleaner, but it will not completely rid you of debris. Depending on the location of the operating electric planer, it is convenient to direct the chip ejection in a certain direction.
To do this, just switch the key to the desired position. The method is simple, however, it is inconvenient in some cases, because the hose and cord limit the flexibility of the structure.
There are many different accessories for the tool, regardless of the price of the electric planer. For example, corrugated knives made of hardened steel, of different dimensions, which are used for roughing, as well as equipment that allows you to set a planer stationary and turn it into a planer and an automatic jointer at the same time.
The side stop, together with the depth gauge, is able to precisely set the width and thickness of the removed chips. In order to cut the angle, it is customary to tilt some of the stops from 0 to 45 degrees. When cutting a thin edge, the side fence will help give the plane the balance it needs. The above described accessories of all possible must be included in the kit.
The power of the electric planer is 0.4 - 2 kW. For home use and do-it-yourself repairs, an electric plane is suitable, which has a power of 500 - 900 watts. For simple and short-term work, a household-class electric plane or a home-made low-power electric plane is suitable. And for real masters, you only need a professional powerful tool.
The rotational speed of the cutter is able to influence the cleanliness of the surface treatment and is 10 - 18 thousand revolutions per minute. In some models, the rotation speed can be changed. It is also able to be maintained at a constant level by electronics, which is very convenient when working with hardwoods.
The planing width is 82 millimeters and more. This figure matters when you spend most of your time working on boards. For many firms, the planing width of wood usually does not exceed 82 mm, but there are companies on the market, for example, Interskol, which have increased the planing width to about 102 millimeters.
You can set the planing depth within the range of 0 - 4 millimeters. It can be smooth and step-by-step. The cutting depth of the edge ranges from 0 to 25 millimeters, respectively.
The electric planer that you will make is designed to process wood in one pass, which has a width of up to 120 millimeters and a processing depth of up to 1.2 millimeters. The work piece will rest on a plate with a cutterblock hole. The guide square is attached to the base plate with 2 M8 screws, which have plastic heads, it prevents lateral displacement of the product during processing.
Attached to the base plate from below with M6 screws, which have countersunk heads, bearings of the rotary knife shaft bearings. Outside the base plate at the end of the knife shaft, it is customary to install a V-belt pulley. The plate is attached with 10 screws to the body of an electric planer, which is welded from a steel corner measuring 20 by 20 by 3 millimeters.
The safety casing is connected to the body with three M6 cylindrical head screws over the V-belt transmission through spring washers. The electric motor of the tool is located inside the housing and is connected to it by means of 2 supports in the form of steel strips. They have 2 holes with a diameter of approximately 6.5 millimeters, which are intended for attaching to the body of an electric plane with your own hands, as well as 2 grooves each, providing installation and adjustment of the position of the electric motor for tensioning the belt.
The electric motor of the apparatus is controlled from a remote control located on the front of the body.Under the U-shaped bracket inside the control panel there are 2 phase-shifting capacitors, which are fixed in parallel and have a capacity of 4 μF. The switch is mounted externally on the panel. The motor is protected from direct ingress of dust and chips by a casing.
Make the base plate first. The most time-consuming operation is considered to be the execution of a curly cut in the slab, which is intended for the exit of the knives. For this purpose, use an electric drill with a cut-off wheel of a small diameter or drill along the contour of the hole, and then file the slot with a file. After drilling the mounting holes in the base plate, threaded holes are made along them in the 4 upper corners of the electric planer body.
Before welding, the upper corners are attached to the base plate with 10 screws, the remaining corners of the body are welded to them. Then the base plate is removed, and the body is finally welded along the contour, cleaning the welded seams. It is especially carefully cleaned along the plane in which the body rests on the base plate. In this case, gaps are unacceptable, because they provoke vibration during the operation of the electric planer. Consider this before making a do-it-yourself electric plane.
After completing the assembly, make sure that the cutter shaft will rotate counterclockwise - in the direction of feed, as judged from the side of the console. This feature is of great importance, because the technique of fixing the V-belt pulley on the knife shaft does not allow it to move in the opposite direction. Fasten the planer body without gaps with 4 M6 screws before starting work.
The knife shaft for slotting is equipped with 2 knives, which are 120 millimeters wide, or one knife. In the latter case, a counterweight is installed on the opposite side of the shaft in order to eliminate unbalance and vibrations. Each knife is secured using pressure plates and 3 M8 screws, which are screwed into the threaded through holes of the rotating knife shaft.
For knives, the most accessible blanks are the worked-out blade of hacksaw saws for metal, which has a thickness of about 3 millimeters. The angle of sharpening of the cutting edge of the knives should be within 30 - 40 degrees. With curly sharpening, you can get a relief surface for artistic frames or platbands.

Narrow and thin profile strips, which have a width of less than 10 millimeters, can be prepared by ripping a wider board. When working with narrow knives (less than 12 millimeters), it is not recommended to process grooves that have a depth of 8 millimeters, due to the lack of strength of the tool.
Now you know how to make an electric plane, it remains to learn how to properly sharpen the knives for it. Let's talk about this in the next article.
Below we present the full text of the article published in the magazine "DEMAND" 2010/4.
A good planer should not only plan smoothly, but also accurately select the quarter and chamfer flawlessly. How the economy-class models cope with these tasks, we found out during the tests.
The main parameters by which the electric planers were selected for the test were the planing width (82 mm) and the engine power (from 570 to 750 W). The productivity of the tool largely depends on the power: the higher this indicator, the thicker the shavings the plane is able to remove in one pass.
Four samples of foreign production took part in the test (Hitachi P20SB, Skil 1560АА, Black & Decker KW 712, Bosch PHO 20-82) and two electric planers of Russian brands - Interskol R-82TS-01 and Baikal E-313... All of them are widely available for sale, and their price ranges from 1800 to 4000 rubles.
1  2
2  3
3 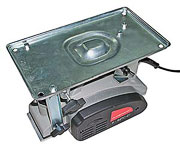 4
4  5
5 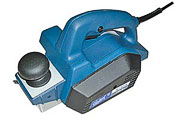 6
6
- Hitachi P20SB
- Black & Decker KW 712
- Bosch PHO 20-82
- Interskol R-82TS-01
- Skil 1560АА
- Baikal E-313
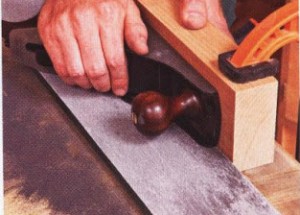
The richest in terms of equipment turned out to be Interskol... This electric planer is supplied with horizontal and vertical stops for cutting a quarter, a wrench for changing knives, as well as a bag for collecting chips and a stand that allows you to turn the plane into a stationary mini-machine.To do this, the tool must be installed on the stand with the sole upward, and the stand itself must be screwed to the support (see photo at the beginning of the article). The kit also includes a special "flag": it covers the rotating blades, but does not interfere with the work (pictured on the right).
But at Skil and Black & decker There are no “accessories” other than the hex wrench for changing the blades. The rulers for choosing a quarter and a bag for collecting chips for these models are offered to be bought separately, but it turned out to be very difficult to find them on sale.
The feature set for all tested samples is approximately the same. This is primarily planing, folding and chamfering.
For four models, the planing depth is stated in the range from 0 to 2 mm. This dull monotony is diluted Hitachi (declared range 1 to 2 mm) and Baikal (maximum planing depth 3.5 mm). Indeed, Baikal confidently removes shavings of 3.5 mm, but the regulator of this electric planer has caused criticism. There is no correspondence between the actual planing depth and what is written on the graduated scale.
Have Hitachi the planing depth regulator does not have a limiter, therefore, despite the declared 1 mm, this plane is able to go deeper into the wood by 5 millimeters. However, when working with a wide board it is better not to do this so as not to overload the engine. But if we are talking, say, about processing the end of a thin board, this feature can be very useful. For example, when, when clapboarding, it is necessary to fit the edge board. Although in this case it is difficult to set the exact depth of planing - you have to determine it by eye.
Have Interskola the planing depth adjustment knob is difficult to turn. In addition, this plane has a slight backlash.
All dough models have a V-groove on the front adjustable sole for chamfering the edges and edges of parts. And at Bosch even three such grooves (pictured on the left). This allows chamfering of different depths and widths. If a very wide chamfer is required, set the maximum planing depth for the first pass and proceed as usual for the following passes. 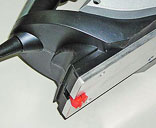
Feature of models Skil and Bosch - a pivoting support heel located on the back of the sole (pictured on the right). It prevents the knives from contacting the work surface when the plane is stopped or turned off. And during work, the heel itself goes inward and does not interfere with planing. It also makes it possible to continue working after a break at any point on the surface.
Table 1... Technical characteristics of electric planers
Congratulations! Indeed, after you have worked yourself up to the seventh sweat with a hand tool, then having worked with electric iron you experience a great pleasure.
Who has a Skil 1525 - tell us how the device is.
And what is the difference between 1525NA and 1525Нb.
I want to return to the discussion of Skil 1560.
Dear owners, how is the device in operation?
what models can you still look at at the same price?
Skil 1560 - functions normally.
Eliminated the shortcomings (it was necessary to look at the purchase)
1-sanded soles
2- eliminated the skew (see above)
3- replaced the cord: it was 2 meters and hard
4- removed the emphasis on the back sole, it only interferes
made a side stop from a bar and a duralumin plate, now you can plan along the guide;
in the plan, also remake the switch - remake the lock into a latch and loosen the spring; make a smooth start
Alexilten wrote:
in the plan, also remake the switch - remake the lock into a latch and loosen the spring;


went through the search but never found:
for Skil 1560 can you buy a side stop? or holes on the sides for beauty.
for Skil 1560 can you buy a side stop? or holes on the sides for beauty. [/ QUOTE]
for emphasis, you can buy in addition, but where? I searched for half a year, did not find it, spat and in one evening I did what I needed. Cheap and cheerful.
Alexilten wrote:
for Skil 1560 can you buy a side stop? or holes on the sides for beauty.
for emphasis, you can buy in addition, but where? I searched for half a year, did not find it, spat and in one evening I did what I needed. Cheap and cheerful. [/ QUOTE]
how, from what.
if there is a picture - pliz!
Sorry, but there is nothing to do the photo. Everything is simple and primitive there: I cut out a bracket from a 6 mm thick duralumin plate, a cat. screwed into place.In the rear sole, closer to the end and to the left edge (when looking at the plane from behind), I drilled a 5.5 mm hole - there are niches with stiffening ribs, I put a 5 mm thick rectangular steel plate with an M5 hole and thread in the niche, holes in the sole and in the plate, respectively, coincide. A birch (yes, anyone will go, just got under the arm) a bar 350 * 35 * 70 screwed with two self-tapping screws to the bracket, and through a correspondingly drilled hole with an M5 screw to the back sole. The screw must be selected in length so that it sinks into the bar and does not rest against the body of the planer when screwing. That's all. True, the bar takes 35 mm of usable width. I had to pierce an uneven edge of a board 2.5 meters long, with clamps I pressed a straight rail from the edge at a distance of 73 mm and literally in a few passes I got an even (at least shoot) edge. Naturally, the dimensions of the bar are not critical, they can be made several for different situations in length and width. If you could not explain, then do not kick too much, I will look for something to take a picture.
Today I bought and today the belts burst (the engine is running, but the drum does not spin = (), when planing 0.6 mm 5 minutes after starting work.
It's a shame, I tuned in to this particular model so far.
It will take a little physical effort and the tools available in any workshop to return this time-worn instrument to its former working form.
Most of us have one or more old planers that have been gathering dust on the shelves for years. Hand tool expert John Olson recently took on one such planer, the Stanley No. 5, released about a century ago. It occupies an intermediate position between the finishing plane (grinder) and the jointer and serves for the primary processing of boards. "Five" is still one of the most widespread models, and spare ones are not in short supply. Even if your planer is different from this, it can also be improved using the operations shown below.
The plane John chose to rebuild had minor external defects, but it showed visible signs of heavy use - clear evidence of the planer's outstanding performance. (photo A).
If you are going to tidy up your plane, completely disassemble it and inspect it carefully.
- Rust. You shouldn't pay too much attention to it, as it can be easily removed. But if small parts are badly corroded by rust or screws, levers and other adjustment elements have jammed as a result of corrosion, and deep cavities have formed on the sole, it is better to refrain from restoration. at the mouth or a broken lever, forget about repairs.
- Lack of detail. Spare parts for most bench planers can be found by purchasing new ones from catalogs of specialized companies or old ones at online auctions (consider picture below, to find out the name flew). But if the cost of replacing a part exceeds the cost of a new plane, it makes sense to think about the feasibility of repair.
All of this cannot be avoided - you have to sweat to clean the rusty plane. John prefers a thin steel wool cleaning method with his signature Work Rust Free, which penetrates into every corner. (photo B).
Let the rust remover soak in for 30 seconds before scrubbing off the plaque with a steel wool swab. Then wipe the surfaces with white spirit.
A drill with a polishing tip will help you quickly clean brass nuts to a shine.
To combat stubborn rust and paint marks, it is better to use fine-grained sandpaper or a drill with abrasive, brush and polishing attachments. (photo C).
If these methods seem too slow for you, try electrolysis.
Masking tape covers areas that cannot be stained.Carefully cut off any excess tape with a knife, starting from the middle of the cut and guiding the blade along the edge.
In the old days, most planer manufacturers protected metal parts from corrosion with special paints, the formulations of which were kept secret and lost. Instead, John uses modern anti-corrosion paints such as Rustoleum Black.
First of all, you should protect the sole, body cheeks and the contact area for installing the "frog" with masking tape. (Photo D). Glue the flat areas where the blade contacts the frog and the body, and the bottom of the presser that contacts the chipbreaker. Then spray two to three coats of paint on all exposed surfaces of the body, frog and pressure. Let the paint dry completely and remove the masking tape.
Turn the "frog" so that the lever does not interfere with the work, and grind a part of the plane. Then move the lever to the other side and sand the rest.
In order for the "frog" to reliably hold the blade at a certain angle, it must have close contact with both the blade and the body. Place the frog on the contact pad in the body - it should fit snugly and remain absolutely stable. Even the slightest wiggle is unacceptable. If you feel a little unstable, apply a little car engine valve paste (available at auto dealerships) to the underside of the frog. Having secured the body in a vise, move the "frog" back and forth along the contact area until it is stable. Wash off all dirt and paste residue with white spirit. Then flatten the top of the frog where the blade rests. Place a 120-grit sheet of sandpaper on a flat piece of glass and lightly secure the glass with a bench vise, stops and wooden blocks. Move the adjusting lever aside and sand the front plane of the frog on the edge of the sandpaper (photo E). Check the result often. When the entire surface is shiny, move on to 220 grit sandpaper to remove any rough marks.
Unevenness in the leading edge of the chipbreaker creates gaps in which the chips will get stuck and impair planing performance.
The chipbreaker (as its name suggests) breaks the chips at a specific point, thereby preventing the wood from cracking under the wedging action of the blade. Damaged or worn chipbreaker (Photo F) complicates the planing process, preventing correct chip removal and obtaining a smooth surface. Carefully correct the shape of the leading edge of the chipbreaker following the steps shown in (photo G and H).
Using the edge of a workbench to hold the chipbreaker at an angle, sand the front edge from the inside with 120 and 220 grit sandpaper.
Fix the chipbreaker in the sharpener at an angle so that the sharpening plane is tangent to the bend line, and sand the leading edge with 120 grit and 220 grit sandpaper.
Then start sharpening the blade (old or new) using your usual method. With a variety of sandpaper numbers on hand, John used it to chamfer the blade at a 25 ° angle, successively using 120-grit abrasives; 220 and 320 units, and then sanded the microfilm at the cutting edge with an angle of 30 ° with sandpaper No. 2000 (photo I and J).
Buff the back side with 220 grit paper; 320 and 2000. A sheet of fine grain paper is held in place by friction.
Sharpen on 120 paper to a solid bevel. Then make a few consecutive strokes with 220 grit; 320 and 2000 units.
Guide the file at a slight angle, removing more material from the taphole side to avoid widening the mouth.
In this type of planer, the bulge on the leading edge of the chipbreaker promotes firm contact with the blade, increasing its stability during operation. But it partially covers the opening of the tap hole, making it difficult for the chips to escape. John solves this problem by widening the gap in the sole (mouth). Using a square, draw a line parallel to the front edge of the mouth. Hold the body in a vise and file off some metal from the front edge (photo K). The line serves as a guide to keep the edges of the mouth straight.
In order to level the plane of the plane of the plane, the stresses in its body must be the same as during the planing process. Therefore, you need to completely assemble the plane, without pushing the blade over the sole, and again do the grinding with sandpaper.
Correctly holding the plane, as in planing, and moving it back and forth, you involuntarily make pendulum movements. This is useful for real work, but sanding will create a bump in the midsole and grind the toe and heel faster. John prefers to turn the plane all the time to keep the sole flat. To align the outsole and cheekbones, follow the steps shown in Photo L—O.
Now it remains to clean again everything with a soft cloth soaked in white spirit. Apply a thin layer of wax paste to the newly sanded strip and cheeks to protect them from corrosion and to set up the reconditioned planer for planing. Congratulations! You have become the owner of an excellent tool that will last for long goals.
Check the sanding result often. After a few strokes, shiny spots will show the degree of wear on the outsole
Once the sole is completely lined up, finish sanding by removing any marks with 220 and 320 grit sandpaper.
To keep the body cheeks perpendicular to the sole, sand them by pressing the sole against the edge of a hardwood block.
Timely and correct adjustment of the electric planer knives allows you to fully exploit the full potential of this magnificent tool.
With the correct adjustment of the planer blades, large volumes of material can be dealt with effortlessly.
New models of electric planers allow you to effortlessly cope with large volumes of material. The electric plane can do both rough and finishing, wood processing. Some models of electric planers allow you to get such a good result that there is no need for surface grinding.
The cleanliness of the treated surface directly depends on the depth at which the planing is carried out. The planing depth for some models is set in increments of 0.1 mm. When purchasing a tool, you need to pay special attention to this particular parameter. In general, setting the knives for work should always be done very carefully.
The electric planer device includes two knives, which have two cutting surfaces and can be easily removed.
The electric planer allows you to process the surface with high quality, while maintaining certain dimensions. But the outcome of the work directly depends on the selection of knives. Often during use, an unpleasant defect occurs - the surface looks wavy. The reason is the slight difference in height. The problem is solved by correct adjustment and replacement of the electric planer knives with spiral ones.
Power tools usually come with two blades. They are most often made from high strength hardened steel. Tungsten blades are less common. They are sharpened using a special mechanism, in which the knife is fixed and the sharpening angle is set.
When buying knives, you need to consider their safety. Most often, power tools are equipped with two types of protection:
- protection of the surface undergoing treatment;
- finger protection.
Many electric planers have a protective plate, which, when working, closing the drum, allows you to work the surface at different depths and at any distance.
The control mechanism is located on the handle of the electric planer. The actuation of the mechanism leads to the extension of the knives. Adjustment depth 2 mm.
Electric planer knives are sharpened according to the same principle as for hand tools. The only difference is in the number of blades. The electric plane has two of them and they are changed only in pairs. Using blades from one set avoids imbalance. Violation of this rule will lead to a very low quality of processing and accelerated tool breakage.
The cutting elements of the planer are mounted on a rotating drum. It is located in a special groove and secured with nuts. After loosening the nuts, the slot can be extended and the blades changed. The blades are swivel, which means that when one side is dull, the blade can be quickly and easily changed.
Currently, various shapes of electric planer blades are produced:
- Straight lines - for planing small parts, sampling of quarters.
- Wave-like - allow you to imitate "aged" wood.
- Rounded - neatly make transitions between planing lines, therefore they are used for working with a wide surface.
Knives can be classified into 3 groups depending on their size.
Traditional 82 mm, also called "plates". Exact dimensions: length 82 mm, width - 5.5 mm, thickness - 1.2 mm. Fits most imported planer models, including Skil, Black & Deccer. Manufactured from carbon steel. The price and quality of these knives depends on the manufacturer.
Special knives designed for some tool models. From "plates", these knives are thicker and wider, stronger. The length of these knives is 82 or 102 mm. Thanks to their thickness, they are easy to sharpen.
Knives manufactured for a specific model, for example, Rebir. Most often they are thick and wide (up to 110 mm). There is a hole for fastening.


