In detail: do-it-yourself encoder repair on a radio tape recorder from a real master for the site my.housecope.com.
In the practice of repairing car radios, there are cases when the elimination of a malfunction is solved by simple cleaning.
During long-term operation of car radios, there are problems associated with the mechanical elements of the device. Since all control of the car radio takes place through the front removable panel, those elements that are installed on it are also damaged. Usually these are all kinds of buttons, less often miniature display backlight lamps (in older car radios), volume controls, a multi-pin connector connecting the removable panel with the main part of the car radio.
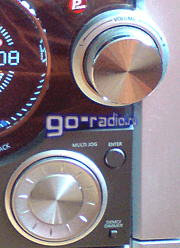
You have probably seen that in many car radios, the role of the volume control is performed not by a set of buttons, but by a knob. In the official documentation knob, as a separate radio component, it is customary to call encoder, although in essence they are the same thing. In addition, this miracle of technology is called a shuttle. But the word shuttle means a control element already built into the device, and not a separate radio component.
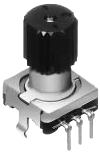
This is what an encoder looks like
It is important to understand that the encoder is part of the digital electronics and serves to enter information by turning the knob. All control takes place by changing the angle of rotation of the knob. The knob itself looks very much like a conventional variable resistor, which was previously used in semi-digital and analog car radios to control the volume.
But if with the help of a variable resistor only one function was performed - adjusting the sound, then with the help of a knob it is possible to adjust the sound volume, set the parameters of low and high frequencies, navigate through the menu and much, much more. Naturally, such wide functionality is possible only with the use of digital electronics.
| Video (click to play). |
Encoders can be found in any technology where digital function control is used.
All is well, the knob is undoubtedly very convenient, compact and multifunctional. But since it has mechanical parts of the structure, sooner or later it fails.
So, in case of malfunction of the knob, the following malfunction most often occurs in car radios:

It is better to replace a faulty encoder with a new one, but what if it is out of stock or difficult to get? In this case, the faulty one can be repaired, however, to eliminate the breakdown, disassembly of the encoder will be required.
The encoder design resembles that of a conventional variable resistor. As already mentioned, even in appearance they are very similar.
Externally, the encoder is very similar to a conventional variable resistor.
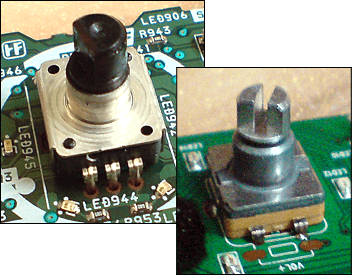
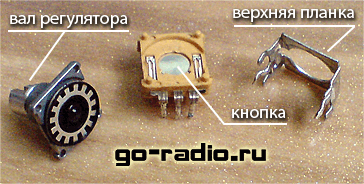
Usually, a micro-button is built into the encoders that are used in digital car radios, which serves as a kind of analogue of a button ENTER (entering or confirming a selection). This button is located under the regulator shaft (see photo). The knob has three pins. Together with microbutton leads - 5. Also, for rigid installation on the board, there are two wide leads from the top plate of the case. They are soldered into the board.
Disassembled encoder
Before starting to disassemble the knob and clean it, it is necessary to remove it from the front panel printed circuit board. At first glance, the operation is simple, but in practice the process is complicated by the fact that there are usually small SMD elements next to the encoder and there is a possibility of damaging them when the encoder is removed.
Therefore, to dismantle the encoder from the printed circuit board, it is better to use a special tool for soldering multi-pin parts. Read more about this here.
It is worth disassembling the rotary encoder carefully without using excessive force. The main task is to get to the internal contacts and clean them from dirt and oxides. You can bend the moving contacts slightly so that they make better contact with the fixed contacts when sliding.
It is better to clean the contacts with special means. To do this, you can use, for example, spray cleaner DEGREASER... It is easy to apply to the surface, evaporates quickly without leaving traces, it cleans well from frozen rosin, oxides, dirt and fine dust. It is better to apply the spray to the toothbrush in a small amount and then gently clean the surface of the internal contacts of the rotary encoder. After that, we assemble the knob and solder it into the printed circuit board.
Usually, after such cleaning, the rotary encoder works stably and the malfunction with chaotic volume control no longer manifests itself.
Banned
Posts: 494
Your editor
Posts: 8043
I use this
my.housecope.com/wp-content/uploads/ext/2255
Posts: 2951
my.housecope.com/wp-content/uploads/ext/2255
Posts: 2951
my.housecope.com/wp-content/uploads/ext/2255
Posts: 2951
If done correctly, then you need to open, remove the remnants of dried grease, oxides, then lubricate with silicone. Moreover, if you cleaned it correctly, then until p% d, how much to add lubricant, even if you fill everything, but it works. The lubricant serves not only to reduce wear, but also to protect against corrosion. To cleanse from any infection I pshik WD40, I wash everything with it, then I wash it in gasoline for lighters, grease it with silicone grease and collect it. Everything, order.
After "pshikanya" with spray-60, problems arise, after which this thing needs to be changed.
Why there were no "repetitions" - the answer is simple - they carried it to another workshop, and the last client, who was more patient, was caught and decided to step on a rake for the second time.
After repairmen with sprays, I restored it so many times, there were worn-out ones, but there was nothing to replace, I had to re-manufacture the movable contacts.
I picked one such knob (also piz. cases in the adjustment-hung), - int. how to put the spray there without disassembling - from the side of the panel
–


there the handle is in the depth and enters the body of the knob itself (metal. tube) - with an interference fit and under silicone grease. How the spray is poured through the silicone


Increase font A A A
The volume knob has stopped turning down the volume. That is, regardless of the direction of rotation, the volume only increased. Disorder.
Let's open the radio and see what's inside. To do this, you need to unscrew the mounting screws and tuck the back cover.
To get to the volume control, it doesn't hurt to remove the knob. Usually it is easy to remove, but here it was necessary to tinker. Someone put her on the sealant. The knob of the regulator is collapsible, the upper part is held on bent metal plates. We bend them and remove the upper part.
Here we see a very dirty mechanism (by the way, the same problem was with a faulty mouse wheel). We wipe all rubbing parts (contact disc and antennae-shaped contacts) with a cotton swab and alcohol. I also fell off the "holey round timber", I had to glue it.
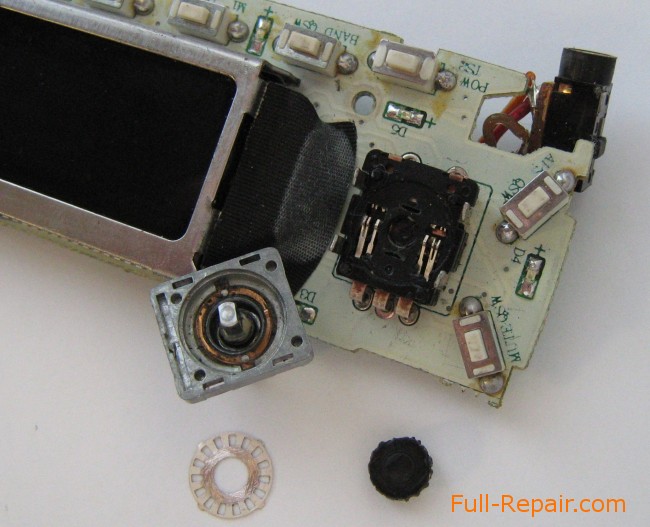
We clean the place of connections of the contact plate and glue it in its place.
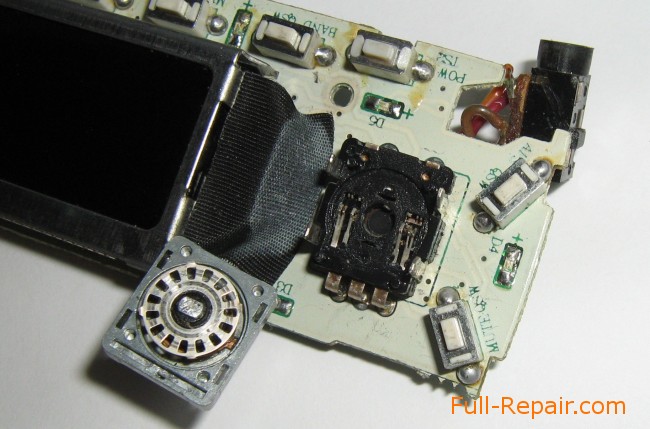
After cleaning, we make sure that all rubbing "antennae" are located exactly and on the same level, then we collect everything in the reverse order. I broke one of the four metal plates that hold the volume control assembly. It's okay, it will also hold on to three. And if everything breaks off, then you can put the upper part on the glue, only carefully so that the glue does not get inside the contact elements. You can go and check!
Share the article with your friends on social networks! I would be very grateful to you.
In the practice of repairing car radios, there are cases when the elimination of a malfunction is solved by simple cleaning.
During long-term operation of car radios, there are problems associated with the mechanical elements of the device. Since all control of the car radio takes place through the front removable panel, those elements that are installed on it are also damaged. Usually these are all kinds of buttons, less often miniature display backlight lamps (in older car radios), volume controls, a multi-pin connector connecting the removable panel with the main part of the car radio.
You have probably seen that in many car radios, the role of the volume control is performed not by a set of buttons, but by a knob. In the official documentation knob, as a separate radio component, it is customary to call encoder, although in essence they are the same thing. In addition, this miracle of technology is called a shuttle. But the word shuttle means a control element already built into the device, and not a separate radio component.
This is what an encoder looks like
It is important to understand that the encoder is part of the digital electronics and serves to enter information by turning the knob. All control takes place by changing the angle of rotation of the knob. The knob itself looks very much like a conventional variable resistor, which was previously used in semi-digital and analog car radios to control the volume.
But if with the help of a variable resistor only one function was performed - adjusting the sound, then with the help of a knob it is possible to adjust the sound volume, set the parameters of low and high frequencies, navigate through the menu and much, much more. Naturally, such a wide functionality is possible only with the use of digital electronics.
Encoders can be found in any technology where digital function control is used.
All is well, the knob is undoubtedly very convenient, compact and multifunctional. But since it has mechanical parts of the structure, sooner or later it fails.
So, in case of malfunction of the knob, the following malfunction most often occurs in car radios:
It is better to replace a faulty encoder with a new one, but what if it is out of stock or difficult to get? In this case, the faulty one can be repaired, however, to eliminate the breakdown, disassembly of the encoder will be required.
The encoder design resembles that of a conventional variable resistor. As already mentioned, even in appearance they are very similar.
Externally, the encoder is very similar to a conventional variable resistor.
Usually, a micro-button is built into the encoders that are used in digital car radios, which serves as a kind of analogue of a button ENTER (entering or confirming a selection). This button is located under the regulator shaft (see photo). The knob has three pins. Together with microbutton leads - 5. Also, for rigid installation on the board, there are two wide leads from the top plate of the case. They are soldered into the board.
Disassembled encoder
Before starting to disassemble the knob and clean it, it is necessary to remove it from the front panel printed circuit board. At first glance, the operation is simple, but in practice the process is complicated by the fact that there are usually small SMD elements next to the encoder and there is a possibility of damaging them when the encoder is removed.
Therefore, to dismantle the encoder from the printed circuit board, it is better to use a special tool for soldering multi-pin parts. Read more about this here.
It is worth disassembling the rotary encoder carefully without using excessive force. The main task is to get to the internal contacts and clean them from dirt and oxides. You can bend the moving contacts slightly so that they make better contact with the fixed contacts when sliding.
It is better to clean the contacts with special means. To do this, you can use, for example, spray cleanerDEGREASER.
It is easy to apply to the surface, evaporates quickly without leaving traces, it cleans well from frozen rosin, oxides, dirt and fine dust. It is better to apply the spray to the toothbrush in a small amount and then gently clean the surface of the internal contacts of the rotary encoder. After that, we assemble the knob and solder it into the printed circuit board.
Usually, after such cleaning, the rotary encoder works stably and the malfunction with chaotic volume control no longer manifests itself.
Home & raquo Secrets of car radio repair & raquo Current page
TYou will also be interested to know:
Many years have passed since one of the best shirpotrebovsky transceivers FT840... The excellent price-quality ratio and price-durability have brought it well-deserved fame and, to this day, the happy owners of this device continue to receive satisfaction from its operation. At the same time, he has one serious flaw, with which everyone meets sooner or later. This is a jammed knob problem. Back in the 90s, Vladimir radio amateurs - Alexander RA3VR and Vladimir RW3VA found a solution in the complete replacement of the knot of rotation of the rotary encoder with an analogue manufactured at the enterprise. Practice has shown that the assembly made of Russian brass made by our turners allows you to forget about the problem. Nevertheless, not each of us have our own instructor at hand, and in this case, the article Yuri Lebedinsky UA3VLO from Aleksandrov will allow you to “see” the problem and understand how to cope with it.
The FT-840 is a good and reliable unit, but the knob problem is, as far as I know, a fairly common problem. It happened for me too, in the midst of “ARRL DX-CONTEST”. The tuning knob began to rotate tightly, and then generally jammed. I had to forget about the test. I have to do something, but how? On the Internet, despite the abundance of information about this transceiver, I did not find anything about the malfunction of the knob. Thanks to Volodya Akminsky RW3VA, who once faced this problem for a long time and gave useful advice.
So, if the knob is jammed or the tuning knob suddenly began to rotate with great effort, you need to stop using the transceiver and urgently engage in repairs to avoid scoring in the rubbing surfaces. The repair is not difficult and will not take much time.
FOR REPAIR IS NECESSARY:
1.small Phillips screwdriver for M3 screws;
2.
key for 11;
3. Allen key for 2;
4. nippers;
5. assembly knife;
6.Soldering iron with tweezers;
7. WD-40 lubricating fluid (sold in auto parts stores);
8.CIATIM grease.
1. Unscrew the 5 screws securing the top cover and remove it.
2. On each side of the front panel there are 2 screws - the upper locking screws, the lower ones are in the grooves. Unscrew the upper screws, loosen the lower ones. Now the front panel can be deflected towards itself by the length of the groove:
“
Remove the decorative rubber ring from the adjustment knob.:
“
There is a hole on the adjustment knob through which we loosen the fixing screw with a small hex key 2 2 and remove the knob:
“
There is still a spring and a gasket on the shaft, carefully remove them too:
“
Using a 11 key, unscrew the rotary encoder mounting nut. From the outside, it seems that this is a bushing with an external thread, but if you look closely, you can see the turnkey bevels:
“
In order to pull out the knob, it is necessary to free the 4 wires going from the bundle to the knob board. To do this, very carefully, so as not to damage the wires in the bundle, we bite off the nylon cable tie with pliers. This turned out to be not enough for me, another bundle going to the front panel interfered. I had to bite the screed and this tourniquet. We take out the rotary encoder. A printed circuit board with four wires of different colors is attached to the bottom of the knob.We memorize or sketch the places where the wires are connected, solder them off and take out the rotary encoder. You can, so as not to forget, bite off the wires in these places, leaving 3-4 mm from the rations.
“
Valkoder is a plastic box with dimensions 4 * 4 * 1 cm, closed with a metal plate with an axis .:
“
Use a Phillips screwdriver to unscrew the 4 M3 screws and disassemble the knob. On the axis of the rotary encoder there is a graduated disc and a spacer. Carefully (the disc is very thin) remove the disc and the gasket so that only the plate with the axis remains. Surprisingly, the axis is attached to the plate as in any variable resistor, for example, type SP:
“
Spray WD-40 grease on the axle, hold it for a while, then try to turn the axle. My axis was wedging tightly, but after processing it began to turn. Repeat this procedure several times until the axle starts to rotate easily and without jamming.
“
Having lubricated the rotating parts with CIATIM grease, we assemble everything in the reverse order.
“
I hope my experience will be useful to those who have the same problems with the knob.
Tech Maniac Guru


Group:
Administrators
Posts: 2443
Registration: 25.12.2009
From: Ufa - the city of three screws
Outside the forum
Auto: Subaru XV
Reputation:


Today the volume control on the radio panel is covered (all other buttons work fine). I wanted to turn down the volume, but the twist, as it were, rested on something, and then fell off and began to spin freely. The volume is regulated from the remote control, which means a purely mechanical breakdown of the regulator itself. I disassembled the panel to see the name of the regulator - there is not a single mark on it, and next to it there is an EN301 inscription on the board. I tried to find information on this number in the internet, but I could not - some kind of nonsense climbs. Can someone tell me what kind of “beast” it is, can you find / buy it to re-solder it yourself? For clarity, I post photos of the panel itself and its board. I didn’t reduce the size of the photos so that small letters could be read.
Dedicated to inquisitive "nerds"!
This report is not the last resort and postulate, this is just my experience in car maintenance.
When I turn on the Mystery MCD-968MPU car radio installed on my car:
When the volume control was rotated, there was a breakdown in the maximum direction. )
Moreover, this happened independently, in the movement of the car.
The manipulation of the regulator did not help.
Only the radio remote control helped!
A breakthrough in the Internet, I found out that there is a problem with the volume control and it needs to be changed!
You have probably seen that in many car radios, the role of the volume control is performed not by a set of buttons, but by knob.
In the official documentation, the knob, as a separate radio component, is usually called encoder, although in essence they are the same thing. In addition, this miracle of technology is called shuttle... But the word shuttle means a control element already built into the device, and not a separate radio component.
I heard such words for the first time, because not an electrician, not an electronics engineer, not a radio amateur.
I am an Inquisitive Botanist! :)
Therefore, I decided to deal with this shuttle myself!
Moreover, the bouncing of passengers to the ceiling, after another "dirty trick" with loudness, simply forced me to do it.
And what came of it, see below!
Yes, this kind of "operation" is possible on any car radio, with some nuances on the knob!


Salute to everyone.
I decided to make such a contraption because it is very convenient.
You go, listen to music, so as not to poke your fingers at the monitor, but not to be distracted - turned the knob - increased / decreased the volume.
Target:
1. Make a physical volume control without distorting the sound (ala software)
2.To make this volume control rotate in both directions endlessly (encoder) and even press it (Mute, etc.)
Repair of Chinese car radios
Repair of Chinese car radios today is more and more interesting to the ordinary user. The question is why?
The answer is clear: almost the lion's share of today's car head units are made in China. Having become the owner of such a radio tape recorder (high-quality or low-quality, it does not matter), the user eventually finds himself face to face with a problem.
The equipment deteriorates, loses its sound, or, at best, it may be necessary to flash a Chinese car radio. In our article, we will consider the main malfunctions of Chinese car radios and try to explain all the nuances of repair, to give a practical understanding of this process.
Today everyone knows that a radio tape recorder is the most common electronic device among motorists. It is very rare to find a car that is not equipped with such a device.
And there is nothing surprising in this. Good music on the road will not hurt any driver, regardless of his preference.
Note. Videotapes and CD-players are the evolution of such devices these days. But despite this, almost the same details and elements remained inside. As a result, the devices are still called car radios and in case of repair, the process is almost the same.
So, before starting the repair process, you need to provide power to the device. As you know, car radios do not have a built-in power supply, like a music center, and you will have to provide it.
Note. All experts, as one, will declare that it is not recommended to use a battery as a power source in this case.
The most acceptable option would be a power supply unit, ideal for repairing Chinese car radios at home. Such a unit should be able to provide an output voltage of 12-13 V, and the load current be within 10 A.
On the other hand, the load current may be less, since it is not necessary for the car radio to work at its full capacity during repairs.
Alternatively, you can offer a PC power supply. Although the power supply can be made independently, then you will need to buy a powerful transformer.
Note. The power supply must be from a computer of AT or ATX formats.
- Such a power supply unit is capable of providing short circuit protection. For example, a short circuit can occur due to accidental over-polarity or other problems.
- Such a power supply will have the required output voltages. Usually, the yellow wire on the PSU is + 12V, and the red wire is + 5V. It is these very values that are needed in the process of repairing Chinese car radios.
- Low weight and small dimensions also speak in favor of such a power supply. It is known that the power supply of a computer is compact, and at the same time it has a lot of power.
- The supply voltage is provided stably. Having built-in stabilizers, such a power supply unit, with a current voltage load, never exceeds the normalized level.
Note. It is useful to know that a voltage output of plus 12 V will have a current load of 10 A or more. It all depends on the power of the PSU. As for the output to plus 5 V, then when diagnosing various motors, of which there can be up to 3 pieces in modern Chinese radio tape recorders, it is irreplaceable.
This power supply unit also has a built-in power switch, as well as an indicator on the LED.
During the repair, you will also need one of these components. The active resistance of the coil inside should be 4-8 ohms. You will need a speaker (see How to choose speakers for a car radio on your own) to control the sound quality.
Note. It is advisable to use speakers with an impedance of 4 ohms, since modern Chinese car radios are designed for just such a value.
In addition, of course, you will need tools:
- Standard multimeter.
- A good small screwdriver designed specifically for disassembly or assembly.
- Narrow nose pliers.
- Tweezers.
- Soldering iron with a set of necessary components.
Chinese car radio firmware
One of the types of repairing Chinese car radios is called firmware. Why is it needed?
Let's try to figure it out:
Note. Firmware is a software update.There may be several reasons why such an update is needed. They are presented below.
- The firmware is carried out for the compatibility of the radio with the new software of additional devices, such as a navigator, a rear view camera, a telephone, etc.
- It is also carried out to improve the overall performance of the device.
- The firmware can be carried out in order to expand the configuration possibilities, for example, when new features need to be added.
- Firmware can be carried out in cases where the drive software is incomplete or there are errors.
- It is also carried out to remove the binding to any region.
- To change the ID string of the drive.
- To remove a riplock, etc.
The firmware itself is also software. Having received it, a device such as a car radio is equipped with a modern operating system.
Note. Firmware can also be called a file containing the main version of the program for upgrading the device, the boot process itself, etc.
To make the firmware, use special programs obtained from the Internet or from other sources.
Approximately, as described below, the process of backing up the update of the Chinese radio is carried out:
- First, a firmware program is launched, for example, Binflash.
- Make sure that the same drive is selected for which you intend to make a backup.
- We connect the DUMP function.
- We see the appeared dialog box for the backup.
- Click on the "Save" option and wait for the backup process to complete.
Riplock, in fact, is a limitation of the speed at which the radio tape recorder reads certain types of media. Riplock was originally conceived as a method to combat video piracy.
This method will not allow you to quickly copy videos, but the riplock will ideally reduce the noise level when playing discs with films or clips recorded on them.
Note. Most Chinese radio tape recorders do not have a riplock. It was removed or not at all. Thanks to this, the rip speed is increased several times, but as a rule, only for stamped media. If the riplock is standing, removing it can lead to noisier DVD playback.
You can flash a Chinese car radio directly from DOS.
To do this, you need to do the following:
- Insert the desired disc into the drive.
- Open formatting.
- Create an MS-DOS boot disk.
- Click to start the process.
More detailed information on how to carry out the firmware can be found in the instructions of a particular source.
Not surprisingly, newbies starting to repair speaker head units often fail. The fact is that when carrying out competent repairs, it is necessary to have the correct schemes in stock.
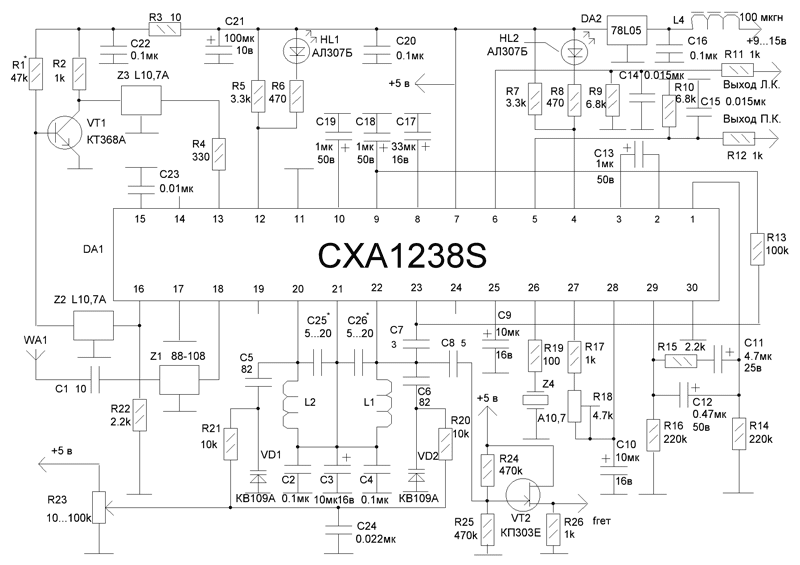
You can't do without a circuit of Chinese car radios during repair
Without them, you will not go far and for each model of the car radio, despite the uniformity and sufficient ease of repair, it is desirable to have its own separate circuit.
Note. The correct diagram may be needed not only during repairs. For example, if you need to connect a separate adapter for Chinese car radios, the circuit is more useful than ever. In addition, the standard adapter for the Chinese car radio may need to be repaired.
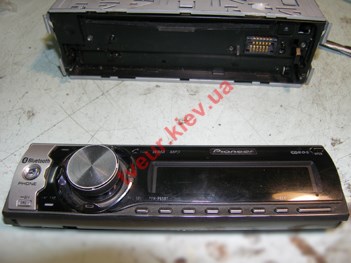
Car CD / MP3 receiver model Pioneer DEH-P65BT, with numerous functions. Broken encoder on the front control panel. Since this is a regulator of all modes, the car radio is uncontrollable. Restoring the installation and replacing the encoder is the repair of the car radio. Amount with a detail UAH 340
Good afternoon, there is a problem in the audi gig2 radio tape recorder, the sound jumps when adjusting it goes to 0 then to 3. In general, it is problematic to adjust the sound normally, is it possible to repair it?
When they did such a repair of a standard car radio, the volume encoder turned out to be faulty there: https://my.housecope.com/wp-content/uploads/ext/1598/ne-reguliruetsya-zvuk-v-shtatnoy-avtomagnitole-aud.
in this case, it looks like a malfunction in the processor part. The car radio is very old, there are not many chances that we will repair it, but you can try.
Hello.You currently have a Hosiden HXW1723 potentiometer (as pictured by Pioneer DEH-P65BT). I have a SONY BT-5000 radio tape recorder.
Uv. Ivan Vasilyevich makes no sense to send the same question 5 times. We do not have this encoder at the moment. We buy all spare parts only for our car radio repairs and do not sell them separately.
Good day. Tell me if you have an encoder with a joystick for 4 directions with a volume control for a car radio pioneer DEH 5000UB
unfortunately we are engaged in purely car radio repairs and do not sell spare parts
Hello! Please tell me what is the correct name of the encoder for the Pioneer DEH-P65BT radio tape recorder. Thank you for your help!
Thanks to all! I ordered on Ali in appearance HXW1723. It fits one to one, but I haven't tested it yet in terms of functionality.
I was looking for such an encoder for a kenwood kdc 5751 radio tape recorder, on an ali express the name is HXW1723.
Hello Sergey. We are afraid to make a mistake with the answer for the car radio repair three years ago. However, at that time, the encoder was ordered by its part number from this car radio model. No other information has survived.
good evening, there is a 28-position encoder (type 18) with a 4-way joystick for kenwood 5051u
Hello Valentine. We are not engaged in the sale of spare parts separately. We can offer to bring this car radio for repair, with the malfunction “rotary encoder does not work”. Then we will try to do everything that is needed for effective repair.
This article has a video version!
Subscribe to the channel to keep abreast of updates!
Incremental (or incremental, from the English. increment - "increase") an encoder (angle sensor) is a device that converts the rotational motion of a shaft into a series of electrical impulses that allow determining the direction and angle of its rotation. Also, based on the found values, you can determine the rotation speed. The main difference between incremental encoders and absolute encoders is that they can only report the magnitude of a change in their position, and not their absolute state. The most popular example of the use of an incremental encoder in everyday life is the volume control knob for a car radio.
Also, encoders are ideal for navigating various menus.
Incremental encoders are available in optical, magnetic, mechanical, etc. Regardless of the principle of the device, all incremental encoders at the output generate 2 lines (A and B) with pulses offset from each other. It is by the displacement of the pulses that one can judge the direction of rotation. And according to the number of impulses - about the angle of rotation.
This article will consider a mechanical incremental encoder EC11 with a switch (button) and step-by-step fixation of the shaft position (between each pulse train).
Each incremental encoder has the following main characteristic - discreteness (number of steps, positions between pulses, per one shaft revolution). Due to the discreteness, it is possible to calculate the angle of a single position change. In our example, the EC11 encoder generates 20 pulse trains per revolution. This means that each step is equivalent to an 18 ° turn. In addition, the encoder shaft is fixed at every position between each pulse train.
The heart of the encoder is 2 pairs of pins and a metal notch plate. As the shaft rotates, each pair of contacts closes and opens. But these pairs of contacts are located in such a way that when the shaft rotates in different directions, the order of closing / opening the contacts is different - and, thanks to this, the direction of rotation can be determined.
| Video (click to play). |
Encoder with push button has 5 outputs - 2 outputs ( D and E) are responsible for the switch (button), 1 ( WITH) - common (GND, ground), and the remaining 2 ( A and B) - impulse lines signaling rotation.

