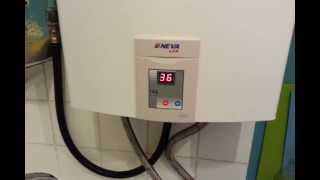
In detail: do-it-yourself repair of a geyser neva lux 5514 from a real master for the site my.housecope.com.
Repair of the water unit of the gas column Neva Lux 5513, 5514, 6011, 6014. Repair kit Neva Lux. Placement date 02/28/2017
If a water unit is flowing in your column from under the seal gland, - here you are! If the membrane does not move the stem and the microswitch when the hot water tap is opened, and the column is silent and there is no spark, then you too! More complex malfunctions usually relate to the operation of the control unit or valve block. In this article, we consider only the problems with starting the column or leaking the stuffing box of the stem seal of the water unit.
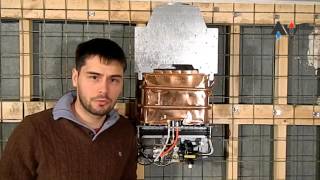
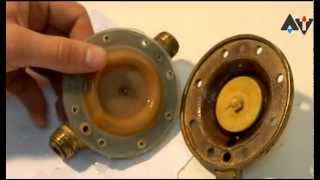
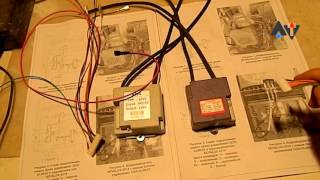
We use the repair kit offered by us in the water units of the Neva Lux 5513, 5514, 6011, 6014 geysers. Date of entering new data 26.04.2016 Moreover, the version of this unit can be either brass, which was in the first columns, or "plastic", a newer version. The versions of the Neva Lux gas water heaters were originally completed with a brass assembly. In the brass assembly, the diaphragm and stem were ABSOLUTELY THE SAME design.
We had a man with a brass knot in his hands, who witnessed and allowed to take the following photos, so that you and we EXACTLY make sure that the kit offered today is exactly the same as the original.
Briefly about the brass knot. Information about working with the kit is below.

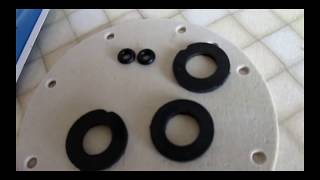
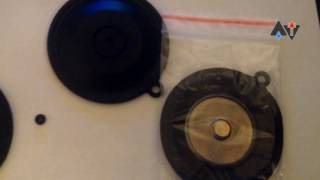
So. Contents of this repair kit: Silicone diaphragm with already integrated poppet + stem seal gland + grease. Previously, the diaphragm was made of rubber and the stem with seals was also included. At this stage, we can offer only a sealing ring to the membrane, and you need use an existing stock... Order this repair kit now.
| Video (click to play). |
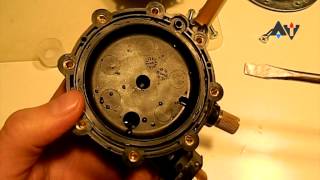
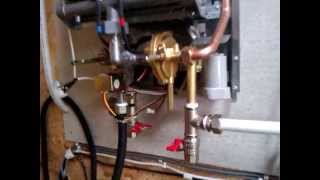
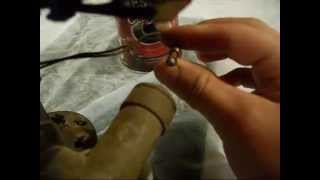
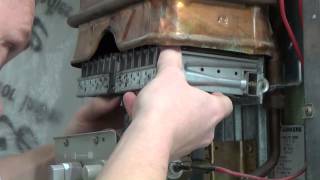
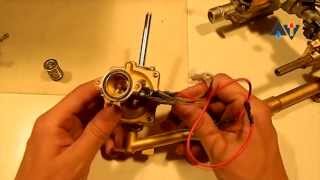
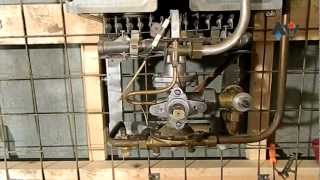
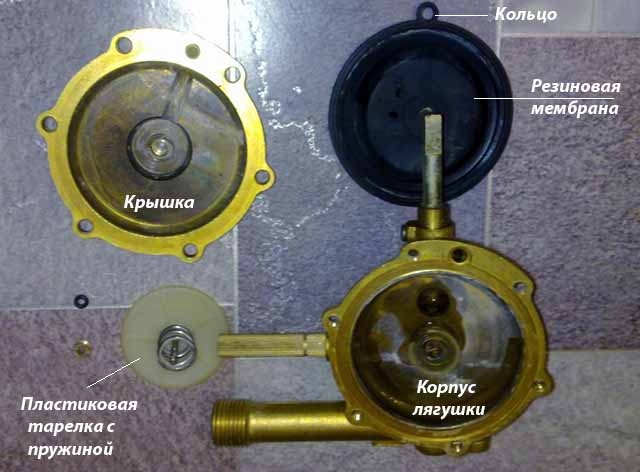
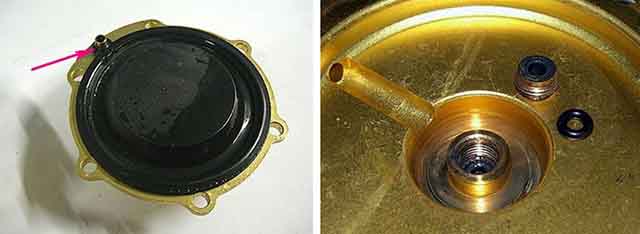
Replacing the membrane is usually not a problem. We disassemble the water unit. The photo shows the location of the membrane. Do not forget the brass threaded retainer (inserted into the membrane eyelet) and wrap it up, fixing the bypass hole. We place the membrane “concave up” so that it has a course inside the node. If set on the contrary, it will not work.
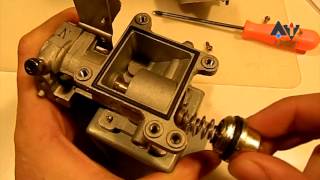
The main difficulty usually arises when trying to get close to the stem seal when repairing a leak. The rubber band cannot be reached from the outlet side of the stem.
Turn over this half of the assembly and see the washer (or plug). With all her behavior and standing to death, she can be easily removed with a sharp awl. We put something sharp directly inside the hole and just pick it out from there. It is worth recalling here restrained strength plus accuracy. That is, we pick out carefully, but strongly.
She's not going anywhere. When the washer is removed you will see the stem seal rubber underneath. If this elastic band is worn out from the knot it drips. We replace it with a new one from our kit.
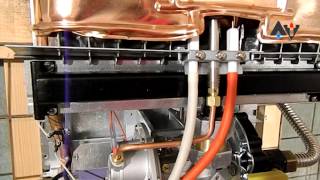
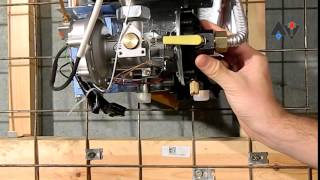
Now a few words about the correct assembly of the stem. Below are two photos showing the Neva Lux gas water column fully equipped.
Point by point, it can be described as follows:
1. We put the seal ring and immediately on top of it with a finger a smear of grease.
2. Snap the washer back
3. We put a rod into the hole
4. We take the padding. We put it on the stock. We apply grease so that the packing is saturated.
5. We cover the whole thing with a cap.
And cover the stem with a membrane with the corresponding side so that the stem rests on the plate from the side of the flat platform.
We close the water unit. We install it in its place. We start the column. Finally we wash.
Thanks to all!
Warning. This section is intended for specialists who have the appropriate permission to repair gas equipment! If you repair yourself during the warranty period, the warranty is void!
This article will focus on malfunctions of Neva speakers (models 4510, 4511, 4513, 4510M, 4513M, 4610, 5611).Many Chinese speakers, such as Vecktor or Oasis, and not only Chinese ones, work on the same principle as the Neva, so the remedies below apply to them as well. But, please be more careful, the photographs in the article show details for the Neva columns.
No spark when hot water is opened.
When the hot water tap is opened, there is a spark discharge, but the column does not ignite.
- Check if the hot water tap in front of the column is open.
- There is no gas in the main gas pipeline. You need to call the service to fix the problem.
- Check the serviceability of the EMC. Connection contacts may be broken.
- Correct the spark plug, it is possible that the discharge does not reach the flow of the gas-air mixture (about 5 mm from the end of the plug to the burner).
- When using a column from liquefied gas, it is necessary to check the gas supply in the container (cylinder).
- Weak spark from spark plug electrode. It is required to clean the contacts of the battery compartment or to completely replace the ignition elements (batteries).
 Connection contacts may be broken.
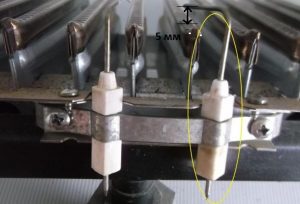
The column will run for a while and turn off.
- Poor cravings. Thrust sensor triggering. It is necessary to clean the chimney or check the tightness of the exhaust pipe connection on the column pipe.
- Overheating of water (outlet water temperature is more than 90C, triggering of the limit temperature sensor). It is necessary to use the column control knobs to reduce the gas consumption and increase the water pressure.
- Replace the membrane of the water unit.
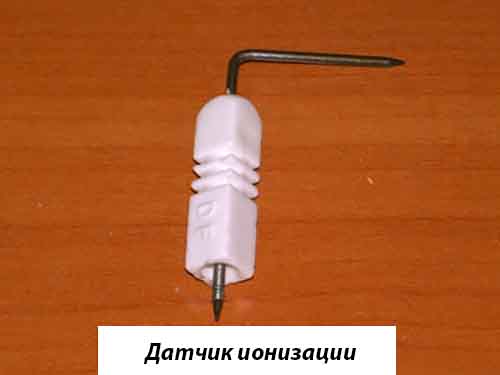
- There is no signal from the ionization sensor (flame sensor). In this case, the burner works for no more than 7 seconds, and spark discharges from the spark plug do not stop. It is necessary to restore contact with the sensor, correct its position (if it touches other elements of the burner) or replace it.
 It is necessary to clean the chimney or check the tightness of the exhaust pipe connection on the column pipe.
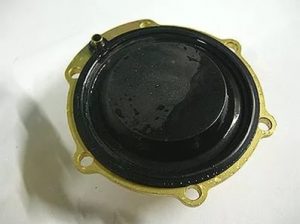
 In this case, the burner works for no more than 7 seconds, and spark discharges from the spark plug do not stop. It is necessary to restore contact with the sensor, correct its position (if it touches other elements of the burner) or replace it.
The water temperature reading is not shown on the column display.
- Defective water temperature sensor. It needs to be replaced.
- Check the connection contacts of the display itself to the ignition unit. If there is no result, replace the display.
The water does not heat up well.
- Reduce water pressure.
- It is required to check the heat exchanger for the presence of scale on its walls. If necessary, remove it, rinse with Solita. It is also necessary to clean the column burner from dust and soot on its surfaces.
- Insufficient gas pressure in the line - call the service to eliminate the causes.
- Repair or replacement of the water unit is required.
 It is also necessary to clean the column burner from dust and soot on its surfaces.
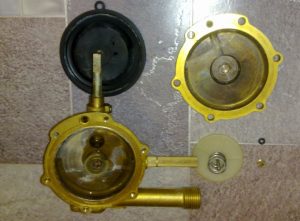
The flame of the burner of the column is yellow and weak, with smoky tongues.
1. It is necessary to clean the column burner from dust and soot on its nozzles and internal surfaces.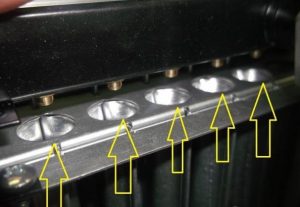
Excessive noise of water during the operation of the column.
- It is necessary to reduce the water pressure with the column adjustment knob.
- Extrudes gaskets at the joints of the water pipes. Replacement of gaskets is required.
The burner continues to operate even when the hot water tap is closed.
- The stem of the gas unit is seized (it is very difficult to move the stem manually). It will be easier and safer to replace this unit.
- It is required to replace the membrane of the water unit.
 It will be easier and safer to replace this unit.
These were the most common malfunctions of the Neva speakers. We hope this article helped you troubleshoot your water heater.
the wick burns very strong during the night heats up the pipes with water when the water is opened after a few seconds there is boiling water for the daughter-in-law of the children sprinkles when they wash their hands the plastic tubes of the teapot how to reduce the wick
Hello, tell me the model of the column.
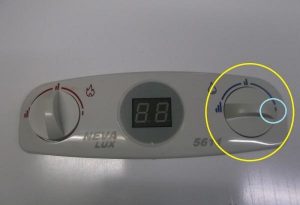
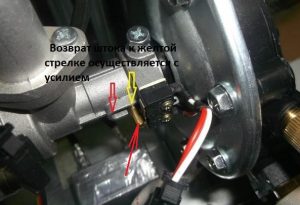
remove the front cover and on the gearbox you will see a yellow bronze screw for a screwdriver. twist it smoothly while the wick is working.
WHY WHEN THE WATER REGULATOR IS ADDED IT GOES OUT
Nikolay, to open the gas valve, you need a certain water pressure in the water valve. As the flow of water increases, you decrease this pressure and the gas valve closes.
The situation is as follows: when the hot water tap is opened, the flame does not light up for 4 seconds, and then a strong pop. The flame ionisation sensor is not working. Previously, after three seconds there was no flame, the gas supply to the burner stopped. This rarely happens. Neva 4501
Hello Dmitry. The ionization sensor has nothing to do with it. There are several probable reasons:
1. Check batteries (replace if necessary)
2.Check the ignition plug, its position relative to the burner (5mm gap)
3. Poor traction is possible (gases accumulate and therefore cotton occurs)
4. Clean the burner itself from soot
5. Unlikely, but still, the control unit itself requires replacement.
Hello. Column Neva. There is a slight leak in the area of the microswitch. What do you recommend to do?
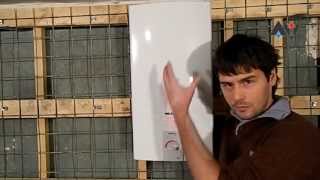
If you are faced with a breakdown of a water heater, do not panic - our article will help. Malfunctions of the "Neva" gas column can happen for various reasons, but typical ones can be distinguished. We will tell you how to repair Neva models at home.
Important! If your equipment is under warranty, do not disassemble it yourself, otherwise you will lose free service.
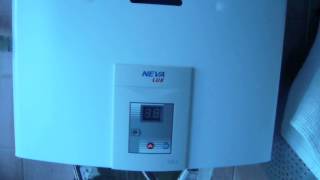
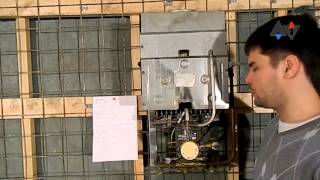
How to understand the location of the water heater components? Don't worry, the diagram will help you. It is based on Neva speakers.
- Metal casing.
- Control window.
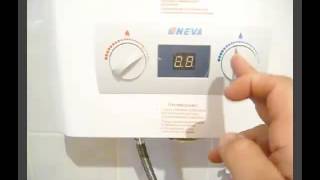
- Gas flow regulator.
- Water regulator.
- Digital indication of temperature.
- Cold water connection (thread G 1/2).
- Hot water outlet.
- A branch pipe for connecting to a gas line (cylinder).
- A branch pipe for the removal of combustion products is connected to the chimney.
- The foundation. Back wall.
- Installation holes.
- 6, 7, 8 - continued, nozzles, as indicated above.
- 12 - water unit.
- 13 - water regulation rod.
- 14 - drain plug.
- 15 - microswitch.
- 16 - control unit.
- 17 - gas unit.
- 18 - fuel adjusting rod.
- 19 - solenoid valve.
- 20 - collector.
- 21 - collector fixing screws.
- 22 - burner nozzles.
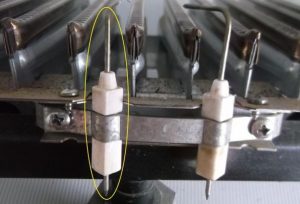
- 23 - spark plug.
- 24 - ionization sensor.
- 25 - copper heat exchanger.
- 26 - output to the water unit.
- 27 - outlet to the gas unit.
- 28 - mounting bolts.
- 29 - thermal relay.
- 30 - thermometer.
- 31 - gas outlet device.
- 32 - thrust sensor.
- 33 - mounting brackets.
- 34 - battery compartment.
Having understood the design, you can start troubleshooting.
The indicated malfunctions and options for their elimination are suitable for all models produced by "Neva", including: 4510, 5514, 4511, 4513, 4510M, 4513M, 4610, 5611. We will separately consider error codes and breakdowns on the example of some models.
You will need to remove the cover to access the inside of the instrument. How to do it yourself:
- Be sure to shut off the water and gas supply.
- Pull the adjusters towards you and remove.
- Some models have a screw behind the adjuster. Unscrew it.
- Disconnect the temperature indicator wiring.
- Remove the casing securing bolts.
- Pull the trim towards you a little, then up.
You can start repair work.
Reasons for the appearance and ways of troubleshooting.
The burner does not ignite. No spark... In this case, the temperature indication does not work when the mixer is opened.
- Weak water pressure. If the pressure in the tap is small, you need to wait until the flow is restored. The installed model may be too powerful for your plumbing. Also check the adjustment toggle switch, set to the maximum value. For frequent pressure problems, it is recommended to install a circulation pump.
- The batteries are dead. Some users are confused by the scoreboard. If the display is lit, the user thinks the batteries are ok. But lighting a candle requires more current. It is important to choose high quality batteries.
The manufacturer recommends installing LR20 (alkaline) batteries. Therefore, salt cells such as R20, which are sometimes used, will not give stable performance. An alternative to the LR20 is the CR20, but the cost is much higher. To replace, turn the knob in the battery compartment.
Expert Advice: Check food contacts more often. The technique works with water, so the contacts are susceptible to corrosion and chemical deposits.
- Defective flow sensor. Inspection and replacement required.
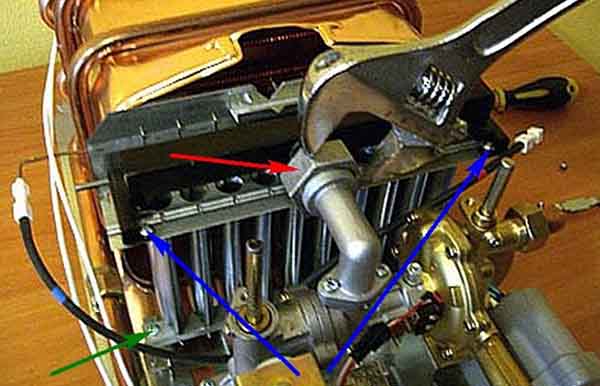
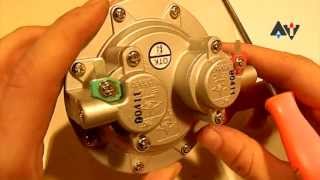
- Wear of the rubber membrane. This can be understood by visual inspection. Open the mixer and see how the pusher works. If it does not move, then the membrane is damaged or stretched (marked with a blue arrow in the photo). Red arrows mark places that are susceptible to leaks.
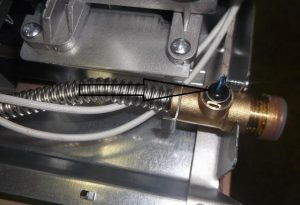
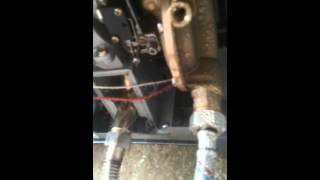
You can remove the water part together with the gas part.The dismantling procedure is marked with letters:
- a - after turning off the fuel supply, the supply hose is unscrewed.
- b - the cold water nut is loosened.
- c - the nut of the water block and the radiator pipe is unscrewed.
- d - the wiring of the solenoid valve is disconnected.
- d - the microswitch loop is disconnected.
- e - the bolts of the flange connection are unscrewed.
Broken electronic board requires a call from a specialist.
Breakdown on the body of the device. A clicking sound is heard, as when a spark is formed, but no ignition occurs. This means that the insulation of the candle is broken. If defects are found during inspection, a serviceable part must be supplied. Also, the cause of the breakdown is a violation of the tight connections of the cable with the control unit. Return the cable to the socket.
The display allows the user to see the fault code. Self-diagnosis of the column gives a digital value in case of a malfunction.
E0 - the boiler shuts down. Fuel does not flow into the system. Check the gas valve; the supply may have been shut off for a short time.
Error E1 - the control board does not receive a signal from the flame sensor. More than a minute passed.
- Air in the gas pipeline. This happens when the device is turned on for the first time or when the device is turned off for a long time. Open and close hot water several times until the burner ignites.
- The fuel supply valve is not fully open. Unscrew the tap.
- Insufficient pressure in the gas line.
- The tank has run out of fuel. The cylinder needs to be replaced.
- Violation of the wiring between the water unit and the flame sensor, solenoid valve. Examine the loop for damage to the insulation.
- The electrode has moved out of place, does not reach the burner. Return the part to its original location.
- Soot is present on the electrode and flame sensor. You can clean the parts with a brush.
- The contacts between the spark plug and the high-voltage wire are removed.
- The nozzles are clogged with soot.
The burner must be removed for cleaning. Disconnect the wiring and unscrew the nipple nut. Unscrew the two manifold bolts, then do the same with the burner mounts. After dismantling, the holes are washed with a brush and soapy water. Reassemble after rinsing and drying.
E3 code - the solenoid valve was triggered earlier than the signal from the flow sensor.
- The valve is defective. A new element is being installed.
- The electronic unit has broken. Diagnosis is carried out by a specialist.
Error E7 - after 7 attempts to ignite, the equipment still does not light up or goes out.
- Open the fuel valve as far as it will go.
- The ionization sensor has moved or soot has accumulated on its electrode. It should be in the flame area, near the burner. Cleaning is done with a brush.
- The electrical valves are out of order.
- The water or gas block has boiled. Replacement of elements.
Error E8 - the thrust sensor has been triggered. Causes:
- The sensor is broken. See if the contacts are tight, change the part.
- The chimney is clogged with debris or soot. If you cannot clean the passage with your own hands, contact your utilities.
L0 - not enough fuel is supplied for normal operation. What happened:
- Weak water pressure. The line pressure acts on the diaphragm, which opens the valve. Wait for the flow to recover, adjust the toggle switch, or descale the radiator. How to do this is described in the article on cleaning and repairing a gas column heat exchanger.
- The temperature at the controller is too low. Increase your metrics.
- The pressure in the gas line exceeds the permissible limits. Install the reduction gear.
Such malfunctions are typical for the Neva 3208 and Neva Transit models.
The device works for a while, then turns off... Draft problems that can arise from blockages or improper installation of the hood.
Typical user mistakes:
- The ventilation pipe is installed too close to the wall of the chimney, normal draft is not generated.
- Another device or hood is connected to one pipe.
- There is another window on the level with the ventilation of the column.
The column does not light up or immediately goes out... The temperature sensor is triggered.
- Overheating has occurred.
- The part is out of order.
- The membrane is stretched.
- Flame sensor does not work.
Display does not work:
- The thermal sensor is out of order. Need a replacement.
- Contacts broken.
- Display defective.
The equipment is very noisy:
- Twist the water regulator. Reduce the head.
- The gaskets in the pipe joints protrude out of place. Replace the gasket.
You have learned the structure of the Neva water heater, its typical malfunctions. You can start fixing the problem. We hope our article helped you get the technology back on track.
The gas column Neva (Neva) 4510 does not turn on. Repair, replacement of the membrane
NevaLux 5514 heading Repair # 1 Academy of Heat Engineering
NevaLux 5514 heading Repair # 3 Academy of Heat Engineering

What to do if the Neva 4513 gas water heater goes out / does not work / stalls
NevaLux 5514 rubric Autopsy Academy of Heating Engineering
Neva-3208 # 3 heading Repair Heat Engineering Academy
Gas water heater Neva 4511 malfunction in sensors repair

Membrane for Neva 5514 part 1 AT
NevaLux 5514 heading Review Academy of Heating Engineering
Checking the functionality of the solenoid valve on the gas water heater NEVA-TRANSIT VPG - 8EG (MT)
NevaLux 5514 heading Repair # 2 Academy of Heating Engineering
# 3 Neva 4511 / Neva Lux 5611 - The principle of operation of the apparatus [Gas sector]
Why the gas column does not light up
Gas water heater Neva 6014 lux
The battery powered gas water heater Neva does not turn on.
Does not light up. The Chinese gas water heater lights up and goes out. Repair of a flowing water heater
NevaLux 5514 heading Repair # 4 Academy of Heat Engineering
Replacement of the membrane of the water block of the gas column Astra VPG-21 1-V11-UHL 4.2
Neva 6011 Standard components Repair AT
NevaLux 5514 heading Repair # 6 Academy of Heat Engineering
Replacement of the heat exchanger of the gas column "Neva-Lux 5013"
Neva Lux 6014
Fighting the formation of soot in the gas column. Part 2. Cleaning the burner
Performance test Neva 6014 lux
Control unit Neva 5514 Review AT # 1
Small water unit of Chinese gas water heaters_AT_ # 2
NevaLux 5514 heading Repair # 7 Academy of Heat Engineering
cleaning the gas column heat exchanger
Gas water heater does not turn on Repair Neva 3110
Gas water heater: easy descaling with a cheap means!
# 1 Neva 4511 / Neva Lux 5611 - At a Glance [Gas Sector]
Stop paying extra money, or a gas water heater from the network
Neva 4513 Water gas unit repair AT # 5

Neva-3208 # 2 heading Repair Heat Engineering Academy

Neva 4511 Control unit Repair # 1 AT
Large water unit of Chinese gas water heaters_AT_ # 3
Neva-3208 # 10 heading Repair Heat Engineering Academy
Repair kit Neva 5514 with a ring and a membrane revision AT # 3
HOW THE NEVA GAS COLUMNS ARE DESIGNED FROM THE INSIDE DIAGRAM EVERYTHING FOR REPAIR
# 4 Neva 4511 / Neva Lux 5611 - Security Automation [Gas Sector]
Neva-3208 # 6 heading Repair Heat Engineering Academy

Water-gas unit of Chinese gas water heaters_AT_ # 1
Since the Neva 4511 series geyser is one of the most common models, the topic of its maintenance and repair is of interest to many users who are accustomed to doing such work with their own hands. Indeed, these open-chamber instantaneous water heaters can often be brought back to life without the need for service personnel. Let's look at what malfunctions occur during the operation of these units, as well as ways to eliminate them.
It is impossible to independently repair a household appliance without knowing how it functions and what it consists of. Unlike old-style water heating devices, this series of gas water heaters is equipped with a controller and electric ignition, which made it possible to remove a constantly burning igniter. The rest of the design remained fairly simple and maintainable. It consists of the following basic elements:
- Housing with hinges for wall mounting.
- The diffuser is a collection of combustion products with a chimney pipe.
- Copper heat exchanger.
- Gas burner device.
- Water node.
- Membrane actuator (so-called frog).
- A gas valve with an electromagnet, connected by a common stem to a water unit.
- Controller.
- Microswitch for power supply to the electronic unit.
- Water supply pipes.
- Ignition electrode.
- Flame detector (ionization).
- Additional electrode for ignition of the burner.
- The valve is a flow regulator.
- Adjustment of the intensity of combustion and heating temperature.
- Connection of a draft sensor installed inside the diffuser.
- Compartment for batteries (batteries).
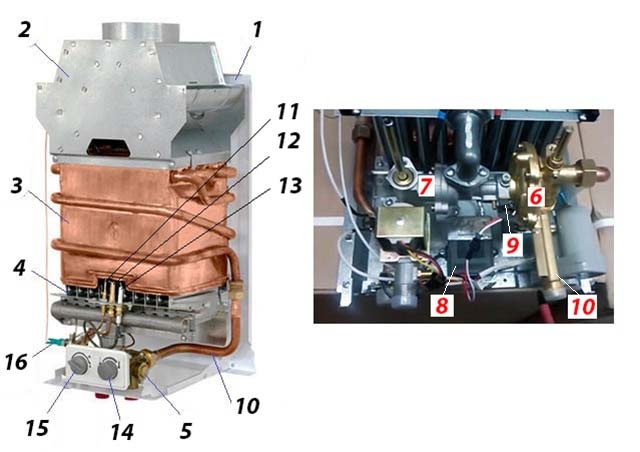
The diagram above shows the device of the Neva gas column with numerical designations of parts corresponding to the list.
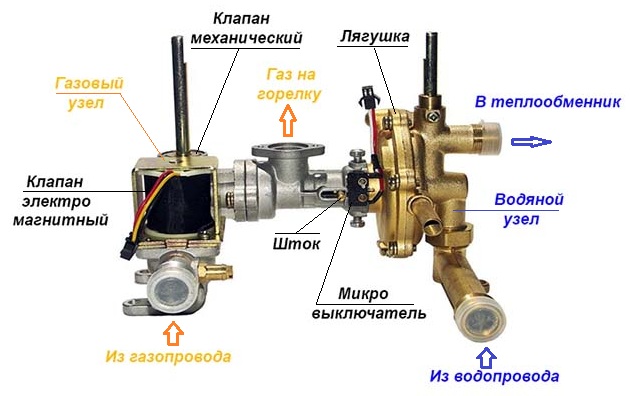
Automatic switching on and heating is controlled by the water unit together with the controller, and the solenoid valve connected to the draft sensor is responsible for the safe gas supply. The algorithm for the operation of a water heater looks like this:
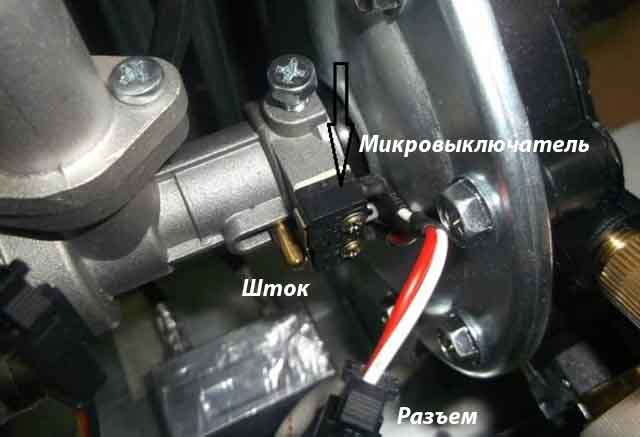
- After opening the hot water tap at the inlet of the "frog", pressure arises, which acts on the rubber membrane of the assembly. It moves the stem that opens the gas valve and closes the microswitch contacts.
- When the electrical circuit is closed, battery power is supplied to the controller. He gives 2 commands at the same time: open the solenoid valve for gas passage and create a spark on the ignition electrodes. As a result, the burner ignites.
- The flame sensor detects the appearance of fire and transmits a pulse to the electronic unit, which interrupts the sparking. The heater switches to operating mode.
- When the valve on the mixer is closed, the pressure in the network disappears and the spring throws the frog diaphragm back, at the same time closing the mechanical gas valve. The limit switch is triggered and the controller loses power, and with it - the electromagnet. The fuel supply is interrupted and the burner is extinguished.
The fundamental point. The solenoid valve is connected in one circuit with the draft sensor (pos. 16 of the diagram). If, for various reasons, the draft in the chimney disappears or weakens, the sensor will heat up and open the circuit, de-energizing the electromagnet. The latter will return to the closed position and cut off the gas supply to the burner.
To exclude possible overheating of the water in the heat exchanger, the manufacturer has implemented a simple technical solution: a temperature sensor connected to the controller is built into the pipeline. If the flow heats up to a critical level (about 90 ° C), then the gas supply will automatically stop and the burner will go out. The structure and principle of operation of the Neva 4511 column is shown more clearly in the video:
In order to fix the malfunction of the Neva gas column with your own hands, you need to diagnose it correctly. Over the years of operation of the water heating apparatus, one part of the parts wears out and requires replacement, the other - periodic maintenance. In this case, a variety of problems arise, characterized by certain symptoms. We propose to divide all emerging problems into groups according to the following criteria:
- the burner does not light up when opening the tap of the DHW system;
- after working for 5-10 seconds, the unit shuts down;
- the flow heater starts up and functions properly, but does not heat the water well;
- other problems.
Advice. Most often, the rubber membrane of the water unit fails in gas water heaters - it stretches, cracks or breaks. This is a consumable part that should always be kept in stock. A sample of the part is shown in the photo.
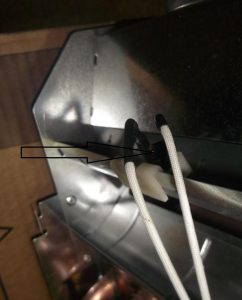
When the water heater does not react in any way to the inclusion of hot water, you need to perform the simplest action - check the condition of the batteries and the contacts of the battery compartment (they can oxidize). Clean them with sandpaper, install a new set of batteries, and then try firing up again.
An important point. The luminous display of a household appliance does not at all indicate a full charge of the batteries, since it does not consume much energy. If the batteries are "hung up", then the voltage for triggering the electromagnet and sparking may not be enough. According to the specifications published on the official website of the manufacturer, the set of elements is enough for about 250 hours of operation.
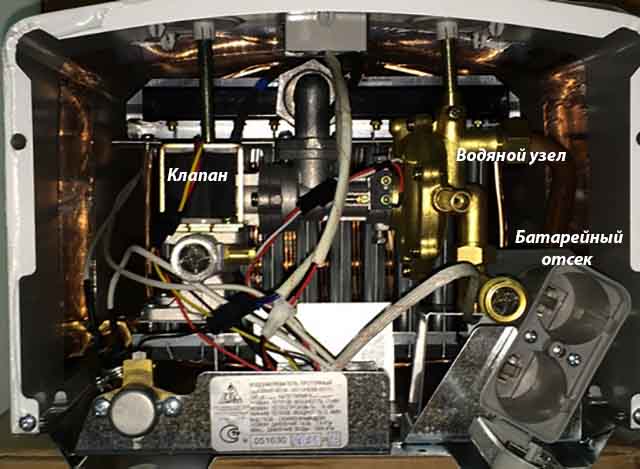
Battery compartment location - bottom view of the device
Is the power supply ok? Then continue diagnosing the gas water heater using this algorithm:
- Make sure that there is enough pressure in the piping to turn on the device. It is possible that someone accidentally closed the shut-off valve or control valve on the heater itself (on the right).
- If there is a strainer on the incoming water supply, check its condition and clean if necessary.
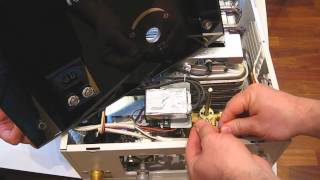
- Remove the front panel of the device and open the DHW tap, observing the stem. If it does not move under normal water pressure, the reason lies in the frog's membrane.
- The stem has moved, released the switch button, but nothing happens? There is a problem with the electrical circuits. You need to check the microswitch and ring the other wires supplying the controller and solenoid valve.
Advice. When repairing the Neva gas water heater, accompanied by disassembling the unit, just in case, shut off the gas main.
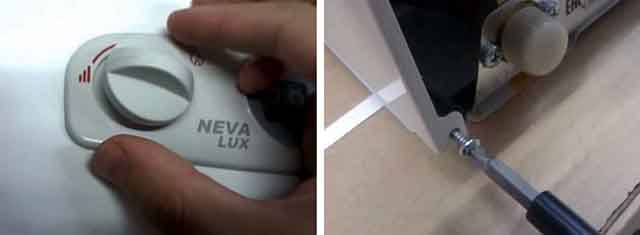
To dismantle the front casing, it is necessary to remove the plastic handles from the control valves and disconnect the display connection connector. At the back, the panel is supported by 2 self-tapping screws located at the bottom of the device. Unscrew them and remove the cover by pulling it towards you and pulling it up.
To check the limit switch, you must disconnect the connector and ring it with a multimeter or lamp tester. When the button is pressed, the circuit must be open. As for the wiring, it rarely fails, unless you catch your eye on a fallen off wire, which is easily removed.
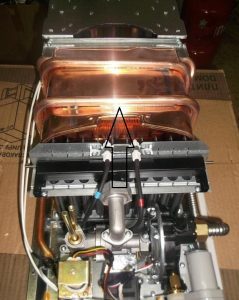
To replace the membrane in the Neva 4511 column, remove and disassemble the water unit together with the gas one, following the instructions:
- Close the cold water and gas supply, unscrew both supply pipes with an open-end wrench. Also disconnect the copper pipe leading to the heat exchanger.
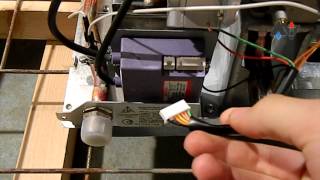
- Disconnect the controller and microswitch connectors.
- The entire water / gas block is fixed with 2 screws to the burner flange. Unscrew them with a Phillips screwdriver and remove the assembly.
- Disassemble the frog and replace the membrane, and with it the small O-ring shown in the photo.
Note. The replacement can be done without dismantling the whole block, but it is extremely inconvenient to perform the operation in this position. The described disassembly technology is also suitable for other models of gas water heaters - Neva Lux 4510, 5611 and so on.
How the membrane of an instantaneous water heater changes, see the next video: