In detail: do-it-yourself repair of gas stoves fret from a real master for the site my.housecope.com.
A competent approach to business will save you time and money. Remember, these works are a source of increased danger.
Therefore, before repairing the gas stoves with our own hands, we shut off it with a shut-off valve. After work, we check for leaks at the joints.
According to the letter of the law, maintenance of gas equipment must be carried out by a master who has permission to work in gas hazardous areas.
- From easy to complex - changing the control knob:
- we release the handle (a) with a flat screwdriver and, pulling it towards ourselves, remove the handle (b)
For handles equipped with a spring (c), they must be pulled towards you with effort, and when installing, make sure that they enter the grooves.
- Flame pressure adjustment:
Many cookers have the ability to adjust the pressure control.
This screw is just under the control handle. By turning the screw, we achieve stable combustion of the flame at a minimum feed.
- Conversion to liquefied - replacement of the injector (jet, nozzle) of the burner:
There are two options for the gas mixture: either methane (SN4, main) or butane-propane - (liquefied, bottled gas).
Natural is supplied to the user with less pressure than balloon, and the composition is different. This factor influences the orifice size of nozzles and flow restrictors in control valves.
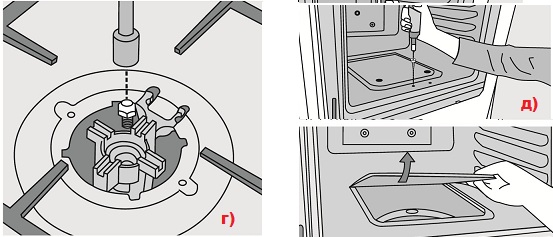
- the injector is turned out from the inside of the burner with the appropriate socket wrench (fig. D)
We select the nozzle according to the power of the burner (we look at the diameter of the outlet hole) and tighten it all the way
Do not forget to change the nozzle on the oven - the lower one and the grill, if any.
Open the front door, unscrew one of the screws on the protective cover of the burner, lifting the protective cover, release the two springs from their projections (Fig. E). We release access to the thermocouple and the oven burner. Dismantle the nozzle with the appropriate socket wrench.
| Video (click to play). |
- Removing and replacing the oven door:
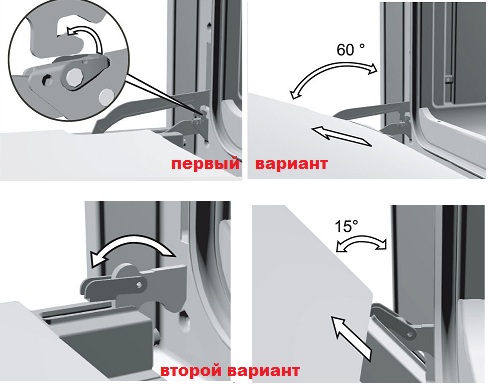
Please note that there is a difference in door dismantling. We offer one of the options.
We open the door to failure. We put elastic rings on the hooks in the lower parts of the bracket.
Supporting the door from below, raise it, making sure that the rings do not slip off the hooks.
When assembling, the rings are removed after the door is fully opened. If the ring slides off the hook, the installation is correct.
- Removing and replacing the top burner panel:
Dismantle the upper work panel.
We release the igniter lead connected to the upper burner, while removing the clamp.
We unscrew the nut connecting the burner with the supply pipe, while firmly supporting the burner, simultaneously press the connecting clamp and, freeing the burner from the support, remove it (Fig. A)
For another type of burner, two screws are unscrewed, securing it to the holder (Fig. B).
After doing all the operations in reverse order.
Sooner or later, the need to repair the gas stove overtakes almost all owners of these devices.
It is often costly to contact a master, and you want to troubleshoot at home so as not to waste time transporting tiles and repairing them.
There are a number of problems with gas stoves, such as the regulation of the electric ignition, which you can really deal with on your own.
An analysis of the most common breakdowns in plates and ways to solve them, as well as a video that reflects all stages of work, will help you with this.
Before doing repairs, you need to understand what a gas stove is, what details are present in it, and what kind of repair of a gas stove with your own hands may be required in one case or another.
There are many companies producing gas stoves: Gorenje, Ardo, Ariston, etc. But all tiles, even if they differ in price, have a similar type of interior arrangement.
The most visible part of any stove is the burners. Each hob is bolted to the stove table. The burner also consists of several parts: they have a lid, a divider and an injector.
A steel and copper tube is connected to each burner, which has a fastening similar to the American one. Due to this device, the burner receives gas.
Gas burner device
No special tools are required to work with the burners: you will need a key, most likely 13, to disassemble the parts of the burner if it needs repair or cleaning.
After completing the repair and assembly, you need to assemble the structure and check how tight it is in order to prevent gas leaks.
Each burner has two candles around the perimeter.
One helps to create ignition, working with piezoelectric elements or an electronic circuit, and the second serves as a thermocouple connected to the circuit that controls the combustion.
Gas burner (grid for dishes removed): 1 - nozzle, 2 - electric ignition plug, 3 - flame sensor (hot junction of thermocouple)
Candles differ from each other even externally, so it will be difficult to confuse them.
A candle for electric ignition has a ceramic caftan, it is needed to prevent sparks from breaking below the required level.
That is why it is important to properly ground the stoves where the electric ignition is built in. Also, electric ignition does not tolerate the use of liners for water supply and metal threads.
It is important to separate the slab from the riser with special gaskets during installation and repairs, otherwise there is a real risk of explosion.
The thermocouple candle has a bronze caftan, which is a powerful conductor of heat
The reliability and speed of switching on the protection that blocks the gas after you have finished using the stove depends on how quickly the semiconductors cool down after the flame goes out.
A manifold can be seen under the slab table. It looks like a thick tube, from which the liners to the burners diverge.
The gas flow is controlled by solenoid valves, the number of which is equal to the number of burners on the stove.
This is necessary so that if the flame of one burner goes out, the others can still function.
The solenoid valves are equipped with an inductor. When the thermocouple is heated, an EMF is formed, which fixes the device open.
Solenoid valve with induction coil
A full repair of Hephaestus, Gorenje and other models of gas stoves requires the intervention of specialists, because it will be not only difficult to do it on your own, but also dangerous.
However, there are a number of works that can be done with your own hands at home, and bring the stove into working condition if its damage is not too serious.
The most common problem with gas stoves is the failure of the electric ignition. A video will help you fix this problem - watch it before starting the repair in order to do everything right.
Video instructions for repairing an electric ignition using the example of a Gorenje stove:
First of all, you need to disconnect the stove from the power supply, remove the partition from it and inspect for deformations.
If you see that there are chips and cracks on it, it means that this is why the stove does not work, and the partition should be replaced.
It can be changed only when ignition or autoignition is disabled - do not forget about it. After replacing, check how well it works now.
If a piezo ignition is built into your Gorenje stove or another model, then the operating technology will be slightly different.
Replacing the spark plug
First you need to remove the device from the control, then remove the plate partition from the bottom and remove the igniter, which is screwed to the bracket with the fastener.
If it is cracked or otherwise deformed, it should be replaced with a new one. To install a new igniter, you need to turn off the module responsible for ignition.
The instructions for the stove will help you find it.
After that, in place of the old part, you need to install a new igniter and check how well the gas stove is now working.
Often, after prolonged use, the oven doors begin to stick or do not close properly.
To make a similar repair of Indesit, Gorenje and others gas stoves, you need to unscrew the screws that hold the doors and swing them in different directions so that the door is firmly fixed on the hinges, from which it may have fallen off.
After that, re-tighten the bolts, if everything is done correctly, then the door should snap into place, and the oven should close tightly.
Video instructions for repairing the oven door:
If the part still does not work, then perhaps you should replace the gasket, which is responsible for the tight fit of the oven door to the stove frame.
To do this, you need to unscrew the door hinges, which are located above the handles, and remove the plate cover.
Most likely, you will also need to remove the internal screws and panel edges, or you can simply move them aside and thus remove the cover.
The screws with which the glass is fixed on the panel block must be removed, and then the glass itself must be removed by disconnecting the gaskets that hold it.
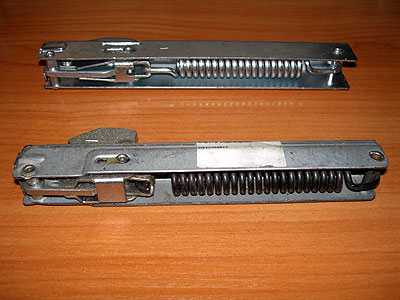
Oven door hinge assemblies
Now you need to detach the gaskets themselves, which are between the door and the glass from the inside.
Now you need to change the gasket to a new one and put all the parts back in place, proceeding in the reverse order.
Use the manufacturer's instructions, as the device of different models will be slightly different, and you will have to act in different ways.
It often happens that the gas supply to the burner is not adjusted correctly. As a result, the flame burns intermittently or disappears altogether. If the device is working properly, the flame should be even and have a bright blue color.
Correctly adjusted minimum flame
If your device works in a different way, it means that the ignition or autoignition needs to be properly set up and adjusted the stove.
To do this, you must first turn off the gas supply and then remove the baffle. Then you need to turn it back on and determine which air damper needs adjustment.
Flame adjusting elements: 1 - gas burner, 2 - valve stem, 3 - minimum flame adjustment screw
To adjust the work, you need to unscrew the set screw that locks the plate - it is responsible for the proportion in which the gas mixes with air.
Having set it in the desired position, turn on the stove and check how it works.
There is a categorical prohibition, supported by administrative and criminal law, on unauthorized interference with the operation of gas equipment. But not everything that is called gas is directly it. But in reality, repairing a gas stove with your own hands is not only possible, but also necessary. After all, it is not always advisable to pay for the call and work of the master who replaced the faulty pen or adjusted the fuel supply level. And, all the more, there is no need to take an official permit from the gas service for this.
The principle of operation of gas stoves is as follows. Natural gas is supplied to the burner from a centralized gas main or an autonomous cylinder. At the moment of transition from the nozzle of the burner to the diffuser on the burner, the fuel is mixed with oxygen from the air. After that, it becomes possible to ignite the gas-air mixture, the combustion of which will continue until the gas valve is completely closed..
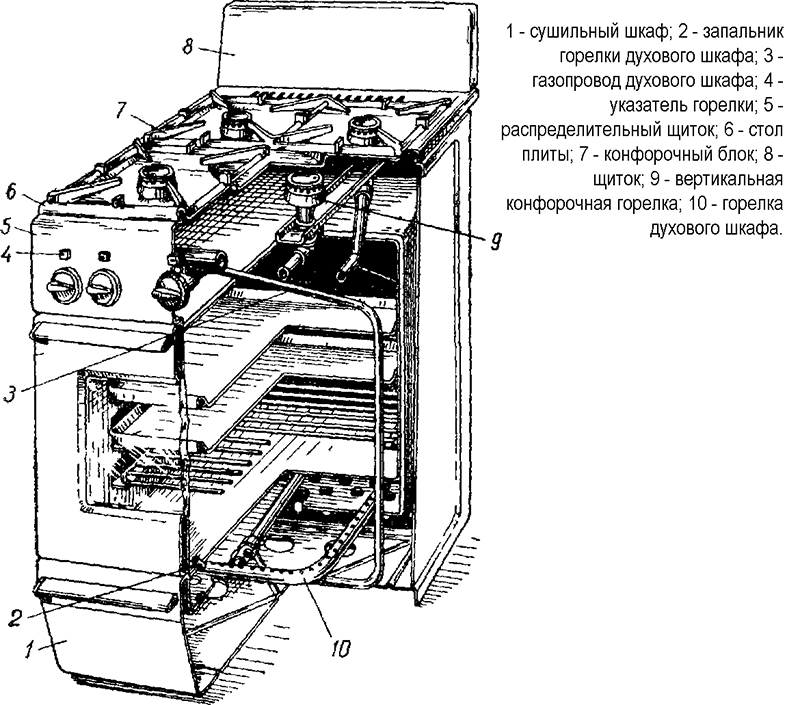
The furnace includes several systems that are responsible for the correct operation of the entire unit:
- gas system, which includes pipes and hoses with taps and burners;
- an electrical component designed for lighting, auto-ignition and grill operation;
- the body of the device, which has a template set of parts and is made of enamelled sheet steel.
Important! The overall design is the same for all ovens. Some models differ only in design and functionality.
The hotplate is the final stage of gas delivery. An already burning jet of a gas-air mixture, moving along the base, fed to the lid, reflected from which it enters the divider... There, the flame divides into uniform little tongues. When the burners are removed for cleaning, the burners with nozzles at the ends are visible. They are also called jets and nozzles. There are three types of burners used.
- Diffusion... In them, gas mixes with air in a natural way. Used in the oven.
- Kinetic... The pressure in the gas line of the furnace is low. Its energy is just enough to suck in the mixing air and supply it to the burner.
- Combined... Modern ovens use two methods at the same time.
Panel can be manufacturedbut from enamelled steel sheet. But today most slabs are made from specially hardened impact-resistant glass. Directly under the hob are electrical devices and a gas system, into the pipeline of which several control valves are embedded. The intensity of the flame depends on the degree of opening of the regulators.
The electrical component of the oven includes timer, thermometer and lighting elements. It also includes electronic controls that control the operation of heating elements and fans, which are present in some samples.
Gas ovens are divided into two types.
- Dual mode, without ventilation. Sometimes a grill is attached to the top of the oven.
- Multi-mode... The air in the oven is moved forcibly by the fan. And so that it does not extinguish the flame, special hollow burners are used.
To preserve heat in ovens, thermal insulation is used, and the door is made of two or three layers of glass.
Gas leakage is controlled by a thermocouple, which is located in the center of the flame and, when heated, generates a current that feeds a small electromagnet... The task of the latter is to keep the valve on the gas pipeline open. In the event of a sudden cessation of combustion, not associated with turning off the fuel supply manually, the sensor quickly cools down and the magnet turns off. This leads to the interruption of the gas supply.
It takes a few seconds for the hob to turn on for the sensor to reach the desired temperature. AND all this time you need to hold the regulator knob pressed. Some users consider this a serious inconvenience and choose ovens without gas control. Such models can be found from several manufacturers - Mora, Gefest, Ardo, Ariston, Darina and Indesit.
Important! It is better to diagnose a malfunction of a gas oven when it is turned off. Failure to do so may result in a serious accident using a damaged device.
If there is a smell of gas in the room, and the stove is not working at that moment, then somewhere there is a leak of blue fuel. It is necessary to disassemble the oven and smear all connections of the gas pipeline with soapy water both outside and inside. Air bubbles will show where the gas is coming out.
To inspect regulators and shut-off valves, you need to remove the top cover. To do this, remove the grates and burners, unscrew the fixing screws with a screwdriver and lift the hob lid.
To check the inside of the oven for leaks, first you should look at which side of the plate the gas supply goes into it.Depending on what you see, you need to shoot the right or left wall. After detecting a leak, it is required to re-twist the nodes by winding more sealant in the form of a FUM tape or a Loctite 55 thread onto the thread.
Advice! For work involving gas leaks, it is recommended to call the emergency gas service.
Gas stoves, like any other complex mechanisms, are also prone to malfunctions, which are as follows:
- gas stops burning;
- ignition does not occur immediately;
- uneven flame;
- work is accompanied by noise and foreign smell;
- problems with the oven;
- difficulty in turning on and others.
To fix such breakdowns, it is not necessary to call a foreman. Spend self-repair is quite within the power of everyone. But before repairing the device, you must turn off the gas supply to it.... The shut-off valve handle is located on the wall behind the stove or directly on the stove in the area of the back wall.
Troubleshooting should start with cleaning the stove. If small food particles enter the burner, the nozzle is often clogged. Debris is blocking the fuel path. In this case, the flame does not ignite at all or burns unevenly. Sometimes, because of the obstacle, the fire burns only at a minimum. Clean the nozzle you can use a thin needle.
Likewise, food pieces or other debris can fall into the divider. Being in the path of the flame a foreign object can give off an unpleasant odor... Remove the hotplate and clean it thoroughly.
The power or height of the flame is adjusted using the knobs on the hob. Sometimes she can turn with difficulty or stay in place at all. To spend handle repair complete disassembly of the faucet will be required. To do this, you first need to remove the controls and the front panel.
At the faucet, carefully pull out the pin, then remove the spring and plug. All parts must be cleaned of grease and debris. Sharp objects must not be usedso as not to damage the integrity of the plug. After cleaning, coat the surfaces of the parts with graphite grease and reassemble them in reverse order.
Advice! In order to regulate the flame when using canned gas, among other things, it is necessary to change the entire set of jets. For this job, you need a specialist from the gas service. Only he will be able to make the correct setting of the equipment so that the fuel burns out without residue.
Almost all modern gas stoves are produced with such a useful function as electric ignition. And only the most budget models may not have it. For example, there are such ovens from manufacturers Elekta, Flama, Gorenje and Hansa.
The auto-ignition system is often prone to breakdowns. If problem with one burner, then you need to check her ignition electrode. There may be a crack on its ceramic surface, causing the spark to blow to the side.
Then the integrity of the wire connecting the piezo and the electric ignition unit is checked. If the entire unit fails, ignition does not work for all burners... Defective elements must be replaced with new ones. The absence of a spark on all burners can also be caused by a malfunction of the power button. If the button is working, then check the power wires. The piezoelectric element in the oven is examined in the same way.
It often happens that the oven door does not close. If the oven door does not fit tightly, there is a significant loss of heat, and the cooking process can be delayed indefinitely.. Reasons maybe two:
- the mount is loose;
- the sealing gasket has become unusable.
The mount must be tightened with a screwdriver. And the gasket needs to be replaced. To do this, remove the door from the hinges and remove the old gasket. Clean the gutter with detergent and install a new seal.
May fail gas control devices: due to the constant temperature difference, the thermocouple often burns out. Gas control repair consists in replacing a part.But sometimes users prefer to turn off the protection function. How this is done is shown in the following video using the example of the Brest 1457 slab:
At violation of the balance of the gas-air mixture a loud noise is heard when the fuel is burning. To fix the problem, in the old stove it is necessary to correct the air damper, and in new models the noise will stop after replacing the diffusers.
If it stopped working all electrical equipment gas stove, then the reason is most likely a power failure. The search for the problem must be started from the outlet to which the device is connected.
Important! When checking electrical equipment with subsequent repair, you must first disconnect the device from the network.
Repair of the timer, temperature sensor and backlight elements carry out the replacement of failed parts with new ones.
In order for the kitchen unit to work for many years without serious breakdowns, regular preventive maintenance is required. After each cooking, wait until the stove cools down, wash thoroughly and remove food debris from the surface... This will protect the equipment from various blockages.
Not recommended leave running equipment unattended... The boiling liquid can overwhelm the flame on the burner, thereby reducing the service life of the gas control mechanism and auto-ignition elements.
Advice! You can use baking soda to remove burnt food from the surface. This will speed up the cleaning process and add disinfection. Cast iron burners and grates are cleaned with a wire brush.
Necessary regularly lubricate the rubbing surfaces at the control valves... How to do this was described above.
It is not difficult to repair a gas stove. But it's even easier to keep it clean and tidy. And then the irreplaceable kitchen appliance will serve for many years, delighting with impeccable work.
It is impossible to imagine any kitchen without a hob, be it an electric or a gas stove, since it is on these units that the cooking process takes place. But unfortunately, these devices fail over time for various reasons. Repair gas stoves, fix all kinds of breakdowns and carry out maintenance qualified gas service specialist... But there are minor faults in which you can fix the gas stove on your own. So, you can repair a gas stove with your own hands with the following malfunctions:
- one or all burners do not light up;
- electric ignition does not ignite the gas;
- after the gas is ignited, the burner goes out;
- the oven lid is not covered.
This malfunction can be caused by a number of reasons:
- clogging of the gas supply nozzle;
- failure of the ignition plug;
- damage to the insulation of the wire going to the candle;
- faulty electric ignition control unit;
- malfunction of the power button.
The nozzle (jet) of the unit can become clogged from food, detergent powder or gas combustion products. In this case, self-repair of a gas stove is very simple: you need to remove the burners and clean the nozzle a wooden toothpick (do not use metal objects such as a paper clip or needle for cleaning).
If you cannot clean the nozzle without disassembling the stove, then you should remove the top panel of your device by unscrewing a few bolts. For a good cleaning of the jet, it can be unscrewed.
Before disassembling the gas stove, you should disconnect from it the power supply (voltage for the candle - 220V), which is required for electric ignition. This malfunction of the electric ignition device can affect both one burner and all at once. If the spark does not skip on one burner, this means that the ignition plug (electrode) is out of order. On it, in the ceramic insulator, a crack may form, as a result of which the electrode stops working correctly.
To repair a gas stove with your own hands about replacing a candle, it is enough to remove the burners, open the stove cover (by unscrewing a few bolts), and change electrode on new.
Also, a frequent malfunction of the electric ignition on one burner can be wire damagegoing to the candle. To check this, press the ignition button with the unit cover open. If the wire is “punctured” in any place, then you will see a spark slipping in this place either on the body of the device or on the foil that covers the oven. Repair of electric ignition of a gas stove with a damaged wire consists in replacing it with a new one, or it must be moved to another place so that there is no “breakdown” to ground.
In the case when the electric ignition does not work on all burners, including in the oven, this means that the ignition unit is out of order. To repair the autoignition, you need to replace the unit with a new one after removing the top panel of the device.
The process of repairing the electric ignition of Darin's gas stove is shown in detail in this video:
There are times when a properly working gas stove suddenly starts to present surprises. For example, you turn on the gas supply, it lights up, and after releasing the handle, it immediately goes out. Such symptoms speak of thermocouple faults - a sensor that turns on the supply of a combustible mixture.
A thermocouple works in the following way: when heated, it generates an electric current, which magnetizes the solenoid valve. The valve, in turn, opens and the gas flows freely into the burner. If the thermocouple stops heating, the electrical impulse is lost and the valve shuts off the flow. Thus, if, after opening the tap to turn on the gas and ignite it with an electric candle, combustion stops immediately, this means that the solenoid valve has triggered and cut off the supply of the combustible mixture.
It is quite simple to repair a gas stove with such a malfunction.
-
First, you need to remove all the handles and the top panel of the stove by unscrewing the bolts on the sides of the lid and under the burners (stove designs may be different, respectively, and the location of the fasteners may differ).
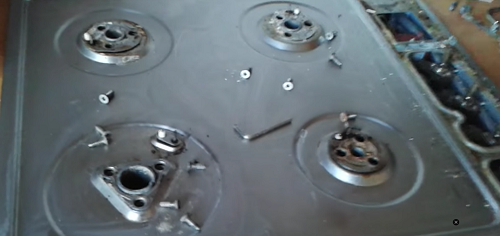

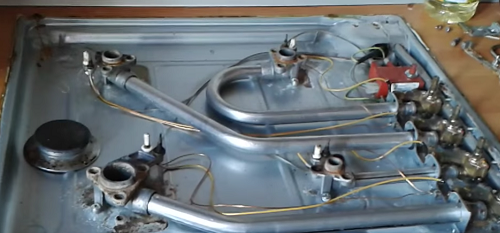

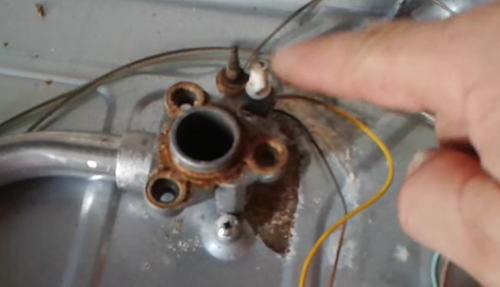

Thus, it is possible to repair the Hephaestus, Ardo gas stove, Brest and Hansa stoves if the thermocouple fails.
Also, do not forget about safety precautions: before you repair the gas stove, you should disconnect it from the mains.
Sometimes a broken button can be the cause of a spark plug failure. This malfunction during the repair of Gorene gas stoves or other brands can be determined by throwing the wires (after removing the top panel of the device) to another button gas stoves. If the ignition works when the burner tap is opened, then the faulty button must be replaced.
The most common oven breakdown is poorly closing the oven door. It occurs most often when there is a small child in the house who simply sits on the open door, as a result of which the brackets holding this part bend and do not fulfill their function of pressing the sash.
To repair the oven of the Indesit gas stove, Brest 1457 or the Flama stove, you will need disconnect the door from the unit... To do this, you need:
-
Since the door is held on hinges equipped with latches, they must be bent on both sides of the unit.
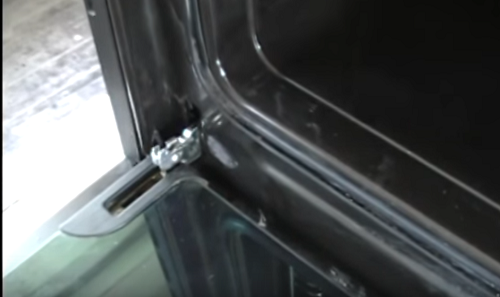



Summing up, we can say that only the above malfunctions can be eliminated with your own hands. All types of troubleshooting of gas stove malfunctions associated with disconnecting gas supply pipes and hoses must be carried out by a gas service employee, after which he draws up an act of repair performed. The same rule applies to connecting the gas stove to the mains - it must be carried out by a specialist. To carry out self-repair, it will not be superfluous to get acquainted with how the gas stove is arranged.
It is impossible to imagine any kitchen without a hob, be it an electric or a gas stove, since it is on these units that the cooking process takes place. But unfortunately, these devices fail over time for various reasons. A qualified gas service specialist should repair gas stoves, fix various breakdowns and carry out maintenance. But there are minor faults in which you can fix the gas stove on your own.
It is impossible to imagine any kitchen without a hob, be it an electric or a gas stove, since it is on these units that the cooking process takes place. But unfortunately, these devices fail over time for various reasons. A qualified gas service specialist should repair gas stoves, fix various breakdowns and carry out maintenance. But there are minor faults in which you can fix the gas stove on your own. So, you can repair a gas stove with your own hands with the following malfunctions:
The cooking zones do not light up
This malfunction can be caused by a number of reasons:
clogging of the gas supply nozzle;
failure of the ignition plug;
damage to the insulation of the wire going to the candle;
faulty electric ignition control unit;
malfunction of the power button.
Clogged nozzle
The nozzle (jet) of the unit can become clogged from food, detergent powder or gas combustion products. In this case, self-repair of a gas stove is very simple: you need to remove the burners and clean the nozzle with a wooden toothpick (you cannot use metal objects for cleaning, for example, a paper clip or a needle).
Electric ignition does not ignite the gas
Before disassembling the gas stove, you should disconnect from it the power supply (voltage for the candle - 220V), which is required for electric ignition. This malfunction of the electric ignition device can affect both one burner and all at once. If the spark does not skip on one burner, this means that the ignition plug (electrode) is out of order. On it, in the ceramic insulator, a crack may form, as a result of which the electrode stops working correctly.
To repair a gas stove with your own hands about replacing a candle, it is enough to remove the burners, open the stove cover (by unscrewing a few bolts), and change the electrode to a new one.
Also, a frequent malfunction of the electric ignition on one burner may be damage to the wire going to the candle.To check this, press the ignition button with the unit cover open. If the wire is “punctured” in any place, then you will see a spark slipping in this place either on the body of the device or on the foil that covers the oven. Repair of electric ignition of a gas stove with a damaged wire consists in replacing it with a new one, or it must be moved to another place so that there is no “breakdown” to ground.
The fire goes out after being ignited
There are times when a properly working gas stove suddenly starts to present surprises. For example, you turn on the gas supply, it lights up, and after releasing the handle, it immediately goes out. Such symptoms indicate a malfunction of a thermocouple - a sensor that turns on the supply of a combustible mixture.
A thermocouple works in the following way: when heated, it generates an electric current, which magnetizes the solenoid valve. The valve, in turn, opens and the gas flows freely into the burner. If the thermocouple stops heating, the electrical impulse is lost and the valve shuts off the flow. Thus, if, after opening the tap to turn on the gas and ignite it with an electric candle, combustion stops immediately, this means that the solenoid valve has triggered and cut off the supply of the combustible mixture.
It is quite simple to repair a gas stove with such a malfunction.
First, you need to remove all the handles and the top panel of the stove by unscrewing the bolts on the sides of the lid and under the burners (stove designs may be different, respectively, and the location of the fasteners may differ).
After unscrewing the fasteners, remove the top cover of the unit.
After disassembling the unit, you will see two protruding parts near the inoperative burner. White is the ignition plug, and next to it is the thermocouple.
A wire goes from the thermocouple to the connector, from which it should be pulled out. Disconnect the gas control sensor from the burner.
After removing the non-working element, install the new one purchased in advance.
Thus, it is possible to repair the Hephaestus, Ardo gas stove, Brest and Hansa stoves if the thermocouple fails.
Button malfunction
Sometimes a broken button can be the cause of a spark plug failure. This malfunction when repairing gas stoves, burning or other brands can be determined by throwing the wires (after removing the top panel of the device) to another button on the gas stove. If the ignition works when the burner tap is opened, then the faulty button must be replaced.
Summing up, we can say that only the above malfunctions can be eliminated with your own hands. All types of troubleshooting of gas stove malfunctions associated with disconnecting gas supply pipes and hoses must be carried out by a gas service employee, after which he draws up an act of repair performed.
Sooner or later, the need to repair the gas stove overtakes almost all owners of these devices.
It is often costly to contact a master, and you want to troubleshoot at home so as not to waste time transporting tiles and repairing them.
There are a number of problems with gas stoves, such as the regulation of the electric ignition, which you can really deal with on your own.
An analysis of the most common breakdowns in plates and ways to solve them, as well as a video that reflects all stages of work, will help you with this.
Before doing repairs, you need to understand what a gas stove is, what details are present in it, and what kind of repair of a gas stove with your own hands may be required in one case or another.
There are many companies producing gas stoves: Gorenje, Ardo, Ariston, etc. But all tiles, even if they differ in price, have a similar type of interior arrangement.
The most visible part of any stove is the burners. Each hob is bolted to the stove table. The burner also consists of several parts: they have a lid, a divider and an injector.
A steel and copper tube is connected to each burner, which has a fastening similar to the American one. Due to this device, the burner receives gas.
Gas burner device
No special tools are required to work with the burners: you will need a key, most likely 13, to disassemble the parts of the burner if it needs repair or cleaning.
After completing the repair and assembly, you need to assemble the structure and check how tight it is in order to prevent gas leaks.
Each burner has two candles around the perimeter.
One helps to create ignition, working with piezoelectric elements or an electronic circuit, and the second serves as a thermocouple connected to the circuit that controls the combustion.
Gas burner (grid for dishes removed): 1 - nozzle, 2 - electric ignition plug, 3 - flame sensor (hot junction of thermocouple)
Candles differ from each other even externally, so it will be difficult to confuse them.
A candle for electric ignition has a ceramic caftan, it is needed to prevent sparks from breaking below the required level.
That is why it is important to properly ground the stoves where the electric ignition is built in. Also, electric ignition does not tolerate the use of liners for water supply and metal threads.
It is important to separate the slab from the riser with special gaskets during installation and repairs, otherwise there is a real risk of explosion.
The thermocouple candle has a bronze caftan, which is a powerful conductor of heat
The reliability and speed of switching on the protection that blocks the gas after you have finished using the stove depends on how quickly the semiconductors cool down after the flame goes out.
A manifold can be seen under the slab table. It looks like a thick tube, from which the liners to the burners diverge.
The gas flow is controlled by solenoid valves, the number of which is equal to the number of burners on the stove.
This is necessary so that if the flame of one burner goes out, the others can still function.
The solenoid valves are equipped with an inductor. When the thermocouple is heated, an EMF is formed, which fixes the device open.
Solenoid valve with induction coil
A full repair of Hephaestus, Gorenje and other models of gas stoves requires the intervention of specialists, because it will be not only difficult to do it on your own, but also dangerous.
However, there are a number of works that can be done with your own hands at home, and bring the stove into working condition if its damage is not too serious.
The most common problem with gas stoves is the failure of the electric ignition. A video will help you fix this problem - watch it before starting the repair in order to do everything right.
Video instructions for repairing an electric ignition using the example of a Gorenje stove:
First of all, you need to disconnect the stove from the power supply, remove the partition from it and inspect for deformations.
If you see that there are chips and cracks on it, it means that this is why the stove does not work, and the partition should be replaced.
It can be changed only when ignition or autoignition is disabled - do not forget about it. After replacing, check how well it works now.
If a piezo ignition is built into your Gorenje stove or another model, then the operating technology will be slightly different.
Replacing the spark plug
First you need to remove the device from the control, then remove the plate partition from the bottom and remove the igniter, which is screwed to the bracket with the fastener.
If it is cracked or otherwise deformed, it should be replaced with a new one. To install a new igniter, you need to turn off the module responsible for ignition.
The instructions for the stove will help you find it.
After that, in place of the old part, you need to install a new igniter and check how well the gas stove is now working.
Often, after prolonged use, the oven doors begin to stick or do not close properly.
To make a similar repair of Indesit, Gorenje and others gas stoves, you need to unscrew the screws that hold the doors and swing them in different directions so that the door is firmly fixed on the hinges, from which it may have fallen off.
After that, re-tighten the bolts, if everything is done correctly, then the door should snap into place, and the oven should close tightly.
Video instructions for repairing the oven door:
If the part still does not work, then perhaps you should replace the gasket, which is responsible for the tight fit of the oven door to the stove frame.
To do this, you need to unscrew the door hinges, which are located above the handles, and remove the plate cover.
Most likely, you will also need to remove the internal screws and panel edges, or you can simply move them aside and thus remove the cover.
The screws with which the glass is fixed on the panel block must be removed, and then the glass itself must be removed by disconnecting the gaskets that hold it.
Oven door hinge assemblies
Now you need to detach the gaskets themselves, which are between the door and the glass from the inside.
Now you need to change the gasket to a new one and put all the parts back in place, proceeding in the reverse order.
Use the manufacturer's instructions, as the device of different models will be slightly different, and you will have to act in different ways.
It often happens that the gas supply to the burner is not adjusted correctly. As a result, the flame burns intermittently or disappears altogether. If the device is working properly, the flame should be even and have a bright blue color.
Correctly adjusted minimum flame
If your device works in a different way, it means that the ignition or autoignition needs to be properly set up and adjusted the stove.
To do this, you must first turn off the gas supply and then remove the baffle. Then you need to turn it back on and determine which air damper needs adjustment.
Flame adjusting elements: 1 - gas burner, 2 - valve stem, 3 - minimum flame adjustment screw
To adjust the work, you need to unscrew the set screw that locks the plate - it is responsible for the proportion in which the gas mixes with air.
| Video (click to play). |
Having set it in the desired position, turn on the stove and check how it works.


