In detail: do-it-yourself repair of the grant fret generator from a real master for the site my.housecope.com.
Lada Granta cars appeared on our roads relatively recently, however, unfortunately, many owners of this model of the Russian car industry have already noticed the presence of many chronic "sores" among which one of the most unpleasant is the low reliability of the standard Lada Granta generator.
As always, the most correct method of solving the problem is, at the same time, the most radical one. In this case, it means replacing the 9402.3701 generator with a more reliable and perfect product, for example, a 110 Amp generator from Bosch. Such a modernization does not require any structural changes and will help to get rid of problems associated with power supply for many years, although it must be admitted that such a revision will cost a lot.
As a preventive measure, you can slightly improve the power generation system on the Lada Granta by replacing it with an obviously unsuccessful bracket and, in this case, it is advisable to install the Lada Kalina bracket, which has a special roller for adjusting the belt tension. Despite its apparent insignificance, such a simple modification can significantly extend the life of the generator bearings.
However, if there is a desire and some practical skills, then it is quite possible to repair the Lada Grant generator with your own hands.
Generator voltage regulator Lada Granta - check and prevention
Prevention of the Lada Granta generator
Such prevention can give new life to the Lada Granta generator.
| Video (click to play). |
1. Remove the alternator drive belt
2. Remove the lugs of the wires from the contact bolt.
3. Disconnect the wires from the generator
4. Using a 13 mm socket wrench, unscrew the bolt nut of the upper mounting of the generator. Using a 17 mm socket wrench, unscrew the bolt of the lower mounting of the generator.
5. Remove the bolts from the generator bracket and remove the generator.
6. In order not to lose, remove the nut and bushing 'of the bolt from the generator bracket.
It is possible to check the stator and rotor winding for an open circuit without removing the generator from the car. For this it is necessary to remove the rectifier unit.
To complete the work you will need:
- three- or two-grip puller;
- homemade mandrel from a set of a cup puller.
1. Remove the generator from the car
2. Remove the voltage regulator
3. Prying off with a screwdriver, we extract the ends of the stator windings from the spring-loaded contacts of the rectifier unit.
You can check the condition of the rectifier unit and stator windings without further disassembling the generator. It is enough to carefully bend the winding leads to the sides. The check procedure is the same as shown below.
4. Using an 8 mm spanner wrench, unscrew the three fixing bolts of the rectifier unit (remembering how the insulating and thrust washers are installed).
5. Using a 12 mm wrench, unscrew the contact bolt nut.
6. Remove the rectifier unit.
7. With a marker, mark the relative position of the front and rear covers of the generator (to simplify assembly).
8. Using an 8 mm socket wrench, unscrew the four bolts tightening the front and rear covers of the generator.
9. Using a slotted screwdriver, carefully open the generator covers.
10. Remove the rear cover, take out the contact bolt (with an insulating washer put on it) and the plastic bearing sleeve.
To determine the technical condition of the rear bearing, wiggle it from side to side and vigorously rotate its outer ring.The bearing should not have significant play, the ring should rotate freely without jamming and extraneous noise. The defective bearing must be replaced.
11. With a marker we put marks on the relative position of the stator and the back cover.
12. Prying with a screwdriver, remove the stator from the back cover of the generator.
13. To determine the technical condition of the front bearing. holding the pulley with your hand, rotate and wiggle the front cover from side to side.
If the bearing sticks, has significant play, or makes a lot of noise during vigorous rotation of the cover, it must be replaced.
The manufacturer does not recommend changing the front rotor bearing, since the bearing is sealed in the front cover of the generator. But, given that the cost of the bearing is much lower than the cost of the new front cover and, moreover, of the generator assembly, it is advisable to press out and replace the faulty bearing.
14. If it is necessary to replace the front bearing of the generator with a 24-minute socket wrench, unscrew the pulley fastening nut, holding the pulley with sliding pliers.
15. Remove the pulley 3 with spring and flat washers 2, spacer sleeve 1 from the rotor shaft.
16. With blows of a hammer with a rubber striker we press out the rotor from the front bearing (for this we bait the pulley fasteners on the rotor shaft thread, flush with the end face).
17. If it is necessary to replace the front bearing of the generator, install the front cover in a vice.
19. Having fastened the rotor in a vice with soft pads on the jaws, using a universal puller of a suitable size, press the rear bearing off the rotor shaft.
1. Applying the ohmmeter probes to the slip rings of the rotor, we check the field winding for breakage. The resistance of a serviceable field winding should be 5-10 ohms.
2. Connecting the ohmmeter probes to any slip ring and to the rotor, we check the excitation winding for a short to ground. With a good rotor winding, the ohmmeter should show infinitely high resistance.
3. Alternately connecting the ohmmeter probes to the terminals of the stator winding, we check the stator windings for breakage. In the absence of an open circuit, the ohmmeter will show a small electrical resistance.
4. Having connected the ohmmeter probes to any winding terminal and to the stator, we check the stator winding for a short to ground. If there is no short circuit, then the ohmmeter should show an infinite resistance.
Defective rotor and stator are replaced.
A working semiconductor diode conducts electric current in only one direction. If the diode does not conduct current or conducts current in both directions, then it is faulty.
5. We connect the probe of the negative terminal of the ohmmeter to the diode terminal, and the probe of the positive terminal to the body of the diode under test (or to the plate into which it is pressed). A working diode should not pass current (resistance tends to infinity).
6. We change places of the tester probes. If the diode is ok, the ohmmeter should show electrical resistance.
7. Similarly, we check other diodes of the rectifier unit.
Before pressing the bearing into the front cover of the generator, it is necessary to check the bearing seat and, if necessary, restore the chamfer with a knife or scraper where the edges of the hole remained jammed. When pressing the front bearing into the cover, force must be applied only to the outer ring of the bearing.
1. Having picked up suitable mandrels from the set of a cup puller, we press the new bearing into the front cover of the generator until it stops.
2. By applying light blows with a hammer through a drift, we restore the bearing filling in the cover.
3. Using a tube of suitable diameter (you can use a 19 mm deep head) press the rear bearing onto the rotor shaft until it stops.
Before installing the alternator rear bearing, make sure the shaft is securely in the vise.Place a piece of wood of a suitable size under the rotor shaft so as not to damage the front rotor impeller during pressing. To avoid damage to the bearing, shocks should only be applied to the inner ring of the bearing.
Further assembly of the generator is performed in the reverse order of disassembly. At the same time, we combine the marks applied to the covers and the stator of the generator. Finally, tighten the tie bolts evenly, criss-cross, in several steps according to the pat-turn. Having tightened the bolts, we make sure that the rotor rotates slightly (the rotor jamming can be caused by the skewed covers). Before installing the plastic casing, we make sure that the terminals of the stator windings are securely fastened.
1. Remove the alternator drive belt 2. Remove the wire ends from the contact bolt. 3. Disconnect the wires from the generator
4. Using a 13 mm socket wrench, unscrew the bolt nut of the upper mounting of the generator. Using a 17 mm socket wrench, unscrew the bolt of the lower mounting of the generator. 5. Remove the bolts from the generator bracket and remove the generator. 6. In order not to lose, remove the nut and bushing 'of the bolt from the generator bracket.
1. Remove the generator from the car 2. Remove the voltage regulator 3. Prying with a screwdriver, remove the ends of the terminals of the stator windings from the spring-loaded contacts of the rectifier unit.
You can check the condition of the rectifier unit and stator windings without further disassembling the generator. It is enough to carefully bend the winding leads to the sides. The check procedure is the same as shown below. 4. Using an 8 mm spanner wrench, unscrew the three fixing bolts of the rectifier unit (remembering how the insulating and thrust washers are installed).
5. Using a 12 mm wrench, unscrew the contact bolt nut. 6. Remove the rectifier unit. 7. With a marker, mark the relative position of the front and rear covers of the generator (to simplify assembly).
8. Using an 8 mm socket wrench, unscrew the four bolts tightening the front and rear covers of the generator. 9. Using a slotted screwdriver, carefully open the generator covers. 10. Remove the rear cover, take out the contact bolt (with an insulating washer put on it) and the plastic bearing sleeve. To determine the technical condition of the rear bearing, wiggle it from side to side and vigorously rotate its outer ring. The bearing should not have significant play, the ring should rotate freely without jamming and extraneous noise. The defective bearing must be replaced. 11. With a marker we put marks on the relative position of the stator and the back cover. 12. Prying with a screwdriver, remove the stator from the back cover of the generator. 13. To determine the technical condition of the front bearing. holding the pulley with your hand, rotate and wiggle the front cover from side to side.
If the bearing sticks, has significant play, or makes a lot of noise during vigorous rotation of the cover, it must be replaced. The manufacturer does not recommend changing the front rotor bearing, since the bearing is sealed in the front cover of the generator. But, given that the cost of the bearing is much lower than the cost of the new front cover and, moreover, of the generator assembly, it is advisable to press out and replace the faulty bearing. 14. If it is necessary to replace the front bearing of the generator with a 24-minute socket wrench, unscrew the pulley fastening nut, holding the pulley with sliding pliers.
15. Remove the pulley 3 with spring and flat washers 2, spacer sleeve 1 from the rotor shaft. 16. Press the rotor out of the front bearing with a hammer blow with a rubber striker (for this we attach the pulley fasteners to the rotor shaft thread flush with the butt end). 17. If it is necessary to replace the front bearing of the generator, install the front cover in a vice.
19. Having fastened the rotor in a vice with soft pads on the jaws, using a universal puller of a suitable size, press the rear bearing off the rotor shaft.
one.Applying the ohmmeter probes to the rotor slip rings, we check the excitation winding for an open circuit. The resistance of a serviceable field winding should be 5-10 ohms.
2. Connecting the ohmmeter probes to any slip ring and to the rotor, we check the excitation winding for a short to ground. With a good rotor winding, the ohmmeter should show infinitely high resistance. 3. Alternately connecting the ohmmeter probes to the terminals of the stator winding, we check the stator windings for breakage. In the absence of an open circuit, the ohmmeter will show a small electrical resistance.
4. Having connected the ohmmeter probes to any winding terminal and to the stator, we check the stator winding for a short to ground. If there is no short circuit, then the ohmmeter should show an infinite resistance. Defective rotor and stator are replaced. A working semiconductor diode conducts electric current in only one direction. If the diode does not conduct current or conducts current in both directions, then it is faulty. 5. We connect the probe of the negative terminal of the ohmmeter to the diode terminal, and the probe of the positive terminal to the body of the diode under test (or to the plate into which it is pressed). A working diode should not pass current (resistance tends to infinity). 6. We change places of the tester probes. If the diode is ok, the ohmmeter should show electrical resistance.
7. Similarly, we check other diodes of the rectifier unit.
Before pressing the bearing into the front cover of the generator, it is necessary to check the bearing seat and, if necessary, restore the chamfer with a knife or scraper where the edges of the hole remained jammed. When pressing the front bearing into the cover, force must be applied only to the outer ring of the bearing. 1. Having picked up suitable mandrels from the set of a cup puller, we press the new bearing into the front cover of the generator until it stops. 2. By applying light blows with a hammer through a drift, we restore the bearing filling in the cover.
3. Using a tube of suitable diameter (you can use a 19 mm deep head) press the rear bearing onto the rotor shaft until it stops. Before installing the alternator rear bearing, make sure the shaft is securely in the vise. Place a piece of wood of a suitable size under the rotor shaft so as not to damage the front rotor impeller during pressing. To avoid damage to the bearing, shocks should only be applied to the inner ring of the bearing.
Further assembly of the generator is performed in the reverse order of disassembly. At the same time, we combine the marks applied to the covers and the stator of the generator. Finally, tighten the tie bolts evenly, criss-cross, in several steps according to the pat-turn. Having tightened the bolts, we make sure that the rotor rotates slightly (the rotor jamming can be caused by the skewed covers). Before installing the plastic casing, we make sure that the terminals of the stator windings are securely fastened.
VAZ 2190 was launched on sale in 2011. The car is a budget version of Lada Kalina with an enlarged trunk and a more modern generator mechanism. The mechanism for adjusting the alternator belt tensioner, which is absent in Lada Granta, is its feature, unlike other models. The economy class model was intended to replace its outdated predecessors, the production of which at AvtoVAZ had already ceased.
However, as the experience of car owners has shown, closer to 5000 km of run, a characteristic sound is heard, announcing that the alternator belt has torn, unable to withstand too strong a stretch. Despite the fact that the alternator belt was provided with an automatic tensioner, in practice it is often over-tightened, which leads to a quick break.The case is recognized without problems as a warranty, the replacement of the alternator belt is made, but with significant time costs.
It should not be bent, its teeth should be intact. It is necessary to inspect the oil seals. Leaking oil will negatively affect the wear resistance of the rubber. Grants users will have to listen carefully to ensure that they do not miss a moment when their alternator belt needs to be replaced. You can determine that the alternator belt will soon break: in wet weather or on a cold engine, it starts to whistle.
- dull headlights and dashboard;
- the heating of the passenger compartment is unstable;
- the sound of car signals has become lower;
- the turn signal and wiper intervals have increased.
You can avoid regular contact with the described problem. There are several ways out for this.
With regard to the third point, some masters are not puzzled by the search for a suitable option. They independently correct the standard mount, with the help of a grinder and a sharpener, they make it thinner. To implement the fourth option, they turn to a service station (also with a loss of warranty) or do all the manipulations on their own.
We must wait for the car to cool down. Next, remove the right side of the mudguard. Then the pieces of the belt are removed. After that, a new belt is put on in stages, first on the crankshaft pulley, then the other part of the belt is wound behind the pulley, pressing against it, the crankshaft begins to rotate clockwise. But if a spare timing belt is not at hand, it can be replaced with materials at hand.
In the case when tights did not work out, elements from a men's wardrobe are perfect. Leather belt for trousers or bags or tie. In this case, the length of the future product is measured in proportion to the worn out belt. This approach is due to the fact that leather and fabric products can be overtightened, thereby harming the mechanism. In this case, repairs will threaten much more serious than just replacing the alternator belt.
Many owners of Lada Grant are faced with the problem of a generator that fails after several thousand kilometers (some earlier, others later). The case is under warranty, but it will take about 2-3 weeks to wait for a new part, and during this period the dealer may prohibit the operation of the car.
If the belt tension is excessive, this can lead to the destruction of the generator bearings (unfortunately, the bearings are most often Chinese, the quality of which leaves much to be desired). If you find that the belt on your Grant is taut like a string, there are several ways to loosen the tension a little.
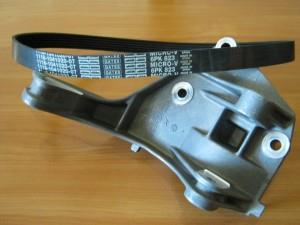
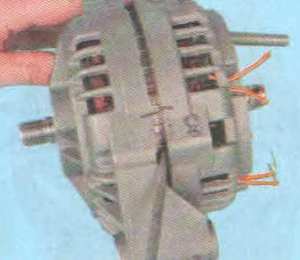
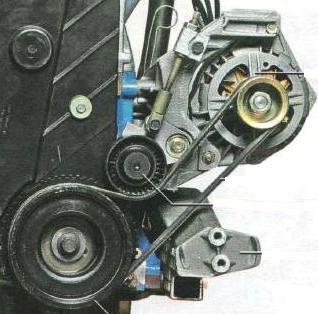
Anyone who has a problem with the generator, redo the mount, and you will be fine, like mine. Now I will show how the generator looks like on Kalina and on Grant. The grant has a bracket with number 2190 without holes for the tensioner and tensioner pulley, so it must be unscrewed and replaced with the 1118-1041034 bracket, tensioner pulley, tensioner bracket, bushings, belt from 1118. Issue price 1,700 rubles.

The Lada Kalina bracket includes a tension roller, which allows tensioning of the alternator belt, thereby affecting the service life of the alternator belt and bearing. Grants.
The grant has a bracket with number 2190 without holes for the tensioner and tensioner roller, so it must be unscrewed and replaced with:
- Bracket 1118-1041034 Lada Kalina.
- Tensioner pulley.
- Tensioner bracket
- Bushings.
- Belt from 1118.
The cost of the issue is 1700 rubles.
We remove the generator Grants, dismantle the old bracket. We install the Kalina bracket (its fastenings are similar), and then the generator itself.
We stretch the alternator belt according to the rate described above.
With such a modification of the generator bracket, we lose the warranty, but recently they say that along with the replacement of the generator, a tensioner is also installed under warranty.
The car's generator is an important component of the entire energy supply system. The operation of the ignition system depends on its correct operation. In the event of a generator malfunction, consumers will consume current from the battery, which will not allow full-fledged and long-term driving of a car with a broken generator. This article provides an operational guide to repairing a Lada Granta generator. Cases of repair of both the electrical part of the generator (checking the electrical characteristics using a measuring device) and mechanical parts, wear of slip rings, housing parts, generator bearings are considered.
1. Remove the generator from the car, see "Removal and installation of the Lada Granta generator".
2. Remove the voltage regulator, see "Checking and replacing the voltage regulator on a Lada Grant car".
3. Remove the three screws securing the rectifier unit.
4. Use a screwdriver to squeeze the spring clip and, at the same time, use another screwdriver to pull the stator winding out of the clip.
5. Remove all six stator winding leads in the same way.
6. Remove the power bolt nut.
7. Remove the rectifier unit from the generator housing.
This is how the removed rectifier unit looks like.
8. Check the "negative" diodes by connecting the "positive" (red) tester probe to the "minus" plate (bus) of the rectifier unit, and the "negative" (black) probe, alternately connecting to the three contact terminals of the diodes in three places (through one ) fastening the stator windings. If the diodes are good, the tester will show a resistance of 580-620 ohms.
9. Connect the "negative" (black) tester probe to the "minus" plate of the rectifier unit, and the "positive" (red) probe alternately connect to the same three pins. If the diodes are good, the tester will show an infinite resistance.
10. If the tester shows low or close to zero resistance, then the diode is "broken". If the tester's reading tends to infinity regardless of the color of the connected probes, then the diode is “open-circuit”. In both cases, the rectifier unit must be replaced.
11. In the same way, check the "positive" diodes, but only in relation to the "positive" plate of the rectifier unit or the output "B +" of the generator.
12. Check the stator winding with a tester for an open circuit and a short circuit to the stator housing.
13. Unscrew the nut with a spanner wrench, having previously clamped the alternator pulley in a vice so that it does not rotate.
16. Mark the relative position of the generator covers.
17.. Remove the four tie bolts located around the circumference of the generator.
nineteen. . remove the generator cover from the drive end (assembled with the generator bearing).
20, Remove the rotor shaft from the bearing.
If necessary, screw the pulley fastening nut onto the rotor shaft and press the rotor shaft out of the bearing through a wooden spacer with light hammer blows.
21. Remove the stator.
22. Inspect the stator. On its inner surface there should be no traces of the armature rubbing against the stator. If wear is found, replace alternator bearings or covers.
Check the electrical characteristics of the alternator stator winding. Details on checking the stator windings can be found in the article "Repair of the VAZ 2110 2111 2112 generator", checking the stator windings for these generators is similar.
23. Inspect the cover from the drive side (assembled with the generator bearing. If, when the bearing rotates, you feel play between the rings, rolling or seizure of rolling elements, damaged protective rings or grease drips, replace the bearing, and if cracks are found in the cover, especially at the attachment points generator, replace the generator cover.
24. To replace the bearing or cover, unlock the generator bearing.
25. Using a mandrel suitable for the diameter, use light hammer blows to press the bearing out of the generator cover.
26. Press the new bearing into the cover using a socket of a suitable diameter and while taking measurements, make sure that the winding leads do not touch the generator cover.
27. Inspect the slip rings. If they have seizures, risks, scratches, wear marks from brushes and other defects, grind the ring. If the damage to the rings cannot be removed with sandpaper, grind the rings on a lathe, removing a minimum layer of metal, and then sand.
28. Check the resistance of the rotor winding with a tester by connecting it to the slip rings. If the tester shows infinity, then there is an open circuit in the rotor winding and the rotor must be replaced.
29. Check the absence of a short circuit between the rotor winding and the housing by connecting the tester leads to any slip ring and the rotor housing. The tester should show infinity.
30. Check the ease of rotation of the bearing from the side of the slip rings. If, during the rotation of the bearing, play between the rings is felt, rolling or seizure of the rolling elements, damaged protective rings or grease drips, the bearing must be replaced.
31. To do this, press the bearing off the rotor shaft with a puller.
32. and using a suitable mandrel, press on the new bearing by applying force to the inner ring of the bearing.
33. Assemble the generator in the reverse order of disassembly. Orient the generator covers as previously marked. Tighten the nut to 39-62 Nm.
You can learn how to replace the bracket of the Lada Grant generator with the bracket from the Lada Kalina generator from the article "Generator Grants for the generator bracket from Kalina"
Granta can "boast" of his characteristic disease - generator breakdown, which occurs after a couple of thousand kilometers of driving. That is why the repair of the Lada Granta generator is another topical topic that we could not ignore.
How is the severity of a generator malfunction determined? A typical characteristic is the hum from the engine compartment. At first, you can drive with such a generator, but it is better not to delay the repair. As a preventive measure, you should check the tension of the alternator belt, which should easily rotate 90 degrees.
Too much tension will lead to accelerated bearing wear. Unfortunately, Granta cannot boast of having a special mechanism that allows you to quickly tension the alternator belt, but the mechanism can be borrowed from Kalina. So, we unscrew the standard generator bracket and the tensioner roller, and instead use the same parts, but from the Lada Kalina.
Bushings and belt will have to be purchased separately. This will eliminate the original problem, but two others will appear ... Many Grant owners note that the new tensioner is the reason for the breakage of the alternator belt, which lasts no longer than 40 thousand km. After that, an output of 1mm is formed and the belt begins to disintegrate at a rapid pace.
What is the second problem, you ask? Answer: revision puts an end to guarantees. Let's note one more drawback of the Grants generator. When unscrewing the upper bolt of the device, which is responsible for the position of the generator and the belt tension, the part is held on the lower bolt. We recommend changing the upper bolt to a thinner one. Only if you are going to visit a dealer under warranty, return everything to its original places so that the warranty will not be canceled. Here is such a way to repair the Lada Granta generator.
We disassemble the generator to check and replace the voltage regulator, rectifier unit, rotor, stator, and bearings.
Having wrung out the casing latch, lift the generator casing with a screwdriver.
Similarly, we squeeze out two more casing latches ...
… And remove the generator casing.
Using the "8" head, unscrew the two bolts of the brush holder.
Use the 12 key to unscrew the threaded bushing ...
... and remove the brush holder output from the contact bolt.
Prying the tip of the wire with a screwdriver ...
... we remove it from the output of the rectifier unit ...
... and remove the brush holder with voltage regulator assembly.
Using the "8" head, unscrew the three bolts of the rectifier unit.
Having wrung out the spring clip with a screwdriver, we disconnect the output of the stator winding from the rectifier unit.
Likewise, we disconnect the remaining five terminals of the stator winding from the rectifier unit.
Using the "12" wrench, unscrew the nut ...
... and remove the rectifier unit.
We grip the generator in a vice by the fastening eye.
We insert a screwdriver between the fan impeller and the jumper of the generator cover ...
... and keeping the armature from turning, turn off the pulley fastening nut with the “24” head.
Remove the alternator pulley.
Mark the relative position of the generator covers with a marker.
Using the "8" head, unscrew the four bolts tightening the covers.
Prying off the back cover with a screwdriver ...
… Disconnect the generator covers.
We take out the stator from the back cover.
We take out the contact bolt from the back cover.
Remove the plastic bushing from the rear bearing.
We screw the pulley fastening nut onto the rotor shaft, flush with the shaft end ...
... and striking with a hammer with a plastic striker on the end of the shaft, we press out the rotor shaft from the front bearing ...
... and remove the rotor from the front cover.
To replace the front bearing ...
… Press out the bearing with a suitable tool head, applying force to the outer ring of the bearing.
Press the new bearing into the cover with a tool head, applying force to the outer ring of the bearing.
To replace the rear bearing ...
… With a two-grip puller we press the bearing off the rotor shaft.
When performing this operation, the screw of the puller should rest exactly on the center of the shaft so as not to damage the plastic insulator of the rotor slip rings.
To install the rear bearing, we rest the front end of the rotor shaft on a wooden block and press the bearing onto the rear end of the shaft with a mandrel or a piece of pipe of a suitable diameter, applying force only to the inner ring of the bearing.
We assemble the generator in the reverse order.
Most owners of Lada Grant are aware of a problem with the generator, in order to fix it, in some cases it is necessary to remove the generator. Today we will tell you how to independently remove a generator on a Grant.
An imported belt made by Gates was used to drive the generator. Alternator belt size - 6PK 823. Catalog number VAZ-1118-1041020-07, that is, borrowed from Lada Kalina.
Recall that in the previous article we looked at how to install bi-xenon lenses on Grant with our own hands.
Removing the generator Grants from the engine
Required tool: socket head "13", mounting blade.
Disconnect the negative cable from the battery
Procedure:
1. Disconnect the harness connector from the alternator.
2. Remove the protective cap of the power cable retaining nut.
3. Unscrew the nut to the side.
4. Remove the wire from the generator contact bolt.
5. Unscrew the nut of the upper bolt of fastening of the generator, press the generator away from the engine with a mounting blade and remove the bolt.
6. Remove the bolt of the lower mounting of the generator.
7. Using a spudger, press the generator away from the engine and remove the bolt from the holes.
8. Move the generator towards the right mudguard.
9. Remove the belt from the alternator pulley and remove the alternator.
10. Remove the belt from the crankshaft pulley.
The generator is installed in reverse order. Make sure the V-grooves line up with the grooves of the pulleys when installing the drive belt.
It is necessary to remove the “Grants” generator for various reasons: for repair, maintenance, and modification of the unit. You can do it yourself if you know how to remove the generator on the "Grant".Depending on the modification of the car (8 or 16 valve engine, the presence of an air conditioner), the procedure for dismantling the generator has its own characteristics, so it is worth considering each option separately.
- socket wrenches for 8, 10 and 13;
- mounting blade.
Before removing the generator on the "Grant" without air conditioning, you should disconnect the "ground" from the battery by removing the negative terminal.
The procedure is as follows:
- unscrew the 2 rear engine protection mounting bolts;
- unscrew the 4 front engine protection bolts;
- remove the engine protection (mudguard) from the machine;
- undock the block of wires from the generator;
- dismantle the protective cap of the nut holding the power wire;
- unscrew the nut and disconnect the generator power wire;
- unscrew the upper fastening nut of the "Grant" generator;
- press the generator with a mounting blade and remove the upper mounting bolt;
- unscrew the lower mounting bolt of the generator;
- move the generator away from the engine with a mounting blade and remove the lower mounting bolt;
- move the generator towards the right mudguard;
- remove the alternator belt from the unit pulley;
- pull out the generator;
- remove the alternator belt from the crankshaft pulley.
To put the generator LADA "Grant" in place, you must perform the steps in the reverse order.
Important: when installing the alternator belt, make sure that the grooves of the pulleys and the grooves on the belt match.
Mounting the generator on the 16-valve variation "Grants" is distinguished by the presence of a belt tension mechanism. Therefore, the procedure for replacing the generator on this model is slightly different.
To work, you need socket wrenches for 8, 10 and 13.
As with the dismantling of the generator from the 8-valve "Grants", before starting work it is necessary to remove the "ground" terminal from the battery in order to eliminate the possibility of a short circuit.
After that, it is necessary to remove the engine protection by unscrewing the 4 front and two rear bolts securing it to the body parts. The 16-valve generator “Grants” is removed as follows:
- disconnect the connector from the “D” terminal on the generator;
- remove the rubber cap covering the “B +” terminal of the generator;
- using a 10 wrench, unscrew the nut holding the wire tip;
- loosen the tightening bar nut using a 13 wrench;
- by turning the tensioner adjusting bolt counterclockwise, loosen the tension of the belt of the "Grant" generator (10 socket wrench is required);
- move the generator towards the engine and remove the belt from the pulleys;
- unscrew and remove the adjusting bolt of the belt tensioning mechanism from the generator mounting bracket;
- dismantle the tension bar;
- unscrew the bottom nut of the "Grant" generator fastening;
- remove the spacer sleeve and pull out the lower mounting bolt;
- remove the tension bar;
- pull out the LADA "Grant" generator.
To install the generator, you must do the above in reverse order.
Important: after installing the generator of the 16-valve LADA "Grant", it is necessary to adjust the belt tension.
The LADA “Granta” air conditioner is driven by a generator belt, which complicates the work. You must first take the air conditioner to the side, and then proceed with the removal of the generator.
For work you will need:
- socket wrenches for 8, 10, 13 and 18;
- balloon wrench;
- jack;
- WD-40 tool.
First, you will have to disconnect the “ground” from the battery, as usual.
Removal of the generator on the "Grant" with air conditioning is done as follows:
- treat the bolts holding the engine mountings and the bracket with WD-40;
- dismantle the protection by unscrewing the mounting bolts;
- when the WD-40 agent works, unscrew the bracket nut;
- put a jack under the right front of the car;
- loosen the bolts holding the front right wheel;
- raise the jack by hanging the wheel;
- remove the wheel from the car;
- unscrew the tension roller;
- unscrew the bolts securing the pillow;
- carefully lower the vehicle by hanging it up (the airbag will move to the engine, opening access to the belt and alternator).
Next, it remains to remove the generator in one of the ways described above.
The procedure for installing the generator is reverse to that for dismantling. After installing the generator, it is necessary to screw on the pillow, install the engine protection and the wheel, put the “mass” terminal on the battery.
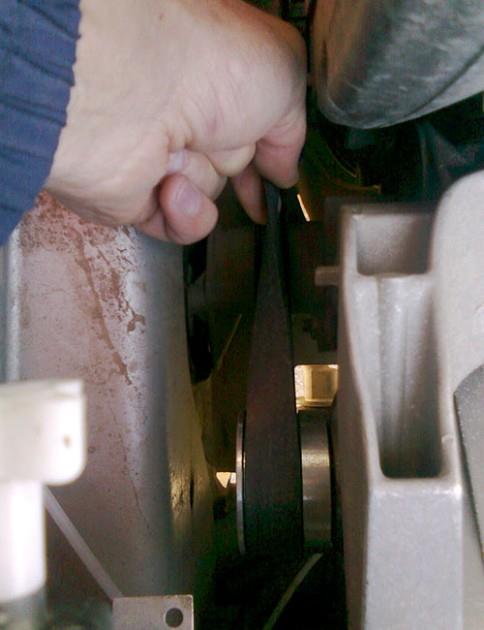
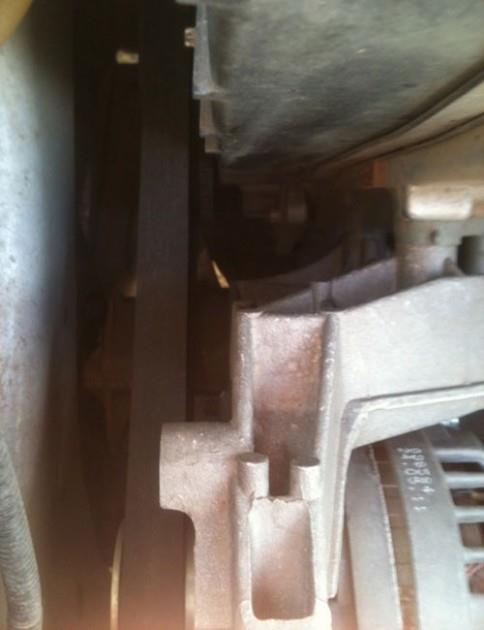
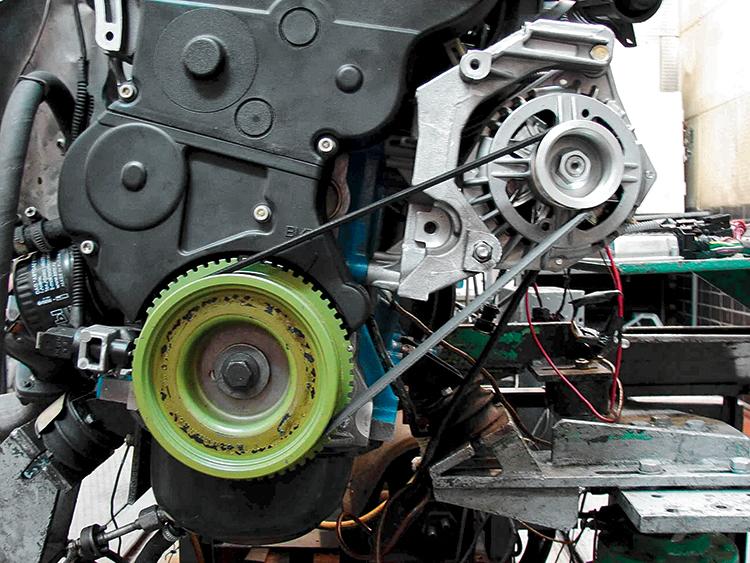
In most modern cars, there is a tensioner on the alternator belt, which suggests some peculiarities during repair work or when replacing the belt itself. But, in the Lada Granta model, which operate a motor with eight valves, the belt tensioner is not provided by the manufacturer. So replacing the alternator belt must be done in a slightly different way.
The alternator belt is located under the alternator itself
If we focus on the manufacturer's technical regulations, then the belt should be checked at least once every 15,000 km of track. And every thirty thousand kilometers, this belt needs to be replaced.
That is, a cycle is obtained with an interval of fifteen thousand kilometers, in which the alternator belt is checked and replaced in turn.
And, given that the tensioner itself is not used, the belt is focused exclusively on one-time stretching during installation.
There are options for reusing the belt, but this practice is highly discouraged.
In order to make sure that the belt is in good condition, you need to perform simple steps. Initially, the fifth gear is included. On it, leaning on the front bumper, we try to push the car back. At the same time, we are trying to conduct a visual inspection of the belt along its entire length.
Cut off all the grooves, such a belt is on the verge of breaking
There, as a general rule, there should be no cracks, even the smallest ones, as well as tears and delaminationthat occur due to long-term use of rubber products.
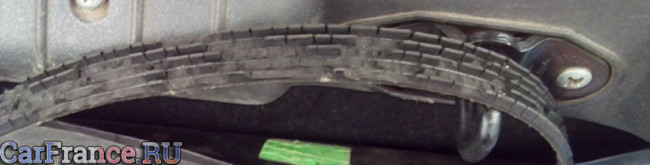
Such a belt is no longer good for anything.
If such problems are found, then the belt must be replaced. The timing belt is checked in a similar way.
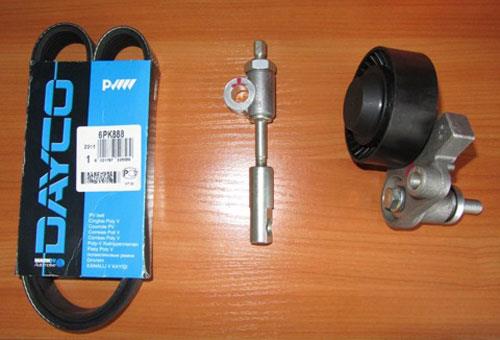
It is also not superfluous to check the external state of the generator itself, since its quality raises questions. Do not forget to inspect the generator roller as well.
The belt is already bad, but the generator roller still looks like


