In detail: do-it-yourself repair of a Skoda octavia tour generator from a real master for the site my.housecope.com.
Self-repair of the generator and regulator
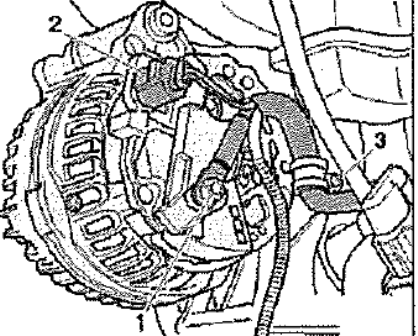
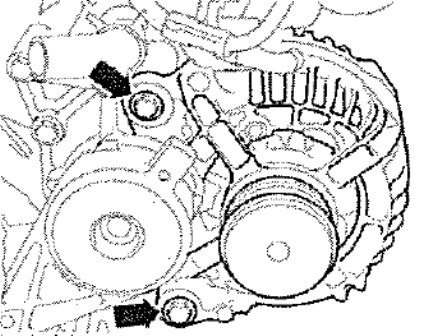
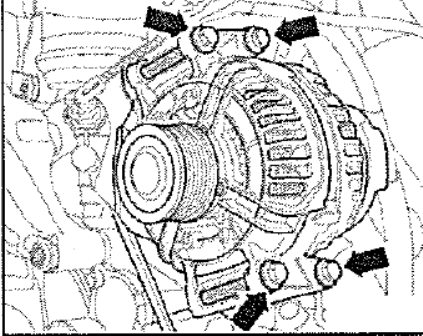
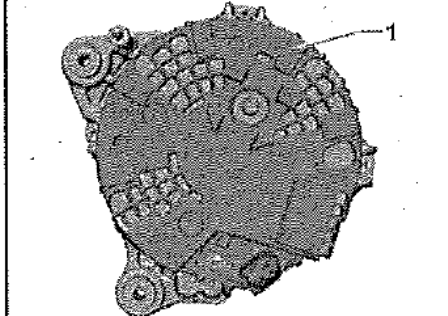
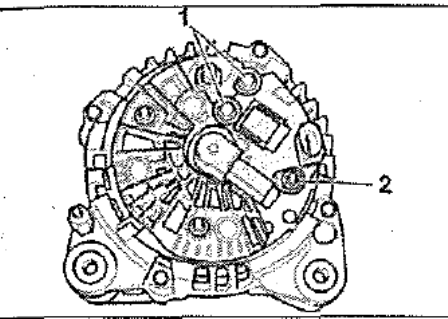
To remove the cover (2) of the Bosch generator, unscrew the three Phillips screws (1), remove the B + wire from the threaded bolt (3) and push off the two retaining lugs (arrows).
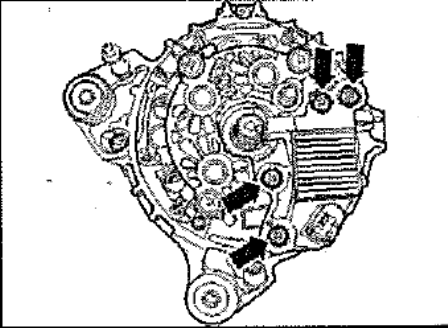
The voltage regulator (2) is secured with two Phillips head screws (1). Position (3) denotes the rotor axis.
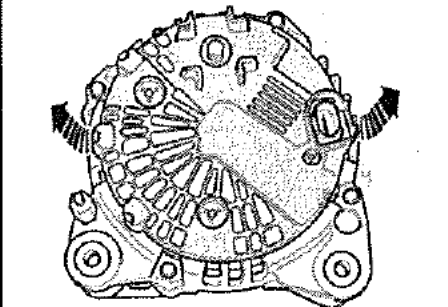
On the removed voltage regulator ((4), the illustration shows a new design), the length of the brushes (2) is indicated by arrows. Position (1) shows the contacts of the voltage regulator, (3) are the fastening bolts.
The illustration shows the measurement of the length of sliding electrographite contacts on a removed voltage regulator from Bosch of an older design: the brushes should not be shorter than a = 5 mm.
Usually the generator does not require repair, except when replacing the generator brushes. More serious damage cannot be repaired with home remedies.
Checking the charging voltage
- Connect a volmeter between the generator thick red wire terminal and ground.
- Leave the engine running at medium speed.
- If the voltage regulator is working properly, the voltmeter should read 13.3 to 14.6 V.
- If not, check the brushes or replace the regulator.
- Otherwise, the generator itself is faulty.
- Disconnect the negative battery cable.
- Bosch alternators: remove battery cover at rear (where fitted).
- Disconnect the regulator from the generator. To do this, remove the two screws.
- Fold back the regulator so that the carbon brushes do not stick in the holders.
- Measure the protrusion of the brushes.
- The length of the new brushes is 13 mm; minimum length 5 mm.
- Valeo alternators: Remove both regulator fixing screws on the rear of the alternator.
- Pull out the regulator.
- Measure the length of the protruding brushes.
- If the remaining length is 5 mm, the brushes are worn out.
- Valeo generator brushes cannot be purchased separately; it is necessary to change the entire regulator.
| Video (click to play). |
Replacing the brushes on the new generation of Bosch generators is no longer possible - therefore carbon brushes are no longer sold as spare parts. If they are worn out, the entire regulator should be replaced. The same can be said for the Valeo alternator; carbon brushes are not sold as spare parts - you need to buy a new voltage regulator if the old brushes are worn out.
However, with older generators from Bosch, such a replacement is possible. This will require a soldering iron, solder and, in addition, knowledge of soldering.
- Remove the voltage regulator as described above.
- Unsolder the stranded flexible wires, pull out the carbon brushes.
- Remove pressure springs from old brushes and put on new ones.
- Solder stranded flexible wires.
- At the same time, apply a little tin and work quickly so that the wires do not suck in a lot of tin. Otherwise, they will become tough.
Hint: if the brushes are removed, you can check the copper slip rings at the same time (brushes walk on them). If deep traces of running-in are found on them, then you need to grind and polish them in an auto electrician workshop.
- Disconnect the ground wire from the battery, otherwise there is a great risk of short circuit.
- 4-cylinder models: Remove the front pivot cover (where fitted) on the toothed belt guard.
- Models with 5-cylinder engines: remove the underbody protection from the engine compartment.
- 4- and 5-cylinder models: Disconnect alternator wires.
- Disconnect the earth cable, where available.
- Unscrew the clamping bolt on the alternator shim.
- Loosen and remove the V-belt or poly-V-belt
- Loosen and remove the hinge bolt while holding the generator.
- 6-cylinder models: remove the underbody protection from the engine compartment.
- Remove the V-belt (work described later in this chapter).
- Remove the connecting cable and cooling air guide from below.
- Loosen the mounting bolts, remove the generator.
Driving with a faulty generator
Hints: If the alternator or voltage regulator is not working, you can still continue driving as the battery can take over as a power source. During the day, its current reserve lasts for a long time, because the electronic ignition / injection control, as well as the electric fuel pump, need a minimum voltage. In addition, the battery is often only 2/3 charged. Depending on the capacity of the battery, you can drive at least another 5 hours. In winter, the general weakness of the battery is a complicating factor. In addition, the headlights must be switched on earlier.
Therefore, the motto should be to save current: you should not interrupt the trip unnecessarily, because the starter needs a lot of current. If possible, you should start "from the roll." Do not turn on heated rear window, heater and radio. It is more economical to handle the wiper. Drive at night without high beam and fog lights. Additionally, disconnect the cables from the generator and insulate them separately so that the battery cannot be discharged through a faulty generator or voltage regulator.
On my Octavia with a range of over 100 km. The generator began to howl. To determine exactly what he is howling, and not the bypass rollers, you can temporarily remove the alternator belt and listen without it. If the unpleasant sound remains, then we are definitely changing the bearings and the freewheel clutch, since it also has a bearing, and it can howl.
I was surprised when I removed the generator and found that it is at 140A and this is in my simplest configuration as an asset. In theory, the gene is set at 70A for the minimum configuration, and already at the top 140A. Well, okay, that's not the point, although if something happened to him and I had to change it, I would definitely not be happy, the price of the original BOCSH 06F 903 023F almost 45 thousand rubles, of the analogs, the most normal is: Valeo 439 554, which already costs 25 thousand rubles.
In fact, rarely does anyone buy a new generator, usually they are repaired or overhauled, which will happen in this article. The price of repairs is tens of less than buying a new one.
To replace, we need:
- Special Key Force f-674;
- Bearings;
- Overrunning clutch.
A special key to unscrew the clutch, it is not necessary to take the original Force f-674, I took the domestic analogue for 400 rubles, it completely copes with its purpose.
Overrunning alternator clutch:
Original coupling number: 022 903 119 C
I took: Fenox OP6006 for 1200 rubles, the quality is good.
Rotates in one direction only. Smoothes the speed to the alternator from the drive belt. My original clutch had an Inna bearing.
After the replacement, I didn’t regret that I put this one, it looks well packed and is also good in quality. Has served for a long time, does not cause any complaints. You can read about the choice of spare parts for replacement in the article, which also contains all the replaceable parts of the generator: the coupling and bearings of the generator
Conference of the Skoda Car Lovers Club
And so we have a Skoda octavia 1.6 AKL car produced in 2002. Mileage on the speedometer 250 thousand kilometers. Generator Valeo 90A catalog number 030 903 023 J. Symptoms: hum when consumers are turned on (as it turned out, not from the generator).
Bearing front FAG 63032RSR
Bearing rear FAG 62022RSR
Protective ring of the cargo bearing 135508
Contact plastic (current collector) Cargo 230090
BOSCH 1127014022 regulator relay brushes (a little more than necessary, but it doesn't matter)
Epoxy adhesive, fast drying or cold welding
Good stock of tin
What is needed from the tools:
Keys 10, 13, 15, 24 (bent for the nut in the pulley), if not bent then gas
Heads 7, 8, 10, 13, 24
Good powerful soldering iron (I have 75W)
Screwdrivers, mallet, hammer
Torx Bits
Pullers large 3-jaw and small 2-jaw for bearings
Metal brush
The process itself: (photo of only important operations)
1) Remove the lower protective cover of the engine (AKL)
2) Disconnect the 2-pin connector from the generator and unscrew the power wire from the generator using a 13-point head. Be careful with the power cord. I carefully unscrewed it, took it aside and wrapped it with electrical tape so that it would not close to the case. If you are afraid of silt, you are not sure of yourself, then disconnect the battery.
3) With a 15 key, pull the poly V-belt tensioner towards ourselves until the holes in its body match, insert the pin, remove the belt. Remember in which direction the belt was, put it back in the same direction.
You don't have to, but it's more convenient:
4) Use a key or a 13-point head to unscrew the tensioner screws (3 pieces) of the poly V-belt and remove it.
You don't have to, but it's more convenient:
19) Using the 8 head, unscrew the 4 screws of the plates holding the stator winding for its further cleaning and so that it just does not interfere.
That's probably all. On other sites there are similar reports on the repair of similar generators, but as it turned out, there are still differences. The diode bridge is attached differently and the diodes are different.
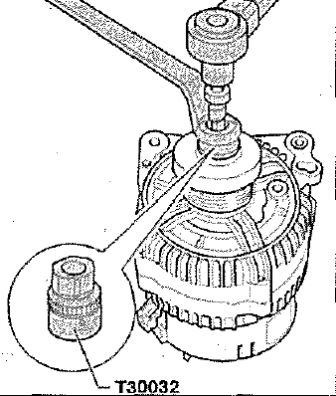
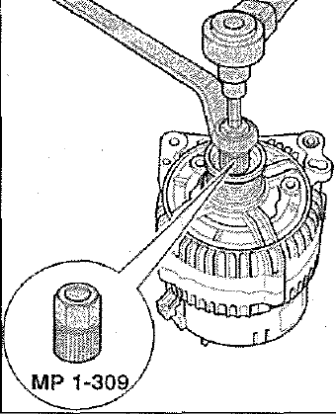
... and a set of special keys for removing the pulley from the generator shaft.
NOTE
The manufacturer recommends using the original set of keys MP 1-309 to remove the alternator pulley.
2. Use a Phillips screwdriver to remove the alternator cover securing screw.
3. Remove the contact bolt nut ...
4. . and a nut for securing the generator casing.
6. Use a Phillips screwdriver to remove the two screws securing the voltage regulator.
7.. and remove the regulator with the brush assembly.
8. Use a Phillips screwdriver to remove the four screws holding off the generator covers.
NOTE
When repairing the Skoda Octavia generator, mark in any way (for example, with a marker) the relative position of the stator and the generator covers in order to ensure the alignment of the holes for the generator assembly during reassembly.
9. Disconnect the complete cover with the rotor and the cover with the stator.
10. Remove the three screws securing the rectifier unit.
11. Use a flat-blade screwdriver to pry the six connections of the rectifier unit to the stator winding.
12. . and remove the rectifier unit.
13. Separate the stator from the cover on the slip ring side.
14. Using a flat-blade screwdriver.
15. . remove the cover from the alternator pulley.
16. Holding the generator shaft against turning with a special wrench, unscrew the pulley with the second wrench (counterclockwise).
17. and remove it from the generator shaft.
18. Remove the four screws securing the front bearing pressure plate.
19. Using a universal puller.
twenty. . remove the rotor together with the bearing from the cover.
21. When repairing the Skoda Octavia generator, check the short circuit of the rotor winding to ground. To do this, connect the tester probes to the rotor pole and alternately to the slip rings. The measured resistance must be infinitely large, otherwise replace the rotor.
22. Check the resistance of the rotor winding with a tester by connecting it to the slip rings. The resistance should be no more than 2.1-2.4 ohms. If the tester shows infinity, then there is an open circuit in the windings and the rotor needs to be replaced.
23. Check the stator windings for an open circuit, alternately measuring the resistance between all winding leads with a tester. If the measured resistance tends to infinity, then i must replace the stator.
24. Check the rectifier unit To do this, connect the test leads of the tester to the output of the phase winding of the stator and the radiator of the diodes. By swapping the tester probes, measure the resistance. If the tester readings are the same in both cases, the rectifier unit is defective and needs to be replaced.
25. Check the other two diode circuits of the generator in the same way.
26. Check the ease of rotation of the bearings.If, during the rotation of the bearing, play between the rings is felt, rolling or seizure of the rolling elements, damaged protective rings or grease drips, the bearing should be replaced. Of this day.
27 ... press the bearing off the rotor shaft
28. Press on the new bearing by applying force to the inner ring. After installing the bearing, make sure that it rotates evenly, quietly, and without jamming. There should be no axial or radial runout.
29. After repairing the Skoda Octavia generator, assemble the generator in the reverse order of removal, orienting the generator covers and stator according to the previously made marks.
NOTE
Pulley tightening torque with freewheel (80 ± 10) N * m.
Repair of imported generators has a number of features that require the purchase of additional equipment. In particular, it is necessary to have a sufficiently powerful soldering iron (at least 100 W). It will come in handy when you need to solder the diode bridge. There is no way to avoid this. When performing this operation, you need to be extremely careful so that later you do not experience difficulties in installing this component in its place.
In addition, a puller is required to replace the bearings. For the repair of generators of a Skoda Octavia car, you can use a three-valve. But such a device is not always convenient. It is better to immediately determine the place of installation of the "paws" of the puller. You may need a puller with straight "paws", of which there will be two, not three. Therefore, when buying, you need to pay attention to the functionality of the device, and not the quality and price. Even cheap pullers, provided they are correctly installed, can easily cope with their task of replacing generator bearings and do not break. After all, the effort applied to dismantle the bearings of the generator set is not that great. Sometimes it is recommended to purchase bearings in advance, but I would like to advise you not to do this, but first remove the old ones, and then come with samples to the store.
If you do not know where to start when disassembling an imported generator, then it is better not to act according to the principle: “the main thing is to start disassembling!”, And then put it together in reverse order. Such numbers do not work with imported generators. The theory must be studied. But if you can't find the instructions you need, then it is best to start disassembling the generator by removing the pulley and front cover from the shaft. Although, the options for disassembly can be completely different, so you should not rush. carefully inspect every detail for hidden latches and locks. To deal with them, if any, you may need a set of precision (miniature) screwdrivers.
Replacing the brush assembly requires the craftsman to be careful and careful, since hidden brush clips are very often found on imported generators. Fortunately, on Škoda generator sets, the operation of installing the brush assembly is straightforward. But just in case, it is advisable to familiarize yourself with the detailed instructions for repairing generators of Skoda cars.
VALEO and BOSCH alternators are installed on the VW Group engines installed on Skoda cars.
The Skoda Octavia generator serves for a very long time, but sometimes you have to change the relay-regulator.
The relay-regulator for the Skoda Octavia generator is installed depending on the model and power of the generator, so you always need to know the catalog number of your generator.
Relay-regulators installed on the Skoda Octavia generator:
- VAG No. 047 903 803 - PP generators VALEO 70A, 90A
- VAG No. 038 903 803 C - PP generators BOSCH 90A
- VAG No. 078 903 803 EX - PP generators BOSCH 70A, 90A, 120A
- VAG No. 038 903 803 K (from 01.12.2006 VAG No. 06B 903 803 A) - PP generators VALEO 70A, 90A, 120A
If you have any questions or additions, please feel free to write in the comments.
Good day to all! Take in your ranks. My name is Kucher.
About 3 months ago, I became the proud owner of a Skoda Oktavia car, 2012.1.8 manual transmission.
Faced such a problem. I noticed that the car at idle turns out to be muttering outside the box. I drove to the nearest service (Medvedkovo), where the guys said that there was a problem with the generator. As a result, a replacement was needed. A new one costs about 40-50 thousand rubles. Because of the overrunning clutch located in it. Replaced with a used generator made at the factory. Paid about 25 thousand for everything.
I ask for your advice and consultation. What caused the breakdown, is this a sore spot for Skoda. Are the prices adequate ?! Maybe I'm already buggy, but I began to listen and again some kind of noise from the rubber belt of the generator, or maybe it should work like that.
I apologize in advance for the text. I don't really understand myself. Therefore, I am addressing you. I would be grateful to hear reasonable advice and comments. Thank you.
The generator plays a very significant role in the operation of the car and human life. Without the stable operation of this unit, the battery will not charge normally, which can lead to a quick discharge, and, accordingly, the car may not start in time. Skoda is famous for its accuracy and stable operation of electrical components, but wear does not spare anyone. Therefore, in this article we will consider the repair of the Skoda Octavia A7 generator, the reasons for its unstable operation and how to fix them.
There are quite a few reasons for the generator not working on the Skoda Octavia A7, but consider the main ones:
- oxidation of the wires of the contact group, after water gets on them;
- wedging of the generator shaft;
- a weakened drive belt, which serves as a complete or partial loss of the element's torque power, and, accordingly, does not recharge the battery;
- mechanical damage to generator elements;
- open circuit inside the winding due to a short circuit;
- breakdown of the diode bridge;
- failure of the voltage regulator.
Based on the above, it follows that it is necessary to regularly monitor, diagnose and maintain this unit on the Skoda Octavia A7, since its failure can adversely affect the rest of the car's elements.
The choice of generator is quite simple, as there are not many analogs that fit. This is due to the fact that the Skoda Octavia A7 is a relatively new car. Consider what kind of analogs the manufacturers provide us and what is the original catalog number.
The process of replacing a generator with a Skoda Octavia A7 is quite difficult and the process itself for a beginner can take a whole day. But, don't be scared and worried. If you follow the step-by-step instructions, then everything will work out. Let's start describing the process.
- We dismantle the terminal.
- Remove the drive belt.
- Remove the protective caps.
- Unscrew the wire fasteners, and also disconnect the wire connector, as shown in the photo above.
- We unscrew the mounting screws, they can be in front or on the side. See the pictures below.
- We remove the generator from the car.
Since the generator is removed, you can start diagnosing and replacing damaged parts. The process itself:
- We pry on the back cover and remove it.
- Unscrew the mounting screws and dismantle the voltage regulator.
- For a Valeo alternator, the governor removal procedure is outlined in the diagrams below.
- And now we remove the belt pulley.
- It makes no sense to remove the rest of the parts, since there are no spare parts on sale.
Of course, the manufacturer recommends replacing and repairing the Skoda Octavia A7 generator only at a specialized station, where specialists will do everything quickly and at the highest level. But, our man has learned to do everything himself.
Recommendations for replacement and repair:
- use only high-quality materials and spare parts for repairs;
- do everything step by step and do not forget to put all the details in place;
- all details are carefully diagnosed.
Having considered all the options for replacement and repair, we can conclude that this process is not quite complicated and that it is quite easy and simple to perform them yourself if you follow the instructions.Also, it is worth noting that the generator on the Skoda Octavia A7 should be changed only for the recommended ones, since others, whose production is unknown and their quality is in doubt.
Skoda Octavia, new, 13th year of manufacture, departure
And what a big setback ... and now what to throw out the car?
The rear left wheel turned so easily to the right, as if there was a tie rod.
On the right, he turned out all the gaps with a banana
The roof floated out from under the rear window so cool
And the whole back of the roof sticks out like a spoiler
The rear wheel ran right up to the front door
Well, the front Skoda looks like brand new and fresh on the snow.
Octavia was brought to us on a tow truck in this form
They unloaded the machine on their own - it started up and somehow, not without distortions, slid to the ground
An interesting angle - as if the starboard side of the car was bent.
We start to raze the jam
We saw, and the bottom with huge waves - as if the barge was swaying in a storm
The rear wheel has already appeared
Well, how do you order such folds to be straightened?
The amplifier is welded by a pipe inside the threshold of a Czech car
Internal wing amplifiers also in waves
We throw all these remnants of the car onto the slipway
We attach to the flanging of the thresholds
We take off the rear suspension
Here is the suspension. Fresh, small mileage.
This is how the body on the slipway looks like
Sawed straight on the amplifier
Removing a piece of the main jam so that nothing gets in the way
Throw a piece to scrap metal
Pulling with slipway hydraulics
We straighten what was bent by a banana
Unscrew all amplifiers
Next, we proceed to the donor
As a donor, we have a broken body on the right and front
Cut off the back left part with the roof from the donor
At the donor we open the threshold - there are the same amplifiers in the form of a pipe
What a whole black rear left wing our crumpled red shkodnik will have!
Preparing the bottom of the original Skoda for docking
Factory welded seam on the bottom - drilled point by point
And we cut the amplifiers across
See what branded rubber clip tied the body to the slipway
We put the donor on the slipway to the prepared red skeleton
Both sides of the docking process are prepared for the process
Choosing the same docking orbitals for the Union and Apollo
We expose everything with a pneumatic jack at the same height
Removing the slip clamps
And with the help of a winch we push a new ass on the Skoda's face
I remember the army saying “I will pull my eyes on. "
Roof pillars gradually join
The bottom creeps into its factory weld spots
A little more, for now, a finger crawls between the pillars of the donor and original roofs ...
And now the match won't fit ...
Gaps on the starboard side - even now sit down and drive
On the port side, we expose more gaps
We boil all amplifiers first
Then we boil the outer metal of the thresholds
And we cook the bottom at the factory points
Getting started on the roof pillars
We boil the internal amplifiers first
Then we boil the outer metal, just as it happened with the thresholds
We paint over all repair places on the inside of the bottom
From the bottom on the bottom we make Tectyl anticorrosive
We prepare all attachments for painting
The client asked for more soundproofing
We use vibro sheets stp bomb
We cover everything attached to it + the bottom
Further, as usual - we glue the splenitis on the vibro-sheet
Beauty is better than from the factory!
The result of our shkodorezok is:
Do you like our site? Join or subscribe (notifications about new topics will be sent to the mail) to our channel in Mirtesen!
Skoda Octavia Combi A4 / Skoda Octavia Combi A4 (model code: 1U5) 1998 - 2010
We have a 1.6 AEH engine. I decided to replace the timing belt, the mileage was 130 thousand km, I opened the lid, the original is worth, apparently dear. I'm sure 90 percent that they did not change. Ordered through exist, too, the original and the SKF video. Received the other day and was upset, the DAYCO belt came, though with VW AUDI badges. Costs 3 times cheaper without badges!
There are many reasons why you need to service any vehicle yourself.
Maybe the posted photos will help someone with this.And so, we have Skoda Octavia 1.9 TDI letter code of the AGR engine. We change the oil and all the filters. At the same time, we try to fulfill the requirements of the service instructions known to us, and especially for cleanliness, since dirt dramatically reduces the resource of any engine, and especially for a diesel engine, and even with a turbine.
Skoda Octavia 1998-2004: Removal and overhaul of the engine. (rus.) Considered engines AEE, AEH, AKL, AVU, BFQ, AEG, APK, AQY, AZH, AZJ, AXP, BCA, AGN, AGU, ARX, ARZ, AUM, AUQ, AGP, AQM, AGR, ALH, AHF, ASV, ASZ.
This engine repair information applies to all VAG vehicles. In order to quickly find the documentation for your engine, simply press Ctrl-F on the keyboard and type the letters of your engine. For example: 2E or BSE (English only!)
(Cooling, Heating, Air Conditioning and Climate Control Systems)
It all started with the fact that the interior began to sweat inside and the further the worse. I began to notice that the level of antifreeze was slightly lowering, but everything was dry everywhere, even in the cabin. I poured in a little and drove on. I thought the stove damper that switches the street-salon broke. I checked - everything was in order, then I took off the glove compartment and only then noticed phlegm at the passenger's feet, from where the air was blowing! I realized that the stove is kirdyk.
It all started with the fact that the interior began to sweat inside and the further the worse. I began to notice that the level of antifreeze was dropping a little, but everything was dry everywhere, even in the cabin. I poured in a little and drove on. I thought the stove damper that switches the street-salon broke. I checked - everything was in order, then I took off the glove compartment and only then noticed phlegm at the passenger's feet, from where the air was blowing! I realized that the stove is kirdyk.
Reason for repair: the gear wheel of the air recirculation control electric drive is turning. A crackling sound is heard when the recirculation button is pressed. During self-diagnostics, the climatronic gives a 4FA error, when the recirculation mode is turned on and off, a buzzing and clicking sound is heard under the torpedo, in the rain everything fogs up.
Skoda Octavia Climatronic system (rus.) Design and principle of operation. Self-study program. Components and parts, Control unit, Control panel, General description of systems, Air temperature control, Sensors, Actuators, New control system, Air supply to the passenger compartment, Refrigerant circulation circuit, Radiator fan electrical circuit, Compressor control system, Self-diagnosis, Functional diagram.
Heater and air conditioner (rus.) Skoda technical manual. Training of service station specialists. The air conditioning systems used on cars Felicia (unregulated compressor), Fabia (compressor with external regulation), Octavia I (compressor with internal regulation), Octavia II (compressor with external regulation), SUPERB (compressor with internal regulation) are considered in detail.
Suitable for many cars VW, Skoda, SEAT, Audi
The troubleshooting program is a very useful text-based flowchart for identifying problems in a particular vehicle, taking into account the specifics of the factory installed equipment.
Actually, this is a textual version of what was later transferred to VAG diagnostic devices under the name “Guided Fault Finding”. 49 pages. 1 Mb.
This information on injection systems applies to all VW, Skoda, SEAT, Audi vehicles.
Suitable for many cars VW, Skoda, SEAT, Audi
Skoda Octavia 1997 ->: Engine 1,9L / 50kW SDI (AGP, AQM) Workshop Manual (rus.) Technical data, Engine removal and installation, Crankshaft drive, Crankshaft drive, Cylinder head, valve train , Power system, Exhaust system. (8 Mb.)
Suitable for many cars VW, Skoda, SEAT, Audi
Skoda Octavia 1997 ->: Engine 1,9L / 50kW SDI (AGP, AQM) Workshop Manual (rus.) Technical data, Engine removal and installation, Crankshaft drive, Crankshaft drive, Cylinder head, valve train , Power system, Exhaust system. (8 Mb.)
Suitable for many cars VW, Skoda, SEAT, Audi
(Front and rear suspension)
Skoda Octavia: 4x4 all-wheel drive. (rus.) Device and principle of operation. Self-study program.Four-wheel drive, Manual transmission, Rear axle final drive, Propeller shaft, Four-wheel drive vehicle redesign (Rear axle, Fuel tank, Vehicle underbody, Exhaust system), Haldex clutch (System description, Mechanical components, Multi-plate clutch) Hydraulic system, General description of the system, Sensors, Control unit, Drives, Self-diagnostics, Functional diagram, Modes of movement.
Suitable for many cars VW, Skoda, SEAT, Audi
(ABS, EDS, ESP / Brake system)
Skoda Octavia Tour - Security systems (rus.) Design and principle of operation. Self-study program. ABS, ABS + EBD, EDL, Electronic Stability System ESBS, EBС. Engine brake management, CAN data bus, ABS self-diagnosis, ABS service, ABS / EDL function diagram, Pedal assembly, Side airbags, Alarm system.
ESP unit number 1J0 907 657 A / acceleration sensor 1J0 907 651A was installed on cars: VW Golf 4 / Bora (1J), VW New Beetle (1C, 9C), VW Lupo (6X, 6E), VW Polo 3 (6N), VW Sharan (7M), VW Transporter T5 (7H), Skoda Octavia (1U), Audi A2 (8Z), Audi A3 (8L), Audi TT (8N), SEAT Alhambra (7V), SEAT Ibiza / Cordoba (6K) , SEAT Leon / Toledo (1M). This information is likely to apply to other vehicles as well.
Skoda Octavia: Security systems (rus.) Design and work description. Self-study program. The active safety system is constantly being improved, in combination with the passive safety system, more than ever, helps to prevent or reduce the consequences of accidents.
Contents: ABS - Anti-lock braking system, ABS + EBD - Electronic brake force distribution, ABS sensors, ABS powertrain, Anti-lock braking system, EDL, Electronic stabilization system ESBS, EBС, Engine braking control, CAN information bus, ABS self-diagnosis, ABS service, ABS / EDL functional diagram, Pedal assembly, Side airbags, Function and function, Maintenance work, Self-diagnosis, Block diagram, Alarm system.
Over the past thirty years, vehicle manufacturers and braking system suppliers have been developing braking and stabilization systems to help drivers cope with certain critical situations. These systems, together with seat belts and airbags, are essential elements of active safety.
Myths about security systems Due to the lack of awareness of the principles of operation of auxiliary systems, there are many rumors among amateurs.The most common myths are the following incorrect statements:
• ABS system increases the braking distance;
• using fast, intermittent braking, the ABS system can be replaced;
• the ESC system intervenes in driving a car prematurely and inaccurately;
• the ESC system is able to eliminate any critical situation for the driver while driving
Suitable for many cars VW, Skoda, SEAT, Audi
Suitable for many cars VW, Skoda, SEAT, Audi
Watch an interesting video on this topic

