In detail: do-it-yourself sable generator repair from a real master for the site my.housecope.com.
Gazelle Sable. Removal and disassembly of the generator 3212.3771
Generator 3212.3771 (BATE) is installed on engines ZMZ-405, -406; differs from the generator 9422.3701 (see "Generator", p. 137) by the presence of an additional output from the stator windings and eight power diodes in the rectifier unit. The maximum generator current is 90 A, the nominal voltage is 14 V.
To remove the generator, disconnect the battery.
Generator 3212.3771: 1 - casing; 2 - output "B +" for connecting consumers; 3 - capacitor; 5 - output "W"; b - plates of the rectifier unit; 7, 8 - diode (valve) of the rectifier unit; 9 - voltage regulator; 10 - back cover; 11 - clamping screw; 12 - front cover; 13 - stator winding; 14 - a distance ring; 15 - front bearing of the rotor shaft; 16 - pulley; 17 - nut; 18 - rotor shaft; 19 - spring washer; 20 * - thrust bushing; 21 - beak-shaped pole pieces of the rotor; 22 - stator core; 23 - bushing; 24 - rotor winding; 25 - rear rotor bearing; 26 - bearing sleeve; 27 - slip rings; 28 - brush holder; 29 - conclusions of the stator winding; 30 - additional diode (valve); 31 - terminal "D" (common output of additional diodes).
Disconnect the battery.
Remove the engine mudguard (see Removing the engine mudguard).
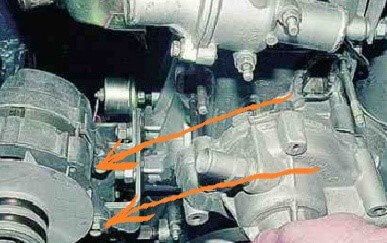
Weaken the belt tension ...
... and remove the tip of the wire from the terminal "+" of the generator.
Using the "10" wrench, unscrew the wire fastening nut ...
... and remove the tip of the wire from the output "+" of the generator.
Remove the plug from the generator plug.
| Video (click to play). |
Using the "13" wrench, unscrew the nut, holding with the "12" wrench the bolt fastening the generator to the lower bracket.
Using the "13" wrench, unscrew the nut, holding with the "12" wrench the bolt fastening the generator to the upper bracket.
Using the "12" wrench, loosen the bracket bolt.
We take out the bolt with the bushing and remove the generator from the engine.
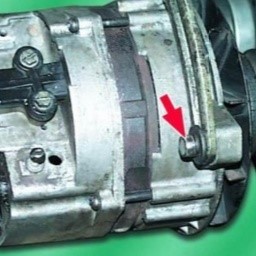
Using the "10" wrench, unscrew the wire fastening nut.
Using the "8" wrench, unscrew the condenser mounting nut and remove it.
Using the "8" head, unscrew two nuts ...
… And, prying it off with a screwdriver, remove the plastic casing of the generator.
Disconnect the connector from the voltage regulator.
We unscrew the two screws securing the voltage regulator ...
Using the "8" wrench, unscrew the nuts of the bolts tightening the covers.
We unsolder three outputs of the stator winding from the rectifier unit.
Using the "8" wrench, unscrew the three nuts securing the rectifier unit ...
Using the “24” head, using a gas wrench, unscrew the pulley fastening nut, while holding the shaft from turning with a “8” hex key through the holes in the head.
Having pressed the nut flush with the end face of the rotor axis and holding the generator in weight by the fan, we knock out the pulley with not strong blows through a soft drift.
After unscrewing the nut, remove the pulley, fan and thrust bushing.
We mark the relative position of the generator covers and remove the back cover.
We take out the stator from the front cover.
If there is no special puller, screw the nut onto the shaft flush with the butt end and knock the rotor axis out of the front bearing with a soft metal hammer.
Remove the thrust bushing from the axle.
We unscrew the four screws securing the front bearing cover.
We knock out the bearing through the mandrel ...
Using a puller, we dismantle the rear bearing from the rotor shaft.
Press in the new bearing with a suitable sleeve, applying force to the inner ring.
With an ohmmeter, we check that the stator winding is not shorted to the case.
We check the absence of an open circuit in the stator winding.
We check the absence of a short circuit of the rotor winding to the case.
We measure the resistance of the rotor field winding, which should be in the range of 2.3–2.7 ohms.
Applying voltage (12 V) of different polarity to the diodes, we check the serviceability of the rectifier unit.
We assemble the generator in the reverse order.
On any car, the generator performs two important functions - it provides all consumers with the necessary electricity, and recharges the battery. The Gazelle generator generates an alternating electric current, and the constant voltage required for the on-board network is achieved using a rectifier.
A lot depends on the performance of the energy source - it is impossible to operate a car with a faulty generator.
The generator on Gazelle cars is a synchronous three-phase electric machine, in the excitation windings of which an electric current is generated. The rotor (armature) rotates in the housing and is located inside a constant magnetic field, which is created by the stator (winding). Electricity is generated here as follows:
- when the engine is started from the crankshaft through the drive belt, the movement is transmitted to the generator set pulley;
- together with the pulley, the rotor begins to rotate, a magnetic field arises between the stator and anchor windings;
- due to electromagnetic induction, EMF is generated, alternating current appears;
- a diode bridge, consisting of diodes of different polarity, rectifies the electric current, making it constant;
- then the current from the rotor collector is transmitted to the brushes and fed to the relay-regulator;
- the regulator limits the voltage, ensuring the safe operation of consumers.
The scheme of the Gazelle generator is very simple, the unit consists of the following parts:
- case, it consists of two halves - aluminum front and back covers;
- stationary winding - stator;
- rotating shaft - rotor (armature);
- pulley and impeller;
- diode (rectifier) bridge;
- two bearings on which the armature rotates;
- brush assembly;
- relay-regulator (voltage regulator).
It should be noted that the voltage regulator is not located on all Gazelle models directly on the generator; on cars with the ZMZ-402 engine, the relay-regulator can be mounted on the spar.
The type of generator installed on Gazelle commercial vehicles depends on the engine model - on the first GAZ-3302 cars there were two types of motors:
On the second generation of Gazelles, ZMZ-405 and Chrysler 2.4 engines were installed, Gazelle Business cars, produced since 2010, are equipped with UMZ-4216 and Cummins engines, respectively, other types of generator devices are installed on them.
Generators are of different power, and are capable of producing currents of different magnitude. The standard power supply is calculated with a small power reserve, but the additional power consumption is not taken into account here. Additional energy consumers can be:
- power windows;
- electroantenna:
- audio system;
- air conditioner;
- additional cooling fan in the passenger compartment;
- additional stove motor.
If the alternator is weak, it will not be charged enough and the battery may be discharged as a result. Therefore, in many cases, Gazelle owners try to install a more powerful current source - the car will not suffer from the power reserve. For the gazelle, there are generators that produce a current of 65/75/90/100/115/120/135 Amperes. There is a misconception - if the power of the generating device is large, the electrolyte in the battery may boil. But this is not true - the generator supplies current depending on the load, and the excess voltage is limited by the relay-regulator. A powerful generator has only two drawbacks:
- such an electric machine has a higher price;
- the overall unit may not always fit in size.
The generator, like any other part in the car, tends to break down, there are several types of malfunctions in total:
- charging completely disappears;
- there is an "undercharge";
- there is a large voltage in the network (more than 14.7 volts);
- the generator starts to make noise.
There can be several reasons for the noise:
- worn or defective bearings;
- has defects in the drive belt;
- the belt tension is weak, and therefore a whistle occurs;
- the impeller touches the belt or generator housing;
- damaged pulley;
- the generator fasteners were unscrewed.
If the voltage in the on-board network of the car is higher than the permissible norm, there is only one cause of the malfunction - the regulator relay is out of order. For the same reason, there may be undercharging - the voltage regulator cannot cope with its functions.
If there is not enough charging, or it is completely absent, there may be several reasons for such problems:
- the brushes in the brush assembly are worn out;
- there are breaks or short circuits in the armature winding;
- the same defects are present in the stator winding;
- the diode bridge is faulty.
On a Gazelle car, the generator can be repaired quite easily, but if there are too many defects in it (for example, the rotor and stator are faulty at the same time), it is easier to buy a new unit and change it. 
On Gazelle cars, the generator belt drives the generator, thereby ensuring the rotation of the rotor, due to which the electric current necessary for the on-board network is generated. Different engine models are equipped with different types and sizes of belts:
- ZMZ-402 - toothed or smooth poly-V-belt, size - 10x1030 mm;
- UMZ-4216 - the same type as on the ZMZ-402 motor, size - 13x1040;
- ZMZ-406 (405) with power steering - multi-channel type, length - 1420 mm;
- ZMZ-406 (405) without power steering - multi-channel type, 1220 mm;
- Chrysler - poly-V-type, 1750 mm;
- Cummins 2.8 - multi-bar type, 1226 mm.
Depending on the engine model and manufacturer, alternator belts can be different in price, they wear out over time, and must be replaced. Since the belt drive also ensures the rotation of the water pump, if the generator belt is too tight, the noise of the pump bearings and the generator itself appears. You cannot do a very weak stretch either:
- charging disappears;
- the water pump weakly pumps, respectively, the engine starts to overheat;
- a very unpleasant whistle of the belt appears.
For Gazelle and Sobol cars, generators are produced by different manufacturers, the most famous companies are:
- ELDIX (Bulgaria);
- PRAMO-ISKRA (city of Rzhev);
- KZATE (old name KATEK, Samara);
- BATE (Belarus).
In 2016, generators for GAZ commercial vehicles cost on average from 4,000 to 9,000 rubles, the cost of the unit largely depends on the manufacturer, the engine model and the power of the generator itself. The most expensive parts are for the Cummins turbodiesel, the prices for spare parts are in the range from 8 to 15 thousand rubles, the most expensive are parts of the original production. The ZMZ-402 generator produced by KZATE for 65 Amperes is relatively inexpensive - an average of 4.5-5 thousand rubles.
The entire generator unit on the car is changed in the following cases:
- if many parts in the device require replacement, and repairing the unit is not economically profitable, it is easier and cheaper to buy a new generator;
- you urgently need to go on a flight, and there is no time to do repairs;
- a new generator is installed, and the old one is repaired and put away in reserve - it is a reserve one.
The complexity of replacing the generator unit also depends on the engine model, but on any engine the work is done quickly enough, since it is still simple on all brands of Gazelle cars. The easiest way is to replace the generator with a car with a 402 engine, we perform the work as follows;
- we put the car on a flat area; in this case, you can easily do without a pit or a car lift;
- we de-energize the electrical circuit - remove the terminal from the battery (better mass);
- unscrew the nut for securing the supply wire at the back of the generator (for a 10 mm wrench);
- we take out the connector of the generator brushes;
- we unscrew the bolt of the tensioning bar of the generator belt (for a 12 mm wrench);
- we move the generator with our hands first to the engine, take out the generator belt;
- then we pull it away from the engine, unscrew the bolts and nuts (2 pcs.) - fastening the generator unit to the brackets;

- dismantle the unit, install a new generator, screwing it onto bolts and nuts;
- do not tighten the fasteners to the end, press the generator case to the engine, put on the belt;
- using a knob or a pry bar, we tighten the belt, tighten the extension bolt;
- after the belt tension has been made, we fasten the bolts and nuts to the end - they are now under the generator, and it is already somewhat more difficult to get to them.
To fix the generator securely, it is necessary to install two nuts on the bolts, and be sure to lay between the bolt and the nut according to the engraver - on the ZMZ-402 motors (however, as on the UMZ-4216), vibration fasteners tend to loosen.
If the bearings in the generator are worn out, noise (hum) occurs in the generator assembly. It is possible to drive with such noise for some time, but it is undesirable, and it is impossible to delay the repair for a long time - the bearings can jam and burn out. Bearings are always changed on a removed generator, and in order to replace, the generator unit must be disassembled. Such work can be done independently, but it should be borne in mind that the bearings are pressed in, and a special puller is required to dismantle them. The rear bearing is rigidly pressed onto the rotor shaft, and it is practically impossible to do without a puller here.
In some cases, the bearing in the front housing cover boils tightly, and in this case it is easier to replace it as an assembly with a cover.
Operation of a car without a generator is impossible, since it is responsible for the on-board power supply and electricity generation. Repair of the GAZelle generator is one of the most common restoration work for these cars. The malfunction of this unit is easily determined by the disruption of the transport and constant discharges of the battery. This is the main reason for the need to contact the service. It is difficult to repair the generator yourself, but if desired, it is quite possible.
The main problems of the generator are:
- breakage of bearings;
- diode bridge problems;
- burst of charging wires;
- short circuit in the stator;
- malfunction of the voltage regulator;
- "Aging" of brushes or slip rings.
Like other transport mechanisms, the GAZelle generator is doomed to receive not only mechanical damage, but also electrical damage. Based on this, the troubleshooting methods are different. Mechanical damage is considered to be damage to springs, also swing bearings, drive belt or pulley and housing. Electric ones include a breakdown of the regulator, a break in the winding in the starter, melting of the insulation, turn-to-turn circuit, wear of the brushes.
Faults can be caused by moisture and, accordingly, corrosion. Mechanical problems arise from material "fatigue", non-compliance or violation of operating standards, from contamination, salts, high temperatures.

To carry out repair operations, you should know how to properly remove a generator on a GAZelle without breaking anything. First of all, you will need to de-energize the car networks. For this, the negative terminal is removed from the battery. Then the belt is loosened by a special mechanism, after which it is removed. Only after that the bolts are unscrewed and the generator can be removed on the GAZelle.
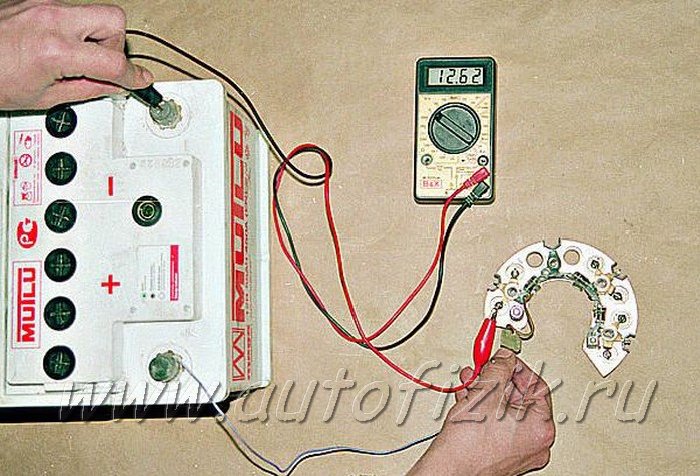
The initial express generator check can be performed directly on the vehicle.
On cars with engines ZMZ-4025 and ZMZ-4026, generators 16.3701 or 191.3701, not equipped with a built-in voltage regulator, are installed.These generators work in conjunction with an external transistor voltage regulator of type 13.3702-01 or 50.3702, which has electronic protection against short circuits in the generator field winding circuit.
It is more convenient to work together.
We start the engine, let it run for a few minutes, then, pressing the gas pedal, we bring the crankshaft speed to 3000 min –1. We turn on consumers: high beam headlights; heater fan; wiper; emergency signaling. In this mode, we measure the voltage at the battery terminals, which should be above 12 V. If this is not the case, the generator windings are faulty (open or short circuit), the voltage regulator with a brush assembly, slip rings are oxidized or oiled, brushes are worn out or "stuck". In order to make sure that the voltage regulator is malfunctioning, we turn off all consumers except for the side light and measure the voltage at a speed of 1000 ... 1200 min -1, which should be within 13.8 ... 14.5 V.
1. To check the generator excitation circuit, disconnect the connector block from the regulator.
2. We connect a voltmeter or a test lamp to the terminal "W" of the block and to the voltage regulator body. Turn on the ignition
If there is no voltage (the lamp is off), one of the following malfunctions is possible: violation of the contact of the excitation winding with slip rings; breakage of the excitation winding; "Hanging" of the brushes in the channels of the brush holder; burning, oxidation and severe wear of the rotor slip rings.
The engines of the ZMZ-406 and ZMZ-405 families are equipped with 9422.3701 or 5122.3771 generators with built-in integral voltage regulators.
We start the engine, let it run for a few minutes, then, pressing the gas pedal, we bring the crankshaft speed to 3000 min –1. We turn on consumers: high beam headlights; heater fan; wiper; emergency signaling. We measure the voltage at the battery terminals, which should be higher than 12 V. If this is not the case, the generator windings are faulty (open or short circuit), the voltage regulator with a brush assembly, the excitation winding rings are oxidized or oiled, the brushes are worn out or "stuck".
In order to make sure that the voltage regulator is malfunctioning, we turn off all consumers except for the side light and measure the voltage at 1000 ... 1200 min -1, which should be in the range of 13.5 ... 14.2 V.
The removed voltage regulator can be checked as follows. We connect a lamp between the brushes (21 ... 35 W, 12 V). We connect +12 V to the “D” terminal, and “minus” to the “ground” terminal. In this case, the lamp should be on, and when the source voltage rises within the range of 13.5–14.2 V, it should go out. If the lamp is on in both cases, replace the regulator.
Checking the diodes of the rectifier unit and additional diodes, see Generator 9422.3701 GAZ-2705
We recommend replacing the rectifier unit in case of failure of its elements. It is allowed to replace individual diodes, but they will need to be repressed into the holder - an operation that requires accuracy and skill.
Disconnect the battery.
Remove the engine mudguard (see Removing the engine mudguard).
Weaken the belt tension ...
... and remove the tip of the wire from the terminal "+" of the generator.
Using the "10" wrench, unscrew the wire fastening nut ...
... and remove the tip of the wire from the output "+" of the generator.
Remove the plug from the generator plug.
Using the "13" wrench, unscrew the nut, holding with the "12" wrench the bolt fastening the generator to the lower bracket.
Using the "13" wrench, unscrew the nut, holding with the "12" wrench the bolt fastening the generator to the upper bracket.
Using the "12" wrench, loosen the bracket bolt.
We take out the bolt with the bushing and remove the generator from the engine.
Using the "10" wrench, unscrew the wire fastening nut.
Using the "8" wrench, unscrew the condenser mounting nut and remove it.
Using the "8" head, unscrew two nuts ...
… And, prying it off with a screwdriver, remove the plastic casing of the generator.
Disconnect the connector from the voltage regulator.
We unscrew the two screws securing the voltage regulator ...
Using the "8" wrench, unscrew the nuts of the bolts tightening the covers.
We unsolder three outputs of the stator winding from the rectifier unit.
Using the "8" wrench, unscrew the three nuts securing the rectifier unit ...
Using the “24” head, using a gas wrench, unscrew the pulley fastening nut, while holding the shaft from turning with a “8” hex key through the holes in the head.
Having pressed the nut flush with the end face of the rotor axis and holding the generator in weight by the fan, we knock out the pulley with not strong blows through a soft drift.
After unscrewing the nut, remove the pulley, fan and thrust bushing.
We mark the relative position of the generator covers and remove the back cover.
We take out the stator from the front cover.
If there is no special puller, screw the nut onto the shaft flush with the butt end and knock the rotor axis out of the front bearing with a soft metal hammer.
Remove the thrust bushing from the axle.
We unscrew the four screws securing the front bearing cover.
We knock out the bearing through the mandrel ...
Using a puller, we dismantle the rear bearing from the rotor shaft.
Press in the new bearing with a suitable sleeve, applying force to the inner ring.
With an ohmmeter, we check that the stator winding is not shorted to the case.
We check the absence of an open circuit in the stator winding.
We check the absence of a short circuit of the rotor winding to the case.
We measure the resistance of the rotor field winding, which should be in the range of 2.3–2.7 ohms.
Applying voltage (12 V) of different polarity to the diodes, we check the serviceability of the rectifier unit.
We assemble the generator in the reverse order.
- Like
- I do not like
Nikola R1 06 Apr 2015
- Like
- I do not like
Nikola R1 06 Apr 2015
And what generator did I repair, otherwise I am also looking for a rotor for BATE 90, can it also be possible to do it?
- Like
- I do not like
Nikola R1 07 Apr 2015
- Like
- I do not like
Nikola R1 07 Apr 2015
there is also such a generator, thanks for the “idea!
- Like
- I do not like
It was possible to solder the repair plates in "potassium". I've never met a contact group assembled here. There were separate rings, and even those disappeared.
such a repair in "starters" is a mower
- Like
- I do not like
such a repair in "starters" is a mower
We have 200 rubles for one current collector.
And so that this disgrace does not repeat itself, it is better to change the brushes for foreign ones. They are softer, the price of the issue is 60 rubles
And what generator did I repair, otherwise I am also looking for a rotor for BATE 90, can it also be possible to do it?
Any rotor can be supplied, even from a 24V generator, as long as the dimensions fit. The rings are also easy to remove and install. True, I have not seen such as those of the author, I have not disassembled starters for a long time.
- Like
- I do not like

Toyota007 07 Apr 2015
Nikola R1, Run your genes.
- Like
- I do not like

Pashochek26 07 Apr 2015
Any rotor can be supplied, even from a 24V generator, as long as the dimensions fit. The rings are also easy to remove and install. True, I have not seen such as those of the author, I have not disassembled starters for a long time.
It is not always possible to deliver what fits in size. 3 days ago I changed the armature genes, the mileage was 14000 km, when the armature resistance rose and the charge disappeared, different generators have different armature resistance, the resistance going beyond the permissible limits affects the operating parameters of the generator.
It is not always possible to deliver what fits in size. 3 days ago I changed the armature genes, the mileage was 14000 km, when the armature resistance rose and the charge disappeared, different generators have different armature resistance, the resistance going beyond the permissible limits affects the operating parameters of the generator.
There are such small differences that they can be neglected, and in your case, there may be an inter-turn or elementary impermeability on the rings.
Post has been editedt-r-a-k-t-a-r on: 07 April 2015 - 14:06
- Like
- I do not like
Pashochek26 07 Apr 2015
There are such small differences that they can be neglected, and in your case there may be an inter-turn.
I know what an interturn is and how to check it. But I wrote from personal experience, I came across it 2 times.
I know what an interturn is and how to check it. But I wrote from personal experience, I came across it 2 times.
And how do you check the inter-turn?
- Like
- I do not like
Pashochek26 07 Apr 2015
And how do you check the inter-turn?
And why are there parameters with permissible deviations?
- Like
- I do not like
Nikola R1 07 Apr 2015
- Like
- I do not like
Toyota007 07 Apr 2015
I did not collect genes from constructors. (Different parts) But logically speaking, the anchor is a controlled magnet, it is controlled by the PP. So it seems to me that the tract is right.
Nikola R1, Gena, how long has passed, that so the tracks are worn out.
And why are there parameters with permissible deviations?
I ask how YOU check for interturn? With a simple tester? It can appear just when heating.
- Like
- I do not like
Nikola R1 07 Apr 2015
It was possible to solder the repair plates in "potassium". I've never met a contact group assembled here. There were separate rings, and even those disappeared.
Solder separately without options, since the ring rubbed right through to the plastic, began to rub the plastic, there was a hole through the slip ring, so I decided not to solder anything, but to screw in the finished one.
Such a contact part did not lie on the windscreen, but stood out only at my request :-)
Any rotor can be supplied, even from a 24V generator, as long as the dimensions fit. The rings are also easy to remove and install. True, I have not seen such as those of the author, I have not disassembled starters for a long time.
The performance of the generator set is primarily reflected in the operation of all electrical equipment in the vehicle. This unit consists of many parts, so even a breakdown of one part can cause the entire unit to malfunction. How to properly maintain the Gazelle generator, what you need to know about diagnostics and how to change the brushes correctly? We will discuss this below.
Gazelle cars 402 and 406 are equipped with generator sets, which are a synchronous three-phase electric motor with electromagnetic excitation. The purpose of this device is to convert rotary motion into electricity, which subsequently feeds the battery and all electrical equipment of the car. Gazelles Business or Cummins are equipped with generator sets of models 2502.3771 or 9422.3701, their power parameter is around 1000 W.
Briefly about the technical characteristics of the device:
- the unit implements the right direction of shaft rotation;
- the voltage level issued by the device is 14 volts;
- the maximum current value is 72 amperes;
- excitation of the unit at an air temperature of 25 degrees is 1400 rpm;
- at a rotational speed of 1800 rpm, the generator unit will be able to deliver no more than 40 amperes of current, at 5000 - about 70 amperes;
- the resistance value in the excitation winding at an air temperature of 35 degrees is about 2.3-2.7 Ohm;
- the device uses brushes of the M1 brand;
- the number of auxiliary diode elements is 3, and the number of power limiters for them is 6.
As for the principle of operation, it is based on electromagnetic induction. In particular, when a magnetic flux passes through an internally mounted copper coil, a voltage appears at its terminals. The voltage values are proportional to the rate at which a given flux changes. Then it is necessary that this flow passes through the coil, this will allow it to be converted.
A rotor device is used as a source of an alternating field, which consists of a shaft, slip rings, and a pole system. An equally important component is the stator, which is used to generate the alternating current.The latter structurally consists of a winding and a core.
The main nuances of maintenance:
Consider the diagnostic process using the example of the ZMZ-402 engine, the check procedure should be carried out with an assistant:
By what signs can you determine the incorrect operation of the generating set:
- the charge on the device disappears;
- lack of charge, the equipment cannot be powered normally by current;
- too high a voltage is generated in the on-board network, amounting to more than 14.7 volts;
- the unit itself has become too noisy.
In accordance with the connection diagram, the procedure for replacing brushes is as follows:
- The battery terminals are disconnected first.
- Next, you need to disconnect the connector from the brush holder.
- Using a flat head screwdriver, remove the two screws securing the holder mount.
- Then the holder itself can be dismantled and the protrusion of the brushes from it can be checked. If the protrusion is less than 8 mm, then the holder itself or the brushes must be replaced. The installation procedure is carried out in reverse order. You also need to make sure that the brushes move without problems in the holder.
As for replacing the belt, this procedure is also not particularly difficult, it is performed as follows:
- First, you need a 12 wrench, they need to loosen the screw that secures the tension roller. Difficulties may arise due to the nearby radiator. If the radiator bothers you, then it can be removed.
- Next, you need to loosen the strap tension, for this, using a 10 wrench, you need to turn the tension roller screw counterclockwise.
- After completing these steps, the belt itself can be removed from the pulley.
- Then a new strap is installed. Using a wrench, rotate the roller screw until the belt deflection is 15 mm under a load of 8 kgf. In this case, the load itself must be applied to the center of the drive branch, that is, between the pulleys of the generator device and the pump. If the tension suits you, then you need to tighten the screw that secures the roller.
To change the bearing elements, you need to do the following:
- First, the generator set itself is removed from the vehicle.
- Next, remove the plastic cover from the unit body.
- After that, the brush holder from the regulator relay is unscrewed, before that you need to disconnect the connector with the wires from it.
- Then it will be necessary to remove the four tie rods of the unit body, as well as the cover along with the stator mechanism.
- Further, the winding terminals are disconnected from the diode bridge, the stator is dismantled, and if necessary, the bridge itself.
- The drive pulley and the bearing cover can now be removed from the shaft. The bearing itself is pressed in, so it is removed using a special puller. The bearing is installed by pressing it in; assembly is carried out in the reverse order.
How to check and repair the unit with your own hands - the video below provides detailed instructions indicating the main points of this process (the author of the video is channel 13).
Verification and generator repair car
Repair generators do it yourself not many car owners do. The video guide shows you how to change spark plugs for a 2009 audi a4 b8 with your own hands. Yet, having some experience in auto repair and "straight" hands, easy generator repair can be done without the help of others. This article will discuss the repair of generators for cars of the VAZ family, which you can do on your own.
We have previously written about some of the signs of malfunctioning generators. This time we will dwell in more detail on simple ways to check and repair car generators that are within our power to carry out. do it yourself.
What to do if the battery charging indicator lamp on the instrument panel lights up, and the voltmeter needle goes into the “red zone”?
The first step is to inspect the alternator belt for damage. Then check the belt tension by trying to turn the alternator pulley:
- If the pulley slips against the belt, tighten it urgently.
- If the belt is stretched and not stretched, it is useless to repair it - replace the belt.
The belt is tensioned by moving the generator along the tensioning bar (position 1 in the figure below), having previously loosened the fastening nut. The easiest generator move with a pry bar.
A weak alternator belt tension in most cases is accompanied by an unpleasant whistle. You can learn more about this from our article "Why does the alternator belt whistle and how to eliminate the whistle?"
If the drive is working properly, you should continue troubleshooting in the generator itself. To test the performance of a car generator do not remove the terminals from the battery while the engine is running... How to replace the timing belt of a VAZ 2105 with your own hands - step by step instructions + photo report and video how to replace the timing belt and how to tighten the timing belt. Doing so could damage it due to a sudden power surge - even if generator was serviceable, after that you will definitely need it repair.


