In detail: do-it-yourself generator repair on a Peugeot 206 from a real master for the site my.housecope.com.
Frequent problems with cars arise in terms of electrics. So, not charging the battery indicates a malfunction of the generator. Often, it does not come to replacement, and the part is simply repaired by the skillful hands of an auto electrician. But you will have to dismantle it yourself.
Alternator replacement video

The video will tell you how to remove the generator from the car, and also tell you about the secrets of dismantling.
The process of dismantling a generator on a Peugeot 206 for a gasoline and a diesel engine is different. Therefore, these processes should be considered separately. In order to remove the generator, you will need a set of keys and some constructive knowledge in the location of parts.
Removing the generator from the diesel engine is slightly different from the gasoline brother due to the fact that there are structural differences in the location. So, consider the sequence of actions aimed at dismantling the product from the car.
- First you need to disconnect the minus terminal from the battery.
- The second step is to disconnect the connector from the control unit.
- The protective plastic guard can now be removed from the top of the engine.
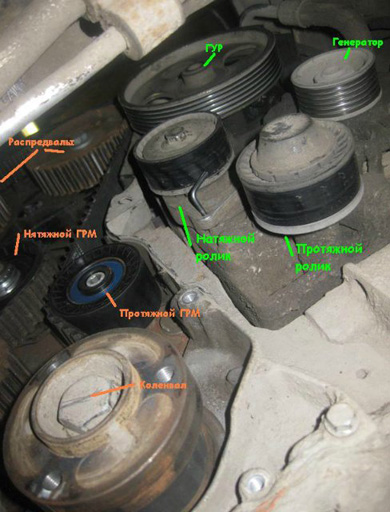
- When the engine becomes available, remove the alternator belt drive and auxiliary units.
- Next, you need to unscrew the power steering pump mount and take it to the side. It is worth doing the procedure carefully so as not to depressurize the system circuit.
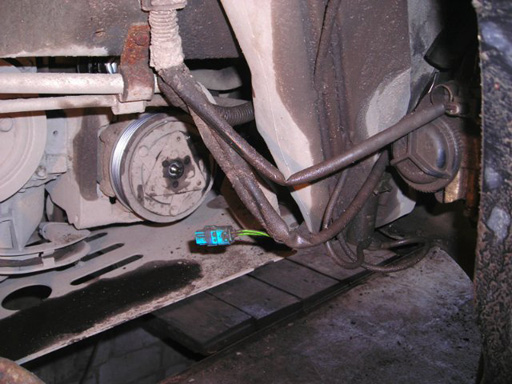
- Now you can disconnect the contacts from the generator.
- We unscrew the bolts securing the spare part.
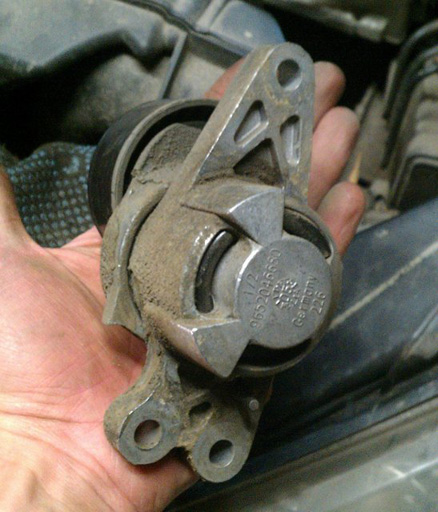
- We are dismantling the generator.
- Assembly is carried out upside-down.
| Video (click to play). |
When we figured out how to dismantle the generator on a diesel engine, let's begin to disassemble the sequence of actions for a gasoline power unit. So, let's get to work:
- First you need to disconnect the minus terminal from the battery.
- Remove the alternator belt drive and auxiliary units.
This belt is no longer good for anything!
Instructions for removing the generator.
For a gasoline power unit, everything is much easier than with a diesel one, since there is more access to the engine compartment.
The original catalog number of the Peugeot 206 generator is 9638275880. Also, the same part is installed on French Citroen cars.
In addition to the original product, there are a number of analogs that are suitable for installation instead of the original part. So, which generators are suitable for the Peugeot 206:
Self-repair of the generator and regulator
To remove the cover (2) of the Bosch generator, unscrew the three Phillips screws (1), remove the B + wire from the threaded bolt (3) and push off the two retaining lugs (arrows).
The voltage regulator (2) is secured with two Phillips head screws (1). Position (3) denotes the rotor axis.
On the removed voltage regulator ((4), the illustration shows a new design), the length of the brushes (2) is indicated by arrows. Position (1) shows the contacts of the voltage regulator, (3) are the fastening bolts.
The illustration shows the measurement of the length of sliding electrographite contacts on a removed voltage regulator from Bosch of an older design: the brushes should not be shorter than a = 5 mm.
Usually the generator does not require repair, except when replacing the generator brushes. More serious damage cannot be repaired with home remedies.
Checking the charging voltage
- Connect a volmeter between the generator thick red wire terminal and ground.
- Leave the engine running at medium speed.
- If the voltage regulator is working properly, the voltmeter should read 13.3 to 14.6 V.
- If not, check the brushes or replace the regulator.
- Otherwise, the generator itself is faulty.
- Disconnect the negative battery cable.
- Bosch alternators: remove battery cover at rear (where fitted).
- Disconnect the regulator from the generator. To do this, remove the two screws.
- Fold back the regulator so that the carbon brushes do not stick in the holders.
- Measure the protrusion of the brushes.
- The length of the new brushes is 13 mm; minimum length 5 mm.
- Valeo alternators: Remove both regulator fixing screws on the rear of the alternator.
- Pull out the regulator.
- Measure the length of the protruding brushes.
- If the remaining length is 5 mm, the brushes are worn out.
- Valeo generator brushes cannot be purchased separately; it is necessary to change the entire regulator.
Replacing the brushes on the new generation of Bosch generators is no longer possible - therefore carbon brushes are no longer sold as spare parts. If they are worn out, the entire regulator should be replaced. The same can be said for the Valeo alternator; carbon brushes are not sold as spare parts - you need to buy a new voltage regulator if the old brushes are worn out.
However, with older generators from Bosch, such a replacement is possible. This will require a soldering iron, solder and, in addition, knowledge of soldering.
- Remove the voltage regulator as described above.
- Unsolder the stranded flexible wires, pull out the carbon brushes.
- Remove pressure springs from old brushes and put on new ones.
- Solder stranded flexible wires.
- At the same time, apply a little tin and work quickly so that the wires do not suck in a lot of tin. Otherwise, they will become tough.
Hint: if the brushes are removed, you can check the copper slip rings at the same time (brushes walk on them). If deep traces of running-in are found on them, then you need to grind and polish them in an auto electrician's workshop.
- Disconnect the ground wire from the battery, otherwise there is a great risk of short circuit.
- 4-cylinder models: Remove the front pivot cover (where fitted) on the toothed belt guard.
- 5-cylinder models: remove the underbody protection from the engine compartment.
- 4- and 5-cylinder models: Disconnect alternator wires.
- Disconnect the earth cable, where available.
- Unscrew the clamping bolt on the alternator shim.
- Loosen and remove the V-belt or poly-V-belt
- Loosen and remove the hinge bolt while holding the generator.
- 6-cylinder models: remove the underbody protection from the engine compartment.
- Remove the V-belt (work described later in this chapter).
- Remove the connecting cable and cooling air guide from below.
- Loosen the mounting bolts, remove the generator.
Driving with a faulty generator
Hints: If the alternator or voltage regulator is not working, you can still continue driving as the battery can take over as a power source. During the day, its current reserve lasts for a long time, because the electronic ignition / injection control, as well as the electric fuel pump, need a minimum voltage. In addition, the battery is often only 2/3 charged. Depending on the capacity of the battery, you can drive at least another 5 hours. In winter, the general weakness of the battery is a complicating factor. In addition, the headlights must be switched on earlier.
Therefore, the motto should be to save current: you should not interrupt the trip unnecessarily, because the starter needs a lot of current. If possible, you should start "from the roll." Do not turn on heated rear window, heater and radio. It is more economical to handle the wiper. Drive at night without high beam and fog lights. Additionally, disconnect the cables from the generator and insulate them separately so that the battery cannot be discharged through a faulty generator or voltage regulator.
Posts: 14
User #: 6.861
Registration: 21.3.2010
Club Card #: not yet
Thank you said: 12 times
all in all. as an introduction - the generator is covered, good. which is not far from home.
I arrived, looked at the insane delivery times on the eksist, scratched my turnips and. started repairing the old one.
I want to say right away.that the generator actually died on the Peugeot Partner, but the engine compartment on it is practically no different from the compartment of his wife's car - she has a Peugeot 206. We have the same engines - TU3JP.
1. Open the hood)) DISCONNECT THE PLUS TERMINAL.
2. Remove the protection over the exhaust pipe
3. then we see the generator itself. (Do not pay attention to the rolls of duct tape - they are. Battle wounds))
by the way, who cares - I have it Valeo CL8 +
4. remove the terminal (nut for 13), unscrew three nuts (for 8). which secure the back cover. Disconnect the connector with the control wire. (I have it wrapped with electrical tape)
6.Unscrew the three bolts (7th) that secure the block with brushes
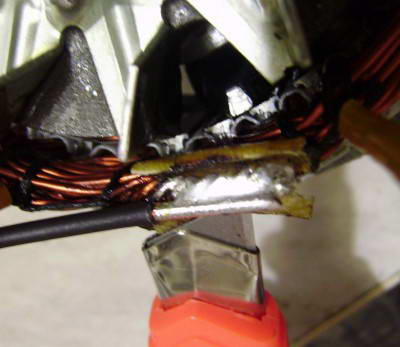
the photo shows that one brush has worn out almost to zero. Taking spare brushes from a Chinese grinder, sharpening them, I stuck them in to replace the worn out ones.
The next photo shows the shaft with the alternator slip rings. It is seen. that the shaft output is more than a millimeter. This upset me, because I just have no idea how to change the rings. and in the present state of affairs, and even with new brushes, the generator will not work for a pancake for a long time.
Gathering everything in reverse order, I connected the positive terminal of the battery and measured the voltage in the network - on a charged battery it should be around 12.5 V. Turn on the motor. We measure the voltage - if it rises to 14.5 V, then the generator is working.
My car: Peugeot 206 5 doors 1.4 automatic transmission 2005 complete set: unknown color: silver! Purchased in 2010!
Posts: 87
User #: 14.751
Registration: 29.8.2012
Club Card #: not yet
Thank you said: 0 times
My car: Peugeot 206 Sedan 4 doors 1.4 manual transmission 2008 onwards color: Red! Purchased in 2012!
Posts: 21
User #: 10.726
Registration: 27.4.2011
Club Card #: not yet
Thank you said: 1 time
My car: Peugeot 206 5 doors 1.4 manual transmission 2004 onwards complete set: mystery covered in darkness) color: red metallic! Purchased in 2010!
Posts: 88
User no .: 21.635
Registration: 17.1.2016
Club Card #: not yet
Thank you said: 3 times
Yesterday I tried to remove the cover from the generator in order to inspect the brushes. Firstly, the exhaust manifold cover cannot be removed. The pipes on top and the radiator in front are in the way. Perhaps the Partner has more space in the front. Generator Valeo. 7mm cover bolt heads. Secondly, getting close to the rear cover mounting bolts is not realistic. Very crowded. I unscrewed it, of course, but it fell somewhere (((. One and a half hour got screwed up. I could not remove it. I will remove the generator completely.
Post has been edited resours-lsv – 15.9.2016, 8:57
My car: Peugeot 206 Sedan 4 doors 1.4 manual transmission 2009 onwards package: VF32BKFWA72797123 color: 11203 KDE! Purchased in 2016!
The problem is that I can't find which ones I need. How to determine what a generator costs by VIN? I don't want to disassemble everything to find out what kind of RAO UES is in my car.
Flamer Beginner / Peugeot - 206Sedan
in short, and here they do not know anything.
2 206Sedan: The manager from Exist asked me “what is the generator worth? and how many amperes? ”. apparently only disassemble and watch. changing the whole gene is very expensive
Flamer Beginner / Peugeot - 206Sedan
moff: in short, they don't know anything here.
2 206Sedan: The manager from Exist asked me “what is the generator worth? and how many amperes? ”. apparently only disassemble and watch. changing the whole gene is very expensive
Flamer Beginner / Peugeot - 206Sedan
As usual - a foenndoscope with a tube instead of a membrane.
Flamer Beginner / Peugeot - 206Sedan
The belt was not removed on my car. I don't know how they listened after removing the belt from the moff car.
You just spin the video with your hand and you can hear everything even without the enty foenndoscope.
before replacing the rollers, the alternator belt did not live up to 8 km. the parasitic wedge along the way and the strap broke on the way to the service. It's a shame damn it. why parasitic? because the bearing in it fell apart sooooooooooooooooooooooooooooooooooooooooooooo now only a few balls flew out.
Vital2546 18 Aug 2011
 Vital2546 18 Aug 2011
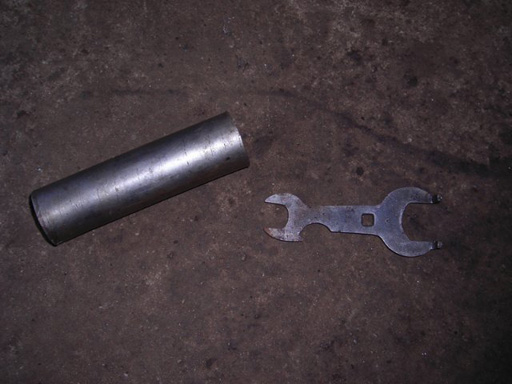
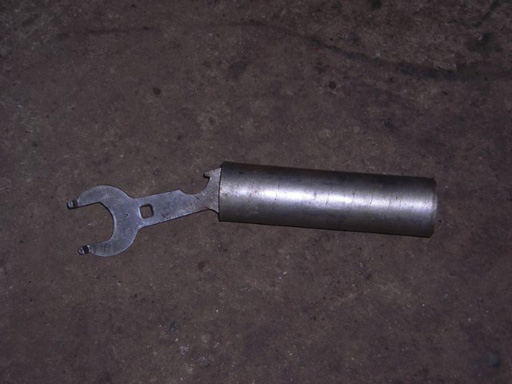
Hello members of the forum! The question is perhaps funny, but the matter is: it is necessary to change the bearings on the generator from the Peugeot 206, I removed the generator and I am afraid to remove the pulley from it - they are embarrassed by some teeth on the inside of the pulley and the same teeth on the screw that is screwed into the shaft. I’m such that I would clamp the pulley in a vice and unscrew that strange toothed bolt with a hexagon (fits 8) but I'm afraid I’ll suddenly break his neck, what kind of adaptation is needed? How to unscrew?
need adaptation consists of two gizmos-sprockets - if there is an overrunning clutch.one gizmo holds the generator axis - the other teeth on the inside of the pulley (a simple pulley on a cone plus a nut)
it is necessary to change the bearings on the generator from the Peugeot 206, I removed the generator and I am afraid to remove the pulley from it - they are embarrassed by some kind of teeth
You can see the instructions for the repair and modernization of the generator.
For many operations, you can not so much read as see detailed photos: 
- idler roller Citroen / Peugeot 16 114 229 80
- idler pulley Citroen / Peugeot 16 114 245
- attachment drive belt Citroen / Peugeot 5750.XA
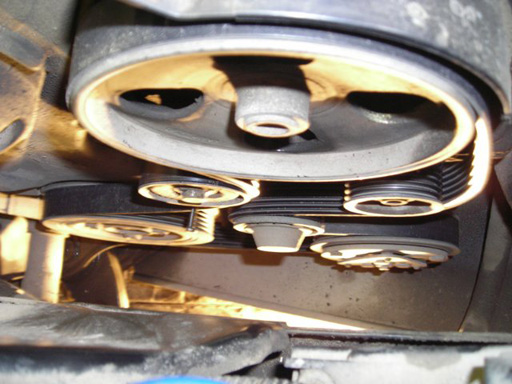
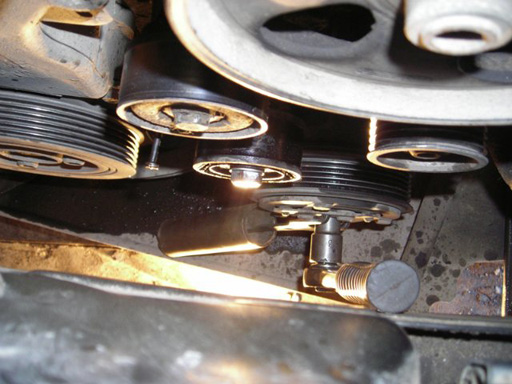
- remove the accessory belt;
- air conditioner clutch;
- tension and broaching rollers.
These actions were performed on the NFU 1.6 engine, 110 hp, 2005.
This will require the following tool:
- ratchet with head sizes 10, 13 and 16
- an angle grinder wrench or a Soviet bicycle wrench with an extension pipe for the handlebars
- large bearing puller (cost about 300-400 rubles)
- awl or snap ring puller (platypus-like)
- screwdriver
To replace only the rollers and the belt, you do not need to lift the car and remove the wheel - all this can be done in the garage or right next to the store, on the street.
- To remove the air conditioner clutch, it is preferable to raise the car, then remove its right wheel, and also remove the floor of the locker (four bugs).
- It usually takes only five minutes to remove the belt. Everything is quite simple, without any difficulties, so anyone can cope with such a task.
Take a ratchet with a 13-point head and a bolt (hairpin, nail, stick) 3-5 centimeters long and 3 millimeters in diameter.
Place the key on the tensioner roller and turn it counterclockwise 30 °.
Using your other hand, insert a bolt (stick, hairpin, nail) into the hole in the roller pad (the motor has an identical hole that the bolt will fit into).
| Video (click to play). |
The belt must be in a free position and the roller must be secured. 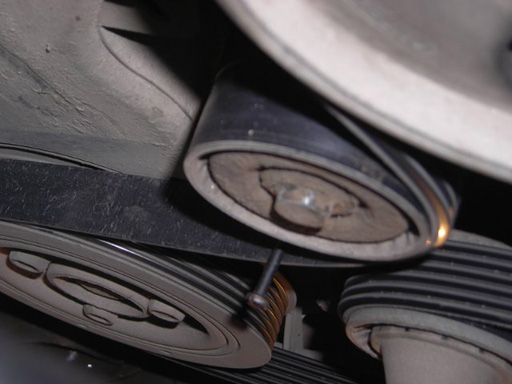
Attach the idler roller pad with three bolts (one bolt at the top and two at the bottom). Unscrew with a ratchet with a head 10.

Images of all videos, and among them the timing belt under the casing:
As a rule, the roller and belt are removed in 30 minutes.
- Remove the locker, then climb into the wheel arch to get to the air conditioner.
- Take a wrench or special tool.
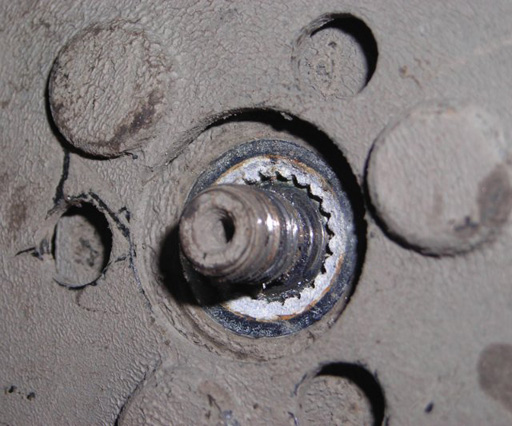
- Insert it into the coupling holes and unscrew the nut with a ratchet with a 13-point head.
- The first sleeve plate (with holes and a triangle) is mounted on the teeth. You should tighten the head 13 more towards the center and tap it for a while, then remove it towards you. It is recommended to be careful not to overdo it when inserting chisels, screwdrivers, etc. into the gap between the coupling and the plate, otherwise you can bend the triangle and the ring of this "shock absorber". It is necessary to remove the center, and not pull the edges with a thicker screwdriver.


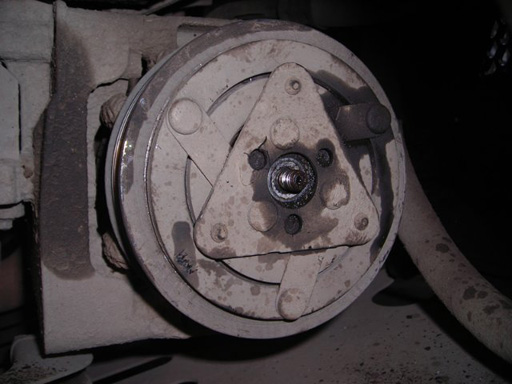
Ready. Now you need to assemble in the reverse order:
- put the clutch in place;
- put on the retaining ring;
- put on the washer;
- put the first disc (the one with the triangle);
- tighten the nut;
- if the air conditioner was removed, then put it back;
- put on a belt;
- release (release) the tension roller;
- insert a locker;
- put the wheel in place and lower the car to the ground.
This photo report contains removing the hinged belt additional equipment are removed tension and pinch roller, as well as air conditioner clutch from the car Peugeot 206 (Peugeot 206) with an engine capacity 1,6 liters, TU5JP4.
The procedure is simple and trivial, do it yourself. If from all of the above you only need to replace the belt and rollers, there is no need to remove the wheel and raise the machine.
It is advisable to raise the car in order to carry removing the air conditioner clutch, this also removes the right front wheel and half of the locker, holding on to four "bugs".
Profile
Group: Assistants
Posts: 192
User #: 26040
On the forum since: 03/25/2013
Has warnings:
(0%)
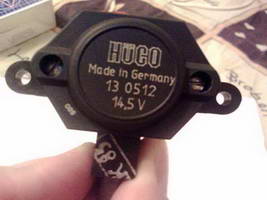
Good day! a customer brought a new generator from a PEUGEOT 206 with a complaint overcharged. I put it on the stand for testing, the generator gives out everything as it should, that is, it self-excites, no load 14.5-14.6 with full load 13.2-13.2 (everything seems to be fine). There is a constant plus in the connector 2 pins (L and FR) on pin L for any load (the lamp between this pin and “-” is constantly on, the voltage on L from the load on the generator practically does not change (about 12.8 V according to the digital multimeter)
Is this how it should be with such a generator? Or does the relay need to be changed?
the replacement relay should be IM606, but if not, is the replacement IM498 equivalent?
Profile
Group: Assistants
Posts: 244
User #: 27352
On the forum since: 09/27/2013
Has warnings:
(0%)
Profile
Group: Assistants
Posts: 192
User #: 26040
On the forum since: 03/25/2013
Has warnings:
(0%)
about the pins: the pinout in different sources is different there is l-dfm and there is l-fr
dfm and fr are one and the same thing.
Profile
Group: Assistants
Posts: 244
User #: 27352
On the forum since: 09/27/2013
Has warnings:
(0%)
Profile
Group: Assistants
Posts: 192
User #: 26040
On the forum since: 03/25/2013
Has warnings:
(0%)
Profile
Group: Assistants
Posts: 244
User #: 27352
On the forum since: 09/27/2013
Has warnings:
(0%)
Profile
Group: Assistants
Posts: 192
User #: 26040
On the forum since: 03/25/2013
Has warnings:
(0%)
Profile
Group: Old people
Posts: 1374
User #: 3904
In the forum since: February 15, 2007
Has warnings:
(0%)
Attached image (click to enlarge) 
Profile
Group: Old people
Posts: 1374
User #: 3904
In the forum since: February 15, 2007
Has warnings:
(0%)
And this. And where can you see that DF and DFM are the same?
Attached image (click to enlarge)
Profile
Group: Assistants
Posts: 192
User #: 26040
On the forum since: 03/25/2013
Has warnings:
(0%)
so no one spoke about it. they said that FR and DFM are one and the same.
Dear Vasilich, I saw that the pinout L is DF / DFM. but how to check an already removed regulator with a DF pin?
about such a pinout on the forum has been written more than once, that's just how to check, or no one wrote to start the relay, sorry in advance if the question is "stupid"
Profile
Group: Assistants
Posts: 244
User #: 27352
On the forum since: 09/27/2013
Has warnings:
(0%)
Profile
Group: Old people
Posts: 1374
User #: 3904
In the forum since: February 15, 2007
Has warnings:
(0%)
Profile
Group: Assistants
Posts: 192
User #: 26040
On the forum since: 03/25/2013
Has warnings:
(0%)
thanks for the link, yes - I read this thread, but it's still not entirely clear. I understand what DF and DFM are separately. if the whole thing is combined (that is, it goes through one channel (pin), too, in a pinch, my brain is able to overpower - BUT!
(I'll make a reservation in advance, maybe I'm wrong, my education is not "electrical")
DF means an external regulator - right?
this relay gives out the stabilization voltage as it should. (that is, there is still a regulator inside it?)
Your yesterday's post did not allow me to sleep until 2 am - I went to the Internet, to profile sites for YOURS. It turns out that overcharging is a fairly common sore for them, and as they write, the problem is solved by replacing the relay in 90% of cases.
On the same forum, people write (omitting details) instead of IM606 they put IM498 and everything works for them. (The generator numbers are exactly the same differences in the last letter)
from suppliers of spare parts regulators IM606 and IM49 are analogs (prada also write that IM498 is weaker than IM606
Why do they write DF if everything works in general? and was someone in a situation that the absence of DF affected the performance of the unit?
sorry for the confusion, do not kick too much, please.
If it is impossible to repair the generator on the Peugeot 206, we will replace the generator with a new or rebuilt one. Repair of a Peugeot 206 generator takes 1-2 days, depending on the complexity of the repair. The feasibility of repair or replacement is determined on the spot by the master after diagnostics.
Running spare parts for the repair of the Peugeot 206 generator are always in our warehouse. Also, for some models we keep remanufactured (sorted out) generators, for which we give a 6-month warranty.Please note that we do not accept generators that have been removed from the vehicle ourselves for repair. We initially do diagnostics on a car, we remove, repair and put back on ourselves.
If, after diagnostics, it turns out that repairing an old generator is more expensive than a new one, we will replace the generator with a new one from our warehouse.
The cost of repairing and replacing a generator on a Peugeot 206:
Dismantling the alternator and replacing the brushes on the Peugeot 206. REPLACING ALTERNATOR BRUSHES
Oynatıcı kontrollerini göster
- katma 30 Oca 2014
- Alternator replacement of alternator brushes alternator repairDismantling of alternator and replacement of brushes for Peugeot 206 REPLACING ALTERNATOR BRUSHES on a PEUGEOT 206.
Good day! Can you tell me how to remove the generator from the car? Do you have to shoot something besides him?
In the article we will talk about how you can repair the generator with your own hands, and also try to understand its design.
The generator is an electrical equipment that has a very complex design. If it is broken or completely out of order, then the battery charge is completely absent, and the motor also stops functioning. You can purchase a new unit or contact a car service for the purpose of analyzing a breakdown or performing repair work, but these options for getting out of the situation will cost too much financial costs. Therefore, it is best to try to repair the generator yourself. This requires only a minimum of knowledge in electrical engineering, as well as the presence of a soldering iron and skills to work with it.
First, let's discuss the problems that can cause a generator to malfunction.
- First, it can be the rejection of any charger.
- Secondly, the generator may supply too little voltage.
- Thirdly, there may be an excess of charging energy - (relay regulator is faulty).
- Also, during the charging process, a warning light on the panel may flash.
- And lastly, during operation, the generator emits any extraneous sounds - (bearings are faulty).
Here are the most common problems that will signal a generator failure.
Below we will discuss some of the above problems in more detail.
Most often it occurs among car owners that charging is rejected, that is, the generator does not charge.
The reasons for this breakdown may be:
- the fuse has blown, or it may simply move away;
- breakage or sudden wear of the brushes;
- breakdown of the regulator relay;
- the occurrence of a winding short circuit (the rotor or stator circuit may be broken).
In several of the above malfunctions, you can simply replace the defective parts. But if the battery does not charge due to the short circuit of the winding, then in this case you can resort to several options for repairing this problem.
You can safely purchase a new winding, or repair the old one yourself. If, nevertheless, it happened that there was a break in the winding, then in this case it is necessary to repair the rotor, either send it for repair, or do it yourself.
Quite often you can find that the break occurred precisely in the area of the slip rings. To repair and solve the problem, it is worth rewinding the coil in the section where the rupture itself occurred. Make the wire so long that it is quiet enough for soldering to the slip ring itself. It is necessary to very carefully unsolder the end of the winding, which was previously broken and proceed to the production of a normal, that is, a serviceable end to the same previously broken winding.
It may also be that there was an accidental unsoldering of the tip just at the winding that has its own location on the rotor. Here you just need to solder it to its original place. If necessary, it is better to repair and clean the slip rings themselves on the generator.It may be deep enough, then you should turn to a file for help, thanks to which you can eliminate this problem in the generator.
In parallel with the repair of the above problems, another one can be eliminated, such as the occurrence of extraneous noise during the operation of the generator. To do this, it is necessary to thoroughly inspect the bearing, which is located on the rotor, and if you find any malfunctions, then it is best to replace it yourself, the bearings are not subject to repair. A common problem is the lack of play in the generator bearing. If it happened that this happened in your case, then it is worth dismantling the protective lining, after which it should be rinsed in gasoline and lubricated.
Now let's talk a little about what to do if there is a weak charge from the generator, or the completely opposite happens in general - that is, the battery is recharging. It is best in this case to start looking for a problem in the battery relay, and if necessary, replace it. Another reason for this defect may be the appearance of a hole in the diode, which is located in the diode bridge itself. As the practice of such malfunctions shows, it is recommended to simply replace the relay regulator at the place of repair, or, as it is called, the "diode bridge."
In this case, the cause may be an accidental breakdown of one diode (there may be several at the same time), which is responsible for the entire lamp supply circuit. They are also located on the diode bridge. You need to unscrew the nuts (key 7) on the generator and dismantle the fastening of the winding located on the stator. After that, it is worth creating a recoil of the nut and dismantling the diode bridge. In the process of performing this work, you can also make replacement or repair of the winding on the stator.
That's all there is to it. Do-it-yourself repair of the generator. But do not forget about the most important rule - for the successful completion of this repair, you should have at least minimal knowledge in the field of electrical engineering.


