In detail: do-it-yourself single-lever kitchen faucet cartridge repair from a real master for the site my.housecope.com.
Single-lever mixers attract with their laconic design and easy control of the water flow. Turning on the water, changing its temperature and pressure - all this with one turn of the knob. These devices are reliable, have a solid service life - some branded ones give a 5-year warranty. Nevertheless, repairs to the single-lever mixer are periodically necessary.
Despite the external similarity, there are two types of rotary or single-lever mixers - with a cartridge (cartridge) and ball - with a ball inside. You can repair any of them, but for this you need to disassemble them first. And so that you can not only disassemble, but also assemble, it is advisable to get acquainted with the internal structure of each.
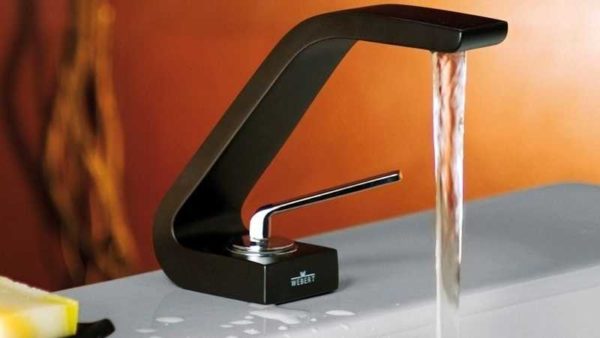
The design can be different, the structure remains the same
Cartridge mixers are named so because their locking and regulating mechanism is hidden in a special cartridge flask. In the more expensive models of faucets, the cartridge body is made of ceramic, in the cheaper ones it is made of plastic. What are good about these models is the ease of repair, but with them it is not always easy to achieve the required pressure - you need a tighter control of the handle. But it is very easy to change the temperature of the water - with a slight movement of the hand.
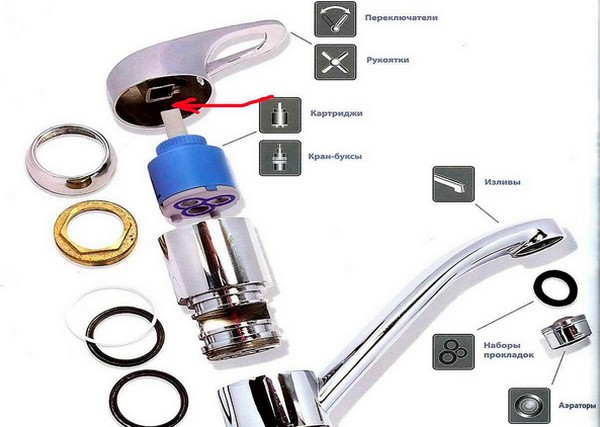
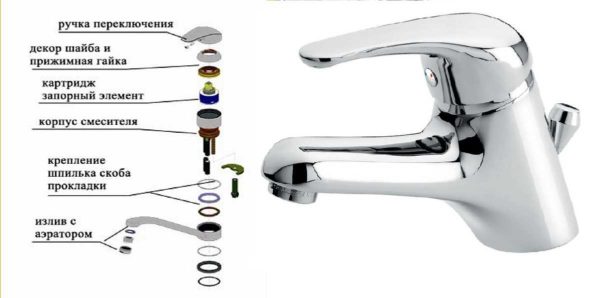
The structure of a single-lever valve with a cartridge is simple. If you go from top to bottom:
- Switch with fixing screw.
- Locking (compression) nut.
- Cartridge. It mixes the streams of water, the same device shuts off the water.
- The body of the mixer, which has a seat for the cartridge.
- Fasteners, studs and gaskets to ensure tightness.
- Spout (gander). It can be a separate part - in swivel models for the kitchen or part of the body - for sinks in the bathroom.
- If the spout is separate, gaskets are still installed from below and there is still a part of the body.
| Video (click to play). |
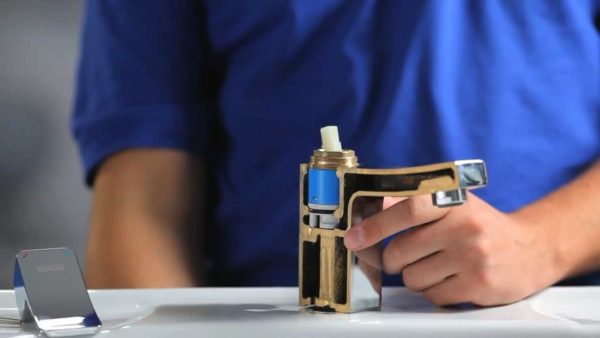
What a single-lever mixer cartridge consists of
The cartridge itself contains several (usually 4) specially shaped ceramic or metal discs. A stem is welded to the upper disc. By changing the position of the rod, we change the position of the plates relative to each other, changing the amount of water passing through the holes in the plates.
For the faucet / mixer to work properly, the plates are ground very tightly. For this reason, single-lever cartridge mixers are very demanding on water quality. If foreign fragments enter between the plates, the valve leaks or stops working altogether. To avoid this, some manufacturers install filters on the inlet pipes. But, it is better to put filters on the water supply and get clean water, which can be safely supplied to household appliances.
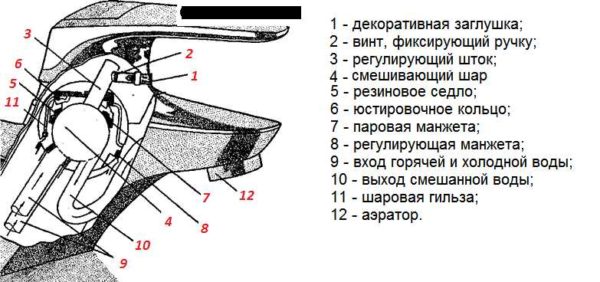
It got its name from the element in which water is mixed - a ball with cavities. The ball is usually metal, hollow inside. The outer part is polished to a high shine. There are three holes in the ball - two for the inlet of cold and hot water, one for the outlet of the already mixed one. A rod is attached to the ball, which goes into the cavity on the handle. This rod with a rigidly attached ball also changes the temperature of the water, its pressure.
The structure of a single-lever mixer with a ball-type water mixing mechanism
It is easier to adjust the parameters with such a device - the parts are well ground in, the handle moves easily. Ball mixers are less critical to the presence of mechanical impurities, but do not respond very well to the presence of hardness salts and excess iron. So for normal operation, pre-filtering is also required here.
Repairs to single lever cartridge faucets often involve overhauling and cleaning the O-rings. Salts are deposited on them, debris and dirt accumulate, which is why the tap starts to leak. To eliminate this nuisance, the mixer is disassembled, all parts are wiped from contamination (with warm soapy water), rinsed, dried, and put in place.
The sequence of installation of parts in a cartridge single-lever mixer
Let's figure out how to disassemble a faucet with a cartridge. First, turn off the water, and then the procedure is as follows:
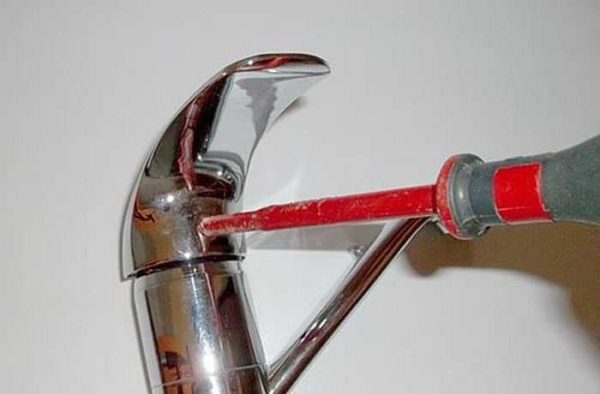
- Remove the decorative cover on the handle. Just pick it up with a screwdriver.
- A fastening screw is hidden behind it. We unscrew it with a hex wrench and take it out.
First, unscrew the fixing screw
That's all. The single-lever mixer with cartridge was disassembled. As you can see, there are not very many details. The main working part is a cartridge. It is in him, inside, that mixing takes place.
The cartridge itself has a sealing gasket - a rubber seat at the bottom, which provides a snug fit to the body. Over time, rubber loses its elasticity, water begins to ooze. If this is the problem, you can first try to clean this ring of salts and deposits that have formed on it. Put the cleaned part in place, check the work. If the leak does not stop, the cartridge will have to be replaced.
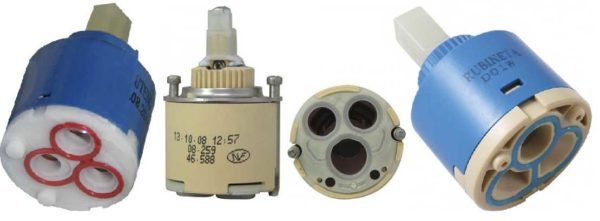
One-hand mixer cartridges
Mixer cartridges have different diameters, inlets and outlets in the lower part are located in different ways. Therefore, if you need to replace it, first you disassemble the mixer, get the cherished part and go with it to the store or to the market. You need to choose exactly the same model without any deviations. At home, you install the cartridge into the case, turn it slightly until you feel that it has "sat down" in place. Next - the assembly, it goes in the reverse order.
Install the compression nut first. Actually, at this stage you can check how the new cartridge works. Turn on the water, adjust the temperature and pressure with the rod. To make it more convenient, you can put a handle on the stem. If everything is ok, continue with the build.
The single-lever ball mixer was invented a little over 40 years ago. Its design is simple and reliable - there is actually nothing to break. If problems arise, it is only because of poor-quality water - dirt particles settle on the rubber seats on which the ball rests. Contact deteriorates, water seeps out and the faucet starts to leak.
How to disassemble a single lever ball mixer
Some ball valves are also available with a cartridge. Only the inside of the cartridge is not a plate, but a ball. Disassembly of this type is no different from the one described above. The whole difference is hidden inside the flask. There are also other types of taps. In them, the shut-off ball is installed directly in the rubber seat. There are some minor differences here.
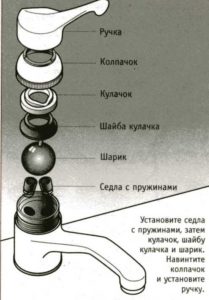
The tap lever is removed in the same way - first remove the plug, then unscrew the screw with a hexagon. Pull the lever up, remove it. After the actions are very simple and similar to those described above:
- We unscrew the cap, preferably with our hands, since it is usually made of thin metal, it is easy to bend it.
- We unscrew the clamping nut, there is a washer under it, we also remove it.
- Access to the ball is now open. We pull the stem, take out the ball.
- There are two saddles under the ball, with springs so that the rubber bands are pressed more tightly against the ball.
All dismantled. Next is the repair of a single-lever mixer. In theory, the problem is that deposits have accumulated at the point of contact between the ball and the seat. They must be removed - gently clean, wipe. There may be problems with the springs. They also sometimes accumulate dirt, but more often they simply lose their elasticity.
The third source of problems is the ball itself. Actually, it should be made of stainless steel, therefore, it only needs to be cleaned of deposits.In reality, this is not always the case - cheap taps have appeared, even with plastic balls or made of cheap metal. In this case, peeling of the surface or other similar troubles may occur. Such a locking element will no longer work normally. It needs to be replaced. With a ball, you also go to the store, pick up a replacement of a suitable size. Assembling the mixer in the reverse order: the springs from the saddle, the saddle is out of place, there is a ball on them, etc. Collecting the entire structure, carefully center everything - a skew will lead to rapid wear and the valve will flow again.
Faucets with a swivel spout are placed on sinks in the kitchen or on the bathroom. Periodically begins to flow from under it. The locking mechanism in this case is not to blame, it is just that the gaskets have lost their elasticity or the lubricant has dried out.
Repair of a single-lever mixer with a movable spout
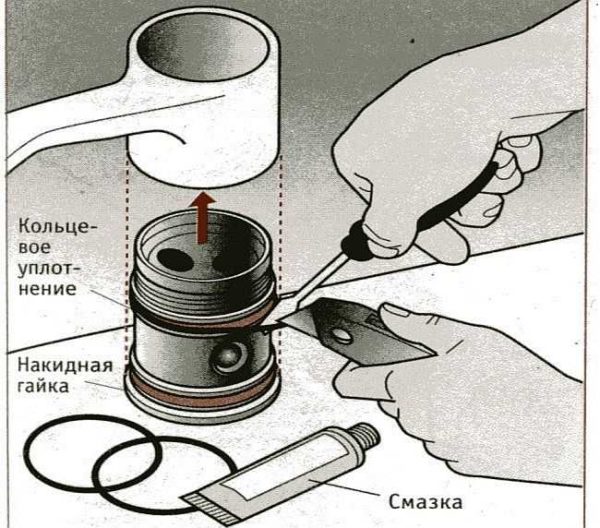
In this case, disassemble the mixer as described above, then remove by pulling up the spout. Remove all old gaskets. If they are stuck, you can use a flat screwdriver or even a knife blade. You need to remove them, but they still need to be replaced. Select new ones from the removed gaskets. It is desirable that they be made of silicone, not rubber. Silicone is more elastic, retains its properties longer, and better tolerates contact with water.
Lubricate new gaskets with plumbing silicone grease, install in place. Replace the spout. It must be pressed down well so that it rests against the union nut on the mixer body. Next - the assembly of the rest of the mechanism.
When in the bathroom my one lever mixer started to dig in the closed position, I disassembled it and tried to find the cause of the breakdown.
I completely disassembled the cartridge, pulled out the O-rings and gaskets. As far as possible, I cleaned all the parts with a cotton swab.
Visually, I did not find any defects - no cracks, no chips.
I decided to lubricate all the parts and reassemble the cartridge. Waterproof silicone grease is not cheap - a 20 gram tube is about $ 15. For the experiment, I decided to use petroleum jelly as a lubricant.
The mixer worked without problems for 4 months and began to dig again. Having decided that the problem was precisely the lubricant, I bought a tube of silicone lubricant, removed, disassembled, cleaned and again lubricated the cartridge with the “correct” lubricant.
For six months now, there have been no problems with a repaired mixer.
Disassemble your mixer and if there are no cracks or chips on the ceramic parts, and the O-rings and gaskets are intact and elastic, lubricate all these parts with silicone grease and, perhaps, the mixer will serve you for more than one year.
First you need to get this cartridge, for this you need to remove the plug and get the pin, and then lift the handle up. The pin itself is unscrewed with a hex wrench.
Next, the casing is removed to get close to the nut that secures the cartridge. It is unscrewed with a key for 30 (although I could be wrong), there are also special keys so as not to scratch the case.
The cartridge itself rises up entirely.
Although the cartridge is not repairable and is completely changed, it can be restored with a small problem for a while. To do this, half of the cartridges, we look at the condition of the plate as well as the presence of a depletion. In the place of production, you can grind the protrusion with sandpaper and for a while nothing will prevent the plate from moving, but a gap will already appear.
Cartridges can be different in design, there are collapsible cartridges, there are non-collapsible ones.
Not collapsible, they are not repaired in any way.
Also, cartridges with cracks on the case, or with worn plates are subject to complete replacement, repair is possible only if there are several identical cartridges of the same type, in other variators, only a complete replacement.
First of all, we shut off the water (both cold and hot).
There is a plug under the mixer lever (most often it is divided into two parts, blue and red).
We pry it off with a flat-blade screwdriver and remove.
There is a screw under the plug, unscrew the screw and remove the mixer lever.
The cartridge itself is held in place by a clamping nut, I usually unscrew it with an adjustable wrench (yes, before that we unscrew the "cup" decorative piece between the mixer body and the lever, unscrew it counterclockwise).
They unscrewed the nut, the cartridge in the hands.
The seat was cleaned of rust.
If the cartridge is collapsible, then there are two plastic latches on the body.
Use a small screwdriver to pry them and take out the “bottom” of the cartridge (the part on which the O-rings are).
We slightly press on the cartridge rod and take out the actual part which is called the “cartridge” (plates can be both plastic and ceramic).
We clean the inner surface of the cartridge from rust.
And then everything is from breakage, very often the plastic "cover" which is located on the "lever-cartridge" unit breaks down, there is only a replacement of this part.
Before reassembling, we clean the ceramic plates (disks) from the old silicone grease (cotton swab + alcohol) and apply a new one.
The cartridge rings (sealing) can also be replaced with new ones, and the minimum is to clean them from rust and dirt.
Further assembly in reverse order.
The kitchen faucet is one of the most commonly used plumbing fixtures in an apartment or house, so it comes as no surprise that it often fails.
In this case, a rotary one-hand valve needs preventive repair with the replacement of units, sometimes the malfunction cannot be eliminated and the plumbing fixture has to be changed completely.
These home jobs can be done by almost every homeowner without calling a paid plumber. To do this, you need to know how to disassemble a kitchen faucet with one handle and have a simple construction tool available.
Single Lever Kitchen Mixer
In modern kitchens, the main type of taps are one-hand types, which have practically replaced the inconvenient two-valve designs and are more practical than touch devices.
The device of a single-lever kitchen mixer is not complicated, the main units are the body (it has an ebb, seats for installation in a sink and water supply) and a built-in adjustment unit.
In case of failure, the repair of a single-lever mixer in most situations consists in a simple change of the unified switching unit or its parts.
The manufacturer supplies the market with single-lever models for mixing liquids with only two types of control units: ball and plate ceramic cartridges.
It can be noted that ceramic cartridges, due to their high technical characteristics and performance, have practically ousted ball models from the market.
A high-quality ceramic block can regulate the water supply for up to 10 years without losing its operational properties; low-cost Chinese crafts can fail the next day and need to be replaced much more often.
Appearance of structural elements of ceramic cartridges
The ceramic cartridge is a prefabricated connection of parts installed in a plastic cylindrical body, at the top of which a lever is installed, on which a rotary knob is attached. In its lower part there are three holes: water enters two of them, and from the third the mixed liquid is directed to the low tide and flows out.
The main components of the cartridge are two slotted ceramic plates that fit tightly together. When one of them rotates around its axis, the inlet holes through which cold and hot water flows overlap to a different extent - thus, the temperature regime is regulated.
If the movable plate is displaced along its axis, the simultaneous overlap of both inlets occurs - this is how the pressure is regulated.
The main advantage of equipping a kitchen mixer with a cartridge is its ease of replacement and high maintainability - its cylindrical body can be easily disassembled.
How the ceramic block works
Ball control assemblies consist of one main part - a metal ball with three water holes and a stem for installing a rotary knob. During operation, the ball rotates in a spherical body seat that has three holes: two for water inlet and one for pouring out the mixed fluid.
Adjustment of temperature and pressure is similar to moving the handle in ceramic models; for sealing, spring-loaded rubber rings are inserted into the area of the inlet openings.
The advantage of one-armed ball valves is simplicity of design, long service life and excellent maintainability - the metal ball itself cannot theoretically fail, therefore, repairing the mixing device consists only in installing new gaskets.
Features of the device of ball joints
To avoid risks when buying and operating, it is better to purchase sanitary equipment from manufacturers that have proven themselves in the market - this guarantees that it will serve for a long time without breakdowns and malfunctions.
Usually, the control unit is already installed in the plumbing fixture upon purchase, and given that all their models are unified, the right decision would be to purchase exactly such a device at once. This will allow, in the event of a breakdown of the old unit, to immediately replace it with a new one, and if the situation repeats, to assemble from two faulty devices working with the further use of the repaired one.
When using a kitchen faucet, in most cases, water is supplied using flexible reinforced hoses, which are not always of high quality. To avoid flooding of the premises in case of damage to the water supply hoses, you can install an Aquastop valve at the outlet of the pipes.
It should be borne in mind that the principle of the valve is to shut off the water flow at high pressure, that is, it is effective if the water hose falls off the mixing body or pipe. In other situations, in the event of a leak, the apartment can be successfully flooded with the Aquastop protection.
To carry out repair work, you will have to disassemble the faucet without removing it from the sink, sometimes it may be necessary to repair the kitchen spout, which in one-hand models can be carried out without disassembly operations.
When dismantling the crane, you have to remove the handle, unscrew the fixing nuts and hoses - this requires the right tools, consumables and accessories.
Tools and supplies for plumbing repairs
To carry out repair work, you will need the following tool:
- An adjustable wrench for unscrewing the nut from the mixer body and dismantling the flexible hoses.
- Socket wrench or flat wrench for attaching and removing bolts from the mounting studs.
- Phillips screwdriver or Allen key to remove the handle.
When removing the mixing body from the kitchen sink, removing the underwater hoses, one often encounters difficulties associated with the contamination of the dismantled parts with limescale or their corrosion. Before carrying out work, it is better to treat their surface with household chemicals to remove rust and limescale - this will simplify the dismantling and further installation of the equipment.
The presence of gaskets in the underwater hoses and mixing body excludes the use of various types of additional seals in the form of synthetic and linen bands, rubber rings.
During repair work, it is often necessary to change underwater hoses that have become unusable; for replacement, it is better to purchase types with a stainless braid and a union nut with fittings made of non-ferrous metals (copper, brass).
Interior of the Single Lever Cartridge Mixer
Repairing a mixer with a built-in cartridge, depending on its malfunction, requires a different approach. If water does not close well or is constantly flowing in the tap, in most cases the cartridge needs to be replaced. When the casing or ebb is damaged, you will have to remove the mixing device and purchase a new valve with subsequent installation.
The main components that most often fail during operation are the adjustment unit and the spout. The regulating unit can be damaged as a result of prolonged operation with poor-quality performance or from contaminated water with sand getting into the water supply system. The main reason for its malfunction is the breakdown of the built-in plastic parts and the stem on which the handle is attached.
The ebb most often fails as a result of clogging of the filter nozzles at its outlet - in this case, the water pressure breaks its thin-walled tube and a leak forms.
When carrying out repair work, it is often necessary to disassemble a single-lever mixer, the process consists of the following steps:
- Using a knife or flat screwdriver, remove the plastic plug in the side of the handle; the fixing screw can have a Phillips screwdriver head or a hex key. Unscrew the fastening screw with a suitable tool; before carrying out work, it may need to be pretreated with household chemicals against limescale and rust.
- After removing the handle, unscrew the decorative attachment. It is designed for manual removal, but in the course of long work, water gets into the thread and plaque prevents it from twisting. To facilitate removal, you can use an adjustable wrench, after placing a soft cloth under its jaws to prevent scratches on the chrome-plated surface. When carrying out work on dismantling the hood, avoid excessive forces - this can lead to deformation of the thin-walled cover.
- Under the cap there is a clamping nut with a hexagon ring in the upper part - it is simply unscrewed with an adjustable wrench counterclockwise. Removing the cartridge is easy - it is removed from the installation slot with your fingers on the lever.
Disassembly of the ceramic cartridge valve
Before changing the cartridge in the mixer, the internal parts of the mixer body are cleaned of plaque and dirt using a rag and household chemicals. Replacing the cartridge with a new one is quite simple - during installation, the body projections are aligned with the grooves in the installation slot.
It often happens that after a seemingly correct assembly, the cartridge does not work correctly. This is due to the fact that the protruding rubber gasket in the lower part, during installation, prevents the two fixing protrusions on its body from getting precisely into the seats. The crane will have to be completely dismantled again, the block must be installed in the correct position and pressed down more by hand when tightening the clamping nut.
During installation, it is important not to pinch the clamping nut - this can lead to a tight movement of the joystick and compression of the body shell, causing rapid wear of internal parts and, in extreme cases, their cracking - if the joystick moves tightly, you should immediately release the clamp.
How to disassemble a ball-type kitchen faucet
The main repair of a ball mixer in the kitchen with your own hands is the replacement of gaskets; in case of significant damage to the ebb or the body shell, leading to leaks, the plumbing will have to be changed.
Before repairing the ball valve, prepare conventional tools and consumables in the form of rubber cylindrical gaskets and a dome washer.Household chemicals may be needed for the preliminary treatment of coated and corroded parts.
The main malfunctions of ball types include:
- wear on the top dome gasket;
- defects of a hollow metal ball;
- abrasion of saddle valves;
- loosening of springs.
If we repair the mixer with our own hands, then, unlike cartridge types, to accurately determine the faulty part, its preliminary disassembly is required.
Disassembling a single-lever ball-type mixer perform the following operations:
- Remove the decorative overlay on the handle, completely unscrew the fixing screw and remove the handle.
- Unscrew the upper cap with an adjustable wrench, placing it in the outer slots.
- Remove the plastic washer with a domed rubber ring and the ball from the body, take out the saddle gaskets with springs with a screwdriver.
How to disassemble a ball mixer - replacing seals
In self-repair, instructions for connecting the crane can help, after studying which it will be much easier to fix it.
But even in its absence, the repair is not particularly difficult, mainly the following operations are performed:
- Most often, valve seats are changed. To do this, they are inserted into the housing recesses together with the springs.
- If the ball is damaged, any ball repair is ineffective - it is replaced with a new one.
- The wear of the upper dome washer is very rare, and it needs to be replaced if abraded.
To speed up the repair time without carrying out a preliminary examination of the ball valve with its disassembly, it is better to purchase a standard repair kit in advance in the retail network.
Before installing the ball, it is helpful to use a silicone lubricant that is applied to the surface of the ball to better seal and reduce abrasion of the rubber parts.
Do-it-yourself repair of single-lever kitchen faucet models is a fairly simple task, even for an untrained homeowner. The main types of valves - ball and cartridge valves, have similar disassembly and assembly processes using the same plumbing and household tools.

