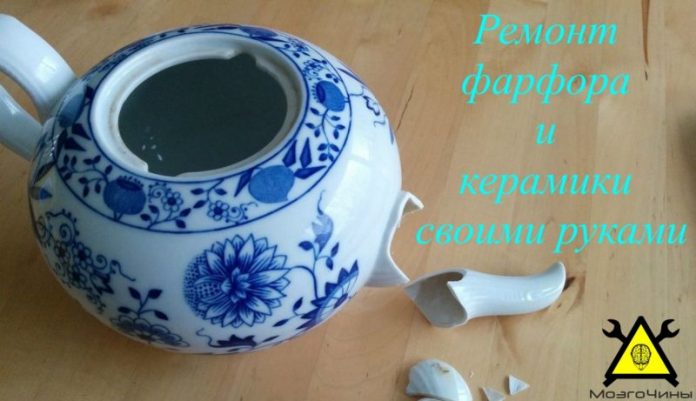
In detail: do-it-yourself ceramics repair from a real master for the site my.housecope.com.
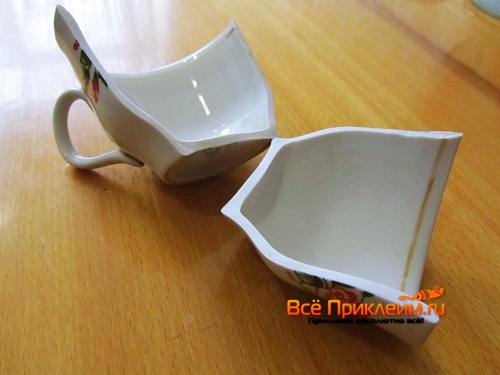
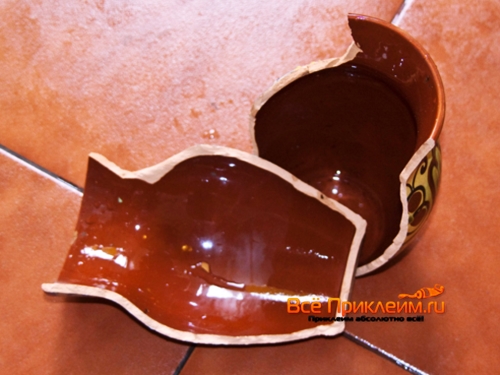
Broken glazed ceramics reveal two layers at the site of the split - a porous inner part (usually white or cream in color) and an outer glaze layer. This structure is clearly visible in the first photo: a ceramic saucer with gold ornaments before and after restoration. The photo shows the characteristic features of the ceramics: no glaze layer (compare with photo 2).
The presence of a layer of glaze distinguishes porcelain from conventional ceramics.
Try to collect even the smallest pieces from the broken ceramic object. Wrap each one in tissue paper and store until then. until the time comes to do the restoration work. Remember that if the shards are dirty, you must first wash them thoroughly.
Prepare the following materials: cotton swabs, paper towels, acetone or cellulose paint thinner, abrasive powder (optional), soft brush, bottle of child care disinfectant, matches or toothpicks, duct tape, razor blade, file, sandpaper paper and two-part glue, such as "Ardalit".
1. Each piece of ceramic must be clean, therefore, first of all, it should be rinsed and dried.
First, wash the broken edge of the shard with a cotton swab and soapy water (large surfaces can be washed off with a paper towel).
Try not to wet the ceramics too much - the water remaining in the pores will slow down the drying of the shard, and a not completely dried out shard of ceramics may simply not stick. If soapy water is not sufficient for rinsing, wipe the shard with acetone or cellulose paint thinner. As a last resort, clean up
the edges of the shard with abrasive powder collected on a match or toothpick. Rinse the shard and let it dry completely.
| Video (click to play). |
2. If after rinsing in the cracks of the ceramics there is still dirt (it is especially noticeable on white ceramics), the shard should be bleached. Remember that you cannot use household bleach for this, which together with dirt can destroy the glaze layer. For bleaching, immerse the shard in a solution of
three parts water and one part child care disinfectant.
3. Before you start applying the glue, try on the broken pieces to see if they fit well together and how many pieces have been lost.
At the same time, you will involuntarily remember in what order you have to glue the pieces together. Step 9 will tell you how to deal with the missing pieces.
4. It makes sense to first glue small pieces to each other and so move on to large pieces, which will be more convenient to glue together.
At the same time, proportion the work with the time it takes for the adhesive to dry. It is best to use a two-part adhesive for bonding, which dries within 24 hours, instant adhesive can only be used if it is a single piece of breakaway.
5. Connect the glue-coated pieces. Remove excess glue with a cotton swab.
6. If you are dealing with white ceramics, add some titanium white powder to the glue.
If the item is made of dark terracotta, you can add some powdered pigment of a suitable color to the glue.
If individual fragments of an object are lost, you will need: tracing paper, palette knife, talcum powder, ink eraser, plasticine, sandpaper, ceramic paints matching the color and (optionally) metallized paints.
7.Apply glue with a match to both edges of adjacent shards and glue them to each other. Continue glueing the shards from the bottom of the item to the top. To secure the pieces to be glued, connect them with strips of adhesive tape.
8. Let the bonded item dry for 24 hours at room temperature. Use a razor blade to remove the remaining dried glue, gently touching the surface of the ceramic. Be careful not to damage the glaze layer with the razor, especially where there is gilding or silver paint.
9. It may happen that a small piece of pottery is lost, or it may turn out that the remaining piece does not enter the hole intended for it. In this case, mix some of the two-part glue, coloring it to match the glaze (see Step 4), with talcum powder until the consistency of clay. Fill the hole with the resulting paste using your fingers or a palette knife. Let the glue cure and then sand the surface
file and sandpaper.
10. If you have lost a large piece of glass, for example the handle of a jug or the edge of a plate, mold a "shape" from plasticine. Take a lump of plasticine and with your fingers squeeze a depression inside it, repeating the shape of the lost shard.
eleven . Apply a layer of two-part adhesive to the chipped edges. Hold the clay mold in one hand and fill it with glue paste with the other (see Step 9) using your fingers or a palette knife. If you need both hands to fill out the form, tape it to the item with duct tape. After filling the mold with glue paste, leave the mold in place until the paste is dry.
12. When the glue paste is completely dry, remove the mold and sand the surface of the created piece with sandpaper. Small parts can be sanded with ink erasers. When doing this, do not go over the adjacent areas of genuine ceramics, as this may damage the glaze.
13. The dried adhesive paste should be painted over with a suitable color for ceramic paints.
Follow the pattern of the ornament, and in difficult cases, copy the pattern onto tracing paper.
14. To transfer the pattern to the surface of the dried glue paste, place a piece of carbon paper under the fry and trace the drawing with a pencil.
Sometimes you may need metallic gold or silver paint to restore your design.
ABOUT THE RESTORATION OF PORCELAIN
The most important difference between porcelain and ceramics is the presence of a glaze layer - it can be seen on
cleaved. There is a porous ceramic layer between the glaze layers.
You should not undertake the restoration of valuable porcelain - it is better to entrust it to a specialist.
If we are talking about a product of little value, you can do the following.
Remember the first rule: try not to moisten the porous ceramic layer too much during cleaning, and glue
porcelain immediately after the shard has been washed and dried.
Porcelain should be glued according to the same rules as ceramics, including glue touch-up.
After the glue has dried, it may be necessary to restore the existing one on the surface of the object.
pattern. For this, use acrylic paints to simulate the shiny surface of the glaze, and enamel paints, which are used to decorate porcelain.
Choose the colors carefully and copy the pattern as described in Steps 13-14, but never try to simulate the background, as you are unlikely to be able to find the exact shade.
Hair Crack Repair
1. Clean the area around the crack as described in Step 1 on page 158, Mix and color the two-part adhesive as described in Step 4. Place the item in the oven, set at 0 ° C, and heat until the handle will not get hot. The edges of the crack will be slightly parted, and it will be easier for the glue to get inside.
2.Remove the cup from the oven and immediately fill the crack with glue by rubbing it in with your fingers or a palette knife.
Try to fill the crack with glue as tightly as possible.
3. When the glue stops entering the crack, wipe off any residue with a soft cloth or gently scrape off with a razor blade, taking care not to damage the design on the cup. Let the cup cool.
From the book “Repair and restoration. Practical guide "
We explain step by step how to fix ceramic tiles and make them shine. For information on how to do this, as well as what materials and tools are required, see our guide - DIY tile repair.
Indeed, in everyday life, tiles can not only get dirty quickly, but also get damaged. And no matter where it is laid, it can be a bathroom or a kitchen, such situations are real everywhere.
The damage is often so small that replacing the tiles is not necessary. Well, if you have a tile set aside in case of renovation, it will make the renovation even better.
Clean damaged areas thoroughly before repairing tiles. To do this, apply the tile cleaner with a sponge or cloth according to the manufacturer's instructions. After cleaning, check that the defects to be repaired are dry and free from dirt, grease and dust.
Apply paint tape around the damaged tile, this will protect the entire tiles from all kinds of dirt and damage.
Repair cracks and other damage to the tiles using a special repair adhesive with 2-component epoxy resin. The tip of the spray gun is held directly on the damaged surface and the adhesive is carefully pushed into the gap. Apply glue thinly and then model with a plastic spatula.
Let the glue dry and cure thoroughly. This can take up to 2 hours. - Please also note the manufacturer's data. Then you can carefully remove the masking tape.
If the filling material dries out, the repaired area should be leveled. To do this, sand it carefully with fine sandpaper. Be careful not to damage the surface of the tile itself.
Now paint the cured glue with tile paint to the desired color, follow the manufacturer's instructions. The desired shade can be obtained by mixing the base coat with the selected paint color. Let the varnish dry for about 2 hours, if necessary, walk the varnish several times to achieve full opacity.
For more damage, you must replace the bad tile. To do this, remove the grout around the tile using the handy tools and then punch a hole in the center of the tile. To prevent pressure from transferring to adjacent tiles, you must ensure that the joints around the tiles are completely and deeply cleaned. Then remove the tile using a hammer and chisel (or other tools at hand), clean the backing, apply dispersion glue and insert a new tile.
This is how do-it-yourself tile repair is done. And if you just need to replace the tile seams, you can read - here on our website there is a complete instruction.
The restoration of porcelain and ceramics is a complex and time-consuming process that requires patience and accuracy. In addition, you must have certain skills in working with similar products. If you do not have experience in restoration, then it is better to entrust the work to professionals, especially when it comes to antiques.
Repairing porcelain, which has scattered into fragments, should start with collecting the fragments and comparing them. Porcelain should be glued according to the following scheme:
- Ceramics are glued only in their pure form, so it should be rinsed before the procedure.
- All fragments are compared, from small to large.
- Large fragments are glued last.
- After applying the glue, the product must dry within 24 hours.
- A special paste or mastic will help to remove traces of gluing.
Let's start with the question of how to glue porcelain. The answer is simple: glue, which is sold in the store, will help to glue the surface of the product. Having bought such glue, you can safely start the restoration. But before gluing the fragments, they need to be rinsed well; warm water and detergent are suitable for this.
If necessary, wipe the edges of the product, small and large fragments with acetone or solvent.
Having degreased the surface, it is necessary to match all the fragments: it is worth starting with small ones, since it is easier to glue large ones. If a small shard has been lost, then it can be replaced. A small amount of glue is also suitable for this, which is fixed with your fingers. The remnants of the glue are removed with a cotton swab.
If the glue remains on the surface for a long time and dries up, then it will be difficult to remove it from the product, because acetone or a solvent can damage the ceramics and erase the enamel or gilding.
After gluing, the ceramics are left to dry for a day. This time is quite enough for the glue to fix and fill the cracks.
After gluing, the craftsmen use mastic or paste based on porcelain or glass dust. With its help, it is possible to remove cracks and make the restoration invisible.
If small cracks with a cobweb covered the surface of porcelain ceramics, then such a paste will help correct the situation. But if such material is not at hand, then glue can be used. The glue is diluted with acrylic paint, imitating the color of the product, then the dishes are placed in the oven, heated to 200 degrees. When the product is hot, it is removed from the oven and the cracks are coated with glue, the excess is removed with a swab or suede.
The restoration of porcelain figurines begins with the head, since it is the face and head of the figurines that suffer the most. If it is required to restore the integrity of the coating and the pattern, then either acrylic paints or enamel are applied to the porcelain. The color is selected individually. Enamel is ideal as it is used for painting ceramics and porcelain.
If part of the figurine breaks off, then you need to glue it with glue, wipe the seam with mastic - this way it will last longer.
And how to glue porcelain if a large fragment is missing? For this, you can use plasticine. Plasticine is selected by color, treated with glue, and then the crack is filled. It is worth applying a drawing on the restored surface so that the restoration procedures are less noticeable.
Restoration of ceramics and porcelain, on the surface of which there is gilding, is a rather difficult task at home. If the item has historical and cultural value, it can be attributed to antiques or rarities, then it is better to use the services of a master. If this is not possible, then something can be done on your own.
Gilding is restored in three main ways:
- applying gold leaf to ceramics;
- the coating is restored using special paints;
- partially glued by processing the joints.
A ceramic object with gilding on its surface can be restored with gold leaf. It is applied to the porcelain surface with a thin layer, fixed with glue. The danger of this method of restoration lies in the fact that you need to dock pieces of gold leaf with an existing pattern. If you apply it to the gilding surface, then after the restoration the drawing will have irregularities.
The use of paints has several nuances: you need to choose a color, paints are applied in a thin layer. The thinner the layer, the better the gilding looks. If paints are applied to the surface of the product in several layers, it will not look too neat. The color is selected independently, it can be difficult to accurately determine the shade, therefore it is often necessary to remove the remaining paint from the surface of the dishes.
Gold leaf can be glued along the joint, and gilding is also applied along the joint. If the shade of the paint has a resemblance to gilding, then the restoration will not cause any particular difficulties. The paint is applied to the ceramics with a thin brush; if necessary, you can remove paint from the surface of the product with acetone.
Acetone or thinner will work well with paints, but this treatment may damage the item itself. As a result of this manipulation, some of the gilding will be removed along with the paint or glue that was used for the gold leaf.
Tableware made of porcelain and ceramics, which has undergone restoration at home or has just left the workshop, needs special care:
- Do not use aggressive detergents for washing dishes.
- Products are not recommended to be washed in hot water.
- After restoration, the dishes should not be used on a daily basis.
If the thing is related to antiques, then after restoration it is better to leave it in the closet on the shelf and not use it in everyday life. It is recommended to wash such a product only with warm water, then wipe it with a soft cloth.
Gradually, the seams that have been processed lose their tightness, water and reagents destroy the glue and mastic, so it is not recommended to wash porcelain or ceramics often. But it should be borne in mind that the dishes that have undergone restoration at least once will certainly end up in the hands of the master again.
The process of restoration of porcelain according to the classical rules, as exemplified by the restoration of a broken plate.
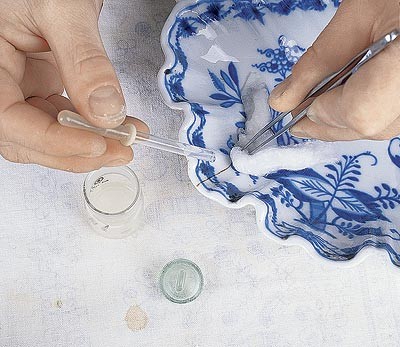 Whitening cracks with a compress
 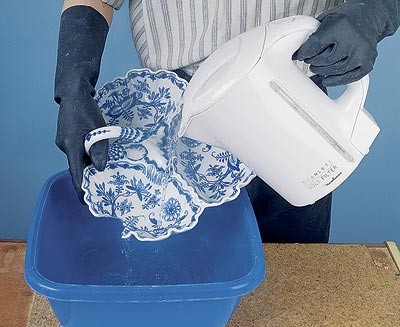 Warming up with boiling water and dismantling the old gluing
 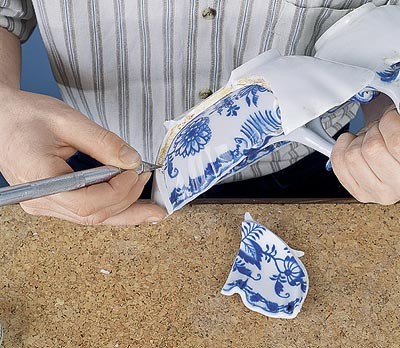 Removing traces of previous gluing
 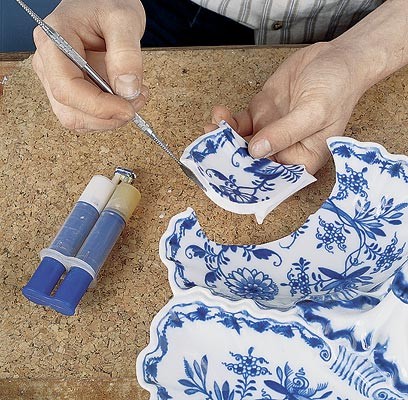 Applying glue to the chip surface
 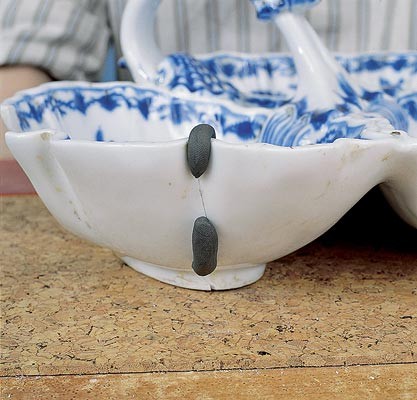 Fixing the glued fragment
 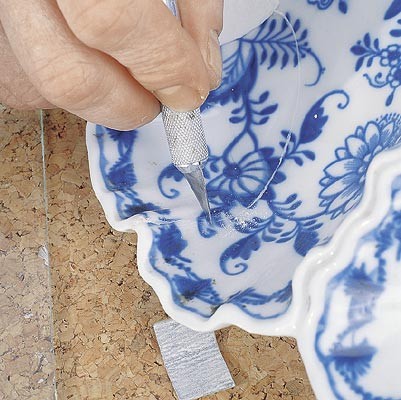 Removing glue that has come out on the surface
 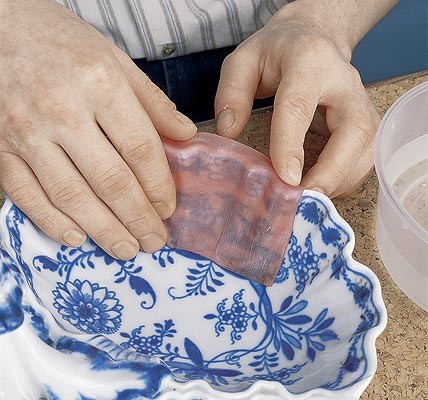 Applying wax for mold making
 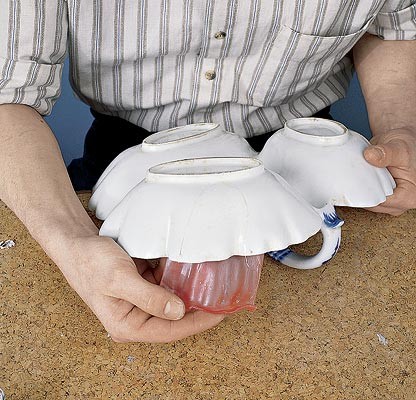 Removing the finished, hardened wax mold
 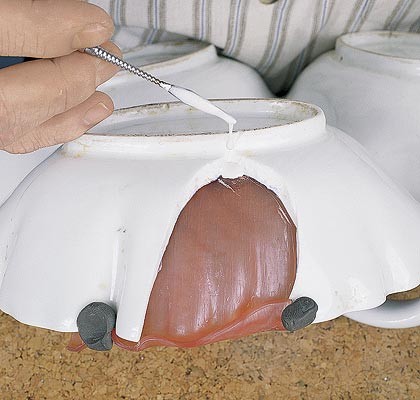 Filling the mold with a porcelain-like mass
 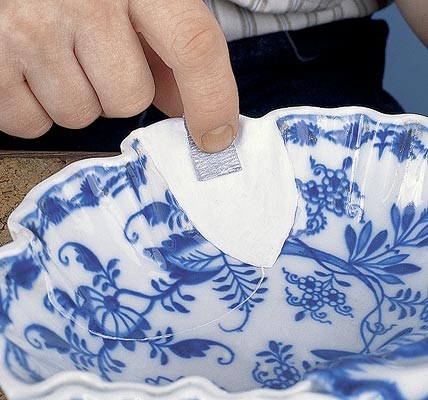 Sanding the cast piece with sandpaper
 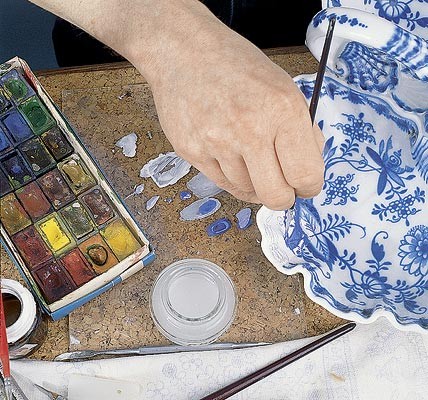 Restore tinting
finished product
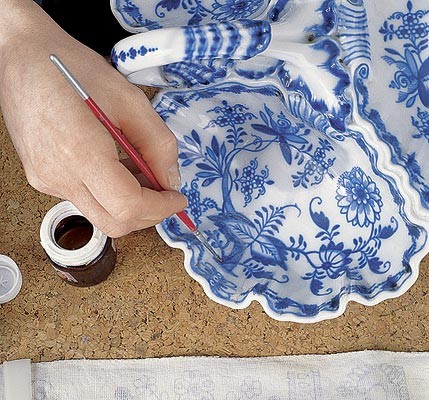 Preservation of new fragments with varnish
 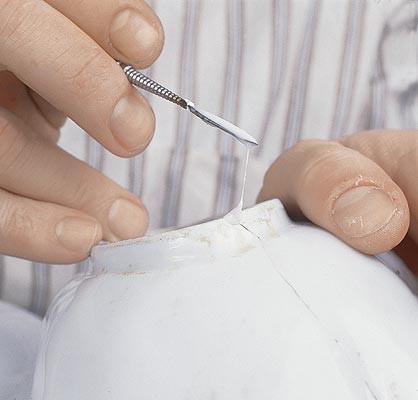 Mastication of small chips along the edges
 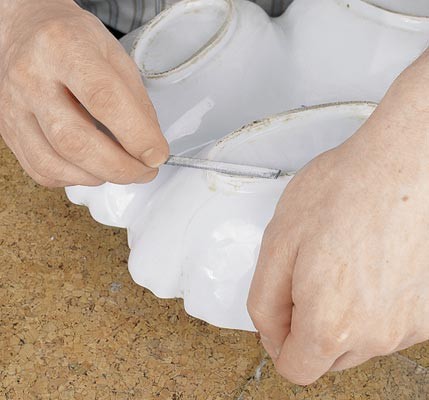 Grinding a fragment with a file
“. The shards lay on the floor lit by the setting sun, it seemed, a playful breeze scattered them at some distance from each other, and I did not want to believe that what had been my mother’s favorite cup last night, even this morning, had turned into blue porcelain petals. ”- who does not remember the sad story about the blue cup, told by Arkady Gaidar. The feeling of a hopeless, irreparable loss mixed in memory with a child's fear of broken dishes. This story, of course, would have ended in a completely different way if it happened today and if its heroes had the last issue of our magazine.
Mom’s favorite blue cup would undoubtedly be restored, so much so that Mom would hardly notice anything special. Dishes beat at all times - its fragments are either hurriedly thrown away, or ineptly glued together with BF glue.
Now we will tell you about the restoration of porcelain according to all its classical rules.
First of all, let us forestall the restoration extremists - if you are the lucky owner of Meissen or Gardner's porcelain, temper your restorative ardor and reassure yourself that you have at your disposal a truly museum piece that can only be entrusted to a highly qualified specialist.
Our advice relates specifically to the “blue cups”, that is, to those dear vases, figurines, teapots and cups, which, nevertheless, have no museum and collection value. Our teacher in such a responsible matter as the restoration of porcelain was Sergei Bobrov, the most famous Moscow restorer. He gained his professional experience while working at the All-Russian Art Scientific and Restoration Center named after V.I. I. Grabar and Tsaritsyno Museum-Estate.
Belonging to a narrow, select circle of elite restorers in Russia, the master has a high professional reputation among colleagues, collectors and antique dealers. His works adorn private and state museum collections, and they were also presented at the largest exhibition “250 Years of Russian Porcelain” at the State Tretyakov Gallery.
The work place of the restorer should have natural daylight, which is especially important when tinting and reconstructing porcelain. It would be good to protect the table with a cork or any other elastic covering, which in the event of an object falling, will weaken the impact. You should pay attention to the fact that all the actions that you perform, and their consequences must be corrected, that is, on what professionals call the reversibility of the process. In no case, even with the best intentions, should you drill, grind, or scratch the original.
Let's take a closer look at the restoration process using the example of restoring a broken porcelain cabinet. First of all, the object is carefully examined; cracks, chips, places of old gluing come to light. Then, depending on the nature and extent of the damage, a restoration plan is determined, that is, the order and sequence of restoration work. If the product is broken, you need to try to combine its pieces without gluing, find out the possibility of their coincidence, identifying the most difficult places.
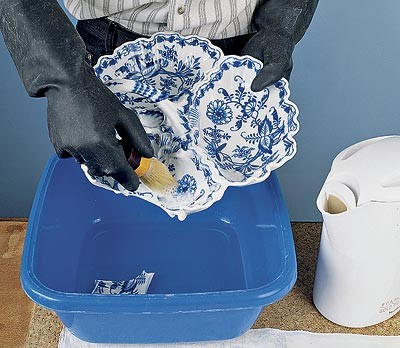
Next, you need to wash the product in hot (50-600 C) water, using any soap with a low alkali content, this can be, for example, ordinary baby soap. Dishwashing detergents and soda are not suitable for this, as they can lead to leaching or delamination of the glaze. Washing should be quite gentle - use a bristle brush or shaving brush instead of a brush. To remove dirt in the cracks, a compress is used - in this case, it is a cotton cord moistened with 10% citric acid solution or 3% hydrogen peroxide solution - applied to the darkened crack. The compress is kept until it is completely bleached. To prevent the solution from evaporating too quickly, the compress should be covered with cellophane or the entire product should be placed in a plastic bag. If the product has been glued earlier, it must be dismantled after washing.
Heat the seam with a stream of boiling water directed to the place of the previous gluing. After sufficient warming up, without applying great mechanical force, try to separate the glued fragment. If this is not successful, pour boiling water over the product and leave for a while. This can be done several times, until the fragments easily separate from each other. Dismantle it over a plastic bowl of water so that the product or its fragment will not break if accidentally dropped.
The fragments obtained after dismantling must be cleaned of old glue with a scalpel or a sharp knife. The glue heated with boiling water softens and should easily separate from the chips. If removing the glue is difficult, you can use acetone or alcohol. To avoid damage to the glaze, it is best not to use numbered thinners, solvents, or concentrated acids. When the old glue is completely removed, fold the peeled pieces to determine the order of the new glue - small pieces are glued together first.
After degreasing the surface of the chips with alcohol or acetone, carefully coat the chip of a smaller fragment with glue.
As an adhesive, you can use a two-component epoxy resin EPOXY GLUE from BONDO, BIZON or the like, in the worst case, you can use a commonly available superglue, the disadvantage of which is too fast "setting".
For a more accurate match of the fracture relief, the glue should be applied in a uniform, extremely thin layer. When the fragments are smeared with glue and tightly pressed against each other, fix the gluing place with tape, plasticine, adhesive plaster.In any case, even if it seems that the product is firmly glued, it should be left for a day to dry completely, since the “setting” and complete polymerization of the glue are not at all the same thing. After you are sure that the gluing is complete, the fragments are held firmly, remove the glue that has protruded along the seam with a sliding motion of a scalpel.
If the fragments of the product are irretrievably lost, they can be made by ourselves, but only if the thing is symmetrical or is a figure of rotation. Then, with a detail similar to the lost fragment, first remove the mold using the base wax produced by the Kharkov plant of dental materials “STOMA” in the form of 170 80 mm plates.
The plate heated in hot (50-60 C) water is placed on the remaining surface and pressed tightly. The plate should be larger than the fragment to be repaired, and go beyond its edges by about 10 mm. Carefully remove the cooled, hardened wax form and apply to the lost area. Now, having previously fixed it around the edges with plasticine, proceed to casting the desired fragment.
Clean the surface of the chip from fat, prepare a mass, which consists of epoxy resin (binder) and dry white titanium or zinc pigment. Grind them until they form a porcelain-like viscous mass. When filling a mold, you must first try to cover the entire surface of the mold with this mass, and then gradually increase its thickness, accelerating from the center to the edges. It should be noted that pigments containing lime (eg chalk) are not suitable for preparing porcelain imitations. When the lost fragment is completely restored, process it with sandpaper, gradually moving from coarse grain to "zero". Sand the surface, being careful not to touch the edges of the original piece. Now that the surface of the fragment is almost the same as the original, let's start toning the background.
For tinting, use acrylic whitewash, refining the shades of white by adding watercolors. When choosing a shade, one should bear in mind the further preservation of the product with varnish, so the color should be half a tone lighter than the original. Also reproduce ornaments or drawings on the lost fragments with watercolors and whitewash, as pure watercolors are too bright. At this stage of restoration, patience and good daylight are the main helpers, because the accuracy of the color matching determines the quality of the restoration. It is not recommended to use oil paints for toning, which can change color in the future. The process is completed with conservation, that is, coating with MAIMERI dammar or acrylic varnish or similar, in one or several layers so that the nature of the gloss of the coating completely coincides with the gloss of the original.
If, when inspecting the product, small chips are found, you need to carry out a mastic, that is, fill their volumes with an epoxy mass imitating porcelain, the recipe for which you learned above. Grind, tint and preserve in the same sequence. Now the refurbished product can again decorate a sideboard, slide or home showcase. However, drinking tea from my mother’s cup is still not worth it, now it belongs to family history. It is not possible to use food for the restored cookware - it can nullify all your efforts and adversely affect your health.
Every house has a ceramic or porcelain product. How often does it happen that dishes break. It can be a crystal goblet, a porcelain cup, a ceramic plate, or an ordinary ceramic figurine. And, despite the fact that ceramic dishes are strong, they still break. If expensive dishes were broken, then after the repair, the gluing points should be treated with special dyes, or some experts advise using liquid glass.After drying, carefully cut off the remnants, so as not to touch, the part where the repair was carried out.
I would like to extend the life of ceramics. It is not only used for its intended purpose, but also decorates the interior with its originality and uniqueness. What is better than ceramics or porcelain in terms of quality and durability is difficult to say, it all depends on various factors.
How to glue porcelain and ceramics? What kind of glue for porcelain and ceramics to choose? Or throw away the broken product? Throw out the broken vase or not? If not, how to glue a ceramic vase?
Don't rush to throw it away. You can always throw it away. First you need to try to glue the product, and if nothing works out, then you can throw it away. Throwing out is the last thing left to do.
Various adhesives are used to repair ceramics. There are a huge variety of products on the market for repairing ceramic dishes.
The universal cyano cryalate-based super-adhesive is the optimal adhesive for ceramics, which can be easily found in any specialty store.
The following adhesives of Russian production for the repair of ceramic dishes are offered for sale - "Secunda", "Super-moment", "Cyanopan", "Skley", "Power", "Monolith", "Elephant". There are also imported glues for gluing. The best waterproof ceramic adhesive is MARS.
For ceramics used for storing food, you can use PVA glue for gluing. However, it is recommended that after gluing the ceramic cup be covered with a layer of varnish. For gluing ceramic products, you can use epoxy glue, F-2 and BF-4 adhesives.
The following range of adhesives for porcelain is on sale - STANGE, "cosmofen ca-12", you can also use "RAPID". Carbinol glue should be noted among Russian-made adhesives. Also, instead of glue for porcelain repair, you can use EPOXY GLUE epoxy resin produced by BONDO, BIZON or similar adhesives.
For bonding porcelain, you can use gypsum-based cement. To do this, add the protein of 1 egg to the gypsum powder and mix very well. The resulting glue can be used to glue porcelain. Moreover, the gluing procedure should be carried out very quickly, because this glue hardens quickly.
For gluing, you can make other glue at home. To do this, mix 1 protein and soda. Belov beat until foam, without adding soda. For one day, the whipped protein should stand, and only then add soda to the settled protein and mix. Soda should be added so much that a mass similar in consistency to a regular dough is obtained.
Very often food glue is recommended for repairing porcelain, one that is easy to make at home.
- Take 1 liter of water. Add 100 gr. To the water. Sugar, 100 gr. lime (necessarily slaked). Put the resulting mixture on fire and believe on low heat for about 3-3.5 hours. The main thing when "cooking" is that it does not boil.
- Cool the resulting broth and let stand for a few more hours.
- The water that remains after settling must be drained.
- Add 0.5 kg to the mixture. tile adhesive. Mix well and leave to stand again for 10-15 hours.
- If there is excess water, then it must be drained. Boil the resulting mass 1 more time.
- Cool down. The porcelain glue is ready.
This glue is ideal for food utensils.
There are a huge number of all-purpose adhesives. These are adhesives that can be used to glue both porcelain and ceramics - casein glue, epoxy adhesives. The most popular is Porcelan Potch glue. Food-grade glue is very often suitable for bonding both ceramics and porcelain. For example, the recipe described above can be used as an adhesive for ceramics and porcelain.
It is quite easy to glue porcelain with glue at home; you can use food-grade porcelain glue for this. If you use one of the following adhesives for gluing - "Rapid", "AGO", "Kittifix" and "Mekol", then you should do the following:
- Wash and dry the gluing surfaces;
- Wipe with acetone;
- Apply one layer of glue to the bonding sites and immediately glue the parts together, pressing firmly.
- Can be fastened with a tourniquet for strength.
Cups also break very often. And I want to give a second life to your favorite cup. The following shows how to glue a porcelain cup. Since the gluing algorithm is similar to the previous algorithm, there are some differences:
- For gluing, the craftsmen are advised to take super glue.
- Prepare surfaces for gluing - wash, dry and rub with acetone. If the part breaks in the same place, remove the remaining glue.
- Collect parts in advance.
- The process for applying the glue is the same. Glued in two layers.
- Then the glued product should be placed, if they are not large in size, they should be placed in a saucepan or cauldron, filled with warm water and put on fire. Boil water over low heat for 2-3 hours. The product is put to cool in water. And only then, when the water has cooled down, they remove it.
- If it is not possible to “boil the product”, then it can be “warmed up” in the oven, or held over an electric stove (but in this case, the “warm-up” procedure must be performed very carefully so as not to overheat the product and not burn yourself).
It may happen that a crack has formed in the vase or cup, or a splinter has fallen off, and a small hole has broken out.
Then the gluing algorithm is as follows:
- Preparation for gluing is the same.
- First you need to cut out a patch, the size of which should be 0.5 - 1.5 cm larger. You can use super glue for ceramics, and natural glue for gluing the patch is also suitable.
- It is imperative to take a waterproof one for repairs.
- Pour water into the product, but start the patch, but so that the water does not come into contact with the patch.
- Then boil water for 2-3 hours.
- Cool everything down. And pour out the water.
- If necessary, paint the bonding area with paint.
Repair of porcelain figurines is done in the same way. But after the figurine has dried, it is recommended to cover it with several layers of varnish for greater durability. Each next layer of varnish can only be applied when the previous layer of varnish is already well dried. After coating with varnish, the figurine will be a little heavier and not as fragile.
It is quite simple to glue ceramics at home. You just need to follow these rules:
- We start by collecting all the parts that need to be glued. If you need to glue a previously repaired cup or vase, then remove the remnants of the glue with a knife. And when everything is removed from the surface, you can proceed to the next step.
- Wash all assembled parts thoroughly in warm water. For washing, you can use dishwashing detergent. Then rinse and drain. It is not recommended to wipe, so as not to cut with sharp edges or break something from the edges of the part.
- We hide all the details before gluing, so that we know in advance what to glue where.
- We process the gluing points with acetone.
- Apply glue evenly with a thin layer to the gluing sites. You can use either a fine brush or an ear-cleaning stick to apply the glue.
- Leave the first layer of glue to dry simply.
- Then apply a second coat of glue. And press down those parts that need to be glued. Let's keep the details for a few minutes. Then remove the remnants with a cloth.
- It is advisable to glue the other part after a while, so that the previous parts stick well.
- After the product is glued, it is desirable to fix it. And in this way everything will be grasped not only correctly, but also well.
- A part is considered well repaired if it has stood for 1-3 days (depending on the repair performed).
Since the broken parts are still glass, it is recommended to wear rubber gloves during repairs in order to protect your hands from small cuts and wounds in advance.
When gluing, tweezers can and should be used as needed, for example, for working with small parts.
It is very easy to repair porcelain and ceramics according to the above algorithm.
Do not forget that all refurbished products are no longer desirable to be used for food. Because if, after placing sour or salty food in such a product, harmful substances that are contained in the glue will begin to be released. And this is very unhealthy.
As a result, you know how to glue ceramics, how to glue ceramic dishes and how to glue porcelain. How to choose glue or prepare glue with your own hands.
| Video (click to play). |

