In detail: do-it-yourself computer keyboard repair from a real master for the site my.housecope.com.
When a computer keyboard breaks down, you shouldn't immediately throw it away and run after a new one, even if it's cheap. Believe me, repairing a computer keyboard is not so difficult, and sometimes it is simply necessary (when, for example, a breakdown occurred at night, and the next morning you need to finish an important project).
In most cases, the reasons for the failure of a computer keyboard are typical - it is damage to the PS / 2 computer keyboard connector or its contact matrix. The connector deteriorates, as a rule, due to inaccurate handling of the cable - in particular, if you have a habit of putting the keyboard on your lap and rolling on a chair so that the wire is stretched as much as possible.
The matrix deteriorates from the fact that liquid gets inside the keyboard - coffee, cola, beer, etc., or if it is not cleaned correctly.
Damage to the electronics of a computer keyboard is a rather rare case, and then, as a rule, repair is inappropriate. However, it depends on the price of the keyboard and the degree of interest in the repair process.
Connecting a defective computer keyboard to the PS / 2 connector does not pose a particular danger to the system unit, since the keyboard is powered by 5 V, which is not fatal to the controller even if it is short-circuited.
The first thing to look for when diagnosing is the behavior of the Num Lock, Caps Lock and ScrollLock indicators when the PC is turned on. If the LEDs do not light up, then the keyboard cable, or rather the connector, is most likely damaged. To eliminate this breakdown, it is necessary to disassemble the keyboard and ring the four wires of the cable with a tester for an open and short circuit.
| Video (click to play). |
Calling, of course, is necessary by disconnecting the cable from the keyboard board. A break occurs much more often, so you should carefully inspect the cable (inside the keyboard it is usually connected with a connector that can be easily removed), and if there is no external damage, then the matter is in the connector. When an internal short circuit has occurred, it is easier to replace the cable or shorten it by cutting it to a problem area.
If, when you turn on the PC, the LEDs on the keyboard are constantly on, then something is wrong with the electronics board. Having disassembled the case, it is necessary to carefully inspect the insides for breaks and shorting of contacts, as well as the quality of connecting the films to the contact pad. Finally, with continuous blinking of the LEDs, it can be assumed that the keyboard controller on the motherboard is damaged. In this case, it is not worth repairing the computer keyboard on your own, it will be better if you contact the service center.
If the behavior of the LEDs on the keyboard is normal, but some keys do not work, then most likely it is necessary to repair the film matrix. And here you should be especially careful not to damage the connector that connects the matrix to the printed circuit board. The fact is that it is impossible to solder the film - it is possible to glue it with conductive glue, but this is quite difficult to do.
Hello readers and guests of my blog! Today I would like to present to your attention a post on the topic of repairing a computer keyboard. What is the purpose of the computer keyboard, I think everyone knows who at least once had a chance to deal with working on a computer. Directly consider keyboard malfunctions and repair.
Many probably know that a computer keyboard is of various shapes, has any additional keys that are convenient for any functions. Take the multimedia keyboard, for example.It usually has a row of buttons located at the top of it. For example, play, stop, pause, forward, backward, shutdown, etc. Convenient isn't it? It's all good as long as it works. And as soon as it ceases to function normally, many people think to buy a new keyboard. This is also a solution that is often economically viable, as a new keyboard costs between $ 8 and $ 80. But you and I were not born in vain on the territory of the former USSR and we are not alien to the feeling of curiosity and insufficient financial condition. Therefore, for many, even 10 dollars is already money. From this we have no choice but to pick up a screwdriver, a soldering iron, a tester and go ahead to save the dead or half-dead Klava.
1. The keyboard does not work at all ... The main reason is a broken wire in the cable connecting the keyboard to the computer. This occurs at the base of the keyboard or near the connector. To check if this is the case, restart your computer and observe the state of the LEDs on the keyboard, which are located in the upper right part. At a certain moment, on a working keyboard, all three LEDs should flash and go out. If this does not happen during loading, and after loading they also do not light up, then you need to ring the wire.
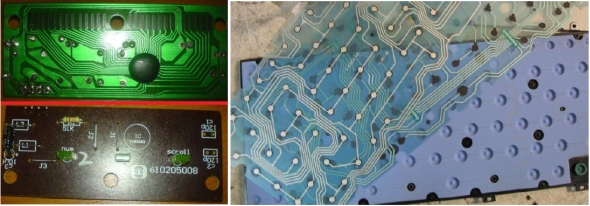
To do this, turn the keyboard over and unscrew about a dozen self-tapping screws on its back with a Phillips screwdriver. Carefully remove the cover and you will see a film with tracks and a small printed circuit board. On it there will be a small microcircuit in the form of a black drop.
The wire is soldered to the board. Use a DMM in resistance or diode continuity mode to test the cable. The latter mode is much more convenient, since there is a sound signal during a dial tone.
Ring all the conductors of the wire, and if at least one conductor does not ring, then the replacement of the wire is inevitable. Sometimes it is enough to bite off a part of the wire at the place where it passes into the keyboard. There are often broken wires. Use every opportunity. It also happens that the microcircuit fails and then you will not be able to revive the keyboard. You can go and buy a new one. Oh, I almost forgot to give you another reason. For example, you rearranged the system unit and disconnected all the wires from it. And then they began to connect and in a hurry they hit the socket badly and thereby bent one or two pins in the PS2 connector plug.
They turned it on, but the computer does not see the keyboard and it does not work. Therefore, carefully inspect the connector and if you find bent pins, align them with a fine needle and tweezers.
2. Several keyboard keys do not work ... This can happen for several reasons.
The first reason. Liquid has been spilled on the keyboard. For example, very often users sit at a computer with a cup of coffee or tea. It's nice to drink in front of the monitor, but this sometimes causes problems. The glass turned over and poured the claudia. In this case, you must immediately disconnect it from the computer. How it can be reanimated in this case will be described below.
The second reason. The contact pads under the keyboard buttons or conductive rubber are worn out. In this case, minor damage to the tracks can be repaired using special conductive compounds applied to the damaged tracks and the base of the conductive rubber. I would like to note that repairing a computer keyboard is not always possible when its service life is no longer short. For those users who are engaged in typing, repairing the keyboard is generally not advisable, since the keyboard wears out too quickly.
Well, now let's directly move on to repairing the keyboard when liquid is spilled on it. Naturally spilled liquid may contain sugar, milk and other undesirable constituents.Therefore, the disassembly of the keyboard needs to be complete in order to rinse all its filling with alcohol. First, we need to capture all the keys in order to access the space under the keys.
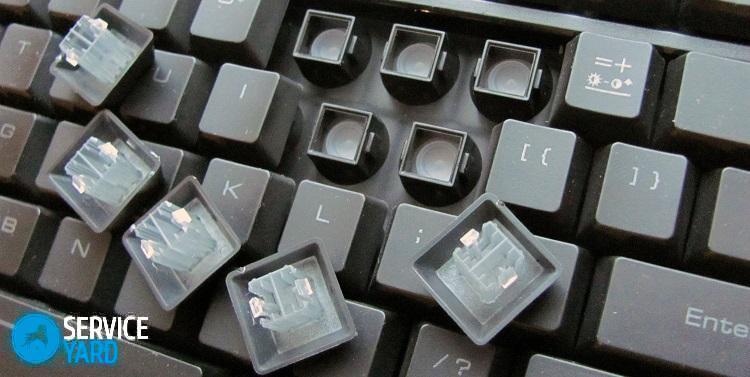
To remove the key, use two thin screwdrivers or better use two wire loops. The wires are wound under the key from both sides and by pulling on them the key easily snaps off. Before removing the keys, sketch their location so as not to confuse them later during assembly. After removing all keys, set them aside. Turn it over and unscrew a dozen, one and a half screws from the back side.
This removes the back cover of the keyboard.
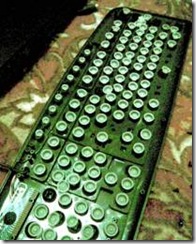
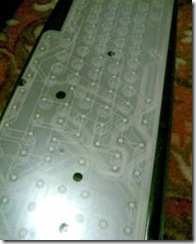
Peel off the tape carefully. It must be very carefully wiped with a cotton swab with alcohol, to remove the remnants of the spilled liquid.
Then let it dry well. Then wipe the surface with a cotton swab and alcohol under the keys. Now, after carrying out all the above-mentioned manipulations, install the film with the tracks and screw the back cover of the keyboard. Now all that remains is to replace the keys, connect the keyboard to the computer and turn it on.
Setting up operating systems, PCs, laptops, ASIC Antminer.
So, the keyboard is flooded, the buttons do not work partially or completely.
DO NOT PANIC! We read the article!
Warning:[/ u]
all material presented in this article is exclusively
for informational purposes only and the author of the article is not responsible for
the consequences of your actions. In addition, you should know that outsiders
tampering removes your laptop from warranty service. So
if the keyboard of your laptop is out of order, and the case is under warranty, then
You should definitely contact an authorized service center.
Some skills and tools are required for a successful repair.
[hide =] The main reason for keyboard failure is violation
conductive paths inside the keyboard due to flooding it with liquid
(rotting, short-circuiting of tracks). The first thing to do with
a flooded keyboard - rinse it with distilled water (it will go and
usual, but better distilled). Then you need it first.
dry thoroughly with a hairdryer, and then leave to dry for at least
1-2 days.
If after that the keyboard still does not work, you need to disassemble it and restore the tracks.
For repairing tracks, conductive glue is suitable for restoring heating tracks for the rear windows of a car.
First, remove the keyboard:
Then you need to dismantle the keys. The key itself, most often, consists of
two parts: elevator and pad keys, but on some keyboards
you can add a spring-loaded element here. To remove the keys
a dental hook or instrument is best suited
similar shape from engineering kits. In principle, you can get by
thin watch screwdriver. The key pad is latched to
lift, there are from three to four connection points, it is worth noting that in
in the case of three - one, and four - two mobile connections. US
first of all interested in a fixed connection, it is necessary to insert
hook between these fixed connections into the gap between the platform and
lift. Which side are the fixed fasteners on? This is already
you can find out by removing at least one key, but most often this is the bottom
part of the key.
The photographs show the elevator in the raised and lowered
condition. In the raised one, the attachment points to the site are clearly visible
(upper movable, lower fixed).
Next, you need to remove all the elevators. Since everything is already available here
look - there should be no difficulties, there are also mobile ones,
there are fixed mounts (in the photo, the top is movable, the bottom is
motionless), it is easier and faster to shoot, as a rule, from motionless, but there is
and exceptions.On more or less modern keyboards, elevators have more
degrees of freedom, they can not only fold (rise and
lower), but move relative to each other when folded
condition. In this case, it is easier to extend the movable part of the elevator to
maximum (its attachment will go beyond the holding frame) and raise the lift
entirely, after which already release the fixed part from the "vice".
Having removed all the elevators, it will be possible to remove part of the
keyboards with spring-loaded elements, and polyethylene boards with
the paths drawn on them.
On fairly old keyboards, the parsing method can be somewhat
differ, an intermediate stage of removing the edging with plastic will be added. V
In this case, you will need a hair dryer or a soldering iron with adjustable
temperature. Need to melt the plastic on the back
keyboard. When assembling, if possible, then melt the fasteners again
to get the hats, if not, then drip on
a quarter of a droplet of a supermoment or its analogues. Such keyboards are more often
in total do not have a layer with spring-loaded elements, these elements
made in the form of separate rubber caps. Third from the top
the photographs just clearly show that on the part of the keys of these elements already
no.
Now let's move on to the main part of the keyboard - plastic boards with
drawn paths. Polyethylene parts - three, two with tracks and
one blank to provide a gap. Two parts with tracks most often
connected to each other along one of the edges and constitute, as it were, one
part, just this part folds in half (at the place of the fold and
go through the connecting paths), but there are exceptions, for example, on
the photographs are three separate parts, there is just a contact pad for
connections. As a rule, on older keyboards, these three parts are not glued.
between each other (there are two or three spot gluing points), but more or less
fresh is a problem. You can't just disconnect it, just
by pulling, you can tear off the tracks at the intersection with the glue. So
we arm ourselves with a hairdryer and a scalpel (or a clerical knife), and slowly,
starting at the corner of the keyboard (when I say keyboard I mean
polyethylene part), we begin to separate the layers. Glue most often has
blue color. Remember to heat the glue well with a hair dryer before
to divide some area. Take your time - even if somewhere you cut off
track, it can then be restored, but if the tracks are torn off
there will be many, it will be a big problem to restore them.
So the layers are corroded. If you can see the remnants of the liquid that was once spilled -
it is better to rinse this part of the keyboard again and dry it again. More often
total damaged tracks can be seen with the naked eye, but check
tester still follows. In theory, all damaged areas need
redraw, but not always possible (too close
paths are located), and this is not always necessary, on a well-washed and
On a dried keyboard, the corrosion process practically stops. Everything
tracks should have a resistance close to 0, most often 1-2 ohms at
large distance of the measured points - not critical, but in theory the tester
should show short circuit. The damaged track may not ring at all or
have a sufficiently large resistance, in this case it is necessary
lead a path over the decayed one. If the track has rotted all the way down to
contact pad, you will have to carefully clean the area with a scalpel
directly next to the site. The actual drawing process can be seen on
photographs. Remember to check the resistance after the glue has dried.
After the end of the drawing, and the drying of the new tracks (1-1.5 hours),
it is worth collecting the polyethylene part, placing it on an aluminum pallet and
put a part with spring-loaded elements on top. In this form
carefully connect it, start the laptop and check if all the keys are
work. To check, you can use a regular notepad or
special program:
There must be 1 (one) message on the forum
If all keys work normally, you can turn off
laptop, disconnect the keyboard and finish collecting it. Perhaps,
there was only one nuance left with the installation of the keys, more precisely with the key pads. After
installation of elevators, platforms are installed, as a rule, a platform is needed
lower on the spring element in the center, then click on
the platform strictly vertically downward until it clicks.
P.S.
Dear readers, the author is not able to know and remember all laptops,
therefore, answer with 100% probability how one or another understands
the laptop just can't. However, if you correctly ask your question
in the forum (with a MANDATORY exact indication of the model of your laptop), then
most likely get the right advice. Most fastening methods
discussed in the article, while the author operates with photographs from the Internet.
The original article is on the site: _ There should be 1 (one) messages on the forum [/ hide]
The keyboard is an integral device for the operation of personal computers and laptops. The breakdown of this component makes work and leisure at the computer completely inconvenient. Are the malfunctions with the input device removable? How do I fix the keyboard myself? We will analyze this issue in detail and in this article.
It's no secret that these devices can have different shapes and additional keys with appropriate functionality. Even take the same multimedia keyboard, which has a number of special keys at the top. Pretty convenient, right?
But what to do if several keys have stopped doing their work or the entire keyboard is completely out of order? Without a doubt, you can buy a new device, but then you need to be ready to allocate 10-100 dollars for a new device. Why waste money if you can bring your old device back into working order? Prepare a soldering iron, Phillips screwdriver, tester, and read the troubleshooting guide for multiple cases.
The most common cause of a breakdown is a broken wire connection inside the USB cable, which we are used to using to connect an input device to a computer.
Important! Most often, the break occurs at the base of the keyboard itself or near the connectors for connection.
In order to establish the exact cause of the breakdown, you need to look at the operation of the LEDs, which are usually located in the upper right corner of the device. If the keyboard is “working”, then all three lights should flash and go out during the restart of the computer. If this does not happen, then you need to arm yourself with a multimeter (or any other testers) and ring the cable. To do this, you need to do the following:
- Turn the device over, take a screwdriver and unscrew all the screws that hold the cover.
- You will see a “tape” in front of you with a lot of tracks. Also inside the keyboard is a printed circuit board and a small microcircuit, which is a black blob.
- The wire itself must be soldered to the board. We need to check the integrity of his connection with her. We take a multimeter, turn on the ohmmeter on it and call the desired area. You can also ring the diode, which is much more convenient because of the sound signal.
- If at least one “vein” does not ring out, then replacing the wire with a defect cannot be avoided. You can try to bite off the part of the wire that is located at the place of passage into the keyboard case with pliers.
- If everything is in order with the wires, then the matter is most likely in the microcircuit itself. Then you will definitely have to run to the store for a new one.
- Chances are, the problem is with the connector itself. Examine it carefully for defects and align the bent legs with a thin hard object, if any.
We figured out the return of the whole device to life, but how to fix the button on the computer keyboard?
Often we spill something on the desktop, and it’s good if the liquid doesn’t get on the keyboard from the computer, because if the keyboard gets wet, then several buttons or all of them may fail to work. Also, strong mechanical stress, which sometimes happens accidentally, can lead to partial damage. What to do in all these cases? Let's talk about each method of how to fix the keyboard in detail.
Is your favorite tea on the input device? Immediately disconnect the gadget from the computer and wait until it dries completely. If after that several buttons became unusable, then the following recovery method will help you:
- Remove all keys in order to access the space under them. Use thin objects or copper wire loops for this.
Important! If you are a novice user, we recommend that you save a photo of the location of the keys to your computer so that the assembly goes smoothly.
- Put the keys aside and turn the keyboard over. Now unscrew about a dozen screws holding the cover.
- Remove the cover and the film with tracks, very gently wipe them with a cotton swab, which should be moistened with alcohol. Let the film dry completely.
- Again, take a cotton swab moistened with alcohol and wipe the space under the keys.
- It remains to collect everything back and check the device for performance.
The keyboard device contains contact pads and conductive rubber. They are all located directly below the keyboard buttons. Sometimes minor damage to tracks can be repaired using special compounds capable of conducting current. They are applied to the tracks and bases of conductive rubber. But repairs are not always possible if the device has been used for a very long time.
Important! Users who are fond of typing can generally forget about repairing it, since there is no point in it. Quick wear will bring everything back into place.

