In detail: do-it-yourself electric stove burner repair from a real master for the site my.housecope.com.
In this article, I will tell you about everything you can do with your own hands when your electric stove or hob is broken.
First, let's define what you can do yourself and what not. Plates are electromechanical and electronic. In this article, and indeed on the site, I will not consider electronic stoves and hobs, since the field of electronics ... Let's just say that electricity is just a small piece of electronics in the modern world. I can also say so. To understand electricity, to a greater extent, it is enough to know Ohm's law and understand it. In electronics, even if I now begin to list in simple words, everything will drag on for a very long time. So, regarding the electronic hobs, I will briefly touch on them, but I will not disassemble the repair directly. Before you start reading further, if you are going to disassemble the stove, be sure to read the electrical safety instructions. When you read the instructions just click on the "back" button and you will come back here.
Actually, there are literally several faults and I will divide them into points:
Well, now, let's go in order and consider each point in detail.
To do this, you need a multimeter. The voltage will need to be checked in the outlet (first of all), in the terminal block of the stove, on the burner mode switches, on the heating elements themselves. How to measure voltage with a multimeter is written here.
So, we disassemble the socket for the electric stove and measure the voltage. If it is within 220-240 volts, then everything is in order, but do not rush to close the outlet. Carefully insert the plug into the socket, turn on the hob and check the voltage again. If it suddenly disappeared, then you have a problem on the supply line and not in the stove. If you are using an outlet like the RSH, as in the photo, then turn off the power, make sure it is not there, and do two manipulations.
| Video (click to play). |
- It has been very difficult to find a good socket for an electric stove lately. If the socket is behind the stove, I recommend replacing it with U739M clamps. But if you just need an outlet, then you need to pay close attention to the correct connection of wires to it. In the photo you can see how the contact was deformed. This is due to the fact that the wire was simply inserted into the terminal and tightened. It seems that you tightened it tightly, but in fact, the wire is almost not tightened due to the deformation of the contact. Therefore, in low-quality sockets, a ring must be made from the wire and only then tightened. The tightening in this case, at least, will be reliable.
Next, you need to pay attention to the contacts. In the photo, a blue circle indicates a contact in which the plug will not provide a reliable connection. Therefore, the contact plates must be straightened as shown on the right contact, circled in red, to ensure a secure connection. If the metal is flimsy, then you need to do this every time you pull out the plug (in any case, if you do not bend it, then check the condition of the contacts). All this can be avoided by using U739M clamps or any others like them. Plug in the plug and go to the next step.
In the terminal block, a different burner is connected to each phase contact. Thus, if one or two burners do not work for you (especially if you installed a new stove yourself), then there is a high probability that you forgot about the jumpers or forgot to tighten them. It may be that you tightened the jumpers loosely. And weak contact causes heating. If you are interested, you can find out what the current does to the wires. If the stove does not work completely, then there is hardly a problem in the terminal block, most likely a problem in the power supply.
Now you need to turn on the power to the plate and check the voltage at the terminal block. You need to check by touching the screws themselves, not the wires. Moreover, check each screw. So you will understand if there is voltage at the terminal itself if the wire is not clamped correctly. That is, zero and first screw, zero and second screw, etc. If everything is in order and there is tension, then you will have to disassemble the stove.
After disassembling the plate, look at the connections on the back of the terminal block.
Conclusion on checking the voltage: if the stove does not work completely, then you need to check the jumpers, there is no point in checking the voltage in the outlet. If the stove does not work completely, then you need to check the voltage in both the outlet and the terminal block (if there is voltage in the outlet), since there is a possibility that there is no contact in the plug or some problems in the wire. If any one burner does not work, then go ahead.
If you have not yet read the article that was mentioned just above and which tells what current does to the wires, then read it. The main unpleasant property of weak contact is that when it heats up, the contact can disappear and then reappear. Therefore, if something works for you, then it does not, then you need to look for a weak contact. Unfortunately, this will have to be done under voltage, consistently going through the circuit, so be careful and attentive.
To begin with, there are three types of switches. They are all mechanical, but differ in the way they work.
- step power control
- smooth power control
- smooth power control with the ability to turn on an additional area
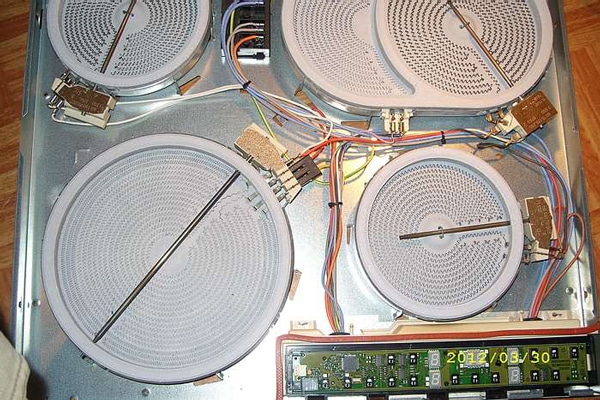
Accordingly, each switch uses its own cooking zones. The step switch uses a hotplate with several heating elements. You can find everything about such a hotplate here. The temperature on the hotplates with these switches is adjustable in steps and has fixed positions.
For the switch with continuously adjustable power, burners with one spiral are used. Therefore, such a burner, if it burns out, then once and for all. Unlike burners with several spirals (they were discussed in the previous paragraph), which continue to work partially, but do not give out maximum power. You can regulate the temperature on such burners smoothly within a very wide range, almost like on gas stoves.
For a continuously adjustable switch and an additional area, burners with one spiral are also used, but the burners have two areas. Consequently, a malfunction can manifest itself in two ways: one area does not work, or both areas do not work.If only one area stopped working, then it is more likely that the reason is either in the switch or in the hotplate, if both areas stopped working at once, then most likely the power to the hotplate or the problem is in the switch.
What about this item? Since you will be working with dangerous voltages, you need to be very careful. Turn on the switch and check the voltage on the hotplate. If there is voltage, but the burner does not work, this can indicate two malfunctions - the burner burned out or the burner thermal fuse (if any) is faulty. If there is no voltage, but it comes to the terminal block of the plate, then the problem is purely in the switch.
Basically, there is only one step switch malfunction. Poor contact leads to heating of the contact plates and either burns out the contact or deforms the switch guides. In this case, only a close inspection of the switch will help determine the malfunction. If you see darkened terminals, then the switch will have to be changed, since it cannot be repaired at home. You can only postpone his death for several days / months.
I wouldn't repair the continuously variable switches either. There are a little more malfunctions, but they all boil down to the fact that there is a breakdown of the bimetallic element. The principle of operation of these switches is that a current flows through the bimetallic plate, causing the plate to heat up, which in turn leads to reversible deformation of the plate. As soon as the deformation reaches a critical point, the switch changes the position of the contacts, closing or opening the contact plates of the power supply of the burner. If you repair such a switch, then setting up the correct activation and deactivation of it is quite problematic. In this case, the hotplate will either not reach full power or will not turn off completely.
Before changing the modulating switch with additional area, it makes sense to disassemble it first. There are two types of malfunction: the additional area does not turn on and does not turn off. In the first case, you need to look at what prevents you from turning it on, in the second case there is such a moment as welding the contacts. In this case, the contacts are opened, cleaned with a sandpaper or file until the contact pads are even, and this may solve the problem for a long time, or it may not. It all depends on the quality of the material of working contacts.
The task of the timer in the stove is to ensure that you have the possibility of automatic cooking. That is, you can set the on and off times, select the cooking mode, place the dish and the stove will turn on and off by the appointed time. Most often, the timer controls only the oven, but there are models in which one of the burners is also connected via a timer. The oven will not work until the timer has been set. It is not necessary to set the exact time, it is much more important to simply set it. The correct time does not affect the workflow in any way, it is rather intended for your convenience, so that you can correctly navigate the time by which you need to prepare your dish (for example, in the morning or reheat food for dinner).
Actually, if the timer is faulty, either only the oven or another hotplate will not work for you, if it is connected via a timer.
In part, I considered the repair of EKCH burners, where all malfunctions of burners with several spirals are written. The troubleshooting methods are suitable for all cooking zones. Here I will dwell in a little more detail on modern burners.
Therefore, it is possible to designate malfunctions:
If power comes to the burner (to the yellow and blue contacts), but the burner does not work, then two reasons can be distinguished: the contacts of the temperature sensor do not close or the spirals are burned out.If there is no thermal sensor, then the most likely cause is the combustion of the spirals. But everything must be looked at in place.
Let's summarize and briefly go through troubleshooting.
- We determine the presence of voltage starting from the outlet, if the stove does not work completely and then in series: terminal block, switch, thermal fuse (if any), burner.
- Having found a faulty area, we try to repair it. If it cannot be repaired, we will change it.
- When replacing a burner, remember that EKCH burners can be used in circuits where regulators with smooth switching are installed, but not vice versa.
- We do not forget that we are working with dangerous voltage, therefore, we observe safety precautions.
In the article, I tried to consider as much as possible all possible malfunctions of mechanically controlled electric stoves. Some of the faults are suitable for electronically controlled cookers. In principle, mechanically controlled plates are easily repaired at home, but it is better to entrust electronic plates to specialized workshops.
Repair of hobs with touch controls is discussed in this article. Although this is a separate article, it is a kind of supplement. If you have a purely mechanical control, then you can read the article on touch control panels only for self-development.
If you've read it, well done! Well, I say goodbye to you.
Thanks to such a versatile energy as electricity, the popularity of electric stoves is growing. This site has an article on how to connect an electric stove, and this page describes common problems, methods of identifying and eliminating them.
In many cases, a home craftsman or an ordinary user can make repairs to the electric stove with his own hands, without resorting to expensive specialist services.
Electric cooking
Regardless of the model of the electric stove and the type of burners used, the identification of the cause of the failure of the electric stove should be carried out according to the following algorithm:
- Check with a voltmeter for the presence of a supply voltage (it is possible that the circuit breaker on the stove connection line has tripped, the wiring is damaged, or the outlet is faulty;
- Make sure that the plug and the power supply cord are in good working order - the glow of the control lamp or electronic indication on the control panel automatically excludes this malfunction;
Disassemble and check the power outlet
Troubleshooting the electric stove
The task of any repairman is localize the problem... Having gone through this algorithm step by step, you can repair the electric stove with your own hands, having a small set of tools available and having limited knowledge in electrical engineering.
The most important condition on which not only the successful repair of the electric stove depends, but also the safety of the master and those around him, is knowledge of the basics of electrical engineering and electrical safety.You also need to be confident in your abilities - some measurements will have to be made with the voltage turned on.
From the tools for disassembling the body of the electric stove, you will need screwdrivers with suitable tips, perhaps a set of keys, pliers. For work inside the case, depending on the detected malfunction, you will need a soldering iron, wire cutters, electrical tape or heat shrink tubing.
Repair tool kit
Sometimes it is possible to identify a problem only by visual inspection (carbon deposits on the contacts, or a soldered wire). But, practice shows that in most cases it is impossible to repair an electric stove without measuring instruments.
Inspect the connections to the terminals
The most acceptable would be to use a multimeter - a multifunctional measuring device, which should be used by any master dealing with electrical engineering. In some cases, you can get by with a voltage probe and a homemade continuity from a light bulb and a battery.
If the mains voltage is normal, and the stove suddenly stops working after switching on, then it is worth checking the outlet itself - perhaps it does not correspond to the power, or the contacts are worn out, and they spontaneously bend during the heating process.
There are cases that in electric stoves with mechanical regulators and burner power switches, the control lamp burned out long ago, and the stove itself stopped working properly much later. At this stage, without starting to disassemble the case, it is possible to identify a malfunction in the switches, including various burners and switching modes their work.
The two burners of the electric stove do not work
If it is found that some of the heaters are working, albeit not at full capacity, then the malfunction of the power cord can be excluded, and you need to look for problems in the switches or in the spirals of the burners.
It is unlikely that all burners will burn out at the same time (although this is possible if all heaters were running during a power surge). Therefore, if there is no response to manipulation of the switches, the voltage may not be supplied to the controls.
Since electric stoves and hobs come in a variety of shapes, sizes and designs, there is no way to describe them all in one article, so the user must independently figure out how to disassemble the case. But the presence of thermal insulation is common to all types of electric stoves and it is necessary to work with it very carefully.
Various designs of electric stoves
If the thermal insulation layer of the electric stove is significantly damaged, its energy efficiency will decrease, as well as the readings of the temperature sensors will change, which will entail the stove's malfunctioning in the future.
It must be remembered that it is necessary to work with glass wool thermal insulation only with thick gloves, and the asbestos dust of the thermal insulation gaskets of old electric stoves is harmful to health.
Having disassembled the body of the electric stove, it is necessary to study the internal structure of the equipment, determine the type of regulators, switches and heaters. It will be very handy to have in stock plate layout... But even without a circuit, knowing the basics of electrical engineering, you can understand the heater control system and identify the problem.
Attention, the following verification methods are contrary to the user's instructions, which prohibit turning on the electric stove when the case is disassembled, so you should be very careful!
If the electric cooker does not work at all, you should check for the presence of voltage at the input of the switches or the electronic control circuit. Imported electric stoves with an electronic control unit are vulnerable to power surges, and very often problems in them are not related to damage to the heating elements.
Electronic control unit for electric stove
If the power cord is OK, and the voltage is on, and the display does not light up, then the internal fuse of the electric stove control unit may have blown. But the indication of a working display does not always guarantee its performance - perhaps there was a breakdown in the power switching relays.
The most accessible way to check the control unit is to check the voltage supply to the terminals of the burner heaters. If the voltage comes in, but the heating element does not heat up, then you need to disconnect the electric stove from the outlet, then disconnect the terminals from the heating elements and ring them.
Checking the supply of voltage to the terminals of the coil of the burner
It will be safer if you first attach special crocodile clips to the terminals of the heating elements, which are put on the measuring probes, and then apply voltage. If only part of the burners is working, then it will be more expedient to ring the heaters first, and only then look for an open circuit in the power circuit. It must be remembered that heating elements can have several coils - the heating power is regulated by the way they are connected together.
If a burnout of the filament or a breakdown on the case is detected, the damaged heating element should replace.
If the stove is old, then it is worth replacing the burned out heaters with more advanced and economical ones. The best electric heaters have proven themselves for electric stoves.
If the continuity of the spirals did not reveal any malfunctions in them, then the cause should be sought in the control unit. As already mentioned, heating elements can have several built-in coils, which are switched using switches or electronic relays. In both cases, a large current flows through the contact groups, from which carbon deposits form on them.
Switch for operating modes of the electric stove
Let's say the heating element of an electric stove has two spirals: C1 and C2. For their switching, a three-position switch with three contacts can be used: K1, K2, K3.
Connection diagram of a heating element with two coils
When K3 is turned on, both spirals are connected in series and will work at half their capacity. When K2 is turned on, the C1 spiral will heat up at full strength. The maximum heating will be obtained with the simultaneous closure of K1 and K2 - two spirals will be connected in parallel. All other possible options are meaningless and should be excluded by the switch design itself.
To fix such a switch, you need to disassemble it and get to the contacts to clean them with sandpaper or a thin flat file. You also need to check the tension of the hold-down springs and the fit of the contacts. Cleaning the surfaces, tightening the springs, and bending the contacts will help fix the problem.

