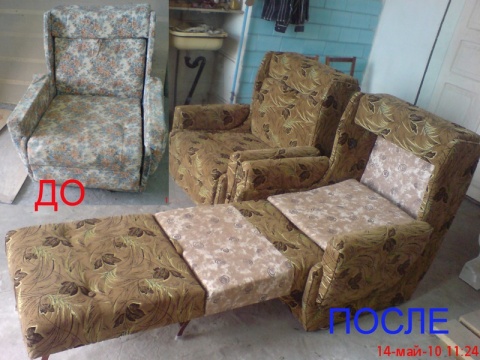
Do-it-yourself chair repair is not complete without replacing the upholstery and filler, since these structural elements are prone to wear out during use.
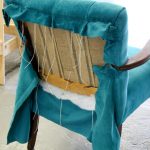
The seat renewal begins by tightening the furniture straps from the underside of the seat. They should be criss-cross.The belts are fixed with special nails, after which the bottom of the chair is closed with a strong fabric that will protect the belts from wear. The fabric is attached to the base with nails or furniture staples.
Pull cotton fabric onto the prepared frames and secure with staples. Then you should cut the foam blank along the contour of the seat with a margin, apply glue to the edges of the fabric and carefully glue the filler. The edges of the foam are secured with a furniture stapler on the back of the seat. In no case should glue be applied in the middle of the product, because the front side of the filler on the seat and backrest should bend so that a person can sit comfortably.
The foam rubber is covered from above with an upholstery fabric, which is stretched, leveled and fixed on the back of the seat. When cutting upholstery fabric, it is recommended to make allowances of 5-7 cm on each side. This is necessary so that the fabric does not come apart while using the furniture.
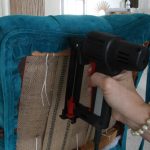
When upholstered, the material must be well tightened and fixed with a stapler every 2-2.5 cm. The corners must be done last, excess fabric goes to them, which should be hidden inside. At the corners, the staples are located as close to each other as possible.
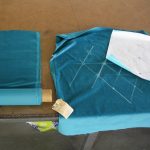
When the upholstery is done, you need to find the places where the holes for the screws are in the wooden frame. These points are marked on the fabric with chalk and specified. After that, small holes are made in the appropriate places with scissors. The edges of the resulting holes are treated with colorless nail polish or fire. The fabric around the holes is additionally secured with staples.
Now the task of the master is to connect all the details of the chair with each other. The structural elements are fastened with self-tapping screws, which are installed in the same places in which they were previously. To increase the strength of the fasteners, you can fix the fasteners with wood glue.
In the course of work, it is necessary to check the evenness and strength of all joints, and, if necessary, hammer the joints of the parts with a hammer. When everything is ready, it remains to check whether individual parts of the product are loose. After that, the chair can be used for its intended purpose.
VIDEO
A comfortable computer chair is an integral part of the workplace. But it, like any other piece of furniture, tends to wear out. And if complex mechanisms are difficult to repair (in most cases they have to be replaced), then you can update the external armchairs yourself, at home.
First of all, you need to disassemble the chair, or rather remove from it those parts that need repair. It is necessary to detach the handles and backrest by unscrewing the fastening screws with a karst screwdriver. The fabric-covered upper section of the seat can then be easily removed.
The main difficulties for novice craftsmen arise at the next stage, when it is necessary to remove the protective cover of the back, but at the same time not a single fastening element is visible. To understand how the casing is attached to the backrest, pull firmly on one of its corners. The cover is fastened with four special latches that open at the moment when they try to pull the cover off the structure.
The fabric should be detached manually, without using additional tools, as excessive mechanical stress can lead to breakage of the latches. The cover should also be installed in place carefully, tapping with a fist (but not with a hammer!) On the location of the latch.
The hardest part of the job is to fit the parts correctly. The fabric blank must be put on the frame and pulled so that there are no folds on the front side. The tension should be evenly distributed, for this it is recommended to fix each side with a stapler in the center (cross). Then it is necessary to fix the corners, and only then should the sides be laid out parallel to each other.
Do not be afraid to use a standard furniture stapler, as it can easily hammer the staples into the plastic from which office chairs are made. If errors occur, the staples can be removed by prying them off with a flat screwdriver. When the seat and back are covered, you need to trim off the excess fabric and reassemble the structure.
If desired, you can cover the cross-piece and armrests of the chair with fabric or leather. The product is ready to use!
Do-it-yourself furniture hauling is a laborious, long process that requires a wealth of experience and skills. For this reason, many simply throw away old furniture, not realizing that it can be restored with their own hands. If you are good at working with your hands and have a rich imagination, hauling the chair with your own hands will not be difficult, especially if you follow the instructions.
Furniture restoration is the restoration not only of its functionality, but also of its appearance.
Do-it-yourself new life for an old but beloved armchair
Making something with your own hands is a fascinating process that allows you to reveal your creativity. It is not for nothing that in the age of factory production, hand-made products are valued higher than factory counterparts. Such a thing will surely attract the attention of guests, will decorate your interior.
An old armchair with ripped upholstery can be turned into a chic exclusive piece of furniture
Having decided to make the banner of the old chair with your own hands, you are free in the choice of finishing materials, and you can also save on buying a new chair. Any design, texture, the only limitation is your imagination and imagination. And also hand-made things are much nicer and closer than those bought in a store.
Variety of upholstery fabrics for armchairs
When choosing a finishing material, first of all, you need to pay attention to how to pull the chair, as well as indicators of strength and durability.
For a living room, leather or fabrics with a distinct pattern are great: tapestry or jacquard. Correctly selected material will show guests the good taste of the owners of the house and will retain a good appearance for a long time.
Color range of upholstery material - leather
Samples of fabric upholstery for furniture restoration
Chenille is good in density and strength, high wear resistance, natural
Flock is a versatile non-woven textile with a characteristic pile on the front side
When choosing a suitable upholstery material, pay attention to the presence of a special impregnation. It will extend the service life and make it easier to care for the fabric. Therefore, before buying, check with the seller about the presence of impregnation.
Necessary tools and materials for sewing the cover
Consider a set of tools that are required to tighten the chair. Prepare them in advance so as not to waste extra time.
The furniture stapler is the main working tool with which the upholstery is attached to the frame. You can buy it at any hardware or hardware store, at a low price. You need to buy special staples of the appropriate size for the stapler. It is better to take them with a margin so that you do not have to interrupt the work process.
Foam rubber or batting - if the old filler has lost its former elasticity, it is necessary to replace it with a new one. Sold at a hardware store or hardware store.
Furniture filler - foam rubber
Batting for filling upholstered furniture
A flat screwdriver or pry bar for removing old brackets.
The minimum set of tools for repairing furniture at home
A hammer, pliers, tailor's scissors, an adjustable wrench - all this is needed to fully assemble and disassemble the chair.
A sewing machine, tailor's chalk or a bar of soap to sew new upholstery.
You will need a sewing machine to sew a new chair cover
A metal brush, coarse and fine sandpaper - for renewing external wooden elements, as well as varnish or paint of the required shade.
Internal structure of a soft chair
Having prepared the entire set of tools, you can begin to disassemble the old chair. First of all, you need to put it on the back to get to its bottom. Using a screwdriver, unscrew the legs and wooden armrests, if any.
We disassemble the bottom, for which we remove the old staples. It is convenient to hook them up with a flat screwdriver and remove them permanently with a pry bar. Removing the bottom upholstery, we need to get to the back of the seat. After that, we begin to remove the old upholstery with pliers. It is important to do everything with extreme care, as the upholstery will be needed to cut new fabric.
Diagram of a chair for sewing new parts
To simplify the process, you need to note the sequence of steps, this is useful when reassembling. You can also note which detail, where it was, so as not to get confused. Since the upholstery is attached with staples, we remove them using a flat screwdriver and a pry bar.
After dismantling the old fabric, the quality of the padding can be assessed. If the foam has turned yellow, began to crumble, it is better to replace it with a new one. If you just lost shape, you can add a new layer of foam rubber or batting on top. In places where fasteners have remained, they should be removed for a better fit of the sheathing or filler.
We take measurements, make patterns, leaving allowances for seams
The next step, using a tape measure, take measurements from the old upholstery, write them down separately. Then we go to the store and buy a canvas of the appropriate size. At this stage, you can choose the material, texture, pattern to your taste. It is advisable to take the canvas 10% longer than the required length. In any case, the excess can be cut off, but if the length is not enough, it will no longer be possible to finish. For fabric with a pattern, use more fabric to match the pattern on all elements of the chair.
Cutting and cutting out parts from the main fabric
We place the old parts of the upholstery on the fabric, outline them with tailor's chalk, leaving a small margin.
Stages of sewing the side of the seat cover
If the fabric is woven or piled, pay attention to the correct direction of the pile: from top to bottom and back to front.
We replace the soft padding - synthetic winterizer or foam rubber
To create decorative folds, mark the folds of the fabric and use the sewing machine. Before sewing, secure each element to the chair frame with pins, check how it will look when finished. After a series of trials and experiments, you can proceed to the final sewing. Having cut out all the details and bringing them to their proper form, you can proceed to the constriction.
We make cuts in the allowances in those places where one part is sewn onto another
Before reassembling and hauling, the external wood elements should be updated. To do this, remove the old paintwork with a wire brush or coarse sandpaper. Then sand these parts with fine-grained sandpaper and cover with varnish or paint of your choice.
We fix the new cover with staples
Try on all the details again with the help of pins: if everything fits together, you can start covering. We start the process from the place where we finished disassembling the chair. We fasten one end of the part to the frame using brackets, starting from the center, leaving a distance of 10 centimeters at the edges. Having fastened, we pull the fabric from the front side, check for wrinkles. If everything is in order, we tighten it and fasten the remaining sides. Check the appearance again. If everything is in order, attach the edges of the upholstery to the frame.
We fix the inner part of the seat with brackets
By the same principle, we fasten all the elements of the chair, observing the reverse order of disassembly. As a result, the fabric will completely bend around the entire chair, and all the edges will be bent.
We make holes in the case for attaching the legs and fasten the legs
Fully hauling furniture can take a lot of time, but the most important thing in this process is not to rush anywhere.It is important to note that different chairs have their own characteristics, so you will have to figure out many details on your own. The final result will definitely pay off all the efforts to tighten and will delight you for a long time.
Ready-made chair after hauling with your own hands
We will separately consider the repair of the back, if it was broken for any reason. After completely dismantling the upholstery, you need to determine the cause of the breakdown. These may be loose mounting bolts that need to be tightened.
If there is a crack in the frame, you can try to find a similar part and replace the broken one. Or carve a new one out of wood with your own hands.
If a loose tie strap is the cause of the breakage, tighten it. To do this, remove one of the edges of the tape and pull it evenly, then fasten it with staples.
If the tapes have lost their previous properties, it is necessary to replace them with new ones. The remaining excess is cut off with scissors so as not to spoil the appearance after the constriction. You will get a beautiful chair at no extra cost.
VIDEO
The armchair is an integral attribute of the interior, which is found in almost every home. A person uses this furniture almost every day, which leads to a deterioration in its condition. An operation such as repairing seats will help restore the technical parameters of the structure.
Furniture repair is a complex operation that depends on the type of product and the breakdown itself. Today, such operations are rarely carried out on their own. It is desirable to entrust the solution of such tasks to experienced specialists who will perform them much faster and better.
Furniture restoration is the restoration of not only its functionality, but also its appearance. A feature of upholstered furniture is that it uses fabric upholstery. To repair the internal structure, the fabric will need to be dismantled or replaced. This operation also requires some skill and effort.
Chair breakage is not always a problem, as you can try to restore it yourself. There are several types of operations that can be easily performed at home:
Padding. This process involves replacing the old fabric with a new one. This also includes changing the filler (foam rubber, etc.) and restoring the internal structure of the chair. If necessary, the wooden surface itself can be restored.Upholstery. This approach involves upholstering the surface of the chair with fabric in order to update its appearance. Often, such operations are performed with old rigid structures, the surface of which is not so easy to restore with paint.Repair. This is a general concept that includes the previously discussed operations. But often this word is understood as all repair work related to the restoration of the state of the chair frame. This can include strengthening the structure with metal corners, replacing legs or a seat, and restoring the surface of the material with paint and sanding.To carry out all the previously described operations, one should not only have experience, but also stock up on a variety of special tools.
Modern armchairs are made from a variety of materials. The design of such modifications consists of many elements that can be replaced if necessary. Often these chairs include office models that are equipped with a gas-lift mechanism. For the restoration of such products, you may need several types of components:
Rollers. This mechanism is made from various types of plastic. When choosing this product, it is important to consider its purpose, connector type and fixing method.Gaslift. Almost all office chairs are equipped with this element, which allows the chair to be held at a certain height. There are several types of these designs on the market today. It is important to pay attention to the type of mechanism that was previously used in the damaged chair.Crosspiece. Plays the role of a pivot element. It is carried out in the form of a 5-ray star, to which the rollers are attached. When buying, it is important to pay attention to the quality of the material and the way of joining the parts.There are many other components that will be needed when repairing such furniture. This includes everything from small knobs and bolts to specialized fabrics.
One of the ways to restore an old leather chair is to stretch it. This process is quite lengthy and laborious. New fabric is bought first. The upholstery can be done like leather and other popular materials. Some experts also recommend purchasing stuffing materials (foam rubber, batting). To simplify the hauling operation, you also need to have a stapler, nails, a hammer, etc.
The algorithm for solving this problem can be described in several sequential steps:
The process of upholstering a chair is slightly different from a constriction, although in many ways it is very similar to it. This operation involves covering the chair with a cloth. For such purposes, only furniture is used that was not originally equipped with fabric upholstery.
Upholstery technology involves the performance of several sequential operations:
All other elements are sheathed according to the same principle. The material can be trimmed if necessary.
Old chairs are often very sturdy and durable. But after a long service life, they lose their attractive appearance. Do not rush to throw away such furniture, as it can be easily restored.
Sooner or later, any upholstered furniture, for example, a chair-bed, wears out. Its upholstery can be torn or frayed and stains appear. What to do in such cases? Padding. This process does not require special skills and abilities, so you can do it yourself. What are the stages of upholstering a chair-bed?
First you need to determine what material will be used. You can drag the chair with fabric or leather. Working with one and the other material has its own characteristics.
There are several requirements for the skin:
It should be elastic and thin. It will be better if its thickness is no more than 3 mm. Thicker material is very difficult to work with. This is especially true when you have to connect several separate pieces together.
Also, the material must be dry. Wet skin first stretches and then shrinks and becomes smaller. You can wet this material if there is a need to tighten it more.
With fabric, things are a little easier. It is not necessary to buy special upholstery fabric. You can take the simplest tapestry. It has several advantages:
Low, in comparison with upholstery fabrics, price.
Almost complete lack of the ability to take a puff. If it does appear, the loop can simply be cut off. In this case, the integrity of the fabric and the pattern will not be violated.
After the material has been selected, you need to inspect the chair-bed. It is important to determine in advance which parts of it need to be replaced or updated. These can be foam pads, staples, tie straps and, in fact, the upholstery itself.
The next stage after preparation is furniture disassembly. It requires the following tools:
pliers;
keys;
screwdrivers (Phillips and regular);
pliers.
Disassembly consists of several stages:
Remove the back cover and the plywood that is located at the bottom of the chair. If the plywood is in good condition, remove it as carefully as possible so as not to damage it.
Remove the foam pad located at the bottom of the chair.
Remove the upholstery and remove the padding from the backrest. A flat screwdriver and pliers will help you to do this. With their help, you need to pry and pull out the staples.
Remove all fasteners (brackets) gradually.
Remove upholstery and foam rubber from all parts of the chair. It is worth remembering that old foam rubber can crumble.Therefore, it is necessary to cover the floor in advance with paper or film.
After the furniture is disassembled, it is necessary to inspect its frame. If necessary, reinforce loose parts and renew paint.
The back is restored first. Here she plays the role of a headboard. To work, you need a furniture stapler and staples for it. Experts recommend stocking up with 6 mm and 10 mm staples.
The lashing straps are inspected first. If they are loose, they need to be tightened up a little. To do this, one end of the strap must be detached from the headboard and pulled. Then fix it with a stapler. The staples must be driven in randomly. Placing them in a row can cause the plywood to crack or delaminate.
In the event that the belts have deteriorated, they can be replaced with new ones.
If necessary, in addition to the belts, you can also replace the soft pad. For this, the headboard is placed on a softener. A few centimeters are measured for the bend. Next, you need to circle the back with a felt-tip pen and cut out the resulting part. Glue it to the old fabric on the chair and trim off any excess.
The next step is to remove the old upholstery. In most cases, it is glued, so it should be easy to remove. If you still have difficulties, you can use a clerical knife.
If the old material is in good condition, it can be used. It can be used to secure a new foam pad. The upholstery must be fastened tightly. It should not sag or wrinkle. The opposite folds should only be at the corners. The staples are attached on both sides of them.
The seats, like the rest of the parts, need to be handled carefully. It is necessary to remove the upholstery fabric and pull out the old foam rubber, remove staples, screws or nails. It is also important to remove all excess fabric, threads and dried glue from the attachment points.
As with the backrest, old upholstery can be used. You can also find application and soft pad. It needs to be glued to the seat with a diamond. Cut off the protruding pieces. You can also attach the old back cushion here. The joints of the gaskets must be carefully glued, otherwise they will disperse during operation.
The upholstery of the chair-bed begins with fixing the material on the side of the back. The staples are spaced approximately 10 cm apart. It is advisable to start from the middle.
Having finished on one side, go to the other. Stretch the fabric and secure in the same way. It is important to avoid wrinkling.
VIDEO The hauling of the seats is carried out in the same way. The chair-bed has two parts.
After all parts of the chair have been tightened, you can start assembling it. This process takes place in several stages:
The seat is connected to the back.
Legs are attached to the structure.
The plywood is installed in place from the back and bottom. Plywood can be sheathed. It is worth remembering that sometimes the staples are not enough to secure the plywood parts. Therefore, it will be advisable to use a hammer.
Finally, it is recommended to check the quality of the fasteners.
Hauling a chair-bed is a process that you can do yourself. It is necessary to prepare tools, upholstery and foam rubber, and then it remains to act according to the instructions. Done right, your old chair bed will get a new lease on life.
The ability to hold tools in your hands is useful if you need to properly organize the space in a small apartment. For optimal use of space, you can make a do-it-yourself chair bed, and a step-by-step guide will help you easily cope with this task. It is better to choose a model that is simple, but reliable, and the texture and color of the upholstery will make it stylish.
You should start with measurements.If there is a specific room where the chair will stand, then we can determine the width of the product, its length when assembled and unfolded. The decision is individual, so the length can be made for the height of a particular person. In addition, the height of the backrest and armrests is important.
The minimum width of the berth is 60 cm, narrower structures are inconvenient to use.
Knowing the dimensions of the chair-bed, it is easy to calculate the material consumption. For clarity, you need to make drawings of the chair-bed with your own hands, indicate all the dimensions.
We determine what materials are needed for the manufacture of the frame, only durable are suitable:
10 mm plywood for the folding part;
Chipboard (chipboard) for sidewalls 18-20 mm thick;
Fiberboard or hardboard on the bottom;
bars on the frame of the folding part.
Many people prefer laminated chipboard - an inexpensive, low-toxic, easy-to-process material that will last at least 10 years. The comfort of using the chair depends on the quality of the interior filling. It is better to sheathe the frame with foam rubber. Use only solid sheets of foam rubber, then the seat will not sag and retain its shape and appearance longer.
You will need a set of tools:
stapler with staples;
screwdriver;
hacksaw (jigsaw);
scissors.
For marking parts, a large metal or wooden ruler, tape measure, sharp pencil. To assemble the frame parts, you need to have screws and glue.
Based on the diagram, we cut out the parts of the chair body and the folding part, we take the dimensions of all parts from the drawing. Cut 4 squares out of plywood. 3 pieces will go to the sleeping part, one will go to the back. Sawing can be done with a hacksaw or jigsaw.
6 pieces for the longitudinal part of the berth;
7 pieces for crossbars;
4 pieces for folding legs.
Mark the connection points of the parts and drill the holes. We cut out the armrests from the chipboard, which are bolted to the main part of the structure. All parts are fixed with furniture screws into pre-prepared holes with a smaller diameter. Foam rubber is glued to the sides, back, parts of the berth.
There are many types of materials for upholstered furniture upholstery. This is a practical, easy-to-clean flock, as well as velor in terms of strength and color fastness. Tapestry and jacquard upholstery will look good in the interior. Chenille is now popular - one of the varieties of jacquard.
We cut the fabric, taking into account the thickness of the foam rubber and the dimensions of the structural parts. We disassemble the chair, cover each element with a fabric blank, fix it with a stapler. The body is made in order to start using the chair-bed, it remains to connect the parts.
The operating conditions and the size of the room dictate the choice of the transformation mechanism, there are several of them:
A draw-out mechanism is the best solution for a novice craftsman. In operation, this mechanism is the most reliable. To organize a sleeping place, you need to push forward two sections, and lower the back to a horizontal position. Piano hinges and bolt connections should be used to connect the parts. Using such a transformation mechanism, you get a laundry box located at the bottom of the box.
The disadvantages include the fact that the assembled model with a roll-out mechanism looks cumbersome, but its reliability and the presence of a laundry box justify the choice.
Frameless armchair beds are preferred by young people. This type of furniture is practical, in line with modern fashion. The frameless chair-bed has no rigid parts; it is a transformer made of pillows.
Having several frameless chairs, you can combine them: make a sofa, move it to different ends of the room, placing it near the TV or coffee table. No carpentry work is needed, for work you will need a sewing machine, scissors, a ruler, and chalk.
A chair-bed can be made of foam rubber sheets 10 cm thick. We glue them in pairs using PVA construction glue.We cut out the dried layers with a ruler and a marker, cut exactly according to the marking with scissors, we get blanks:
square 80x80 cm - 2 pieces;
rectangle 30x80 cm - 1 piece;
rectangle 20x80 cm - 2 pcs.
The cut-to-size parts are 20 cm thick. The next step is to cut the fabric. During work, it is important not to forget about the seam allowances, they should be at least 2 cm, where the zipper will be sewn in, the allowance is larger - 3 cm.
When sewing parts, use tape for strength and durability of the seams.
Take the time and money - sew 2 types of covers. Some are rough from an inexpensive blended fabric, the other - smart ones from high-quality furniture fabric. You will get several rectangular blanks folded in half, they are equal to the dimensions of the foam blanks. The parts are assembled into a single structure with the help of zippers sewn into the covers. You will need 7 zippers, each 80 cm long. Now you know how to make a chair-bed with your own hands, you can take the proposed ideas as a basis, and for your apartment, come up with a more original solution and implement it.
VIDEO
Video (click to play).
VIDEO

