In detail: do-it-yourself d3s xenon lamp repair from a real master for the site my.housecope.com.
Light in the dark is an extremely necessary thing. Therefore, how to repair the xenon ignition unit with your own hands, it will be useful to know everyone who has such lamps. Spending money on a new block means punching a noticeable hole in the budget, which you want to avoid in any way you can.
Going to a car electrician is, again, to lose a certain amount, and even, possibly, to be left without a car for a while for repairs.
In addition, light can be lost even far from the benefits of civilization, in particular, from car service stations, on a long journey. And in order to get to the service station or garage, you will have to solve the issue on your own with the headlights, even if you are not very willing to decide on an independent repair of the insides of your car. Because the alternative would be to spend the night in an open field - until dawn, and there will be an opportunity to get to the repairmen without headlights.
Advice: before starting to test the ignition unit, try to screw in the operating lamp into the extinguished headlight. Perhaps your light source just burned out. You can also visually and tactilely check the lead contacts. But if these very simple measures did not help, we move on to a deeper check.
DIY xenon ignition block repair not possible in all cases. There are situations when only his replacement can help. And such circumstances also need to be able to determine. We will try to tell you how to do this correctly in this article.
There are several factors that can render this unit unusable:
- Violation of the tightness of the unit itself, as a result of which dust or water penetrated into it. If the components of the electrical circuit did not have time to burn out from moisture, banal drying and cleaning can save the situation;
- Corrosion, as a result of which the solders can diverge, and individual elements can move away from the solder. Cleaning will not always help: you have to solder;
- Partial or complete failure of transistors;
- Breakdown on the winding of a multiplier or transformer;
- Absence or interruption of the control signal from the controller.
| Video (click to play). |
Breakdowns manifest themselves in different ways... The headlight may flicker, may not light up at all, or it may emit a burning smell. Only the situation with the covered controller is considered irreparable - then you will have to completely change the block. All other problems can be solved at low cost, although not always.
After all the procedures, the xenon ignition unit must be started again. If it was possible to find and eliminate the malfunction, the headlight will cheerfully light up. In this case, after waiting for the block to cool down, the board should be filled with paraffin.
It is better not to use silicone sealant: it hardens to the state of concrete, if again it is necessary to change the transistor (and they burn quite often, and in turn), it will be virtually impossible to open the layer. In addition, some chemical constituents of silicone, when heated, release compounds that affect the strength of contacts, and not for the better.
The issue of good roadway lighting is relevant for any driver, especially if trips are mainly made outside the city. In order not to get into an accident, you need to be confident in the reliability of the headlights, regardless of their type. However, many believe that the standard optics does not provide sufficient illumination and therefore install a xenon ignition unit with appropriate lamps (if the device is not included in the factory configuration). How does such a system work, and what are the benefits?
Xenon lighting implies the use of not only the appropriate lamp, but also the ignition unit (BR), which ensures the normal operation of the entire system.Its purpose is to generate a current of a certain strength so that the gas in the flask begins to burn and subsequently shines with a constant power. The standard electrical equipment of the car cannot produce the required voltage, which predetermined the use of the unit. It also automatically adjusts the level of light flow depending on the level of illumination of the road.
All devices are a step-up transformer enclosed in a housing. Their task is to convert pulses from the on-board network into a voltage of up to 25 thousand volts. Powerful start makes xenon glow. In the future, the unit delivers 85 V, which is necessary so that the gas does not go out. Factory-installed products are characterized by high operational stability, reliability and long service life. All of them have a special marking - OEM codes. They are needed in order to check the compatibility of the car, headlights and the ignition unit itself. The supply voltage of the unit is 12 V for cars, and 24 or 36 V for trucks or SUVs.
Universal (adaptive) ignition units are used to independently change the optics. Available in two versions:
- DC. Constant current device. It is distinguished by the absence of a stabilization unit and a relatively low cost. However, the lamps working with it flicker: the combustion is not very stable.
- AC. AC device. Provides a high-quality glow of the lamps. The use of a stabilizing block guarantees an even voltage - there is no flicker. The downside is the higher cost.
There are no OEM codes on the universal ignition units. All products are connected to a standard 12 V car on-board network, have a power of 35 W and output a voltage of 23 thousand volts.
If everything is clear with the factory devices: it is necessary that its code matches the characteristics of your car model. And how to buy a universal BR and what should you look at first of all?
First, make sure that the supply voltage of the unit matches the on-board network of your car. Manufacturers produce blocks designed for 12, 24 and even 36 volts. Other parameters (average data):
- power: 35-75 W;
- starting and operating current: 5.8 and 3.1 A;
- ignition voltage: 23 thousand volts;
- arc stabilization time: up to 20 seconds;
- working temperature: from minus 30 to plus 105 degrees.
Editions, incl. and on the Internet, regularly publish ratings of companies producing xenon kits. Among the most frequently included in the "tops" are several manufacturers:
- MTF. Differs in high quality products - the percentage of rejects does not exceed 1%. Most popular kits: MTF-Light Slim Line, MTF-Light Slim Line MSP with noise suppressor. Of the minuses, one can note the original connectors (they do not fit the blocks of other companies) and the high (5500 - 5900 rubles) cost.
- Optima. The ARX304 units manufactured by the company belong to the 5th generation of devices. The average price for a set is 3300 rubles. (maximum for trucks - 4800 rubles). It is advisable to change lamps every year and a half.
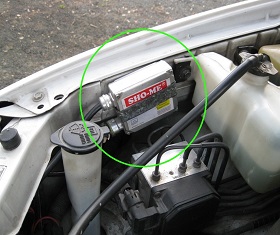
- SHO-Me. The most widespread set in the Russian Federation. There is a standard design and slim. It is recommended to replace lamps after 12 months. The average cost is 2800 rubles.
- APP Digital Ultra Slim. Japanese manufacturer specializing in the production of lighting devices for cars. It has an extended operating temperature range suitable for Russian conditions: from minus 40 to plus 125 degrees. Average price 4000 rubles.
- Interpowre. High quality and reliable unit. Lamps last up to 2 years. The cost of the set is 2500 rubles.
- Xenotex. This is a product in the creation of which 3 countries participated at once: Japan, China and South Korea. The set is characterized by an affordable price - an average of 2300 rubles.
In most cases, especially if a standard xenon unit is used, the reason lies in the failure of the lamps (they gradually change color and fade away). They can be restored using special equipment - an automatic corrector, or simply buy new ones.What signs indicate that the device of the xenon ignition unit is out of order? They can be:
- The glow of the lamps is interrupted. The reason lies in the deterioration of the car wiring or the power supply circuit of the ignition unit.
- Constant flashing of lamps (can be weak or bright, interfering with seeing the road). This indicates a poor contact of the unit with the "mass" of the car, or a wiring malfunction. Ballast can also corrode.
- Headlights fogging. It can occur in cold weather or frost. Here the whole thing is in the absence of cold air inside the headlight housing, which is heated by the engine. To remove the temperature difference, thin long tubes can be put on the intake channels, which are led out behind the front bumper.
- When the unit is turned on, the motor may stall or slow down. You can solve the problem by installing a relay between the lamps and the unit.
If the lamps are in order, but the light still does not correspond to the parameters declared by the manufacturer, the problem may lie in the ignition unit itself. The most typical reasons for its failure:
- Ingress of dirt or moisture, which is caused by poor tightness of the ignition unit. As a result, the lamps start blinking or there will be no ignition at all.
- Malfunction (breakdown) of the unit transistor or its transformer.
- Corrosion. The junction points of the electronic components of the ignition unit are oxidized. The poor-quality assembly at the factory and constant humidity are “to blame” for this.
It should be noted right away that a full check is possible only with an oscilloscope and a tester. In a garage, you need to inspect the block body for cracks. If you smell burning, then the device will have to be replaced. You can also remove the cover and look at the transistor, other electronic components: their blackening indicates the need to purchase a new device.

First, make sure that the corresponding fuse is intact, then disconnect the negative terminal from the battery and the ignition unit itself. Remove the cover from it. If there are traces of moisture or rust, wash the electronic board with alcohol. If you see that some components are loose, you will have to remove the sealant from the back and solder the problem leads. Further verification is possible if you have experience with electronic components and a tester. In this case, check the transistors and resistors. After soldering the parts, fill the board with molten paraffin.
In conclusion, we can say that xenon lamps guarantee better illumination compared to conventional halogen lamps. However, if you decide to install the system on your car, you should give preference to the factory kit, which works better and lasts longer. And the second point: a complete repair of the xenon ignition unit with your own hands is possible only with special equipment and experience. Otherwise, buying new equipment is inevitable.
The ignition unit is a high-voltage device that is the starting device for xenon and bi-xenon lamps. Since gas-filled lamps contain xenon gas, they need a high voltage - about 23,000 - 25,000 V. This voltage is needed only at the start, then the ballast maintains stable operation (xenon combustion inside the bulb) throughout the entire operation of the lamp.
For those who want to save material resources, step-by-step instructions for installing ballast:
- To begin with, it is worth choosing a suitable place where the ignition unit will be reliably protected from moisture, dirt and strong heating.
- It is best to place the device near the light bulbs so that the wires are not taut.
- The place of the ignition unit must be level.
- We securely fix the ballast, it should not fidget on the surface. This can be done with bolts or clamps.
- Then we connect the devices to xenon / bi-xenon lamps.
- We do the same with the second ignition block.
In cars with on-board computers, some difficulties may arise.If the lamp does not light up properly or does not function, it is worth installing a voltage relay. Thus, the load on the wiring will be stabilized during the ignition of the headlights.
As you yourself have seen, installing the ignition unit yourself is possible. But is it really possible to repair the device with your own hands?
You will need these skills at the most inopportune moment. The xenon system may be unusable on the road when the workshop is far away. Decisions need to be made urgently. But, before proceeding with the repair of the unit, it is worthwhile to understand what types of breakdowns can affect its malfunction.
Before you start repairing ballast yourself, you should learn how to determine the breakdown yourself. You must be sure to correctly diagnose the problem.
Remember! That 100% correct it can only be done by a professional, but you can still try to determine it yourself.
- The appearance of a burning smell. When you open the hood, you can determine the place where the smell comes from, if it is from the ignition unit, then the xenon system in it is broken. If you have the opportunity, you can purchase oscilloscope. It will help to determine exactly what exactly influenced the breakdown of the unit: a controller, a resistor or a transformer.
- If, with correct diagnosis, it was revealed that the reason is in the controller, then repair is impossible. In this case, you should get a new part for your xenon.
- If there is a breakdown in the transformer or resistor, then it is possible to repair the ballast yourself.
- The first thing to try is to rinse the ballast housing with alcohol. This manipulation is appropriate in case of moisture ingress or rust formation. After that, the block should work. If the cause is not eliminated, then follow next.
- Disconnect the sealant from the back of the unit, if there are disconnected boards, then try to solder them. Perhaps the reason is in them.
It is worth checking the device only in the assembled state, after it is connected to the lamp. The surface where the ballast is located must not conduct current, remove all flammable objects that are near the high-voltage unit. The voltage of the multiplier is about 35 V and should never be touched with bare or wet hands.
- Open all covers and remove the sealant.
- Test all 4 transistors with a tester. If you find a breakdown. Then you need to replace the field worker. It is best to use 4N60. It will need to be soldered instead of the one that does not work. If no breakdown is detected, then move on.
- For greater accuracy, solder the sealant in places where the flux is inactive. Wash off excess flux, it is not needed. You can use a pink indicator liquid, it does not require rinsing. So that no pink spots remain afterwards, warm up the gel well before use.
- After eliminating all possible malfunctions, connect the ignition unit. If the xenon headlights shine like new, then everything is done correctly and your device will work for a long period of time.
- If, nevertheless, the headlights do not turn on, then the cause may be in the transistor. If you find a damaged transistor, then re-solder it. In this state, turn on the unit. If it works, then turn off and connect the ignition unit according to all the rules.
- After the proven procedures with the ignition unit, the device board should be carefully filled with paraffin. Give preference to it because other sealants are difficult to remove. In addition, they can emit harmful substances that have a negative effect on contacts.

So, you have learned how to independently determine the cause of the failure of the ignition unit. And we ourselves were convinced that the repair of the device is possible. Moreover, if the reason is in the transistor, then it will take you a little money for repairs. Agree, this is cheaper than spending a large sum on a new high-voltage device.
Currently, the driver should know about the xenon ignition unit, do-it-yourself repairs and features.Without such knowledge, serious problems can arise in the form of a breakdown. And you can't move without light, especially at night. We'll have to call specialists and spend extra money. To prevent all this, it is necessary to carry out regular maintenance and inspection. Experts note that the cost of a block varies greatly. Not every driver can afford to buy a new one. In this regard, it is required to obtain at least some knowledge about the device and repair methods.
Xenon ignition unit, do-it-yourself repairs are carried out without any problems if the driver has experience and a special tool. Of course, you can contact the service, where everything will be done efficiently and quickly. But there are times when a breakdown occurs far from civilization, urgent action is required and continued movement. If you do not understand anything about the device of a car, then you can just stay overnight in an open field until dawn.
Experts note that before starting testing the unit, it is necessary to unscrew the old lamp and install another. Perhaps it just burned out, and there is nothing to worry about. You should also check the wires for an open circuit. If all these actions did not help, then a thorough examination and testing is required.
Let's look at the main reasons for the breakdown:
- The tightness of the block is broken. Because of this, a lot of dust, dirt and water gets inside. All this negatively affects the elements of the ignition unit, a banal burnout is possible;
- A lot of corrosion occurs. As a result, the soldered elements simply come off, are lost in the interior of the case. Cleaning will not solve the problem in any way; re-soldering is required;
- The transistor partially or completely fails;
- A large number of breakdowns occur on the windings of the multiplier and transformer;
- The control signal is missing or interrupted.
All these breakdowns can manifest themselves in different ways:
- The headlights can just flash;
- Do not light up at all;
- There is a burning smell, which is not very pleasant.
If the controller fails, it cannot be repaired. You just have to change it to a new one, which is not very cheap. All other issues can be solved without investing serious money.
First, you need to exclude simple reasons:
- Check all wires for breaks and leaks. Most often, the ignition unit stops working due to a pinched wire;
- Rinse the unit gently with clean alcohol. This is necessary in order to get rid of rust and possible condensation. If all this does not help, then you can disconnect the sealant from the back of the board and solder the contacts;
- Open the housing block and inspect it carefully. All work should be carried out in compliance with safety measures to prevent injury.
Check the lamp connection unit. If it does not work, then wait a while until everything cools down and continue to inspect.
Next, you need to completely disassemble the unit, disconnect the sealant and all the covers. Take a tester and check all transistors for performance. If the problem is found, then good. You just need to remove the old transistor and install a new one. It should be noted that the check is carried out without the block itself. It is required to remove each element.
If the transistors are functional, then you need to go to the resistor. The first symptom of a malfunction is an unpleasant smell of burning. The resistor needs to be urgently replaced with a new one. If this is not done, the vehicle will not go anywhere. Be sure to go through it again, thoroughly rinse the case from the flux residues. All this is done with a brush.
In the final part of the work, check the operation of the unit, turn on the xenon headlights. If everything works, then the problem has been found and fixed. Unplug the device and let it cool down. Pour in special paraffin. It is not recommended to use a silicone base for this purpose.The fact is that it quickly solidifies and turns into a solid base. In addition, silicone contains substances that, when heated, emit harmful vapors.
After eliminating all the problems, you can move around by car without any problems and safely. The main thing is not to delay the repair, so as not to get into a traffic accident and not get serious injuries.
So we examined why the xenon ignition unit breaks down: do-it-yourself repairs are carried out without any problems. The main thing is to have a little experience in this area and a tool. If you do not want to do anything, then it is better to contact a specialized service.
I went to d1s and d2s and d3s
there is no difference whatsoever.
never traveled to china or taiwan ONLY ORIGINAL!
put HBI and CBI those that are +% 5000 k.
it shines more beautifully in dry weather, but on wet weather, 4300 is better for me! although the taste and color.
do not chase +++++ install standard lamps!
They don't shine normally!
And + a reflector with China does not live long!
China is the eighth year in the headlights, the flight is normal))
in short, xenon cannot produce a “cool” yellow at all. and passing through the light filter, the light becomes "worse"
what is “cool yellow”? it is not monochrome. it is the color of mixing different wavelengths.
and the simplest experience of comparing two lamps installed in the PTF escalator headlights in a large garage (1000 sq.m) shows the illumination of the surface, which is quite close to the eye, from 3400 and 4300 * K. only 3400 lemon yellow color of light has. (The bulb of the “yellow” lamp is only pale-pale yellow. This is obviously why such a small difference in brightness.)
oukey. then I pass. just watch the picture and SEE why xenon can't be bright and yellow. or intense and yellow. or well luminous and yellow. or “cool” and yellow. 34323
this is the spectrum of a xenon lamp
This is the spectrum of the xenon lamp theory. What is the temperature of the lamp spectrum? ...
and you don't seem to understand that the filter is not an “ideal” device and still passes frequencies other than yellow. all the more so a “weak” filter as it is in a “yellow” xenon flask. that is why the eye and the small difference in illumination in comparison with 4300 *
theory. What is the temperature of the lamp spectrum? ...
and you don't seem to understand that the filter is not an “ideal” device and still passes frequencies other than yellow. all the more so a “weak” filter as it is in a “yellow” xenon flask. that is why the eye and the small difference in illumination in comparison with 4300 *
no. you don’t understand that we are talking about the same filter! only in different words!
I just add that according to its characteristics (spectrum, flux density in the yellow spectrum) xenon cannot be very good yellow.
after all, what does the filter do? he just does not pass part of the unwanted spectrum. xenon, in which the gas discharge would emit fundamentally more yellow than in that picture does not exist. Whatever numbers are written on the lamp / package.
these are the numbers of the color temperature that you see, and not that the gas discharge emits
Whatever numbers are written on the lamp / package.
these are the numbers of the color temperature that you see, and not that the gas discharge emits
beat .. well, how the eye will see and feel that the lamp does not emit 😀
the eye sees exactly what the lamp emits (as an integral device).
6500 * by the way, as far as I remember with a bluish filter. and the light from it is clearly weaker than 4300. (I took this feces in my hands for a long time)
a leading question, why does the glow color of the lamp change from time to time? is it because the emission spectrum of the gas changes: rolleyes:
because the tungsten electrode wears out (evaporates), the arc length increases, the arc temperature drops (= the intensity drops and the short-wavelength component of the visible part of the spectrum "sags") + evaporated tungsten settles on the bulb (decrease in glass transparency) + defocusing
any good automobile xenon lamp is the same in physics. The gas arc emits the same spectrum in the visible range. different color temperatures are achieved:
1 by a change in the composition of the gas (a fraction of a percentage of additional inclusions) => the spectrum changes very slightly. LITTLE.
2 the composition of the glass of the flask changes (again a fraction of a percent of additional inclusions in quartz glass) => just for violet colors
3 a light filter is made => to frankly do not pass = re-reflect some part of the spectrum
(we will not talk about changing the shape of the flask here because, let's say that we are talking about the same DS3 of different color temperatures)
nothing else happens there. in the 3400K lamp it is simply “removed” into the impudent way, it is filtered, a part of the spectrum is re-reflected.
there are no spectrum-shifting miracles there. it's just that the same spectrum is passed in different ways and for different color temperatures you can slightly pump up the desired part of the spectrum (no more than 10 percent)
The warranty is over and the original light bulb costs 13 tr (nonsense to give for a light bulb), so I wanted to ask who uses what analogs, if possible, with a photo in the evening as it shines.
as an option I consider Philips D3S X-treme Vision + 50% 42403Xvs1
and a photo from the Philips website 42403XVS1-U1P-global-001.jpg
Yes, fierce China.
Yes, they will obviously serve less than original or branded ones.
But the price is such that they can be changed at least every six months.
I have no experience of using it myself. Just info for thought.
Such operations as repairing the xenon ignition unit with your own hands cannot be classified as everyday, but they do happen. The option of replacing the block with a new one is not always good for the reason that it is expensive. Sometimes minor repairs cost mere pennies.
Let's first analyze the problems that can arise with bi-xenon in a car. The problem may be not only in the ignition unit, but in the lamp itself. More precisely, in a coil. Here is a tester to help.

The next probable malfunction is the ingress of water into the unit.

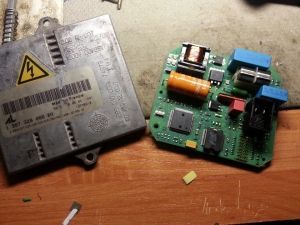
Finally, there is a defect in the multiplier. Green microcircuit - pulse generator (by analogy with a computer - OS). In the photo it is designated by number 1. Number 2 is the multiplier. It is in it that most often there is no contact with the lamp.

If the previous electrical circuit is in good order, then the multiplier must be changed entirely, or look for faulty diodes, solder it, install new ones.
Now we will consider the most common case of repairing a xenon ignition unit with our own hands. The repair algorithm is as follows.
Corrosion of joints and soldering points.
Water ingress into the housing of the xenon ignition unit.
- Rinse the unit with alcohol and allow to dry. In case of water ingress or corrosion, the device may work. Do not touch the board with your fingers, the voltage value can be very high.

We calculate with a tester, solder, put a new one.
- Another possible defect is a blown resistor. We also change. Almost one hundred percent chance that after that the lamps will work. It is only necessary to pour paraffin on the circuit board before reassembling.
Such repairs will cost several tens of rubles.
Well, in pursuit. We already treat the products of China with due respect, the country has learned to do something. But in the case of repairing the xenon ignition unit, we do not recommend purchasing products from the Middle Kingdom, this is not the case. Finally, to clarify: if the knowledge in electrical engineering is completely zero, it is better not to go into the block with your own hands. Let the special work.
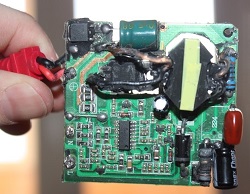
Repaired a Chinese ignition unit. SHO-ME has its own specifics. I changed the transistor to FQPF 4N60, the parameters are not the same, but pulled. Special thanks to the Chinese comrades - the soldering is disgusting. The parts may be intact, and the problem lies precisely in the places of poor-quality soldering.
As a rule, the unit burns due to our negligence. I burned out because there was moisture inside. All 4 IRF840 teristors are covered with a pelvis. So prevention is the best method.
Most car enthusiasts who use xenon devices as lighting are familiar with the ignition unit. Ballasts are designed to fire up xenon equipment. As a result, it turns out that the ballast is a system for igniting xenon lamps. Only with the help of this device can xenon be put into operation and a bright glow can be achieved. But the blocks are always under high voltage, and this factor should always be taken into account.
What is the threat of a seemingly ideal solution for motorists, xenon? Ignition units do in fact result in bright and sometimes even excessive and dazzling lighting. This is not always a good thing, as the light can obscure oncoming drivers. This, in turn, leads to a number of traffic accidents and non-standard situations on the road. There is another nuance - the ignition unit may not work at full strength and have a number of faults that lead to insufficient lighting of the lamp and, accordingly, to poor lighting. In such conditions of insufficient illumination of the road path, a number of unpleasant aspects also arise, since the driver who is driving will not see all the obstacles in his path and may not react to them properly in time. In addition, excessive pressure is exerted on the driver's vision, which subsequently leads to fatigue and loss of vision.
This is rather strange, but many drivers often wonder whether it is possible to assemble the ignition unit on their own. In fact, this is a strange and incomprehensible question. Why? Yes, because ballast is a type of device that consists of a number of microcircuits and solders and it is practically impossible to make it under normal conditions for an inhabitant, of course, if you are not a genius. From the above, it is worth concluding that no one produces the ignition unit with their own hands. In fact, it is not real. The ignition block with your own hands is not only impossible to do, but it is, moreover, also dangerous. In this case, we should pay attention to the fact that the ballasts pass a lot of voltage through themselves and if these devices are actually not serviceable or made, so to speak, obscenely, then this type of installation is fraught with consequences.
Based on the above, it is worth knowing that ignition units are devices that need to be purchased only in specialized places. You should buy quality products from bona fide distributors and manufacturers so that you do not suffer yourself later.
It is worth knowing that in some countries in Europe, xenon equipment is completely prohibited, its operation is also completely prohibited. The reason for this was the unfair use of this type of lighting. On the territory of our country, xenon can be used only if you have xenon optics equipped in advance, and also have special washers and glass cleaners.

Xenon is an inert gas that is odorless, tasteless and colorless.One of its features is that when a discharge of electric current is passed through it, this gas becomes the strongest source of light. There are several reasons why xenon has gained immense popularity among car enthusiasts.
Xenon bulbs shine very bright daylight, and this is more familiar to human vision. They have a high light output and allow a wider view of the road in front of the vehicle.
Xenon bulbs are durable, very economical and resistant to physical stress. In addition, they are quite easy to install in cars instead of standard lamps. This process will be discussed below.
Today, there are a huge variety of different xenon lamps on the automotive market. This variety complicates the choice a little, and we will try to figure out which xenon is best for a particular car.
Most xenon kits consist of:
- xenon lamps;
- ignition blocks;
- wiring and fastening parts.

Xenon lamps have special markings - 6000K, 5000K, etc. It stands for color temperature - the brightness and color of the light that the lamp shines with. Xenon marked 4300K shines white with a slightly yellow tint... Often they are installed in fog lights and headlights of the main light of a car. They are best suited for driving on wet asphalt.
Lamps 5000K shine in a shade that is closest to white... Their light output power is the highest, and light is normally perceived by the human eye. Lamp light 6000K has a slightly bluish tint, and is inferior in power to the two previous types, since it has the lowest light output. However, this type is the most popular in the Russian and Ukrainian markets. 
The ignition unit is a device that supplies the required voltage to the xenon lamps, which is necessary to ignite them. The more complex and “smarter” this unit is, the more processes it controls. High-quality ignition block will ensure long-term and high-quality lamp operation, since during their ignition and glow, the lamp parameters are within the permissible limits.
It will be useful for every driver to know what the penalty is for driving without insurance or with a stitched CTP policy.
Airbrushing is an original way to decorate your car. We have prepared an article for those who want to highlight their car from the gray mass.

First, it should be understood that not necessarily the most expensive xenon will work the best... The cost of well-advertised products includes the cost of advertising, so there is no point in overpaying.
Also, in order not to overpay, you should select an ignition unit that matches the functions of your car. For example, if a module that controls the voltage of the lamps is not installed in the car, then it makes no sense to buy xenon with the so-called "blended". This will save money and not lose quality.
It also makes no sense to buy slim "slim" ignition blocks if you have enough space under the hood to install a standard block. Good slim blocks are more expensive, and very cheap ones often have poor quality materials and workmanship.
Most popular xenon lamp manufacturers:

The installation process itself is quite simple and every motorist can handle it. Briefly, the xenon connection diagram can be described as follows: we install light bulbs, ignition units and connect them using the wires that come with the kit.
What we need to install:
- xenon kit - (lamps, ignition units, wires and fasteners);
- scissors;
- Phillips screwdriver
- double-sided tape or clamps.
You may need a 25mm drill and cutter, as well as some wrenches.

Do not neglect safety precautions when installing xenon, as you can not only damage the equipment, but also seriously injure yourself. Therefore, keep your hands dry and free of oil.
Also, do not touch the xenon bulb with your hands. In case of contact with it, it is necessary to degrease the surface with alcohol.
It is better to check the correctness of the connection according to the scheme, which will certainly be in the instructions. You can also use this xenon connection diagram: 
Some difficulties arise when installing xenon with your own hands on cars with on-board computers. If xenon does not function properly during ignition or during lighting it is recommended to install a voltage relay. It will stabilize the load on the wiring at the moment when the headlights light up.
This video shows you how to install your own xenon lamps. Lamps manufactured by IL-Trade, color temperature 4300K with H7 base.


