In detail: do-it-yourself repair of a samsung 940n monitor from a real wizard for the site my.housecope.com.
Today I will tell you how to repair an inverter with your own hands.
If your monitor has a defect that it turns off after two to three seconds after being turned on, and at the same time the image appears at the time of turning on.
A trance defect can be determined by a device for short-circuited loops, by resistance.
Usually one of the trances breaks. This is, in principle, a disease of monitors.
The simplest option, in the absence of a trance, is to install a new inverter, of which there are many on sale.
A detailed examination revealed a defect in one of the inverter trances. It is easy to check this: you need to try the working candle one by one, first at the exit of the first trance, then the second, and so on alternately. In a non-working trance, the candle will naturally not light up at the moment of switching on.
Without going into details, we solder the transformer of the TMS91429CT inverter so that the protection does not work.
After dismantling the trance, it will look like this:
Then we take a ready-made inverter, for the same number of candles (4 candles), which are freely sold on radio markets, radio stores, etc., such as: model SF - 04S402, dimensions: 135-45 mm. Or something similar, the main thing is to fit the inverter in size.
Next, we supply it with power and control, place it with Velcro in a convenient place. It may be necessary to increase the length of the wires from the lamps to the output of the inverter.
Here are some examples of inverter placement.
And here are examples of ready-made inverters.
It will not be difficult for a person to disassemble.
I got the Samsung 940N monitor on the occasion. When turned on, an image appeared for a second, then the screen went out. During verification, a faulty backlight transformer was found (breakage of one secondary winding). There was no new transformer, and its replacement in workshops was slightly less than the cost of the monitor. It was decided to try to restore it at home. The transformer was removed from the monitor board and inspected. Its design could not be disassembled. Since the converter for the backlight lamps was single-ended (there is most likely a gap in the core of the transformer), it was decided to carefully break it in order to try to restore it in the future (gaps during gluing should not greatly impair its operation).
Video (click to play).
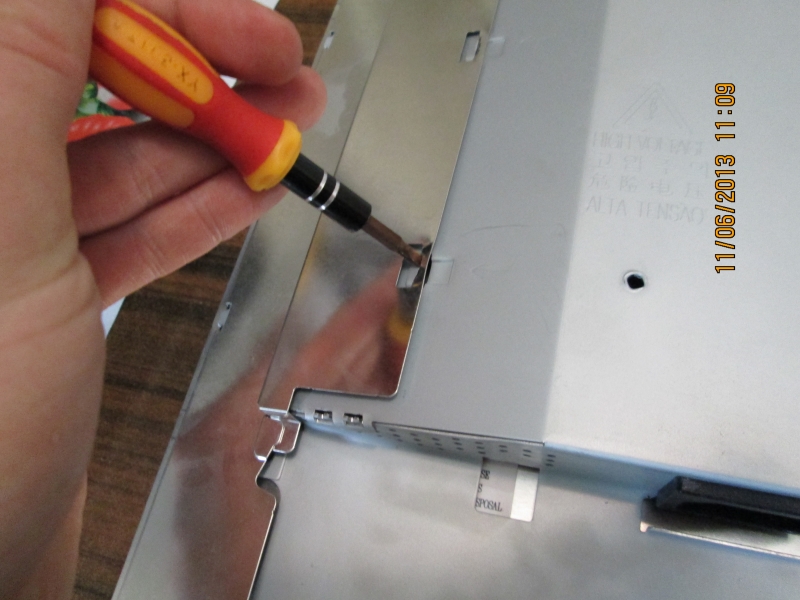
With a screwdriver, its side jumpers were carefully broken off from the W-shaped core. Then, to free access to the winding, the plastic frame of the transformer. The old winding was cut off and a new one was wound in its place, 8 sections of 80-100 turns in one section with a thin wire (it was 0.1), preferably even thinner is needed.
After winding the winding, the transformer core was glued with super glue. The photo shows the glued seam. The frame of the transformer was also glued together. It turned out without the upper protective part (the pieces were too small).
Below in the figure is a view of the transformer from the reverse side, the new winding is on the left side, the terminals are not yet soldered. After soldering the leads and dialing the transformer, the resistance of the new winding turned out to be much lower than the remaining one. Well, this is understandable, the new winding was wound with a wire thicker than the original one.
Next, the transformer was installed in the monitor power supply board (new winding on the underside of the board). The monitor was assembled and performance tested. After turning on the monitor, all the backlight lamps lit up, the power supply did not go into protection. Test run of the monitor showed quite satisfactory operation of the repaired transformer.
It is also possible to restore the performance of the monitor without rewinding the transformer - by transferring the monitor to work only from 2 backlight lamps (one on top and one on the bottom), which can be powered from the remaining working secondary winding of the high-voltage transformer.To do this, it will be necessary to remove the SMD diode "CA2": D10 or D11 from the monitor's power supply board (depending on which transformer winding is faulty) and rearrange the backlight lamp connectors accordingly. The faulty winding will need to be mechanically, carefully removed (cut with a knife). After that, accordingly, the brightness of the monitor will decrease slightly, but the monitor will remain quite working.
They brought 2 samsung monitors for repair - 940n and 740n. Most often, these devices have problems with the power supply, but, interestingly, there are several modifications of these same units for the forties models. Our guys got one modification for both seventeen and nineteen inch models. Accordingly, we will describe the repair of this modification here.
The first thing to do is to look at the display from different angles (preferably with the D-SUB cable disconnected, which VGA goes to the video card). If it is noticeable that the inscription “cable not connected“Then this is our patient. The backlight does not work for the patient, and everything else is normal.
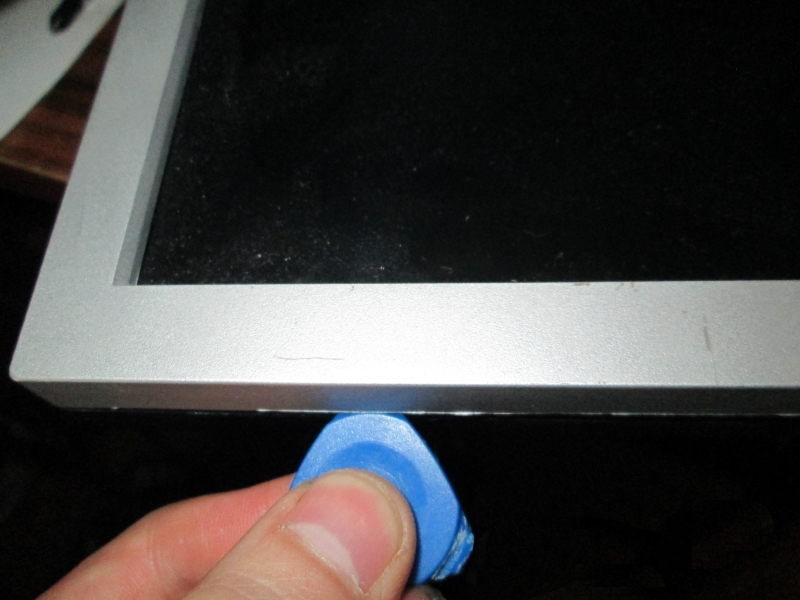
Of course, in order to fix this beast, it must be disassembled. This is done quite simply - we remove the leg and half the body. I half the body using this blue piece that looks like a pick (photo below). You can buy it in most radio markets and one such thing costs about 15 rubles. It is not suitable for any technique, but for both monics, one such was enough for me.
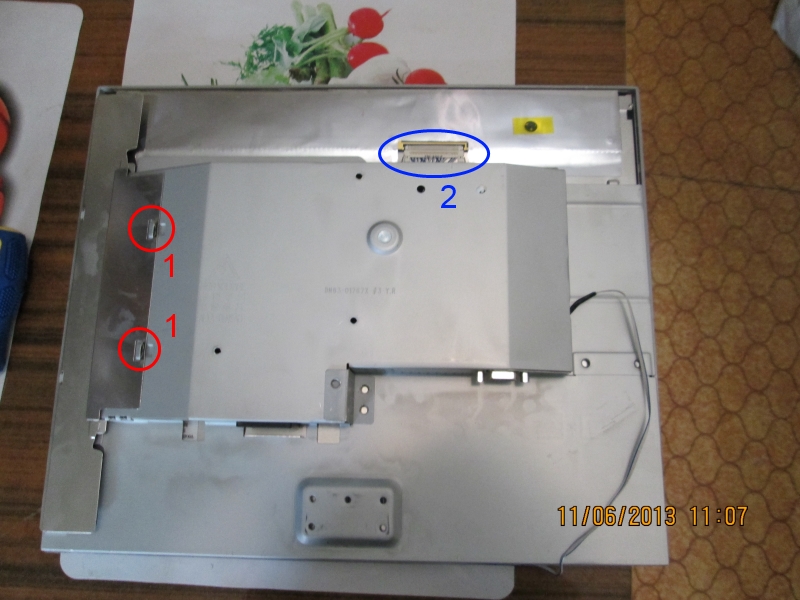
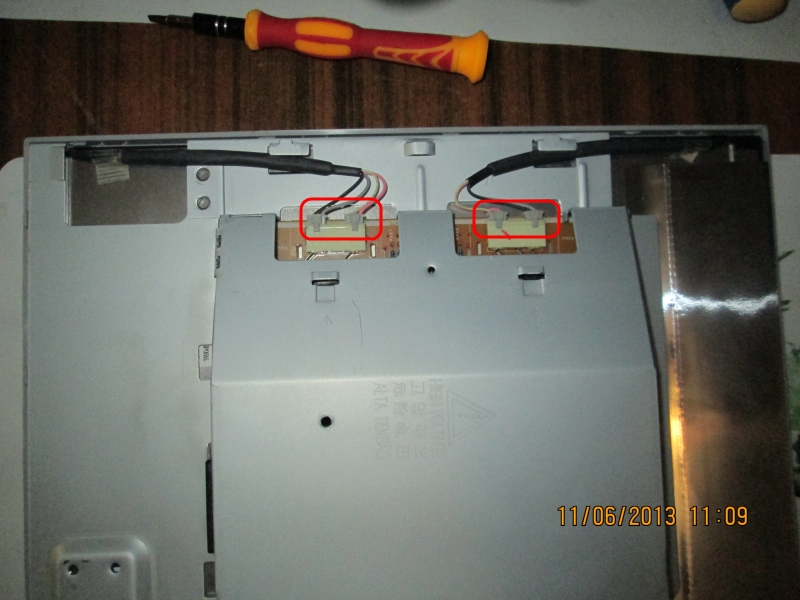
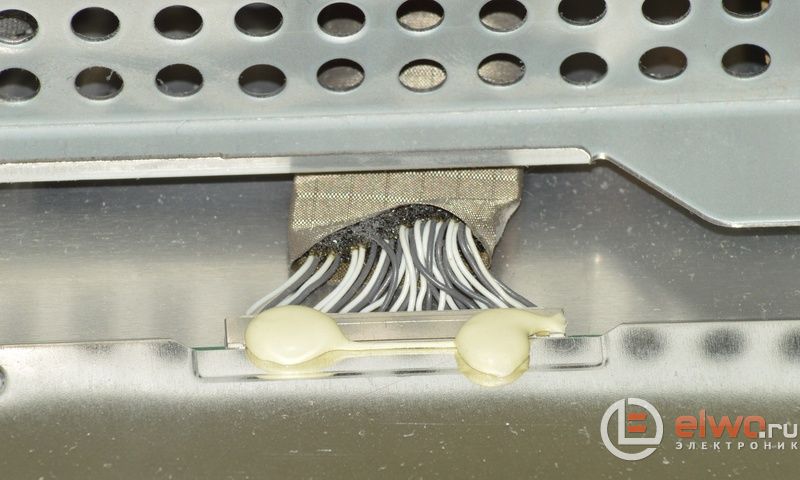
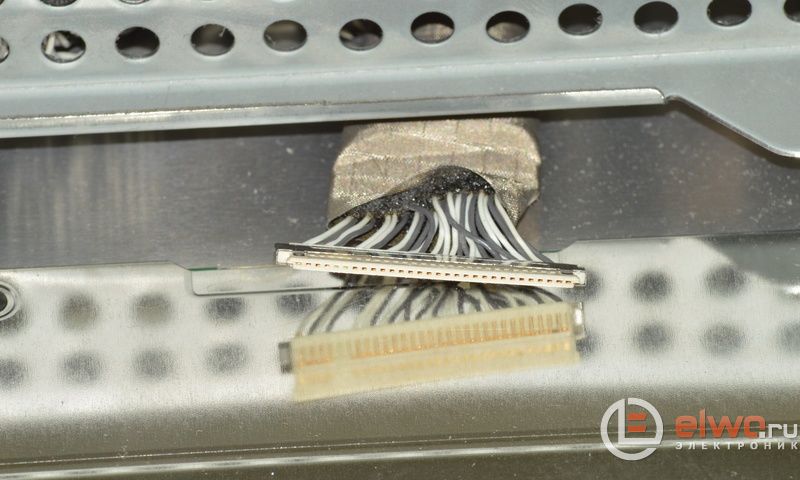
After all the latches are unhooked, put the monitor with the display down and remove the plastic cover. The next step is to remove the casing that protects the wires going to the backlight lamps and unhook the loop 2, circled in blue. The cover can also be removed easily with a small, thin, flat screwdriver. After removing the casing, we detach the wires supplying the backlight (pictured below).
The Samsung SyncMaster 940n monitor received for repair with a malfunction does not turn on, as the owner said that he served faithfully for 13 years, although the production date on the label is May 2007. The monitor itself is well preserved and this was its first renovation. How high quality monitors were made 10 years ago.
Well, I will not delay for a long time and start repairs, in fact, here he is our patient.
When plugged into an outlet, there was no image on the screen and the blue LED on the power button was constantly blinking, which can be assumed that the power supply is faulty. But let's not guess prematurely and from the beginning we will disassemble the monitor.
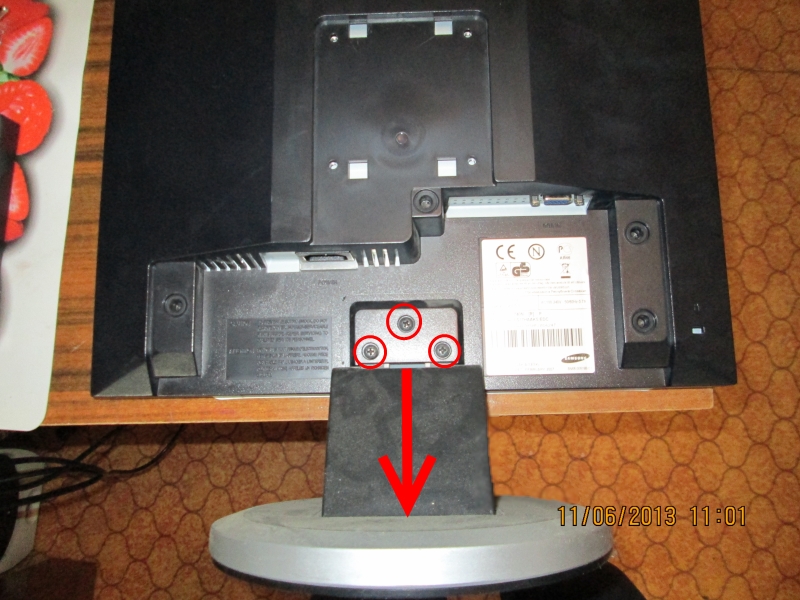
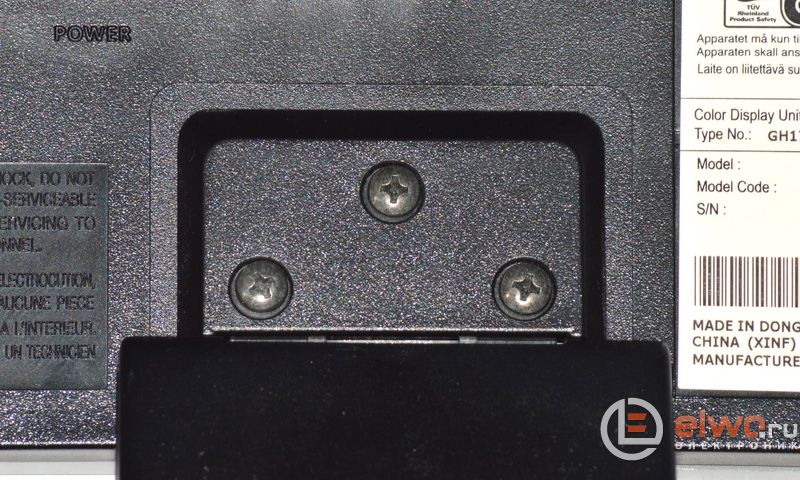
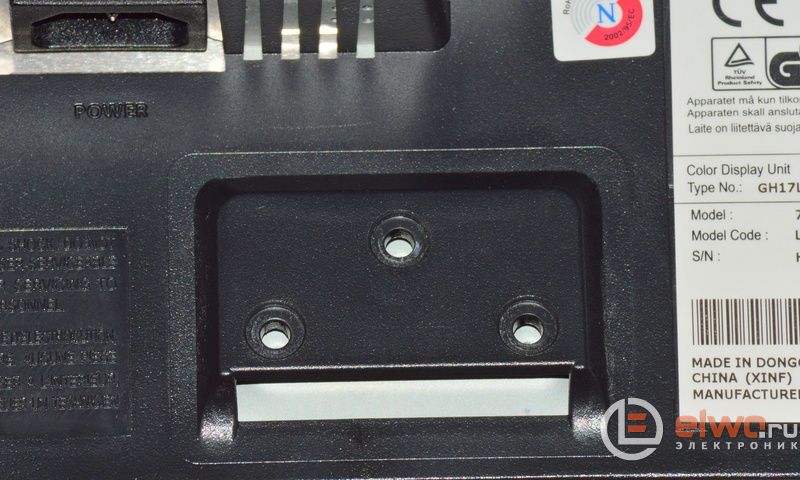
The monitor can be disassembled very easily, it is enough to unscrew three screws, remove the leg and click on the latch perimeter.
To separate the back cover from the muzzle, I use a medical scalpel, it is very convenient for them to do this. So that the scalpel did not press so hard on my hand, I put heat shrink on it.
We insert the scalpel into the gap between the back cover and the frame of the muzzle and unlatch the latches.
After removing the back cover, disconnect all wires and cables.
Then we remove the casing and turn it over. We unscrew the three screws and remove the insulator.
After removing the power supply board and the inverter, here they are combined, three pregnant capacitors were found about which there was a suspicion at the very beginning.
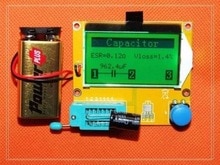
We solder the unusable capacitors. For the sake of interest, we check them on ESR Micro. We see that the resistance is 0.63 ohms and the capacitance is 241 microfarads, which means that the capacitor has almost completely lost its capacity, which was originally 1000 microfarads.
We take out a new capacitor and also check it with a device. Fine! The capacitance in the aisles of the norm is 980 microfarads and esr is 0 ohm, which means that the capacitor is good.
We seal the new capacitors into place.
Capacitors installed 2 pieces 1000 microfarads 25 volts and one 470 for 50 volts. It remains to assemble the case and put the monitor on a technical run and then give it to the owner.
By the way, this monitor has a slightly defective matrix about which the client immediately warned me. So I won't buy a new monitor.
Thank you for your attention, good luck everyone!
Subscribe to the site update mailing list. [wysija_form id = "3 ″]
So, I decided to disassemble the monitor. It did not work right away, because how to understand how he understands is very difficult if you do not know the principle of disassembly. Okay, friends suggested. And I took it apart. How this is done is described here.
Having disassembled the monitor, I removed the built-in power supply board. Here it is on the panel on which the monitor boards are attached (left board):
After I removed this board, I examined it closely. Almost immediately I noticed that one of the capacitors was slightly swollen:
It can be seen that from above, where there should be a flat round incised surface, it is slightly convex.
So, I evaporated this capacitor and replaced it with another one. Unfortunately, I didn’t have one with the same capacity (1000 uF), so I had to use it with a larger capacity (2000 uF). Here it is, already soldered to the board:
Next, I put the board in place, connected the previously disconnected wires to it, assembled the monitor and connected it to the computer. Included. It works!
So, thank God, the monitor is working! And 3 thousand rubles remained with me, and did not migrate into the pocket of someone else's uncle. God grant that it will continue to work properly. What I really hope for!
Repair of the SAMSUNG SyncMaster 940N monitor. No backlight. —————————————————————————————– Laptop Repair Set of 715 BGA Stencils Post card for laptops (compal) https://ali.pub/1hfkg9 DDR3 memory tester Universal programmer RT809f https://ali.pub/1mr2ry Solder mask 5 colors Adapters for laptop adapter https://ali.pub/1mr2x0 Copper plates for the chip cooling system https://ali.pub/1mr340 Universal programmer RT809f https://ali.pub/1mr2ry
LEDs for LCD TVs 6 volt LEDs on LG 2 watt size 3535 (large platform - cathode (-)) https://ali.pub/7ixcg 6 volt LEDs on LG 2 watt size 3535 (large platform - anode (+)) https://ali.pub/wt8hg 6 volt LEDs on LG 1W size 7030 https://ali.pub/ldrz8 3 vola LEDs on LG 0.5 W, size 7020 https://ali.pub/qfwyb LEDs 3 vola on SHARP 0.5 W size 4214 https://ali.pub/1mr16s 3 volt LEDs for LG size 3528 (large platform - anode (+)) https://ali.pub/s0q47 3 volt LEDs on Samsung 1W size 3537 https://ali.pub/nqcai 3 volt LEDs for Samsung size 7032 https://ali.pub/z38c2 LEDs 3 volts on Samsung 0.5 W, size 5630 https://ali.pub/rcilb If you don't see what you're looking for in the list, search here! https://ali.pub/t3g4v
Equipment and consumables for repair Multimeter UT-890C https://ali.pub/1mr32n UV Lamp for Drying Solder Mask Super Tester of Electronic Components Thermal Conductive Tape for LED Lighting Universal programmer RT809f https://ali.pub/1mr2ry
Useful modules DC-DC buck converters https://ali.pub/1mr2h2 DC-DC boost converter https://ali.pub/1mr2jl Battery charge board Li-Ion 1A https://ali.pub/1mr2zc Charging board for multiple Li-Ion batteries https://ali.pub/1mr30w LED backlight for LCD monitors and TV https://ali.pub/1mr2no
Video Repair of the SAMSUNG SyncMaster 940N monitor. No backlight. HamRadio Tag channel
A Samsung 940N LCD monitor has been repaired with a declared malfunction - the image disappears a couple of seconds after turning on.
We try to turn it on - indeed, after turning it on, the image appears for a few seconds, then the screen goes out, that is, there is no image backlight, the image itself is present. We will disassemble.
We snap off all the latches along the monitor body with a pick and remove the back cover. We inspect the inverter board for swollen capacitors - there are no swollen capacitors. We try to throw in external lamps (we change all four).
The lamps are on and not extinguished. Everything is clear - the matter is in the lamps (that the matter in the lamps was clear a little earlier, when red light prevailed in the image, which appeared for several seconds, since the lamps are used in two colors - blue and red, it was immediately clear that it was burning weakly (or not lit at all) blue lamp). We will change the lamps.
The matrix name of this monitor is HSD190ME13.
We remove the piece of iron with the power supply-inverter board and with the interface board - the scaler board.
We unscrew the 3 screws from the top and carefully bend the matrix board to the side. We snap off all the latches along the matrix body and take out the matrix itself from the iron frame.
Changing the lamp assemblies. The lamps in this monitor are installed CCFL 39cm * 9mm. Putting everything together in reverse order. We include.
We see a colorful splash screen with information that it is necessary to connect the signal cable to the computer. We connect - a beautiful image in which there is no longer a predominance of red. We put on a four-hour run with periodic off-on. Everything is working.
All photos are taken with Samsung GT-C3222 phone.
1 Precautionary measures
1-1-2 Maintaining the LCD Monitor
1-1-3 Fire and electric shock
1-1-4 Product Safety Instructions
1-2 Repairs - Precautions
1-2-1 General Service Precautions
1-3 ESD Protection
1-4 Precautions for Installation
2 Ttechnical specifications
2-2 Specifications for LS15HAA / LS15HAB
2-3 Specifications for LS17HAA / LS17HAB / LS17HAT
2-4 Specifications for LS19HAB / LS19HAT Models
3 Aligning and adjusting the image
3-1 Equipment Required
3-2 Automatic Color Adjustment
3-3 DDC EDID Standard Input Data
3-4 OSD Menu Adjustment When Replacing Panel
3-5 OSD Menu Adjustment When Replacing Backlight
3-6 Service Function Spec.
3-6-1 OSD service function display method
3-6-2; 3-6-3; 3-6-4; How to operate the OSD service function
4 Troubleshooting
4-1 No power (LS15HAA / LS15HAB)
4-2 No power r (LS17HAA / LS17HAB / LS17HAT / LS19HAA / LS19HAT)