
In detail: do-it-yourself pioneer navigator repair from a real master for the site my.housecope.com.
A Pioneer 802BFV car navigator came in for repair with a declared malfunction - the display is broken, does not show anything. The malfunction is obvious:
Turn on - does not turn on at all. We put on charging, after which the autonavigator turned on, but the image is completely absent, only the sound of switching on is heard, and then when you press the touchscreen, pressing sounds appear. Well, everything is clear, we will analyze it.
Unscrew the 4 screws at the corners of the car navigator:
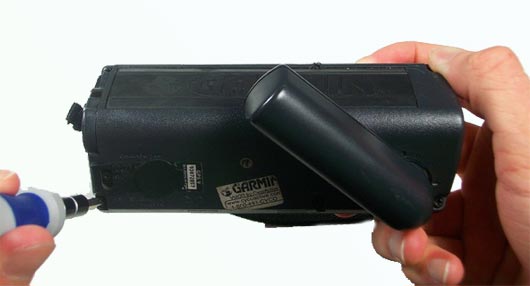
Using a plastic card (the pick has touched somewhere), unlatch the latches along the entire length of the Pioneer 8 02BFV car navigator:
Insert the card from the front side:
As a result, it should look like this:
The insides of the Pioneer 802BFV car navigator, of course, are intimidating: the battery is scanty, they could have at least put a little more, I'm not asking for a battery from BlackBerry, like this, but you could have had a little more capacity. And the power button? What's this? It is the Chinese who make the same boards and insert them into different equipment:
Okay, let's not talk about sad things. Unsolder the microphone and disconnect the display cable from the touchscreen:
We take out the plastic display with a touchscreen:
We insert a new display (it is already assembled with a touchscreen, ordered on aliexpress according to fp211-070-05p4). Here is a photo of the parcel:
Inside, as always, everything is packed in high quality bags with bubbles:
The new display itself + touchscreen on one side:
Changed - collect everything in reverse order - turn on:
Here's a menu that is highlighted:
| Video (click to play). |
In the settings, we calibrate the screen:
Everything calibrated perfectly and works. The repair is over.
All photos were taken with a Kodak EasyShare C1530 camera.
There are no comments yet. Be first! 1,183 Views
An increasingly common problem is the repair of GPS navigators. Not all customers have a genuine warranty card, which can be used to repair the device at a service center for free. And sometimes there is a coupon, but there are no service centers in the city.
The reasons for self-repair can be different. Breakdowns of navigators are mostly trifling. Therefore, it is logical that the user wants to fix the problem on his own, without resorting to the help of often expensive repair organizations.
Whichever brand the navigator is, everyone has similar problems. Here are the most common ones:
- the display does not work;
- buttons stopped responding;
- data is displayed incorrectly;
- sudden shutdown of the device;
- distorted image;
- incorrect work of GPS.
And although repairing GPS navigators is quite difficult, some of these malfunctions can be repaired by yourself at home.
The most common cause of problems with your navigator is mechanical damage. Even with a slight impact, small cracks can appear on the board. They can cause the device to malfunction or stop working altogether. In this case, you need to restore the board. To do this, you need to carefully solder the paths conducting the current. In order not to accidentally touch unnecessary parts with a soldering iron, you can cover them with a piece of a blade.
It is imperative to check all the wires, if at least one of them is lagging behind, then the navigator may stop working altogether. If there is even a slight possibility that the wire will soon come off, you need to solder it. But remember that it is not necessary to use a lot of solder. Even a small amount of solder will do the job well.
Important! If the user noticed any external damage in the case, then it is advisable to replace this part.
The most common display calibration issue is incorrect touch recognition. For example, the user taps the screen on the left, while the navigator thinks on the right and opens the files on the right.Most of all, this problem occurs in the Explay navigators. They have calibration information stored in a folder in their internal memory. If the folder is damaged, then there is no access to the correct calibration.
Special calibration utilities will help to cope with this problem. It is customary to select them depending on the model of the navigator.
The utility is dropped onto an external memory card that is inserted into the device. And already from the main menu the program starts. There are especially difficult cases when it is simply impossible to work on the device. Then the program needs to be inserted into the autorun registry. When you turn on the navigator, the utility should start itself immediately.
Sometimes the buttons stop working. This breakdown occurs very rarely, but it does happen. How and what to do in such a situation is easiest with the example of how to repair the Explay navigator. Because this problem often arises in the devices of this company.
In some navigators such as Expley, the button is quite hard and you have to apply some effort to turn on the device. And if you push the button too hard, it breaks. Or the button may remain intact, but the fake button fails.
To put the false button in place, you first need to disassemble the case. On some navigators, the output for the button may be located under the microcircuit. After that, you need to carefully return the false button to its place, it should be right under the power button.
If the navigator began to display incorrect information or the screen malfunctioned, then you need to reflash the device. To do this, you will have to download the latest software version from the official website of the navigator manufacturer and drop it onto an external memory card. Then insert it into the switched off device. When you turn on the navigator, you need to simultaneously hold down the power and volume buttons, this will open the OS bootloader.
The keyboard shortcut may differ from one navigator to another. In the pop-up window, mark SDMMC (this is an external memory card, but it may have a different name) and restart the device again. The navigator should automatically start installing updates.
Navigator won't turn on - this is a very common problem, especially right after purchase. The device just needs to be charged. You can turn it on after 10-15 minutes after connecting to the charger. Some models need at least 5-10% charge to work. If even after 20-30 minutes of charging the device does not turn on, you need to check if charging works at all. Usually, when the charger is connected, a light on the navigator panel lights up. If this does not happen, you need to check the following points:
- Is the connector defective? If moisture got into it, then it could oxidize and fail. Also, the USB socket could just break. This happens if you rarely pull the cable out of the socket.
- Is the charger working? You should try to charge your navigator with a different charge.
- Check if the outlet works. Sometimes it happens that the navigator charged well from the cigarette lighter, but does not charge from the outlet at all. Plugging into a different outlet usually clears up the problem.
If the connector has oxidized, it can be gently cleaned with wire and an anti-corrosion agent.
In some cases, you shouldn't even try to fix the device yourself, because there is a great risk of completely breaking an already barely working device. And "repair" it so that even a specialist can no longer fix anything. It is necessary to take the navigator for repair in the following cases:
- If mechanical damage touches the screen. It will be very difficult to replace the screen yourself. You can accidentally damage the touchscreen and then you will have to change it too.
- If the user is not sure if he can properly solder the board, especially if he has not done this before.
- If self-repair will cost the same as in a service center. There is no point in wasting your time when professionals will make it better and faster for the same price.
- If the user is afraid to use anti-corrosion agents. It is not normal to get rid of rust without them.
You need to assess your skills sensibly. If the user does not know how to repair electronic devices, then it is better to entrust the repair of navigators to the service center, which will do everything that is needed with high quality.
Repair - replacement of the touchscreen (sensor) of the GPS navigator
All the work on replacing the sensor on the navigator can be done at home if you have: “straight” hands, a Phillips screwdriver, a case opener (you can even get by with a plastic card or other improvised means) and sometimes you need a soldering iron. A thinking head is of course also desirable 🙂
Therefore, for our customers, we wrote a step-by-step instruction with a photo, which is suitable for repairing almost all navigators, since the principle is the same.
The instruction is based on the repair of the JJ-Connect 3400 navigator.
A bit of theory on touchscreens. They are of two main types:
Resistive sensors are usually used in navigators. Such touchscreens have a thin glass base, on top of which there is a touch film, and for interaction with the device there is a loop with 4 contacts. The ribbon cable can either be inserted into the connector on the motherboard of the navigator or soldered to the display ribbon cable. All sensors for navigators and car radios that are sold with us are universal 4-pin with loops, respectively, for soldering or for a connector.
First, of course, you need to disassemble the navigator. Almost all navigators consist of two parts, which are fastened together with 4 screws, and along the perimeter with latches. Be sure to also remove the memory card and stylus.
To do this, you need a screwdriver and an opener.
Next, you need to remove the display with a touchscreen. Take a closer look and find the place where the display flex cable is inserted. In our case, it was necessary to remove the metal cover.
Disconnect the display connector from the motherboard.
If the touchscreen flex cable is connected through the connector to the motherboard, then remove it from this connector.
Next, remove the display from the case. We will just work with him.
If the touchscreen cable is soldered to the display cable, then first unsolder it.
Now comes the fun part. It is necessary to separate the old sensor from the metal display frame. Since it is attached to double-sided tape, it is quite easy to do this, for example, using an ordinary clerical knife. Just very carefully, do not squeeze. Be careful not to hit the display matrix with the blade. Also, do not cut yourself by the sensor glass.
Then clean the traces of glue on the metal frame. You can use ethyl alcohol or isopropyl alcohol.
Now it's time to install a new sensor! Which you purchased from us by choosing by model, or universal in size (width and height).
Make sure there is no dust on the display. Peel off the protective film and the film that covers the adhesive from the sensor. Apply the touchscreen evenly and neatly to the display frame, positioning it relative to the flex cable and the visible area. Then press down a little around the perimeter so that it sticks.
If the touch screen has a cable for a connector, then all that remains is to put the finished display module back in place and connect the cables. If the loop is soldered, then first solder it.
After installing the display in its original place, it is advisable to check all the work. Turning on the navigator, an image should appear on the matrix, and by poking at the sensor, it should react (albeit at the wrong points!). After replacing a new part, it is imperative to go through the calibration in the corresponding menu of the navigator.
We will be grateful if you share the link in social networks, forums and blogs.
A GPS navigator is definitely a very convenient thing, so when it breaks down, the driver often feels like he has no hands. What breakdowns are most common and where is it better to repair such equipment?
Some, in pursuit of savings, prefer to repair and configure navigators with their own hands. However, if you are not a specialist, it will be difficult for you to identify the exact cause of the breakdown and fix everything with your own hands efficiently and for a long time. In addition, there is a risk of permanently breaking the device, and then you will have to buy a new one. Therefore, it would be much more correct to remember the saying “a miser pays twice” and contact the service center.
Most often, navigator repair service specialists have to deal with a software malfunction, which manifests itself in the incorrect display of information on the screen of your device when the car is moving. In addition, such failures include a sudden shutdown of the device when the battery is fully charged, visual distortions of the image on the display, as well as incorrect operation of the GPS navigator with external devices. To fix these problems, you need to replace the software and configure the device.
If moisture gets on the internal elements of the navigator, a short circuit may occur, and then it is required to dry the device, clean its board from the salt deposits that have appeared and replace the failed elements.

In case of mechanical damage to the device, microcracks may appear on the board, which also leads to malfunctions or complete inoperability of the device. To repair such a GPS navigator, it is necessary to restore the board and solder the conductive tracks. If defects appear on the outer surfaces - scratches or chips on the case or screen - the damaged elements must be replaced.
Malfunctions in the operation of the device can also occur as a result of violation of its operating conditions. If you use your device in critical temperatures, high humidity, etc., you should be prepared for the fact that sooner or later it will fail.
When can you count on warranty repair of your navigator? In case of violation of the operating conditions, as well as if the fault of the owner of the device in the breakdown of the GPS navigator is proven, warranty repairs are not made. In all other cases, within the period specified in the documents for the product you purchased, you can use the warranty service.
Our site will help you quickly find an experienced craftsman to order any home appliance repair services. Submit your request and trusted specialists will offer you their services and prices.
When your favorite gadget fails, it's always a nuisance that you want to get rid of as soon as possible. In this case, the main thing is not to rush to replace it with a new one, since the repair and adjustment of Pioneer navigators performed by a competent master can solve the problem.
Parts of the car navigator that may require replacement:
- touchscreen and display;
- control buttons;
- software.
YouDo employs only qualified technicians with vast experience in the repair of Pioneer navigation systems. Our specialists regularly perform such types of services as:
- repair of the navigator screen
- repair of the LCD display of the navigator
- housing replacement
- GPS receiver repair
- repair of Pioneer charging connectors
- battery replacement
- speaker repair
- replacement of control buttons
- flashing
- Russification of the navigator
- map update
- recovery of the boot area of the software
- cleaning from sand, dust, dirt
- restoration of communication with satellites
- and much more.
Repair of the gps navigator Pioneer by our masters is carried out in 4 stages:
- complete diagnostics of the device;
- repairs;
- replacement of spare parts, if necessary;
- test run.
Diagnostics and repairs should be trusted only by a specialist who understands the device of Pioneer navigators, since without special skills and qualifications, you can incorrectly determine the cause of the malfunction and “repair” the wrong part. The performers registered on the YouDo crowdsourcing exchange are specialists in the field of servicing electronic devices. They will be able to carry out high-quality repair of Pioneer navigators in Moscow and St. Petersburg.
The advantage of the Yuda exchange is that you can choose a master at the price that suits you, or offer your own price. On average, in Moscow and St. Petersburg, our masters perform round the clock repair and adjustment of pioneer navigation systems at prices ranging from 1,500 to 3,000 rubles.
How to order repair of the pioneer navigator on our website?
If your navigation system malfunctions, and you need it in working order urgently, the fastest way out of the situation is to leave a request on our website. After that, we will immediately call you back to clarify the details of the order and send the master to you on the same day wherever you say.
Or you can call us yourself, our operators will answer all your questions in detail and advise on the prices and services of our specialists.
Any of the indicated algorithms will allow you to receive the service you need - whether it be repair of the screen (display) of the navigator or firmware of the navigator - in the shortest possible time at the lowest prices in Moscow and St. Petersburg around the clock.
Novosibirsk, Frunze st., 5 (office 718A)
Repair of GPS navigators, car acoustics, car TVs and monitors, car washes, electrical equipment, MP3 players.
Manufacturers: Pioneer, 3COM, 3Cott, 3EYE, 3M, 3Q.
Novosibirsk, Tvardovskogo st., 3
Repair of GPS navigators, car acoustics, car TVs and monitors, car alarms, MP3 players, car radios.
Manufacturers: Pioneer, ACV auto, Acer, Aiwa, Alpine, Asus.
Novosibirsk, Tank st., 72
Repair of GPS navigators, MP3 players, headphones, PDAs, pocket computers, motherboards, monitors.
Manufacturers: Pioneer, A4Tech, Acer, Activ, Alpine, Apple.
Novosibirsk, Kropotkina st., 205 (2nd floor, office 204)
Repair of GPS navigators, car radios, acoustic systems, music centers, turntables.
Manufacturers: Pioneer, Acer, Aiwa, Akai, BBK, Benq.
Novosibirsk, Krasny Prospect, 99 (1st entrance, office 6)
Repair of GPS navigators, MP3 players, headphones, video cards, data recovery, hard drives (HDD, SSD).
Manufacturers: Pioneer, Acer, Asus, Benq, DESTEN, DNS.
Novosibirsk, Dusi Kovalchuk st., 266
Repair of GPS navigators, MP3 players, video cards, data recovery, hard drives (HDD, SSD), game consoles.
Manufacturers: Pioneer, Apple, Asus, Dell, Fujitsu-Siemens, HP.
Novosibirsk, Boris Bogatkov st., 208
Repair of GPS navigators, MP3 players, headphones, video cards, data recovery, hard drives (HDD, SSD).
Manufacturers: Pioneer, Apple, Asus, Canon, Casio, Dell.
Novosibirsk, Sovetskaya st., 22
Repair of GPS navigators, MP3 players, video cards, data recovery, hard drives (HDD, SSD), uninterruptible power supplies (UPS, UPS).
Manufacturers: Pioneer, AMD, Acer, Acorp, Akai, Akira.
Novosibirsk, Belovezhskaya st., 12
Repair of GPS navigators, car acoustics, car TVs and monitors, car washes, MP3 players, car radios.
Manufacturers: Pioneer, 3Q, 4Good, A319, A4Tech, ACME.
Novosibirsk, Krasny Prospect, 157/1 (House of Design Institutes, main entrance, 3rd floor, office 324)
Repair of GPS navigators, computer acoustics, scanners, laptops, monitors, stationary computers (desktop).
Manufacturers: Pioneer, Intel, Lexand, Treelogic, Wexler, Digma.
The organization was checked by the administration of the portal and provided documents officially confirming the conduct of these activities, as well as the conduct of the reception of citizens or the presence of a workshop at the specified address.
Used in everyday life, and not only as a GPS, but also for listening to music and watching movies, navigators break down, not withstanding such a load. Most often: the touch glass stops responding to touches, the touch glass cracks, the connector is broken or partially torn out; car GPS has difficulty finding satellites; the display is broken.
In this case, you can contact our service center, and having purchased the part you need from us, replace it yourself.
However, as a rule, independent repair of GPS navigators Pioneer leads to even more problems. Therefore, trust our masters, who, after listening to you and carrying out diagnostics (FREE), will voice the problem, expediency and price repair.
If you are interested, how much is this or that detail, even before contacting us, you can familiarize yourself with the price list below.
We understand that we are not the only workshop in Moscow in providing this kind of services and in order to win in the competition, we are sensitive to our clients, their requirements and desires. For regular customers of the gsmmoscow center, there is a system of discounts, we carry out repairs conscientiously using original and high-quality components and in a short time. In our center price 100% quality assurance.
2. if we replace a defective part in GPS, then we use original and new parts, which significantly extends the service life;
3.well and, perhaps, the most important of all of the above is that in our service-center We accept only experienced and qualified craftsmen. Without good craftsmen who know what they are doing and know the structure of the device, even the highest quality part will be completely useless if it is incorrectly installed.
2) when the device freezes, does not load well, there are problems with finding satellites, it may be necessary to replace the microcircuit, controller or GPS module - this takes at least two hours;
3) in the case when you do not know why the navigator does not work (there are no apparent reasons) and the wizard, when examining the device, also did not find why it does not work, then before starting the repair, you need to carry out diagnostics. The time required for its implementation is at least half an hour.
Although, of course, if the breakdown is ordinary and common, then, as a rule, it takes from half an hour to two hours.
Contact us at the service center, we will do our best to make you leave us with a feeling of deep satisfaction!
Car radio repair pioneer - as everyone knows that nothing is eternal. Similarly, car audio equipment has a tendency to wear out gradually. In this article, we will analyze how to troubleshoot a car radio. For example, on the basis of when the head unit cannot turn on or turns off during operation.
The first step is to find out the main reasons for which the device does not work:
1. One of the main signs that the head unit is not working is trivial contamination of its mechanical components.When using a radio tape recorder in difficult conditions, dust can get inside the case and thereby disable units and elements of optical and mechanical purposes. One of the proofs of the formation of dirt on the mechanisms is the braking of the disc and the inability of its correct reproduction of music.
2. The next factor that determines why the car radio does not turn on is technical malfunctions. Such a breakdown may include the supply voltage path. It is this problem that arises as a result of the incorrect initial connection of the head unit. The lack of illumination of the radio tape recorder scale or the inability to turn it on, this is already the first sign of a malfunction in the supply voltage circuit.
Car radio circuit board
Before you start car radio repair pioneer and dismantle it from the car, try to study the main malfunctions that occur in the radio equipment. Indeed, before starting the repair, you should definitely know what exactly is to be repaired.
1. With such a symptom, the first thing to do is to check for the presence of a + 5v supply voltage. Then we check the voltage + 14v on the second pin of the CN701 connector, which goes to the collector circuit of the output transistors. In the absence of + 14v voltage, most likely one of the transistors or a zener diode has failed.
2. Not supply voltage signal. In this case, the IX901 controller is checked, in particular its fortieth contact, which should have a voltage of + 4.8v. In addition, there must be a pulse voltage at the third contact of the controller.
Car radio repair pioneer - ringing out with a multimeter
There are many options for such a malfunction:
1. There is no sound when starting the engine, or when you add volume it disappears. As a rule, such a problem is created due to the absence of the Stand-By signal. With such a malfunction, the presence of a + 4.8v pulse on pin 4 of the IC901 microcircuit is checked. If there is no sound and impulse, then most likely the problem is in the controller and it must be replaced. In addition, if the sound disappears when starting the engine or increasing the volume, check the reliability of the power amplifier contacts.
2. When starting the engine, the sound is colored with a strong background. In the case when the background appears when the sound volume is increased, it is necessary to determine the presence of voltage in the base circuit of the output transistors. The value of the voltages at the base terminals of the transistors must differ from zero. If the sound takes on a background tint when the volume is increased, and there is no voltage at the bases of the transistors, then this may indicate a malfunction of the transistors. Another reason for the occurrence of a background when the sound volume is increased may be a malfunction of the mute button or damage to the controller itself. Also, with such a problem, the Q802 transistor must be checked.
3. Malfunctions in the audio path of the radio can appear due to problems with the capacitors installed in the circuit, so they also need to be checked. Any module in the system that passes the audio signal circuit must be tested from the input stage to the output.
Sometimes there are situations when the head unit does not read the flash drive or CD after the car engine has started. Either the disc is jammed in the drive, or intermittent playback is in progress, the device does not see the flash drive.
The reasons for such problems can be the following:
1. It is possible that the playback device is simply unfamiliar with the format in which the recording was made. Try a different disc format.
2. When the system cannot detect the disc when starting the engine or it is stuck in the drive, the playback is intermittent. This can be due to dust trapped on the optical lens.Everything is clear here - you need to remove all the dirt with improvised means, and for the best effect, use a special disc for cleaning.
3. Also, another possible reason could be the lack of voltage on the laser. With such a malfunction, you need to try to adjust it.
4. One of the reasons for the breakdown of the system can be the failure of wires or a loop. Even during the operation of the car, the fastening screws inside the device loosen, which leads to a distortion of the structure.


