In detail: DIY foot pump repair from a real master for the site my.housecope.com.
Is a foot pump (photo 1) more profitable than a compressor? Yes! In the event of a breakdown, it can be repaired by yourself.
- the valve is stuck in the cylinder,
- inside, when shaken, a knock is heard.
To repair the foot pump, we need:
Squeeze the protruding ends with pliers (photo 2)
and take out the cotter pin (photo 3).
We release the stem from the socket (photo 4).
Remove the lock washer with a screwdriver (photo 5)
and take out the axle on which the cylinder is attached (photo 6).
We knock down the lid with a hammer (photo 7)
and take out the insides (photo 8, 9). Everything spilled out into the hand, which means the nut has been unscrewed. The breakdown is not terrible.
We check the components, the kit should include (photo 9):
Putting it together in the same sequence as listed above. We put a pressure washer on the rod (photo 10), the edge is curved and should be directed towards the piston.
Next is the rubber piston and washer (photo 11).
We check the integrity of the grower, if it bursts, we change it and put it on the stock (photo 12). Lubricate the piston with grease or other grease.
We screw the nut (photo 13) not all the way, so as not to crush the rubber piston.
We fill it neatly into the cylinder (photo 14)
and with a hammer, tapping in a circle, we put on the lid (photo 15).
Good time, Friends, fishermen!
On an extreme fishing trip I got into trouble, the pump for pumping the boat out of order.
Fortunately, he was not alone, his partner borrowed his. This is what the initial examination showed, the seam came apart, and the fabric was frayed.
So I had a free day, I decided to do the repairs.
I didn’t immediately "finish" how to disassemble this product of the Asians brothers!
On closer examination, it turned out that everything is simple, like sending two bytes, you only need a slotted screwdriver. First, I removed the sealing gum, such as an oil seal.
| Video (click to play). |
Then he began to "unfold" the fabric.
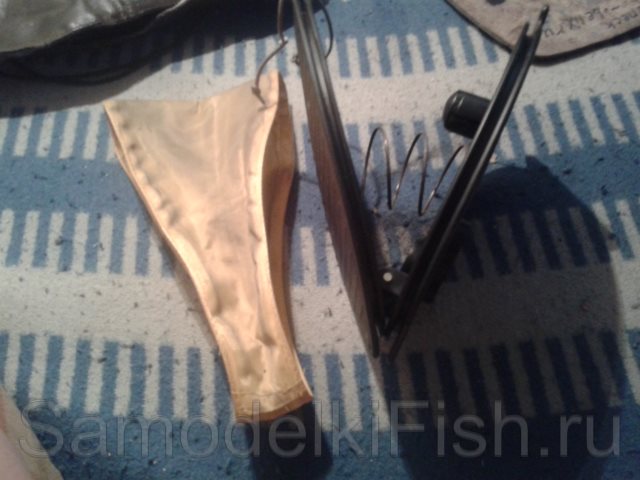
DIY boat foot pump repair
An autopsy of the "Patient" showed that the patient is rather dead than alive!
He started resuscitation. I ripped open all the seams, inside there was a nylon cord instead of a side ring.
Since this “skin” cannot be reanimated, I decide to replace it with natural leather. All the same, our ancestors also used leather on blacksmith furs. Put a cloth on my skin
Outlined the outline with a simple fountain pen and cut out with scissors.
At home, the sewing machine could not sew the leather, it was manually sewn with an old braid.
I decided not to stitch along the contour, but to glue it with glue. But first I checked how the skin would hold in the groove of the case, as it turned out, the native nylon cord is rather thin. I tried on a rubber "oil seal", so it came up just right.
It remains only to "wrap up" everything in the reverse order. I started from the narrowest point.
Since the skin was inserted into the groove quite tightly, I had to help with a screwdriver, only it was necessary to slightly round the edges of the slot on the screwdriver so as not to cut through the skin.
As a result, I managed to resuscitate the pump in about an hour.
A self-repaired foot-operated boat “frog pump” is ready for new and long-term operation.
I hope my experience is useful to you. Thank you for taking the time to read this article.
Melnikov Pavel - Especially for the site SamodelkiFISH, Novokuznetsk, Russia
Pages 1
You must login or register to post a response.
- universal
- Regular customer
- Inactive
- Where: Circus District
- Registered: 2011-10-19
- Posts: 1,776
- Thanked: 5109
The topic of a good pump for a PVC boat is very painful for many, since pumps tend to break at the wrong time or do not satisfy us with real performance characteristics.
The pump bellows quickly deteriorate. Made of not very dense PVC fabric, they quickly lose their airtightness - the fabric exfoliates, air bubbles, cracks and holes form. The fur pump becomes a useless item or you have to transport another pump for final inflation.
Repair of a fur membrane (gluing from the inside) usually gives temporary results - damage is still formed in neighboring places. Plus, it is clear that all repair manipulations with the pump are time and nerves.
On this basis, many have long transferred fur pumps to the category of consumables: they used the season - threw them out, bought a new one. But that's a different topic, and here I ask you to post specific recommendations for repair.
I am demonstrating my experience in repairing the membrane of a fur pump, maybe someone will come in handy ..
1. Disassemble, remove the old membrane. We cut it in a place convenient for you - I chose a cut in the narrow part.
2. We use the old membrane as a pattern. We cut out a new membrane from PVC fabric with a margin of length at the gluing point.
My fabric is denser, probably about 800 g / m2 (the more interesting the experience of subsequent operation will be).
3. Remove the PVC seal from the old membrane or look for a similar new one.
4. We glue it onto a new membrane.
5. We measure the length of the membrane along the pump casing to control the exact length of the workpiece when gluing. Convenient to make with copper wire.
6. Glue the membrane. I filled in the gaps in the PVC seal (my old one was not enough) with small strips of linoleum.
7. Install on the pump body.
Time will tell how long the new product will live.
Continuation of the story a little later 
- universal
- Regular customer
- Inactive
- Where: Circus District
- Registered: 2011-10-19
- Posts: 1,776
- Thanked: 5109
No matter how perfect your pump is, it will not pump a PVC boat well if air leaves the place where the hose connects to the valve. At the resupply, the pressure on the nipple will be weakened, plus it is inconvenient for one to swing the ship - the hose jumps out without hooks.
For some reason, there are no proprietary limit switches with retaining horns for a Bravo-type valve, and for some reason they do not always coincide in the required shape (valve cups are different).
For several years I have been using a home-made end fitting made of a polypropylene pipe with a diameter of 20 mm.
This diameter is also suitable because it fits snugly into the hose for the washing machine. Therefore, it is also not difficult to replace or lengthen your pump hose.
One hook horn fell off on my last piece. I decided to make a new one for the repaired pump.
The manufacturing process can be seen in the photo.
1. We mark curved details on a piece of pipe. Take an ortrezok pipe 70-100 mm - then it will be easier to manipulate when joining the hose - insert, rearrange.
We do everything according to the size of the plug on your valve!
2. Drill out, cut out, cut out. Polypropylene is easy to process.
3. Burrs can be slightly melted over an open fire (1-5 sec.!).
4. We make a tapered winding of electrical tape for a snug fit in an interference fit. Or, as skillfully, we wind up a little electrical tape, tightly screw the plastic nut to the desired depth, cut out the rubber (. Polyurethane foam) washer.
5. In the end piece from the side of the hose, you can insert an adapter for a narrow rubber hose, usually in rubber frogs. We picked up the tube, heated polypropylene on gas, and inserted it.
Got a versatile thing
Not visible in the photo - I have a piece of aluminum pipe inserted. It can be rearranged, if necessary, easily, the joints are sealed with electrical tape. Everything !

- mxm
- Regular customer
- Inactive

- Where: ost. Female worker
- Registered: 2010-03-17
- Posts: 867
- Thanked: 2394
- Per post: 2
I will supplement the topic with the repair of the swivel joint of the Bravo pump-pump 7.
As a result of a breakdown on one of the pump halves of the hinge tips, the pump became unusable. I didn’t throw it away, but left it for long winter evenings. Finally, hands reached him.
1. I decided on the restoration method: installing the tube on the broken part, with an inner diameter equal to the diameter of the loop axis.
2. Search for a suitable tube. A brass rod came up from an old plug connection.
3.Boring a tube seat on a broken assembly. As a cutter, I used a drill with a diameter equal to the outer diameter of the tube. With its side part, I pierced the broken hinges to the desired size.
4. Securing the tube in place. Glued the tube in place and tightened it with a sheet metal clamp using 2 screws with M3 nuts.
5. We collect the pump. Everything is ready!!
Field tests have not yet been conducted. But with active “pedaling” nothing seems to portend the weakness of the design.
You can see everything from the photographs, if something in the text is incomprehensibly outlined.
Replacing the valve in the car foot pump.
completion of the tip.
Waiting for comments, likes and subscribing to the channel
Auto foot pump repair, new valve manufacturing.
For cats
We start a snowdrop
https://ali.pub/2bmn5m
(portable smart charger tested for years)
inserts in shock absorber springs
AutoFen will always come in handy
Liquid glass is just super
Excellent multitool from the market leader
Premium tool
Suitable pressure gauge
https://ali.pub/1z5fdg
Oil change pump
https://ali.pub/1g5nc0
Cool down the car interior while parking
auto solar powered fan
https://ali.pub/1z5fy9
The pump pillow will help open the car or
lift a weight from an uncomfortable position
https://ali.pub/1z5fm7
# drive # engine # autoluk # car # cars # car # road # cars # cars # racing # speed # auto vinyl # steering wheel # autopathy # spoiler # auto # auto tuning # tuning # auto rally # car # motorist # auto travel # car # road home # power #car #driver
Pump repair, valve, pump valve, check valve, pump, auto pump, frog, foot pump, pump, car pump, Valve, valve pump, pump, pump valve ball, disassemble foot pump, disassemble pump, pump pressure gauge replacement, Hose replacement pump, drive, engine, autoluk, typewriter, cars, car, road, cars, cars, race, speed, auto vinyl, steering wheel, autopati, spoiler, auto, auto tuning, tuning, auto rally, car, motorist, auto travel, repair, auto repair, pump repair
Video Foot pump repair # Aleksandr Raldugin channel pump
Don't Litol can get inside the car and damage all non-oil resistant rubber bands.
Change the pump! Take the cheapest or, conversely, "Jock".
What a nightmare! What if I already got it ?! : We urgently need to check if the car has deteriorated from lithol (what if it gets into the wheel bearings - trouble!).
But seriously, the method works and nothing gets anywhere or spoils. Instead of lithol, you can use thick silicone (it is chemically neutral :)))
Oil on the outside of the tire is one thing. And the other is inside. When it is not washed off by the rain and corrodes on the sly. I wouldn't risk it. Pumps - from 80 rubles.
How else can you understand "no"? It is possible and necessary to understand that "no" is harmful.
Many places: In the tube or splint, in the nipple (if rubber), on the nipple seal (if metal), on the nipple cap gasket, on the nipple elastic (if it is not plastic :)).
Accidental release of lithol from the hose in the area of the front wheels can lead to oiling of the brake discs with a subsequent deterioration in the efficiency and symmetry of braking, as well as to the ingress of oil on the cuffs of the brake cylinders.
I see you are interested in the question: maybe continue.
for any you boil (except hunger strike)
Group: Moderators
Posts: 6 583
Registration date: 18.8.2005
Insert nickname
Quote
From: Smolensk, Russia
User #: 261
Thanks said: 169
Your car: Kia Rio
Real name: Ivan
I disassembled the pump, diagnosed with hanuriki cuff (the one that pushes the air). Where to get a new one? Crawled into the court - they said no, it won't, it doesn't happen, and don't look. Well, really because of one rubber band to buy a new pump. They must be on sale somewhere. Where to look?
PS Foot pump, made in Russia.
Group: Advanced Users
Posts: 1 420
Registration: 18.3.2008
Insert nickname
Quote
From: Smolensk
User #: 7 884
Thanks said: 1284
Your car: VAZ-2171
Real name: Vlad
I disassembled the pump, diagnosed with hanuriki cuff (the one that pushes the air). Where to get a new one? Crawled into the court - they said no, it won't, it doesn't happen, and don't look. Well, really because of one rubber band to buy a new pump. They must be on sale somewhere. Where to look?
PS Foot pump, made in Russia.
When I was little, I made a cuff for a bicycle pump myself from a regular piece of rubber. Try it, it might work.
In this article, I will talk about repairing my boat pump.
It so happened that I got the boat "Pelican" - 268 without a pump. Had to buy it separately. But he did not cooperate with the boat for long. I have only managed to inflate the boat with this pump a few times. After which he began to die quickly. And this despite the fact that not always I rocked the boat with a foot pump from start to finish. Often I pumped it with an electric pump, and finished it to the required pressure with a foot.
Pump characteristics: volume - 5 liters. Pressure - 400 mBar. Manufacturer: LLC "Premier", manufactured in the river. item with a strange name - Attic. The pump died quickly. The sticker on the bottom cover of the case did not even have time to rub off!
After a fairly short use, the pump gradually began to wipe the fur on the folds. It was already difficult for them to pump up the boat to the required pressure: more air was released into the atmosphere than into the boat. Therefore, I had to postpone it until winter and end the season, finishing off the pressure in the boat, with a rubber "frog".
The pump fur is made of PVC. Damage visible: from multiple bends.
Putting patches on the damaged places, I considered it useless - after a while, the fur will break in another place.
I tried to find an acceptable method for repairing a pump on the Internet, hammering in the search for "repairing a boat pump", but I did not find anything suitable.
I began to think. It was necessary to find a worthy replacement for the unreliable PVC material. I remembered that there were a couple of rubber boats lying around in the barn. No benefit, but it's a pity to throw it away. But what if you try to make a pump fur from the material of an unusable boat? After all, rubberized material, unlike PVC, is not afraid of multiple bends. It's worth trying, it won't get any worse.
To do this, the pump had to be disassembled: by unscrewing the screws from the clamping clamps, I removed the damaged fur.
Along the perimeter, the fur was generously coated with sealant.
Surprise! As the axis, the manufacturers used a regular nail, 120 mm! Just inserted and bent. The Chinese masters certainly would not have thought of this. Quite a reasonable decision. But such a decision is forgivable for me, for example, as a DIYer. And unforgivable for a company that manufactures pumps, boat accessories and even boats.
Well, okay, the nail does not affect the pump operation.
I will continue.
I tore the gluing of the fur. The result is such a "boxer belt".
Then, I placed the sample on a piece of rubberized cloth taken from an undamaged section of an old boat. I circled the sample with a marker. But circling around, I made an allowance of 1.5-2 cm more, for the convenience of future installation.
Further, I glued the cut out blank with Boat glue, pulled it off with a clamp and left it for a day to dry.
While the workpiece was gluing, I decided to replace the inlet valve at the pump. The fact is that the standard valve is made of rigid PVC. Because of this, he slowly sucked in air.
I cut the new flap from the same rubberized fabric.
On the left is a new valve. On the right is a regular one.
The new valve has been installed. And the bent part of the nail, I still cut it off - I could not look at such a disgrace!
The fur blank is glued and ready for installation.
I decided to make a trial installation of the bellows on the pump casing without the use of glue. When tightening the screws, the plastic ties began to break.
Regular ties turned out to be flimsy and weak.
I had to make similar screeds, but this time from galvanized sheet.
On the left is a new screed. On the right is a regular one.
Retainers for new and old screed.
The pump can now be assembled. Having lubricated the grooves of the pump covers with Boat glue, I installed new ties.
New screeds are much more reliable.
That's all. The pump is ready!
After final assembly of the pump, I was going to cut off the excess, protruding part of the fur.
But I decided to leave it: being lowered down, it will protect the protruding side from accidental blows and damage.
Well, now - the test of the restored pump:
If you squeeze the pump with your hands, close the inlet valve and release it, it remains in a vacuum state for a long time. The tightness is excellent!
Over the course of several days, I rocked and lowered the boat many times.
On the material of the fur, there is not even a hint of abrasion and damage.
The pump easily generated the required pressure.
Pump in transport position.
I was not too lazy to look at the website of Premier LLC, which manufactured this pump. Here's what I read there:
“Our company is constantly developing and is in the process of continuous improvement, works for its customers and tries to meet their expectations. Quality assurance is the guarantee of our work! "
“Drawings from ancient Egyptian frescoes tell us that even in those distant times, mankind knew furs for supplying air to the furnace when melting metals. The ancient bellows pump consisted of two planks that were connected by a piece of soft goat skin. The shape of the pump has changed little since then. The materials have changed! "
Really changed, and apparently not for the better.
I want to warn fishermen-boaters against buying such a pump from this company. Enough for a month, a maximum of two or three.
And this is a pump from my second boat, "Bark" - 290. The boat was bought in the spring. The pump is still in working order, but the frayed bends are already visible.
When he comes out of standing, I will try to restore it using a similar method. Only the material for the fur will not be taken from the cylinder, but from the bottom of the boat. Since the capacity of this pump is larger, then the density of the material needs to be higher.
True, this pump is non-separable, but with a strong desire, you can disassemble everything, even a newspaper!
But that will already be another story.
So, the owners of their "Ufimok", "Zorek" and "Nyrkov", which have served their time, do not rush to throw them into a landfill. Who knows, they can come in handy!
To all boaters with tight cylinders on their boats and strong seams!
Do you like our site? Join or subscribe (notifications about new topics will be sent to the mail) to our channel in Mirtesen!
Do-it-yourself pump repair largely depends on which pump you plan to repair. Take, for example, a conventional pneumatic "bicycle" pump driven by muscle force. Many people have such pumps in their garage, but few take on their repair, since the new device is inexpensive. Meanwhile, self-repair is not difficult, the main thing is to determine what the problem is.
Most often, a pump breakdown is determined by the following symptoms: when pressed, the piston slips freely, and air is blown out in an extremely small amount. The repair process consists in disassembling the pump and replacing the piston. This is not difficult to do, but first you need to get a pair of work gloves, since the piston and other parts located inside the pump are probably covered with a layer of grease.
At the point where the handle enters the pump, there is a cover that is screwed onto the pump by means of a threaded connection. Your task is to unscrew this cap counterclockwise. If the pump is old it may be necessary to exert some effort as grease, dirt and rust debris can make it difficult to rotate the cover. After the cover is removed, you can proceed with the repair. Gently pull the handle out of the pump until the piston itself comes out.
The piston is a structure of rubber gaskets and metal washers. As a rule, the problem is that rubber seals from frequent and long-term translational movements wear out and become unusable. At this stage, the main task is to dismantle the gasket.This will require a wrench or screwdriver, depending on the type of connection. After the gasket is dismantled, it must be replaced with a full replacement. A gasket to replace a worn-out analog can be purchased at a plumbing store or on the market. It is important to choose a rubber gasket that will correspond in density to the old gasket, and in diameter will be larger on average by a millimeter.
It may happen that you cannot find the necessary gasket for the place of the worn seal in the market or in the store, in which case it will have to be made by yourself. A rubber sole from a shoe may be suitable as a material, but provided that it has the same thickness. Just attach the old gasket to the workpiece and circle it with a felt-tip pen, and then cut the necessary part along the contour. It is necessary to make a hole in the middle of the product and then assemble the piston structure together. After that, we insert the piston into the pump and tighten the lid. Ready!
Do-it-yourself pump repair largely depends on which pump you plan to repair. Take, for example, a conventional pneumatic "bicycle" pump driven by muscle force. Many people have such pumps in their garage, but few take on their repair, since the new device is inexpensive. Meanwhile, self-repair is not difficult, the main thing is to determine what the problem is.
Most often, a pump breakdown is determined by the following symptoms: when pressed, the piston slips freely, and air is blown out in an extremely small amount. The repair process consists in disassembling the pump and replacing the piston. This is not difficult to do, but first you need to get a pair of work gloves, since the piston and other parts located inside the pump are probably covered with a layer of grease.
At the point where the handle enters the pump, there is a cover that is screwed onto the pump by means of a threaded connection. Your task is to unscrew this cap counterclockwise. If the pump is old it may be necessary to exert some effort as grease, dirt and rust debris can make it difficult to rotate the cover. After the cover is removed, you can proceed with the repair. Gently pull the handle out of the pump until the piston itself comes out.
The piston is a structure of rubber gaskets and metal washers. As a rule, the problem is that rubber seals from frequent and long-term translational movements wear out and become unusable. At this stage, the main task is to dismantle the gasket. This will require a wrench or screwdriver, depending on the type of connection. After the gasket is dismantled, it must be replaced with a full replacement. A gasket to replace a worn-out analog can be purchased at a plumbing store or on the market. It is important to choose a rubber gasket that will correspond in density to the old gasket, and in diameter will be larger on average by a millimeter.
It may happen that you cannot find the necessary gasket for the place of the worn seal in the market or in the store, in which case it will have to be made by yourself. A rubber sole from a shoe may be suitable as a material, but provided that it has the same thickness. Just attach the old gasket to the workpiece and circle it with a felt-tip pen, and then cut the necessary part along the contour. It is necessary to make a hole in the middle of the product and then assemble the piston structure together. After that, we insert the piston into the pump and tighten the lid. Ready!
No device, no matter how reliable it is, lasts forever. Alas! This also applies to pumps for water supply systems. Therefore, at the end of the topic about pumping equipment, we will figure out what kind of pumping station malfunctions and how to do the repair of a pumping station with your own hands. If you were looking for about: faults in the water supply pumping station, faults in pumping stations for the home, faults in the water pumping station, faults in the pressure switch of the pumping station. then this article is still for you. Further I will simply list possible malfunctions and correct them.
The steps to troubleshoot this problem are as follows:
- First of all, you need to check the check valve, which is in the water in a well or well. It often happens that sand or debris gets into it and the valve does not close. In this case, the water does not rise through the pipes to the pump.
- Secondly, check for water in the piping between the well and the pump. The pump must also be filled with water, if there is no water, fill it through the filler hole.
- Very high output between impeller and pump casing. The pump just works for itself. The reason for this may be the high content of abrasive substances in the water, for example, sand. In this case, the casing and the impeller should be replaced, if they are on sale, or the entire pump (but not the entire station!).
- The water in the well / well ran out corny. Exit - try to lower the suction pipe or hose deeper. But remember: the distance from the water level in the well to the pump should not exceed that indicated on the pump, usually 8-9 m.
To fix this malfunction, you need to do the following:
- Pay attention to the pressure gauge located on the automation unit. If the pressure gauge needle rises to the pressure that the station was set to (the pump turns off), then drops sharply until it turns on, then there may be the following reasons:
- there is no air pressure in the hydraulic tank. At the factory, nitrogen is pumped into the tank to a pressure of 1.5 atm. Sometimes, due to corrosion, cracks appear in the tank body, and the pressure does not hold for a long time. Find the leak and repair the crack (eg, "cold welding"). You can check the air pressure in the hydraulic tank by connecting a pressure gauge (at least a car one) to the nipple. The pressure in the tank may not necessarily be due to the appearance of a crack, but simply for some unknown reason the air has left. Then you do not need to drive yourself to a brain twist in search of non-existent cracks, but just pump the air with a pump (in fact, this is where you should start)
- rupture of the diaphragm separating air and water in the tank. You can check this through the nipple: if water flows from the nipple, then the diaphragm is damaged
- does not work pressure switch... which controls the activation of the pump.
The reason for this malfunction of the pumping station and the measures for its elimination are as follows:
- somewhere there is an air leak. It is necessary to check the suction piping from the wells to the pump, connections and the water level in the well. The suction height should not exceed 8-9 m (with a pipe diameter of 1 "- 25 mm, if the pipe is smaller, for example 1/2", then the height should be less).
Here is just the reason - a malfunction of the pressure switch of the pumping station, with which we do this:
- you need to adjust the pressure switch. There are two springs in the relay for adjustment, a large and a small one:
A large spring adjusts the on / off of the pump (upper and lower limit). Small regulates the difference in pressure between the upper and lower limit. After prolonged operation of the pump, the moving parts of the pump are depleted, and over time, the pump can no longer create the pressure that it was "prescribed" at the factory. Therefore, you need to reduce with the help of a large spring, turning it in the direction of the arrow to -. However, you should not get carried away with such an adjustment.
- the inlet in the pressure switch is clogged:
If the water quality is poor, sometimes hardness salts are formed and the hole in the pressure switch is clogged. The relay simply stops responding. It is necessary to remove the relay and clean it.
Here are the steps to troubleshoot this pumping station malfunction:
- see the contacts of the pressure switch - use a tester to check the presence of power supply. If the contacts are burnt, clean them (for example, with fine sandpaper or a file)
- check the pump motor, check the contacts, power supply, "ring" for the integrity of the winding, check the suitability of the starting capacitor. If the engine burns out, it should be rewound or replaced with a new one.
The reasons for this malfunction of the pumping station are as follows:
- it happens that the pump has been lying somewhere in a shed for the winter, and in the spring they took it out and try to start it. But it starts to hum ... Due to the fact that the pump was left without water and motionless for a long time, the impeller of the pump "stuck" to the casing. It is necessary to manually turn the impeller from the back side, and then plug it into the network
- the capacitor is out of order (located in the branded box of the engine)
- it is necessary to check the voltage in the mains, it may just be too low.
That's all (or almost all) that can be said about malfunctions of a pumping station for water supply systems at home and about the repair of the pumping station with your own hands.
pumping station malfunctions
Water pumps are very often used in everyday life. For example, they can be installed in a hot water heating system or for pumping water out of a basement.
Basically, water pumps are equipped with asynchronous motors. Since the water pump operates with water, it becomes the main cause of pump failure. Depressurization of seals and glands leads to wetting of the stator windings. When the pump is switched on to the network, insulation breakdown occurs. In order for such cases to be less necessary periodically, especially after long downtime, to measure the insulation resistance. The insulation resistance must be at least 0.5 mΩ. With a lower resistance, the winding must be dried.
If you liked the article, share the link on your network - this will be a big thank you for writing it:
How to repair a water pump
Do-it-yourself repair of a water pump often occurs during unexpected interruptions in the operation of the device. This may be due to wear and tear of the equipment during its long-term operation, contamination of the device.
The article offers instructions on how to repair a water pump at home.
Domestic pumps are divided into three main groups, which depends on the properties of the pumped liquid.
- Drainage, designed for pumping not very dirty water, which can also be used to supply clean water, which makes the units versatile. Such devices can be used for pumping liquid from basements flooded with flood waters, or pumping water from a pool with their help.
The motor of the device is well protected from water penetration into the housing. A reliable oil seal protects the motor shaft from moisture. Working wheel. on which the blades are located, when the shaft rotates inside the chamber, it creates excess pressure.
The cavities around the pump motor create a cooling circuit, which allows the pump to work for a long time without overheating.
# 8230 submersible, partially or completely immersed in water and then serve it up. The depth of the liquid intake can be up to 100 meters. The absence of rubbing parts, constant water cooling, protects such units from overheating.
- Sewerage devices are used to pump out household waste water that contains solid particles. By design, these are drainage pumps, but with a special wheel that is capable of chopping large pieces of dirt into smaller ones. Without such units, it is impossible to work cesspools in country cottages.
Before purchasing the unit, it is necessary to clearly define for what purposes the equipment will be used:
- Irrigation and watering of the personal plot.
- Household water supply.
- Drainage works.
- Use for a device in the heating system.
- Drainage of reservoirs.
- The intensity of operation of the unit is calculated, which depends on the volume of water required for needs.
- It's not worth purchasing a model that has a low price. Be sure to carefully study the technical characteristics of the device, consumer reviews about it. The pump is designed for long-term operation, which indicates a long-term investment, and dismantling and then repairing or replacing the unit is very costly.
- When studying the technical characteristics of the device, special attention is paid to the following:
- Is there a pump protection against "dry running" and possible overloads
- it is desirable that its parts are made of stainless steel, this will increase the service life of the product.
- The requirements for the electrical network are taken into account, what voltage is required for its use.
Advice: When purchasing a water pump, you need to pay attention to the amount of permissible voltage deviation on the unit and the presence of protection of the electric motor from unexpected power surges in the system.
The principle of the device of all water pumps for a house or a summer residence is one, common. In the process of working, the device creates a vacuum inside itself, after which the liquid is drawn into the vacuum chamber from the reservoir, then it is pushed out with force and directed through the pipe to the destination.
According to the method of creating a vacuum, there are such principles of operation of the units:
- Electromagnet # 8212 is the main element. When an alternating voltage is applied to its windings, the element attracts the armature to itself, and after the polarity change, the armature again returns to its original position. The photo shows the device of a water pump for a summer residence.
Water pump device
It is much easier to prevent any breakdown than to repair water pumps later.
Advice: Ideal if regular inspections and maintenance of the equipment are carried out. It should be performed at least once a year, and optimally twice, before the start of intensive exploitation in spring and in autumn after its completion.
Remove iron marks on furniture: If you accidentally put the iron on the furniture, use the following advice. Sprinkle salt on a rag, make a swab, moisten it with vegetable oil and rub the stain until it disappears.
To prevent your shoes from getting wet: To protect your shoes from getting wet, do the following. Melt 200g on a fire. Soaps and 100gr. resin. The mass should not cool down to the end. Use a brush to apply it to the shoe where it leaks. Then treat the leather with shoe cream.
For a resident of a summer cottage or rural settlement, the ability to repair a borehole pump, without exaggeration, can be considered a vital necessity.
After all, workshops and service centers are located quite far away - in the city, and it is impossible to extract water from a deep source manually, like from a well.
So at least basic equipment repair skills must be mastered without fail, otherwise your beloved household members and no less adored tomato and carrot beds may be left without a life-giving resource for a long time.
Next, we will see how do-it-yourself submersible pump repair is carried out, and get acquainted with the features of some popular models.
As you know, under the moon, nothing lasts forever, including submersible pumps. Here are the reasons that most often make these units inoperable:
- Breakdown of one of the electromagnet elements (for vibration pumps): here, as a rule, there is nothing to do with your own hands. The pump needs professional repair.
- Clogging by mechanical contaminants: the water entering the pump often contains grains of sand and other particles, which can accumulate in various parts.This can lead to wear of some elements or their seizure. If the wear has not reached a critical level, flush the unit well enough.
- Overheating: the reasons for this phenomenon may be the lack of oil or pumping of a medium with a temperature exceeding the value indicated in the passport (usually 40 degrees). In this case, the troubleshooting method will depend on the diagnostic results.
Most often, failures occur in the operation of the time relay and the protective switch, which is triggered at an excessively permissible current value.
Also, a break in the core of the supply cable or an open / short circuit in the motor winding may occur.
So, let's try to determine why the pump is running low. If it does not turn on, the first step is to check the state of the circuit breaker in the junction box. He may have disconnected the circuit due to overload.
If the suspicions are not confirmed, you need to turn off the unit, remove it from the well and proceed with disassembly.
First of all, near the place of work, it is necessary to spread a clean newspaper or rags on which the pump parts and fasteners will be folded. Then we proceed in the following order:
- We disassemble the discharge part of the unit.
- In a vibration-type pump, we check the condition of the valves, and in a centrifugal pump, we turn the impeller in order to make sure that the shaft is not jammed. If at this stage the cause of the breakdown is found in the form of a clot of dirt or a damaged part, we take appropriate measures.
Disassembled submersible pump
If all the components of the pumping mechanism are normal, we open the electrical part. After that, you need to do the following:
- Check the indicator for the presence of voltage at the terminals to which the power cable is connected (do not forget to plug the pump into the socket before that).
- Check the resistance of the starting winding with a tester (this must be done with the power off).
- Do the same with the working winding.
If the instrument panel shows a resistance close to zero, there is a short circuit in the winding. If, on the contrary, it is infinitely large, then a break has occurred in the winding. In both cases, you need to rewind the motor, which requires a special machine.
- Before disassembly, the engine must be installed with the cover facing up, otherwise oil will leak out during dismantling.
- Before disassembling, it is imperative to make sure that the unit is disconnected from the mains.
- On some models, the engine must be squeezed strongly in a vise to remove the cover.
Mounting screws on submersible pumps often acidify due to constant contact with water.
To make it easier to carry out maintenance and repairs, it is recommended immediately after purchase to replace the "native" screws with a profile for a flat screwdriver with purchased ones with a Phillips profile.
Different brands of pumps have specific features. Let's consider them in detail.

A series of submersible pumps from this manufacturer is called "Vodomet".
These units often have problems with the cable, since there is practically no protection for it.
So if "Dzhileks Vodomet" suddenly announced a strike, the first thing to do is to check the integrity of the conductors of the supply line.
The pumps in this series are centrifugal. The most common problems are impeller cracks and bearing failure.
If the engine fails, then the possibility of self-repair will depend on the model. In some of them, for example, in "Dzhileks Vodomet 50/25", the body of the electric drive is non-separable.
To dismantle the water intake mechanisms, the pump must be clamped in a vice. It should be noted that the force must be moderate, otherwise the hollow body may deform or crack.
Non-toxic substances should be used as a lubricant in Vodomet. Glycerin is most suitable.
Due to the absence of any built-in filters, pumps of this brand are very susceptible to clogging. Most often, you can reanimate a stale "Aquarius" by flushing. To do this, it should be disassembled:
- the protective metal mesh is removed (it is held by a clamp, which should be pry off with a screwdriver);
- the engine is unscrewed (you will need a 10 wrench);
- the polymer coupling connecting the shaft and the impeller is dismantled.
Now you need to grasp the upper part of the unit and, holding it with your hand, slightly turn the shaft using a 12 socket wrench. After that, the entire mechanism is flushed with a powerful jet of water directed from the hose. The shaft should be turned slightly during the flushing process.
If the procedure was unsuccessful, you need to disassemble the injection mechanism. This operation begins with dismantling the retaining ring. To loosen it, the body must be squeezed firmly from above and below.

An electrically driven pump is convenient, but what if there is no power supply? Do-it-yourself manual water pump - tips for making the simplest structures.
We will consider the characteristics of the Agidel pump and the nuances of its installation here.
Like all vibration-type pumps, "Babies" do not tolerate overheating very well, which in most cases is caused by running dry. As a result of this phenomenon, a short circuit occurs in the stator, which is eliminated only by rewinding this unit.
Often, even with a new "Kid", by turning a special nut, it is necessary to adjust the check valve, otherwise the head of the unit will be insufficient. It is better to counter the nut.
Submersible pump Kid with upper water intake and thermal protection - device
Vibrations within the pump often cause loose threads, especially at the check valve retainer and piston. Therefore, they need to be periodically tightened by removing the pump to the surface.
In addition, such a nuisance as the detachment of the epoxy compound (vibration damper) is peculiar to the "kids". The place of detachment should be determined by tapping, after which a small portion of any sealant is injected into the problem area.

Self-priming pumps are most often used in everyday life. But what type of equipment should you give preference to - vortex or centrifugal? The principle of operation of a vortex pump and a centrifugal pump, as well as their comparative characteristics, will be considered in the article.
You will find tips on how to make a DIY vacuum pump in this thread.
| Video (click to play). |


