In detail: do-it-yourself window mesh repair from a real master for the site my.housecope.com.
The mosquito net is a good helper and "protector" from small insects and mosquitoes trying to fly into the living space. It happens that the mosquito nets fail, and then the need for repair comes. Safety nets can be repaired by hand without calling a specialist.
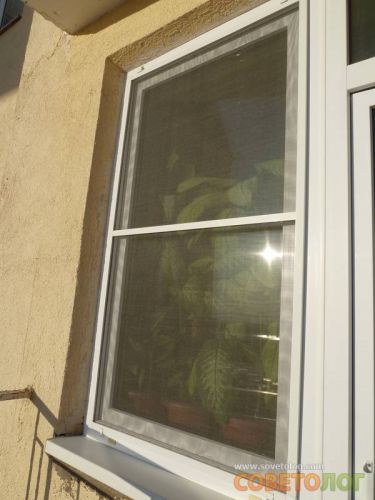
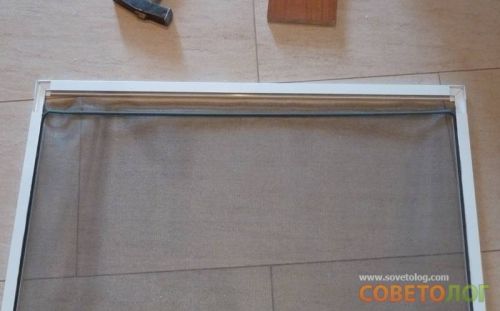
To know how to repair the mosquito net itself, you need to understand how it works. The base of the mesh consists of four aluminum profiles, which are connected by plastic corners. A mesh is attached inside the profiles, thanks to a cord located in the recess of the frame.
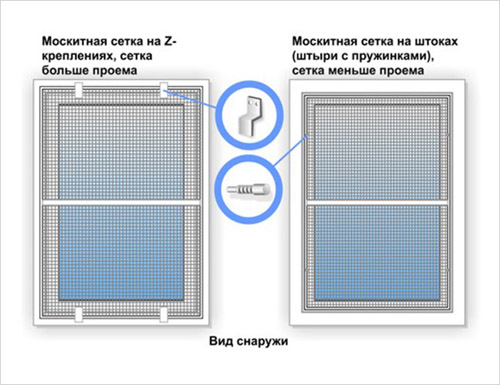
You can find three types of fastening mosquito nets:
Roll. Such nets work on the roller blind principle, that is, a box with a mosquito cloth is fixed at the top of the window, which can be easily pulled down and fixed on the lower part of the frame. Yes, the device is very good, but the price, however, for such a grid is also not small.
Frame mesh. These nets are considered to be the most common ones due to the optimal price-performance ratio: the degree of insect protection is high and inexpensive. The frame mesh is an aluminum profile, inside of which a mosquito cloth is stretched.
Hinged mesh. In this case, there is a reinforced frame, and often swing nets are installed on the entrance, balcony frames. Such a mesh is held on hinges, which are mounted to the door block. On the free side of the frame, there are magnets that prevent the swing net from opening from gusts of wind. Some users do not exclude the installation of such grids on windows.
Video (click to play).
In addition to these methods, there are also homemade, homemade, cheap ways to secure the mesh. Details about the options for attaching mosquito nets.
There are several reasons why mosquito nets break, deteriorate, deteriorate. Firstly, over time, all mesh elements lose their original properties, especially since the profile itself is constantly under the influence of natural conditions: wind, rain, snow, temperature drops. Secondly, the canvas is "clogged" by insects, because of which, in fact, the mosquito net is placed. The integrity of the net is affected by aggressors such as pets and birds.
If the components of the mesh were made improperly, it means that the mosquito cloth will not serve you for a long time. Therefore, it is better not to skimp on the quality of the profile and components from the very beginning of the purchase, then the service life of the mesh will increase significantly.
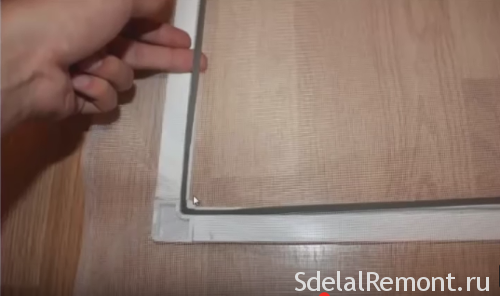
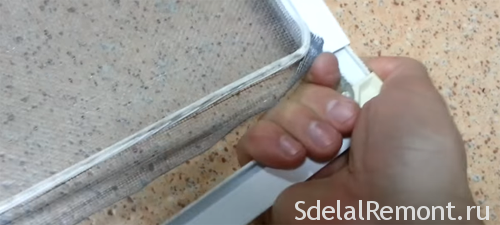
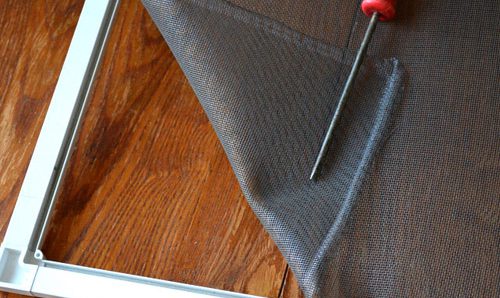
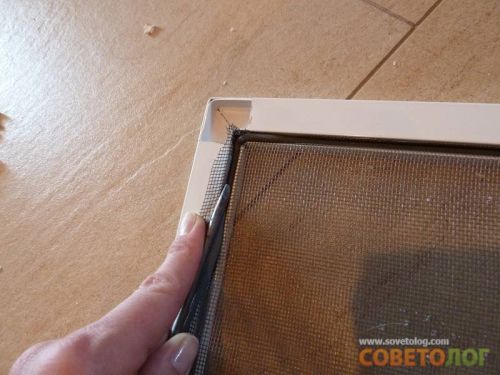
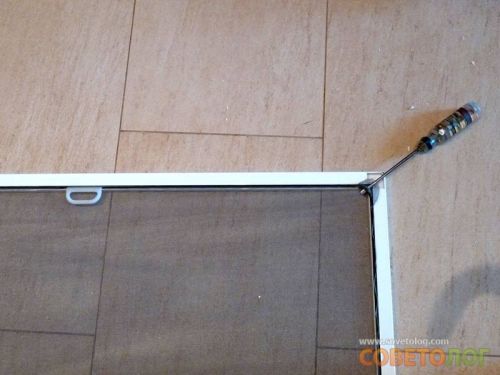
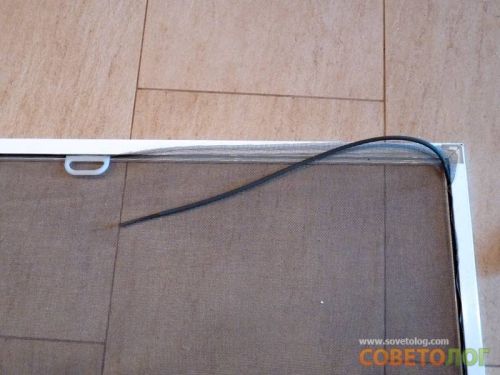
If you need to change the mesh on a plastic window, you need to remove the cord from the frame. It can be easily removed with a thin, sharp object such as a screwdriver. Together with the cord, the mesh is released and easily removed.
Next, we put a new sheet on the aluminum profile. It is necessary to carefully lay the mesh, starting from the top and fix the canvas in the profile grooves with a cord. You can help fix the mesh in the gutters either with the same screwdriver, or with a ballpoint pen, or with another suitable object.
Replacing the canvas of mosquito nets
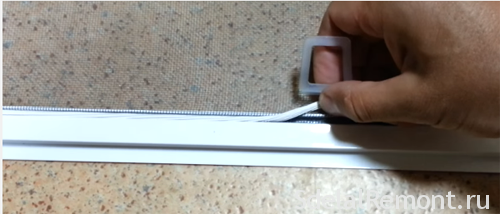
As accurately as possible, you need to pull the third and fourth sides of the mesh - make sure that the canvas does not wrinkle, it is perfectly evenly stretched. After completing the installation, cut off the remaining mesh with a margin, hiding it under the profile. As you can see, repairing a mosquito net is easy and short-lived.
VIDEO
VIDEO
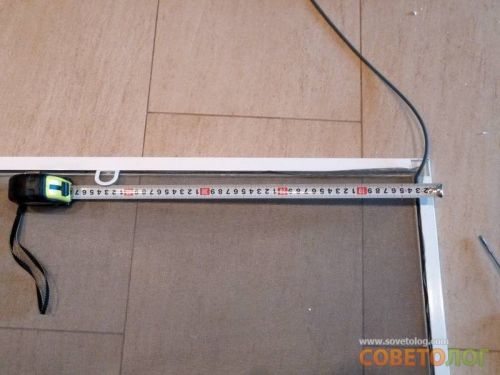
Sometimes it is necessary not only to replace the mesh on the mosquito net, but also to reduce the dimensions of the profile itself. This can also be done by hand. First, you also need to pull out the cord and pull out the mosquito netting. After that, the profile is sawn off with a file and you can proceed to the reverse installation.
If you are worried about the safety of the profile, you can walk with glue and, according to the algorithm described above, assemble a mosquito net.
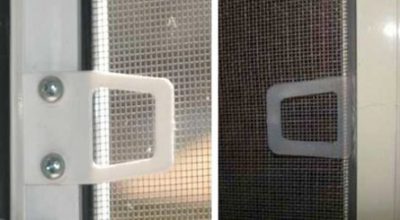
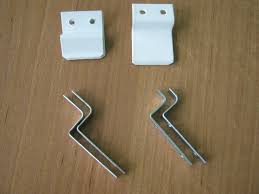
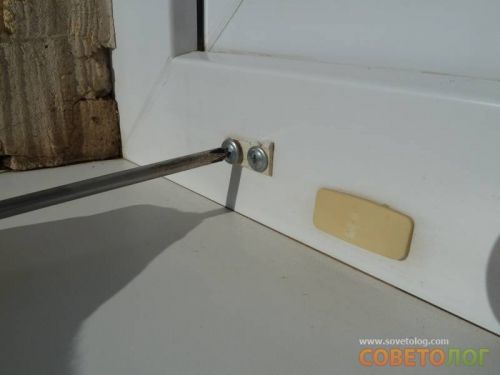
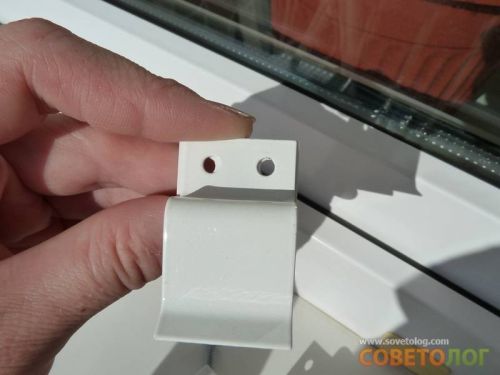
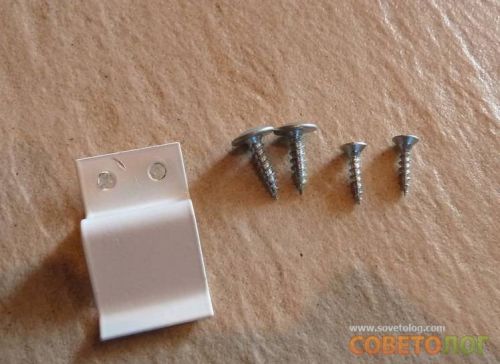
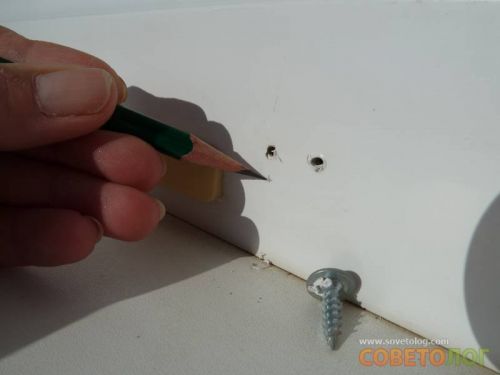
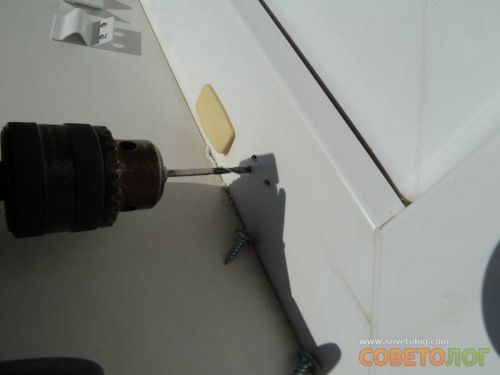
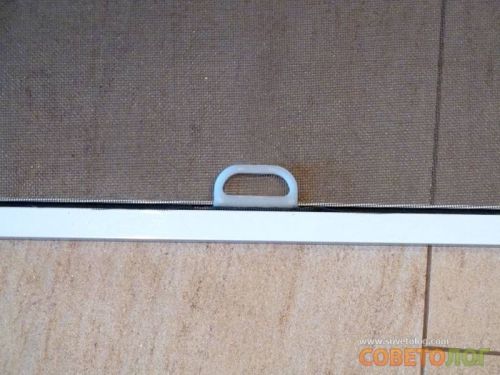
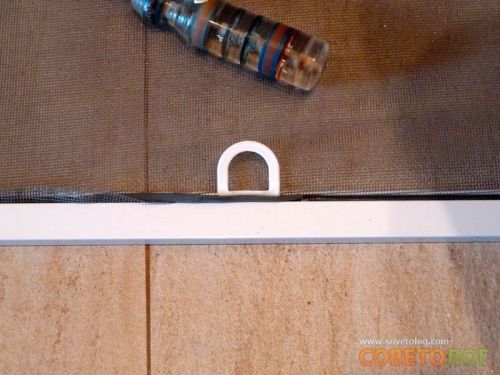
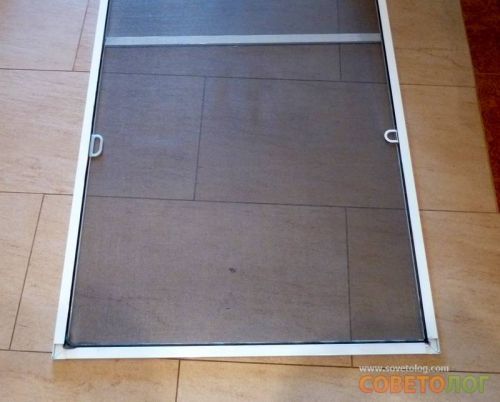
Many people are faced with the issue of broken handles on mosquito nets. Handles are used for installation in a window opening, and, as luck would have it, very often break at the most inopportune moment. Most likely, these pens are not made of the highest quality materials, therefore, under the influence of natural conditions, they become fragile.
Replacing the handles of the mosquito net
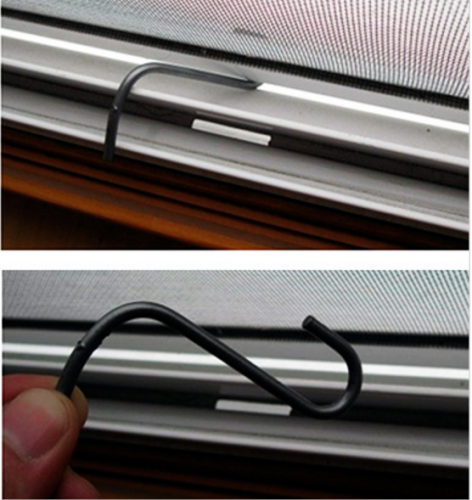
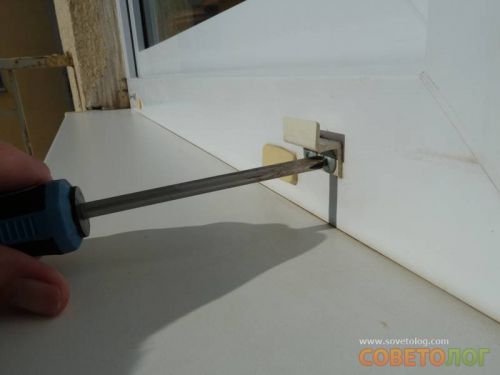
The absence of handles in the grid brings some inconvenience when replacing the canvas itself, so we offer a way out of this situation. You can make a hook from a wire with a diameter of about 3 mm. This hook will be an assistant and a solution in the situation of a broken handle on a mosquito cloth.
The bottom line is that you just need to hook the canvas with a hook, then, if necessary, press it back down. When repairing or replacing a mosquito net on a plastic window with a broken handle, hold one side with the hook while pressing down on the piece of the handle. This will allow you to reach the mosquito net profile from the window.
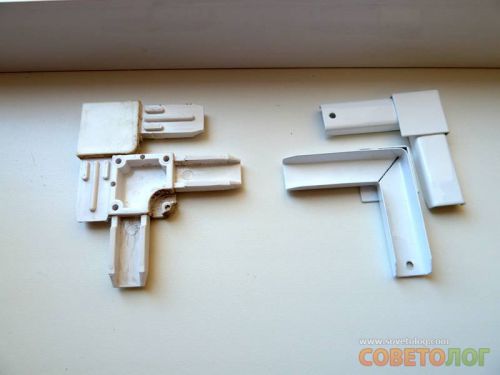
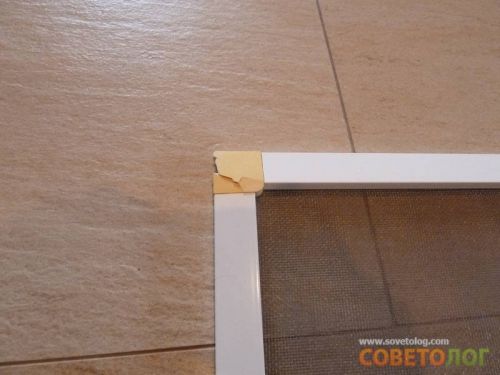
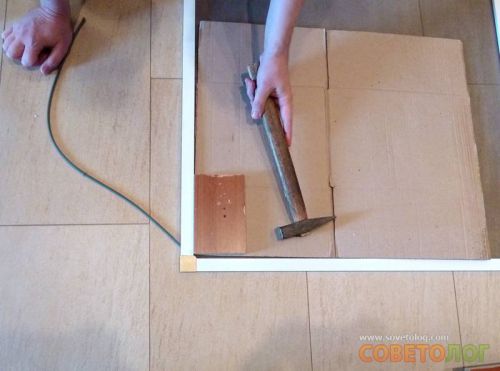
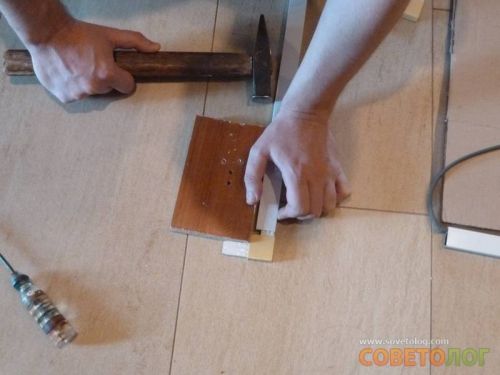
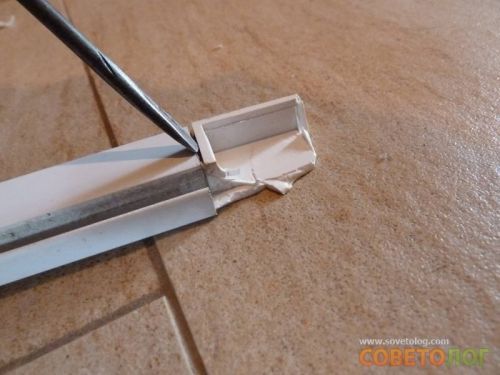
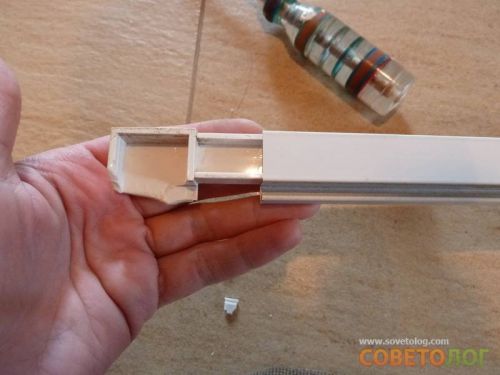
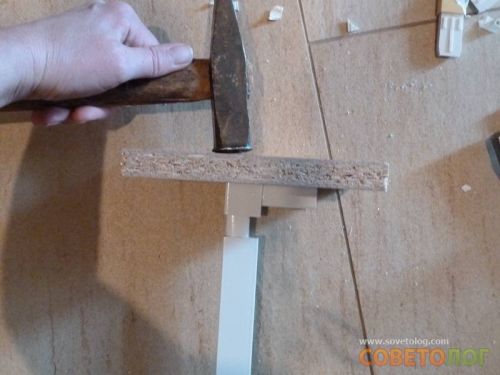
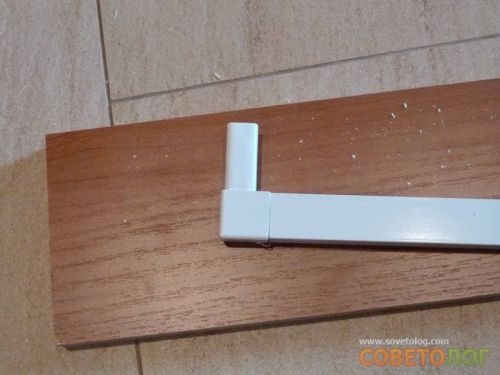
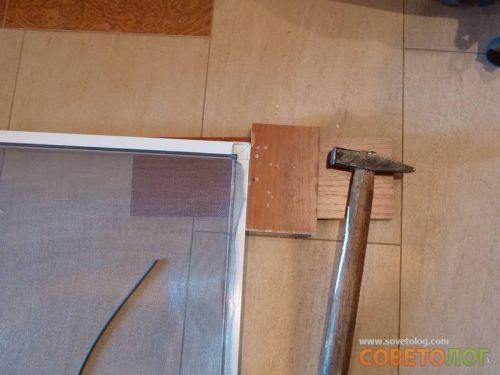
If desired, repairing mosquito nets with your own hands is quite real, you just need to familiarize yourself with the object being repaired and a little perseverance. If a corner is broken in the profile, you need to purchase a new one and remove, clean out the fragments of the previous one. It happens that the piece gets stuck in the profile, then it will be extremely difficult to get it. It is recommended to push the rest of the corner into the profile, you need to be very careful not to make it worse. The replaced corner cannot be hammered with an ordinary hammer, it is better to use a rubber hammer or a block.
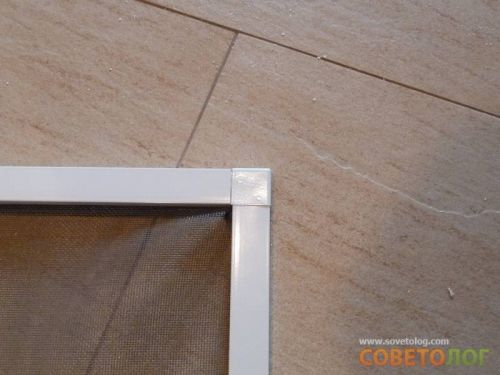
Like the canvas itself, the corners of the mosquito net profile become unusable over time, so it is recommended not to wait for the moment when they break. A sign that the corners have worked out their time is their yellowing. It's time to replace parts of the mosquito net.
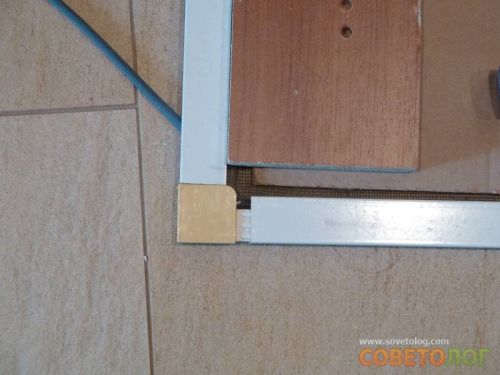
Replacing the corner of the mosquito net
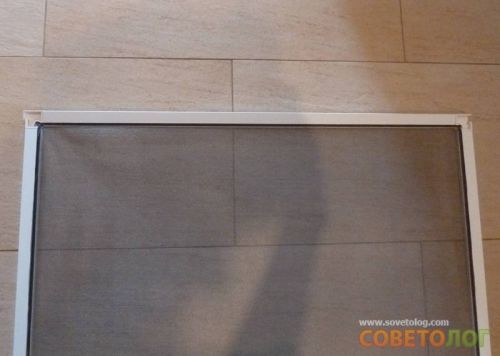
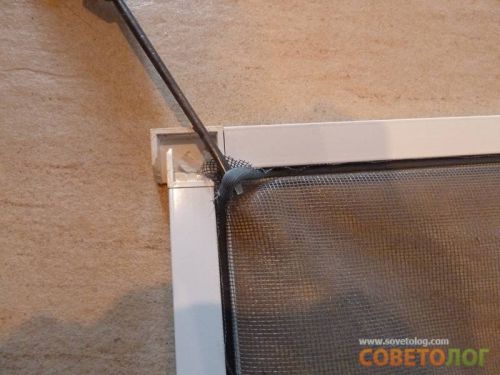
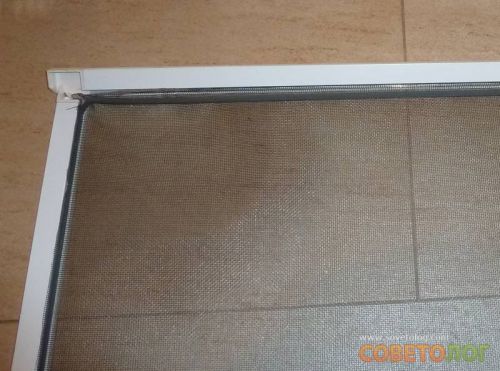
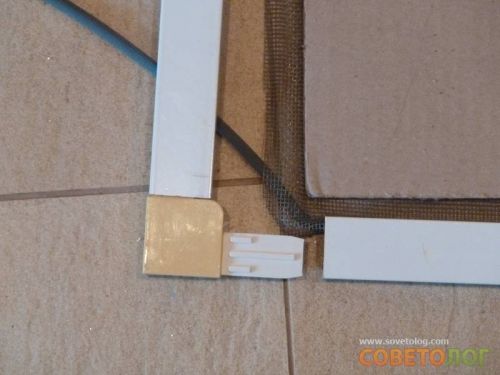
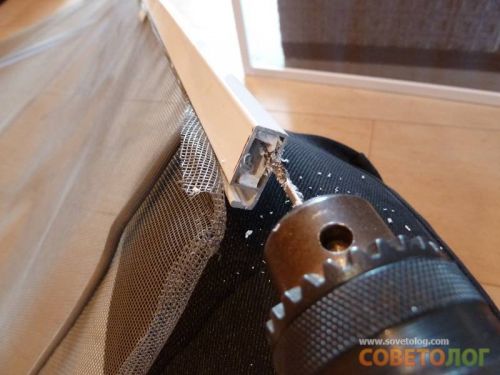
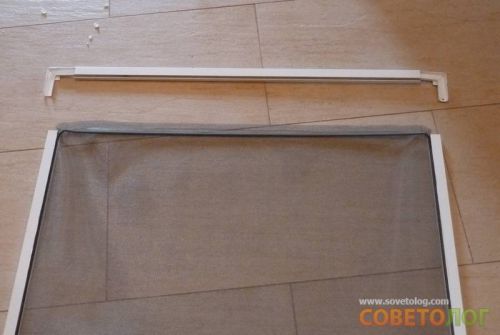
In no case should you completely disassemble the frame to replace the corners. During the manufacture and installation of the mesh, all the excess canvas was cut off, so now we have no stock. For this reason, we will start shooting only the upper part of the mesh.
In the area of the profile corner, you need to pry the gum with a sharp object and get it only from the upper part of the frame. The mesh itself must also be removed from the groove. After that, carefully disassemble the upper profile bar, gently help with a hammer if the frame parts are firmly connected. We take out the corners and replace them, and then we re-install the profile frame and mesh. If a plastic window sticks, learn how to adjust the sash.
VIDEO
VIDEO
Modern mosquito netting is simple and elegant, and does a good job with its main purpose - to keep mosquitoes and other small flying vermin into the living space. But, in spite of the correctness of the well-known axiom of technicians: “the simpler, the more reliable”, sometimes it is nevertheless necessary to repair this product, which is necessary in the house. Let's take an example of how to repair a mosquito net with your own hands without resorting to the help of manufacturers.
The basis of the mosquito net is made up of four specially shaped aluminum profiles, connected by plastic inserts in the form of corners. When assembled, the grooves of the profiles form a recess along the inner perimeter of the frame, in which the mesh is fixed using a special cord.
Frame assembly diagram. In the center of the picture are images of the connecting corner and profile.
In my case, two mosquito nets required repairs at once. In one of them, cheeky sparrows pecked at the netting. It looks like something edible in their eyes was stuck in the net, maybe a spider or a seed, and they only had to interrupt a couple of threads. And after that, the hole parted so much that mosquitoes began to enter the room. The second grid needed to reduce the overall dimensions - height and width (the neighbors asked).
First, the cord is removed - I just forged it with a thin screwdriver sting at the junction and pulled it out, trying not to stretch it in length. (Perhaps this is superfluous - he is not so elastic). The mesh came loose and I took it off.
Two photos at the stage of disassembling the mosquito net.
Now it was necessary to install a new mesh fabric. Approximately orientated it and began from the upper profile to gradually lay the cord in a circle in the groove, fixing the mesh in it. Used the same screwdriver. It turned out not to damage either the mesh or the profile, although a couple of times the screwdriver jumped off dangerously. Whoever wants to repeat - I recommend working with something less dangerous, for example, the blunt end of a ballpoint pen.
The stretching of the third and fourth sides of the mesh is most responsible - I had to redo the corner so that the mesh would not wrinkle. At the end, I cut off the excess mesh with a sharp knife flush with the profile.
This is the result. The bottom mesh is overstretched.
It turned out fine. The photo shows in comparison that the quality of performance is inferior to the factory one. But collectors use some kind of special roller to lay the cord into the groove, and there, of course, it turns out more accurately.
The repair with the second mosquito net went already easier - in the same way I pulled out the cord, removed the netting. I disassembled only two diagonal corners of the frame, carefully pulling out the plastic connecting corner from the aluminum profile. It is held only by friction, but it is pressed in with effort.
Then I sawed the frame profiles in length, walked a little along the edges with a file and proceeded to reassemble. Although the corners were held tightly, just in case I dabbed a little bit of Moment glue. And then everything follows the worked-out grid installation scheme, as I wrote above.
After all that was done, it became clear to me that the service life of the net itself is much less than that of its aluminum frame, but anyone can replace the mosquito netting of a plastic window. You just need patience and accuracy.
Everyone knows the problem of mosquito nets in modern plastic (and not only plastic) windows, whose handles break at the wrong time, intended for installation and dismantling into the window opening. Obviously, these pens are made of substandard plastic. Under the influence of the environment, the material of these fasteners becomes soft and brittle.
Without these handles, it is very problematic to insert a mosquito net into the window opening. For a quick solution to this problem, I propose the following option. I think that everyone will have a piece of steel wire with a diameter of 2-3 mm. I made a hook from the wire.
It is very easy to pry on, hold and press the net with this hook. With one hand I hold the net with a hook, and with the other, pressing on the fragments of the mounts, I help to insert the mosquito net into its seats.
After the mesh is inserted, it is easy to remove the hook through the remaining slot by turning it slightly.
This method, of course, does not repair the mosquito net, but it allows you to quickly install or remove it from the window.
The mosquito net is a necessary accessory that can protect the room from insects; it is attached to both wooden and metal-plastic windows. Most often, special grids with a frame are used for this purpose. They are easy to install and can be removed if necessary. Mosquito net handles will do this, but over time they break and need repair.
Most often, buyers purchase a model with an aluminum frame, which is fastened with plastic corners. In order for the mesh to hold, the profile is equipped with a special groove designed for a rubber cord: it fixes the mesh in place, keeps it taut. Sometimes manufacturers install special handles for mosquito nets., with which the frame can be installed in special brackets: they are located on the street side of the plastic profile. Such fasteners allow, if necessary, to remove and install the mesh.
If the plastic fasteners of the mosquito nets break, they can be made using the metal yourself.
Any model of the frame can break. Most often, they are exposed to wind and ultraviolet radiation, which can cause the structure to break or crack. Most often, the problem concerns windows facing south.
Often there are no handles on the mesh, which is why it is quite difficult to pull it out, it becomes even more difficult to put it in place, since the fasteners are located on the outside, and it is impossible to stick your fingers there. In this case, it is not difficult to make handles for mosquito nets with your own hands.
If you want to reliably repair your mesh, purchase Z-shaped holders and special handles. This will allow you not to return to the problem every year.
In order to fix the breakage of the mesh for a plastic window, you will need to do the following:
Remove the product from the holders. To do this, you need to pull on the handles: they are usually attached to the mosquito net along the perimeter.
You need to start by releasing the lower holders, then you can pull out the structure from the upper ones.
If you see that the corners are in a deplorable state, you should not wait for them to break, in which case you can lose the mesh that has fallen down. Replace them beforehand. For this procedure, you should not disassemble the structure, otherwise it will be impossible to assemble it, since the mesh is cut off after tension at the factory, you will no longer have a surplus.
You need to change the planks one at a time, starting from the top. Remember to remove the rubber bands from the corners. You can pry it off with a screwdriver. Do not pull out the entire elastic, loosen the top notch from it, then carefully remove the top bar. If the part doesn't come off, you can try knocking it out with a small board and hammer. After that, using pliers and a screwdriver, you can remove the plastic corners and replace them with metal ones. Assembly takes place upside-down.
If the handles of the mosquito net are broken, not everyone knows what to do. Pulling out such a mesh will be problematic, and not everyone can figure out how to install new handles. Despite the fact that many nets are designed for frequent use, even the highest quality construction is not immune from the trouble of broken handles.
Most often, you have to think about how to replace the handle of a mosquito net at least once every two years. Less often, this element is able to last longer. Having changed it once, you will understand how this is done, and you can easily make a replacement yourself. The procedure usually does not cause problems and does not require hiring a professional who repairs plastic windows.
The easiest way to repair a broken handle on a mosquito net is to screw a small self-tapping screw into the crossbar to help hold the frame. For complete convenience, cut a ribbon from a plastic bottle or find a ready-made ribbon.
We wrap the self-tapping screw into an aluminum profile. It is easier to do it with a screwdriver, but if you try, it is quite possible with a screwdriver
For convenience, make a loop from the material at hand.
First of all, to repair the do-it-yourself mosquito net handle, you need to buy a kit suitable for repair. This is usually not difficult to do: such items are sold in the same place where there is fittings for plastic windows. These are either large construction stores, or companies that produce custom-made plastic windows. If you just ordered plastic windows, do not be lazy to immediately purchase several repair kits for window screens. First of all, you need metal corners instead of plastic ones and some spare handles.
Gently lift the sealing cord with a knife
Install new handles and crush the cord into place
If you order the mosquito net separately, ask the technician to install the metal corners right away, this will save you the trouble of repairing the mesh frame after a few years. This replacement will slightly increase the price of the mesh.
If your design has a cord, please note that you do not need to remove it. In order to make the pairing of the handles less, it is enough to use a flat screwdriver or scissors. The element can be reached, but you must act carefully, otherwise there is a risk of breaking the mesh. It is not recommended to take it off during work, it is not always possible to put the mesh back: this will add unnecessary trouble to your work.
After you have been able to remove the old handles, you need to leave the new ones in their place and clamp them so that they do not fall off. Take care not to damage the cord or net, otherwise the structure will require more serious repairs.
If the cord breaks, there is no need to replace it entirely. Take the desired piece from the repair kit and insert the missing piece.
You can simply install a mosquito curtain on the balcony door. Read more in our article "Mosquito curtains and curtains".
A do-it-yourself mosquito net is made quickly and inexpensively. Read on our website how to make a mosquito net on the window with your own hands?
It is not always possible to find a repair kit on hand. There are situations when the net needs to be urgently pulled out, but there are no fittings for it, in this case the handles for mosquito nets with their own hands will help to get out of the situation. It will not be exactly what in the traditional sense can be called a handle, but the item is quite suitable for conveniently pulling the structure out of the mountings.
You can use this option even if you do not want to put the same fragile and unreliable parts instead of a damaged set of elements made of low-quality plastic. When the handles on the mosquito net are broken, what to do if there is no repair kit at hand, you do not have to guess. All you need is steel wire thick enough to make a hook that won't bend under light load. If there is no wire in the house, it can be bought at almost any hardware store, it is inexpensive.
With the help of the resulting hook, you can easily pry the structure from the bottom and release it from the grooves that hold the frame in place. It is most convenient to remove the mesh by pressing down with a key the places where the fasteners were before.
If the handles on the mosquito net are broken, there are two ways to solve the problem: replace them or use hooks that will allow you to easily remove the structure if you need to dismantle it.
VIDEO
VIDEO
VIDEO
VIDEO
VIDEO
VIDEO
Plastic window constructions have long been a priority, so everyone is striving to replace outdated wooden frames with new blocks. Such systems are often equipped with additional elements, for example, comfortable and functional mosquito nets, which prevent even small insects from entering the room, as well as dust and dirt from the street when the windows are open. However, these are quite fragile elements that often break, and it is quite expensive to acquire new ones. True, it is quite easy to repair a mosquito net for plastic windows yourself, you will need basic skills, as well as a minimum set of tools, and the net itself will thus serve at least one additional season.
There is a humorous saying about computers, which is also quite suitable for our case, when repair of windows and mesh on windows may be required, it says that the gasket between the computer and the chair, that is, the person himself, is most often to blame for all the main problems. It is the improper installation and operation of mosquito nets that can cause them to break. However, there may be other reasons, which are also definitely worth studying in order to figure out how to prevent troubles, as well as to understand the means and methods of their repair.
So that questions arise as rarely as possible, like how to repair a mosquito net on a plastic window, you must definitely take care of its correct installation, as well as timely care and proper operation.It will be optimal to remove the mosquito for the winter, and set it back by the time the temperature rises above fifteen degrees Celsius.
Plastic is a fairly strong and durable material, however, it also loses its properties and qualities over time. The frame of the mosquito net, made of plastic, deteriorates from time to time and may break.
Continuous temperature fluctuations, prolonged exposure to frost in winter and hot sun rays in summer can also cause breakdowns.
Birds, as well as animals, may well break the mosquito net.
Most often, an emergency repair of nets for plastic windows is required, when plastic corners or adjusting handles, holders from the outside and inside, depending on the design, break, and the mesh itself is torn. It is these cases that we will consider in more detail.
The easiest way is not to be smart, not to waste your own energy, as well as time, and millet contact a company that repairs window nets, that is, to professionals. Most often, such services are provided by installers, you can consult where you ordered the window units themselves. You also need to ask the installer about the warranty, or at the outlet where the mesh was purchased separately, and this must be done in advance, immediately upon purchase.
If the guarantee was not taken care of in advance, then the repair of mosquito nets will fall on the shoulders of the consumer. Spare parts for this kind of work can be found in almost any construction supermarket; today, parts are also sold separately, if you don't need a kit.
Photo from the site: my.housecope.com/wp-content/uploads/ext/2864
A fairly frequent breakdown, which has to be stopped urgently, are burst corners, which you just need to change with your own hands. Such breakdowns can occur due to time and temperature, as well as when the mesh falls from a height. It happens that, if installed incorrectly, the load on the corners increases significantly, then they also may not be able to withstand. How to correctly and easily install a mosquito net, you can read the article on our website.
Let's figure out how to fix a mosquito net if it is the plastic corners of the structure that are sold in the store, both individually and in sets, that are broken. The corners can be standard, as well as solid or reinforced. The latter are more massive, stronger and more durable, and the cost is only slightly higher than usual. Thinking about how to fix the mosquito net in our case, it is worthwhile to understand that the canvas there is fitted end-to-end, stretched and then trimmed, therefore it is worth not disassembling the structure in the heat. If only one corner is broken, for example, the upper one, it makes sense to remove only the upper bar.
First, you need to carefully pry off the sealing cord with a screwdriver or even scissors, which you will see on the back of the structure.
Pull on the cord and remove it from the groove in the top bar.
Try to pull the bar up, and if it doesn't work, then you need to use a wooden bar and a hammer.
The broken parts of the corner must be removed from the grooves using pliers or a screwdriver. If there is nothing to grab onto, it will be much easier to push them inside with the same screwdriver.
Attach the corners to the top bar, and then connect the parts of the structure.
Next, you need to straighten the edge of the mesh, pull it a little, after which you can start laying the seal in a special groove in the frame. You need to grip the cord very tightly, so use a screwdriver or even scissor handles.
Do not forget that you should not directly hit the mesh frame with a hammer, as this can ruin its surface, as well as peel off the paint. Therefore, you need to take a flat wooden block and knock through it.
It often happens that weather conditions, as well as, for example, birds and animals, can cause the netting itself to break.When its integrity is violated, it ceases to perform its direct functions, that is, to protect the room from the penetration of flies, mosquitoes and other gnats. The easiest way in this case is to simply stick a patch on the molecular superglue on the torn place, but then the appearance of your window will still be the same. Therefore, it will be advisable to purchase a new canvas and replace it in a frame, which will not be at all as difficult to do as it might seem.
Pry up the sealing cord from the back and pull it out, gently supporting the frame, around the entire perimeter.
In this way, the damaged mesh will be completely released and can be easily removed and discarded.
The new mesh should be slightly larger in order to have something to grab onto for the final stretch.
Attach the mesh to the frame and begin from one side to gently insert the sealing cord back into the groove.
The mesh must be constantly tightened so that it does not sag, otherwise it will look sloppy, and it can break from the incorrect distribution of the load on the profile and corners. All excess that remains sticking out of the groove must be very carefully cut with an ordinary construction knife with breakable blades, it is very sharp and will allow you to cut the unnecessary flush.
In the same way as when replacing the netting, the overall dimensions of the mosquito can be reduced. To do this, you just need to remove the seal and the mesh, disassemble the frame, and then trim its parts just as much as is required, both in length and in width. By repeating everything in the reverse order, you can assemble the mesh back, after which you can put it on the window, as usual.
If you do not remove the mosquito net in time for the winter, or even from constant exposure to ultraviolet rays, the plastic from which the tiny handles are made may simply lose their properties and qualities. It becomes brittle, loses its elasticity, and often such parts are produced from not excessively high-quality material, since replacing them is easier than ever, and their cost is really low. The simplest solution is to buy additional, new handles and install them in place of the broken ones.
Photo from the site: my.housecope.com/wp-content/uploads/ext/2864
Pry the gasket out of the groove where the piece of the handle is, and pull it out a little, freeing the mount.
Loosening and shaking, take out the broken part, and install a new one in its place.
Next, tighten the mesh and put the sealing string in place, pressing it in with the handle of a knife or scissors.
If the handles are screwed onto screws, then everything is generally simple, you just need to unscrew the broken part and install a new one instead. However, it also happens that the mosquito is still installed on the window, and the handles are broken, and it seems that it is not possible to remove it to replace spare parts. How to remove a mosquito net from a window is easy and simple, even when its handles are hopelessly broken, you can see the instructions on our website.
Photo from the site: my.housecope.com/wp-content/uploads/ext/801
If all of the above suggested at least some, even the most minimal, knowledge or skills, then even a small child who has already held a screwdriver in his hands at least once in his life will cope with the task of changing the broken Z-shaped holders of the mosquito net, of course, if the fasteners match ...
First you need to unscrew the old mesh holders, they can be plastic or metal, and are usually attached to screws.
Comparing fasteners in a store, you need to pick up similar whole spare parts and purchase them in the right quantity, but it is more advisable to change everything right away.
All that remains is to screw the new holders to the frame and the trick is in the bag, the mesh can be installed in place.
Photos from the site: repair-pavlovsky-posad.rf
As you can see, repairing mosquito nets is not at all such a complicated matter, and any home craftsman can handle it with ease. This is a fairly simple system, all parts of which are absolutely easy to replace.You can even assemble such a grid yourself if you get the necessary components, but its cost is not so great that you need to save. However, if there are any unexplained points, it is worth watching a video about repairing a mosquito net with your own hands, and then the whole process will definitely become transparent and understandable.
VIDEO
I have just such a problem. And the bird tore not in one place, but periodically here and there. For some reason, one got into the habit of hanging on the net and tearing, tearing. We tried to just replace. But she successfully tears a new one. Therefore, while there is a possibility and there are not so many holes, I glue with scotch tape. saves from flies, but we do not think about beauty. As you can see, everything is covered with grapes and you can't see it from the street, and insects don't pester us. The tape holds up well and does not block the light.
You can also take some transparencies or pieces of plastic and attach them with a needle and thread. It will be even stronger this way, because the adhesive tape can lag behind in the sun. We have a shadow.
I have the same problem. Only my mosquito net was torn by birds, which fell on the windows in winter. I sealed these places with tape.
It is completely invisible from the room, but neither flies nor mosquitoes enter the room.
Since the question means that it is necessary not only to replace the mosquito net, but to repair it, then you can do what I once had to do.
The birds on the window damaged the mesh and mosquitoes and midges began to fly through the holes in it. But I still had a piece of a mosquito net and hastily put it on the damaged area and stitched both layers with a sewing needle and ordinary black thread.
It is clear that it is not particularly beautiful, but mosquitoes have stopped entering the apartment. Moreover, it was at the very bottom of the casement and was not particularly noticeable from the inside, but from the outside it was generally high and no one would see it.
There is nothing complicated there. The frame for the mesh is assembled from a profile and corners, which are simply inserted into each other
When the frame is assembled, a PVC mesh is applied over it with an allowance of about 1 cm on each side relative to the inner size of the frame. Next is the rubber sealing cord
and fits into the profile groove (see the right side of the top figure) over the mesh. The groove is quite deep, the rubber cord is driven there, for example, with a coin or a door key, pulling the mesh on the frame (in principle, there is a special seaming roller for this, which costs about 500 rubles, but if you do not plan to change the mesh on an industrial scale, it makes sense its purchase is not).
Replacing in reverse order: remove the old frame from the window, pry on the rubber cord (it is convenient to do it at the corner, in the turning zone - there is a gap sufficient for the tip of the screwdriver), pull out the old cord, remove the mesh, put a new mesh over the frame and press it down the same cord. Or if it has lost its elasticity from time to time and began to break, we use a new one (it costs about 5 rubles per meter, but is sold in bays of 100 meters.).
The only problem: in stores that sell fittings for plastic windows, the mesh comes in rolls of 30 linear meters (the width can be 1.44 or 1.6 m), the price of one “square” is low (60-80 rubles), but the problem is the fact that no one will cut the roll to you. So you need to either look for a familiar manufacturer of plastic windows who will cut off the desired piece from the roll, or order a new frame assembly, which will cost 10 times more than the cost of the mesh itself (500-800 rubles), but you will not need to buy a roll , the minimum price of which is 2500 rubles.
The mosquito net on the window is very outdated, there are holes. How to successfully pull the mosquito net yourself?
Training. Measure your design. Buy a new net with a margin of 10 cm in length and width, a mosquito cord-seal with a margin of 2-3 cm more than the perimeter.
Dismantling. Pull out the old cord starting from the adjustment knobs
Installation. Stretch the sealing cord slightly. Put a new canvas on top of the plastic frame.
Put handles in the right places under the cord
It will not be difficult to pull the mosquito net on a regular aluminum frame, connected by plastic corners. The frame must be laid on a flat surface, at the junction pull the rubber “wedge”. It is a round-section flagellum inserted into the groove along the entire perimeter of the frame, it actually keeps the mesh taut.
The wedge can be pry off with a sharp object and pulled upwards. It is necessary to pull out by pointwise lifting the wedge together with the clamp. It is not necessary to pull the wedge around the entire perimeter by grasping its end. So you stretch it in the axial direction, when you reinstall it at the junction, you get surplus, you cut them off, of course, and after settling, the wedge will pull shorter.
Before pulling the wedge, I recommend making a mark with a marker on the cord and frame, so that later the bends of the corners come together, so the cord will lie more correctly.
After removing the cord, remove the old mesh, clean the groove from possibly remaining dust and threads of the old mesh.
We apply a new mesh with a margin of more than the frame. It is better to do this together - one stretches, the second crimps the wedge. When pressing the first side, align the mesh fibers parallel to one side of the frame for a cleaner look.
The insertion of the cord makes it a blunt object, you should not use a screwdriver or similar tools - it often slips and you can tear the canvas
DIY mosquito net repair
Mosquito nets have become part of our life, as well as metal-plastic windows. They are aesthetic and easy to use, reliably protect our home from insects.
The most popular are framework Mosquito nets. The frame is made of aluminum profile and fastened plastic corners. The profile has a groove in which a special rubber band is placed, which actually holds the mesh. The mesh frame is installed behind pens in Z-shaped plastic brackets fixed to the outside of the window frame. Frame nets can be easily removed for cleaning or when washing windows, and can be removed for the winter.
But these seemingly comfortable mosquito nets have flaw - if the frame itself is often made of an aluminum profile (there are also plastic ones), then the corners, Z-shaped holders and handles are usually plastic .
They are the ones that most often break: crumble and crack. This happens especially quickly on nets that protect windows facing south or west, i.e. are actively and for a long time illuminated by the sun.
Corners, Z-holders and handles are replaceable, and to renovate mosquito net do it yourself .
Now appeared metal corners, Z-shaped holders and handles for mosquito nets. I recommend finding just such corners, holders and handles to do not repair mosquito net yearly .
Removing the mosquito net with Z-shaped holders. To do this, lift the net by the handles. up before stop ... We deduce lower the edge of the net outside the lower holders. A little omitting mesh down and release the top edge. Outside unfold the windows so that it goes into the window opening.
Replacement of corners.
Better not to wait for the corners to crack and break. Severe yellowing plastic corners are a clear sign that they need to be changed.
To replace corners do not try disassemble the whole frame at once ... The fact is that pulling the net itself later will very difficult or even impossible ... When making a mosquito net, the net is cut off with a margin, pulled and only then, the excess is cut off. We already have no stock .
Therefore, first we remove only the top the bar.
From the corner we pry a rubber band, for example, with a screwdriver.
We take out the gum only from the top groove. We also take out the mesh from the groove.
We try to pull the top bar up with our hands. If it doesn't work, then turn the grid over grooves for gum down . Covering the grid cardboard so as not to accidentally tear.
With a plank and a hammer knock out the top bar, tapping on one side, then on the other.
From the blows, the corners begin to go out of the frame.
We also first try to remove the corners from the removed bar with our hands, and if it doesn't work, then knock it out with a hammer. Press one edge with your foot (hand), and knock out a corner from the other edge.
It is possible that in this case some corners will break or they were already broken initially. This not scary ... Using a screwdriver and pliers, we take out the remaining parts of the corners from the hollow metal frame, being careful not to damage it.
If all the plastic breaks off at the edge of the frame, and part of the corner remains inside, then we drill leftovers with a small drill approx. 3 mm in diameter.
If you cannot pull out the remnants (there is nothing to catch on), then just push them further inward.
Assembling the frame in reverse order. V upper insert the bar with metal corners.
They fit very tightly, so we hammer them with a hammer through a wooden spacer so that do not damage corner and do not peel the paint off it.
We hammer until the corner tightly will not dock with the bar.
Upper plank with corners simultaneously we insert into the holes of the side plates.
Resting the lower end of the frame against a stationary object (for example, a plinth or lifting the frame vertically - to the floor), we hammer the upper bar with corners through a wooden gasket until it stops, tapping with a hammer, then from one or the other corner.
We straighten the upper edge of the mesh, stretch it a little and slowly start tucking the cord into the groove.
Carefully! Do not tear the mesh or cut the cord.
If the cord is difficult to fit into the groove, then it can be wet water and a little lather .
In the same way, we change the lower corners on the lower plank.
That's the whole frame repair, and they told me in the window hardware store that I could not cope with it. That it is very difficult, and only a professional can handle such repairs. Of course, I had to tinker with the first mesh for almost an hour, but I spent only 30 minutes repairing the second mesh.
Replacement of Z-shaped holders.
Replace holders much easier than to change corners.
Unscrew old Z-shaped holders.
Checking whether the mounting holes on the old and new holders are the same.
There are a little holes on my holders did not match ... In order not to drill new holes, I just took screws smaller diameter .
We fasten upper holders.
But with the lower no need to rush ... The fact is that plastic and metal holders different heights. If you change corners, then dimensions framework decrease and the corners can be screwed into place.
But if you are do not change , and screw the lower holder to the old place, then the frame can do not pass between the edges of the holders.
So in this case (if the corners do not change), before removing the mosquito net from the fasteners (holders), lift the net up until it stops and pay attention to the gap between bottom edge of mesh and top edge bottom Z-shaped holder. If the gap is minimal or 1-2 mm., Then the holes in the metal-plastic frame for attaching the lower holder will have to overdrill ... If the gap is about 6-7 mm., Then you can attach the lower holder to the old place.
If the gap is minimal, then measure difference in height between the old and new holder.
Usually it is 6-7 mm. It is for this distance that you need below the old holes drill new holes.
We do the markup with a pencil.
We drill a hole. Plastic is drilled very easily.
We fasten the holder with a screw, align it. Through the hole drill a second hole in the holder. We screw in another screw. We also fasten the second lower holder to a new place.
Now you can put the mosquito net in place.
We set the grid in exactly the same way. how was filmed , only in reverse order ... By tilting the mesh, we take it out of the window opening. We insert into the upper holders, lift up to the stop.Pressing the mesh tightly to the window, we bring the bottom edge into the lower holders. Omitting grid all the way .
Replacement of handles.
There is more on the mosquito net one weak point - plastic holders for raising and lowering the net during installation - pens .
To replace the handles, we pry the elastic band from the nearest corner.
We take out the gum from the groove from corner to handle inclusive.
Removing the old handle or what's left of her. If the handle does not come off, pull it down to a corner - the handle will pop out of the groove.
We insert a new handle into the old place, slightly pressing it down from above until it clicks. We check the distance from the edge so that the second handle is set at the same distance from the edge. Metal handle install immediately to the right place, she moves badly, but pull her out out at all problematic .
We insert the elastic into the groove. The elastic near the old handle was a little crumpled. It is in this place that you need to put a new pen. It is very difficult to insert the elastic between the handle and the frame. Do not forget that you can lather it, and then the work will go easier.
Now change the second handle in the same way.
Video (click to play).
Everything! You can forget about broken mosquito nets for several years, because metal parts last much longer.