In detail: do-it-yourself Tuareg pneumatic compressor repair from a real master for the site my.housecope.com.
Perhaps, many motorists, and just those who are simply interested, know all the advantages of the air suspension of the Volkswagen Tuareg car. But, in addition to these pluses, there are also minuses, this is natural. The disadvantages, of course, include the problem of leaking air bellows. Unfortunately, this sometimes happens, albeit on high runs. Fortunately, the factory supplies special repair kits with which this problem is solved.
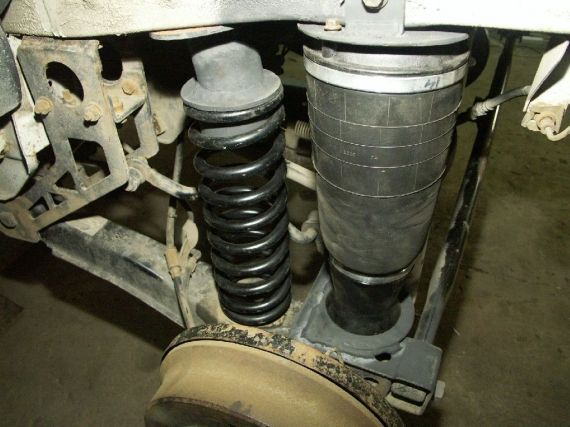
Usually, the problem starts to manifest itself gradually. After a long parking (several days) - You may find that the car has dropped on one wheel. Or on one axis, thus forming an unnatural roll. After you start the engine, the level of the body will be leveled and everything will work normally until you leave the car again for a long time. If the situation repeats, then there is an air leak from the system. The tightness is lost. We strongly recommend not to delay contacting the service as soon as you notice similar symptoms. This is due to the fact that in the absence of tightness, oxidative processes inside the air spring can intensify, the amount of condensate can increase, which will further enhance corrosion. Moisture will accumulate in the places where the rubber seals and the aluminum frame of the rack mate. In these places, violation of the working surface is not permissible. If oxides and corrosion appear on the working surface, a repair kit consisting of rubber seals and ensuring proper tightness will not perform its functions. Tuareg air suspension repair
| Video (click to play). |
If the leak persists even after replacing the repair kit, the only way to solve the problem is to replace the air spring. That is why it is not worth delaying the repair, because you can do just by replacing the "rubber bands". For clarity, we post a photo and a couple of drawings of the air suspension device.
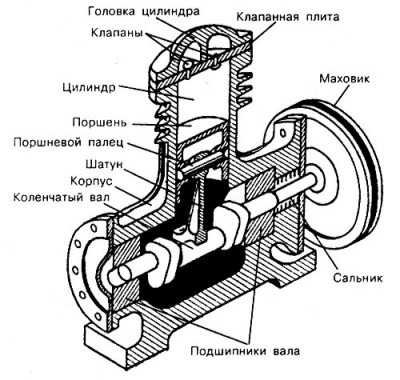
What parts the air strut consists of - you can see in this diagram: Tuareg air suspension repair
On the left parts of the picture (parts that we are changing are highlighted in bold): Tuareg air suspension repair
1 - Bushing
2 - the Bolt
3 - the Cover
4 - Nut
5 - Support
6 - the Valve for maintaining pressure
7 - a pneumocylinder of a suspension
8 - Latch preventing pulling off (must be replaced)
9 - Cover
10 - the O-ring
11 - Lip seal (to be replaced)
12 - Shock absorber air suspension repair Tuareg
On the right parts of the figure (also, the replaceable is highlighted):
1 - Support
2 - the O-ring (it is obligatory to replace)
3 - the Valve for maintaining pressure
4 - the Cover
5 - the outer guide
6 - Cover in the form of a sleeve element
7 - the Piston
8 - Cover
9 - Latch preventing pulling off (must be replaced)
10 - the O-ring (it is obligatory to replace)
11 - the Shock absorber
As you already understood, the repair kit consists of 2x supports, 2x clamps (preventing pulling off), 2x O-rings and 2x lip seals. In order to change this entire kit, you need to do the following:
- Remove both front wheels
- For right-hand pneumatic strut of diesel vehicles
- Remove the fuel filter above the pneumatic strut - Disconnect the shock absorber control cables
- Unscrew the upper struts fastening nuts to the body
- Remove air from pneumatic struts
- Unscrew and disconnect the rod of the body position sensor
- Unscrew the air line from each air strut
- Unscrew the ball of each upper arm from the steering knuckle
- Unscrew the stabilizer struts at the point of attachment to the stabilizer
- Remove the brake pipe mount from the steering knuckle
- Unscrew the steering knuckles from the lower arms
- Remove the air suspension strut
- Disassemble the air struts using a special tool
- Replace O-rings and bearings
- Assemble the air struts and check the tightness by applying a small amount of air to the cylinders using a soap solution
- Assembly is carried out in reverse order, taking into account the requirements of the manufacturer.
Checking the tightness of the pneumatic bellows
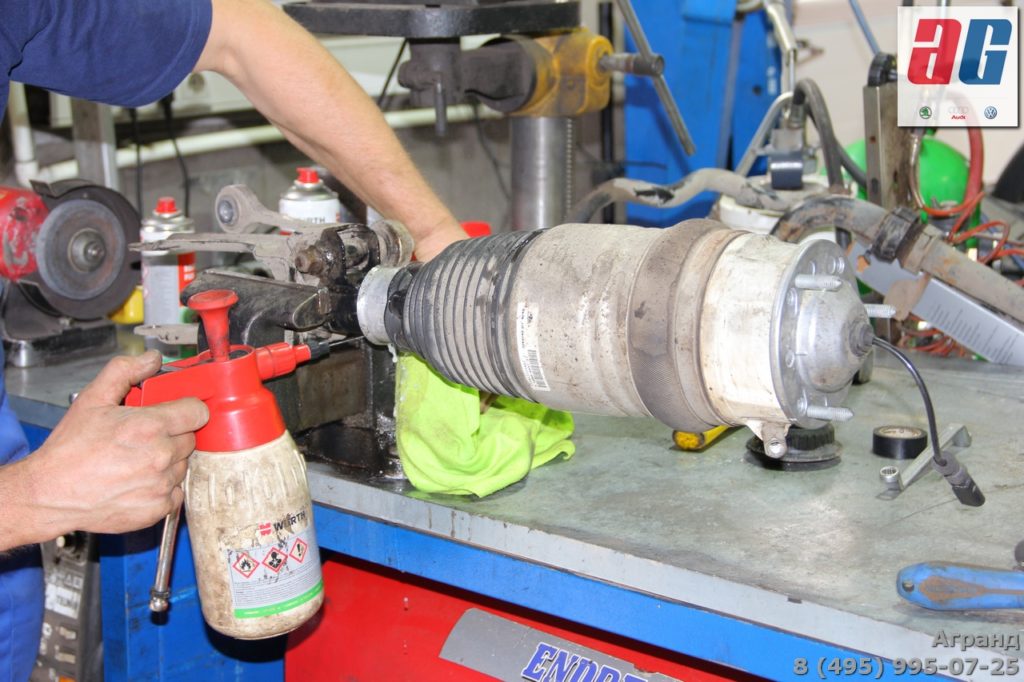
Below you can see other photos of the repair process: Tuareg air suspension repair

Reason: Multiple registration Nth time
IMHO, all rubber bands, gaskets must be changed, not only on the compressor, but for all types of work.
Added after 40 seconds
Bolts optional.
Reason: Multiple registration Nth time
IMHO, all rubber bands, gaskets must be changed, not only on the compressor, but for all types of work.
Added after 40 seconds
Bolts optional.
There may be a leak in the check valve in the dryer housing due to moisture.
Added after 1 hour 2 minutes 25 seconds
With the permission of the author of the topic, I will insert my five cents into a sore problem.
With the onset of winter (well, of course, high humidity), problems began with the compressor (error on the pressure sensor, well, in general, like everyone else). Inspired by the successes of his comrades from the forum, he bought one of the repair kit options on Avito, namely a Chinese head and a ring.
After removing the compressor, I was very surprised not to find critical seizures on the mirror of the original head. Well, okay, maybe general wear and tear, I thought, and assembled the compressor. The car in the garage jumped briskly from sport to extra leveled, and my joy had no limit, but. the next day I saw a familiar inscription. 
Having gained time and energy, I decided to get to the bottom of this problem and also share with my comrades

We completely disassemble for parts:
We pay close attention to the check valve:
I suspect many further, assessing the condition of the rubber bands and springs, collect everything back. But in vain.
We remove the plastic sleeve, and there.
And there are two rubber rings that seal nothing at all!
It should probably be recalled that the released air goes through the dehumidifier (carrying moisture along with it), bringing it to its original state (the regeneration process takes place), and so in the absence of compaction, the air will bypass the dehumidifier through a leak and the poor fellow only accumulates moisture without drying anything.
As a result, the pressure relief valve rusts and fails:
Added after 42 minutes 25 seconds
Since it would not have been possible to find such rings quickly, I went the beaten path to Avito, and was surprised to find a new (.) Dehumidifier body there for a song, but without the dehumidifier itself.
After examining his desiccant, he saw that he was covered in water and rusty:
This silica gel is no longer good for anything, even keep it in the oven for a month 
Well, do not buy a repair kit for 15,000 because of this cartridge. I started looking for silica gel, but everything was sold in large containers. And then I remembered that the trucks have a desiccant cartridge, I went and bought it.
Such a weighty thing
I sawed it and took out a cartridge (open carefully, there is a powerful spring inside.):
We open the cartridge and rejoice at the stocks of silica gel (for 10 of our cartridges, there will be enough for sure!):
Next, we proceed to the electrical part, clean and polish the collector:
When disassembling the compressor, I found another common jamb, the insulation of the wires at the entrance to the case burst, wrapped the latsar with tape and filled it with sealant:
When assembling the compressor, I drew attention to one more subtlety, the air supply tube is also connected with a quick-detachable connection, in which there is a rubber ring. I assembled the compressor and blew it into the air supply hose. Well, in general, the siphon from there, Mom, don't worry, and I went to look for the ring. I traveled around all the shops, I didn't find a nifiga, and by chance my eyes fell on the old rings of the fuel injectors (the old ring on the right):
Put the ring on and voila! Nothing siphon anywhere, everything is hermetically sealed!
Unit ready for installation:
Epilogue: happiness is in the little things, only with completely serviceable components will the compressor delight you with flawless operation. Even because of one ring or the slightest leak, it will swing and swing, causing increased wear of the elements of the piston group and accumulating moisture in the desiccant, which ultimately will completely disable it.
So my conclusion: still, a complete repair kit is preferable, we eliminate all possible and impossible problems with the dryer, valves and fittings (in the end, the price is approximately the same).
No offense to those who sell only heads: I don't know about the author of the topic, but characteristic scratches appeared on my head, which indirectly speaks of the quality of these products, I gave the original head to the sleeve (they will put a sleeve with a ceramic coating), let's see which of it will come out.
First, let's figure out what the purpose of the air suspension is. This equipment will allow you to adjust the ride height in any situation on the road. When the desired mode is selected from four possible on both sides of the car, the height is constantly maintained, which is monitored by sensors. The main task of this equipment is to increase comfort and safety while driving.
The air suspension consists of the following elements: a compressor, a receiver, a switch-on and control relay, a repair kit, and so on. Proper care and timely troubleshooting will help you avoid troubles such as repairing or replacing parts. The compressor and the receiver are responsible for the supply of compressed air, the relay protects the pneumatic system from overheating, and the repair kit allows you to perform maintenance, diagnostics and repairs.

Air suspension height adjustment is carried out by pressing one button. Set the StraKen mode to travel on city roads and wait until the indicator on the panel stops flashing. This will mean that the clearance height has reached the desired value. It is also possible to activate the lifting mode of the car for changing tires or for pumping them up.
Under normal conditions, the compressed air is supplied from the receiver and the suspension is lifted in a few seconds. In the absence of air, the compressor takes over and performs its work a little slower. In order to avoid overheating, the device is equipped with a special turn-on relay.
You can choose one of the available air suspension modes:
- Lade is the minimum ride height. It is installed when the car is stationary or its speed is comparable to the speed of pedestrian movement. In this mode, it becomes necessary when you need to load or unload the trunk.
- StraKen is the standard level for driving on normal roads at speeds over 5 km / h. Switching occurs automatically. The clearance height can be higher or lower depending on the speed of movement. This mode will allow you to increase the stability of the car, its maneuverability and reduce aerodynamic resistance.
- Offroad is a mode with maximum clearance for off-road driving. In this case, the speed should not exceed 70 km / h, otherwise the level will automatically switch to StraKen. To prevent this from happening, it is better to install a speed limiter. The ground clearance will then maintain the optimum ride height for poor road travel.
- X'tra is a temporary mode that cannot be set for a long time. Designed for driving over obstacles or freeing the car from the ground. The speed does not exceed 20 km / h. When leaving an obstacle and increasing the speed, the mode switches automatically.
The Tuareg air suspension compressor is located in the front part of the body at the bottom of the right side of the vehicle and is fixed to the bracket. Under normal operating conditions, there are no unnecessary rattling sounds. The automatic switch-on at engine start activates the compressor.The compressed air is fed into a special cylinder, the so-called air receiver, which can be found in the trunk of your car. Together with it, there is usually a hose that allows you to pump up the wheels.
Stable and long-term operation of the compressor is ensured by the switching relay. Its main advantages include:
- small dimensions of the relay;
- reliability and durability of the product;
- the absence of a large number of current wires, which significantly increases safety.
It often happens that during the operation of a vehicle, you can hear a rumble from under the hood, uncharacteristic for the normal operation of the system. This indicates that the compressor needs repair or replacement.
Most air-suspended cars are equipped with a compressor that regulates the pressure in the wheels and provides them with pumping. After some time of operation, this equipment fails, which it informs the owner about through rattling. This signal indicates that the piston system is in a critical condition and the pump may stop working at any time. This, in turn, will lead to "deflation" of the tires and upsetting the car "on the belly." Naturally, there will be no question of further operation of the vehicle, and repairing the car will become a problem. After all, the minimum clearance of a deflated car will not make it possible to load it onto a tow truck. To avoid such troubles, carry out timely equipment diagnostics, use a repair kit to eliminate minor problems.
Every driver should be aware that an air suspension compressor cannot be a complete replacement for a conventional wheel pump. It cannot be used permanently for this purpose.