Details: DIY Volkswagen T4 suspension repair from a real master for the site my.housecope.com.
The front suspension of the Volkswagen Transporter T4 (see Fig. 378) consists of a beam (cross member) (53), upper (29) and lower (22) levers, torsion (rod) springs (39), and a stabilizer (48). Hydraulic shock absorbers (2) are used to damp suspension vibration and ensure reliable contact of the wheel with the road surface. The front suspension beam is attached directly to the body and supports the front of the powertrain. The individual suspension parts can be removed independently of each other.
Rice. 377 Shock absorber mounting. Install the washer (2) with the flange down
1 - nut, 25 Nm, 2 - washer, 3 - upper rubber bushing, 4 - upper shock absorber bracket, 5 - bolt, 100 Nm, 6 - lower rubber bushing, 7 - spacer sleeve, 8 - shock absorber, 9, 10 - nut , 160 Nm, 11 - front transverse arm silent block, 12 - air guide sheet (only in cars with 14 wheels), 13 - nut
Rice. 378 T4 front suspension device
1 - nut, 160Nm, front shock absorber, 3 - bushing, 4, 7 - shock absorber rod bushings, 5 - bolt, 100Nm, 6 - shock absorber bracket, 8 - cup washer, concave side down, 9 - nut, 25Nm, 10, 31, 35 - nuts, 100Nm, 11- upper buffer, 12 - nut, 110Nm, 13 - lower ball joint, 14 - bracket, installed only on cars with 14 "discs, 15, 38- nuts, 100Nm, 16 - front silent -block, 17- bolt, M14x1.5x82, 18 - eccentric bolt, 19 - rear silent block, 20, 26 - eccentric washers, 21 - nut, 22 - lower arm, 23 - connecting rod, 24 - bolt M14x1.5 × 175, 25 - nut, 110Nm, 27 - eccentric bushing, 28 - upper ball joint, 29 - upper arm, 30 - retaining ring, 32, 34 - silent blocks of the upper arm, 33 - bolt М212х1.5х80, 36 - bolt М14х1.5х42, 37 - bolt М14х1.5х30, 39 - torsion bar, 40 - lever, 41 - nut, 42 - adjusting bolt of torsion bar, 43 - bolt М14х1.5х40, 110Nm, 44 - bolt М12х1.5, 110Nm, 45 - bolt , 55 Nm, 46 - bracket, 47 - stabilizer bushing ora, 48 - stabilizer, 49 - rubber support, 50 - bolt, 45 Nm, 51 - rubber-metal support, 52 - attachment point on the body, 53 - front axle beam.
The tightening torque depends on the thread diameter. M12: 75 Nm and turn 90º, M14: 110 Nm.
| Video (click to play). |
Volkswagen T4 minibuses were produced from 1990 to 2003. Due to its reliability, ease of use and a wide range of model range, the car has become extremely popular both in Europe and among motorists from the CIS. Along with a huge number of advantages, the Volkswagen T4 has some disadvantages and weaknesses that the future buyer should be aware of and pay attention to when buying.
In general, the Techik's body is very durable, made of galvanized metal. However, this material is susceptible to prolonged exposure to moisture. Significant amounts of rust on the body are rare. But a rusty bottom is a very common phenomenon. Corrosion often affects the underside of doors, sills, gutters and rear fenders. Particularly vulnerable are cars that have been operating for a long time in conditions of poor-quality roads, a large amount of reagents on the roads in winter and a humid climate. How to check? To check the condition of the car body, it is necessary to carry out a thorough visual inspection on the overpass. It is necessary to expose the surface of the body, especially the underside, to light mechanical stress with your hands, especially at the seams. And it is important to remember that this model (T4) is no longer produced and therefore practically all cars have problems with paintwork.
Both diesel and gasoline engines have vulnerabilities. Diesel engines are characterized by periodic breakdowns of the high-pressure fuel pump and the glow plug control system.Turbocharger breakdowns are not uncommon for turbo diesel engines. In gasoline engines, the most common malfunctions of auxiliary electrical equipment: starter, generator, ignition coil and others.
First of all, to check the engine, it is necessary to measure the compression in the cylinders using a special device. The main "symptoms" of a problem engine are as follows:
- the car does not start well or does not start at all;
- exhaust gases are blue or white;
- oil on the dipstick with foam or white or light blue splashes;
- the coolant in the expansion tank is dirty brown;
- third-party noise when the motor is running;
- poor cravings.
Automatic transmissions are especially problematic. In them, torque converters regularly fail. But there are many problems in mechanical engineering. Bearings and gears wear out rather quickly. As a result, gear shifting becomes difficult. By the way, the gearbox is considered one of the problem areas of the Volkswagen Transporter 4. When checking, you first need to check the quantity and quality of oil in the gearbox. It should be clean, level. Next, you should shift the gears, on the spot and while the car is moving. In a serviceable car, gears are switched easily, smoothly, without third-party noise, tapping. The gears do not "pop out".
The Volkswagen T4 suspension is strong enough. Its condition depends on the operating conditions of the vehicle and the quality of the roads. In the front torsion bar suspension, the upper ball bearings fail - 50 t.km., the stabilizer bushings - 30 t.km., the silent blocks of the lower arms will last a little more than 60 t.km .. Rear spring suspension - shock absorbers move away 120 t.km ... without a fanatical load. When checking, you should start with a visual inspection. Defective parts very often have oil drips. All rubber components must be intact, free from defects and cracks. A faulty suspension creates characteristic noises while driving.
Breakage of side door rollers is a fairly common problem and one can say Volkswagen T4 disease. At the initial stage of the malfunction, the side doors close poorly, not always the first time. Over time, the door simply cannot be closed. In good condition, it should close easily and immediately. Therefore, when buying, you need to pay attention to this and open and close the door several times.
- Expensive spare parts;
- The gear lever is far away;
- Weak insulation;
- Vibration of window frames;
- Bad optics;
- Crickets in a torpedo;
- Weak and long warm-up of the passenger compartment in the winter.
Based on the foregoing, we can conclude that, in general, the car at one time occupied a worthy place among its competitors, but due to the age parameters of these cars, it should be understood that the body is quite corroded. Therefore, when choosing a car, you need to make the right choice, conclusion and think over all the pros and cons. After all, there are many alternatives to these cars in the car market.
Here are photo reports on repair and detailed documentation on cars:
Volkswagen Transporter T4 (model code: 70A, 70E, 70H, 70J, 70L, 70M) 1991 - 1996
Volkswagen Caravelle T4 / Volkswagen Caravelle T4 (model code: 70C, 70K) 1991 - 1996
Volkswagen Multivan T4 / Volkswagen Multivan T4 (model code: 70B) 1991 - 1996
Volkswagen Transporter T4 (model code: 7DA, 7DB, 7DE, 7DH, 7DJ) 1996 - 2003
Volkswagen Caravelle T4 1996 - 2003
Volkswagen Multivan T4 / Volkswagen Multivan T4 (model code: 7DC) 1996 - 2003
Cylinder head repair on Volkswagen Caravelle Т4 - ACV engine (AJT, AHY, AXG, AYC, AYY, AXL, AUF) (rus.) Detailed photo report.
The ACV engine was installed on the following vehicles: VW Transporter T4 (70), VW Transporter T4 (7D).
Replacing the drive belt on the AAA VR6 2.8 engine (rus.) Photo report
It's time for a little service. It is recommended to change the drive belt every 120 thousand, plus the fact that it is one for everything on this engine.Recently, the belt began to whistle, and why squeeze the maximum, in general, the replacement procedure is described in this report.
Determination of turbine overflow by logs, TDI engines, etc. (rus.) Photo report
The most pressing problem in turbocharged engines is the occurrence of an overflow. This is especially true for diesel engines. the formation of soot in the exhaust gases leads to its rapid accumulation inside the turbine and wedging of the geometry. First, let's try to figure out how the inflation pressure is regulated, and then let's look at what the blowout looks like in the logs.
Power loss during acceleration, turbine underflow, description of problems, removal of logs and diagnostics (rus.)
In case of problems associated with the loss of power during acceleration, both constant and variable loss of traction when driving. Loss of traction in "full throttle" mode or the transition of the engine to emergency mode (driving, but not pulling or pulling weakly) read this entire text carefully, and 9 out of 10 that this will help you establish the exact cause of the problem.
Technical characteristics and data for adjustments of vehicle systems:
engine and cooling system, ignition, fuel system, suspension, liquid volumes, etc.
Volkswagen T4 Caravelle / Transporter / Multivan since 1990: Lubrication system (rus.) Engines: AAC, AAF, ACU, AET, APL, AVT, AES, AMW, 1X, ABL, AJA, AAB, AJT, ACV, AUF, AXL, AYC, AHY, AXG.
Information on the repair of engines VAG / Engines repair
This engine repair information applies to all VAG vehicles. In order to quickly find the documentation for your engine, simply press Ctrl-F on the keyboard and type the letters of your engine. For example: 2E or BSE (English only!)
Cooling, heating, ventilation and air conditioning system
(Cooling, Heating, Air Conditioning and Climate Control Systems)
Volkswagen T4 Caravelle / Transporter / Multivan since 1990: Petrol injection system (rus.) Considered VW Digifant systems (engines: AAC, AAF, ACU); Bosch Motronic 3.8.1 / ME 7.1 (engines: AES, AMV); Simos 5S / 3.5 / 3.5 (engines: AET, APL, AVT)
Injection and ignition systems
This information on injection systems applies to all VW, Skoda, SEAT, Audi vehicles.
General information on ignition systems
Suitable for many cars VW, Skoda, SEAT, Audi
General information on fuel systems
Suitable for many cars VW, Skoda, SEAT, Audi
Disassembly of the inner and outer CV joints (rus.) Photo report.
When replacing the boot, if dirt has got into the grease, the CV joint must be disassembled, rinsed from the old grease, then assembled and filled with new grease. This work is not at all difficult, but it requires accuracy and attention.
General Suspension Information
Suitable for many cars VW, Skoda, SEAT, Audi
Airbag "spiral" repair, airbag slip ring restoration (rus.) Photo report
Let me disagree with the statements about the unrepairability of the “Airbag spiral”. As they say, “the collective farm was a success for me. "So we need: a soldering iron, a tester, a cross screwdriver, a thin slotted screwdriver, flux, tin, a skin or mini drill, accuracy, patience.
Information on the repair of gearboxes VAG / Transmission repair
This gearbox repair information applies to all VAG vehicles.
Repair of the Bosch starter No. 0 001 108 094 (1.4 kW), replacement of components (rus.) Photo report
Once I heard how my starter began to "idle" shriek. I purchased the bushings for replacement. After reading the forum, I saw that many describe the procedure for removing the starter, so I decided not to repeat myself. But some of the nuances directly related to the disassembly of the starter and the further replacement of parts are not reflected in such detail, I hope this report will correct this.
Replacing bearings in alternators Bosch 90A and 65A (rus.) Photo report
The 90A VAG generator number 026 903 015B, Bosch number 0 120 469 729 was installed on many cars, the grinding and rumble when the generator is running indicate that its bearings need to be changed.
Replacing the slip rings of the Bosch 65 Amp generator (rus.) Photo report
The consequences of worn slip rings - there will be no normal charging of the battery and the brushes of even a new relay-regulator will wear off faster. How to replace them in this report.
Volkswagen T4 Caravelle / Transporter / Multivan from 09/1990, petrol / diesel. Repair and maintenance (rus.) The book contains information necessary for the repair of all components and assemblies of a car: engine, fuel system, exhaust system, clutch, gearbox, steering, braking system, tires and tires, bodywork, electrical equipment, accessories. Recommendations for car care are given. The manuals are intended for professionals and car enthusiasts and include over 400 illustrations, fault tables, colored wiring diagrams. Petrol engines: 2.0 l / 62 kW (84 hp), with 9/90 2.5 l / 81 kW (110 hp), 12/90 - 7/96 2.5 l / 85 kW (115 HP), from 8/96 2.8 l / 103 kW (140 HP), from 1/96 - 5/00 2.8 l / 150 kW (204 HP) , from 5/00 Diesel engines: 1.9 l / 45 kW (60 HP), 9/90 - 7/96 1.9 l / 50 kW (68 HP), from 10/92 2 , 4 l / 55 kW (75 hp), from 4/97 2.4 l / 57 kW (78 hp), 9/90 - 3/97 2.5 l / 65 kW (88 hp) .s.), from 4/98 2.5 l / 75 kW (102 HP), from 8/95 2.5 l / 111 kW (150 HP), from 4/98. 350 pages. 72 MB.
If you did not find information on your car, look at the cars built on the platform of your car.
With a high degree of probability, the information on repair and maintenance will be suitable for your car as well.
All documentation in English is marked (eng.), In German - (ger.)
For everyone who has a Volkswagen, hands and the desire to do something with them.
For all who has Volkswagen, hands and desire to do something by them.
Current time: 10/18/18 03:43 AM
HolDeR "13.09.09, 12:32 Re: T4 suspension, changed everything, but the knock remained.
I also had some kind of knocking from behind. I changed the rear shock absorbers, brake discs, pads, hub bearings. I checked my fingers in the caliper. The knock still remained. Found the reason by chance. I began to remove the rear bumper (inflated), so that to remove it I had to open the taillights. And I found it .. It was knocking, or rather, the honey in the headlight blurted out. That is, it fell out and was inside the headlight.
As I found and remembered a bike from a car service:
When a man came to them and said, he blurts out something, and what I don’t understand. They shook up all the suspension for him and the knock remained. After a long search, they installed it - a screwdriver snapped into the inside of the door behind the trim. The man himself removed the trim and forgot to take out the screwdriver, so she rattled there.
What is all this for? Besides, it is not always possible to find out the reason for the knock according to the description. You need to watch individually in each case.
Sinister "09/13/09, 12:44 pm Re: T4 suspension, changed everything, but the knock remained.
Delon "09/15/09, 23:04 Re: T4 suspension, changed everything, but the knock remained.
Gena »09/16/09, 00:29 Re: T4 suspension, changed everything, but the knock remained.
joker53 "01.12.09, 20:18 Re: T4 suspension, changed everything, but the knock remained.
Everything about the Volkswagen VW Bus T1 T2 T3 T4 T5 LT Crafter Caddy - technical parameters, repair, service, service, spare parts, please for repair and service
mexanik »20 Aug 2011, 10:17
kds »20 Aug 2011, 15:31
T-4 clean passenger AAV 2.4D. 94g.v.
Region 83 »20 Aug 2011, 19:58
mexanik

that I have not seen a photo report anywhere (for replacing the rubber bands of the upper arm)


mexanik »20 Aug 2011, 21:57
Region 83 »20 Aug 2011, 23:45
kds »21 Aug 2011, 10:30
T-4 clean passenger AAV 2.4D. 94g.v.
Region 83 »28 Aug 2011, 09:08


here is the photo you can see
took off, pressed in and set in an hour


I think


Region 83 »28 Aug 2011, 09:17
gene »31 Aug 2011, 08:36
Region 83 »31 Aug 2011, 09:44


(aren't you afraid to bend the lever with a jack?)


What, gena?


andruk »31 Aug 2011, 18:17
Region 83 »31 Aug 2011, 18:52
mexanik »31 Aug 2011, 21:08
gene »01 Sep 2011, 09:28
andruk »01 Sep 2011, 18:52
Region 83 »01 Sep 2011, 19:21
935kot »09 Oct 2011, 17:51
kds »09 Oct 2011, 17:54
T-4 clean passenger AAV 2.4D. 94g.v.
935kot »10 Oct 2011, 08:30
kds "10 Oct 2011, 13:31
The one who invented this needs to hammer a nail in the head.
(Bullet, film "DMB")
No sooner had I had time to enjoy the Transporter with a working gearbox, as a nuisance again. I recalled the leak of oil from the power steering circuit, which manifested itself back in December. More precisely, a leak from the steering rack. And after the transportation of bricks (6-7 flights with a load of 1200 kg with a passport carrying capacity of 765 kg), oil generally flowed like a river. In addition, something rumbled in the front suspension.
There are no options, you need to remove the rail. Memories of hemorrhoids with an omega steering gear did not inspire at all. But nothing can be done.
This time, everything took place in a more civilized environment. That is, not outdoors on a cold April night, but on a warm sunny June day in a garage full of tools and warm water for washing hands.
How wheels, brake discs and calipers are removed, I think, there is no need to tell. Although, the calipers can be mentioned. They are bolted to the steering knuckles with hexagonal bolts 21. And screwed so well that even a standard chrome vanadium head from a set of tools (Practa) could not stand it. And, although a sliding cylinder with a slightly reinforced head with a bolt coped with it, I still preferred to get a more impressive tool. Reinforced 21 head (black) with thick walls and a 3/4 ″ square, and to it - a long “poker” with a hinge at the end cost 38 euros.
- Such a tool is taken to work on the railway. And you. what? - the sales assistant refused to believe that I was going to repair a B-category car with THIS.
I must say that this tool without any problems “defeated” all the necessary bolts, and there were a lot of them. Almost the entire front suspension of the Transporter is assembled on hexagon bolts by 21.
Then the entire exhaust pipe was removed, the steering tips were disconnected from the steering knuckles, the shock absorbers were removed, the anti-roll bar was disconnected from the suspension arms, the steering shaft and hydraulic pipes were disconnected from the steering rack, then the bolts of the rack to the subframe were unscrewed. It remains to remove the rail. And here is the first riddle. The rail is threaded with its ends into such narrow windows of the stretcher. Moreover, she "lives" here not alone, but in the vicinity of the stabilizer.
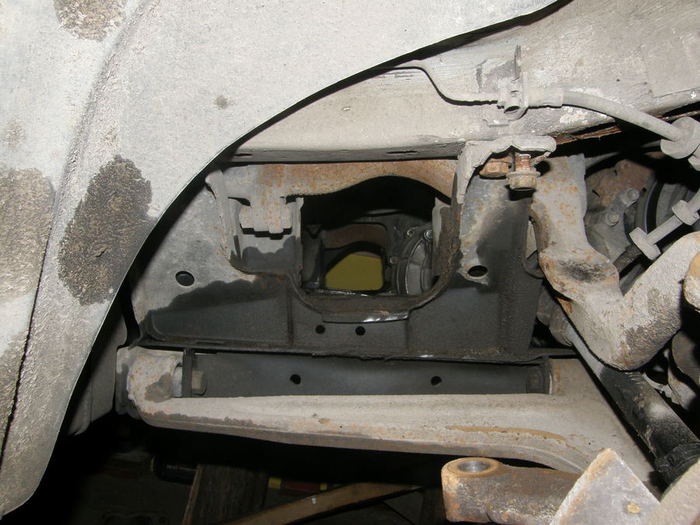
The brackets for attaching the stabilizer to the subframe also had to be removed, leaving this large “poker” to dangle freely, because it is impossible to pull it out without removing the rail.
Having twisted the rail this way and that for a while, I pulled it out.
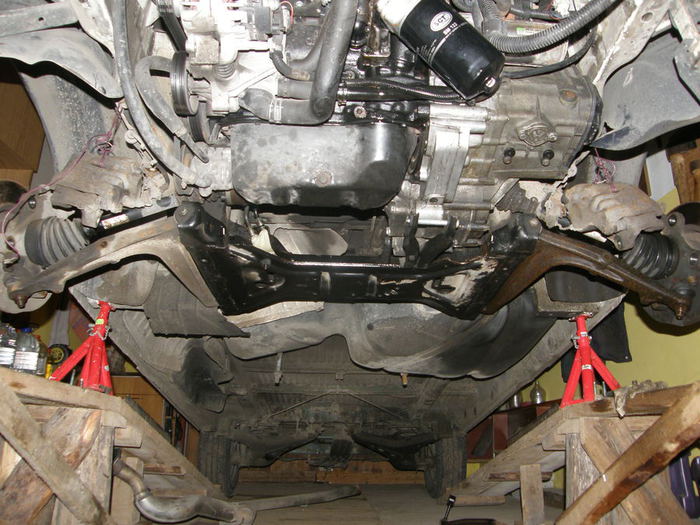

I didn't get inside the reiki, I preferred to give it to people who make money on it and who thoroughly know the structure of the reiki for restoration. There was neither time nor desire to pick it up on my own.
I started to repair the suspension. I decided - since the front end is already half disassembled - it is necessary to change all consumables for preventive purposes. That is, 8 silent blocks, 4 ball joints, 2 steering tip anthers (the tips themselves were replaced less than a year ago, but the rubber has already cracked on one boot), 2 corrugated covers and 4 rubber bushings for attaching the steering rack.
To replace the upper arm bushings, the subframe must be removed. To remove the subframe, the torsion bars must be disconnected from the upper arms. I had to suffer with their sour bolts. The lower ones are clearly visible in the upper part of the steering rack window (in the first photo), the upper ones. are located in one of the most inaccessible places of the car. Their heads are turned back, and behind, almost immediately behind the subframe, there is a fuel tank. I had to solve the second riddle - what configuration the tool should be so that the knob for breaking the bolt or the ratchet for subsequent unscrewing would be exactly between the stretcher and the tank.
Won. He took off the subframe, and the levers from it.
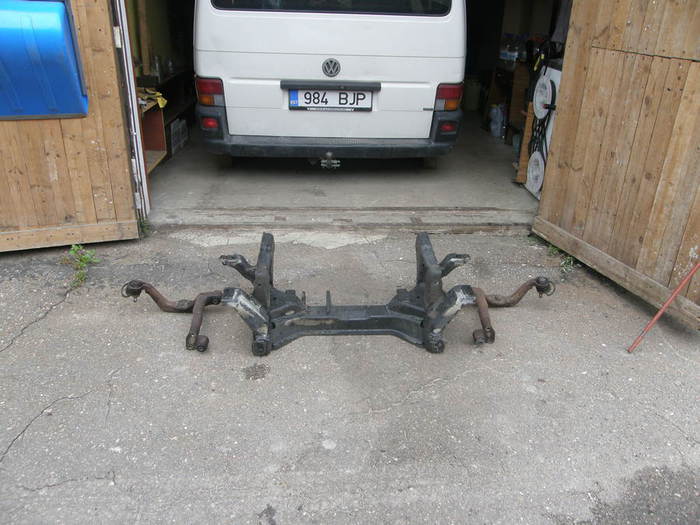
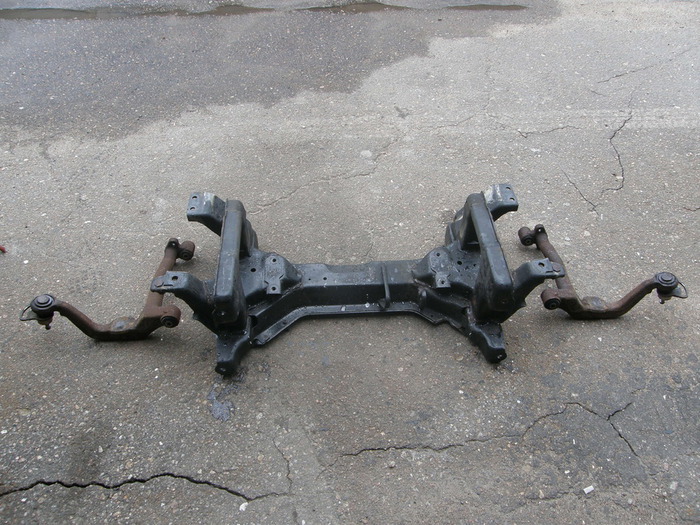

Riddle number three - top ball joints. How to remove them from the levers? I did not find the spring wire staples right away - they were reliably hidden under a layer of road dirt that had crammed into the grooves.
The stripper, even in the most “powerful” version, could not move the supports.
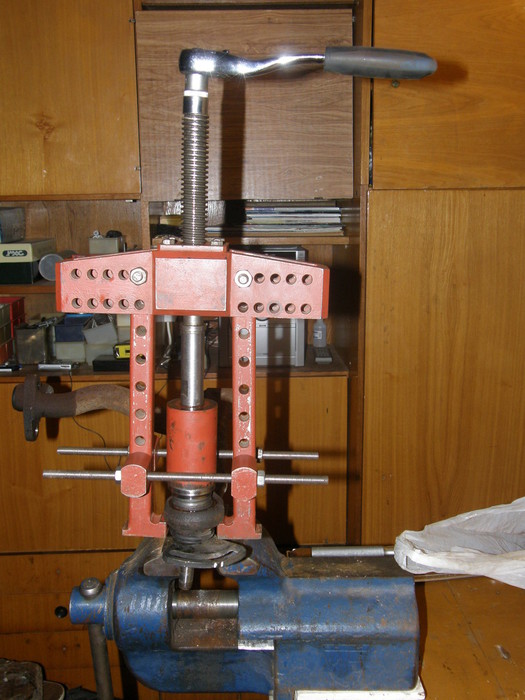
But the sledgehammer coped with the task with a bang - undocking occurred already on the second blow.
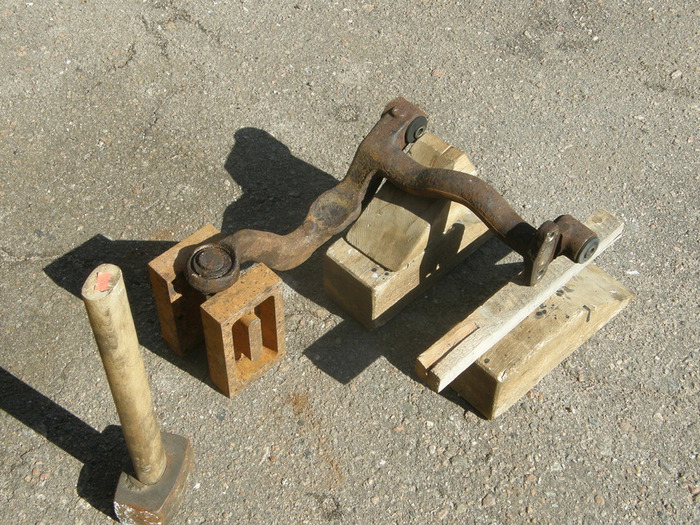
But the dismantling of the silent blocks went like clockwork (with a shudder I remember BMW silent blocks, which even a two-ton press could not master.).
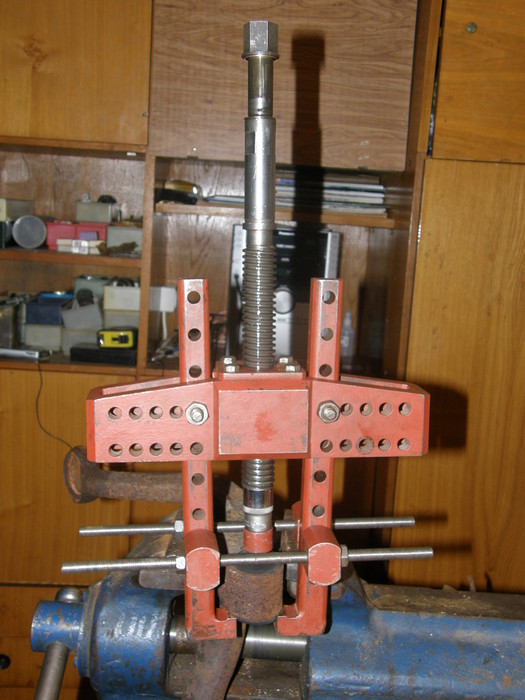
In the same way, he pulled out the rubber mounts from the already repaired steering rack. Only the puller had to be made asymmetrical.
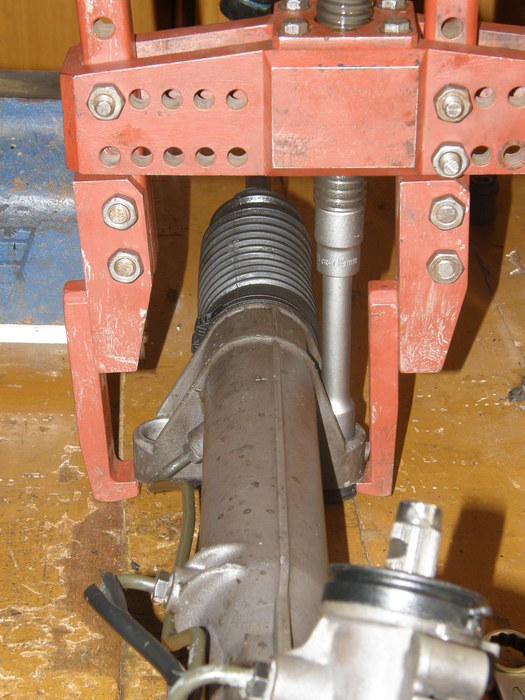
Having replaced everything successfully, I installed a stretcher on the car. I install the rail.
Later, for the sake of interest, I searched several forums on this topic. It’s interesting how the people cope with this task.
Everyone has their own recipe. Someone, before removing, twists the steering wheel all the way to one side or the other, someone removes the steering tips, someone does some magical manipulations with the anti-roll bar.But I did not find a clear process for maneuvering the reiki in a tight space. “Somehow like this, or like that, in general, poked back and forth, and it is not clear how she fell into place. ”- something like this. In this case, someone tortures the rail for eight hours, someone for two days.
The whole process, together with a photo session and constant washing of hands, took me 4 hours. I give here the procedure for installing the rail, maybe again it will come in handy for someone. The removal process, in principle, is the reverse of the installation, just the washed rail and stretcher look better, and it is more pleasant to work with them))).
1. We take in our hands a serviceable and washed rail, we are located with it under the car behind the front axle, approximately under the fuel tank. We place the rail so that its gearbox is located to the right along the direction of the machine. In general, how it should stand, so we have it. There is no need to “twist the steering wheel all the way”, the “steering wheel” of the rack is in the “straight” position. It is also not necessary to remove the steering tips.
I draw your attention to the fact that I have removed the exhaust pipe - this gives a little more room for maneuver.
We turn the rail upside down so that the splined shaft looks down. From under the middle of the car, we insert the left end of the rail into the window of the stretcher, which is left in the direction of the car, and push it there as far as possible. We first move the stabilizer to the left so that its bends do not interfere with the advance of the rail.
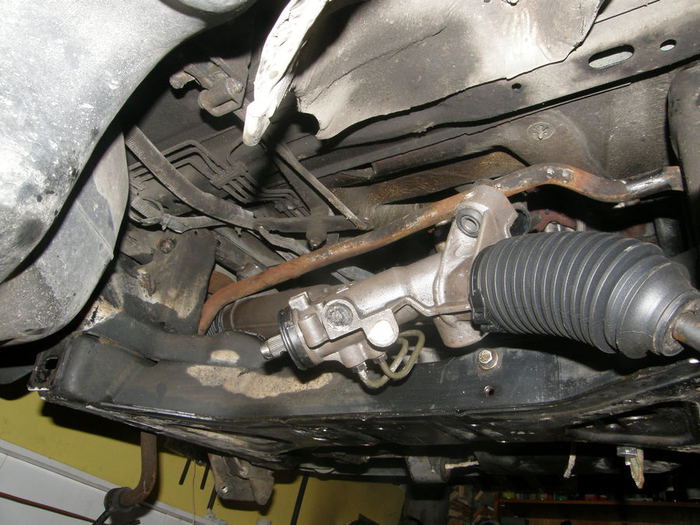
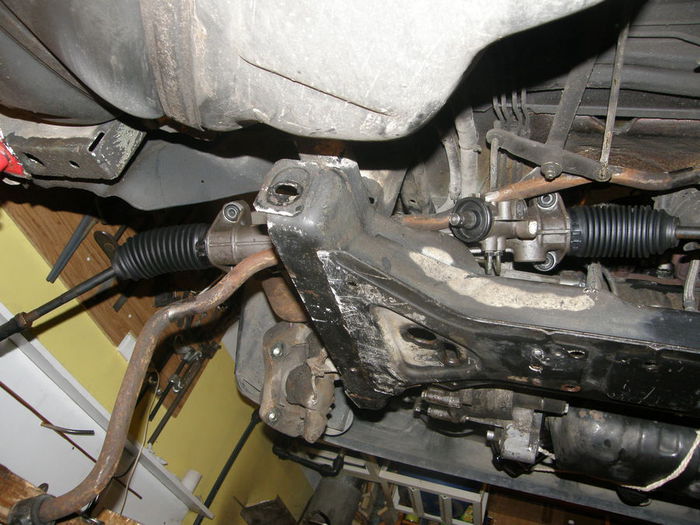

2. Now the right steering tip can be tucked into the right window of the subframe - there is just enough room for it.
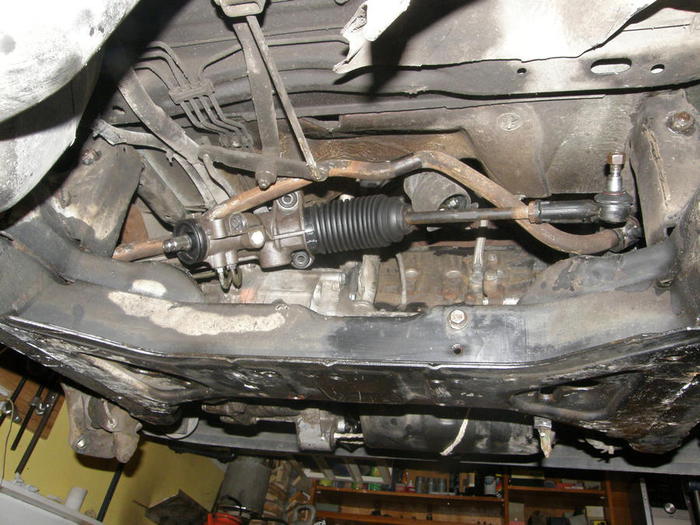
3. If you have removed the exhaust pipe - it's time to put it back (which I did not do).
4. The rail, which remains inverted, is shifted to the center of the car (view from the left wheel arch).
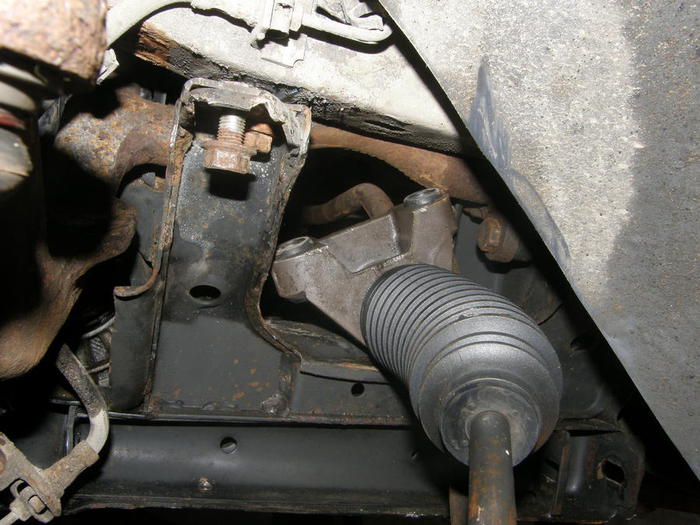
5. We unfold the rail to the working position (put it “on its feet”). We also move the stabilizer to the middle of the car.
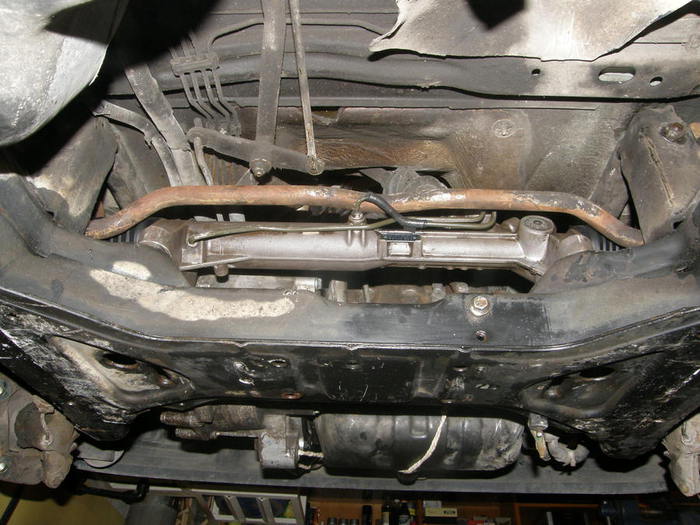
6. We fix the stabilizer in the working position (view from the arch of the right wheel).
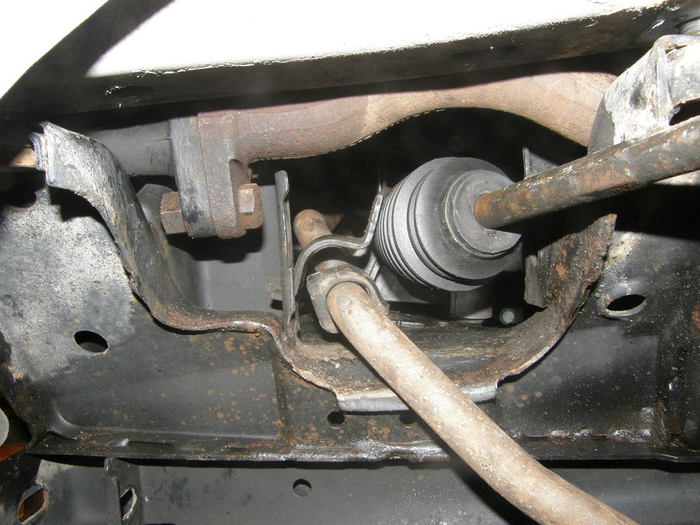
7. Bolt the rail to the subframe. The most problematic according to the reviews of members of the forum is the left front bolt. It is located in a narrow place, almost close to the checkpoint body. It's not easy to get close to it with your hand, and even more so with a key. Sort of.
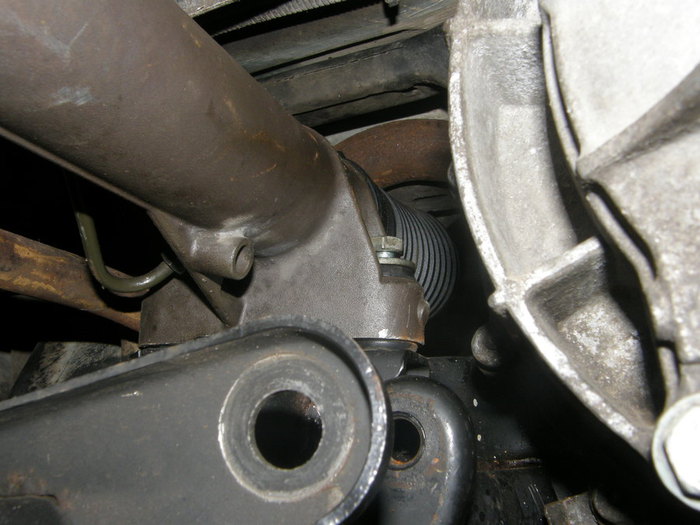
In fact, there are two whole ways to crawl up to him!
First, I assembled just such a structure from two sets of extension cords and a gimbal.
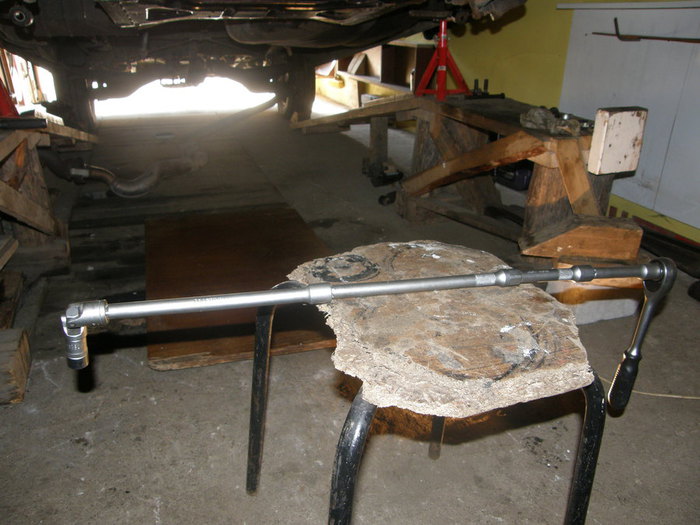
... and twisted the bolt from above, from under the hood.
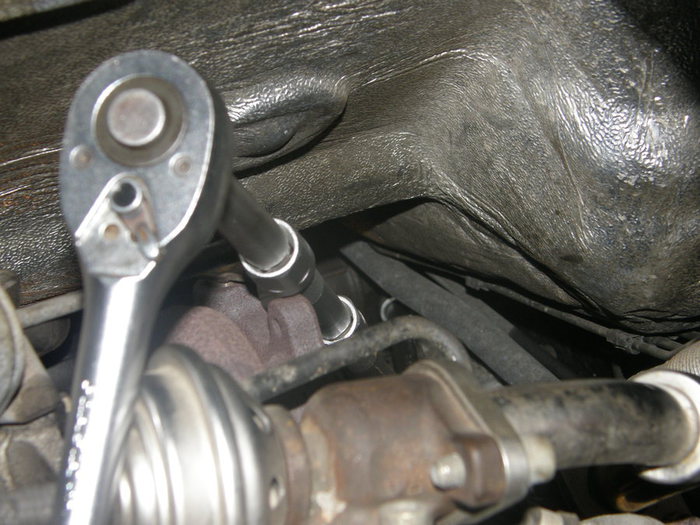
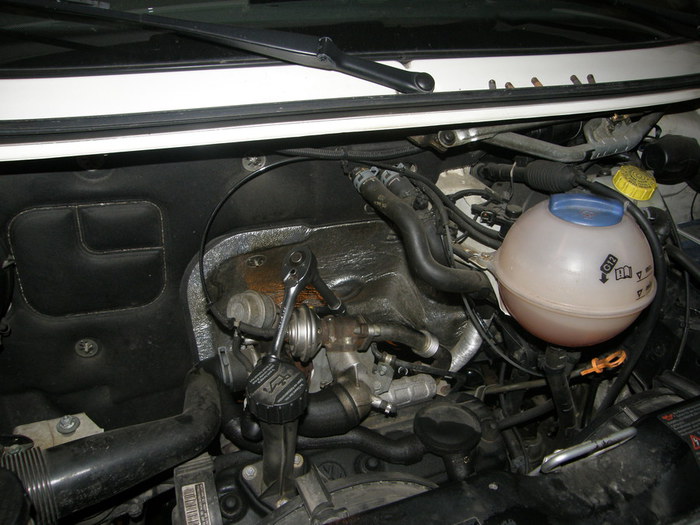

Then I found a more convenient and “forceful” way. Head, short extension and ratchet. The ratchet is located above the steering rack, its handle extends into the space behind the rack (in the direction of the car). Twisting is quite convenient.
8. We connect the tubes of the hydraulic system to the rail, connect the steering shaft with a coupling to the splined shaft of the rail.
9. The steering tips are fastened to the steering knuckles of the front wheels.
Next, I installed shock absorbers, brake discs, calipers. It remains to put the wheels on - and you can move off the overpass. Yes, just a little - put a muffler.
What was the depth of my disappointment when it turned out that the muffler did not fit! And hinders him. steering rack.
For about ten minutes no work was carried out in the garage, only from under the car in all directions swearing flew away. Well, then - what to do! - took up the keys again. He removed the shock absorbers, steering tips from the steering knuckles, hydraulic pipes and the steering shaft from the rack, unscrewed the bolts securing the rack and stabilizer to the subframe. He moved the rail to the side, stuck in the exhaust pipe, then put everything together in the reverse order. It took about two hours (one more time - and you can open your car service).
A few words about the muffler itself. Rather, about the exhaust pipe. Unlike most other machines, in this very system, the Transporter does not have a bellows - a flexible stainless steel coupling that breaks the rigid connection of the muffler with the engine. Instead of a bellows, there is a kind of ball joint that performs the same functions. Its halves are connected with spring brackets.
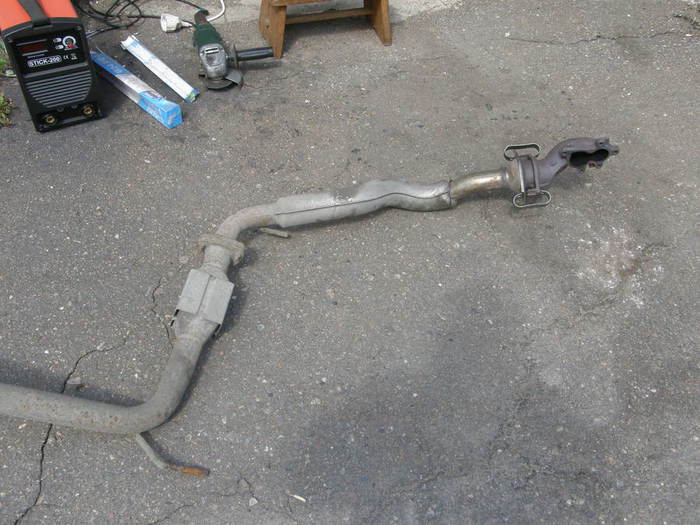
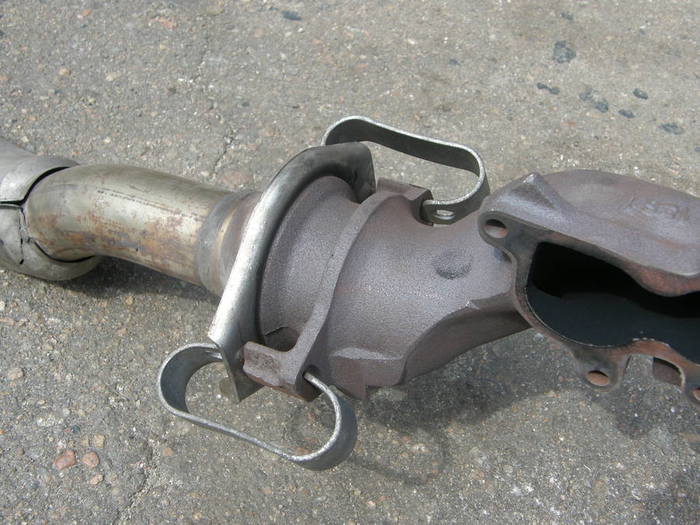

So that's it. To disassemble it, I disassembled it, but there was no need to think about tightening the rigid brackets in the narrow engine compartment among the hoses and tubes.Maybe there is some kind of special device for this, but not in my garage. Therefore, it was necessary to remove the mating part of this hinge together with the cast-iron pipe, which is fastened with five bolts to the turbocharger housing.
In the “fresh air,” the brackets were pulled with an ordinary screwdriver. And then I inserted all this assembly into place from below from under the car, pushing the steering rack aside.
Tell me how to make the suspension on t4 more sporty, otherwise it rides like a bus and sways, I changed the amortization. No changes
Decreased T4
The lowering is made at T4 on the front axle at a lower setting (“rolling”) from the torsion bar and on the rear axle by activating the springs with a lower spring length, supplemented as necessary, using spring materials with lower strength.
Plant decline
Factory with T4 “lowered suspension” (PR-1P4) and “sports suspension” (PR-1BU and PR-1P9) are available.
In both cases, the reduction is approximately 20 mm. It was on the rear axle, through the use of gray springs (701511105 L is achieved); at the front came torsion bars compared to the standard version of the other characteristics of the spring to use. Both the front and the rear axle also had a different shock absorber installed.
Subsequent lowering
This happens in accordance with the principle described above. Very popular are the lowering springs from H & R, with which an increase in load is possible, and the sports shock absorbers Bilstein B6 from.
After changing chassis components, a check or readjustment of the chassis geometry is imperative. In T4 with brake pressure regulator (ALB) on the rear axle, the parameter must also be checked and corrected if necessary; perhaps new tension springs need to be fitted.
Cars change, friends and the forum remain. [my.housecope.com/wp-content/uploads/ext/1209]
Message artem_20 »25 Oct 2010, 09:05
Message sava6565 »04 Nov 2010, 19:14
Message sokot8 »05 Nov 2010, 11:27
Message AUREL 06 Dec 2010, 21:41
Message AUREL "07 Dec 2010, 21:36
Message SpiderBUS71 "Dec 15, 2010 03:21 am
Message AUREL »02 Jan 2011, 20:17
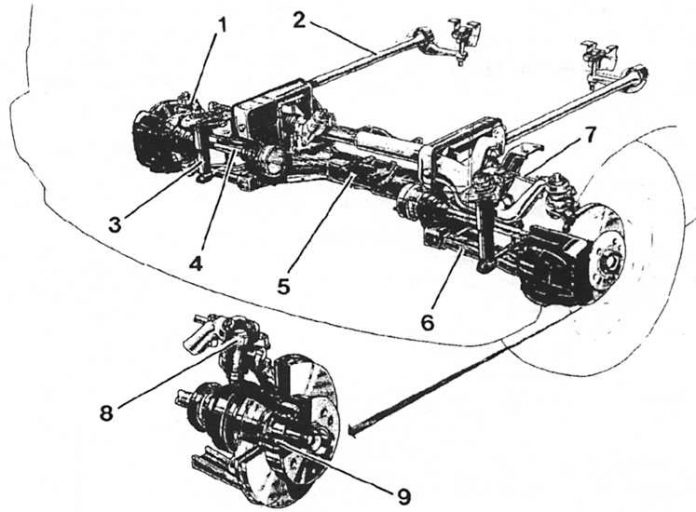
On our website you can get detailed information about the repair of Volkswagen Transporter: VW T4 suspensions. We have all the photos and diagrams necessary for the repair. Complete manual for auto repair and maintenance. 1. Upper steering knuckle 2. Right torsion bar 3. Shock absorber 4. Right axle shaft 5. Attachment bracket.
Owner review Volkswagen Transporter T4 - DIY repair. What, you ask me? Yes, the fact that the suspension needs to get along comprehensively. Well, I changed the spring And the wheelbarrow shifted. Jumping on the towbar, I saw her sausage on the sides. Therefore, the verdict was simple: the spring sagged and the second one would also have to be changed. It's not as interesting as with the first (xs, but I'm almost happy with the suspension (Something all the same taps in front, on the weekend you will still have to meticulously look for the reason). I also replaced the oil on the quiet with an oil filter. I try not to change the pan, DPF like shows itself well, I change after thousands.
The front suspension of the Volkswagen Transporter T4 (see Fig.) Consists of a beam (cross member) (53), upper (29) and lower (22) levers, torsion (rod) springs (39), and a stabilizer (48). Hydraulic shock absorbers (2) are used to damp suspension vibration and ensure reliable contact of the wheel with the road surface. Front suspension Conveyor T4 is mounted on the front beam (53). On the model of release from August, the attachment point of the rear gearbox support was changed. These beams must not be fitted to early production vehicles.
With the help of a press and soap, we press in the silent block. Volkswagen Rear Suspension In addition, in our stores you can purchase all the parts that require overhaul of the running gear Volkswagen Transporter T4, T5 Volkswagen Transporter T4, T5. If you need the service undercarriage repair Volkswagen Transporter T4, T5 Volkswagen Transporter T4, T5, our car services will be happy to provide it to any motorist at the most affordable prices, without denying the quality of work! Guys, give advice on what seals go to the sliding door, from which you can Dmitry Krylov I put the Gazelle.
Switch to English sign up. I read that they put them from Niva.Edited by an administrator, May 18, at 6: Front shock absorber lower bushing T4 Front shock absorber lower salenblock fits with VAZ from the lower arm! Price gr is set for 10 minutes! To replace, we need a front lower arm bush from T4. A slightly different design has gone from year to year. The diameter of the silent block is 35 millimeters. With the help of a press and soap, we press in the silent block.
We cut off a millimeter from each side with a grinder. The length of the silent block is 60 mm, we make mm - GAZ - the interchangeability of AM spare parts as a result of deep research work found that the steering tips fit VW T4 - The emergency gang relay is also suitable from the VAZ I have a fuel pump from a dozen on the Chevrolet, I have been playing for the 3rd year without false !.
Do not make a designer, especially a Chinese one, never dealt with nonsense; it was 4 t4; none of them suffered from such nonsense after me; original, but truthfully not always new unscrewed from other machines but with a normal resource.
Sometimes it is necessary to replace something urgently with what is in stock so that the car is on the move, at least while the ordered original spare part is in progress. So a list of interchangeable parts is essential.
Kostya Kharkov Greetings to all! My caliper knocked on T4, namely the guide fingers, what can I do? And what are the rubber guides anthers suitable for? Maybe someone did something? Thank you I like Share 25 Apr in Like 25 Apr in Anthers are sold separately, cost a penny.
I made such a procedure myself last week. So the bearings from the azlyk are also suitable. Swan rides like nothing. Interchangeable parts for VW T4 Advice for those who need to change the voltage stabilizer for the dashboard: In any radio store you buy a KREN type microcircuit or an imported 78 series and insert the radiator upwards, placing either a metal plate or thick brass aluminum washers under the screw.
In any radio store you buy a microcircuit such as KREN or an imported 78 series and insert the radiator upwards, placing either a metal plate or a thick brass aluminum washer under the screw. They stand in the area of dozens and not rivers. It's a pity to buy completely assembled!
Interchangeable parts for VW T4 who came across an additional pump for stoves Sergey Olgarenko Are there any substitutes for fan relays, they ask for a new original 10tr, as it is not cheap, T4 2. I like Vladimir Rozanov today with a gazelle from a starter. Guys, give advice on what seals go to the sliding door, from which you can Dmitry Krylov I put the Gazelle. Sergey Gustyr From the UAZ a patriot becomes like a native. It is necessary to take either by the footage, or 2 pieces.
Fuel Body gasoline bus 2. Edited by an administrator, Dec 7, at 7: Alexander, they have only 2 types of air, either rectangular or cylinder. And the highways are on sale. Boris, I’m round. Alexander, I do not even know, never wondered such a thought.
| Video (click to play). |

