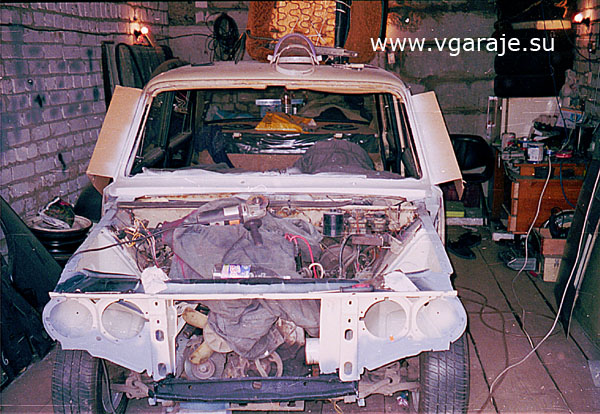
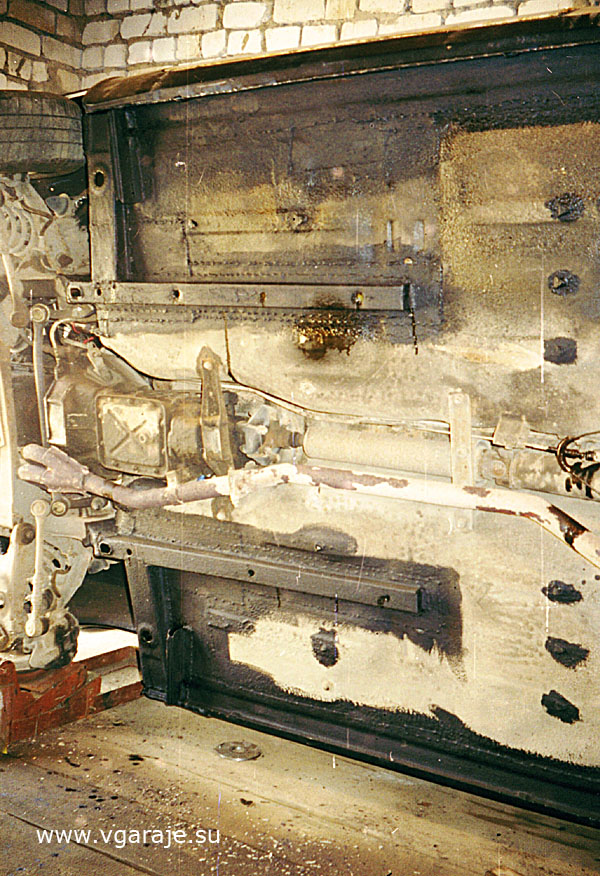
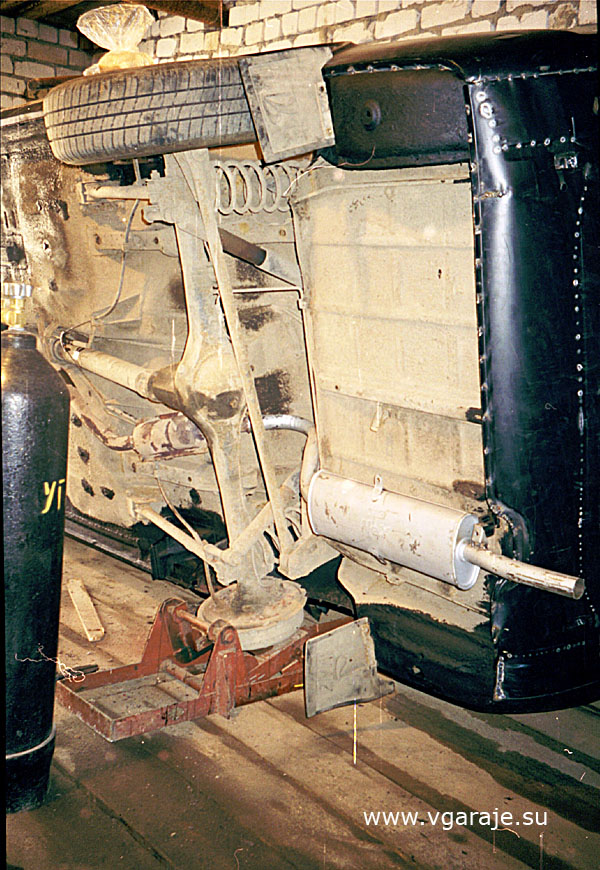
In detail: do-it-yourself repair of the floor of a vaz 2106 from a real master for the site my.housecope.com.
I propose a way to restore the bottom of a car without overcooking and in normal garage conditions. I do not pretend to be the author of the idea, although the idea was born myself 🙂 If we compare the costs of capital welding, then this method is incomparably cheaper. It is certainly not perfect and is unlikely to suit those whose body has already rotted into "dust". And so - think for yourself, decide for yourself - to have or not to have.
For this we need:
Materials:
- galvanized iron in sheets (2 sq.m.);
- antinoise bitumen mastic (2 cans);
- bolts, nuts, washers M5;
- self-tapping screws 15-20mm long
Equipment:
- angle grinder (in common people, a grinder);
- drill
- screwdriver
- scissors for metal;
- roulette;
- brush 100mm wide;
- permanent marker;
- metal brush;
- cutting and grinding wheels.
Details:
- Small front side members right and left
And so, let's get started.
First you need to understand the interior: remove the seats, floor mats, remove the noise insulation. I have only one name left from Shumka :).
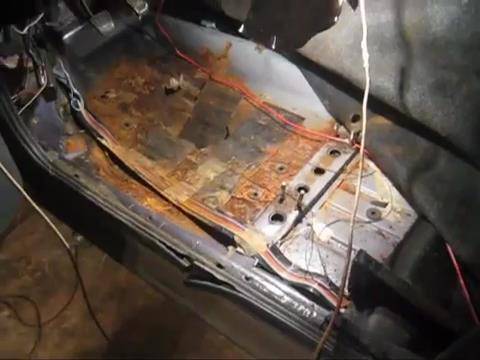
Next, you need to remove the old bituminous mastic from the floor in the cabin. this is necessary for a more detailed assessment of damage and marking of sheets. it is also necessary to remove the exfoliated mastic from the bottom of the bottom.
The rot is already cut off in the photo.
Due to the presence of a "grinder" I cleaned the "live" part of the floor to metal. The only jamb - after a couple of passes through the uncleaned mastic, the petal circle clogged and no longer cleaned it, but polished the rust, it had to be replaced.
In the end, it turned out something like this:
After sanding and trimming everything that is superfluous, we begin to cut the tin. Here, everyone has their own injuries. I covered the entire half from the inside, right down to the transverse spar, although the floor was intact there. The fact that there is stamping in the floor does not really matter, later it will be possible to pour mastic there and everything will be a bunch. In any case, the tin did not work for me from this.
After cutting the material for the inner part, we cut the tin for the bottom. Here, again, your personal wishes, the amount of galvanizing available and the nature of the damage play a role.
After cutting the metal, coat the floor with bituminous mastic (from all sides). It is advisable to let the mastic dry so that the layer of mastic will eventually be larger. I had to dry for a week due to working days.

Galvanizing installation.
Before installing galvanized sheets, we generously smear them with mastic (by the way, it is better to make the mastic thicker, otherwise it flows strongly) only from the installation side, otherwise then all the mastic will be smeared on hands and clothes.
It is better to fix galvanized sheets intended for installation from below with self-tapping screws to the bottom, especially if you do not have an assistant. The protruding parts in the cabin must be cut down. Then we climb into the salon, put the galvanized steel (again, oiled with mastic) on the floor and begin to fasten with bolts. In principle, M5x15 bolts are enough for the eyes with the obligatory use of washers on both sides. When using self-locking nuts, the lock washers can be omitted (only regular ones). If the nuts are common, then the growers must be installed. The drill must be taken with the same diameter as the bolts.
It is better to fasten it to start from one end, since the possibility of metal bending is excluded. I didn't do that right away and had to rebuild the structure.
How many bolts and location to choose according to the situation. If you have to replace the front spar ("jack"), then in this place do not fix the sheet yet.
| Video (click to play). |
Installing the front side member
Preparation of side members:
I removed the hinges for the standard jack, I think very few people use a regular screw jack.
Drill six holes on the long crown attachment petals (three on one side and three on the other).
We apply the spar to his place of permanent residence and squeeze it from below. Better jack.
We drill holes in the floor through the spar. Then we remove the spar, coat the inner side of the spar with mastic and the section of the bottom that will be closed by the spar and put the spar. We fasten again with bolts.
As a result, we got something like this:
the protruding parts of the bolts can be cut off.
In conclusion, we cover the galvanized sheets with mastic, trying to push the mastic into the cracks, if any, the spars and all places not covered with mastic.
I think this design will last longer than a digested bottom.
Now let's summarize the financial result of this venture (the repair was carried out in the winter of 2009-2010):
- galvanized iron 2 sq. M (350 rub.)
- bituminous mastic 2 large cans (360 rub.)
- side members 2 pcs. (200 rub.)
- bolts, nuts, washers, screws (about 80r.)
- cutting disc 1 pc. (15-20r)
- grinding wheel (60 rubles)
Total: approximately 1070r.
Plus an invaluable feeling of what I did myself :). The service asked 15 thousand rubles for overcooking the bottom.
I hope that this manual and idea will be useful to someone.
Do-it-yourself VAZ 2106 body repair is caused by the desire to restore the vehicle after an accident or damage of varying severity. Body repair is carried out according to the instructions. The car owner is advised to first familiarize himself with the types of bodywork, their nuances of carrying out, learn more about the applicable tools, and so on.
These works are classified as bodywork:
- Restoration of the standard, factory structure of an automobile body. It is noteworthy that when the geometry is displaced, machine malfunctions and an increase in fuel consumption are possible. It becomes extremely difficult to control the vehicle. All this cannot but affect safety: the wrong body carries the danger and prerequisites for new accidents;
- Painting. These works are carried out after the restoration of the body geometry. It is customary to distinguish between full and partial painting. The latter type of work is also called selective painting and involves the treatment of small defects in individual body components;
- Polishing. It is carried out as part of a body restoration program. It is necessary if the paintwork has a lot of damage, such as scratches and defects;
- Rust control. This implies a complete treatment of those areas of the car that have already been corroded. The body section is cleaned from rust to the metal surface. Special converters are used;
- Fighting dents with special technology. It involves completely straightening body sections without damaging the paint. It is noteworthy that after this work there are no traces of restorative manipulations;
- Processing of bumpers;
- Thresholds and their repair. Mainly attention is focused on the places for the jack;
- Welding works;
- Stack work. In this case, it means the restoration of the body after an accident using a special unit;
- Straightening, which is the main type of bodywork.
The body of the "six" consists of a large number of materials forged by stamping and connected to each other by welding. The following features make it stand out:
- Bumpers are chrome-plated and equipped with rubber or plastic bumpers;
- Floor with waterproof backing;
- The doors are formed by panels;
- The roof and bonnet have a similar design.
Do-it-yourself restoration of the "six" body is possible if minor damage is evident. If we are talking about changing the geometry of the body, it is better to entrust the work to the pros.
So, the purpose of repair when restoring the body is to bring body parts back to normal with the help of blows.Specific ones with a rubber knob are very helpful in this matter. Note. Restoration is carried out, as a rule, in two stages: first, a punch is made with a wooden mallet, and then straightening.
It is the straightening that should be given more attention if the body of the "six" needs to be given its original appearance.
What does the word "straightening" mean? It translates as alignment. As mentioned above, body straightening is considered the main work and its goal is to restore deformed areas or the entire body.
Straightening, as you know, involves a special technique. It is performed efficiently and quickly. The goal is to stretch or align the concave body parts. If the person conducting the straightening has little experience, it will be very difficult for him to cope with the work.
On the other hand, thanks to modern technology, even a beginner can handle straightening. That only there is a pneumatic hammer, which allows you to quickly bring the body part back to normal.
Common tools for straightening are hammer and jack. Here's how the main stages of straightening are carried out:
- First, the paint is removed;
- The site is being straightened;
- The site is putty and rubbed.
Note. Some experts recommend heating the body parts to make the straightening effect even better. Only in this case it is imperative to control the process, otherwise the metal will overheat and may even melt.
Another secret of straightening: if the dent that needs to be leveled is small, then it is recommended to straighten it from the middle. Conversely, if the dent is large, it is aligned at the edges.
In addition to a hammer and a jack, to independently carry out this operation, you will have to arm yourself with the following tools:
- Spotter, with which spot welding is carried out;
- Hammers of different types: inertial, reverse and with a sharp striker;
- Notching block.
Recently it has become popular to conduct. This procedure allows you to remove bruises on the metal surface many times faster. Vacuum straightening is carried out with special suction cups.
Note. This type of straightening is suitable for large dents, but if there are scratches on the surface, this method is not recommended.
On the "six", the following elements are most susceptible to corrosion:
- Hollow parts;
- Floor;
- Lower zones of doors and pillars;
- Welding and joining areas.
Note. The owner of a VAZ 2106 car must be extremely careful about the ingress of moisture and dirt into the zone of the hidden cavities of the body and into its lower parts. In order to additionally protect these parts of the body from the effects of corrosion, they are treated with anticorrosive material, and the adhesions of individual elements are treated with special mastic.
Here are the instructions to follow:
- Put the "six" on the flyover;
- Remove upholstery and all parts that interfere with work;
- Water the cavities and the lower area of the machine through the drainage holes. Wash until clear water flows out;
- Drive the car into an enclosed space;
- Apply anticorrosive to all places indicated in the photo.
The appearance of corrosion, numerous chips, dents and microcracks in the paintwork is not a complete list of problems that the owners of VAZ 2106 cars have to face. Despite the complexity of many damages, they are repaired by their own hands.
Body repair VAZ 2106 has the following types:
- Redecorating. The paint and varnish coating, bumpers are restored, scratches, chips and foci of corrosion are eliminated.
- Treatment of internal cavities. Side members, sills, door and luggage niches are difficult to access for anti-corrosion treatment. To prevent the parts from rusting, they are treated with special protective agents.
- Car bottom treatment. The working surface is covered with special protective mastics.
- Removing dents. Various impact pads, spoons, hooks, suction cups and reverse hammers are used to level the dented area.
- Body overhaul.It is carried out in case of violation of the geometry of the vehicle body, excessive damage to the paintwork, the presence of a large number of dents, chips and scratches. Also, a major overhaul is necessary when corrosion spreads over more than 50% of the surface area of the vehicle body.
When carrying out restoration work, take into account the specifics of the car body.
Lada of the sixth model has a sedan body type, it consists of a main supporting all-metal frame and various attachments. Units and parts that are installed on models from the classic series are made with the stamping method, and are interconnected by welded seams.
The body includes the following parts: engine frame, front fenders, roof, floor panels, left and right sidewalls. The front and rear bumpers are chrome-plated; they are attached to the body with special brackets. The trunk and hood are quite bulky.
As for the doors, they are made of two panels: external and internal, they are connected by welding. Both front and rear doors have the same type of attachment to the body.
On the six models produced in the mid 90s and early 2000s, the body metal is thinner compared to cars that were produced between 1976 and 1990.
Numerous chips and scratches, dents, the appearance of corrosion require timely elimination. The body repair of the VAZ 2106 is performed using straightening: dents are leveled, rust removed and the paintwork of the car body is restored.
To complete the work, you need to prepare the vehicle, and stock up on the necessary set of tools. Before straightening, assess the degree of damage to the car body, wash, dry and degrease the working surface.
To carry out work on the restoration of the body of the "six", we need the following set of tools:
- A set of hammers of different types and weights. Rubber mallets and percussion tools with grooved working surface.
- Special hooks.
- Reverse hammers.
- Impact spoons.
- Jack.
- Anvils and substrates in various shapes and sizes.
You should also stock up on wrenches for 8 and 22, as well as a screwdriver. You will need these tools to remove schematic bodywork such as bumpers or decorative moldings.
The body straightening of the VAZ 2106 is performed immediately before painting the restored part:
- The surface to be treated is cleaned of dirt, washed, dried and degreased. Remove old paint from the work surface.
- With frequent, gentle hammer blows, the dent is smoothed out. If the defect is deep, then the process is performed from the edge of the damage, and gradually moves to its center. Metal substrates are placed on the reverse side of the area to be restored. They must be properly shaped.
- Metal breaks are repaired using a welding machine. Next, the weld is grinded.
- The area restored from damage is covered with putty. It levels the work surface.
- The putty part is sanded and painted.
The putty should be applied in a thin layer. Otherwise, the paint will become covered with numerous cracks and begin to fall off.
Thresholds on a VAZ 2106 in the course of long-term operation of the car become covered with rust and, as a result, rot. To replace damaged body elements, the following sequence of actions is performed:
- They remove the doors, remove the rugs, dismantle the aluminum plate.
- Remove the rusted body element. To do this, use sills, dismantle with a drill, and cut out of the mount with a grinder.
- They clean the work surface from dirt, remove rust.
- Next comes the installation of new thresholds. For this, the connector is welded in place of the dismantled parts.
- After adjusting the elements to size, they are welded to the car body.
- At the end of the work, an overlay is attached to the thresholds, it is primed and painted.
When performing repair work to replace thresholds, wash the pad, remove corrosion from it, remove the old paint and primer.
When carrying out a do-it-yourself overhaul of the VAZ 2106 body, first of all, you need to pay attention to the condition of the car bottom, including the side members. They represent the main load-bearing element of the entire structure. On a car, they are located on the bottom, and are the length of the entire vehicle.
The side members can be displaced as a result of violation of the geometry of the body, and burst due to mechanical damage. If the part is displaced, it is "restored" in place. To do this, use a jack or cable, which is tied to a post or tree, and the other end of the rope is fixed to the spar. Then the car is pulled with small jerks, and the element being straightened is tapped with a hammer. After completion of the work, additional beams are welded to the side members, since the restored part requires reinforcement.
Corroded elements are cleaned to remove dirt and corrosion. With the help of a welding machine, metal patches are made on the surface, welded seams are ground and the part is processed. Also, by welding, the cracks of the side members are eliminated.
To increase the durability of the VAZ 2106 car body, the body, bottom and hidden cavities are treated with special compounds. Anti-corrosion agents are divided according to the area of their application:
- Movies are suitable for the treatment of cavities.
- Wax mastics, PVC compounds or "liquid" plastics are used to treat the surface of the car body.
- Bottom anticorrosives - bituminous and oil mastics.
When performing rust protection, a number of nuances are taken into account:
- To gain access to the hidden cavities of the car, use standard technological holes, or drill them yourself. In this case, the cavities are plugged to protect against negative environmental influences.
- When corrosion appears, it is removed with a metal brush, and only then anticorrosive is applied to the rusty place.
- Car processing is performed as a prevention of the appearance of corrosion and rust.
Installing wheel arch liners will protect the vehicle fenders from corrosion.
VAZ 2106 is one of the oldest domestic models, it began to be produced in 1976, and only in 2006 the car finally rolled off the assembly line. The car is repairable and reliable, which allows you to repair the vehicle yourself.
This is what the Vaz-2106 mudguard looked like.
The car in question has spent most of his life in Moscow. For six years he regularly drove his master to work, home, on vacation, in general, wherever he needed. In any weather, in summer and winter, along the heavily salted boggy Moscow streets, in the near and far abroad ...
In the seventh year of his life, already being pretty worn out, the car was sold by the owner to his brother, and moved to live in Nizhny Novgorod.
Rusty iron from the six
After another two years or so, the car said: "That's it, I can't take it anymore - either let me go downhill, or put me in for repairs." And the car was put in for repair. Because they treated him like a family member ...
Indeed. Of the whole car, only the engine had no particular complaints - it started up well, pulled well, had a moderate appetite and almost did not consume oil. Although the mileage was already good for 100 thousand. Therefore, we limited ourselves to preventive replacement of valve stem seals, piston rings and liners. We ground the valves, replaced some oil seals and gaskets. We installed a contactless electronic ignition. Yes! They also replaced the timing chain - the old one was already stretched to the limit and did not react to the tensioner even with an elongated pusher.
Further:
1. The suspension required replacement of all ball joints, silent blocks and shock absorbers.
2.Steering: the gearbox had an irreparable play on the steering shaft and required replacement, just like the entire steering linkage - three rods and a pendulum bracket.
3. The transmission required replacement of the clutch assembly with basket and release bearing. It was necessary to change the crosspieces. The gearbox and rear axle were in perfect order, and required only an oil refill.
4. In the brake system, some brake pipes have rotted. Replacement of the rear drums was also required (the old drums were worn out in the trash, moreover, one of them cracked almost in half, and when braking the brake pedal significantly sausage), all the pads, as well as the rear working cylinders (they were jammed) and the extremely stretched parking brake cable. And of course, the brake hoses.
And how do you like such a defective statement? (the burnt out glushak and the downpipe do not count) In my opinion - nothing excessive. For nine years and more than 100 thousand mileage is not so much.
But the body ... Compared to its condition, any defective list, even five times longer, would have rested!
So, in more detail:
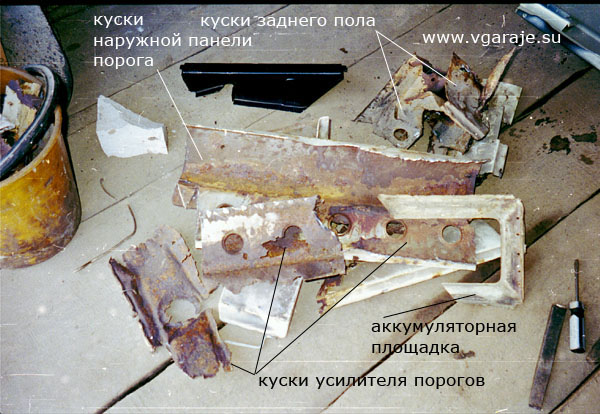
1. The car's front floor has completely rotted, along with all the amplifiers and jacks. The car could only be jacked by the engine beam.
2. Rotted rear floor with jacks.
3. The front spar burst in the area of the steering gear attachment.
4. Rotted all floor connectors, as well as the front seat sled brackets.
5. The floor of the spare wheel and the floor of the gas tank were rotted.
6. The hood in the front part was rusted through and could not be repaired.
7. There was a large hole in the trunk floor, above the muffler.
8. The doors had a fair amount of corrosion on the bottom and corners.
9. Rotted reflectors of all headlights.
And this despite the fact that both the front and rear fenders were in fair condition. And the outer sill panels also looked decent enough - no holes, only rust stains!
It would seem that if the front floor and connectors are rotten, then the outer panels and fenders must also have through corrosion? But she is not!
The TV is finally welded
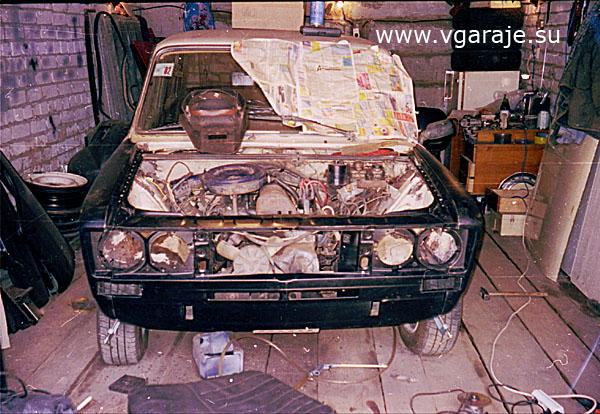
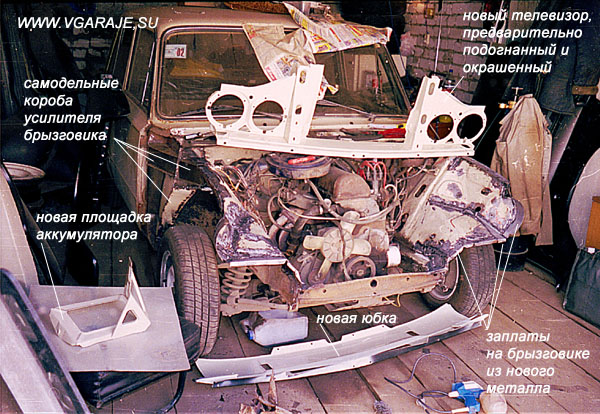
Inspection of the inner cavities of the front fenders showed that almost all the boxes of the mudguard amplifiers had rotted there, and the TV (aka the front panel) could be torn off by hand (which was later done)!
So what's the deal?
It turned out that the car's fenders were changed twice and once the outer sill panels, as well as the TV (after the accident). And anti-corrosion treatment was not done at all! Neither new parts, nor old ones, nor welds.
Six on the tipper - the new floor reinforcers, connectors and BPM mastic on them are clearly visible
On the tipper - view from the rear axle
Like this.
After that, the car safely left for another five years and dashed off almost 70 thousand. Of course, there were also touch-ups, replacement of broken suspension and transmission parts. But there was no longer any corrosion damage. The car was safely sold to the next owner.
But that is another story…
The vehicle for repairs was kindly provided by Dmitry S.
Sometimes there are cases when it is much more profitable, both financially and in terms of saving time, to repair your car with your own hands. In this regard, we will consider today how you can easily and quickly restore the front floor of a VAZ 21099 car. As you can see in the photo below, you will have to change the entire square, which is completely rotten, entirely, patches in this case will not help.
- firstly, it is necessary to put the car so that it is convenient to work, that is, so that there is comfortable access to it both from below and from the side of the door;
-It is also recommended to cover the dashboard and seats with foil so that dust does not get on them when you need to cut a piece of the floor. After that, you will need to purchase or, if possible, get a piece of iron for free in order to cut out of it "a piece of the required size for the floor."
You will also need a front jack and a sill connector for repairs. What materials are suitable for processing? The bottom will need to be coated with Body 930, and the floor, after welding, will need to be filled with Body 992 anti-corrosion primer.
What else awaits the masters during their work? You will have to raise the support (pictured below), under which, most likely, you can find rust. The new metal joint will go underneath it.
How to lift it? It is necessary to drill out points, which will then help to orientate, or you can put yourself other marks.
It is imperative to get to the very place where she stood, otherwise there will be problems with the installation of the seat. In the upper part of the threshold, you need to focus on the area where the paint has been preserved and it is along the edge of this area that you need to cut out a rusted piece of the floor.
As for the door, it is better to remove it. This will help create a more comfortable working environment. Of course, it will take a little longer for repairs, but in the future it will not interfere with the restoration work.
If you look at the threshold, you can see that it itself is quite suitable, only the edge has jammed.
What can be done is to replace the amplifier, put a thick plate in the appropriate place (in the photo below) and weld it together in the right places.
What to look for: before starting work, you need to cover the interior (so that dust does not get on the seats and the dashboard, disconnect the battery terminals).
In this particular case, a semiautomatic device and CO2 gas will be used for welding.
At the initial stage of work, you need to drill out the base. The points are marked, then it will need to be put in place.
As you can see, the support was not removed for nothing, there is a lot of rust under it, which must be removed, as well as mark the boundaries of the new plank.
Now let's move on to the spar. If it is in good condition, you can leave it as in our case. The floor is welded to it with dots. They hold the sill joint and the floor itself.
The photo shows the side member and the threshold connection.
It will also be necessary to change the subjack.
You should also take into account one more important nuance: welding will be carried out in the places indicated in the photo.
As a result, the anticorrosive will burn under the arch. To apply a new one, you will need to remove the wheel and wheel arch liner. However, first, when these elements are removed, you need to cut out the rusted section of the floor. In places where you can find points, you just need to drill them, where it will be impossible to find them, you will need to cut off the metal. As one of the options for reducing dust in the cabin, you can water the treatment area with water and cut on an already wetted surface. After the section of the rusted floor has been cut out, you can proceed to the next stage.
Do not forget that under the section, which is shown in the photo, brake pipes and gas lines pass. Therefore, you need to disconnect them, make a spacer so that they are as far from the metal as possible.
Then you can cut off the old floor. Where you can see the points, it is a little easier, in these places you can drill them and separate the metal.
In places where they are not visible (as on a spar), you can cut off the edges or even make an incision in the middle and, prying the incised area, find these points. The main idea is to leave the spar, which will be in good working order after cleaning.
In addition, as you can see from the photo, in the place of the base plank, where there used to be quite a lot of rust, now it is practically a clean place. All that is needed for this is to clean this area with sandpaper, treat it with a rust converter, cover the area with soil and it does not need to be cut off.
The next step is to cut out the front jack, as it is rather rusty, and we also have a new one. As for the sill connector, it is still in good condition and there is no need to do the extra work by cutting it out and replacing it with a new one.
What should be done next? Everything is very simple: the piece of floor that we managed to get out is put into place, the excess parts are cut off, a careful fitting and welding is performed.
When the floor is welded, you will need to weld the cross member on top.
It is necessary to weld the front jack, install the sill joints, cover a new piece of floor with a primer on top, and coat with grease from below, Body 930 will do.
The first copies of the VAZ 2106 car began to drive around Russian roads in 1976, and many still have them. This publication is devoted to the characteristics of the body of this car and the issues of its repair.
The body elements of the VAZ 2106 are made by stamping and connected to each other by welding. "Skeleton", or its frame is formed by a sub-engine frame, mud flaps, floor panels, rear and front parts, reinforcing cross-members, sills and other details.
The body structure is four-door, type - sedan. Removable elements include the trunk lid, hood, fuel tank hatch and doors with sliding windows.
Front and rear bumpers are chrome-plated, have plastic sidewalls and rubber bumpers. All glass in the VAZ 2106 car is polished, three-layer windscreen, others are hardened. If desired, the rear can be equipped with a heating system.
The floor in the VAZ 2106 car body has a molded carpet with a waterproof backing, and noise and thermal insulation pads are located under it. The interior of the trunk is covered with molded plastic.
On the panel in the passenger compartment of a VAZ 2106 car there are:
- group of devices;
- heating and ventilation control;
- cigarette lighter and ashtray;
- shelf and compartment for things.
The body doors are formed by inner and outer panels, connected to each other along the perimeter by welding. The locks are rotary-type devices and are equipped with an opening lock. The hood of the body is also closed with a lock, which has a cable drive and a saloon handle. The structure of the boot lid is similar to the bonnet. On the inside, the door panels are treated with mastic with bitumen and finished with upholstery.
Many craftsmen do body repairs of the VAZ 2106 with their own hands. This is permissible for minor injuries, experience and a suitable tool. It is better to trust the professionals to restore the body geometry.
When steel body elements are made at the plant, a press machine is used, under the influence of which a certain tension is formed between the iron molecules, which preserves the configuration of one or another part. If the shape of the body parts is broken, this indicator changes, and the purpose of the repair is to restore the tension belt in this place by means of the impact method. For such leveling of the body, including with your own hands, special straightening hammers should be used, some of which have a rubber surface.
The restoration of the body shape of a VAZ 2106 car is carried out in two stages: the first is punching out with a wooden mallet, the second is straightening with soft hammers to avoid linear expansion of the metal.
Carrying out repairs, paint and varnish coating and soil are removed from the surface in the damaged area and the change in the shape of the metal is leveled (see video). In the presence of shallow defects of a large area, their repair is carried out by blows of a straightening hammer at the upper point of deformation.
In the case where the dent is small but deep, the alignment is carried out starting from the edges. An anvil of a similar shape is placed under the element to be repaired. An example of repair is clearly shown in the video at the end of the publication.
In the case when the deformation is small and has the shape of a bubble, then the heating method can be used - after cooling, the metal in this part takes on its original shape. However, such manipulation cannot be carried out more than three times, and if it is ineffective, one should resort to other alignment methods.
Bodywork, both in the workshop and with your own hands, often requires the use of a putty, which is designed to eliminate irregularities. It is important to achieve its minimum thickness, otherwise cracks may appear in this part of the body. The thinner the layer of putty, the more correctly the main straightening work was carried out before this.
Simple locksmith hammers should not be used to reconfigure the car body, as their working surface creates a lot of pressure on the surface. This leads to a thinning of the part and to linear expansion of the metal and the possibility of new irregularities.
At the end of the article, we suggest watching a video about repairing a VAZ 2106 with your own hands.

