
In detail: do-it-yourself repair of the samsung ml 1210 printer from a real wizard for the site my.housecope.com.
Resolving Print Quality Problems
Checklist for ensuring print quality
Print quality problems can be solved by using the following checklist.
list.
• Redistribute the toner in the cartridge (see p. 6.2).
• Clean the inside of the printer (see p. 6.4).
• Adjust the print resolution from the printer properties window (see p. 5.11).
• Make sure the toner save mode is off (see page 28). 5.6).
• Solve general printing problems (see p. 7.2).
• Install a new toner cartridge, then check the print quality again (see page 39). 2.2).
Resolving Print Quality Problems
Light or faded print
If a vertical white streak appears on the page, or
faded area:
• The toner cartridge is low on toner. You may be able to
temporarily extend the life of the cartridge. See section
“Redistributing Toner in a Cartridge” on page 17 6.2... If this
will not help improve print quality, install a new one
toner cartridge.
• The paper may not be of the correct size.
characteristics (for example, the paper is too damp or
too rough). See “Paper Specifications” on
p. A.2.
• If the whole page is light, then it may be set
printing at too low a resolution or the mode is on
save toner. Change the print resolution settings and
toner save mode through the printer properties window. See p.
5.6 and 5.11 respectively.
• Combination of defects in the form of faded and smeared areas
may mean the toner cartridge needs cleaning.
See “Cleaning the Printer,” p. 6.4.
| Video (click to play). |
• The surface of the laser scanner unit inside the printer may
be contaminated. Clean the block. See section “Cleaning
printer ”.
In this review I want to tell you about the Samsung ML-1210 laser printer, its advantages and disadvantages, as well as the biggest problem of this model - prolonged heating of the “stove” and the elimination of this “sore”.
And so, the Samsung ML-1210 printer itself is, in principle, not bad, it prints quite high quality, the cartridge is easy to refill, the toner for it is inexpensive. The printer is compact (photo below), fits easily on the table next to the monitor.
The photo below shows the control panel of the Samsung ML-1210 printer:
1. Error indicator, indicator of the presence of paper in the printer;
2. Indicator of turning on the toner saving mode;
3. Button to reset / stop printing;
4. Button for printing a test page (press and hold for 2 seconds).
To get the cartridge, just open the front cover of the printer (photo below) and pulling the cartridge towards you to remove it.
The photo below shows the cartridge itself. I will tell you about its refueling and malfunctions in subsequent reviews in the near future.
Now we turn to the elimination of prolonged heating of the “stove”.
First of all, you need to disassemble the printer itself, for this, first unscrew the two screws as shown in the photo below.
And also two screws on the back of the Samsung ML-1210 laser printer (photo below).
Then remove the cover (photo below).
And also take out the paper feed tray (photo below) upward movement.
Then remove the top cover of the printer (photo below).
Now we can get to the laser unit, which also needs to be removed.
To do this, you need to pull out two cables from the connectors and unscrew the three screws as shown in the photo below, and do not forget to remove the paper feed roller that is located under the laser unit, it is held by two screws (unfortunately, there is no photo of the roller).
In the photo below there is a laser unit, be VERY CAREFUL with it, as it can be easily damaged, but it is not cheap and it is quite problematic to find it.
The photo below shows where “the dog is buried” - this is a bushing (bearing of the right transfer shaft), it wears out over time, it is advisable to replace it, but if this is not possible, then you can try to lubricate it with conductive paste (photo below) sometimes it helps, but not for long.
After properly reassembling the printer in reverse order and replacing the bushing, the printer will warm up quickly again.
In general, over the four years of operation, I did not have any special problems with the Samsung ML-1210 laser printer - I had to replace the cartridge once, since the old one worn out two and a half years after purchase, and replace the bearing of the right transfer shaft (bushing). There was also a problem with paper jams, but as it turned out later, the problem was in the paper itself, after I bought a high-quality one, all the problems with jams disappeared.
If you have the opportunity to buy a Samsung ML-1210 printer, you can buy it, I think you will not regret it.
After a long break, I am posting a new guide to repairing Samsung ML 1210. Here is the hero of the occasion. Samsung ml1210. The printer is quite old, but, with adequate operation, it will give odds to any modern printer, and the internal structure is quite simple and reliable, like a Kalashnikov assault rifle. Many top-fed laser printers have a pick-up roller that is roughly the same so that you can repair other similar printers. For each step, a photo of what needs to be done will be attached.
Next, unscrew the screws on the back cover, 4 pieces.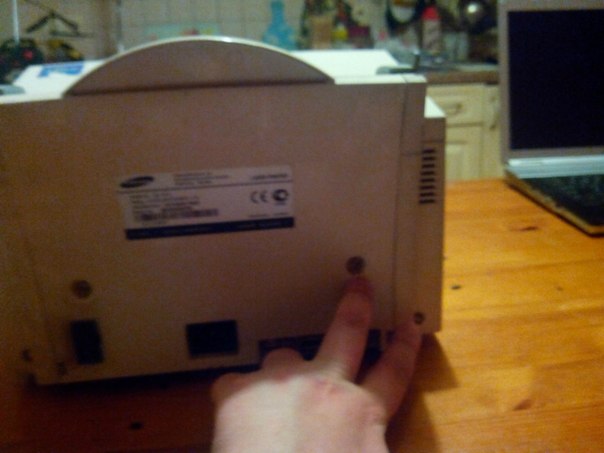
We take out the cartridge; this can be done earlier.
Next, we remove the back cover, which we unscrewed and unscrew a couple of screws on the front panel: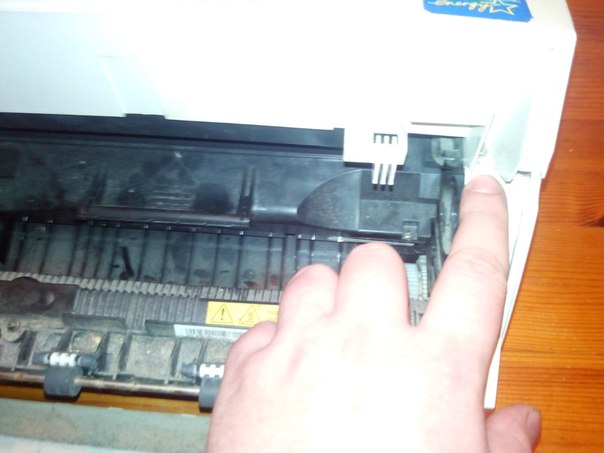
Now we remove the side covers: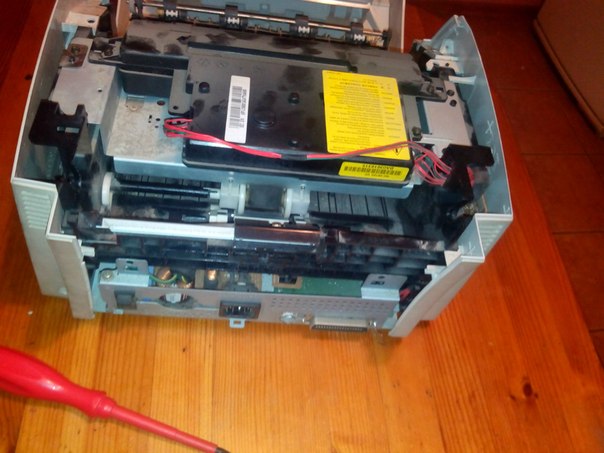
Now unscrew the laser holder:
Next, remove the paper receiving unit:
Now we carefully extract the hero of the occasion:
As you can see, the gum has worn out and lost its properties, has become "slippery", I advise you to buy a new one, it costs from 40 to 50 rubles. But you can simply remove the rubber band and move it to another place, which is what I did.
Degreased the rubber with cologne, put it back on the roller.
Putting everything in reverse order and as a result of our work, the Samsung ml 1210 printer printed us a test page:
Periodically, the sheet was not captured, but now it is not captured at all. the workshop tentatively estimated the work at 3000 rubles. After watching your training I will try it myself. Thank you.
Thanks to Damir for a clear explanation on how to repair the pick-up roller.
I got, by chance, an old M-1210. I didn’t want to grab the paper, but I didn’t print badly. I was going to give it up for repairs, and then I got to your site. In one hour I took it apart, turned the rubber band, cleaned it and now it works like new! It turns out everything is quite simple, but he himself would not have guessed. I wish you health and success!
Thank you very much, Damir! I used the recommendations and for the first time in my life I climbed to repair a printer that did not pick up paper. And I succeeded!
The iron panel can be unscrewed immediately without disconnecting any plugs and the laser device. You just unscrew it and put it on your side. For example, I cleaned the gum with isopropyl alcohol and glued one layer of electrical tape under it (between it and the plastic). Everything works great.
Damir! Maybe you can tell me - the printer has not been used for a long time, although it was serviceable. Today I wanted to get him back into operation. He took out, took out the cartridge, vacuumed with a cordless vacuum cleaner (i.e. very weak) with a soft brush, put the cartridge back in, turned it on. He hummed, as usual, but the humming did not stop, then it smelled hot. Disconnected, took out the cartridge. The block in front of the cartridge that says 180'C was hot. Tried it several times - the same thing. I read on the forums that after replacing the cartridge, the warm-up time changed, but I apparently did not turn off at all, although it was warming up.
It's not entirely clear with heating - I thought that the gray roller in the middle of the bottom of the printer should be warming up, and the heating unit is located at the paper exit point. What does he warm then?
I suppose that I drove the excess dirt somewhere into the moving contact.
Can you tell me?
Read the Information on Replacing the Paper Feed Roller and Retarding Pad on Samsung ML-1210 Printers
When the printer stops picking up paper, or starts picking up several sheets at a time, then it's time to clean or replace the brake pad and paper feed roller.
-special liquid for cleaning, for example (formula A)
We unscrew the two screws securing the rear cover of the printer and prying the latches with a flat screwdriver, remove it.
Remove the front cover with the false panel, disconnect the control board connector and completely remove the front cover.
We remove the top cover, which is fastened with two screws, after that we remove the side covers, which are fastened with latches.
Having unscrewed two screws, remove the paper feed roller located on the laser mounting frame, remove the laser frame itself by unscrewing its mounting screws.
After removing the paper guiding unit and disconnecting the latch, carefully remove the brake pad.
We carry out a visual inspection of the brake pad and the paper feed roller, if they are in good condition, then they should be wiped with a clean cloth moistened with a special cleaning liquid. If there are obvious signs of wear, it is best to replace the entire pair at once.
It is also useless to carry it for repairs, because in service centers there are completely crooked and stupid creatures, which I have already been convinced of many times. And they will not do it, and the time will stretch out, and they will take the money. And I decided that I would try it myself, if it didn’t work, then I would throw it out.
Disassembling the printer down to the printing mechanism, I found this pinch roller, and I saw that one of the two screws on which it is attached was not tightened. Just in case, I even took it off and washed it, then cleaned all the insides with a vacuum cleaner, then collected it and tried to print something. And, lo and behold, it prints like new!
Here is this video (unfortunately, I did not take a picture of it in disassembled form, and now I do not want to disassemble it).
Like this. Moral: there is no need to carry around the service centers something that is elementary repaired on its own.
START COPY CONFERENCE
Printers, copiers, MFPs, faxes and other office equipment:
issues of repair, maintenance, refueling, selection
0. Sergey_2016 17.12.17 15:03
Hello. How to remove the transfer shaft?) At 4200 there is a latch at the end. And then I can't understand something, I don't want to damage it.
Do I want to wash it with warm water or will it be enough to vacuum and lubricate without removing the sleeve?
In 5-10 seconds I found a service manual in Google, and in it:
3-4 Transfer Roller
1 Open the front cover.
2 Use a proper tool (“-” type screwdriver) to pull the one
end of the roller slightly, then take it out.
2. Sergey_2016 17.12.17 15:27
(1) if it were that easy
use a minus screwdriver and pull it out.
similar to the instructions for removing the cartridge from the printer.
Open the cover, use your right or left hand and remove the cartridge)
(0) here from the end there is a bushing under the board, remove it. Then, from the opposite side (where the cartridge gear is), you can gently squeeze the latches (the shaft itself is pressed down) and removed with a screwdriver (but very carefully). Or, if with minimal risk, but here you have to make out a lot.
P.S. I do not recommend being zealous when washing the roller itself, then you can get a long way out in readiness (although this is "treated" too).
4. Sergey_2016 17.12.17 15:51
(3) Thanks for your reply.
Maybe then I'll leave this venture, vacuum the shaft itself well.
And lubricate the bushing on the right with conductive grease by turning the shaft
(4) I usually take off, but I clean only with a “muscle” with green (or other similar means) - I pour it on a sheet of paper (but you can also on the shaft itself, just not much), wrap the shaft, and roll it on the table like a rolling pin .Like that.
(0) Sergey! The question is, why remove the transfer shaft, there the conductive bushing is reliable, as in the Samsung SCX-4300. It is possible to wash, as in (5), in its regular place, on the sly not with a fluffy rag with MM, only first, in addition to a vacuum cleaner, a compressor, remove the toner and, if possible, any, "guano" -. and under the transfer shaft, and on the boards themselves. Desirable. before doing this, move the laser unit aside.
7. Sergey_2016 17.12.17 17:16
(5) good idea)
at 4200, I took it off completely and with liquid soap under warm water and then dry it on the battery)
8. Sergey_2016 17.12.17 17:18
(6) I think I will do so, I will go over the entire shaft with a vacuum cleaner and wipe the MM with a rag. dries up and put the device back)
(8) I wonder what the mileage is on it? And yet, the state of the cartridge - here in it - always clean the mixing shaft from the remnants of paper dust and chalk.
10. Sergey_2016 17.12.17 17:37
(9) Mileage 37 thousand since 2001.
The cartridge sprinkles toner, but this is not a problem, I will sort it out, clean it, wash it and refill it.
Dali, as if with a problem, captures all the paper at once, I disassembled the printer, ordered a roller and a brake one and decided to make him an audit, clean and wash the nodes.
(2) Indeed, what nonsense is it to use the service manual.
12. Sergey_2016 17.12.17 19:06
(11) no, not stupidity.
The question is that following the description of the service manual, it will not work to get the shaft.
13. Dmitry Krsk 17.12.17 20:15
(12) EMNIP in 1210, the transfer by the other side is worth compared to 4200. (correct if not right, I haven't seen them for a long time)
or the bushing on the other side? I don't remember damn (
Soldier
Group: Members
Posts: 2
User #: 2824
Registration:
3-December 09
Please tell me the reason for printing on the left side of the dots along the entire length of the sheet at a distance of 37-40 mm.
photo is attached.
General
Group: Members
Posts: 270
User #: 832
Registration:
8-October 08

Soldier
Group: Members
Posts: 2
User #: 2824
Registration:
3-December 09
General
Group: Members
Posts: 270
User #: 832
Registration:
8-October 08
This means the shaft in the printer has the same diameter. Once I had that the rubber shaft of the stove was poked with a sharp one, pulling out the paper, so exactly in half, that on printing in diameter, the roller turned out to be 2 times smaller in diameter (although you have to manage to do this).
To be honest, I don’t remember a shaft with such a diameter in the printer itself, but I mostly climbed in the stove.
Check if the cartridge is spilling, if there is toner inside the printer. When cleaning the printer, some paper feed roller is dirty and leaves similar marks. Drive out a clean sheet, if these are broaching rollers, they should also leave traces on it.
Have you tried another cartridge in this printer?
And are there the same points on the other side?
Expert
Group: Members
Posts: 886
User #: 2094
Registration:
15-July 09
General
Group: Members
Posts: 270
User #: 832
Registration:
8-October 08
Soldier
Group: Members
Posts: 6
User #: 2841
Registration:
7-December 09
Expert
Group: Members
Posts: 566
User #: 1816
Registration:
2-May 09
Expert
Group: Members
Posts: 886
User #: 2094
Registration:
15-July 09
Download / Print topic
Download a theme in various formats, or view a printable version of the theme.
The same theme began to burn like light music, that's a trample in which there is a lamp that is fixed rigidly and when heated, its contacts are accordingly expanded, while their breakdown occurs day to day soldered took from the binder cut out two plates tinned soldered like a new one, and the effect is 0-l the question is what should the lamp heat up after turning on the printer or not, or it heats up when starting to print, the power goes to the stove through the PW-2N 9072 E150 (a mechanical thermal sensor with a trigger), I will probably collect problems with it.
rang the stove all vary now you need to think further what are the troubles
rang the stove all vary now you need to think further what are the troubles
then what was the enticement
1) The contact on the right side burst, sealed it, used a flux, it seems hydrochloric acid, in which there were balls of lead, tin
2) checked the heating element circuit (PW-2N 9072 E150 + Lamp) with an ordinary LED, which lit up and confirmed that the soldering was successful, the stove contacts are normal.
3) on the right side, where the stove is fastened, there is a terminal from which there is a metal tongue, which is attached to the base of the stove. it must be powered with a soft, spring-loaded shaft under the stove (I bent it a little, otherwise I probably didn’t connect it either)
Yes, the most important thing is that the OVEN SHOULD LIGHT A BRIGHT YELLOW LIGHT FOR ABOUT 8 SECONDS UNTIL HEATS UP THEN GOES OUT
Read the Information on Replacing the Paper Feed Roller and Retarding Pad on Samsung ML-1210 Printers
When the printer stops picking up paper, or starts picking up several sheets at a time, then it's time to clean or replace the brake pad and paper feed roller.
-special liquid for cleaning, for example (formula A)
We unscrew the two screws securing the rear cover of the printer and prying the latches with a flat screwdriver, remove it.
Remove the front cover with the false panel, disconnect the control board connector and completely remove the front cover.
We remove the top cover, which is fastened with two screws, after that we remove the side covers, which are fastened with latches.
Having unscrewed two screws, remove the paper feed roller located on the laser mounting frame, remove the laser frame itself by unscrewing its mounting screws.
After removing the paper guiding unit and disconnecting the latch, carefully remove the brake pad.
We carry out a visual inspection of the brake pad and the paper feed roller, if they are in good condition, then they should be wiped with a clean cloth moistened with a special cleaning liquid. If there are obvious signs of wear, it is best to replace the entire pair at once.
Calm as a boa constrictor
Posts: 570
So I have something similar. Only other old ladies “OKIpage 10e” and OKIpage 8p ”.. Cartridges cost a lot of money .. the printers themselves are workers .. It's a pity to shake them ..
Can try to disassemble cartridges and process according to your method ..
Has anyone done something like this with OKI?
Extremely unqualified specialist
Posts: 548
Extremely unqualified specialist
Posts: 548
Time will tell, while everything is fine, the printer will not be recognized.
Here I read and I am glad that this Samsung 1210 is a great printer, but not everything is so simple and smooth.
I will not say anything about the printer itself, but the cartridge 1210 and others like it 1710.1750, Xerox 3110.3116, etc. are full of gem. After 2-3 refills (though if very expensive paper was used and expensive toner was refilled), surprises begin.
Hemorrhoid No. 1 Doses. blade
after its wear and tear (and he just kind of dreams about it), in most cases, the cartridge is in the trash heap, and nothing helps, neither the tape nor the squeegee.
Hemorrhoid No. 2 Tightness
Toner continues to spill from the cartridge.
Hemorrhoid # 4 Developing roller worn around the edges if not in the middle
and a lot of very small hemorrhoids.
But we must pay tribute to the ingenuity of Samsung instead of chips and all the tricky technologies that HP uses
against refuellers, Samsung went the cheap and reliable way. They didn't even hide the refueling hole in the cartridge
Like, refuel if you can!
By the way, alcohol does not interfere with anything, you can use it, and acetone for washing rubber is better to dilute with water and after cleaning, wash the rubber with water!
ssvWhat's the leak high?
I have an interesting problem and a couple of questions.
ML1210 printer is faint. Suspicion fell on the metering blade. Put it out of the cartridge where it was relatively normal (no printing defects). The image is still pale. Replaced the toner with a new one. It became noticeably better. But soon it worsened again.
Another printer happened to be nearby (1250). I put this "pale" cartridge into it - the print is excellent! I take a cartridge from 1250, insert it into my 1210 - the print is excellent!
I put my cartridge back into my printer - the print is clearly worse (paler, with noticeable thin stripes, and the contrast slightly noticeably gradually deteriorates from one edge of the sheet to the other evenly along the entire length of the sheet).
I took an old cartridge, inserted a photo cartridge from the "pale" into it - the print is almost excellent. I thought that was the cartr. there was a leak high (which has been hinted at here). But he was overjoyed early. The print again (and quickly) deteriorated markedly.
What are these "miracles"? How and with what to measure the voltage applied to the shafts of the cartridge? Are the voltages constant or impulse?
Now questions about the restoration of the cartridge (1210).
Toner. Subtracted somewhere that the toner should be NON-magnetic. This is serious? I took different toners from people with different printers (the same principle of operation).EVERYTHING is "taken" by a magnet, from a distance of 2-3 mm.
A request to all participants, especially service technicians: please check the toners passing “through your hands” for magnetic properties. And tell us about your results 
Dispensing blade. Not on sale (we have, at least). Therefore, he is extremely interested in the technology of its restoration. I tried to sculpt duct tape, only dirtied the transfer roller in the printer. As far as I understand, there must be a certain angle of the edge, ensuring the necessary immersion of it (the edge) into the body of the developing roller. And replacing the corner with a plane leads to a faster carbon build-up of the toner at the point of contact with the surface of the developing roller. Someone has stable results of recovery of this hemorrhoid (
) blades for at least one filling? Please share.
Conductive grease. What is this beast? What's its name? Or is it possible to rub graphite from a simple pencil into ordinary (automobile) lubricant?
Lint-free fabric. What's this? What is it made of and where can you buy it?
Extremely unqualified specialist
Posts: 548
1Dimon1, and a Russian-made lubricant? Is copper not an abrasive for supporting shafts? They're kind of like bronze. Copper is of course softer, but, in theory, it should scratch.
Extremely unqualified specialist
Posts: 548
Well, what has climbed into the jungle, maybe it is correct - everything should come through UNDERSTANDING WHAT IS HAPPENING. As for maintenance: standard procedures for a one-piece apparatus using the principle of dry electrostatic transfer. The printer is like a woman - “loves affection, cleanliness and lubrication!”
I climb into the jungle out of poverty, of course. There are not many “businessmen” in our town who are ready to change cartridges without refueling.
Moreover, knowing that such exists.
When the quality suits, then no questions are asked.
Actually, toner is not hygroscopic. Yes, it can change its properties from time to time, but from moisture and temperature in the printer. I have never met.
"Rumbles", as a rule, wasted toner, ie. one that has gone through several charge-discharge cycles (see Xerography Basics :))
Magnetic toner? Can not be. (see Xerography Basics
)
VaVo » 12:20 – 12.11.07
Oleg Al » 17:57 – 12.11.07
SPAM » 20:02 – 10.12.07
Alatena » 00:37 – 31.03.11
I seem to have a similar problem. I hope very much for your help.
About 2 years ago, the printer did not take paper, but gave it to the service.
A few days ago, a rubber earbud from the earphones got into the paper tray and got stuck under the rubber shaft that regulates the paper feed. When the printer was turned on, an ominous crack was heard. While disassembling the printer, making out the place of the jam and picking out the insert, I had to turn on the printer at least 10 times. Something may have been mechanically damaged. 
I began to collect. No, there weren't any extra parts, but the printer still doesn't work.
Now the situation is like this:
1) the rubber shaft is flattened (it should be like that, right?) And smokes only with the upper gears;
2) the upper gears on the right, at the paper feed, have a gap (there are no “spikes”). Rotate from the lower gears until they are tightened to the gap. Then they stop. There are no traces of broken teeth, everything is smooth and clean;
3) The error light comes on and the printer stops.
Previously, there was no need to disassemble the printer, so I do not know what is the norm and what is not. Please help me figure it out:
1) what's the matter?
2) can you fix it yourself?
Photo:
Joshua » 00:52 – 31.03.11
Alatena » 01:13 – 31.03.11
Alatena » 01:17 – 31.03.11
Bim » 15:12 – 30.10.13
Mishel01 » 16:59 – 30.10.13
Bim » 08:10 – 31.10.13
Mishel01 » 09:31 – 31.10.13
Bim » 10:26 – 31.10.13
Mishel01 » 11:26 – 31.10.13
Bim » 12:51 – 31.10.13
Thank you. Well, why is it made precisely in the form of a clutch and consists of two gears, one of which contains a spring?
Manual point 6.2.2 JAM 0 (p. 64):
Check and Cause
2. Check if the pad is loose due to bad sealing of the side-pad. -
Solution: Replace the side-pad Assembly L or R, if necessary.
Bim » 13:04 – 31.10.13
Mishel01 » 14:45 – 31.10.13
1. Didn't understand the question. Don't like the design?))
2. It seems that the brake pad was called that. Although why "L" and "R" is not clear.
3. What is the error? Who / what will be “blocked”? Where exactly does the leading edge of the sheet stop? Not “rand”, but “random [ly]” - randomly, not constant. Koreans - what do you want from their English))
Bim » 15:16 – 31.10.13
Mishel01 » 19:01 – 31.10.13
Bim » 08:56 – 01.11.13
To be honest, I did not understand anything, since the mechanism of operation of this clutch was not disclosed to me.Well, okay, it would be enough for me to understand whether errors in this clutch could be the reason for the sheets to stop and the printer blocking with an error in the form of a red LED.
So I wrote - NOW it works. But I'm expecting another breakdown, which happens unexpectedly. Should I take a picture of him? Just in the manual there was a drawing of the position of JAM 0. Here, in the attachment is a clipping from the manual.
Mishel01 » 09:55 – 01.11.13
1. Certainly it can - and, as a rule, they are.
2. Either take a photo or describe it adequately verbally.
3. Either stop talking nonsense, or continue sekas alone. The sensor is NON-CONTACT and has always been, please finish your fantasies about bouncing.
4. Incorrect translation. Paper feed sensor - never a tray sensor.
5. Yes, of course, but what does it have to do with it?
Bim » 10:23 – 01.11.13
It may be non-contact, but this is a physical device that can give those same false positives due to the presence of a mechanical lever.
Enlighten (there, almost below) -
PAPER FEED SENSOR -> paper feed sensor
more
English-Russian dictionary of terms used in office equipment
PAPER FEED SENSOR paper feed sensor
At the beginning I wrote to you - the paper sensor.
You know, I probably really will stop the topic, since only you answer, but nothing becomes clearer from your answers, since they do not contain specific information, and besides, they are misleading.
I apologize, if anything.
Mishel01 » 10:31 – 01.11.13
Bim » 11:12 – 01.11.13
How does a mechanical lever signalize? Most likely, this is an optocoupler, in the slit of which a lever goes, closing the path of light rays. If the stroke of the mechanical lever in the slot is adjusted incorrectly, or for some reason the slot is illuminated, then a false (non) actuation occurs. Bounce is such a slang term for electronics engineers, and it immediately becomes clear that we are talking about distorting the signal from the sensor. Then you need not engage in sarcasm, but simply clarify that the sensor is non-contact, but it can still cause interference (distortion), and you need to check it. Here's how - that's another problem. It's good if you have an electronic oscilloscope to take a signal in time, but we, for example, only have an analog one. Maybe the same DCU diagnostic would be useful here, but this is completely unrealistic.
At the beginning I wrote - paper datas. You answered sarcastically - "Which sensor?"
Is that the answer? Written by: paper sensor. Then I assumed it was a tray sensor. But then I considered that there is one more paper sensor - at the feed roller, and it also has a lever. So he can give a problem, according to the manual. But that's only if you believe him. 
I asked how the clutch works. And more than once. You don’t answer.
Mishel01 » 15:39 – 01.11.13
__Oleg__ » 16:06 – 01.11.13
Mishel01 » 18:40 – 01.11.13
Bim » 07:58 – 02.11.13
Mishel01 » 08:15 – 02.11.13
Bim » 13:44 – 02.11.13
Of course, this remains a problem because this “clear answer” does not reveal the function of each of the gears in the clutch. Therefore, the price of such an “explanation” is a pittance. And the fact that the clutch sits on the same axis with the paper pick-up roller was no secret anyway. Why is there a spring and why two gears, and not one - remains a mystery to us.
Generally speaking, the maintenance manual does not agree with you - read on page 07_Alignment & Adjustment p. 4.2.2
If you do not speak English, then here is the translation:
If the light is red, an error has been detected - paper jam, paper out, cover open *) or empty toner cartridge **)
Probably, you should learn a little more.
Well, I just didn’t know that they are right or left. But in English, the brake pad is called the Separation pad.
Mishel01 » 19:24 – 02.11.13
Injener.crb Mar 24, 2011 3:22 pm


 Tell me how to fix the problem Samsung ML-1210:
When the sheet leaves the oven, the ends of the paper are bent up and then the sheet is folded into an accordion
I went through the whole stove to the last spring, everything is intact, I cleaned everything
I would like to kick the printer
Aleshachka Mar 24, 2011 3:25 pm
Injener.crb Mar 24, 2011 at 3:30 pm
sailor Mar 24, 2011 3:37 pm
kvg Mar 24, 2011 3:39 pm
Injener.crb Mar 24, 2011 3:47 pm
kvg Mar 24, 2011 3:51 pm
It looks like the ends of the sheet are sticking to the Teflon, but it is, as you say, clean. But on the other hand, toner usually sticks to the edges of the Teflon in the form of stripes.
Added after 5 minutes 5 seconds:
What about the sheet crumpled to the stove? Have not checked?
The other day they brought me a Samsung ML-2015 printer with a problem - it does not pick up the paper. Since there was not enough time, I decided to take pictures and write an article on cleaning or replacing the feed roller on such machines. Similar design in Samsung ML-1610/1615/1620/1625/2010/2015 and Xerox Phaser 3117/3122/3124/3125 printers.
The first thing we will do is take out the cartridge. Open the front cover and pull out the cartridge handle.
Now, looking from the front, we can see the pickup roller that we need to get out. Someone manages to get it through this hole, but it is inconvenient for me to do this, so I will disassemble further.
So, remove the front cover by removing it from the grooves.
Unscrew the two bolts at the front of the common body immediately.
Next, turn the printer, and look at the rear convex wall. Below it are the printer control boards. We need to remove this cover in order to remove the case later. To remove it, you need to unscrew one bolt on each side.
We remove the cover, as shown in the figure, from left to right, otherwise it will not work.
We will not touch the control boards, we have nothing to do with them. It remains to unscrew the two bolts on the common body from the back.
Now begin to gently lift the entire body from different sides. Pay attention to the paper exit rollers, if they get in the way, gently press them down.
After removing the body, the pick-up roller became accessible from above, now it is easy to get it.
To remove the roller, move apart the latches that are on top in different directions, just do not overdo it so as not to break these latches.
As soon as the video is free, it will jump out of its place by itself.
Of course, it is advisable to change the pickup rollers to new ones, but the client refused to wait for the receipt, so I'll just clean it and then turn the rubber band, and the roller will also serve for the benefit of the printing house. I clean the roller with a special liquid, and when it is not at hand, I simply wipe it with isopropyl alcohol.
When installing the roller, first press down on the bottom and then click on the top.
Further, when you put the general body in place, pay attention to the paper exit rollers, in rare cases they can bend and remain under the body, and during printing the paper will, if not jam, then come out wrinkled.
Assemble the back cover in the reverse order from right to left.
When the printer is completely assembled, be sure to check the result of your labors. The fact is that these devices often wear out the brake pad together with the roller. In this case, after cleaning the pick roller, the printer will pick up two or more sheets at a time. In this case, only replacing the brake pad, well, or the rubber bands on the site, will help.
And to replace the brake pad, you need to remove the metal plate with two boards, which is located on the back of the printer.
This concludes my writing. All the best to you!
For once, Google brought a normal instruction
Tell me dear, this printer captures 2-3 sheets of paper, where to look for the reason? working out, roller, etc. Thank you
You need to change the brake pad. To do this, you need to disassemble half of the printer. Instructions for replacing the brake pad on our website at:
Thank you very much! I learned a lot for myself here, keep it up, good luck to you.
Thank you very much, EARNED. He crawled without removing the case, pulled back the latches with a screwdriver and the roller jumped out.
Good afternoon. The problem is as follows. The 2010 printer stopped picking up paper after a year of inactivity. More precisely, it starts and as soon as the paper reaches the cartridge it simply stops.
There can be many options here. If the paper just stops, then there may be a problem with the paper registration sensor, or the pick-up roller picks up the paper with a slip (if it is worn out) and the paper belatedly passes through the registration sensor, which informs the printer of the problem. If the paper is jammed near the cartridge, there may be a problem with the cartridge, such as the drum not spinning, resulting in a paper jam.It is also possible that somewhere something got inside the printer and prevents the paper from going its way.
In any case, first of all, listen to how the printer picks up the paper - easily and the first time, or with a shrill, and not always the first time. If it's not easy, then clean, change the rubber band on the roller, and then, if the problem persists, you will need to look further.
The video picks up normally. Makes one turn and stops. If you manually push the paper or roller, it pulls it through and the printer prints, but the text it prints is shifted up. I have a question about gears. There are two gears on the roller that feeds the paper, they must work synchronously or with rotation.
| Video (click to play). |
This site uses Akismet to combat spam. Find out how your comment data is processed.


