A complete find will be good luck, and a separate selection with knowledge will not take much time. The suspension solution is 70%. If you buy an independent torsion bar or rubber-harness suspension, the rest of the chassis will have to be bought due to the least versatility. Few people like to bore a purchased spare part for old components. Shock absorbers are worth buying new ones.
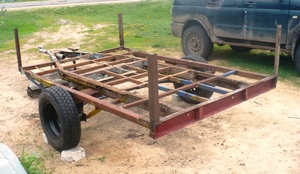
To make a two-axle trailer for a car yourself, you need the same material, only in a double name. With the correct procedure, the first thing will be the ability to cook metal, and the last is to find an awning or material for its manufacture. If you haven't cooked, you need to contact an expert, having previously prepared everything that needs to be welded. At the design stage, the tipper system must be taken into account. If it is conceived, then the body structure needs hinge mechanisms and separate strength amplifiers.
You cannot pass by drawing up a drawing. The preparatory steps may not leave numbers in memory. Visibility provides visual control, understanding of the assembly, moreover, if there is help from the master when welding or milling. Summing up the collection of material, components, tools will give permission to start actions:
VIDEO
Video instruction for making a trailer
The sample test is carried out with a gradual increase in weight. It is advisable that someone help in this matter, visually fixing the work of the suspension and the coupling unit. Painting with an anti-corrosion coating is carried out at any stage of installation. It depends on the availability of covered seats.
The last step will be to register a self-made model of our own production. The traffic police will send the owner and the trailer for examination. It is important that the laboratory is accredited. It is necessary to keep receipts for used components, and most importantly - a certificate for the hinge device, the same fastener. In this circumstance, it is better to buy it. Of the standard papers, you need: a copy of the passport of the owner and the car, photos of a trailer for cars with your own hands, a statement to the traffic police about the registration of the towing hitch, a receipt for the state duty. If there were documents, earlier it was necessary to undergo a technical inspection, a positive decision of which was recognized as the compliance of the trailer with the standards, after which they were registered and issued with numbers. This procedure is described in more detail in this article.
Events and exhibitions are constantly held to demonstrate automotive technology. Motorists love to show off a do-it-yourself light trailer that matches the style of the car, at least due to the color scheme. Today it is profitable to make a trailer yourself. Customized solutions add to the collection of technical findings in trailer design. Reliability and safety remain the unchanged rule.
Hello everyone! There are many craftsmen living in our country who prefer to do everything with their own hands. Some even assemble an axle for a light trailer on their own. Therefore, we will talk about this topic today.
Before you start assembling an element of your car trailer, I advise you to decide on the choice of design. They are different, which brings some differences to the device.
With a little bit of work with the hub, springs, shock absorbers and other components, you can get a great homemade axle, and a trailer with a dependent or independent suspension will demonstrate performance no worse than the factory models.
For some, it is easier to order a ready-made axle assembly than to assemble something yourself. But if you know how to do it or want to understand how all this is made with your own hands, I suggest you just buy or find the appropriate parts and assemble a full-fledged axis from them.
But which one? The axle of the trailer, as a suspension element, is just a tube. It is of two types, depending on the section:
If we take identical parameters for wall thickness, cross-sectional area and diameter, then the square versions will require more effort to bend. That is, they are stronger than round ones.
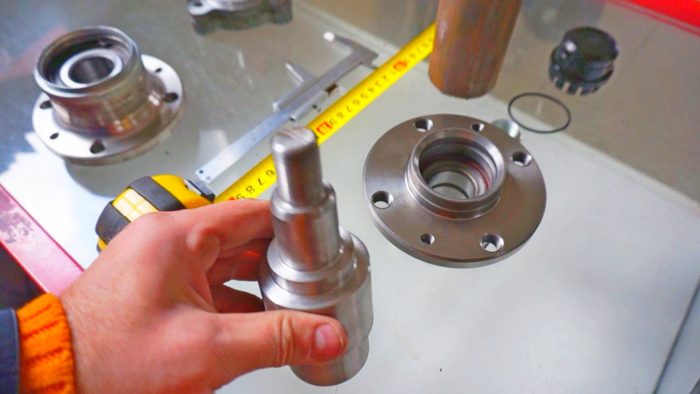
Also, the axle assembly comes with a hub and brakes (not everywhere). Basically, 2 types of hubs are used:
Chamomile is better price and repairable, although hub blocks are more reliable and durable at a higher price. They can only be changed as a set. I do not see anything bad here, since it simplifies the replacement procedure and maintenance of the trailer.
The hubs are welded or screwed on. The last connection method is actively used on Kurgan trailers. Accordingly, between welded and prefabricated structures, I would prefer the latter due to the simpler approach to repair and maintenance. But it's up to you to decide.
On trucks and less often on passenger cars, trailers can go with a pivot axle, where the entire axle rotates along a vertical axis with the help of a pivot pivot circle.
The suspension or axle used on caravans is:
torsion bar (with and without brakes);
spring (with and without brakes).
We will consider them in more detail.
Torsion models are now very popular and in demand. This can be explained by objective advantages:
serve for a long time;
no difficulties in operation;
easy maintenance;
it is not necessary to use shock absorbers;
are small in size;
the space between the axle and the frame is reduced;
have a small mass;
these are structures with independent suspension at the trailer wheels.
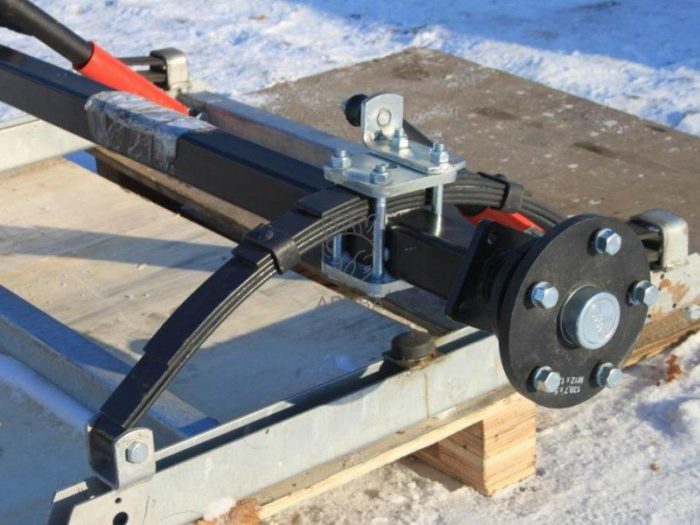
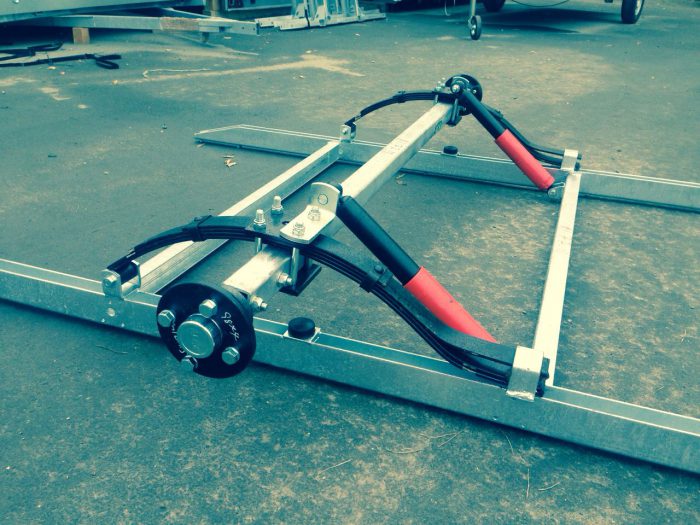
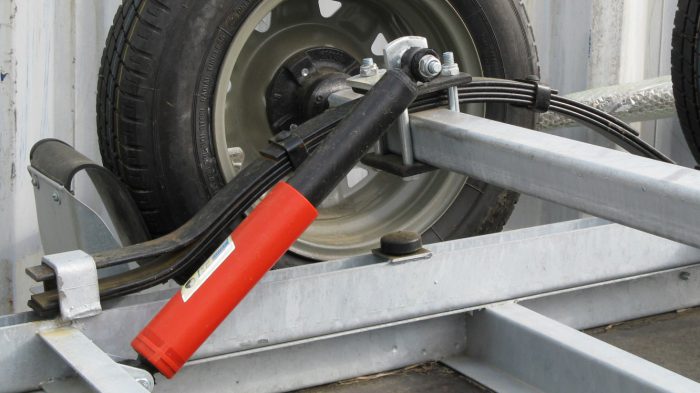
Torsion or rubber-band structures are equipped with a rigid mount with a frame. There is a polygonal tube mounted to the frame, inside of which there is a tube of a similar shape, only with a smaller diameter. The free space between them is filled with special rubber bands. They make it possible to ensure the immobility of the inner tube connected to the wheel.
I would not buy such a suspension among used options. Used or used ones already have a noticeably reduced resource, since the long service life directly depends on the condition of the harnesses.
Plus, rubber-band models are not suitable for active use in harsh conditions. This is an option for those who are going to operate the trailer mainly in the city and on relatively flat asphalt.
If the operating conditions are tough, then it makes sense to make or buy a spring-type axle that is more resistant to loads. She is not afraid of serious overloads due to the longer stroke length compared to the torsion bar counterpart. But keep in mind that you will have to take care of the spring suspension more carefully and more often.
Leaf springs, like the torsion axis variation, are available in Voronezh, in Belarus, you can buy it in Moscow, St. Petersburg, contact Chelyabinsk or Kiev. It doesn't matter where you live. Now the width of the assortment is so limitless that it is not difficult to order a complete suspension or components for self-production.
Regarding the spring suspension, I already wrote HERE, so I advise you to follow the link and read.
After all, it is also important to collect what you need to make the axle from and put it on your own light trailer. I advise you to pay attention to the components from Al Ko.
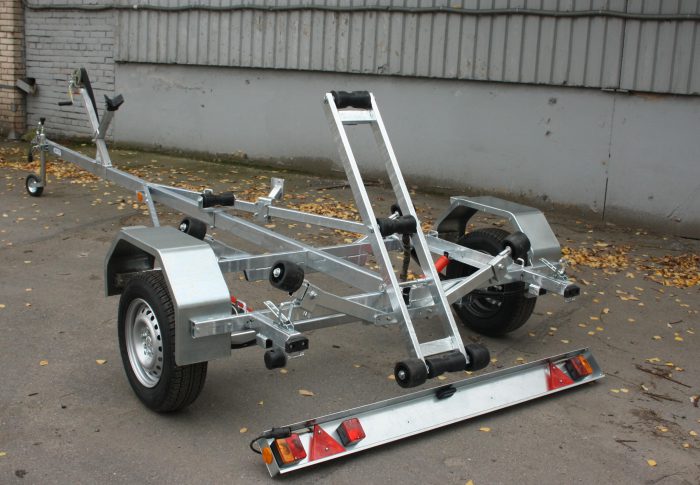
Suppose you already have a trailer frame and have selected the wheels for your caravan.
Now you need to figure out how all this is assembled and turns into a full-fledged axle as an element of the construction of your car trailer. Let's take a look at a few key steps.
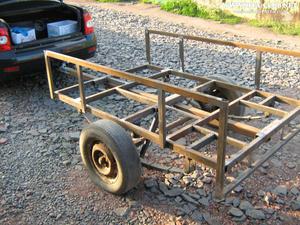
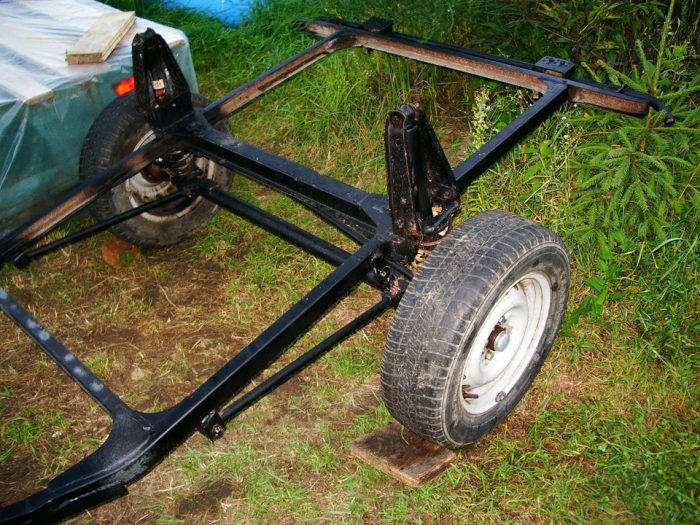
To begin with, the beam itself is selected. With a round or square section, it will not be fundamentally important. The main thing is that you take the appropriate dimensions and use high quality metal. Otherwise, the suspension will not last long;
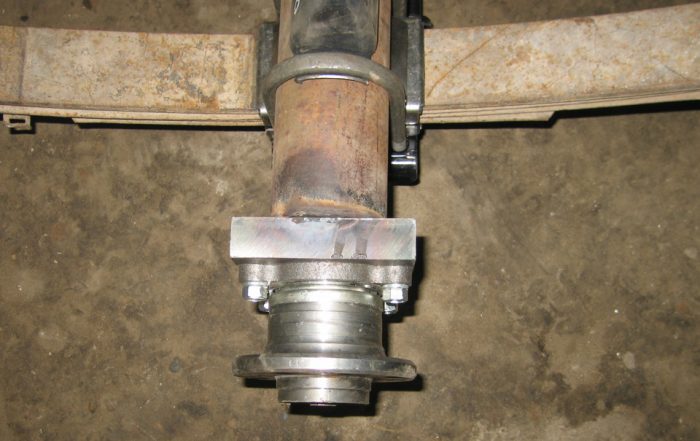
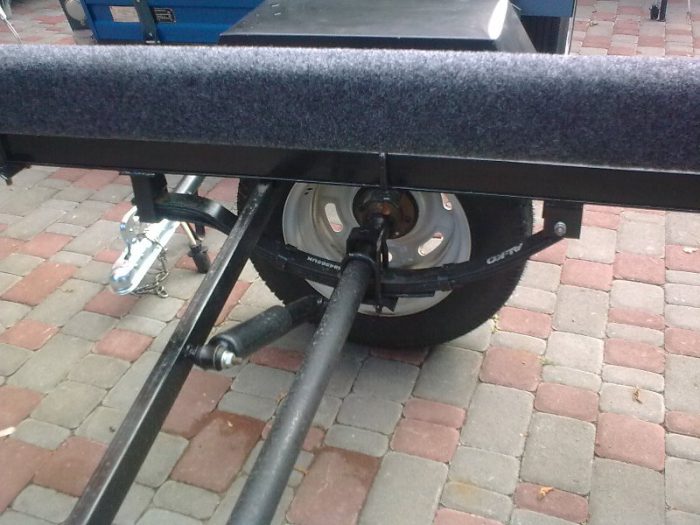
Next, we take the hub axle, on which the hub itself will be installed, and connect it to the pipe. How do these two elements fit together? It will be ideal if the hub axle enters at least a few millimeters with its protrusion inside the pipe. There are more chances for a round section than a square one. Further, it is all welded or bolted together. Learn from Kurgan trailers if you want to make a collapsible model. If not, just weld the elements well together. This is done on both sides;
Here you have a full-fledged axle ready, to which a spring or torsion bar will then be mounted;
According to the current regulation, the axle of the trailer is mounted to a length corresponding to 40% of the total length of the trailer from the rear;
Make replacements exactly, mark the place to place your axle;
Installation is best done from above, that is, the trailer will have to be turned over and placed on a flat surface. Make sure the spindles hang freely and do not interfere with your work;
Clean out the section of the frame of the future trailer where you will mount your axle. Measure the distance between the bushings and divide into two equal parts. Don't forget to mark everything with a marker on the axis;
For control measurement, divide the frame width by 2, and apply the resulting value from the center of the axis. The parallel position is corrected. Only now proceed to the final installation process;
The connection is made by spot welding along the entire length of the contacts.
Many craftsmen advise taking a spring-shock-absorbing suspension type. Although its strength parameters are lower when compared with a rubber-hardened structure, but with such a suspension you will get a smoother and softer ride with an empty and loaded trailer.
How difficult this process is, judge for yourself. If you have never done such work, then I would not recommend starting from this stage. It is easier to buy a ready-made structure or initially take a good factory trailer of the type:
Thank you all for your attention! Operate only reliable and serviceable equipment, do not endanger yourself and other road users on the road.
VIDEO Subscribe to our site, share your opinions in the comments and invite your friends to the discussions!
4 estimates, average: 4,25 out of 5)
Did you like the article?
Subscribe to updates and receive articles by mail!
We guarantee: no spam, only new articles once a week!
If factory trailers for cars do not suit you with something and you decide to make a two-axle trailer for a car with your own hands, then this article is for you.
If you want the State Traffic Inspectorate to allow you to operate your homemade trailer, you need to do it yourself in accordance with the requirements of GOST 37.001. 220-80 "Trailers for passenger cars". For those who do not want to read the original source, we will briefly outline the main restrictions imposed by this document on trailers for passenger cars.
VIDEO If you decide to make a trailer for a car with your own hands, you will need the following parts and materials.
Traction hitch - 1 pc.
Rear hub axle from a front-wheel drive vehicle - 2 pcs.
Rear hub from the same car as the axle - 2 pcs.
Springs from any machine - 2 pcs.
Spring rear end earring –2 pcs.
Padded stepladders - 2 sets.
Shock absorbers - 2 pcs.
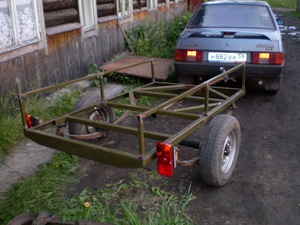
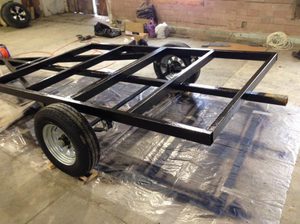
Steel pipe with a section of 30 by 60 mm (2 sections of 190 cm - spars; 2 of 122 cm - beams of the drawbar).
Steel pipe 25 by 25 mm (4 sections of 190 cm each - the bottom and top of the strapping of the side boards; 8 sections of 40 cm each - the racks of the side boards; 4 sections of 119 cm each - the bottom and top of the front and rear boards; 7 sections of 114 cm - cross members).
2 pieces of U-shaped channel # 5 for the manufacture of the bridge beam.
Hinge hinge - 4 pcs.
Side fixing device - 4 pcs.
Rear lights - 2 pcs.
Stranded insulated wires.
Plywood 10 mm thick - 1 sheet (size 1.9 x 1.14 m).
Sheet steel 0.8 mm thick.
Chain or rope Ø 3 mm - 2 pieces of 20 cm.
From the tool you need a welding machine, a grinder and an electric drill.
Fold the sections of the channel so that you get a rectangular pipe, and tighten them with clamps. Boil the joints. Weld the hub axles to the ends. Attach the resulting bridge beam to the springs using ladders.
VIDEO Spread out the side members, traverses and cross members on a level surface.
Cook them to size.
Turn the structure over and weld the brackets for attaching the front ends of the springs to the side members. This must be done so that from the middle of the beam of the installed bridge to the rear edges of the side members is about 950 mm.
Weld the drawbar and attach the tow bar to it.
Screw the front ends of the springs to the brackets, and the rear ends through the earrings to the side members.
Install the hubs on the axles, and the wheels on them.
Place the trailer on wheels.
Fix the towbar on the ball of the car's towbar.
Roll up the trailer to the drawbar.
Fold the drawbar arms over the side members. Secure the alignment with clamps.
Remove the towbar from the hook, roll the trailer away from the machine and weld the connection of the drawbar to the side members.
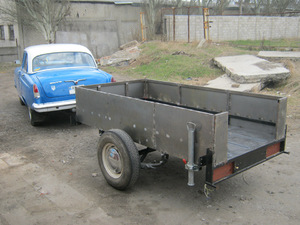
Sheathe the sides with sheet metal. Make the floor by attaching the plywood to the crossbars with countersunk self-tapping screws. Cut the wings out of sheet metal and attach them to the sides with brackets. Prime and paint the structure. Attach the lanterns and route the wiring.Use a chain or cable to make the tow hitch insurance. Only after that you can proceed to registration.
Do you want a dual axle? Weld 2 bridge beams, buy 4 short springs and set everything so that the distance between the axles is no more than a meter.
VIDEO A homemade trailer, which can be used without fear, must be registered with the MREO GBDD. To register, you must have:
Conclusion of a technical examination on the compliance of a self-made vehicle with the requirements of GOST001. 220-80. Where it is possible to make such an examination, you need to clarify in the MREO. Since the conclusion issued by a laboratory not accredited by the State Traffic Safety Inspectorate may be invalidated.
Receipts confirming the purchase of parts and materials used for the manufacture of the vehicle.
A certificate for the hitch hinge (that's why we advise you to buy it, and not do it yourself).
A copy of your passport.
A copy of the traction vehicle registration certificate.
Application addressed to the head of MREO with a request to register a homemade trailer.
Receipt for payment of state duty.
4 photos of homemade products taken from different sides (10 by 15 cm).
Video (click to play).
If you submit all these documents, then you will be admitted to the technical inspection. A positive technical inspection result will be the basis for registering a self-made vehicle.
VIDEO