In detail: do-it-yourself repair of a 4x4 gazelle distributor from a real master for the site my.housecope.com.
A 4x4 transfer case for a gazelle is a unit that distributes torque from the engine to other drive mechanisms that also increase the number of gears in the transmission.
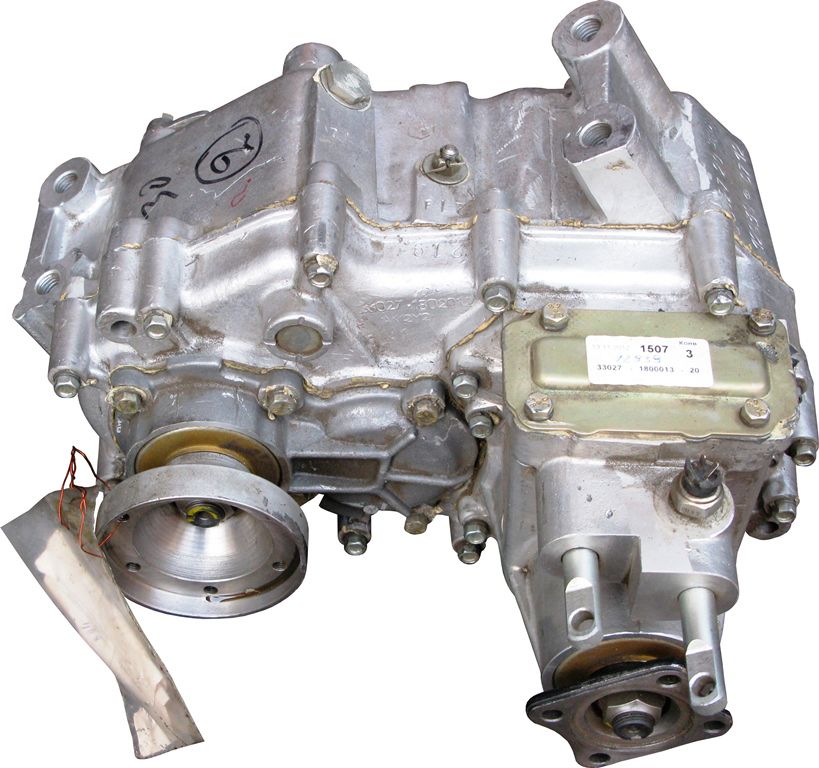
Transfer case 4x4 for gazelle
A transfer case is a unit that distributes torque from the engine to other drive mechanisms that also increase the number of gears in the transmission.
The device is an integral part of all-wheel drive vehicles. The first transport analogs appeared only at the beginning of the last century. They were intended only for racing on the highway and off-road, and they looked like a passenger car. The public at that time considered the development to be simple pampering. After a number of manipulations, a transfer case was produced that fulfills the tasks of modern analogues.
Based on the method of distributing power between the bridges, the 4x4 transfer case for the gazelle of our time is diverse:
- With an interaxle differential drive, which does not provide for the possibility of forced shutdown of one of the driving axles. Cars with such a box are characterized by the constant operation of the front axle. If it is necessary to increase the passage, the center differentials switch to forced locking.
- With an interaxle differential drive, which provides for the possibility of forced shutdown of the front driving axle. Due to the use of a single main gear, this type has gained such popularity.
- With an inter-axle drive of a blocking type with a manually disengaged second drive axle or with the help of an automatic system when the wheels slip. Cars with such a box when driving on a hard surface provide for the disengagement of the front axle. This condition helps to save fuel and reduce tire wear.
- With non-axial driven shafts. An intermediate shaft is not provided here. Main advantages: compactness, noiselessness, high efficiency.
| Video (click to play). |
The 4x4 transfer case is responsible for the distribution of forces on all driving axles of the vehicle. Its additional use is starting and stopping the driving front axle. Basically, a gazelle of this type is characterized by a two-stage gearbox. Its work affects the gear ratio, as a result, the number of gears is doubled.
When starting a direct transmission to a 4x4 gazelle, the first row of gear ratios is introduced, and when lowering, the second. This factor causes the vehicle to travel in a variety of road conditions.
The high cross-country gazelle is characterized by a design that blocks the possibility of engaging a downshift provided the front axle is on. A device of this type makes the rear axle insensitive to high torque overloads.
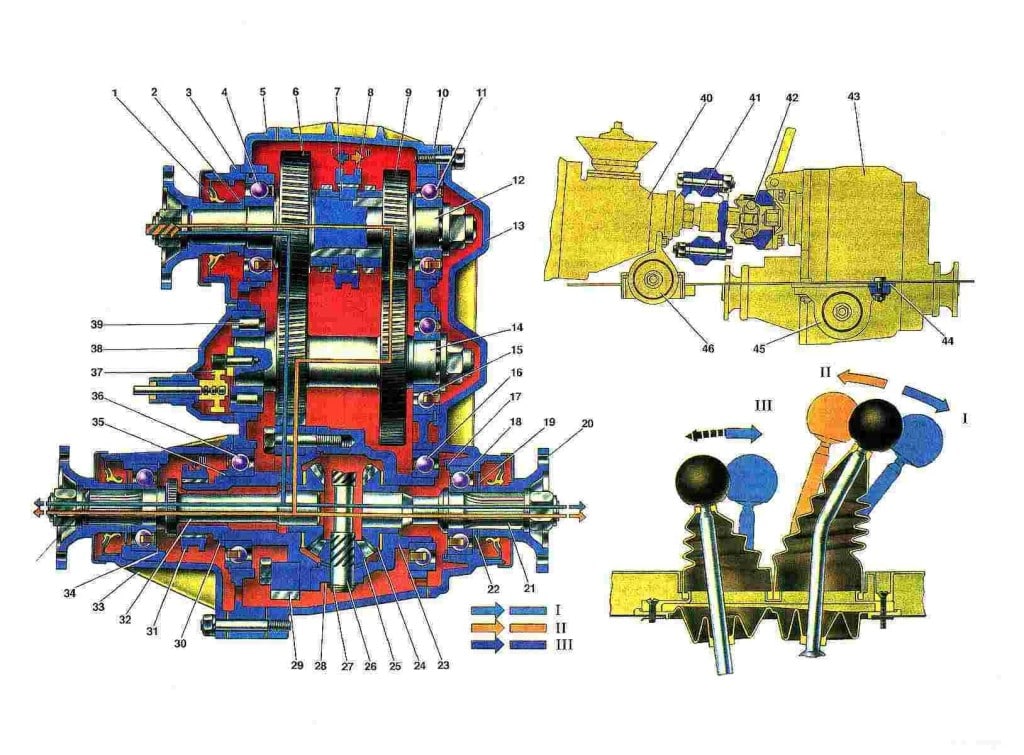
Transfer case device 4x4 for Gazelle
A 4x4 transfer case for a gazelle is characterized by the following main components:
- drive shaft;
- rear axle drive shaft;
- front axle drive shaft;
- center differential;
- a device that blocks the center differential;
- gear or chain transmission;
- reduction gear.
The torque, as the main acting force, is transferred from the transfer case from the gearbox through the drive shaft. The center differential is responsible for the distribution of torque between the axles. In turn, it causes rotation at speeds with different angular values.
The variety of the center differential for a 4x4 gazelle includes two types:
- symmetrical, characterizing the uniform distribution of torque;
- asymmetrical, characterizing a different ratio of torque distribution.
In order to rigidly hitch the front and rear axles, a differential lock was provided for a 4x4 gazelle.
The task of the chain drive is to transmit torque to the front axle, which includes gears and drive chains.... It happens that the gear drive is replaced by a chain drive. And the all-wheel drive system with an automatically connected type of transfer case has the form of a bevel gearbox.
The crawler gear is assigned the role of increasing torque when driving off-road vehicles. The design of the planetary gear is borrowed here.
Driving on deformable soils usually does not imply the circulation of parasitic power, since the value of the total component of the movement resistance force is decent, and the adhesion of the wheels to the supporting surface is insignificant.
A 4x4 transfer case for a gazelle is characterized by regime operation:
Further modes are differential-oriented.
- Its unlocking with the condition of the included overdrive. The division of the torque is in the form of a 1: 2 ratio.
- Blocking with the condition of the included overdrive. The torque split depends on the grip and the surface.
- Unlocking with the condition of a downshift engaged. The torque distribution is represented by a 1: 2 ratio.
- Locking with the condition of the included underdrive. The distribution of torque is carried out depending on the adhesion of the tires to the surface. The functioning of the front and rear axles is inseparable. This mode has the highest passability.

- Like
- I do not like
Hello everyone! Tell me who knows, the blocking stopped turning on. When there was a new car, it was difficult to turn on and off, but it was possible. Now I can’t turn it on, not how. Maybe a competent service will tell you in Moscow?
As they teach in the book, rolling forward and backward, it did not stop working, it just rusted, I have the same garbage with great difficulty, because I rarely use it
- Like
- I do not like
As they teach in the book, rolling forward and backward, it did not stop working, it just rusted, I have the same garbage with great difficulty, because I rarely use it
Thank you for your answer. I don't use it often either, but at every opportunity I try to lubricate everything. The whole thing turned out to be in the activation rod. The old one has a lot of work. Now it turns on easily without straining.
- Like
- I do not like
I bought a new gazelle for Dekaborsk 33027. and I don’t understand the dollar. since when the differential is turned on, the orange one lights up. And is the 4x4 gearbox modernized or of the 1997 model?
No, it should not, since there is NO such light bulb. Its own checkpoint. Differences: there is no hole for the speedometer drive (on the RC) and there is a hatch instead of which you can put a COM.
ЗЫ Specify your location, please.
Post has been editedden773: 17 January 2008 - 21:48
I bought a new gazelle for Dekaborsk 33027. and I don’t understand the dollar. since when the differential is turned on, the orange one lights up. And is the 4x4 gearbox modernized or of the 1997 model?
There is no reason for her to light up and there is no place for a light bulb, unless you start a reserve. The differential lock is lit so that you do not drive and fly away on the asphalt with it. and the reduced one does not affect this. The gearbox is the same, only holes are drilled for fastening the differential and lowered levers and on the other side of the COM fastening hatches it is milled and closed with a metal plate. the number of gears is unfortunately the same, in bridges 5.125
- Like
- I do not like
my transmissions are stuck with difficulty and constantly when driving there are two different sounds from under the checkpoint. So it should be for a car with a mileage of 300 km ??
About sounds in more detail, and "transmission with difficulty" - imported clutch (see sotv. Topics) and oil in the gearbox synthetics.
- Like
- I do not like
appear when moving from 20 km. The first cricket (rattles) trtr-trtrtrtrtrt. the second buzz as if the wheels are out of balance, vibration is felt.
The first is most likely from the levers of the PKK. And the second is the propeller shafts (I talked with the balancing expert - it is imperative to balance, since they do not do this at the factory), although you need to start with balancing the wheels.
appear when moving from 20 km. The first cricket (rattles) trtr-trtrtrtrtrt. the second buzz as if the wheels are out of balance, vibration is felt.
The first cricket is most likely the washers at the ends of the lowered and blocking levers and, respectively, at the ends of the rods from the side of the pk. It is easy to check if you put less noise on these levers while driving. From the side of the pk on a thrust for 35 tkm, the development formed 0.5 mm until I found it. It was cured very simply put rubber washers from a piece of hose, instead of native plastic ones. it is better to change everything at once. Native rubber K-139 at a speed of more than 90 km makes a louder noise than the engine, with such a characteristic hum due to the tread
- Like
- I do not like
- Like
- I do not like
- Like
- I do not like
- Like
- I do not like
- Like
- I do not like

rusha68 22 May 2008
- Like
- I do not like
Today I have already successfully tested the electric drive for controlling the transfer case. For this, two motorized windscreen wipers from a Muscovite were used. They are to the frame, and the movable levers on them cut straight into the rods.
That's it, now a 4-hour trip to the dacha will not drill my brain with the ringing that drowns out the radio tape recorder. Only two extra buttons on the panel https://my.housecope.com/wp-content/uploads/ext/3317/forum/public/s. )))))))
Somewhere I saw a photo, they installed electric engines from ESP. It worked too. Photo and description of the process in the studio!
Post has been editedden773: 27 October 2008 - 16:58
Transfer case drive
1 - lock clutch fork
Details of the drive and intermediate shafts
1 - flange;
2 - an oil seal;
3 - bearing thrust ring;
4 - front bearing;
5 - drive shaft;
6 - top transfer gear;
7 - hub;
8 - clutch;
9 - gear wheel of the lowest transfer;
10 - bushing;
11 - rear bearing;
12 - bearing alignment ring;
13 - intermediate shaft bearings;
14 - intermediate shaft
Transfer Case Differential Parts
1 - retaining ring;
2 - spring washer;
3 - bearing alignment ring;
4 - bearings of the differential housing;
5 - driven gear;
6 - front differential housing;
7 - gear wheel of the front axle drive;
8 - retaining ring of the satellite axis;
9 - satellite;
10 - rear differential housing;
11 - support washer;
12 - gear wheel of the rear axle drive;
13 - axis of satellites;
14 - spring washer of the satellite axis;
15 - support washer
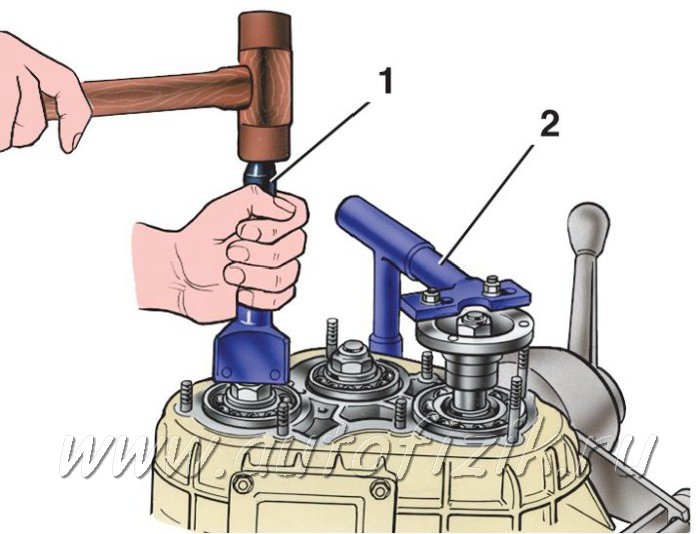
Disassembly
PERFORMANCE ORDER
1. Flush transfer case and drain oil.
2. Fix the transfer case to the disassembly stand and loosen the mounting nuts
flanges on the drive shaft and on the drive shafts of the front and rear axles.
3. Unscrew the fastening nuts and remove the crankcase
1 front axle drive assembly with cover
2, lever, fork, lock clutch
differential and with the drive shaft of the front
bridge. Remove the housing 3 of the speedometer drive in
assembly with a driven gear wheel
speedometer.
10. Remove the front cover 4 together with
differential, then set
bearing alignment ring
differential 3 and remove from the front cover
bearing assembly with differential (1 -
intermediate shaft, 2 - drive shaft).

11. Remove the locating rings from the rear bearings of the drive and intermediate
shafts and remove both shafts from the transfer case housing: the driving and intermediate.
12. Clamping the drive shaft in a vice, remove the thrust washer and the rear bearing 11,
using a universal puller. Remove the gear 9 of the lowest from the drive shaft
gears together with the bushing 10, the clutch 8 for gear shifting, the hub 7 of the clutch,
gear 6 of the highest transfer (see fig. Details of the drive and intermediate shafts).
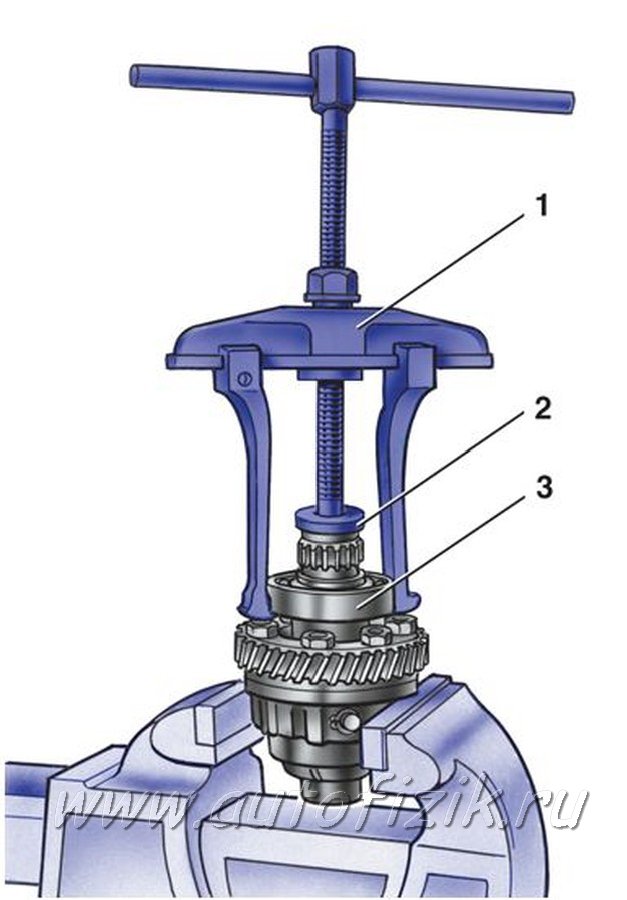
13. Disassemble the differential, for which remove the circlip 1 and the spring washer
2 front bearings (see fig. Transfer case differential parts).
14. Remove the rear and front bearings from
differential housings using
universal stripper 1 - А.40005 / 1/6 and stop
67.7853.9559 - 2 (3 - bearing).
15. Unscrew the bolts of the differential driven gear, mark with risks
on the differential housings, their relative position relative to each other and
separate the case.
16. Remove the differential driven gear.
17. Remove the circlip 8 and the spring washer 14, then press out the axle
satellites and remove the satellites and gears of the drive axle drive with support
washers (see fig. Transfer case differential parts).
18. Press out worn or damaged oil seals from the drive housing
front axle, from the front bearing cover and from the rear cover.
19. Unscrew the nuts from the suspension cushion axles and remove the complete brackets.
Assembly
PERFORMANCE ORDER
1. Assembling the transfer case is carried out in the reverse order of disassembly.
2. Assemble the center differential, aligning the marks on its housings so as not
upset the balance of this node.
3. Install the spring washer on the pinion axle from the side of the blind hole on
the end face of the axis.
4. The axial clearance of each axle drive gear must be 0–0.10 mm, and
the moment of resistance to rotation of the gears should not exceed 14.7 Nm (1.5 kgfm).
5. With an increased gap, replace the support washers with others, of a greater thickness; if
the specified clearance cannot be obtained when installing the support washers with the largest
thickness, replace the gears with new ones due to excessive wear.
6. Leading 1 and intermediate 2 shafts
installed in the transfer case
boxes at the same time.
7. Pressing the bearings onto the housing
differential guide with a mandrel
67.7853.9558 (1).
8. Lubricate the working surfaces of the oil seals before installing in the covers and housings
Litol-24 grease.
9. Tighten the screw connections to torque.
10. When crimping the transfer case shaft nuts
boxes use mandrel 67.7820.9520 (1)
(2 - flange retainer).
11. After assembly, fill the transfer case with oil up to the lower edge of the filler
holes.
Everyone is good with Sobol 4 × 4: inexpensive, good cross-country ability, and in comparison with the Ulyanovsk “loaf” it is simply luxurious. However, there is an element in its design that frightens off a considerable part of consumers - permanent four-wheel drive, full-time "(full-time). The transfer case, along with the front gear and propeller shafts, howl too much and vibrate at high speed.
Two years ago, the designers decided to overcome the disease and began to grind the gear teeth of the transfer case. Introduced 100% control of vibration and noise characteristics of bearings. The handouts began to work quieter, but it was still far from ideal. And then the plant workers took drastic measures. At the joint engineering center of GAZ, work began on a new all-wheel drive transmission of the "part-time" type (part-time) with a connected front axle - instead of the "full-time" version, permanent all-wheel drive.
The new transfer case has kept the maximum unification with the previous one: the original elements (highlighted in red) can be counted on the fingers.
In order not to lose the main market trump card - low cost, the designers were asked to unify the new distribution box with the serial unit as much as possible. As a result, it retained a four-shaft scheme with constant gearing, in which there is no direct drive (the gear ratio of the first stage is 1.07, and the second stage increases the torque by 1.87 times).
Instead of the center differential housing with satellites, a special adapter sleeve is now screwed onto the differential gear.With the rear axle drive shaft, this bushing is permanently connected by splines, but the front axle shaft is connected to it through a toothed coupling. Even in the razdatka, the rods of both forks had to be replaced. Thus, in the new transfer case, it was possible to retain all the old body parts, except for the front cover of the control mechanism.
In addition to the "part-time" distribution, we have developed new cardan shafts with CV joints instead of crosspieces. They are better centered in the circuit and are nearly free of noise and vibration.
Only the owners of "sables" with passenger and cargo-passenger bodies will be able to fully appreciate the advantages of the transmission with the new cardan shafts. In flatbed trucks and three-seater vans, the joints on the shafts leading to the bridges are the same. Their distribution box is located outside the cab, and therefore the noise in the cabin is initially less. The plant workers think so, but I disagree with them.
The transfer case on Sobol 4 × 4 is installed in the middle of the wheelbase and is connected to the gearbox by an intermediate cardan. The latter also received CV joints instead of crosspieces.
I jump into the brand new "Sobol" - "part-time". Inside, nothing has changed: the same three levers in the floor, the familiar transmission indicator lamp on the instrument panel. But their functions are different. The lamp does not signal a locked differential, but the activation of the front axle. And the lever that included the lock now engages the front axle.
The high-torque Cummins diesel engine cheerfully accelerates the car, and I listen to the noises of the transmission: 60, 80, 100 km / h - quietly. Earlier, at this turn, I cut off conversations with fellow travelers: the noise drowned out the conversation. Now we can continue the debate about the advantages and disadvantages of "full-" and "part-time" schemes. There is not even a hint of the former distribution itch, even at one hundred and twenty.
We drive off the asphalt onto a sandy hillock. Quickly losing momentum, the car began to burrow, throwing fountains of sand from under the rear wheels. I push the left hand-out lever away from me. The front end connects with unusual ease - and the Sobol easily climbs both this hill and all subsequent ones.
The shape and location of the transmission levers have not changed, only the content of the information sticker has been updated.
Only when the wheels sank into the sand almost to the hubs, for the first time I decided to resort to a low gear in the transfer case (it can only be used by connecting the front-wheel drive). But there is still a rear interwheel blocking "Eaton" in stock. For a year now, all four-wheel drive "sables" and "gazelles" have been equipped with it. Let's add here a large ground clearance and small overhangs - with such an arsenal "Sobol 4 × 4" will give odds to other venerable off-road vehicles!
The permanent all-wheel drive system has not gone anywhere: the production of cars with full-time and part-time transmissions is going on in parallel. And rightly so: each scheme has its own admirers. The former is preferable for motorists who travel off-road more often than on asphalt. The plug-in four-wheel drive is addressed to those who mainly drive on the asphalt, but sometimes poke their heads where Makar did not drive calves. This option is just right for me. You need to drive comfortably a thousand and a half keme on the highway and then confidently overcome 500 meters of mud right to the water's edge.
Both types of all-wheel drive are priced the same: any "Sable 4 × 4" is exactly 52,000 rubles more expensive than a rear-wheel drive counterpart with a similar body. In the segment of light commercial vehicles, this offer is still the most attractive.
The transfer case with a disconnectable front axle for vans and combi is equipped with flanges for cardan shafts with CV joints. Cars with permanent all-wheel drive are equipped with cardan shafts with crosspieces.
It is not the first year that GAZ has been experimenting with a new design front drive axle - with CV joints instead of universal joints of unequal angular velocities. Their introduction will help to completely get rid of the uneven movement of the wheels at large angles of rotation. On Sobol 4 × 4, this small feature is clearly visible when turning.
The new bridge is likely to mature by the time Gazelle-Next 4 × 4 is put on the conveyor.But even earlier on "gazelles" and "sables", buttons for controlling the transfer case may appear instead of levers: tests of electrified transfer cases are in full swing.
The four-wheel drive engineering school at GAZ is already seven and a half decades old. What all-terrain vehicles have not been designed here over the years! A whole magazine is not enough to tell about everyone. Let's go through only the lightest cars.
The first light all-wheel drive - GAZ-61 - was created by the designer Vitaly Grachev on the basis of the "emka" in 1939. The torque of the in-line "six" GAZ-11 was enough to get by with four gearbox stages from the lorry without an additional downshift in the transfer case. CV joints were used in the drive of the front wheels! Prototypes were assembled with a phaeton (model 61-40), a sedan (61-73) and a pickup with an all-metal cab (61-415). In 1941, only a sedan and a simplified pickup 61-416 with an open cab managed to get into small-scale production. In total, about 200 cars were made by the end of the war.
At the beginning of 1941, Vitaly Grachev developed a compact army SUV GAZ-64 with an original frame and a simplified open body. The car was equipped with an M-1 4-cylinder engine and the same transmission as that of the GAZ-61. It only lacked an intermediate propeller shaft between the gearbox and the transfer case. From August 1941 to April 1943, 671 copies of the GAZ-64 were manufactured. The chassis "sixty-fourth" served as the basis for the light armored car BA-64.
In 1943, the GAZ-64 was modified: the track of the driving axles was expanded from 1206 to 1446 mm (bridges from the GAZ-61) and the body was adapted to them. The car, indexed GAZ-67, held out on the assembly line until August 1953. Circulation of nearly 93,000 pieces. On the basis of the GAZ-67, the BA-64B armored car and the GAZ-011 amphibian were produced.
A new page in the history of the Gorky all-terrain vehicles was opened by the GAZ-69, developed under the leadership of Grigory Wasserman in 1950 and mastered in 1953. He received a 52-horsepower engine and a 3-speed gearbox from Pobeda. The four-shaft transfer case with built-in range-change and front axle shut-off clutch was developed from scratch. Like today's "sables", it was mounted separately from the KP. The gear ratios are 1.15 and 2.78. Along with the base model, the more comfortable five-seater GAZ-69A and the amphibian GAZ-46 were produced. In 1956, the production of "sixty-ninths" was transferred entirely to UAZ. They were made there until 1973. For two decades, the forces of both factories have produced 634,000 of these "gaziks".
In 1954, Grigory Wasserman tried on the transmission from the GAZ-69 to the reinforced Pobeda body. So the light off-road vehicle M-72 was born. The car was mass-produced from 1955 to 1958, the total circulation was about 4,700 pieces. In the GAZ-21 family, which replaced the Pobeda, there was no longer a place for an all-wheel drive.
Another light all-terrain vehicle designed by Wasserman - the M-73 model of 1955 - did not make it to the conveyor, but it served as a prototype for the 410 model Moskvich. We made two prototypes - with pickup and coupe bodies. Both were equipped with a 35-horsepower engine and a 3-speed gearbox from "Moskvich-402". The drive axles and the transfer case are made according to the model of the GAZ-69.
In 1974, according to a one-time Kremlin order, the plant produced a batch of five all-wheel drive Volgas GAZ-24-95 (lead designer Leopold Kalmanson); one of them was sent to the Zavidovo hunting farm to Leonid Ilyich Brezhnev. The transfer box, borrowed from the UAZ-469, was placed in the middle of the wheelbase, separately from the gearbox. The front axle was composed of an inverted GAZ-24 rear gearbox with UAZ steering knuckles and CV joints. The main gears of both axles received cam differentials.
The Volga GAZ-3105 (lead designer Sergei Batyanov) became the only GAZ car in which all-wheel drive was used not to increase cross-country ability, but to provide decent handling parameters on slippery roads. The first prototype was built in 1987.V-shaped gasoline "eight" with a volume of 3.4 liters (170 hp) is installed in front of the front wheel axle. The two-shaft 5-speed gearbox is combined with a front gearbox and a lockable symmetrical center differential. Until 1996, 79 copies of the GAZ-3105 were assembled, including 24 prototypes.
Transfer case overhaul - general information
Overhaul of the transfer case is a difficult procedure to perform on your own. It involves the disassembly and correct reassembly of many small assemblies and components. It is necessary to accurately measure the many gaps and correct them correctly by choosing the appropriate size shims and circlips. Thus, if it becomes necessary to overhaul the transfer case, its removal and installation can be performed by an amateur mechanic, while the actual repair and restoration should be left to the car service specialists. There is a possibility of purchasing remanufactured boxes - consult the specialists of the dealer department. In any case, the time and money spent on repairing and restoring the old box will be quite commensurate with the cost of purchasing a restored unit.
Nevertheless, it should be said that the overhaul of the transfer case by the forces of even an inexperienced amateur mechanic is quite possible, provided that there is an appropriate special tool and an accurate and careful approach to performing each of the procedures, when not even the smallest steps are skipped.
Tools required to perform a transfer case overhaul include pliers for removing and installing both inner and outer circlips, bearing puller, sliding hammer, drift set, plunger-type dial indicator, and possibly a hydraulic press. In addition, it is absolutely essential to have a stable, comfortable workbench equipped with a vice, or a stand for dismantling transmissions.
When disassembling the transfer case, pay close attention to how each of the smallest components are installed, their position in relation to other parts, and the type of fasteners (take notes as you disassemble). The accompanying illustrations provided here are intended to help you understand the layout of the box - however, drawing up explanatory notes during disassembly still much more reliably guarantees the correctness of subsequent assembly.
Transfer case components type NP231
1 - Front holder of the crosspiece, its oil seal, sealing washer and fastening nut
2 - Plug, pin and spring of the switch lock
3 - the Front holder with an oil seal
4 - the Front half of the crankcase
5 - Vacuum sensor-switch with a sealing ring
6 - Assembly of the ventilation line
7 - Bearing and retaining ring of the primary gear
8 - the Retaining ring of a gear wheel of a reduction gear
9 - the holder of the primary gear
10 - Thrust washers of a gear wheel of a reduction transfer
11 - the Primary gear wheel
12 - the Guide bearing of the primary gear
13 - the Gear wheel of the lowering transfer
14 - a hub of a fork of switching of modes
15 - the Retaining ring of the hub
16 - the Distance washer
17 - the Springs of the synchronizer
18 - Sliding keys of the synchronizer
19 - the Hub
20 - the Coupling
21 - the Blocking ring
22 - Retaining ring of the front bearing
23 - the Front bearing of a secondary shaft
24 - the Front secondary shaft
25 - the Drive sprocket
26 - Drive chain
27 - Bearings of the drive sprocket
28 - Rear bearing of a secondary shaft
29 - the Driven shaft
30 - the Epiploon
31 - Assembling the oil pump
32 - Rear bearing of a driven shaft
33 - the Lock ring
34 - Rear half of the crankcase
35 - Filling plug with a gasket
36 - Drain plug with a gasket
37 - the Back holder
38 - Extension casing
39 - the Bushing
40 - the Epiploon
41 - the Mesh screen of the oil sampling tube
42 - Nipple connection of a tube
43 - Oil intake pipe
44 - the Sealing ring of the oil sampling tube
45 - Magnet
46 - Nut and washer of the lever of modes
47 - the Lever of modes
48 - the O-ring and the bushing of the holder of the selector
49 - Selector
50 - Fork modes
51 - Range plug
52 - Spring modes
Transfer case components, type NP242
1 - the holder of the front bearing with an epiploon
2 - the front half of the crankcase
3 - Switching selector
4 - a Fork of switching to a lower gear with inserts
5 - the Shift rod
6 - the Shifting bracket
7 - the Slider bracket
8 - the Bushing with a spring
9 - Fork of modes with inserts
10 - Bushing
11 - the spring of a fork
12 - the Bushing
13 - Assembly of the ventilation line
14 - Bearing and retaining ring of the primary gear
15 - Retaining ring of a gear wheel of a reduction gear
16 - the Holder of a gear wheel of a reduction transfer
17 - the Thrust washer of the gear wheel of the underdrive
18 - the Primary gear wheel
19 - the Rear half of the crankcase
20 - Drain and filler plug
21 - the Rear bearing holder
22 - Extension casing
23 - the Bushing and the epiploon
24 - the Vacuum sensor-switch
25 - Magnet
26 - the Thrust ring
27 - the Lock ring
28 - the switching clutch
29 - the Gear wheel of the lowering transfer
30 - Guide bearing (primary gear / driven shaft)
31 - Front bearing of the front output shaft and circlip
32 - Shaft of intermediate clutch
33 - the switching clutch
34 - the Lock ring
35 - the Driven shaft
36 - Assembling the differential
37 - the O-ring of a tube of the oil pump
38 - Oil intake pipe of the oil pump with a mesh screen
39 - Rollers of the bearing of the driven shaft
40 - the Drive sprocket
41 - Drive chain
42 - the Lock ring
43 - the Oil pump seal
44 - the Oil pump
45 - Rear bearing with a circlip
46 - Rear bearing of the front output shaft
47 - the Lock ring
48 - Driven sprocket
49 - the Front secondary shaft
50 - Spacer washers of the driven shaft bearing
51 - Washer and nut of the shift lever
52 - the Lever of switching
53 - O-ring and sector oil seal
54 - Cork, spring and retainer pin
55 - the Sealing plug
56 - The front holder of the cross with a nut and a sealing washer, a slider and an oil seal
Transfer case components, type NP249
1 - the Epiploon
2 - the holder of the front bearing
3 - The front bearing of the driven shaft with a locating ring
4 - Front half of the crankcase (with a toothed ring of the underdrive of internal gearing and a bushing of the shift rod)
5 - the gear wheel of the lowering transfer
6 - the Primary gear wheel
7 - Thrust washers equipped with tongues
8 - Holder plate
9 - the retaining ring of the primary gear
10 - the clutch
11 - Clutch shaft
12 - the locking ring of the differential
13 - Differential assembly
14 - the Driving gear wheel of the driven shaft
15 - Retaining ring of a driving gear
16 - the Spacer washer of the driven shaft bearing
17 - Needle bearings of the driven shaft
18 - the Spacer washer of the driven shaft bearing
19 - the Driven shaft
20 - Viscous clutch
21 - the Retaining ring of the viscous clutch
22 - the Retaining ring of the oil pump installation
23 - the Oil pump
24 - Rear bearing of a driven shaft
25 - Retaining ring of the rear bearing
26 - the Drive gear wheel of the speedometer
27 - Assembling the rear holder (with a cap, an oil seal, a bushing, an access cover and a gasket)
28 - a locating ring of the rear bearing
29 - the Front half of the crankcase
30 - Rear bearing of the front output shaft
31 - Assembling the oil suction tube (with connecting hoses, mesh screen, tubes and O-ring)
32 - Assembling the shift fork with the rod (including fork lining)
33 - Drive chain
34 - the Front secondary shaft
35 - the Switching selector
36 - the crankcase magnet
37 - Front bearing of the front output shaft
38 - Retaining ring of the bearing
39 - Plunger and retainer spring
40 - Plug and retainer O-ring
41 - Lock nut and washer of the mode lever
42 - the Lever of modes
43 - Oil seal (front bearing of the front output shaft)
44 - the Holder of the secondary shaft cross
45 - the Sealing washer of the holder of the cross
46 - the Nut of the holder of the cross
Before sending the transfer case for repair, it is useful to have an idea of which part of the transfer case is malfunctioning. Some of the defects are uniquely associated with different nodes, which can greatly simplify the troubleshooting procedure and reduce the time for troubleshooting. See also Section Troubleshooting at the beginning of the Guide.
PARKMOTORS sells transfer cases for 4x4 all-wheel drive Gaz-33027 and Gaz-2217 from a warehouse in Moscow.
Transfer case (razdatka) for all-wheel drive Gas-33027 and Gas-2217 4x4 with switchable all-wheel drive
Transfer case for Gaz-2217 4x4 and Gaz-33027 4x4 new generation vehicles with switchable all-wheel drive. The design of the transfer case allows the car owner to significantly increase the resource of both the transfer case and the front axle by using it only when necessary. The design of the transfer case has also been improved. The combination of these factors allows you to comfortably use the car both on public roads and off-road!
ATTENTION! We strongly advise you, before going to the warehouse, call MTS: 8-916-119-99-08 and clarify the availability of a transfer case (distributor) in the warehouse, and then familiarize yourself with the directions.
The transfer case distributes the torque between the axles of the vehicle. Located after the checkpoint in a separate unit. More details
The transfer case distributes the torque between the axles of the vehicle. It is located after the checkpoint in a separate node, or combined with it. For example, the gas transfer case 63, had a connection with the main gearbox through a propeller shaft.
The principle of operation of the transfer case depends on the transmitted power. Differential RK is:
with the disconnection of someone's driving axle,
with disabling only the front axle,
with manual or automatic connection of the second drive axle if the wheels slip.
Replacing the transfer case is a laborious process. Disassembly takes place in stages. It is necessary to remove the transfer case and its subsequent replacement. The main points are replacing the pads, replacing the transfer case oil seal, breather, and treating the cylinder during oxidation. The empty space of the oil seals is filled with thick grease; Litol can be used.
It is important to correctly assemble the transfer case after repair, the assembly of the RK takes place in the reverse order. To do this, it is useful to study the device, diagram or drawing of the transfer case.
You can buy a transfer case from MOSTAT. Transfer case is sold cheaper in bulk. The retail price can be viewed at the link: transfer case price.
To make the operation of the transfer case enjoyable to the owner of the car, clean the gearbox and the gearbox on a regular basis, tighten the fasteners, monitor the oil level in the crankcase and regularly replace the old oil with a new one.
The transfer case of the car is an important and necessary part, the service life depends on your care and control.
If you find malfunctions in the transfer case, you can try to fix them yourself, or play it safe and contact good specialists. Many people recommend MOSTAT.
The transfer case is controlled by a lever through a mechanical drive. The main purpose of the box is to reduce wear on parts and increase efficiency. It will be very useful to use a transfer case subframe - this will reduce noise, vibration and create additional protection against various kinds of damage.
Four-wheel drive transfer case is relevant when driving off-road and bad roads.
There was no time to tell about the installation of the distributor from the gas 66.
In general, it all started with the fact that I once again burned the clutch (ceramic) and screwed up the basket (the basket was already spoiled, and I finally screwed it up)
Here is the root cause itself:
I changed the clutch. The basket was installed by the same TURBO ZMZ, and the disc decided to install it from the stater - it serves as much as ceramics (not for long), but it costs 3 times cheaper, and since there is no visible difference, why pay more. I bought a basket for 2300. a disc for 1500.
Then I changed the transverse beam of the frame (which stands above the end of the gearbox) - I bought a new one for 1,300 rubles.
Then he welded a crack in the frame… It hurts my eyes too - it's been 3 years already. a year ago I welded her, and she went next to the weld seam - this time I put an overlay with oblique edges - it seems like it should hold.
I didn't really like my frequency of clutch replacement, because the work of replacing the clutch is not small (do not confuse it with your cars, I have hydraulics on the box and it's not so simple for me - I need to change the clutch for 2 days).
In general, it was decided to put a lower price for a long time. The transfer case from gas 66 was chosen as the lower one. Why exactly this?
Firstly, because they have already done this before me - and this is very important. A man from Kazakhstan, Sergei Shpiev, did it before me. Here is his forum thread:
And secondly, this lowered me in all respects suited me. it is as reliable as a tank (I think it will not survive a single gazelle - there is absolutely nothing to break there); it has the best gear ratios for me - at the reduced speed it divides the speed by exactly 2. and the second one has a straight speed; there is a switchable exit to the front axle (which is important for the subsequent construction of a jeep); it is not as noisy as a gazelle razdatka ... In general, according to the totality of all these qualities, it was the razdatka from gas 66 that was chosen. I bought it for 10,000 rubles a new one, from storage.
The first step was to make adapter washers for Gazel cardans (first of all - because the search for a sober turner is a long process and can last an infinitely long time, so I decided to take care of these adapter plates from the very beginning):
| Video (click to play). |
Description :
Cars, auto, ZAZ, VAZ, Volga, tuning. pro, professional. love, motor, roar, tire, engine, highway, speed, beauty, paint, names of cars, smoke, sport motorbike, accidents. cool, Truckers, Fire, trucks. Smoke, drag racing. Mercedes, Niva, Oise, swamp. monsters of the road. tanks. Kamaz. snow, repair. fuel filter, oil filter, silent block, Gazelle, Opel, Lada Kalina, Vaz


