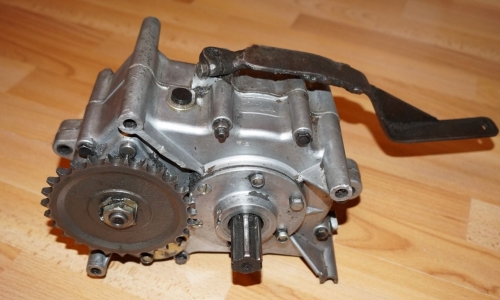
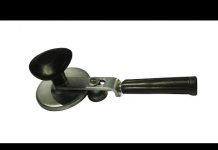
Reducer "Ant" consists of quality manufactured parts, which have a very long service life and readiness for immediate use. Despite this, sometimes you have to remove and disassemble this device, since nothing lasts forever. You can, of course, contact specialized technical services that have vast experience in this area. But you can repair the gearbox and at home, while having the tools, basic knowledge of mechanics and a guide to this device. He will become an irreplaceable guide in this matter.
A gearbox "Ant" is a special mechanism that transmits and converts the angular velocity into one or several mechanical transmissions.
The body of this device is cast as standard. Very often it is cast from high quality cast iron, in rare cases from steel. If it is necessary for the product to be as light as possible, then a material is used that melts quite easily. At the base of the case there are special "ears" for which the device is attached to the base.
To prevent oil from leaking out, a seal (oil seal) is installed at the shaft outlet, which prevents oil leakage.
To prevent internal pressure build-up in the reducer, it has unusual design features. It is they who do not allow the pressure inside the device to rise during the heating of the device.
The gearbox itself is removed from the "Ant" in a certain sequence. It needs to be disassembled if its working functions are no longer satisfactory during operation. Sometimes it happens that when it breaks down, it is sent to a landfill. But this is fundamentally wrong. This device can almost always be repaired, and it will continue to operate and will last for quite a long time. Also, the motor scooter "Ant" is currently a rarity, and spare parts for it are extremely difficult to find. Therefore, it is not worth "scattering" them in vain.
The device itself is dismantled and mounted on a scooter quite simply, there are almost no problems.
Parsing the gearbox will also not bring unnecessary trouble. But with the assembly, increased attention is also required, it is necessary to carefully assemble everything, not to miss anything and not to confuse it. The gears are made of high strength steel (alloy steel), so they rarely fail or deform.The main problem in most cases lies in the bearings. Therefore, regular and careful attention is required to these details, in particular to elements such as oil seals.
When choosing this device, it is worth considering the work that it will perform. Both its reliability and performance, and the operational period will depend on this. Having made a mistake when choosing a device, you can "kill" the gearbox ahead of time. It is advisable to entrust the choice to qualified specialists. They will make all the calculations and advise the best option for the task at hand.
But there is not always a chance to get advice from an experienced specialist. In this case, you need to take the initiative into your own hands. The first step is to draw up the drive kinematics. It will tell you what kind of gearbox is required for the selected system.
Having made the calculations, the resulting gear value will need to be compared with the values of the standard series for all types of gearboxes. It is important not to forget that the resulting calculation is not accurate, it is only approximate. When choosing an electric motor whose shaft rotates at a frequency not exceeding 1500 revolutions per 1 minute, one should take into account the technical characteristics themselves for the electric motor or mechanism, and then analyze and choose carefully.
VIDEO
Despite the past years, the Soviet "Ant" will be a very useful type of equipment. For those who have their own farm, summer cottage or who are simply engaged in their garden on the land, such a machine will be the best option and assistant in all agricultural affairs.
When buying, the previous owner talked about the recent replacement of the gearbox due to the failure of the old one.
On occasion, photos of the same “covered” gearbox and the new gearbox (before its installation) were published. Broken gear:
Younger gearbox (new):
To remove the gearbox, you need to completely disassemble the entire rear suspension. The oil has been drained. The rear axle is removed. When draining the oil, we did not find it. About twenty (or even less) grams of marsh-colored liquid flowed out of the drain hole. This liquid turned out to be an emulsion (oil with water). Gearbox with axle top view:
In appearance, you can't say about its recent replacement:
Dismantling the gearbox. As you would expect, everything inside the parts is covered with an emulsion:
After rinsing the parts and inspecting them, a comforting conclusion was made that the gearbox would live (they did not have time to leave it):
All parts are installed on one of the halves of the gearbox housing:
The halves of the crankcase are screwed together, the next step is to install the bearing caps:
Bearing cover with shaft seal:
Top view (right), bottom view (left):
Front view (right), back view (left):
After assembly, the gearbox was tested successfully. Differential and reverse work.
The gearbox, which we will be disassembling today, up to this point, had been lying for several years in the barn and was found there by pure chance. Throwing it away is a pity, so it was decided to disassemble it and, if necessary, repair it, for further use as the basis of a homemade walk-behind tractor - no more, no less! Moreover, I have in stock a practically new engine from the SPD, there will be just an excellent pair for this gearbox.
Unfortunately, the technical condition of this gearbox was unknown, during the first inspection some details were revealed: The output shafts of the axle shafts did not rotate, the drive sprocket too ... Most likely the gearbox simply "caught the wedge." Therefore, they took him off and threw him into the barn where he lay for many years ...
We clean the housing from dirt, remove all unnecessary ones, after removing the drive sprocket, it turned out that the input shaft bearing had crumbled.
We unscrew the bolts tightening the gearbox housing, take a construction hair dryer, evenly warm the housing with a hair dryer on all sides, then take a wooden mallet and tap the housing until it splits into two halves.
So the reason for the "wedge" was found - a crumbling input shaft bearing, but these are still "flowers". During the operation of the gearbox, the bearing balls got between the gears, which led to serious damage to the teeth, and this is already serious ... Such gears will have to be replaced with new ones.
The damage to the teeth of the input shaft was the most significant.
Damage to the idler gear teeth.
Crack in the outer bearing race.
We unbend the locking plates and unscrew the bolts tightening the cups of the differential housing, remove the gears.
Disconnect the differential cups.
We remove the locking pin.
Using a special puller, remove the retaining ring and remove the axle shaft from the cup.
The parts of the differential passed the test for "excellent", the teeth of the gears are intact without traces of wear, cracks, workings - as it should be. Permissible wear of rubbing surfaces does not exceed 0.1mm.
Everything is great. Guys, the assembly sequence is exactly the same, or there are some tricks like the checkpoint.
Sergey, there are no tricks and difficulties in assembling the gearbox. But again, before assembly, all the parts must be examined for damage and measurements of the mates must be made - to identify the maximum allowable backlash.
Thank you. Checking the details went well.
Tell me, what is the number of bearings that are on the shaft with splines?
I decided to fence myself a walk-behind tractor for the household. I already had an engine ideally suited for this business - from the SZD motorized carriage. But I did not have a suitable gearbox through which it would be possible to increase the total gear ratio of the transmission and at the same time realize the ability to move in reverse.
So I thought this way and in the end I decided to "dance" from some mass-produced gearbox or, at worst, adapt a box from "Ural" for this business. I didn't have to look for the device I needed for a long time: on the occasion, two killed "Maravyevsky" gearboxes were presented to me. One of them, twenty years ago, "caught a wedge" and was left in the barn awaiting its finest hour, and the second still showed signs of life, but had serious damage to the body and severe wear of the gear teeth and bearings.
After disassembling both copies, it turned out that the main shaft support bearing crumbled in the jammed gearbox. It would be okay, you might say as usual, but the whole problem was that, during operation, the balls of the crumbled bearing got between the teeth of the gears, which led to their breakage. Everything else, including the body and the internals of the differential, was, to my great joy, unharmed.The internal parts of the second gearbox turned out to be in a much better condition, but nevertheless, years of merciless exploitation left their negative imprint on their condition.
I first wanted to buy damaged parts from the store. Oddly enough, the spare parts I needed were found in the store - I don't want to take it. And most importantly, the spare parts were still Soviet-made, coated with a thick layer of grease and wrapped in special paper - not 100% China. But the price for them made me think ... In general, for two gears and an intermediate shaft, the trader asked me for more than two rubles + new bearings, a piece of paronite for a gasket and a set of oil seals, and at all - the price loomed under three rubles ...
I thought, I thought, and decided to limit myself to buying new bearings and oil seals, and borrow the damaged gears and intermediate shaft from another gearbox. In general, to make the gear reducer a classic "brute force", which actually will be discussed in this article.
So, all the parts are cleaned, washed, checked for acceptable wear and damage, the threads are driven away, it remains only to collect all this junk "to the heap."
We install the bearings in the gearbox housing preheated with a technical hairdryer. If anyone needs it, I give the bearing numbers:
18 GPZ_204_KZ - 2 pcs (primary shaft); 4_GPZ_60203_K-2pcs (intermediate shaft); 4_GPZ_7_207_K_5-2sht (differential housing); We put the right half of the body on the planks so that the shafts coming out of the body hang freely in the air and do not interfere with the work. We put a standard thrust washer on the support bearing of the input shaft.
We put the gear on the input shaft as shown in the picture and insert it into the housing. Before installing the gears, pay attention to their teeth and cam couplings, with which the gears mesh with each other. The teeth should be free of chips, damage, cracks and signs of excessive wear. The cams must be of the correct shape with sharp, non-slicked edges.
We put the intermediate shaft in its place.
We thoroughly clean and wipe the working surface of the differential axle shaft and the cup in which the axle shaft enters. We put on a standard thrust washer on the semi-axle and insert it into the cup. We take a set of measuring probes, choose the thinnest one and try to insert it between the working surfaces of the differential cup and its axis. If the selected probe passes between the parts without perceptible effort, take a thicker probe and repeat the procedure again until the probe enters with a noticeable effort.
For me, the measurement process was completed on a probe with a thickness of 0.05 mm, the thicker probe did not pass between the parts, which means that the output in this conjugation does not exceed 0.05 mm. The norm is no more than 0.1 mm. If your measurement procedure ends on a 0, 1 mm or more dipstick, change the half shaft or cup for a new one.
In the same way, we put the satellites on the axis one by one, while carefully making sure that they stand strictly in the place where they stood before disassembly, that is, in the place where the output will be maximum. And we are trying to push a measuring probe between the axis and the inner hole of the satellite. The limit of permissible wear, as in the first case, should not exceed 0.1 mm.
We insert the axis of the satellites into the cup so that it goes slightly over the edge and put a thrust washer on it.
We put the satellite on the axis, push the axis further, put on the second satellite, fit the thrust washer under it and push the axis.
We turn the axis so that the hole for fixing it coincides with the hole in the cup and fix it from falling out with a locking pin.
We connect the cups to each other, put thrust washers on the outer ends of the axle shafts and fix them with retaining rings. The axle shaft can be fixed immediately after installation in the cup, or later - no difference.
We put gears on the differential case. There is not much difference where to put which gear. It will work either way or not. We put the locking plates on the bolts and tighten the body with them well.Try to tighten the bolts evenly, crosswise and as tightly as possible, several gearboxes passed through my hands in which the bolts were loosened due to which, during operation, both the bolts themselves and the body were broken.
After the final tightening of the bolts, bend the locking plates.
We install the differential housing in its place.
We put on the reverse engagement gear on the fork of the reverse engaging mechanism, put the pin on the fork into the groove on the leash for engaging the reverse, and insert the fork rod into the mounting hole of the body.
Knock out the housing guides so that they come out on the surface of the housing connector by 5-6 mm, degrease the connector planes, apply sealant to the mating surfaces, lay the gasket and connect the halves of the housing.
We tighten the body with bolts, install the axle shaft covers and bearing caps.
Message Dv »Apr 29, 2015, 15:35
Fastening is their weak point. Many people know about this. Many have seen welded "ears" many times. So the same trouble befell me. I tried to brew it too. No way, the metal is boiling, the ball rolls, well, it just doesn't work. I talked to my technologists, it turns out that I have it from powder metallurgy. The old model was cast. I decided to do it differently, without welding. Sawed off the broken off ears, slightly reamed the hole and cut the thread 12 step 1.25. The turner turned bushings out of aluminum and screwed them onto epoxy.
You never know who will come in handy. After all, argon is not everywhere
Gearbox repair Motor scooter Ant.
Repair of the gearbox "ANT" (old model)
Reducer from Motor Scooter Ant
DSCF2677 Reverse from the ant gearbox to the walk-behind tractor with their own hands. Valery Bryzgalov.
Overhaul of the gearbox and replacement of bearings
Reducer bridge Motor scooter Ant ORIGINAL sSSR
Video question on the gearbox of the "Ant" scooter
4-stroke scooter Ant 250cc preparation for installation part 1
New Life project. Part two. Restoring the motor scooter Ant. Disassembly, cleaning, painting.
DIY REAR AXLE ATV from gear reducer ant
PaVel
Joined: Feb 03, 2012
Here are the options for hard blocking, or in other words, the differential here was simply removed. It is more relevant for homemade products where a gearbox and reverse are needed. Maybe someone will come in handy.
And here is the option with braking
basilich
Joined: May 25, 2010
Dimas
Joined: Nov 02, 2010
basilich
Joined: May 25, 2010
Dimas
Joined: Nov 02, 2010
tuk
Joined: Apr 22, 2011
Here are the options for hard blocking, or in other words, the differential here was simply removed. It is more relevant for homemade products where a gearbox and reverse are needed. Maybe someone will come in handy.
Angel
Joined: Jan 28, 2013
Greetings to all! In the same year, I disassembled the gearbox and went nuts from its scope. Made very soundly, diff is striking in its size.
My option for blocking (partial) using valve springs proved to be quite viable. Here's an example, though not mine, of how it works. So, when one wheel hangs on the second, part of the moment passes, which, in fact, is needed.
andrey_nik
Joined: May 06, 2010
Angel
Joined: Jan 28, 2013
andrey_nik
Joined: May 06, 2010
Angel
Joined: Jan 28, 2013
Angel
Joined: Jan 28, 2013
By the way, no one thought to make a worm differential? Ask to grind helical gears and satellites for our sizes? I just have only one friend at the plant, but he is for stainless steel and titanium, steel is not there. And gears made of food grade stainless steel are somehow too glamorous.
I hope you understand how such a diff works? You can read it on Wikipedia.
big17
Joined: Mar 31, 2015
Colleagues, tell me, please: does the ant gearbox have the same gear ratio for the forward and reverse gears?
Our site is the world's largest association of amateurs of Soviet Motor scooters. Here you will find free access to all technical literature on motor scooters, the opportunity to participate in face-to-face and correspondence competitions for restored equipment and, of course, help in solving any technical issue. Join us and let's save our history together.
Good day to all forum participants! This is my first topic, so don't be too harsh.
So about Minik:
Rear gearbox: standard from Ant or "Disabled", I don't know for sure It has 2 gears - forward and backward, also because of the need, made it possible to engage the Neutral gear, by cutting a groove on the shaft where the fork moves, with emery 😀 It constantly the differential works, without the possibility of blocking (which is bad for working in the garden).
Frame: self-made - two channels are laid at the base in parallel and along the entire Minika.
Management: everything is like in a full-fledged car, three pedals for gas, brake and clutch are made. Gear shifting is carried out using the lever, and, accordingly, the steering wheel, I don’t know why, it only has the Volkswagen badge.
Brakes: drum-type, main-rear, but in the front wheels everything is in place, you just need to attach the cables, and everything will brake.
Hydraulics: the most interesting, and probably an unexpected device on this apparatus: glasses:.
Hydraulic pump: NSh-10 from some kind of electric lift, is driven by a chain drive taken from an IZH motorcycle, a corresponding sprocket was welded onto it, which can be easily removed, which will not complicate the repair of this unit.
Distributor: standard, from the T-25 tractor, two levers, operating modes - lifting, lowering the HZ and floating mode.
Hydraulic tank: homemade, based on an old fire extinguisher, it is too small, but still quite enough, if you need more, we'll come up with something 💡
Hydraulic cylinder: I don't know from what, but the trick is that we bought it in a household store for 18 UAH: O good condition, no complaints.
Hitch: completely homemade, only tensioners were ready (well, or whatever).
The hydraulics work perfectly, if you put something under the hitch and lower it, then the Minik raises itself almost at idle speed of the engine, it doesn't matter if someone is sitting or not.
Electrical equipment: in the standard version, the engine is equipped with a 12V starter-generator, but for some reason my grandfather put Magneto on the engine (by the way, about my grandfather, I removed all the parts from the Ant from his unfinished homemade product while he was not in the village: rofl :) , I already thought that the generator was not working, but I checked it, and realized that I was wrong. With the engine running, the generator itself is excited and supplies energy to power consumers, all that is needed is to gas a little more idle speed, and everything works.
The dashboard: a brake light from some kind of trailer, simple and tasteful. Plus a good backlight from two 5W marker lamps.
Dimensions, turns: from the tractor. At the rear, the role of the parking light is played by a fog lamp, into which a 5W bulb is inserted.
Headlights: also from a tractor, cheap, plastic, Chinese, but still shine, and pretty good. It is possible to turn on the high and low beam at the same time on both headlights, the generator pulls.
Now I'll tell you about the node between the engine and the rear gearbox:
All of the above was solved in this way: first, they made two bearing blocks that could be fixed to the frame. Then they took a one-piece shaft (Ø 18 or 20 mm), on which two trimmed "fourths" from the IZH motorcycle were put on, in order to it was possible to select sprockets, and between them there was just a 21-tooth sprocket from the same motorcycle to ensure the operation of the hydraulic pump. All these details have been welded. The width between the extreme asterisks was carefully calculated, sometimes with errors, then without, in general it turned out. Now we have a fairly large selection of asterisks, although everything is already selected and works fine. True, the asterisk does not change on the NSh, it is scalded along with the “fourths”, but there is no need for selection here. At first, from this block to the rear gearbox there was a narrow chain (from Ant), but it constantly vomited, and then it was decided to replace this chain with IZhevsky, respectively, it was necessary to find an asterisk for the rear gearbox, they found this, welded with the necessary center for the splines on the gearbox, but it was noticeably larger than the previous one, so in view of the design features, I had to make a “sloth”. After this revision, the chains no longer broke and it went even slower, which is buzzing.
But not everything is as good as it might seem - more and more the knot, which bothered us from the very beginning, fell into disrepair. These are the axle shafts for the rear wheels! 🙁
Everything is done so that the axle shaft should be “curved”, for this it was decided to use two crosses from the steering wheel with MTZ to the axle shaft, it is also necessary for the shock absorption of the wheels, which was immediately foreseen during the design of the Apparatus. As a result, 4 completely new crosses were torn, which were bought in the store, and immediately delivered. Two of them just burst, and my father welded them, in order to understand the cause of the breakdown, and in the hopes that they will work. we found 2 more Soviet-made crosspieces for them. Delivered, the result is the same! In total, 6 crosspieces were rendered unusable 🙁 It was decided to put there cardan crosspieces from Moskvich, well, or something similar. But for now, this is in the plans, which will be carried out somewhere in 2 months, since I am at school, far from home.
To be continued. Here is the video here, everything is described in detail!
Video (click to play).
VIDEO

