In early models of NIVA cars, the joints of the flanges with the rear axle were sealed with a gasket. Later, an oil-resistant sealant was used for this. When reinstalling the gearbox, any type of seal must be restored. Follow the sequence below:
VIDEO
The rear axle gearbox is removed for replacement or repair. However, disassembling, adjusting and assembling the gearbox requires the use of special equipment and requires the skill of the performer. Repairing a gearbox in a garage almost never leads to the desired result. Therefore, if you need to repair the gearbox, use the services of a specialized workshop.
You will need: keys "12", "13", a screwdriver, a mounting blade, a torque wrench.
USEFUL ADVICE
1. Drain the oil from the rear axle housing.
3. Disconnect the rear propeller shaft from the rear axle reducer (see "5.4.6 Removing and installing the propeller drive").
4. Remove the eight bolts securing the gearbox to the rear axle beam and.
6. Inspect the mating surfaces of the rear axle housing and gearbox.
NOTE
7.Install the new gearbox in the reverse order of removal.
USEFUL TIPS
NOTE
WARNING
We remove the gearbox to replace it, repair or replace the rear axle beam.
We drain the oil from the rear axle housing (see here).
Disconnect the rear propeller shaft from the rear axle reducer flange (see here).
Holding the gearbox housing, use the "12" head to unscrew the eight bolts of its attachment to the rear axle beam.
... and a gasket.
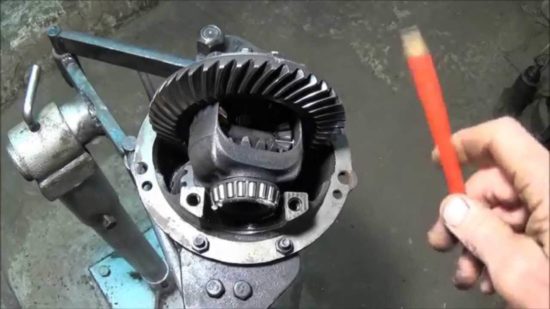
Before removing, we clean the gearbox from dirt. We install the dismantled gearbox on the workbench.
Using the "10" wrench, unscrew the bolt securing the locking plate of the adjusting nut of the right bearing of the differential box ...
Similarly, remove the retaining plate of the left bearing adjusting nut.
Using a punch, we mark the location of the differential box bearing caps on the gearbox housing.
With a spanner wrench "17" we unscrew the two bolts securing the cover of the right bearing of the differential box ...
Remove the right bearing cover.
We take out the adjusting nut ...
... and remove the outer bearing race of the differential box.
Likewise, remove the cover, take out the adjusting nut and remove the outer ring of the left bearing of the differential box.
If we do not change the bearings of the differential box, then we mark their outer rings in order not to confuse them during assembly.
We remove the differential box assembly with the driven gear of the main drive, inner rings, cages and bearing rollers.
We take out the drive gear assembly from the gearbox housing with an adjusting ring, an inner ring, a cage and rear bearing rollers and a spacer sleeve.
Striking blows with a hammer through a drift on the inner ring of the rear gearbox bearing, ...
… Remove the inner ring with cage and rollers.
Remove the drive gear adjusting ring.
We remove the oil seal from the housing of the gearbox (see here).
... and the inner ring of the front bearing with cage and rollers.
With a punch we knock out the outer ring of the front bearing of the drive gear ...
Turning the crankcase over, knock out the outer ring of the rear bearing of the drive gear in the same way.
For disassembling the differential …
... with a puller we press the inner ring of the differential box bearing.
In the absence of a puller, insert a chisel between the end of the bearing inner ring and the differential box.
By striking the chisel, we move the inner ring of the bearing.
We insert two powerful screwdrivers (or mounting blades) into the formed gap and press it ...
… Inner ring with cage and rollers.
Similarly, we press the inner ring of the other bearing.
Clamping the differential box in a vice with soft metal jaw pads, ...
... with a 17-ring spanner, unscrew the eight bolts securing the driven gear to the differential box.
Using a hammer with a plastic striker, we knock down the driven gear from the differential box ...
Turning the satellites, take them out of the differential box.
We take out the side gears.
Before assembly, we wash the gearbox parts in kerosene and inspect them. We check the condition of the teeth of the main gears.Damage to at least one tooth (chipping, scuffing of the working surface) is unacceptable. With a fine-grained sandpaper, we eliminate minor damage to the pinion axle, the axle pinion journals and their mounting holes in the differential box. In case of serious damage to the parts, we replace them with new ones. If even minor damage to the surfaces of the bearing washers of the semi-axle gears is found, we replace the washers with new ones (with a selection of the thickness of the washers). Bearings of the pinion gear and differential box must be free of wear, with smooth working surfaces. Poor bearing condition causes noise and seized gear teeth.
The inner rings of the differential box bearings with cages and rollers are pressed onto the box with a suitable piece of pipe. We fix the driven gear on the differential box.
When assembling the differential, we lubricate the semi-axle gears with support washers and satellites with transmission oil and install them in the differential box. We turn the satellites and the gears of the semi-axles so as to align the axis of rotation of the satellites with the axis of the holes in the differential box, and insert the axis of the satellites. The axial clearance of each half-shaft gear must not exceed 0.1 mm. With an increased clearance, we replace the bearing washers of the semiaxis gears with new ones - of greater thickness. The moment of resistance to the rotation of the differential gears should not exceed 14.7 N.m (1.5 kgf.m) - the gears are turned by hand.
We check the ease of rotation of the differential gears.
Press the outer ring of the front bearing into the housing with a tool head of a suitable diameter (a piece of pipe).
Similarly, we press in the outer ring of the rear bearing.
The correct position of the drive gear relative to the driven gear is ensured by the selection of the thickness of the adjusting ring installed between the end face of the drive gear and the inner ring of the rear bearing. When replacing the main pair of the gearbox or the bearings of the drive gear, we select the adjusting ring. To do this, we make a device from an old drive gear: we weld a plate 80 mm long to the gear and grind the plate to a size of 50–0.02 mm relative to the end of the gear (the adjoining plane of the adjusting ring).
A device made from an old pinion gear.
We grind (or process with fine sandpaper) the place where the rear bearing is installed on the drive gear so that the inner ring of the bearing is installed on a sliding fit. On the manufactured device, we install the inner ring of the rear bearing with a cage and rollers and insert the device into the crankcase. Then we install the inner ring of the front bearing with a cage and rollers and the flange of the drive gear. Turning the gear wheel for the correct installation of the bearing rollers by the flange, tighten the flange mounting nut to a torque of 7.9–9.8 Nm (0.8–1.0 kgf.m).
We fix the crankcase on the workbench so that its attachment plane is horizontal. We install a curved ruler in the bearing bed with an edge so that the bed ruler touches along the line.
Using a set of flat probes, we determine the size of the gap between the ruler and the fixture plate.
The thickness of the adjusting ring is determined by the difference between the gap and the deviation from the nominal position of the new gear (taking into account the sign of the deviation).
The marking of the deviation from the nominal position (in hundredths of a millimeter with "plus" or "minus" signs) is applied to the tapered part of the gear shank.
For example, the measured clearance is 2.90 mm and the gear has a -15 deviation from the nominal position. We translate the deviation into millimeters: –15 x 0.01 = –0.15.
The required shim thickness is: 2.90 - (- 0.15) = 3.05 mm.
We install the adjusting ring of the required thickness on the new drive gear.We remove the device from the gearbox housing and remove the inner rings of the front and rear bearings with cages and rollers.
With a suitable piece of pipe, press the inner ring of the rear bearing with a cage and rollers onto the new drive gear.
We insert the drive gear into the gearbox housing. Install a new spacer sleeve, an inner ring of the front bearing with a cage and rollers, and an oil deflector. Having lubricated the working edge of the new oil seal with Litol-24 grease, we press it into the crankcase socket. Install the pinion flange.
Having locked the flange, gradually tighten the nut of its fastening with a torque wrench to a moment of 118 Nm (12 kgfm).
The preload of the drive pinion bearings is controlled with a dynamometer.
… Periodically checking the bearing resistance torque to the rotation of the drive gear.
If the moment of resistance to rotation turned out to be less than 157 Ncm (16 kgf.cm) - for new bearings, and for bearings after 30 km of run - less than 39.2 Ncm (4 kgf.cm), then tighten the flange mounting nut, do not exceeding the tightening torque. After that, we again check the moment of resistance to the rotation of the drive gear.
If the moment of resistance turned out to be more than 197 Ncm (20 kgf.cm) - for new bearings, and for worn-in bearings - more than 59.0 Ncm (6 kgf.cm), then the preload of the bearings is exceeded.
In this case, replace the overly deformed spacer with a new one and reassemble and re-adjust.
We install the differential assembly with bearings and adjusting nuts in the gearbox housing so that they come into contact with the outer rings of the bearings. We tighten the bearing cap bolts to the required torque.
We make a special wrench for tightening the adjusting nuts from a steel plate 49.5 mm wide and 3-4 mm thick.
The adjustment of the lateral clearance in the meshing of the main drive gears and the preload of the differential box bearings are carried out simultaneously, in several stages.
Using a vernier caliper, we measure the distance between the bearing caps.
We wrap the left adjusting nut (from the side of the driven gear) until the gap in the meshing of the main gears is completely eliminated.
We turn the right nut until it stops and tighten it by 1–2 teeth of the nut.
Tightening the left nut, we set the required lateral clearance of 0.08–0.13 mm in the meshing of the main gears.
With this gap, shaking the driven gear, with the fingers of our hand we feel the minimum backlash in the engagement of the gears, accompanied by a slight knock of the tooth against the tooth.
To set the preload of the differential box bearings, successively and evenly tighten both bearing adjusting nuts until the distance between the covers is 0.15–0.20 mm. Having established the preload of the bearings, we finally check the lateral clearance in the meshing of the main gears, which should not change. For this,…
... while slowly turning the driven gear three turns, use your fingers to control the backlash in the engagement of each pair of teeth.
If the clearance in the engagement turns out to be greater than the required one (0.08-0.13 mm), then by rotating the adjusting nuts we bring the driven gear closer to the driving gear or move it back if the clearance is less. In order to maintain the established preload of the bearings, we move the driven gear by tightening one of the adjusting nuts and loosening the other by the same angle.
After adjustment, install the locking plates of the adjusting nuts and fasten them with bolts.
This work should be carried out when an oil leak is detected.
For work you will need:
Keys on "13" and "24".
Screwdriver.
Hammer.
Torque wrench.
The first step is to establish the cause of the oil leak.
Before starting work on replacing the oil seal, make sure that the cause of the leak is not the breather ... To do this, check the amount of oil leakage by moving the breather cap in different directions. First, check the amount of oil in the axle and add it. After that, the plug of the oil filling hole should also be squeezed.
If the work will be carried out on a pit, then the bridge must be hung out and put on supports.
Then you need to start the engine and turn on 4th gear ... The speedometer reading should be within 100 kilometers per hour. In this position, the machine should work 10-15 minutes (engine temperature 80 degrees ). If about 5 drops of oil , then it is necessary to change the oil seal.
Turn off the engine first. Further:
Release the brake (parking) lever if it has been depressed.
Drain the oil from the axle and screw the drain plug back.
We drain the oil from the bridge and wrap the plug back.
Disconnect the gimbal from the bridge.
We check the moment of resistance to turning the drive gear.
We unscrew the nut that secures the drive gear flange.
Remove the pinion flange.
Using a screwdriver, remove the old oil seal.
Lubricate the new oil seal before installation.
Install a new oil seal using a mandrel and a hammer.
VIDEO
As you can see, taking into account the above, you can replace the rear axle oil seal on a Chevrolet Niva yourself ... If you have any difficulties with this, you can always contact the specialists at the service station.
The rear axle gearbox is removed for replacement or repair. However, disassembling, adjusting and assembling the gearbox requires the use of special equipment and requires the skill of the performer. Repairing a gearbox in a garage almost never leads to the desired result. Therefore, if you need to repair the gearbox, use the services of a specialized workshop.
You will need: keys "12", "13", a screwdriver, a mounting blade, a torque wrench.
Replace the gearbox on the lift or inspection ditch.
1. Drain the oil from the rear axle housing.
3. Disconnect the rear propeller shaft from the rear axle reduction gear (see "Removing and installing the propeller drive").
4. Remove the eight bolts securing the gearbox to the rear axle beam
6. Inspect the mating surfaces of the rear axle housing and gearbox.
On parts of cars, the crankcase is sealed with a gasket.
When removing or replacing the gearbox, it must be replaced.
If the gearbox is installed without a gasket (using a sealant), special care must be taken when choosing a sealant. It must meet the difficult operating conditions of this vehicle unit
7. Install the new gearbox in the reverse order of removal.
If you are installing the gearbox after repairs or adjustments, use fine emery paper to remove the remnants of the old gasket and hardened sealant from the flange. Apply sealant to the gearbox mounting bolts.
Tighten the gearbox mounting bolts evenly and gradually crosswise with a torque of 35–43.5 Nm (3.6–4.4 kgf · m).
Remember to fill the rear axle housing with oil.
It will be about replacing the main pairs (GP) in the axle gearboxes. When asked why? I will answer:
Two classic rear axle gearboxes VAZ 2101 with a gear ratio GP 4.3 were purchased (on a shevik 3.9 from the factory)
rear axle reducer (RZM)
washed the dirt thoroughly in diesel fuel
driven gear (planetary)
10/43 = 4.3 10-number of teeth on the driving and 43-driven gears
I bought all the bearings, a spacer sleeve, oil and one inner CV joints (already crunching, it's time to change)
threw off the differential box, measured the torque of the planetary gear to the box with a torque wrench, oddly enough the Shevik differential was screwed on with a torque of 70Nm, and classically about 100Nm.
pulled off the driven, satellites and half-axle gears
also, I removed the drive gear (tip)
such a simple set is needed for the subsequent adjustment and adjustment of the gearbox (vernier caliper, micrometer, steelyard, a piece of clothesline
took the dimensions of the adjusting washer of both patients
RPM (native) washer 2.77mm correction for driven +4
gears of the differential block RZM VAZ 2101 (pay attention to the bronze washers of the side gears)
gears of the differential block RPM VAZ 2123 carbolite, or plastic washers cheaper technology ...
For those who want to “remove” the backlash, I took the dimensions from the carbolite washers, 36.6 x 57.7, the thickness is arbitrary (depends on the size of the “selected” backlash)
the dimensions of the washers of the gearwheels of the semiaxis RPM
I assembled a block of differentials, threw a planetary gear (at first I pulled with a moment of 120N-m. I broke 2a bolts ... 100k there behind my eyes
threw the whole thing into the gearbox housing
the thought came to my mind, "" ... why not calculate the thickness of the adjusting washer by the number of revolutions of the shank flange nut ... after all, the thread pitch is 1.5mm ""
this is what happened with washer 3.12
from the same opera, on dried paint
After that, I had to disassemble everything, remove the washer for a while and start setting up.
we tighten the bearing and measure the clearance. I recommend starting with 3.35t.k. it's kind of like the largest washer produced in production, I got 3.47 (well, it doesn't matter, we still need to move it)
shim table
Gradually putting the tip on the bearing (I pressed it in 1/8 of a turn, this is about 0.19mm), we look at the contact patch. it is unforgettable to bring the planetary gear to the tip while maintaining a thermal gap of 0.08–0.13 mm; minimal noticeable play in the engagement with your fingers, accompanied by a slight knock of the tooth against the tooth.
I got it like this
3.09-0.19 = 3.09 we see how the contact patch gradually creeps in the desired direction
etc.
The spot was found ... it remains to check whether my thoughts are correct. He took off the presenter to measure the gap found.
RPM (native) washer 2.77mm correction for driven +4
I built such a structure to crush the barrel))
Here, an equally important point is the preload of the tapered bearings of the driven gear, if it is not observed, then over time all the gaps will simply “float away” and the gearbox will start to howl.
measure the outer diameter of the flange, 45mm
Taking into account the average winding radius (22-25 mm), the steelyard should show 7-9 kg (for new bearings)
Here is such a not cunning device for stopping the drive gear flange had to be piled from improvised means
With aerosol paint from the bottle it doesn’t very well, it dries quickly, you have to wipe it off constantly ...
Differential bearing preload 0.1 mm ...
I decided to do a small test of the gearbox, directly on the workbench,
I argued in the store and argued that the oil seals of the drives are different, although Pradovan assured me - there is no difference. Proved the opposite to him ... the seals have a direction of rotation. The one with the collars is for the left-hand drive
GL-5 lukoilovskaya polusin
I finished with the RPM and took up the RPM, but the left semi-axis did not want to go out in any way.I had to persuade her, for this I made up such a device.
Fortunately, my gearbox was 22x splined, I plugged the REM without a bulkhead, checked only the bearing preload and fixed the flange nut.
Video (click to play).
Left Trialli, set and forget. On the right is Avtovazovsky. Knock-knock-knock began when driving especially upward with an eversion

